
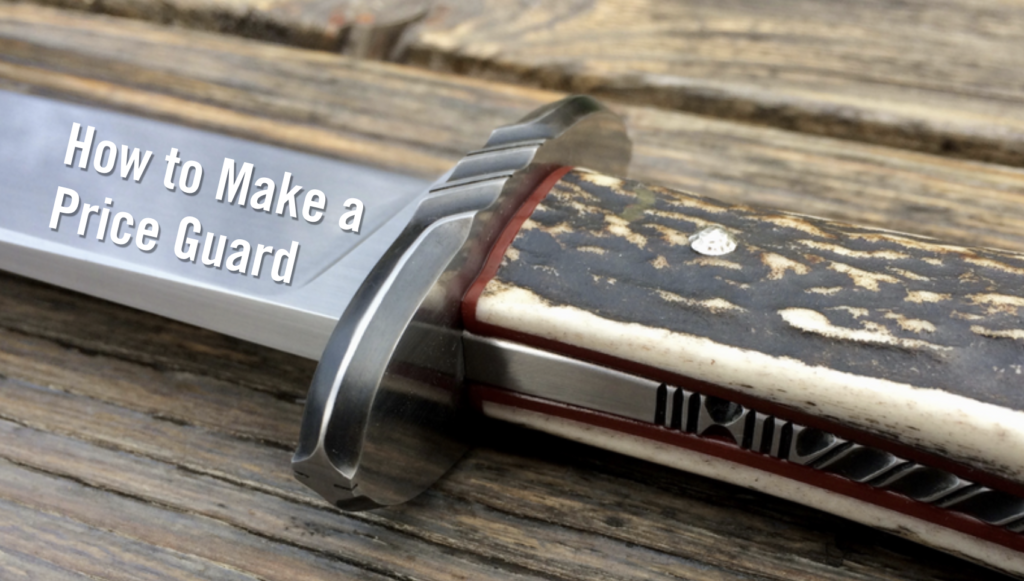
BY JORDAN LAMOTHE
The author fashions it in the style of the classic 19th-century maker
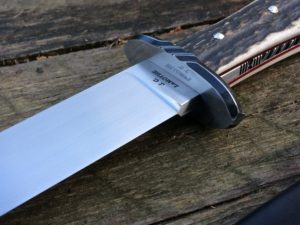
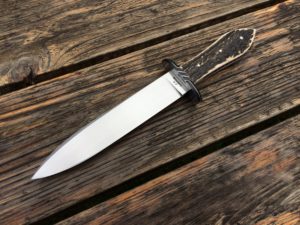
In 2017 I received a commission for a piece in the style of Michael Price, a mid-19th-century knifemaker whose knives are stamped “M. Price San Francisco.” The customer sent me an image of the knife I should use as my template: a spear-point bowie with elk antler scales and Price’s iconic “peanut”-shaped handle. However, he also asked me to add some filework and make it my own. This was not intended to be a replica of the historic piece.

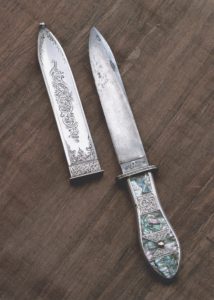
The Price knife whose shape I was to imitate was symmetrical and quite simple, but I found myself a bit baffled by the guard, struggling to answer the question, “How did he attach it?” From the single-side-view photograph I had, several explanations would have been possible: It might have been a frame handle, or the guard might have been slid on from the blade end and soldered in place; or perhaps the image was just an optical illusion, and the swell in the handle was narrow enough so that the guard could slide on from the tang.
Lacking access to the knife or to photos showing the guard/handle juncture, I voiced my confusion on the American Bladesmith Society internet forum. ABS master smith Lin Rhea responded promptly with the expertise of one who has extensively studied and taught 19th-century blacksmithing and knifemaking techniques.
Lin wrote that the knife had a full tapered tang and that Price likely “slid the guard on from the back and forged the tang wider.” Lin added that the shape of the handle would allow the guard to slide back far enough so I could still finish the blade, and the blade would have been hardened after forging the tang to shape.
The practice of passing one piece through another and subsequent forging to form a captive part is common in the traditional joinery found in ornamental and architectural blacksmithing. However, it seems to have been largely forgotten in the knifemaking realm. Meanwhile, I have always fitted the guard after heat treatment and final grinding. It struck me as a new way of thinking about the knifemaking process, one I was eager to try. With Lin’s excellent instructions, all I had to do was execute the design, carefully thinking through the order of operations.
FORGE, GRIND and SAND
Forging the Price-style knife was barely different from forging a hidden-tang blade—I just left the tang really beefy. I forged the blade shape and bevels and shouldered the tang ever so slightly. I left the tang as close to the stock thickness as I could for its entire length so I would have plenty of material to forge it wider and taper it later.
After forging I ground the blade to its final dimensions, knowing that any grinding would be more difficult after the guard was attached, and tapered the tang slightly on all four sides. Though I left the bevels of the blade with a 600-grit belt finish, I knew any part of the blade that contacted the guard must be finished as close to the final polish as possible. Any material removed in final polishing would affect the guard fit, so I hand-sanded the ricasso. I also sanded the edges of the tang from the shoulders back about 1 inch—any sanding beyond that would have been lost when forging the tang. In anticipation of the particular fit I wanted between the handle liners and the tang, I slightly rounded the tang’s edges. At that point, every surface contacting the guard was exactly the way I wanted it in the finished knife, and I was ready to fit the guard itself.
FITTING the GUARD
Fitting a guard for a full tang is only slightly more difficult than fitting one for a hidden tang. As always there must be no gaps between the face of the guard and the ricasso, or beneath the blade shoulders. The added challenge is that there must also be no gaps between the back side of the guard and the edges of the tang (the flats of the tang can be drafted slightly, because the handle scales will cover the transition). I used mild steel for the guard, which would be selectively blued to highlight my filework and would withstand the high heat of forging the tang. I also shaped the guard and added filework. Though these processes wouldn’t affect any of the fitting tolerances, they would have been much slower with the guard in place. I then sanded both guard faces to their final grit finish (Figure 1).


BACK to the FORGE
After spending hours grinding, filing and sanding, I was ready for the nerve-wracking challenge of putting my hard work back in the forge. At the time I made the knife, I used a coal forge almost exclusively—it was the perfect heat source for this kind of forging.
In order to protect the carefully finished guard and blade, it was important to have a very isolated heat on the tang, which also allowed me to hold the blade in a gloved hand while forging to avoid galling the soft metal with tongs. A torch could also have provided such control, but a gas forge would have made it difficult. I kept my coal fire very contained so that I had a small area of intense heat to use.
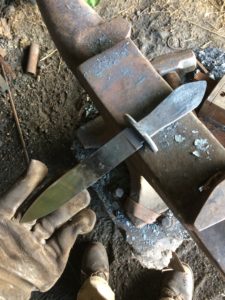
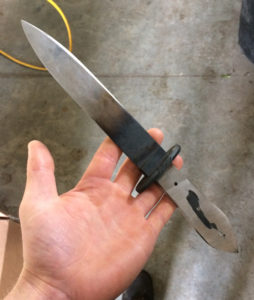
To forge the peanut shape into the handle I first drew the taper in profile, keeping the thickness consistent, and then used the cross-pien on my hammer to forge the swell. Once the profile was adequate, I refined the tapers in the thickness of the tang with the face of my hammer, making sure to keep them flat or a little convex. Any “sway” in the flats of the tang would result in gaps underneath the handle scales that could not be removed by grinding (Figure 2). I then ground the forged tang to its final dimensions and drilled the pinholes. The blade was ready for hardening (Figure 3).

I hardened the knife using my heat-treating oven as I do on most of my knives. Nonetheless, in retrospect, heating it in the forge might have resulted in less scale to clean off the blade due to the more-neutral atmosphere. After hardening and tempering I used a torch to soften the tang, which would enable me to add the desired filework.

FINISHING
To finish the hardened and tempered blade, all surfaces on the knife and guard had to be re-sanded to remove oxidation. The setup sanding that I did prior to forging the tang enabled me to sand only small amounts of material off critical places—such as the ricasso and guard face—to minimize the changes to the guard fit. Though not flawless, the final guard transitions were very clean on both the front and back faces (Figures 4 and 5).
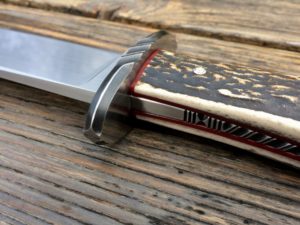
From this point forward, finishing the Michael Price-style knife was a fairly typical progression of fitting the handle materials and shaping them to meet the tang, making sure to properly mask the carefully sanded faces. After shaping the handle, I added the filework to the tang, bluing and polishing as my design required. After every piece had received its final finish, I glued them all together with epoxy and added three piened nickel-silver pins to complete the knife (Figure 6).

LEARNING & RE-LEARNING
The process of making a knife such as this requires more forethought and planning than most techniques that involve fitting a guard after all the forging is complete. It is also considerably more difficult to meet the high standards of fit and finish that are to be expected on today’s handmade knives. Working from a drawing helped to keep all aspects of the knife consistent with my desired result. Even so, reasoning out the order of polishing was still crucial, because each step limited access to certain places on the knife.
Such an inflexible order of operations begs the question, “Why use this process at all in our modern day and age?” If form, fit and finish are the primary goals, then using frame-handle construction would, indeed, give more reliable results for a knife of this shape. Additionally, it would be impossible to use this guard technique on any asymmetrical handles that flare directly after the guard.
From a practical standpoint, one answer is that forging the tang after slotting the guard is an expedient way to make a symmetrical handle without the meticulous and time-intensive machining that frame-handle construction requires.
Perhaps more importantly, however, practicing historical techniques shows attention to the history of knifemaking and adds a depth of craftsmanship to any given piece. It is a process of learning and re-learning that can yield different perspectives on what is possible in knifemaking, enriching the craftsperson and adding to the vitality of the craft.
For more information contact Jordan LaMothe, Dept. BL12, 1317 Count Rte. 31, Granville, NY 12832 518-368-5147 jordanlamotheblades@gmail.com, jordanlamothe.com.

BLADE’s annual Knife Guide Issue features the newest knives and sharpeners, plus knife and axe reviews, knife sheaths, kit knives and a Knife Industry Directory.
Get your FREE digital PDF instant download of the annual Knife Guide. No, really! We will email it to you right now when you subscribe to the BLADE email newsletter.
Click Here to Subscribe and get your free digital 2022 Knife Guide!