

Random Damascus Hunter with Stabilized Curly Walnut
Random Damascus Hunter with Stabilized Curly Walnut
Kingwood and San Mai Hunter
A few days with Andersen forge, just showing a little bit of how things go in the shop. Not a how too video. But more of a who is and where the knives come f…
 Zack Jonas earned his American Bladesmith Society (ABS) journeyman smith stamp at the recent ABS Show in San Antonio, Texas.
The five knives Zack submitted for judging are in the photograph by Point Seven. All feature 1095 carbon blade steel.
Zack said he’s received more comments on the Honey Badger (second from top in the photograph) than any other of the knives.
“Apparently there’s this video on YouTube where somebody has dubbed over some footage of a honey badger being a honey badger, and it’s supposed to be fairly inappropriate,” Zack noted. “[ABS maser smith] Tommy Gann cracked up when I told him what that knife was called.
“I named it that because as I was working it, the swedge reminded me of the coloration on a badger’s back/face, and because the ironwood was distinctly honey-hued. That’s the whole story.”
For more on the knives, contact Zack at [email protected] or click on www.JonasBlade.com.
For more on the latest knives, knife legislation, knifemaking instruction, knife trends, knifemakers, what knives to buy and where and much more, subscribe to BLADE® Magazine, the World’s No. 1 Knife Publication. For subscription information click on http://www.shopblade.com/product/blade-magazine-one-year-subscripti…?r+ssfb021212#BL1SU
Congratulations to the new Journeyman Smiths in the American Bladesmith Society!
The following new Journeyman Smiths had their five presentation knives judged by the Judging Panel and were awarded their new rating at the 9th ABS Exposition in San Antonio, Texas on January 27th.


Congratulations to all!
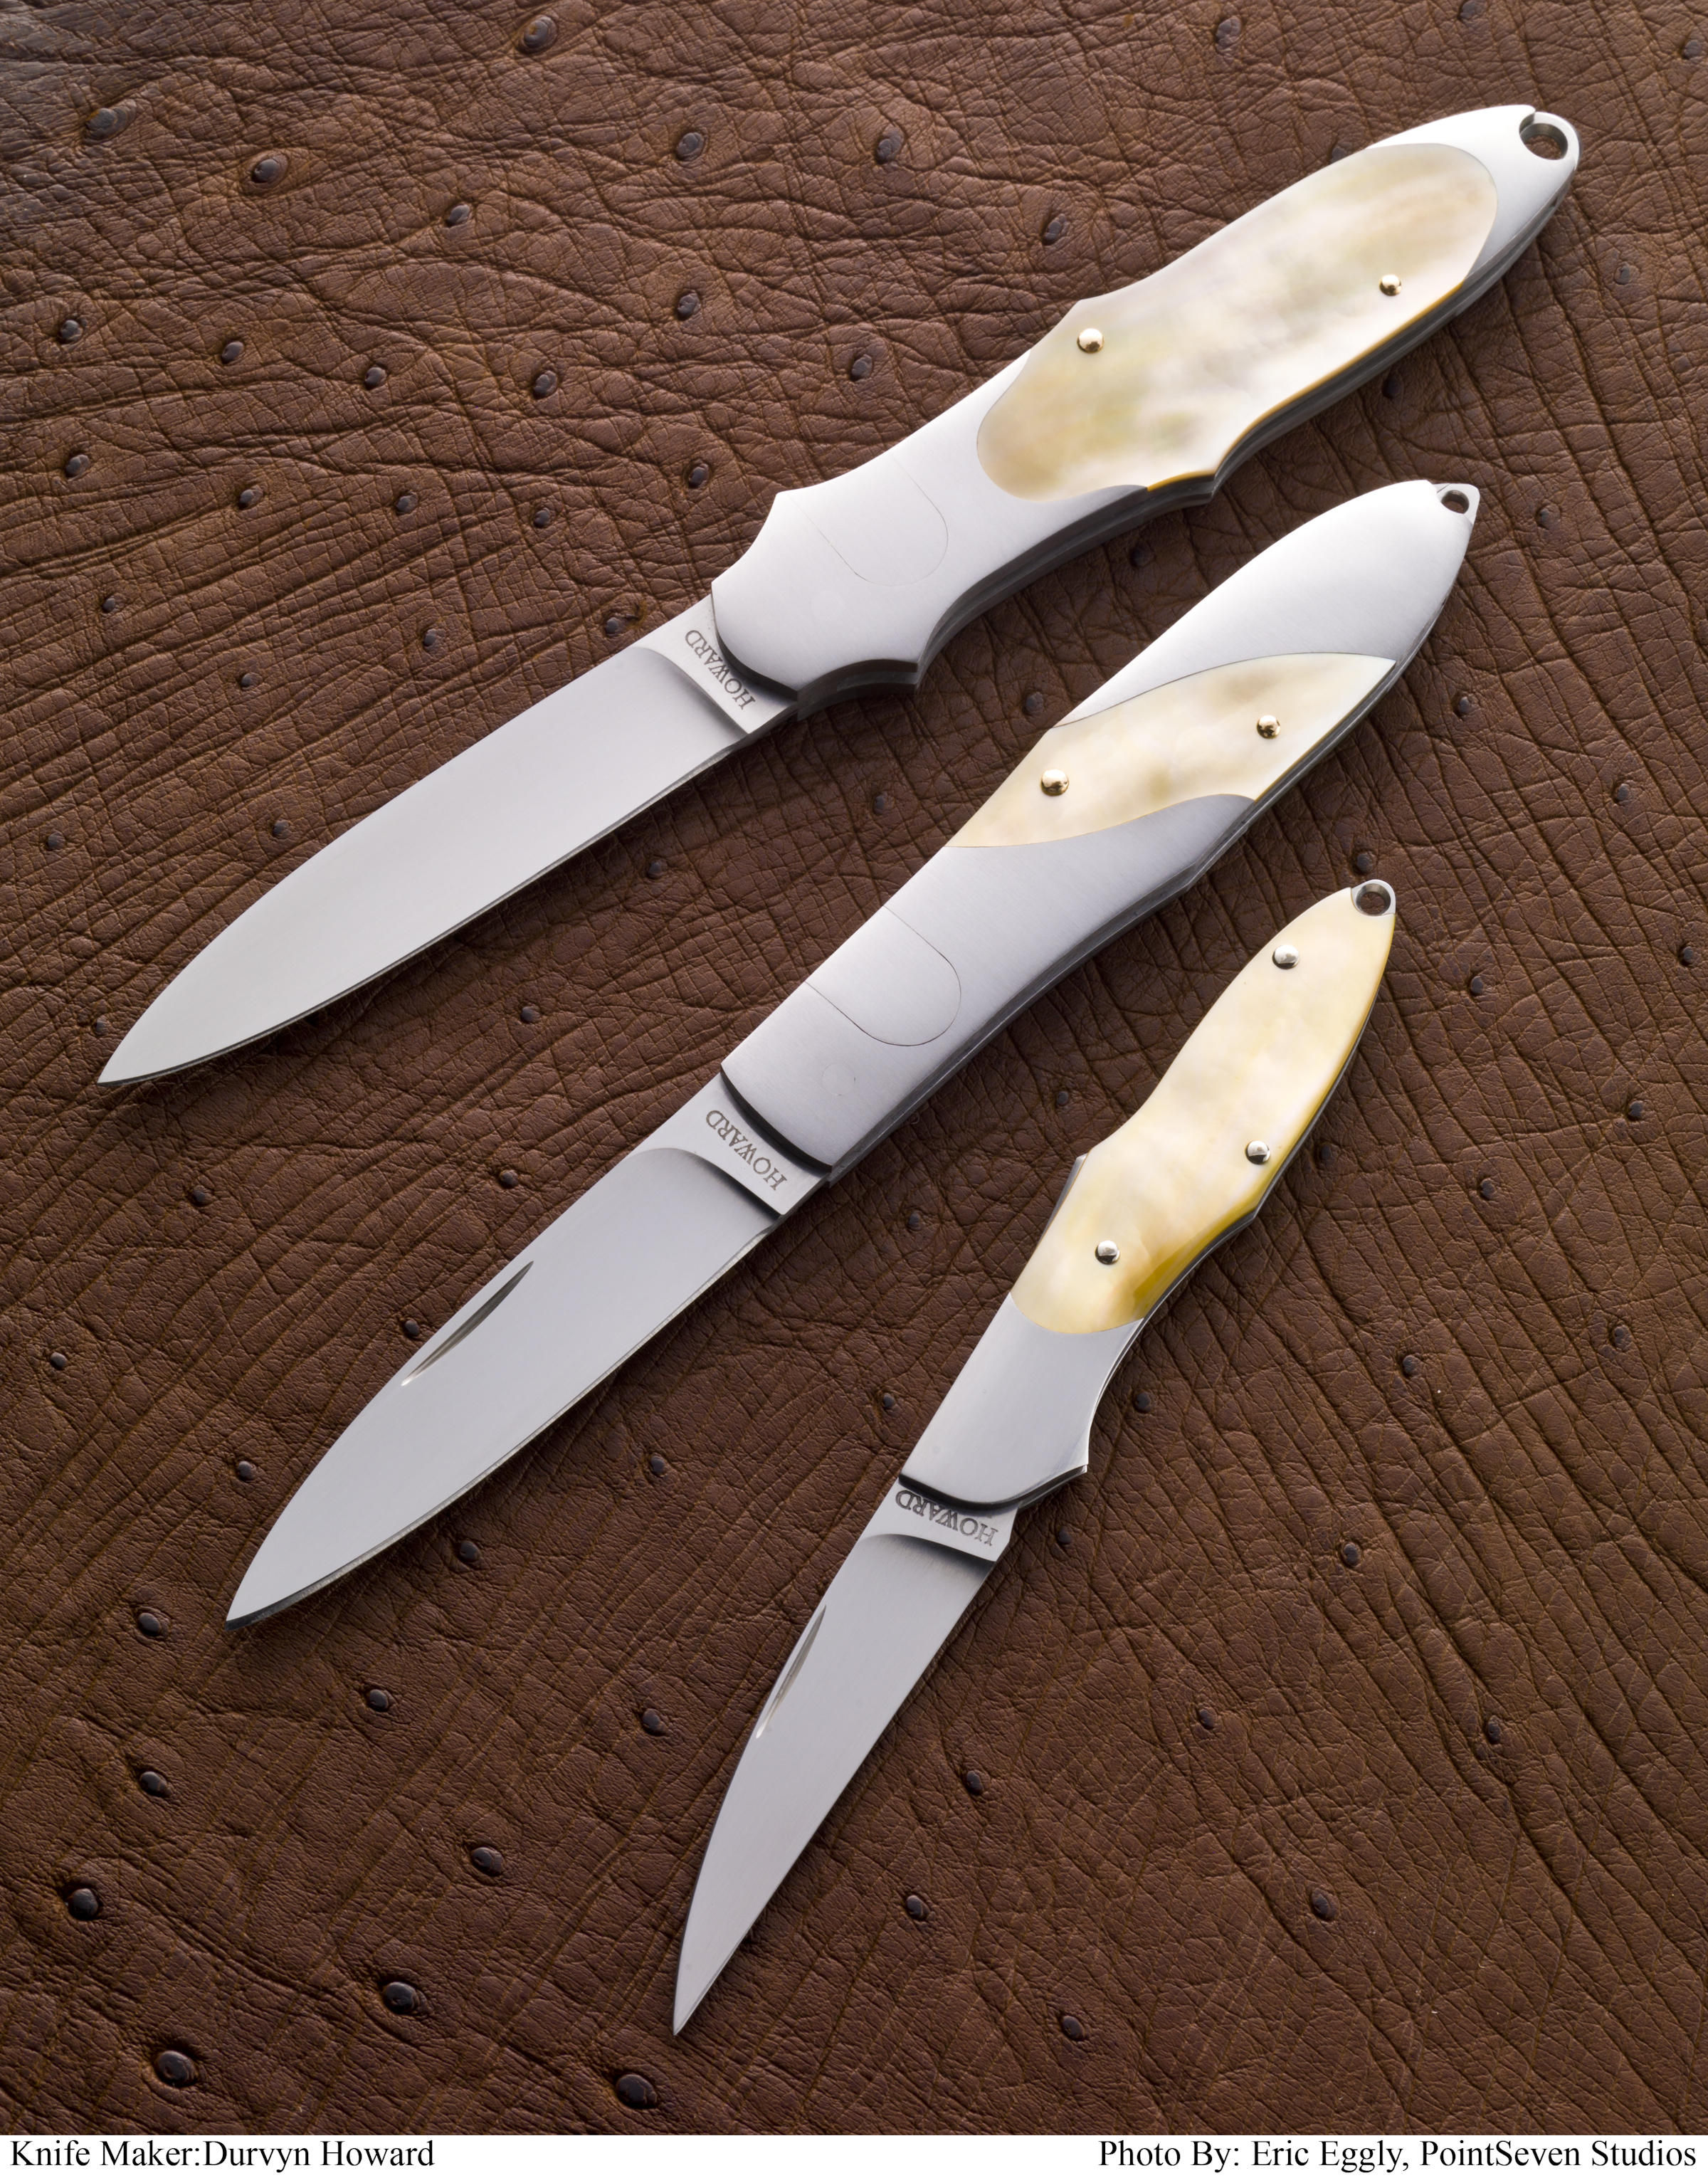
Our Knife Of The Day—make that KNIVES of the day—are these sexy little beauties by Durvyn Howard in gold-lip mother-of-pearl. For more information on these knives, contact purveyor David Hodge of Miami Nice Knife at [email protected]. Howard’s contact info: 4220 McLain St. S., Hokes Bluff, AL 35903 256-492-5720, cell 256-504-1853.
For more on the latest knives, knife legislation, knifemaking instruction, knife trends, knifemakers, what knives to buy and where, and much more, subscribe to BLADE® Magazine, the World’s No. 1 Knife Publication. For subscription information click on http://www.shopblade.com/product/blade-magazine-one-year-subscripti…?r+ssfb120112#BL1SU
The 2012 American Bladesmith Society’s All Forged Blade EXPO is the premier show for hand forged blades. From utility blades, to the finest forged and crafted art knives, the ABS EXPO has something for everyone. The show will be held in San Antonio, Texas, January 27 – 29, 2012 the home of the Alamo.See some of the world’s finest forged knives showcased in a unique and informative format for the enjoyment of the forged blade collector/enthusiast by American Bladesmith Society Mastersmiths and Journeyman Smiths.
Dan Cassidy has set up an Expo Photo Gallery so that the makers can exhibit their knives prior to the show, so that collectors may have a sneak preview of these works of art. I have asked the table holders to make knives especially for this show and to photograph them. Please post your photos in the ABS Exposition Gallery of the ABS Forum and ABS Webmaster Dan Cassidy will be available to assist you. Also post your knife photos on other knife forums so that prospective buyers may have a sneak preview to what they will see at San Antonio.
14 inch Thomas Wells Antique Bowie Progress Report.
To see previous posting,Click:Jim Batson on ABS Expo
BLADE A full scale pattern was made of aluminum from a tracing of the original Bowie. The blade as it was being forged could be laid on the pattern hot as an aide to forge the blade to shape. The steel in this blade was forged from a large coil spring from a rail car. 
(Photo 1)
The blade was ground, set up for the guard, Spanish Notch filed , heat treated and finish ground. The maximum blade thickness is .355 inches at the hilt and .250 inches at the clip. The clip was ground and hand finished on one side of the blade as was the original. 
(Photo 2)
The large tang was used to give the knife a better balance and stronger handle. The tang is tapered from guard aft and from the top down. The pin holes were drilled in the tang.
GUARD
A brass 1/2 template was fabricated to the shape of the guard which fit snuggly on the blade.
 (Photos 3a & 3b)
The guard was hand filed from a 1/4 inch thick piece of cupro nickel 715 , hand finished and polished. Cupro nickel 715 is 30% nickel and 70% copper and is more corrosion resistant than nickel silver which has only 18% nickel.
HANDLE CONSTRUCTION Photo 4 is the end view of the handle that shows the basic handle construction.

Photo 5 is the handle

and Photo 6 is an exploded view of the handle showing all its components.

The handle was fabricated by wrapping the tang with Teflon tape. A piece of tin .007 inches thick was wrapped around the tang and drilled for the pin holes. Two pieces of Mastodon Tusk were shaped into a trapezoidal cross-section to fit against the tin liner. Holes were drilled in the Mastodon handle scales. The scales were shaped a little over size in the plan view. These scales were super glued with gel to the tin liner using pins to align the holes and a rubber band made of an inner tube as a clamp. The assembly was removed from the tang and a dam was made at each end of the handle with masking tape. The voids at the top and bottom of the handle above and below the tang were filled with JB Weld. The handle was ground to final shape in a rectangular cross-section with each scale being of equal thickness.
The handle is a little larger at the pommel than at the guard. I went to Microsoft Word and made a drawing of the rectangular cross-sections at the front and back of the handle. I drew an ellipse in the rectangles and printed them out.
 (Photo 7)
I then cut out the rectangles and pasted them on the front and back of the handle. The handle was shaped with new belts from 36 grit and 80 grit on the flat platen by holding the handle vertically against the platen. The handle was hand finished to 600 grit.
The front of the handle was taped around the handle the required distance from the end as a guide for the front ferrule. A course file was used to recess the handle .032 inches. The pommel was done the same way. A piece of cardboard .032 inches thick was used to measure the circumference of the ferrule. A rectangular of dead soft German silver .032 inch thick was sawed out a little oversize. The handle was used to form the ferrule with the solder joint at the bottom. The joint was overlapped. Both ends were sawed into with a jeweler saw while held in a vise to obtain a straight joint. The ferrule was opened wide enough to allow an eight inch mill bastard file to be used to file the ends. The file is held in the vise with the face up and both ends are filed at the same time by pulling the ends along the top and bottom faces of the file with a slight pressure. The ferrule and pommel ferrule are wired up, fluxed and hard soldered. The ferrule is suspended by the top; the solder is applied to the inside and the heat to the bottom or outside. When the solder appears on the outside, it is done.
The pommel ferrule was wired to an oversize .070 inch thick plate on one end. It was fluxed and pieces of medium hard solder were laid around the joint on the inside and heated from the outside.
The top and bottom straps were made from 1/2 inch wide by .070 inch thick German silver. The bevels were ground and hand finished on each side. The ends were hand file to fit under the front ferrule and pommel cap.
CHAIN KNUCKLE BOW
After some experimenting, I found that the original chain was called a rope chain that was twisted into a flat plane.
 (Photos 8a, b & c for construction details)
Eleven gauge (.088 inch diameter) fine silver wire was wrapped around a 3/8 inch diameter rod by hand. Thirty-six turns were made. Over 4 feet of wire was used. This coil was removed from the rod, fluxed and heated to a dull red, about 1250 degrees F., for about 30 seconds allowed to cool to a black heat and quenched in water. One loop was silver soldered with medium hard solder. The chain was constructed and soldered one loop at a time. After using about 10 loops, the chain was twisted flat to insure good solder joints, The chain was completed with 31 loops. A .093 inch internal diameter tube was constructed to make the hinge attachment to the pommel cap. The chain and tube are pictured in Photo 9 below.

METAL SHEATH
 (Photo 10)
The all metal sheath was constructed of .032 inch thick German silver sheet metal. After the blade was finished a pattern was made of a piece of oak about 3/4 inches thick. The pattern was made oversize to allow for the liner which is about .040 inch thick. Also make the pattern about 3 inches longer than the blade, the edges were rounded slightly. The sides were cut out of the sheet approximately 3/8 inches wider than the pattern on top and bottom. The tip was notched to allow for the bend. The sheet metal I had was in an as rolled state which was hard. I had to anneal the edges that were to be bent.
To shape the sides, place the sides between the pattern and a steel backing in the vice and bend the edges over with a small hammer only hitting the edge in a bending motion. You will have to reset in the vise several times. Take thickness measurements along top and bottom of the blade. Grind the edges of the sides to the require thickness, making sure you have allowed for the metal thickness, the liner thickness and 1/2 the width of the blade. Lay the side flat on the table and measure the height with the depth gage on the back of a veneer caliper.
Once the left and right side are made, flux the inside of each at the joint. Wire the two sides together with black wire at half inch increments. Flux the outside, use a metal spring clamp on a fire brick to present a joint in the up position to be soldered. Solder both sides with medium silver solder. I use a turbo torch and wire solder. Cut and pull the black wire off. I grind the extra solder off with about 80 grit. I use 120 grit to start the finish grinding on the sheath. It is easier to get the 120 grit scratches out than the 80 grit. You want to polish to 400 grit on a wheel. I use a 10 inch smooth 40 diameter wheel with a 3 inch drive pulley.
The sheath should be pickled to clean the inside. The tip and throat pieces were fitted, constructed and soldered with medium solder. These pieces were then soldered to the sheath body with easy easy solder. The belt loop was formed and tinned with soft 4% silver solder. It was then soldered to the sheath.
WHAT’S LEFT
1. Finish chain and pommel cap attachment with hinge. Polish chain in tumbler.
2. Layout incise carving pattern on handle and carve.
3. Assemble and finish knife.
4. Layout engraving pattern on sheath and engrave.
5. Line the sheath


