Home Authors Posts by Joe Szilaski

Joe Szilaski

Using Children’s Modeling Clay to Design Mosaic Damascus

0

Most beginning bladesmiths can hardly wait to forge out their first damascus blades. Making damascus is challenging and exciting, especially when you advance enough to try and create the more complex designs. I still enjoy the challenge forging intricate mosaic damascus patterns, and especially figuring out how to make new ones.

I also enjoy teaching and passing down whatever knowledge I have collected over the decades. So, in 2008 I opened a knifemaking school in Pine Plains, New York. Most of my classes are based on the forging technique.

The most exciting thrill of teaching is watching a few of my students advance to become competent bladesmiths in their own right. I can honestly say I have met a lot of very nice, talented folks over the years at my school. Some just want to be hobbyist or part-time makers, and others hope to one day become full-time knifemakers.

Tips for making mosaic damascus
Greg Cimms forged the blade for his chef’s knife of multi-bar mosaic damascus in a pattern originally worked out in clay. (Caleb Royer image)

They are talented bladesmiths who have been doing incredible work so far. These gents have only been making knives a couple of years. They have learned the proper way to forge and forge weld and have made some nice damascus. I knew they were ready for the next challenge making more complex damascus. I decided it was time for me to hold a more advanced multi-bar mosaic damascus class for them.

The class was four days. On the first day we went down to the shop and I explained what multi-bar mosaic damascus was and how it is made. I also explained how powdered mosaic damascus is made, though it is a completely different process.

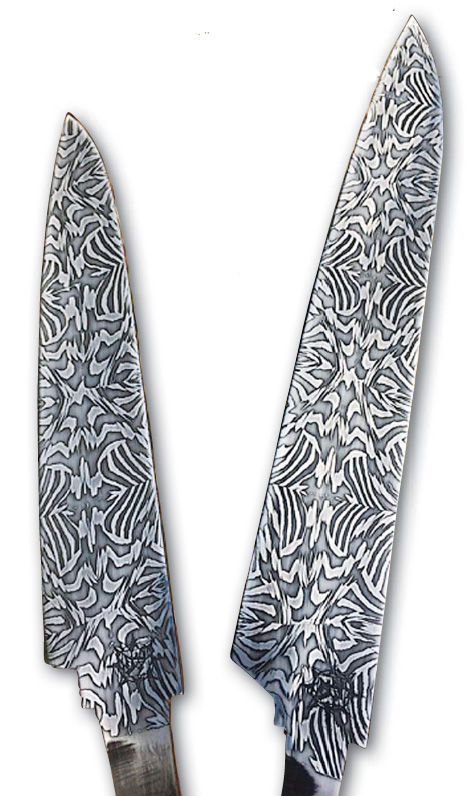
The Problem: “Shooting in the Dark” with Mosaic Damascus Designs

While we were sitting around the table I gave everyone a box of different colored clays. Some thought I was making a joke with the clay until I showed them some of the damascus patterns I had made. Some of those clay designs I made in the early 1990s.

how to make mosaic damascus knives
Bill Greulich followed the same steps he used to develop his pattern in clay to forge his first billet of multi-bar mosaic damascus.

Back then I was working in an art foundry full time pushing a lot of hours, so I had very limited time to forge my knives and tomahawks, never mind work out new damascus patterns. At night I would work out damascus designs on paper. The weekends were often spent working hard at the forge making damascus from the paper designs.

Unfortunately, many times when I finished the mosaic damascus billet, even though some did turn out to be nice patterns, they were not quite what I wanted. Basically, when you work out designs on paper, at least for me, I felt I was shooting in the dark without night vision. I knew I had to find some answer or solution to my problem.

The Solution: Kids’ Modeling Clay

While I was thinking what would be the best solution, the answer was right in front of me. I was working on a sculpture using red and yellow wax, and that is when it occurred to me. I started cutting off a few slices of red and yellow wax and made a billet out of it. I folded, twisted and so on as I would do with steel. While the wax was not so pliable in the cold form, it still gave me the idea of what I had to do.

Mosaic Damascus knife
Greg Cimms forged these two blades from a billet he designed and made in the author’s Advanced Damascus class.

The next day during lunch break I ran out to the arts and craft s store and bought two boxes of multi-colored clay, the kind kids used to play with or use at school. I was very excited for my new finding and anxious to see how well it would work.

I made my first multi-bar mosaic clay billet that turned out better than expected in allowing me to preview the mosaic damascus designs. Making clay damascus does not mean you will like every pattern you create, but it is still a lot more efficient and easier on the pocketbook than forging all day long to find out the design is not what you wanted.

I could hardly wait to show my wife Lori that I had found the solution to my problem. Over the years, I probably came up with more designs in clay than I would ever be able to forge out in steel.

A Shortcut with a Long History

That is how I got started making clay damascus. I shared this technique with fellow makers. Actually, similar techniques have been done in glass beads for hundreds of years. I have many books on Indian trade beads in beautiful designs.

As kids we used to play with marbles that also had beautiful designs in them. It just never occurred to me to incorporate any of this into my knives.

Making Clay Billets

On the first day of class I demonstrated making a clay billet and explained, step by step, what to do and what to watch for.

Next I showed the group how to take the same starting multi-bar billets, and, by using different arrangements and folds, create two or three different mosaic damascus designs.

As the students started working out their designs in clay, I asked them to write down every step they took: how many layers they started with, how many times they cut the billet, how many times they folded it, in which direction they folded, in which direction they forged, and so on. This written reference is very important if you want to recreate the design in steel.

I got such a kick out of watching grownups having fun with clay, showing off to each other the designs they had created. It reminded me of back when I started making clay mosaic damascus and how excited I was.

That day everyone seemed on a diet because no matter how often I said “Lunchtime!” no one was hungry. Finally, Lori came home from work and we had dinner. At the table the only conversation was which of their designs they would choose to forge out on the second day of class.

How Much Money Do You Need to Start Making Knives?

0

Editor’s note: This article was originally published in 2005, so be sure to adjust for inflation. That said, Wayne Goddard’s $50 Knife Shop book is the next step if you’re looking to get started on a minimal budget.

The short answer: A few thousand dollars if you want to get serious about knifemaking, and considerably less than that for hobby projects.

At most forging demonstrations I do, I try to use only minimal tools because I want people to see what can be accomplished with just a few basic implements—a hammer, a few tongs, a good anvil and a forge. Most folks are not set up with every type of tool that can be used in bladesmithing. As you have seen, with just a few basic tools you can make much more than just a basic knife or hawk.

Using only basic tools does require a bit more sweat. This may be fine if you are a part-time blacksmith or bladesmith, but may not be the most efficient avenue for someone trying to make a living at it. If the latter is the case, you can quickly run into thousands of dollars setting up your shop.

tips for how to make a knife
Next step: Learn how to get started making knives with just 50 bucks in tools in “Wayne Goddard’s $50 Knife Shop.”

For starters, if you do not already have a place to set up your forge, then the biggest expense will be for shop space. Obviously, the space cannot be an old woodshed. Keep in mind that you are working with hot metal and fire, and that you need to set up the forge where the metal sparks will not fly where they could cause trouble.

The room also will need good ventilation, no matter if your forge uses gas or coal.

If you already have such a place to use as your forge room, then you can start setting things up. Your next biggest expense will be the forge itself, either gas or coal. I recommend a gas forge because it is cleaner and you have more control of the heat. Such a forge could run about $600.

You need a good anvil; my preference would be at least a 125-150 pounder. You will need a sturdy worktable with a quality, heavy-duty vise, a bench grinder, and a few well-chosen tongs and hammers. This will be all you need to do most of your bladesmithing.

However, whoever told you that you can spend thousands of dollars setting up a shop with all the tools was not pulling your leg. Power hammers, various dies, a drill press and other tools of the trade will make your work easier. Specialized knifemaker’s grinders from Burr King, Bader or Square Wheel will cost you but will be worth the investment.

You could write a whole book on tools that would make your life easier and your pocket emptier. Visit a well-established blacksmith shop and you will be surprised how much tooling will be there. Of course, you do not have to purchase everything at once, but over the years as time and funds allow, you probably will.

My opinion is that you do not have to spend thousands of dollars to set up a shop where you can create a great variety of beauty and function. However, if bladesmithing is your chosen trade, to not invest in the equipment that will save you time and sweat is not a smart option.

Like they say, you need to spend money to make money.

Tips For Making A Hidden-Tang Knife

0

There are a few things to be careful of when making a knife of hidden-tang construction.

The Blade and Tang Both Need to be Straight

First, make sure that your tang and blade are straight. If the tang is tapered, it must be evenly tapered on both sides. The centerline of the tang must be straight to the centerline of the blade.

If the tang is warped a little to the right or left of the blade, or unevenly tapered, then you are not yet ready to fit either the guard or the handle. Go back to the forge or grinder and make your corrections to get things straight right from the start.

A limited amount of “fudging” can be done while gluing the handle to compensate for a tang that is not 100 percent straight and center. To repeat, in my opinion, it is best to correct things right from the start.

Fitting the Guard

After making sure your tang is not going off to the left or right, go ahead and fit your guard. Take your time! The guard must be at 90 degrees from the center-line of the blade and tang, even if you are making a knife with a slanted guard.

Attaching the Handle

Now you can start fitting your handle. Fit the handle to both the guard and the tang as you normally do. If you do this, the handle will be straight to the blade.

Most often I will not cut the handle material in half when making a hidden-tang knife. I will usually use a solid block of wood or a piece of stag.

First, I drill a couple of starter holes in the end where the tang will be inserted. The thickness of the drill bit will depend on the thickness of the tang. I then file the hole out to fit the tang.

It is more important to fit the handle material to the properly fitted guard than it is to fit it tightly to the tang. This does not mean that the fit should be sloppy, just that it is not necessary to make it that tight. Besides, you need to leave some room in between the tang and handle for the glue to be effective and have a strong bond.

With either of these methods, if the blade and tang are straight and the guard is at 90 degrees to the centerline of the blade and tang, then the handle will have to follow.

Try Knifebuilding:

Knifemaking: What is the Best Kind of Tang?

0

Knifemaking Question

“I have been thinking of making a hidden-tang knife with a blade made by one of the companies that advertises in BLADE®. However, that leaves a problem. Most of the blades in question have either a small tang, which causes a possible stress point, or a traditional-shaped tang that seems very short. Which is better and why?

“I also have seen hidden tangs cut out of full-tang knives; how can this be done without affecting the temper?”

~Anonymous knifemaker

Answer

tang making knives

Let me start with the second question about converting a full-tang knife into a stick-tang- or a so-called hidden-tang knife without affecting the temper. If this is what you would like to do, it certainly can be done without damaging the blade or losing the temper.

While most factory-made blades are fully heat treated, tang and all, you do not need to be so worried about softening the tang. This area could just be spring hardened. But, as you know, it is very important to not let the heat travel up into the blade and soften it.

You will need a bench grinder or a belt sander, or you can even use a disc grinder. Any will do. Whichever machine you happen to have or choose to use, the main thing is to not overheat the material while working it.

To ensure this, you will need to use a coarser grinding stone or a new sanding belt not higher than 60 grit. A fresh new belt is essential for the operation. The sharper the belt, the less friction/heat will occur. A duller belt will create a lot more heat.

Another thing to watch for is to not apply a lot of pressure when you are grinding. Again, the more pressure, the more heat.

Besides using a sharp belt and light pressure, after each pass on the grinder be sure you cool off the blade completely by dipping it in cool water. If you want to get fancy, you can place the blade on a piece of dry ice to cool it, though it is not necessary to go to such lengths.

One obstacle when converting a full-tang knife into a hidden-tang one is the pin and glue holes. The size and placement of the holes will dictate the shape of the tang and obviously the handle shape as well. Consequently, you are limited as to what you can do.

One last thing to watch for is to not grind too close to any of the pin or glue holes because this will be the fault or weakest point of the knife. (See Figure 1.)

As for your first question, both the hidden-and full-tang style of knife construction have been serving mankind for hundreds of years, so I would not consider one more traditional than the other.

Concerning which type of tang is better, it is up to individual preference. The properly prepared tang, either full or hidden, will perform well. A well-constructed hidden-tang knife should have no stress points. (See Figure 2.) A stress point can occur during heat treating if the juncture where the blade and tang meet has sharp corners. (See Figure 3.)

This juncture is where you need to pay more attention and take care to avoid creating sharp corners and edges. A full-tang knife also can have stress points if the drilled holes are not slightly countersunk to eliminate sharp edges.

You mentioned that some of the tangs appeared short in the advertisements you have seen. They say a picture is worth a thousand words, but sometimes a picture does not do justice or give you a true measure of the proportions of the subject.

While checking out all the pictures and blade designs available, you may have missed the information written under each picture. Each picture has the overall size and the blade size. If you take away the blade size from the overall size, you will end up with the exact measurement of the tang.

I am happy to hear you are going to try making a knife from a kit or a factory-made blade. Everyone needs to start somewhere. Maybe it will lead you to try making your own knives, too.

Learn More About Knifemaking

Get Wayne Goddard's book and experience the true wonder of knifemaking.
Wayne Goddard’s book makes knifemaking a wonder to behold.
Advertisement

Must Read Articles

Read this before you make a knife

Knifemaking 101 – Read This Before You Make a Knife

  by Wayne Goddard My experience has taught me that there's nothing like digging in and getting started. I've often said the hardest part of the...
how to forge damascus steel

How to Forge Damascus

Advertisement
Advertisement