Home Authors Posts by Kevin Klein

Kevin Klein

Knifemaking: ABS Master Smith J.D. Smith’s 4 Principles

0
  1. A personal approach and style.
  2. An object of art or music should give you a sense of life, an idea what it’s like to be in the artist’s shoes.
  3. Technical control.
  4. An endless flow of ideas.


J.D. Smith: Dancing in the Shop

J.D. Smith and I were neighbors for three years and, as it was a short walk, would frequently wander down to the Massachusetts College of Art and Design (MassArt) together, sometimes for class, sometimes just to work.

Boston’s a very diverse city, and it wasn’t uncommon for him to stop and start speaking Russian or Spanish with various friends along the way before getting to class and beginning to speak Korean with a student.

Neither was it unusual for J.D. to dance around the shop, especially while making damascus. Dance, music, sculpture: They all have a flow to them, and some people simply love to incorporate and live with all three. J.D. dances through the music, the work, and the awards. I was with him at the 2013 Oregon Knife Show when I watched him win four awards, and his study at home was littered with many more.

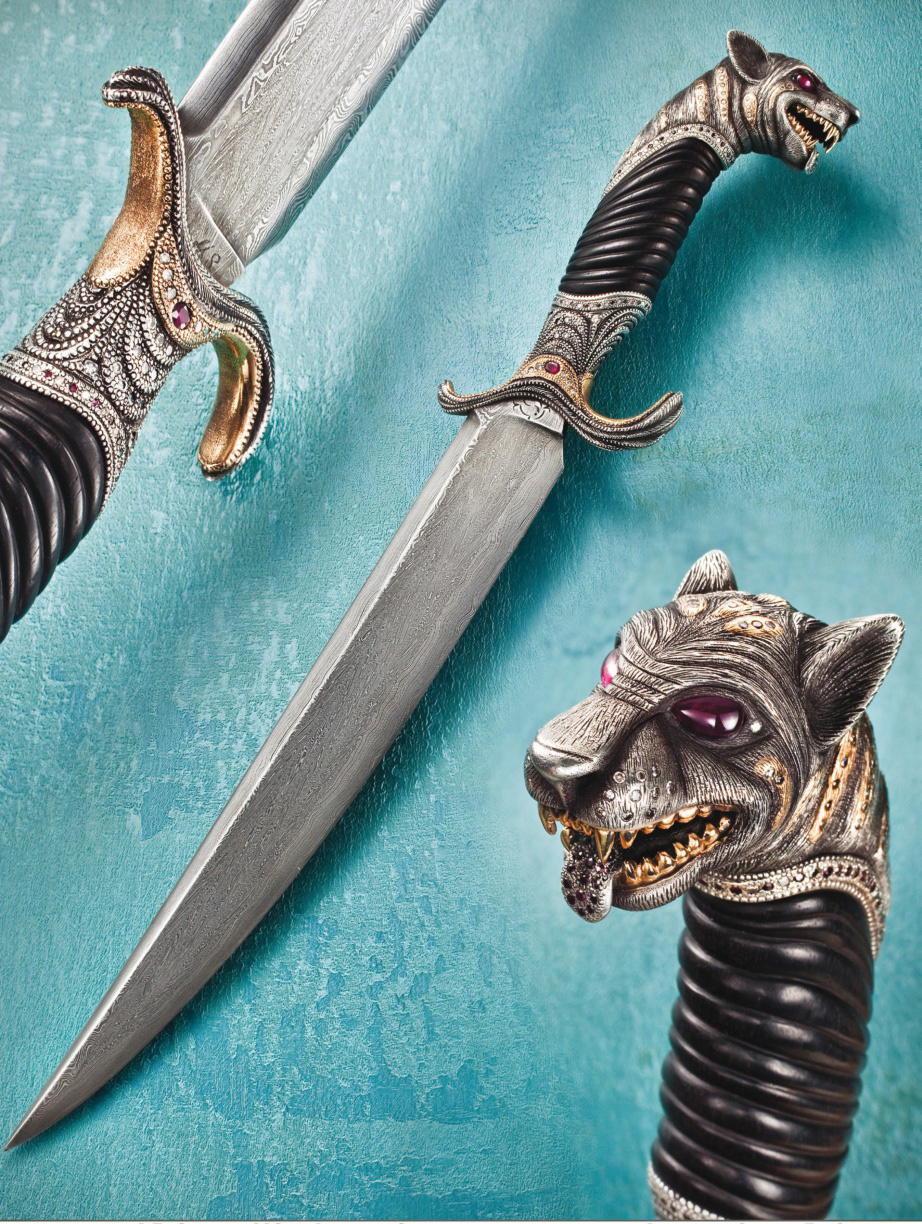
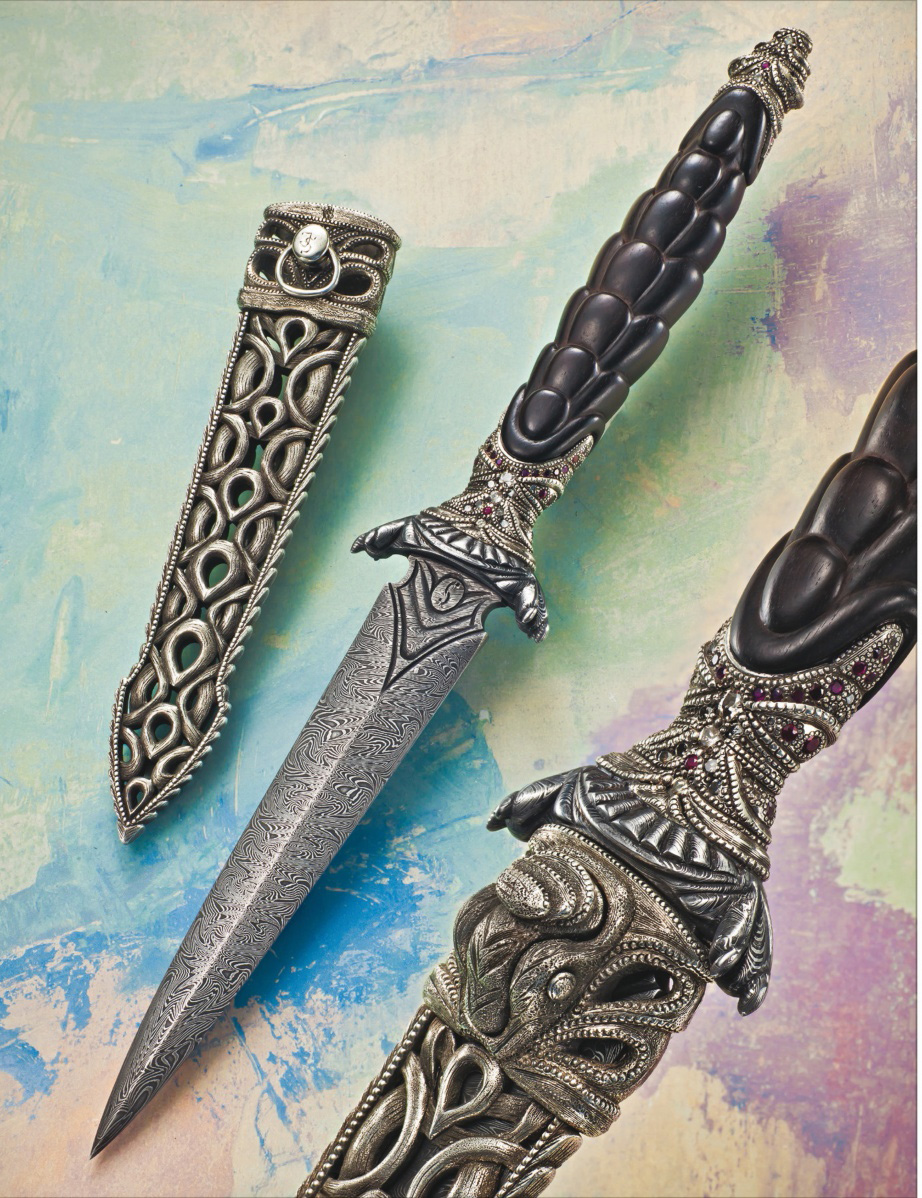
Two of the pieces were collaborations: one a hunting knife with now American Bladesmith Society master smith (MS) and past apprentice Zack Jonas, the second a precious metal and stone-laden sword crafted with the talented Joseph Shnayder, J.D.’s partner at AmeRRuss Blade Arts.

It was also at the Oregon show that BLADE Magazine Cutlery Hall-Of-Fame® member Wayne Goddard gifted J.D. his MS stamp, something I don’t think J.D. will ever forget.

J.D. received the MS stamp in 1998, along the way winning the B.R. Hughes Award for the best knife submitted by an MS applicant at the BLADE Show. This made J.D. the first black MS, though he tries not to dwell on this because he feels it detracts from the bladesmithing.

“The field should be blind to age, sex, and race,” he noted. “The focus should be on the work.”

Developing A Style

In 1991, J.D. walked into Joe Wood’s office, who at the time was head of the MassArt sculpture department. J.D. told Joe that the school’s officials couldn’t say they were teaching the most up-to-date metals program without teaching damascus. Joe agreed and offered J.D. a guest teaching position. In 1996, George Greenimire offered J.D. a regular class to teach.

As a teacher, J.D. would encourage students to do what he thought they were naturally inclined to do without controlling their sense of design, or discouraging them from pushing their limits. The goal isn’t to replicate other people’s work, but, if you can understand what you’re attracted to, you will have an easier time designing your own work and, hopefully, developing your own style.

JD Smith Master Smith
Another collaboration with Joseph Shnayder, this arresting art knife features a 6-inch blade of J.D.’s explosion damascus in 1084 carbon and 15N20 nickel-alloy steels. The handle is carved African blackwood, highly detailed silver work and gemstone settings. The quillons are carved in the shape of claws. Overall length: 12 inches. (SharpByCoop image)

“If there’s a table with 500 different knives on it,” he observed, “someone should be able to pick out your work with ease.”

When I asked him how he started to develop his style, he mentioned it being “cobbled together from Don Fogg, Wayne Goddard, Jimmy Fikes, and Wayne Valachovic—Valachovic especially for folders—Bill McHenry and Jim Schmidt.”

Bill and J.D. had become good friends over the years, and J.D. credits much of his knowledge of folders to him. Bill passed away in 2019 and is greatly missed by many inside and outside the knifemaking community.

Knifemaking: ABS Master Smith J.D. Smith’s 4 Principles of Superior Art

Over the years, J.D. has developed his Four Principles of Superior Art:

  1. A personal approach and style.
  2. An object of art or music should give you a sense of life, an idea what it’s like to be in the artist’s shoes.
  3. Technical control.
  4. An endless flow of ideas.
Tips for Making a Knife
The author collaborated with J.D. on this stylish fixed blade in damascus, a carved handle, and stunning wooden sheath. (SharpByCoop image)

Further explaining his sense of style, he said, “Style is every technique that you use as part of your personal toolbox, and the things you choose not to use. That equals your style. As an artist progresses, he starts to limit his options. It shows a level of maturity. You use four or five techniques, and you develop your style off the permeation of those techniques.”


How to Make Mokume

0

* Images by the author, Jeremy Spake and Austin Moody unless otherwise noted.

Pronounced “moe-ka-may ga-nay,” mokume-gane—or mokume as it is more commonly known—is all about layering. For me it’s simply another component of my work, but within itself it’s about color and pattern.

In short, you stack a variety of different metals, bond them together, forge them down, pattern the material by cutting then forging, or forging then cutting, and expose the various colors that lie beneath. It sounds pretty simple and much like damascus.

Neither is true. I do find mokume a bit more difficult and less forgiving. However, all of this is subjective and depends on the specific materials you’re working.

For damascus I use straightforward, low-alloy high carbon steel; for mokume I frequently use exotic alloys that are not forgiving. You can use exotic high-alloy steel, which makes damascus less simple, and straightforward metals for mokume, which makes it simpler.

But enough of my doubletalk—let’s get into the process.

What You Need

Torque plates: 1-inch-thick 316 stainless steel. The plates should be large enough to accommodate both your billet—with some wiggle room—and a half-inch bolt in each corner of the plate.

Bolts, nuts, washers: at least half-inch thick Grade 8 heat-treated, high-alloy steel bolts. Black oxide will help prevent the bolts from bonding to the nuts. I hope this goes without saying, but you will need the correct size of nuts and washers to accompany your bolts.

Boron nitride: It acts as a resist between bolts, nuts, washers, torque plates and your billet. It also acts as a lubricant.

Three plastic tubs at least 1 foot by 1.5 feet and 6 inches tall, or whatever makes the most sense with the size billet you’re making.

Distilled water.

Simple green® Concentrate All-Purpose Cleaner.

For cleaning, 7447 maroon Scotch-Brite™.

Scott® Shop Towel. .002-inch-thick 304 stainless steel sheet. Medium silver solder: It’s always important to have on hand and can help fix problems should they arise.

Activated charcoal pellets.

How to Make Mokume Step by Step

STEP 1: Cut all of the metal to the appropriate-sized sheets, deburr, and make sure they are relatively flat without denting or kinking the metal. You need each piece to be of a consistent thickness. All the sheets can be different thicknesses, but there must be no dents or tapers within individual pieces.

STEP 2: Take the torque plates with the holes already drilled and coat the inside faces with boron nitride. The inside faces of the plates should be dead flat. Also, coat the threads of the bolts and the faces of the washers. Set aside to dry.

STEP 3: Take the three plastic tubs and place them one next to the other. Fill tub number one and number three with 1 inch of distilled water and the center tub with 1.5 inches of the water.

STEP 4: Mix a couple of tablespoons of the simple green cleaner in tub one.

STEP 5: Using tub one and a small piece of Scotch-Brite, clean each side of the first piece of metal. Use a scratch pattern to track your progress. When finished rinse the piece in the first tub, being sure that the water skims cleanly and easily over the surface. If it beads up anywhere, clean again.

STEP 6: After cleaning and rinsing the piece of metal in tub one, rinse it in tub two and store it in tub three.

STEP 7: Clean all of the metal, dedicating respective corners of tub three to hold each type of metal.

STEP 8: Place the bolts through the holes in the bottom torque plate and set it close to tub three.

How to make mokume

STEP 9: Remove each piece, gently dry using the Scott Shop Towel, and stack in the correct order on your torque plate (see image 1).

STEP 10: Your kiln should be preheated by this point.

STEP 11: Align the metal using a straight edge or square.

STEP 12: When you place the second torque plate on top, be careful to not knock around the billet. Re-align the sheets as necessary while tightening the nuts and bolts.

How to make mokume

STEP 13: When everything is tight, go to your hydraulic press. Use steel standoffs to get past the nuts and bolts, and press down on the stack. Tighten the nuts with the billet under pressure (see image 2).

How to make mokume

STEP 14: When you create the stainless steel jacket, you want all of the seams to be folded twice. After each fold, either work the seams with a rawhide mallet or burnish them with an appropriate tool (see image 3).

How to make mokume

STEP 15: Activated charcoal is ideal for this process—use two tablespoons—but if you only have charcoal on hand, that’s fine. We used hardwood charcoal and crushed the chunks up a bit. You need only a small amount. The point is to seal the foil well enough where no oxygen can come in to cause combustion and burn up the charcoal. Prior to adding the charcoal to the packet, let it sit in the oven for one hour at 250°F to remove any moisture from the charcoal.

How to make mokume

STEP 16: To prevent damage to the bottom of the kiln, we slid our packet in on a thin piece of steel (see image 5).

STEP 17: Kiln time varies depending on how large the billet and torque plates are. You really need everything to be at temperature for only a couple of hours. Larger billets obviously take longer to get to temperature. I recommend doing some research. The billet documented in the article was fired for three hours.

STEP 18: When you have fired the billet long enough, remove it from the kiln, remove it from the foil, and reduce the entire billet by 50 percent thickness at forging temperature. Reduce between 20-to-30 percent with each heat.

How to make mokume

STEP 19: For the first forging process, leave the billet in the torque plates and go straight to the press (see image 6).

STEP 20: After the first reduction, the billet should slide out of the plates when tilted to the side. You can place the billet between two thinner steel plates—though only if you have a secure way to hold everything—and put them back in the kiln at forging temperature. The plates will help prevent the press dyes from chilling the billet too quickly. Continue until you have reduced by 50 percent from your starting point (see image 7).

STEP 21: Now you can go to cold working. Start out by reducing the billet no more than 10 percent prior to annealing. As you work the billet down, you can start to get closer to 20 percent between annealing cycles. The process for annealing depends on your metal combination. The relevant information should be easy to find with an Internet search.

How to make mokume

STEP 22: When it comes to patterning mokume, the process is very similar to damascus. However, instead of using a milling machine or angle grinder to cut a pattern into the metal, tools such as a flex shaft or files would be more appropriate. After cutting a pattern into the metal, forge the billet flat to bring the low points to the surface. As with damascus you can also forge patterns into mokume, either with a hammer or specific coining dyes. Reveal your pattern by grinding down to the low points. As a rule of thumb, it’s not recommended to pattern deeper than one-third the thickness of the billet.

More than One Way to Do It

Full disclosure: there is more than one way to make mokume. I have made and know others who make mokume using processes that differ from what I am sharing.

Advertisement

Must Read Articles

Read this before you make a knife

Knifemaking 101 – Read This Before You Make a Knife

  by Wayne Goddard My experience has taught me that there's nothing like digging in and getting started. I've often said the hardest part of the...
how to forge damascus steel

How to Forge Damascus

Advertisement
Advertisement