Today’s American-made knives embody the latest in the state-of-the-art.
American knifemaking is alive, well and thriving. Certainly over the years the marketplace for cutlery has become more global, despite this native craftsmen and companies have held their ground and remained sharp as ever. Below is a good example. We’ve collected a throng of blades made in good ol’ U.S. of A. that showcase creative prowess of our countrymen.
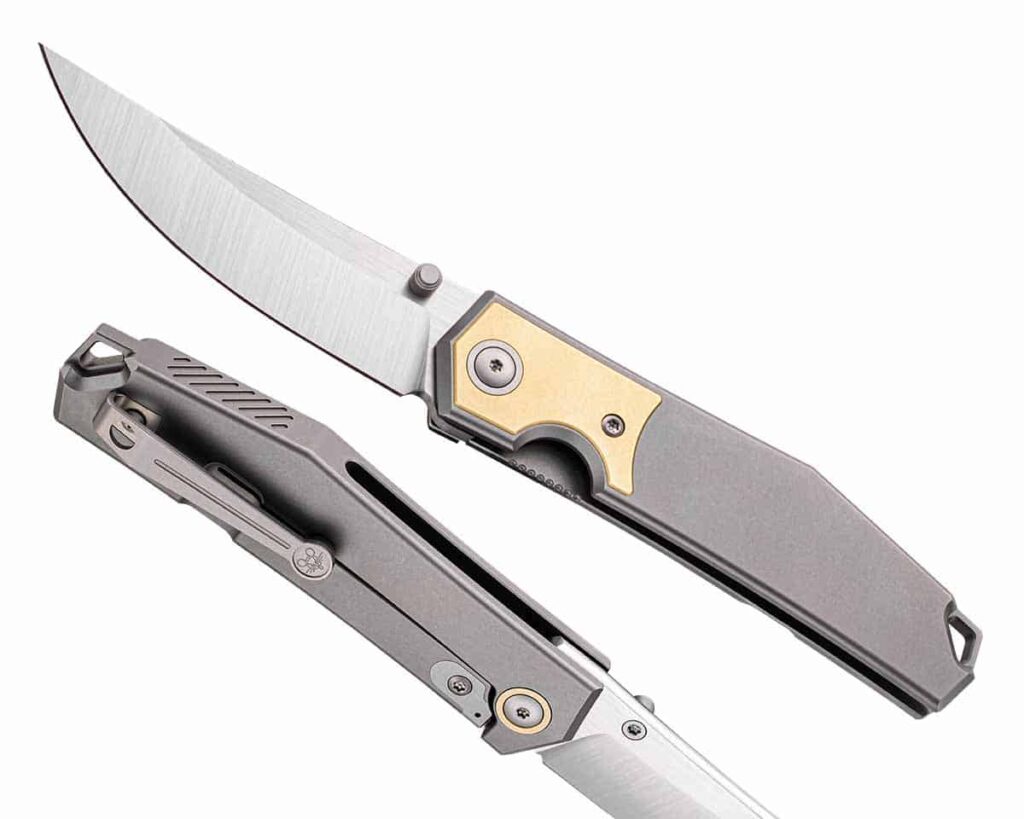
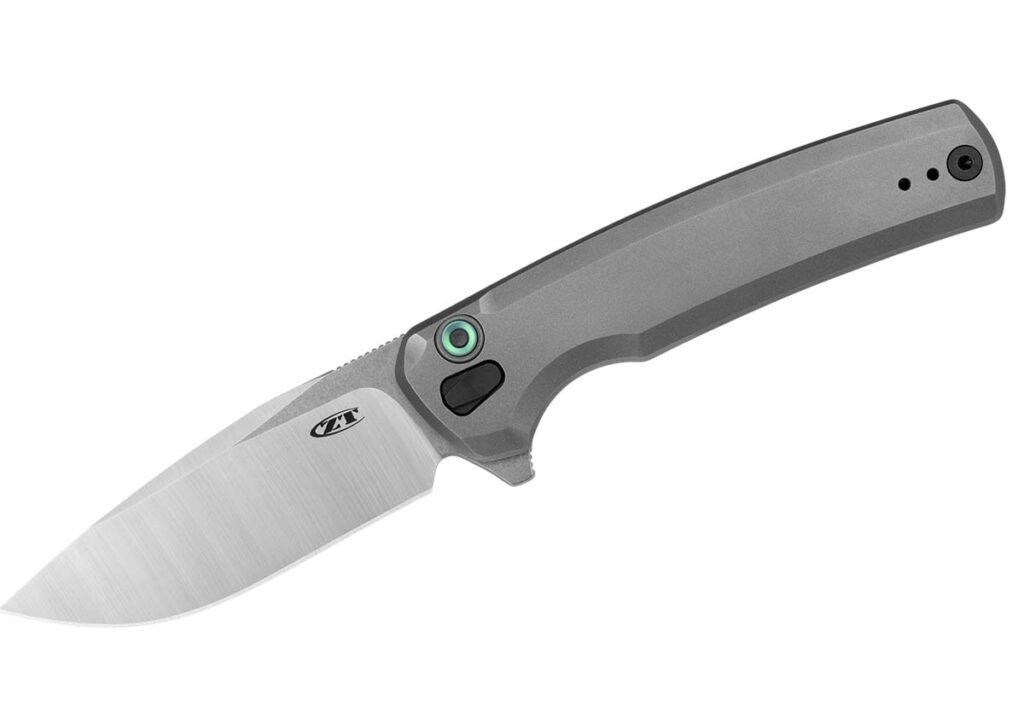
Talon / Hawk Knife Designs
Knife type: Tactical/EDC
Designer: Gavin Hawk
Blade length: 3.5”
Blade steel: M390 stainless
Rockwell hardness: 63 HRC
Blade grind: Hollow
Blade pattern: Modified drop point
Blade finish: Tumbled
Scale material: Black Dunes (Fatcarbon®)
Frame material: Titanium
Furniture material: Titanium (button, clip, backspacer)
Lock: Hawk Lock, toggle detent
Pivot: Bearings
Weight: 4.4 ozs.
Closed length: 4.8”
MSRP: $2,000
Available: NOW
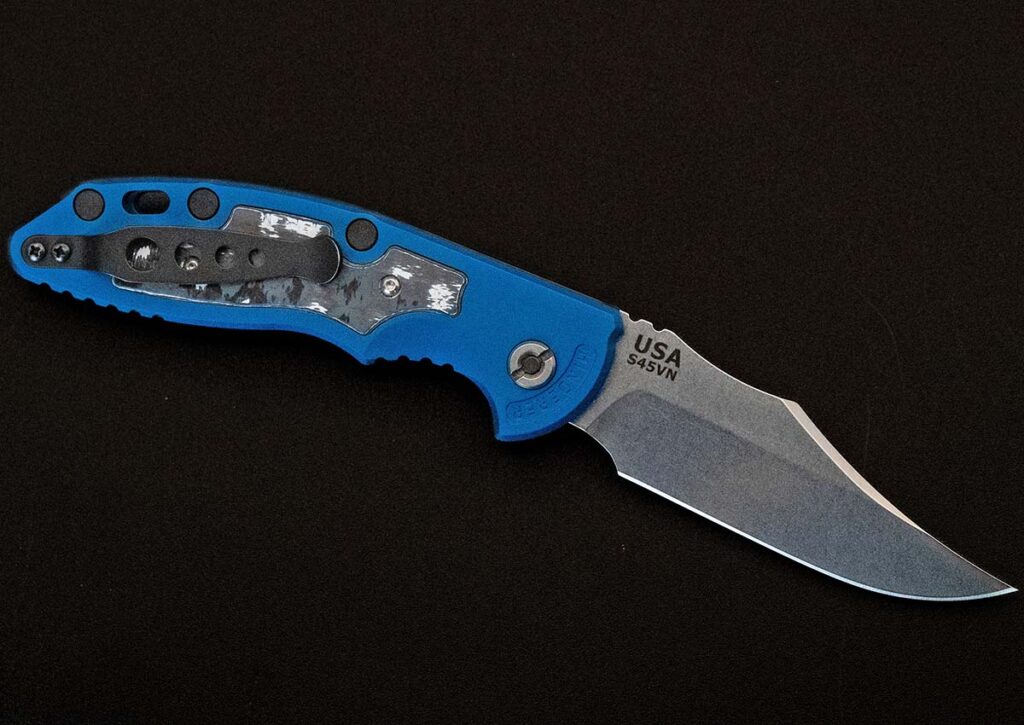
Zero Tolerance 0044
Knife type: EDC flipper folder
Designer: ZT original
Blade length: 3.2”
Blade steel: CPM S45VN stainless
Rockwell hardness: 59-61 HRC
Blade finish: Two-tone
Scale material: Titanium w/bead blast finish
Lock: Button lock
Pivot: Ceramic bearings
Weight: 3.4 ozs.
Closed length: 4.35”
MSRP: $425
Available: NOW
Kershaw Launch Iridium
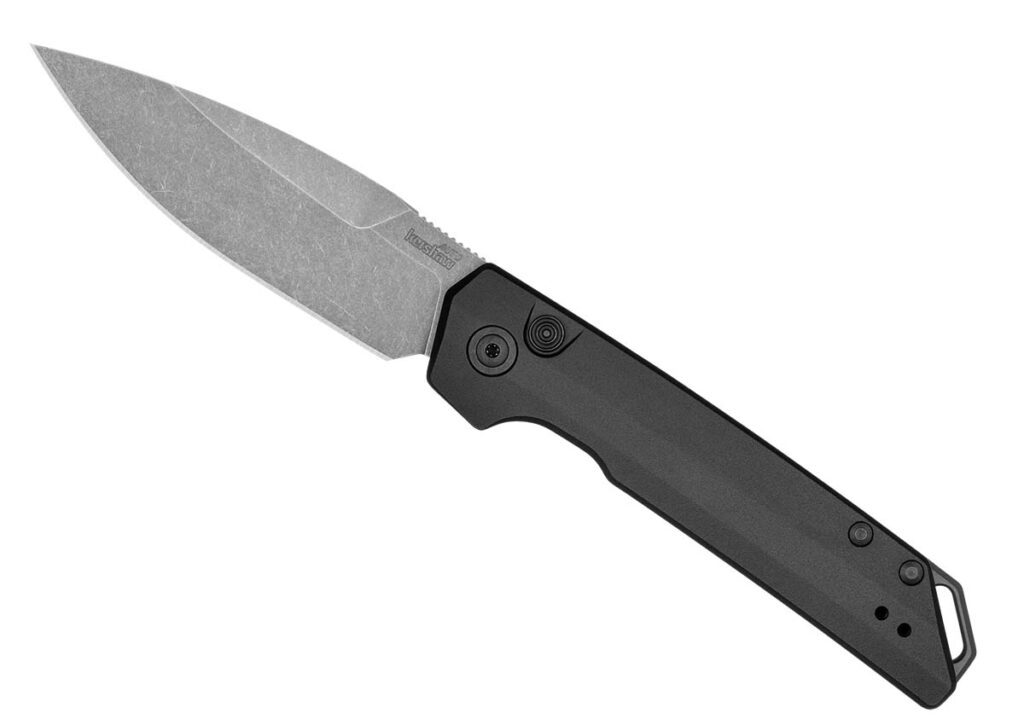
Knife type: Automatic
Designer: Kershaw original
Blade length: 3.45”
Blade steel: CPM MagnaCut stainless
Rockwell hardness: 62-64 HRC
Blade finish: Working finish
Scale material: Aluminum anodized black
Lock: Button lock
Pivot: Washers
Weight: 3.1 ozs.
Closed length: 4.55”
MSRP: $279.99
Available: NOW
Spyderco Lil’ Native Lightweight
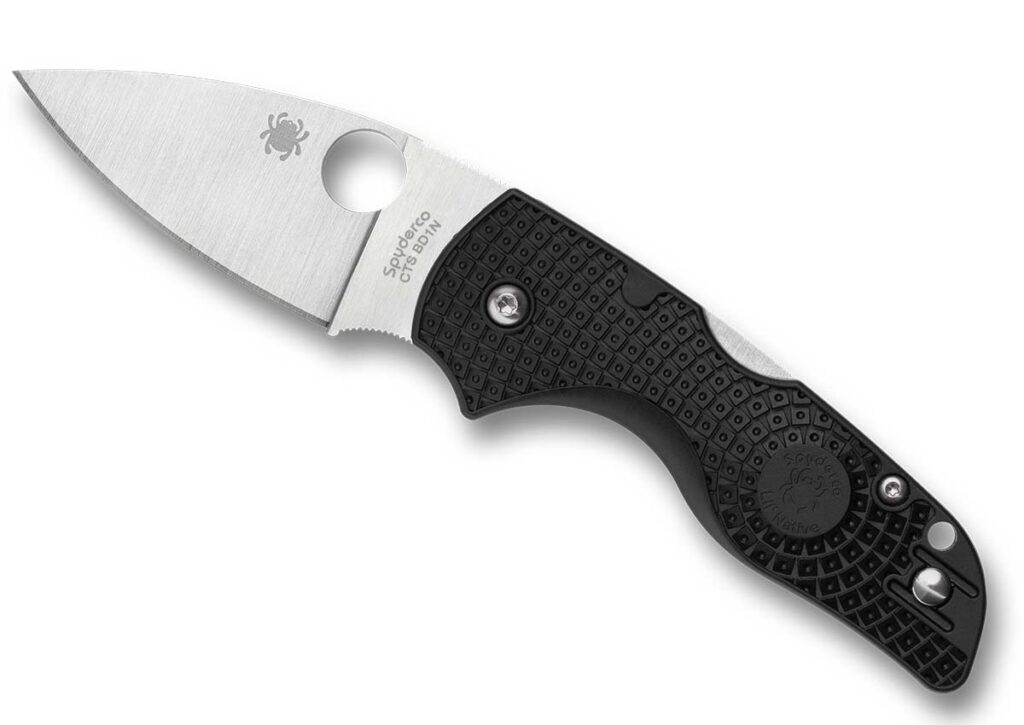
Designer: Eric Glesser
Blade length: 2.42”
Blade steel: CTS BD1N stainless
Blade grind: Full-flat
Blade finish: Satin
Scale material: FRN
Lock: Back Lock
Weight: 1.5 ozs.
Closed length: 3.74”
MSRP: $160
Knife to know: This folding knife takes the company’s Lil’ Native Back Lock platform and lightens it by 40 percent with fiberglass-reinforced-nylon scales.
Available: March
TOPS Knives Wood Nymph
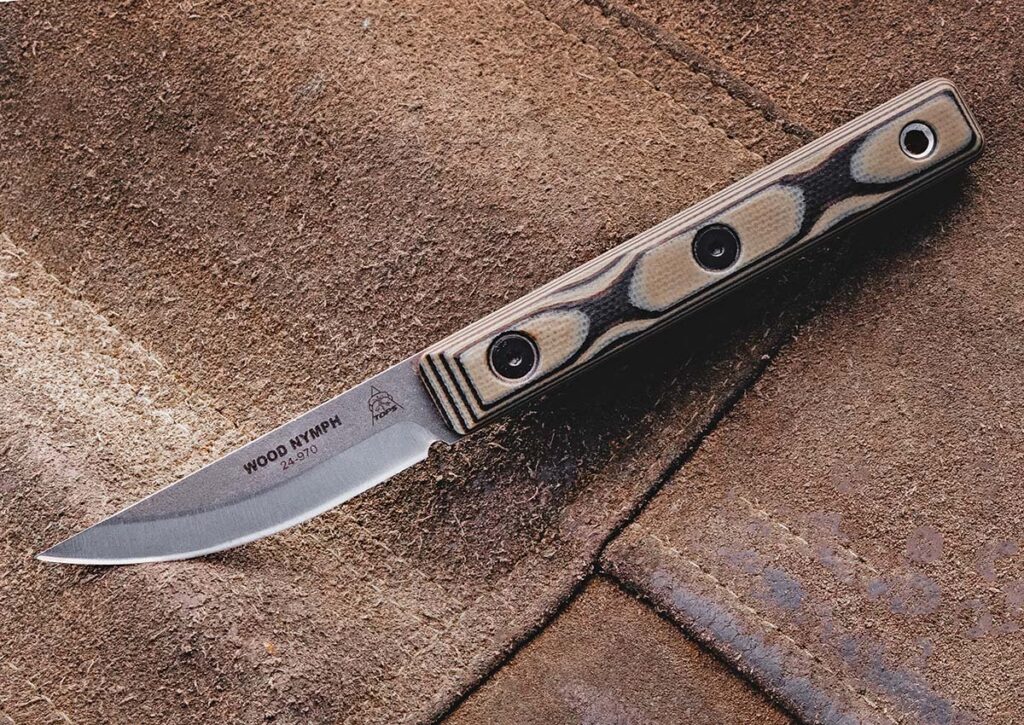
Knife type: EDC/bushcraft
Designer: Bushcraft Kelso
Blade length: 2.25”
Blade material: 1095 carbon steel
Rockwell hardness: 56-58 HRC
Blade grind: TOPS’ modified Scandi
Blade finish: Tumble
Scale material: Tan/black G-10
Weight: 1.8 ozs. (3.2 ozs. w/sheath)
Overall length: 5.75”
Sheath type and material: Brown leather
MSRP: $190
Knife to know: Thick for its size, the handle is well-rounded and longer than the blade for a solid grip. The blade shape is simple and classic. It’s sharp, pointy and a little thinner than most would expect from TOPS at 3/32-inch thick. A simple leather sheath makes this knife one of the easiest to carry. It’s a simple yet effective workingman’s tool.
Available: NOW
Rick Hinderer Knive XM-18 3.5” Bowie Automatic Aluminum
Knife type: EDC
Designer: Rick Hinderer
Blade length: 3.5”
Blade steel: CPM S45VN stainless
Rockwell hardness: 60-62 HRC
Blade pattern: Bowie
Blade finish: Stonewash
Liners: Patent pending titanium half liners
Scale material: Two options: anodized blue aluminum w/inlay and Arctic Storm w/FCF inlay
Frame material: Aluminum anodized blue
Furniture material: Stainless steel black nitride hardware (add on) and matte black Holey Clip (add on)
Lock: Button lock
Pivot: Phosphor bronze washers
Weight: 5.12 ozs.
Closed length: 4.75”
MSRP: $495
Knife to know: Featuring a lightweight yet durable aluminum handle with patent-pending titanium half liners, this knife offers enhanced strength and stability without compromising on weight. Designed with the EDC enthusiast in mind, it blends innovation, practicality and cutting performance, making it a trusted companion for any daily task or adventure.
Available: 2025
Bear Forest Knives Stumpy

Blade length: 2 1/8”
Blade steel: Nitro V stainless
Blade thickness: 1/8” w/90-degree spine
Grind: Full flat
Finish: Raw matte
Scale materials: Various Micarta®/wood/Bearcarta (check availability)
Overall Length: 5 7/8”
Sheath: Kydex® black (.08” thick)
MSRP: $239.99
Knife to know: The Stumpy checks all the boxes; it defines what is needed in a small utility fixed-blade knife while in the shop or outdoors. At the same time, you aren’t giving up comfort.
Available: NOW
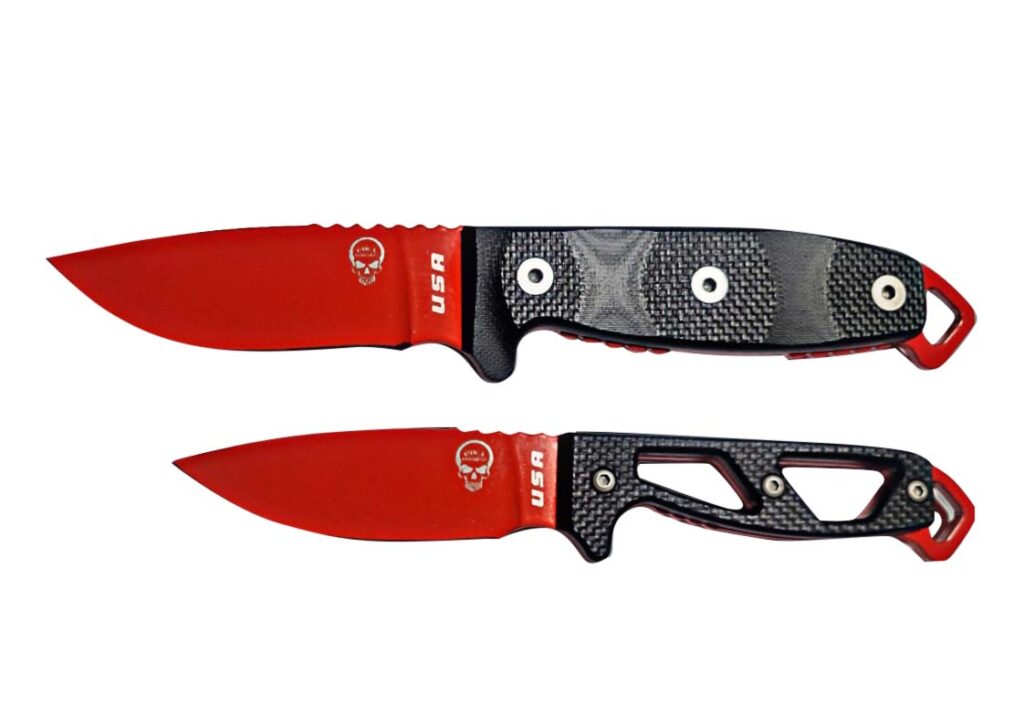
Bradford USA Guardian 3.2
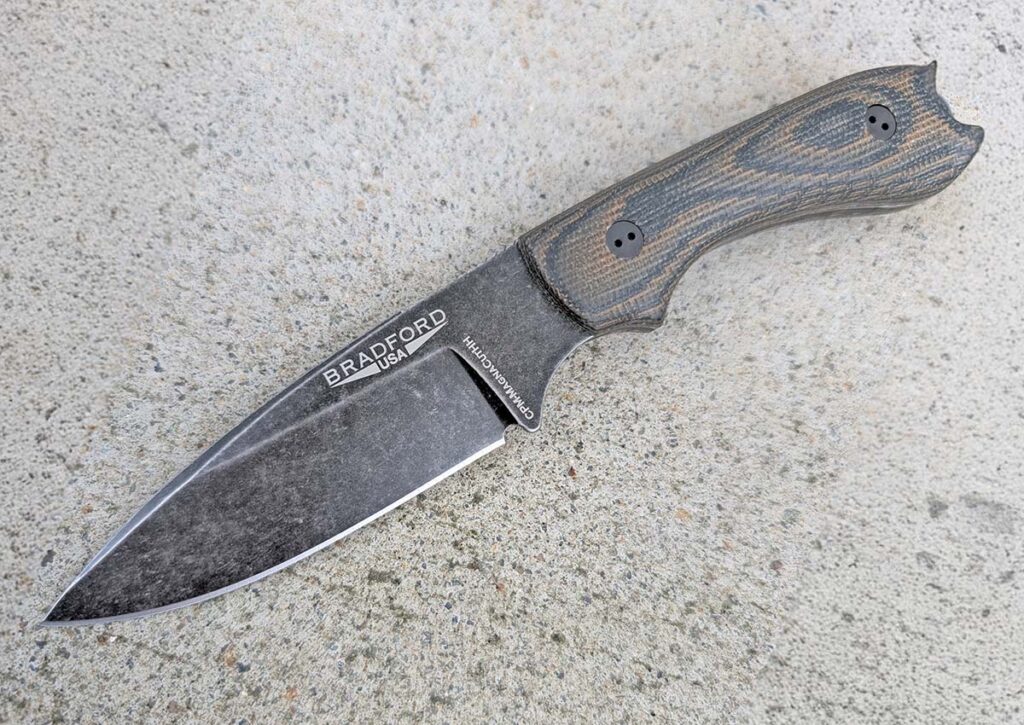
Knife type: Fixed-blade EDC
Blade length: 3.5”
Blade steel: CPM MagnaCut High Hardness stainless
Rockwell hardness: 63-64 HRC
Blade grind: Sabre, false edge, full height flat
Blade thickness: .14”
Scale options: Micarta®, G-10 and carbon fiber
Overall length: 7.125”
Sheath: Horizontal leather
MSRP: $229
Knife to know: Blade also available in a choice of ELMAX and M390 stainless steels
Available: NOW
A.G. Russell Knives California Bowie Knife
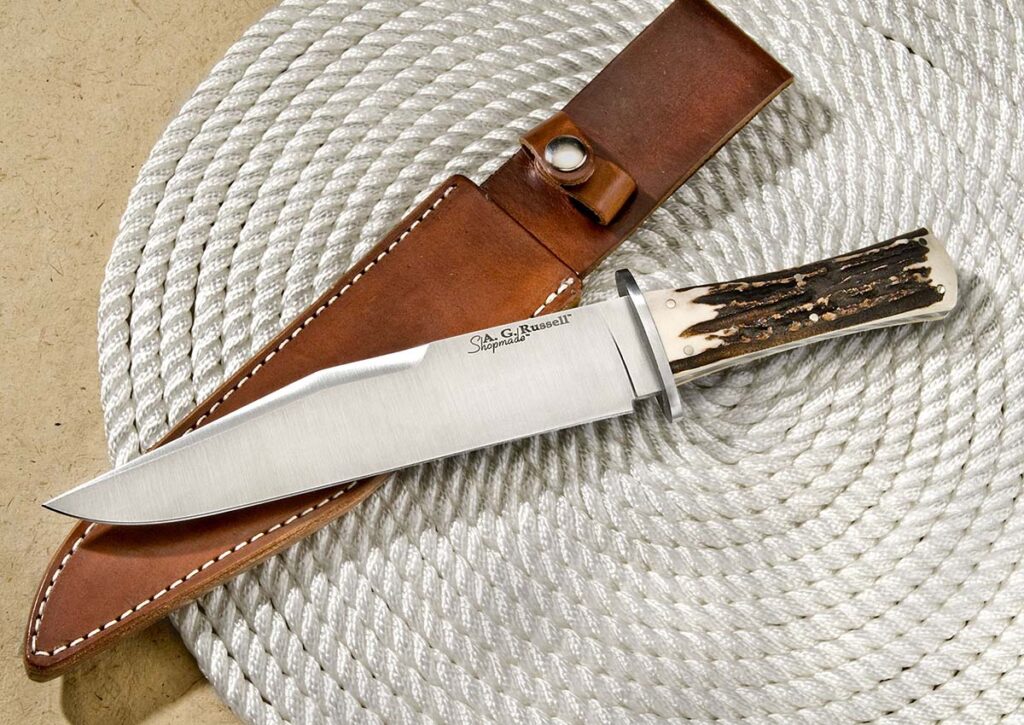
Designer: BLADE Magazine Cutlery Hall-of-Fame® member A.G. Russell
Blade length: 8.5”
Blade steel: 154CM stainless
Rockwell hardness: 59-61 HRC
Blade grind: Flat
Blade finish: Satin
Scale material: Premium India stag
Furniture material: 410 stainless steel
Weight: 10.6 ozs.
Overall length: 13.25”
Sheath type and material: Handmade of leather
Special feature: Long California clip point blade
MSRP: $595
Available: NOW
RMJ Tactical Gym Rat

Designer: Bryan Schellenger
Knife type: Fixed-blade EDC
Blade length: 2 3/8”
Blade thickness: 1/8”
Weight: 2.3 ozs.
Blade steel: Nitro V stainless
Rockwell hardness: 59-60 HRC
Blade finish: Tungsten Cerakote®
Scale material: Three G-10 options: black, dirty olive, hyena brown
Handle fasteners: Torx Grade 5 titanium anodized a bronze color
Barbell bead: Grade 5 titanium
Overall length: 5 1/8”
Sheath: Kydex w/ball chain & ambidextrous clip adapter suitable for pocket and outside the waistband carry
Knife to know: Designer Bryan Schellenger wanted to come up with a small, light but effective blade that could be easily concealed with minimal clothing, and that idea was spawned at the gym; also carries as a necker
MSRP: $185
Available: NOW
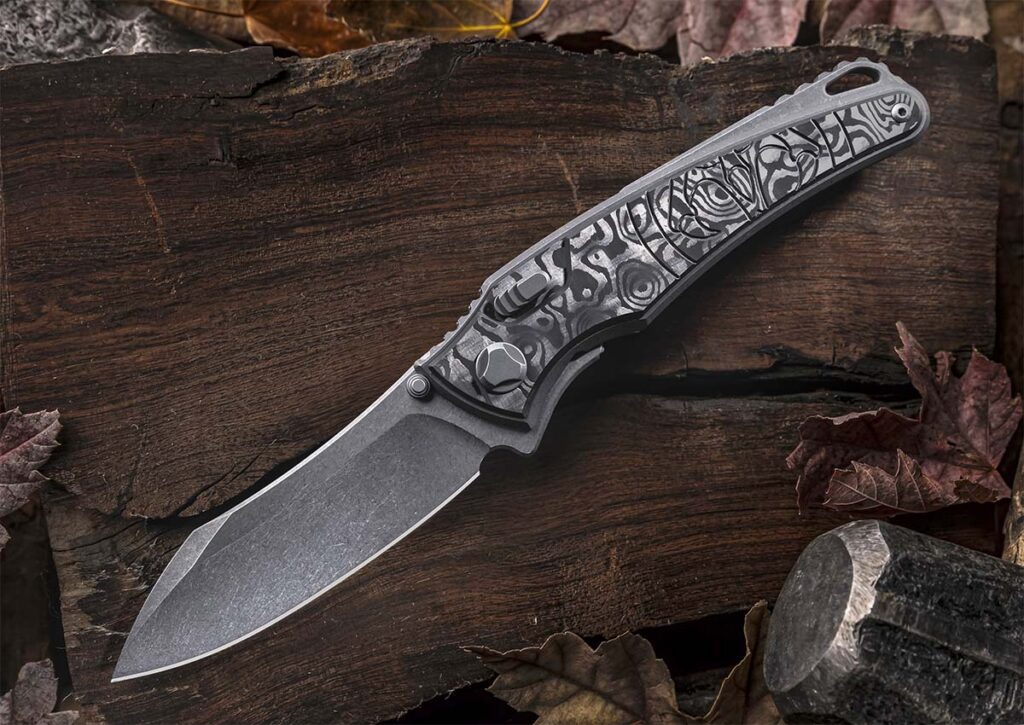
Tactile Knife Maraner 2
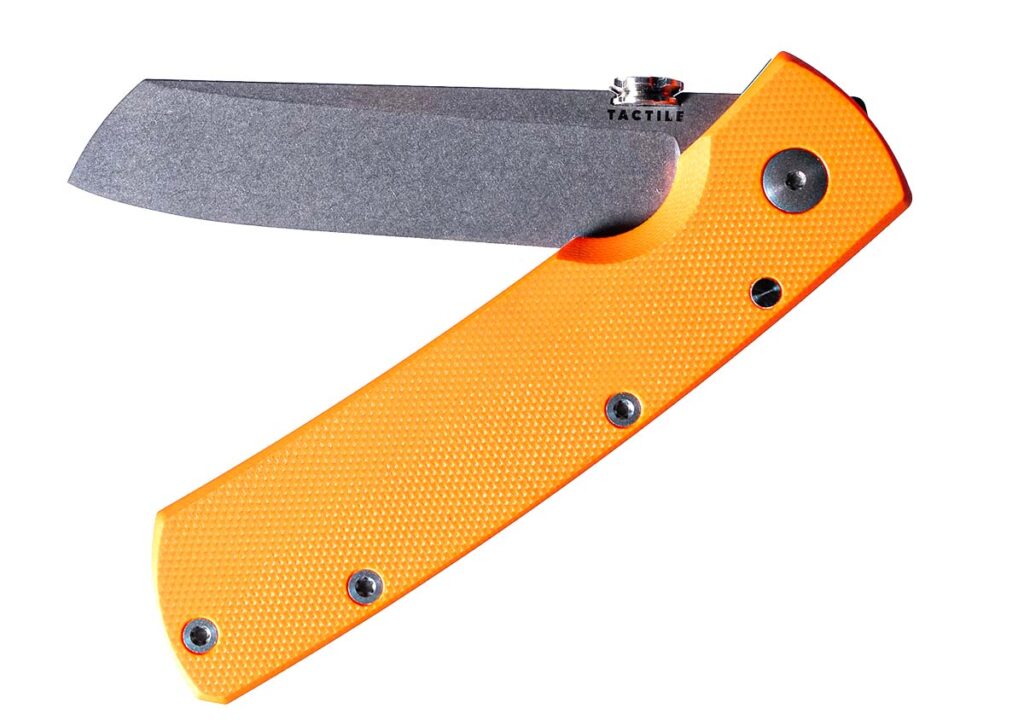
Knife type: EDC
Designer: BLADE Magazine Cutlery Hall-of-Fame® member Bob Terzuola
Blade length: 2.985”
Blade steel: CPM MagnaCut stainless
Rockwell hardness: 63-64 HRC
Blade pattern: Sheepsfoot
Blade finish: Tumbled
Liner material: Hardened stainless lock-bar insert
Scale material: Titanium & G-10
Furniture material: Titanium backspacer
Lock: Insert linerlock
Pivot: Ceramic bearings
Closed length: 4.175”
Knife to know: Designed in 1987; first production variant
MSRP: $399
Available: NOW
Hogue Knives Ballista II
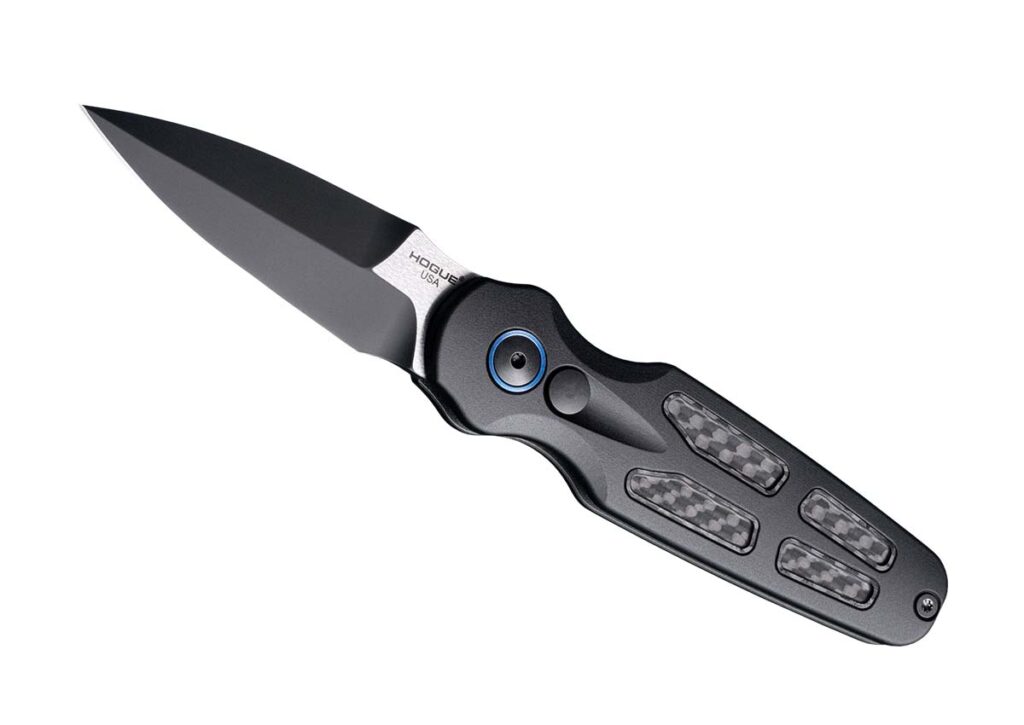
Knife type: EDC automatic
Designer: Scott Bruhns
Blade length: 3.4”
Blade steel: CPM MagnaCut stainless
Rockwell hardness: 62-64 HRC
Blade grind: Flat
Blade finish: Two-tone: stone tumbled and black PVD
Scale material: Carbon fiber inserts
Frame material: Matte black 6061-T6 anodized aluminum
Pocket clip: Deep carry, right-hand carry
Weight: 2 ozs.
Closed length: 3.8”
Special features: Titanium accents anodized blue
MSRP: $239.95
Available: NOW
CRKT Twist Tighe Compact Automatic
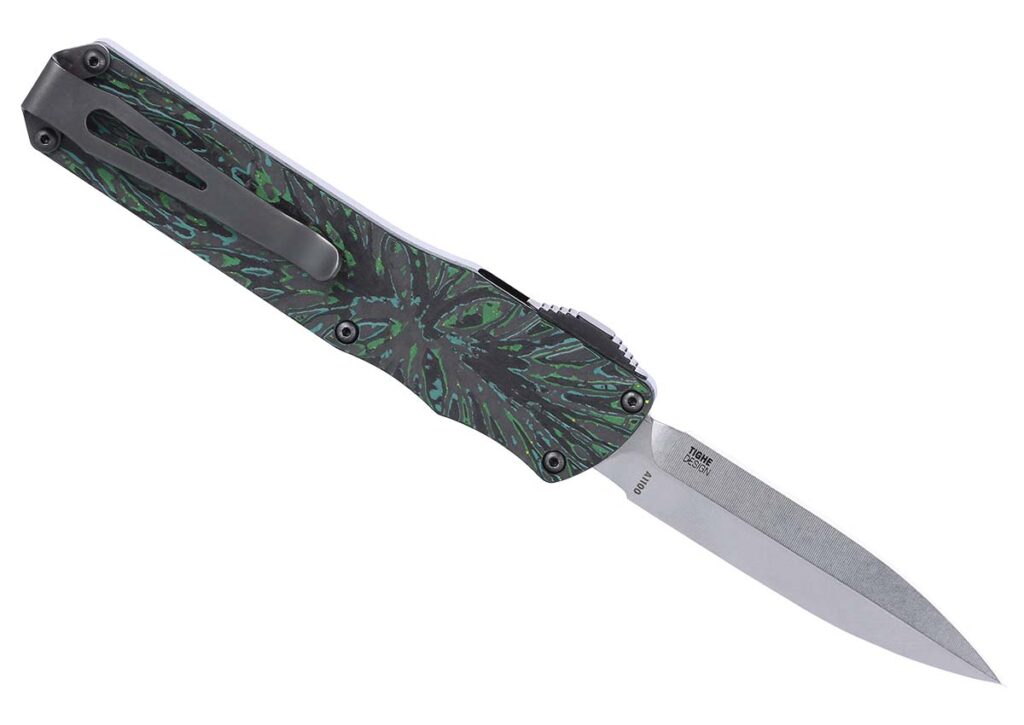
Designer: Brian Tighe
Knife type: EDC OTF automatic
Blade length: 2.69”
Blade steel: CPM MagnaCut stainless
Blade thickness: .09”
Blade finish: Stonewash
Scale material: Green carbon fiber
Weight: 1.6 ozs.
Closed length: 4.01”
MSRP: $300
Available: NOW
Heretic Knives Wraith Auto
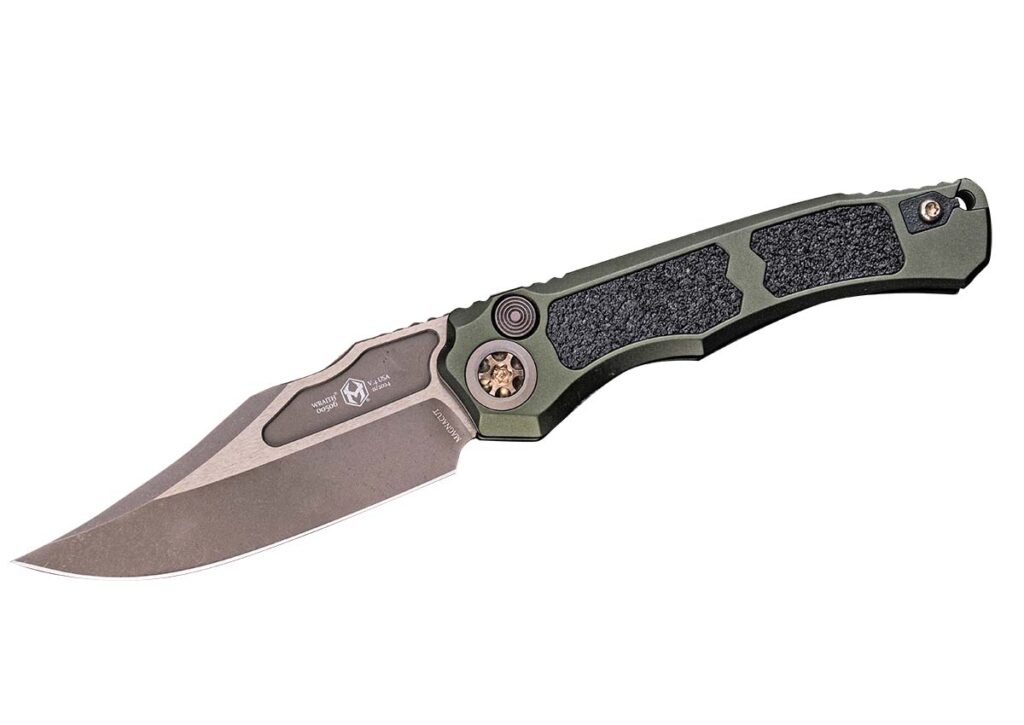
Designer: Anthony Marfione Jr.
Blade length: 3.62”
Blade steel: CPM MagnaCut stainless
Blade pattern: Bowie
Blade finish: Bronze
Scale material: 6061 aircraft aluminum
Furniture material: Stainless steel
Lock: Button lock
Pivot: Caged ceramic bearings
Weight: 6.07 ozs.
Closed length: 5.07”
Special features: Ambidextrous pocket clip, rubber inlays, snappy action
MSRP: $295
Available: NOW
Utica Critical Hit I and II MagnaCut series
Knife type: Tactical, EDC, survival
Designers: Bill Harris, Stephen Schook and Utica team
Blade lengths: 3 and 2.5”
Blade steel: CPM MagnaCut stainless
Rockwell hardness: 61-62 HRC
Blade grind: Flat
Blade finish: Red powder coat
Scale material: Black textured Micarta®
Liner material: G-10
Overall lengths: 8 and 5.25”
Sheath type and material: Critical Hit I ABS sheath w/built-in sharpener and fire striker and reversible belt clip and paracord; Critical Hit II ABS sheath w/belt clip and paracord
MSRP: $170
Available: NOW
Bear & Son 4 ¼” Rancher Sideliner
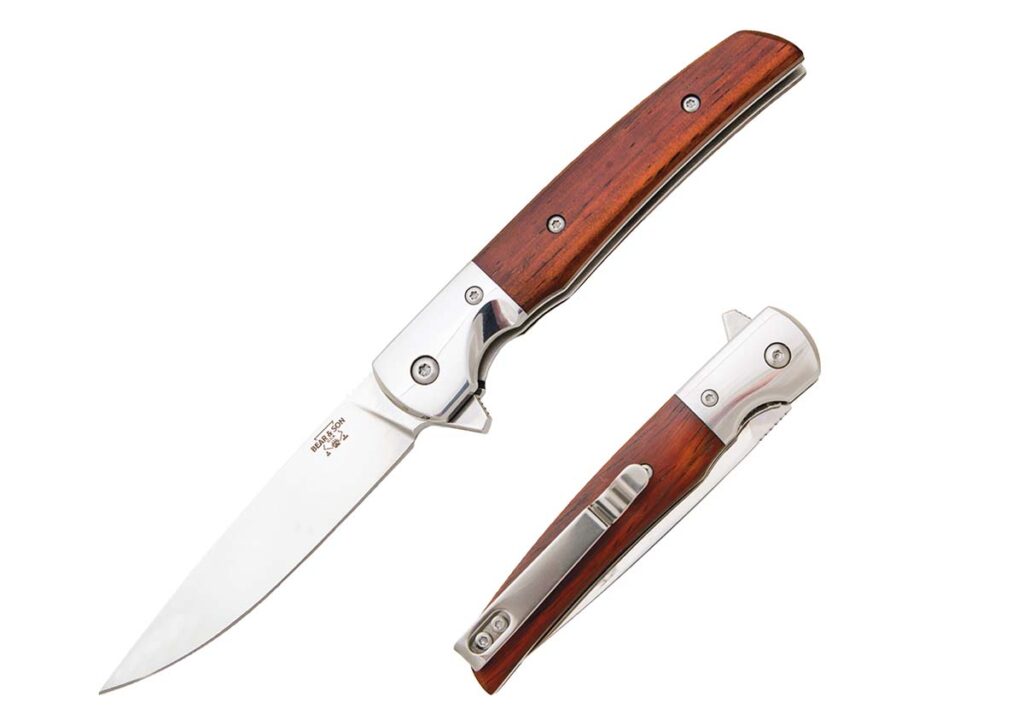
Knife type: EDC
Designer: Bear & Son
Blade length: 3 3/8”
Blade material: D2 tool steel
Rockwell hardness: 59-61 HRC
Blade grind: Taper
Blade finish: High polished
Liner material: Stainless steel
Scale material: Cocobolo
Frame material: Stainless steel
Lock: Linerlock
Pivot: Ball bearing washers
Weight: 3 ozs.
Closed length: 4 ¼”
Overall length: 7 5/8”
MSRP: $95.99
Available: NOW
Benchmade Bailout
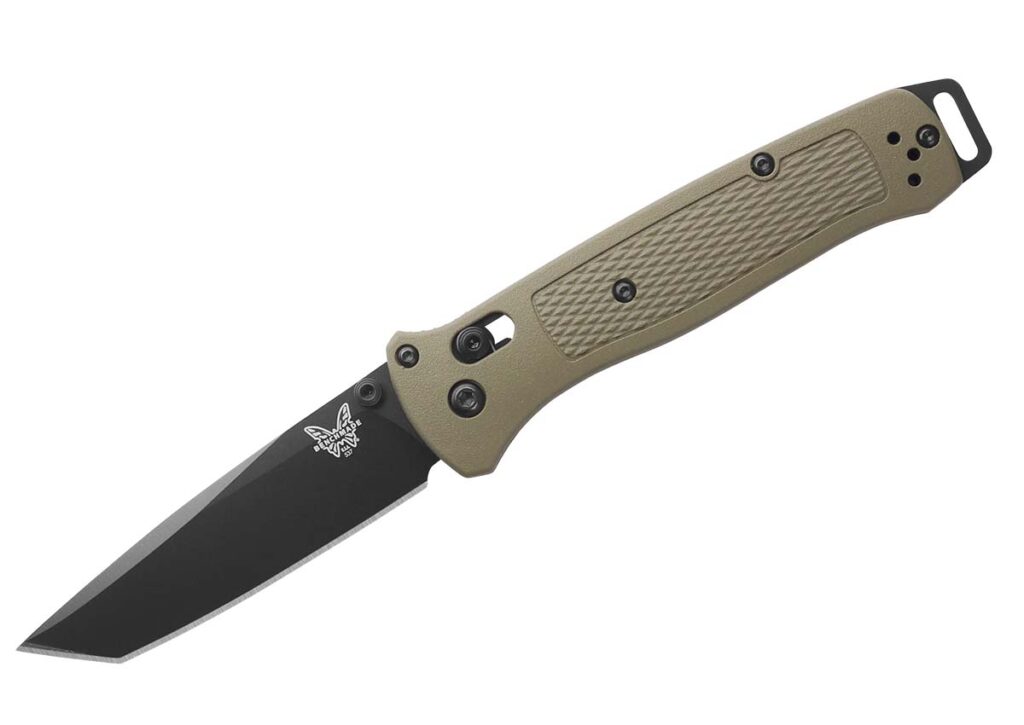
Knife type: Tactical folder
Blade length: 3.38”
Blade steel: CPM S30V stainless
Rockwell hardness: 58-60 HRC
Blade thickness: .09”
Blade pattern: Tanto
Blade finish: Graphite black Cerakote®
Scale material: Grivory® in ranger green
Handle thickness: .41”
Lock: AXIS®
Pommel lanyard: Anodized aluminum
Weight: 2.5 ozs.
Closed length: 4.72”
MSRP: $200
Knife to know: Maintaining its tactical hard-use prowess with a piercing tanto blade, this slim and easily pocketable folder features ultralight Grivory handle scales with highly textured grip zones and CPM S30V steel for superb edge qualities and corrosion resistance.
Available: February