Home Authors Posts by Chris Amos

Chris Amos

Ed’s Quest For Excalibur

0

Remembering Ed Fowler’s 80 Years of Knifemaking.

Editor’s Note: Chris Amos is a kifemaker, writer and close compatriot with the late Ed Fowler. He perhaps knew the knifemaker better than anyone in his golden years and has an interesting perspective in the life of the memorable craftsman.

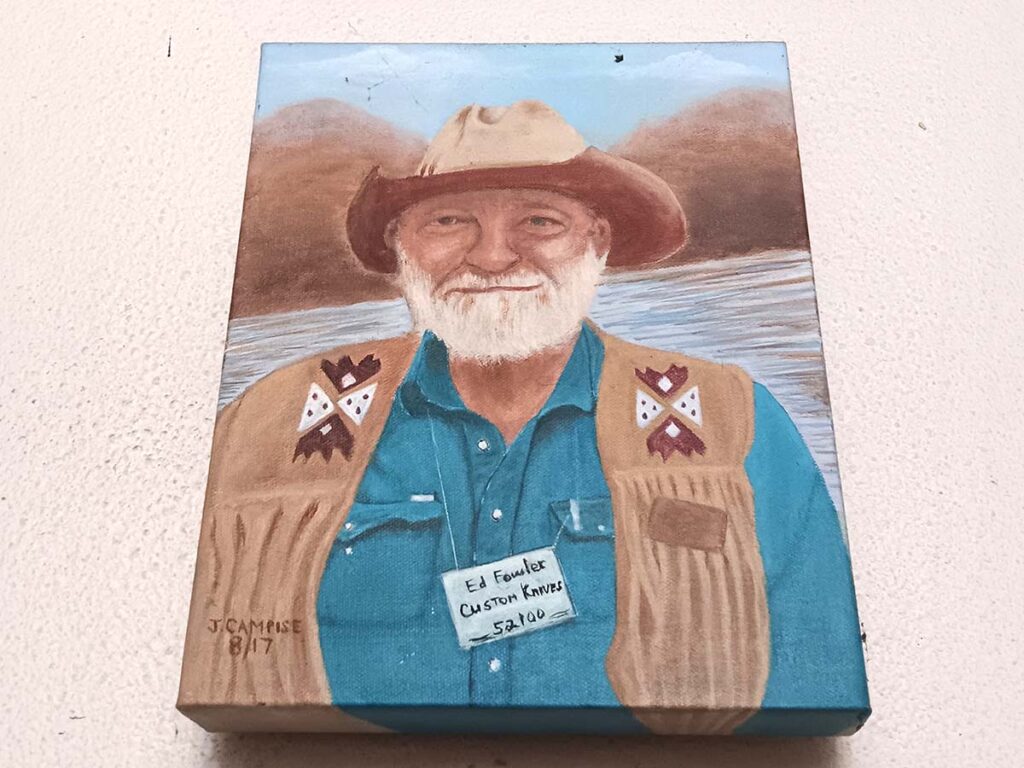
On January 17, 2026, Ed Fowler left the world of mortal men to take his place with the legends of bladesmithing. The High Endurance Performance Knife master smith’s passion for true working men’s knives of history was insatiable. It was the one true love of his life, second only to a good Labrador.

The flyer for his school when I met him 30 years ago, and to this very day, still reads, “Ed Fowler, Author, Cowboy, Friend to All.” This is how Ed approached the world of knives. If we are being honest, it wasn’t necessarily everyone’s experience with him; but it was his intention. No matter what your personal Ed Fowler experience was, I think we can all agree his love of lady knife, his undeniable passion for performance and total commitment to his craft were both impressive and contagious.

A portrait of Ed by his good friend and knife collector Joe Campiese. The knifemaker built a dedicated following among many collectors.

The quest for his own personal Excalibur—the High Endurance Performance Knife—was a lifelong adventure that led him to cross paths with many on a similar journey. That’s how I came to know him so many years ago. I didn’t see his vision at first; I only knew knives as things, not an ideal. But he saw lady knife as so much more.

From his first meeting with ABS founder Bill Moran and BLADE® Magazine legend Wayne Goddard—who would become his lifelong friend and co-conspirator—his path to a 52100 ball bearing steel obsession was sealed. He and Wayne collaborated on the first 52100 knife, and the rest is history. Another longtime friend and BLADE writer, the legendary smith Joe Sizlaski, led him down the road to true skill with a hammer. They collaborated for decades through countless letters and phone calls. Most are still in the filing cabinet waiting to become a book. Over the years in his column Knife Talk, BLADE readers across the world waited patiently for the next nugget of wisdom or anecdote from these great representatives of the world of knives.

As fate would have it, he soon crossed paths with some men who would bring his dreams to life.

Testing His Metal

When Ed first shared his ideas with the conventional world of knives, they met with less than thunderous applause. This changed when metallurgist Rex Walther stumbled on one of Ed’s articles about his multiple-quench method. Intrigued, he contacted Ed, asked a few questions, proposed a few experiments and offered true scientific analysis. As Ed said of this collaboration, “We went from 0 to 100 overnight.” Rex’s feedback became the foundation for all of Ed’s advancements and achievements to come.

At the time, the industry considered a steel grain size as fine as 10* to be possible. Ed reported achieving 15 and finer through his methods, the limit of measurement possible with Rex’s equipment. Later, Kevin Grey, a student at the South Dakota School of Mines, would again not only test Ed’s methods but also write his graduate paper on them, getting them both invited to speak at the Artist-Blacksmith’s Association of North America conference in South Dakota.

One of his happiest moments in recent years was finding out, to his surprise, that he was mentioned in Dr. Larrin Thomas’ book The Story of Knife Steel: Innovators Behind Modern Damascus and Super Steels. Another was his amazement at receiving the 2022 BLADE Magazine Publisher’s Award at BLADE Show.

Ed’s Classroom

I met Ed in the mid 1990s at a knife show in California. I took his class on his ranch near Riverton, Wyoming, around 2007. After that, I traveled several times a year to help him teach, only missing three since that first one. About 15 years ago, I moved to the ranch to apprentice full-time, and the rest is history.

I hope to be here teaching and sharing his legacy and dream of 52100 steel and Excalibur for another 15 years.

Of the countless students who came to learn Ed’s mysterious ways with metal, a few stand out in my mind. The first is a very early student, Jeff Davidson. Jeff is currently an ABS journeyman smith and a passionate forging instructor.

The second is a knife collector and great future maker, whom we will just call “Stan.” He made his way to Wyoming from Taiwan after years of reading Ed’s articles. He is a great ambassador for Ed’s vision of the HEPK around the world.

Ringing The Anvil

I have written many articles for BLADE over the years. As I sit here in Ed’s silent shop, with his last good dog and write the final Knife Talk article from his computer, it’s important you know this isn’t the end.

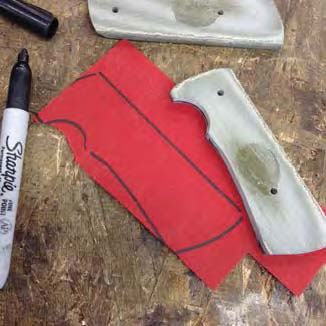
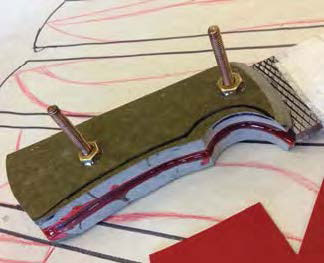
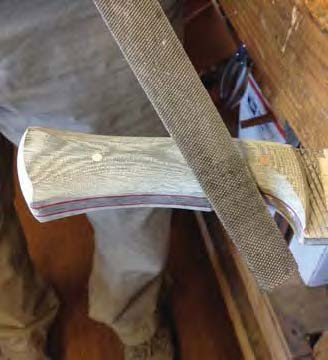
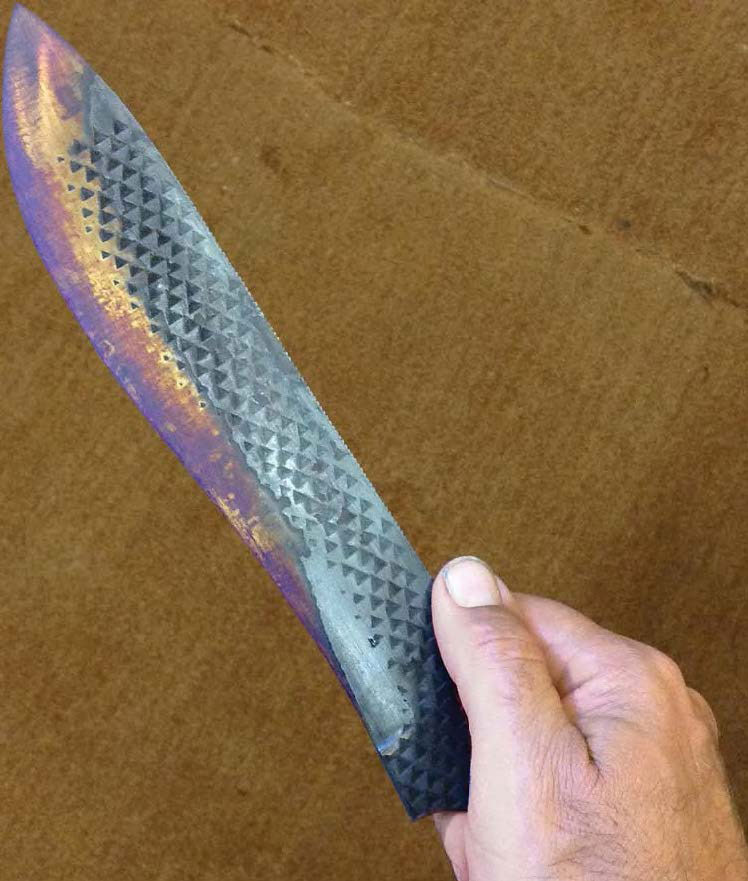
Ed made his first knife, a small wooden knife, at about six years old. He still had that knife. His last completed knife, a light camp in what has become his iconic and signature style, was finished this fall at the age of 86. He didn’t even bother to take a picture of it, just sent it on its way to have its own adventures, never thinking it would be his last. As Willie Nelson said, “The road goes on forever, and the party never ends …”  I think that’s the way he saw it.

For the moment, out of respect and because it could use a little rest, his hammer sits in silence. But soon enough, his forge will be lit again, his anvil will ring and the knife talk will go on. Ed would have wanted it this way—as it should be.

*ASTM grain size quantifies the average grain size of metallic materials using a number, where higher values indicate finer, smaller grains.

Remembering Others The Knife Industry Has Lost:

Make a Handle for a Bowie Knife in 10 Steps

0

Editor’s note: This article is the conclusion to Make a Bowie Knife in 10 Steps. Read that one first if you’re interested in making a complete knife from start to finish.

1) Choose the Material

tips for making knife handle
For handle material, I chose olive drab G-10 with a simple red liner for a little flair. The choice for your handle material is up to you.

While the material used, the rasp, is classic and traditional, the handle material will be more modern. I’ve chosen olive drab G-10 with a simple red liner for a little flair. Any material you like would be fine. It’s your knife and the handle is the easiest place to express your personal taste.

2) Lay Out the Scales

step by step make knife handle
Trace the handle profile. I use a black magic marker since the G-10 won’t absorb the ink.

Now that we have our materials it’s time to start laying out our scales. Trace the handle profile. I use a black magic marker since the G-10 won’t absorb the ink.

If you use a natural or unstabilized material, a pencil might be a better choice to avoid staining or permanent marks.

3) Mark the Holes

drill holes for knife handles
To help ensure your holes will line up, make a light mark with a hand drill and finish in a drill press to help ensure the holes are square and true.

Mark the holes you need to drill on one side of the pair of scales. To help ensure your holes will line up, make a light mark with a hand drill and finish in a drill press to help ensure the holes are square and true.

4) Sand, Drill and Glue

making knife handles
A simple light sanding will flatten the scales and rough up the surface for a better bond. Drill the holes in one scale, place a drop of Super Glue® on the flattened inside surface, and glue the two scales together.

One important thing to remember when doing anything is to never assume. While the handle scales look flat they in fact are not. A simple light sanding will flatten them and rough up the surface for a better bond.

Using the drill press I drill the holes in one scale, place a drop of Super Glue® on the flattened inside surface, and glue the two scales together. This ensures the scales will stay perfectly matched up as you drill your holes and do the rough shaping.

5) Profile the Scales

knifemaking scales
Profile the front of the scales while they are attached by the light glue bond.

Another important step is to profile the front of the scales while they are attached by the light glue bond. First, it is very difficult to clean up the front once it is attached to the blade without scuffing and scratching the blade. Second, it ensures that the faces of the scales will match up just like the holes do.

6) Pop them Apart

make knife handle spacers
Place the edge of a blade on the seam between the scales. A light tap will pop them apart easily and you are ready to add any spacer material if so desired.

Once the holes are drilled and the rough shaping is complete, simply place the edge of your everyday carry blade on the seam between the scales. A light tap will pop them apart easily and you are ready to add any spacer material if so desired.

7) Trace, Cut and Glue

knifemaking handle
Trace the handle shape onto the spacer material, cut to rough shape and then glue to the inside of the scales.

Trace the handle shape onto the spacer material, cut to rough shape and then glue to the inside of the scales. Super Glue or epoxy is fine for this. Different materials will need different bonding agents. I use Super Glue here because the materials are very non-absorbent. If you choose antler or unstabilized wood, an epoxy is probably a better choice.

Once the material dries, clean up the edges and drill through to match the existing pin holes. A hand drill is fine for this as the holes in the scales will guide the bit.

8) Assembly

Knife handle pins
Now you’re ready for assembly. For pins the author uses two simple brass bolts. Use the pins themselves to clamp the scales in place by simply adding a nut and snugging it down after applying epoxy.

Now you’re ready for assembly. I’m going semi traditional and keeping the build simple. For pins I use two simple brass bolts. The advantage is I can use the pins themselves to clamp the scales in place by simple adding a nut and snugging it down after applying epoxy.

Also, the threads on the bolt help add an extra mechanical bond to the handle assembly.
Once you’ve checked the fit of the parts, give them a good spray with brake cleaner to be sure they are free of dirt and oil and to ensure a clean bonding surface.

9) Get the Pins Flush

knifemaking handles knives
Clean off the head of the bolt and then extra length of bolt body on the nut side, and your pins will be flush.

After the epoxy dries, take your angle grinder or whatever you have been using—a file or hacksaw will do as well—and clean off the head of the bolt and the extra length of bolt body on the nut side, and your pins will be flush. When doing this be sure to work slowly! Brass heats up very quickly and that can compromise the bond of the adhesive if you’re using power tools.

10) Clean and Shape

Learn how to make knife from a rasp file
Jump into the rich tradition of knifemaking with this collection of essential books from BLADE. You’ll save a bundle with this bundle!

You’re almost to the finish line. All that’s left is to clean up your handle and shape it to fit your hand. When you do this, again, take your time.

Once you remove any material, you can’t put it back. Go slowly and check the fit often till it fits like a glove, an extension of your hand.

Do some cutting and chopping with the knife—this will let you know what, where and how much material you need to remove.

Work through your sandpaper grits to whatever final finish you desire and voila! Your personal vision of knife perfection is in your hand.

I hope you enjoyed this journey of steel as much as I have. Now get out there and put that knife to work!

Make a Bowie Knife in 10 Steps

0

bowie knife guide to knifemaking
This is what the finished project looks like. The handle is not covered in this tutorial, but the design is ready to take any number of options. (All images by the author)

I’m going to walk you step by step through making a bowie from a common farrier’s rasp, as simply as possible, with a few tips to save time and improve the finished blade as we go. It is a simple bowie-style camp knife useful for all sorts of tasks.

1) Pattern Sketch

knifemaking bowie
The author traced assorted patterns on the rasp images on a large sheet of paper so he could compare each style side by side and see what works and what doesn’t.

The first thing you need to do is decide on a style that suits your needs and your purpose. I find that visual aids are the easiest way to get the results I’m after, so I often do several sketches and drawings to decide what I’m trying to accomplish.

For this I traced the rasp multiple times on a large sheet of paper so I could compare each style side by side and see what works and what doesn’t, as well as what the maximum potential of my material was. I decided on blade shape #4 with handle shape #5. The combo should be a good general chopper and comfortable in the hand.

By visualizing this way I can mix and match infinitely. Don’t be afraid to get creative, especially when using recycled and often-free materials. This is a chance to express yourself and your vision in steel.

2) Annealing

tutorial for making knives
Heat the rasp to nonmagnetic and then bury it in a simple metal toolbox filled with clean wood ash.

Now you have a design in mind, but, before you can achieve bowie knife greatness, you must anneal the rasp so it can be shaped, drilled and ground more easily.

It is certainly possible to make a rasp or file knife without annealing, but great care must be taken not to get the steel too hot and ruin the temper. Moreover, the high hardness of the file in its current state means a blade made this way would be very brittle and prone to breaking under hard-use conditions.
If you have access to a heat-treating oven, by all means use it to anneal your steel. This is a very simple and basic build, so I’ll be heating the rasp to nonmagnetic and then burying it in a simple metal toolbox filled with clean wood ash. Burying it insulates the steel, allowing it to cool very slowly. The slow cooling softens the steel so it’s easier to work.

Vermiculite is also great for this step if you don’t have access to wood ash. Vermiculite can be purchased at most garden centers and insulates very well. It will take several hours for the rasp to cool. Don’t rush it! It will be well worth it once you start filing, drilling and grinding.

3) Design Transfer

how to make a knife
Once the teeth are cleaned off, transfer the blade design to the rasp.

The rasp has cooled and it’s time to go to work. The first step is to grind the teeth off both sides. This leaves a nice, flat surface to work with but the memory of the rasp is left behind, which gives the knife a distinctive, rugged look.

An angle grinder will work great for this task, but any number of basic tools will suffice. Use whatever is readily available to you. Once the teeth are cleaned off , transfer the blade design to the rasp. Cutting out the pattern and over spraying it with black paint works very well.

However, since this design is fairly simple, I drew it out with a permanent marker.

4) Notched & Cleaned Up

steps for making a knife
When you go to cut out the profile from the rasp (left), notching out the shape with a hacksaw or cutting wheel (right) makes the job much easier.

Now you can start cutting out the profile. Notching out the shape with a hacksaw or cutting wheel will make the job quite a bit easier. I find that removing small pieces of metal is easier then trying to make large cuts.

After the bulk of the steel has been removed, the final profile can be shaped out with files or an angle grinder.

5) Drilling Pins

guide for making a knife
Drill a couple of holes for pins. The author uses brass bolts for the latter.

The blade is starting to take shape. Now is a good time to consider what handle material is best for your creation.

There’s no wrong choice. With the seemingly limitless options available today, you can truly express yourself from mild to wild. If you’re feeling traditional you can go with antler or perhaps stacked leather.

If you want to go more cutting edge, there are hybrid burl blocks with every color resin in the rainbow. Shredded money and eggshells are even finding their way into knife handles these days.
I’m going more traditional, so now is the time to drill a couple of holes for pins. I’m going to use brass bolts as pins. They are inexpensive and can be bought at any hardware store. The threads add an extra mechanical bond when they are epoxied into place, and also act as built-in clamping devices to ensure a solid, tight fit-up when the scales are applied.

6) Grind the Bevels

guide to how to make a knife
Rough grind the bevels. The author used a 4-inch angle grinder. Leave the edge about the thickness of a penny.

With the profile cleaned up and all necessary holes drilled, it’s time to start grinding in the rough blade bevels in order to get your blade ready for hardening.

The trusty 4-inch angle grinder goes to work again, though a bench-top grinder or even a good, sharp file will get the job done. The goal here is simply to remove the bulk of the metal on the sides of the blade evenly so there is less work to do after hardening.

Don’t grind all the way to sharp at this point! Leave the edge about the thickness of a penny—this will protect the steel that will become your cutting edge from overheating and decarburization, helping to ensure your finished knife will live up to its maximum potential.

Once the bevels are roughed in, finish up with sandpaper or a flap disc to 220 grit. Be sure to remove any deep, heavy scratches, as these could lead to cracks during hardening.

7) Heating and Quenching

Bowie knife tutorial step by step
After you heat the blade to nonmagnetic, quench the edge. 

Now you’re ready to harden some steel! I’m going to use a forge to heat the blade to nonmagnetic—aka the critical temperature—though a torch works equally well.

Slowly bring the blade up to temperature and check it oft en with a magnet. When nonmagnetic is reached, edge quench to harden the cutting edge, and leave the spine slightly softer for additional strength and toughness.

Submerge the blade in the quench oil once all the color has left the blade and it goes to black. Allow the blade to cool to room temperature in oil. This will take an hour or so.
A variety of things will work as quench oil and everyone has a favorite. Depending on the types of steel used, I’ve had good luck with canola oil, ATF transmission fluid and mineral oil. I quenched my blade in Texaco type A.

WARNING! Mixing hot steel with oil can and will cause a fire! Be sure to take appropriate safety precautions. A well-ventilated space free of other flammable materials, as well as personal protective gear and a fire extinguisher, are musts!

8) Check for Hardening

knifemaking process bowie knife
Once the blade has cooled, remove it from the oil and clean it off. Brake cleaner works well for this, as well as simple dish
soap and warm water.

Once the blade has cooled, remove it from the oil and clean it off . Brake cleaner works well for this, as well as simple dish soap and warm water. If the hardening was successful, you should see an area of clean steel on the cutting edge where the carbon scale has popped off the blade.

A second simple and easy way to check for a hardened blade is with a fresh, sharp file. Run the file over the knife’s cutting edge. The file should skate easily and not bite into the edge. If this is the case, you are ready to temper the blade.

9) Tempering

tempering heat treating knifemaking bowie
During the basic heat treatment and tempering process, the steel oxidizes and the clean portion changes color.

Tempering is a fairly simple process. Basically, in order to reduce brittleness and increase toughness, tempering is heating the blade to a lower temperature than you did in the annealing step.

Again, if you have access to a heat-treating oven, by all means use it. However, a toaster oven or basic household oven will work just as well. Oven temperatures vary greatly—especially toaster ovens—since they lack heavy-duty insulation. This means the exact temperature you need to use will vary as well.

I start by putting my blade in the oven for an hour at 375°F. As the steel heats it oxidizes, and the clean portion changes color. This is a simple, basic heat treatment and temper, so the color change is your indicator rather than an exact temperature.

As the heat rises the color goes from a bright gold to a shade of bronze straw, then a light purple to a blue on its way to a dark blue/almost black. The dark bronze to purple is your goal. The blade should be hard enough to hold a good edge but soft enough to not chip or break during use.
I did three one-hour cycles, each 25°F hotter according to my oven, and 425°F was the temperature that gave me the desired result. A simple trick to get a more even heat in a regular household oven is to put a sheet pan on the bottom rack.This holds heat closer to the element and keeps the temperature fluctuations to a minimum.

10) Finishing and Final Edge

Learn how to make knife from a rasp file
Jump into the rich tradition of knifemaking with this collection of essential books from BLADE. You’ll save a bundle with this bundle!

Now you have a hardened and tempered blade ready for finishing and a final edge.

You need to remove only a small amount of steel to get down to the final edge. Don’t rush at this point! Go slowly to keep from getting the steel too hot and ruining all your hard work up to now. As long as the steel stays bright and shiny you will be fine. Any discoloration at this stage means overheating and the risk of losing the blade temper.

You also are working down to the final, finished and sharp edge. Stitches aren’t cheap! Be aware of where your fingers are.

Some light grinding or fi ling as in the previous steps will bring your bevels down to the finished edge. Polish to at least 220 grit. A higher-grit polish will look more finished, as well as be less prone to rust, and provide smoother, more fluid cuts.

Once you get to 220, it’s time to apply an edge and see how you did. Some simple test cutting and chopping will tell you if you need to change anything, such as the thickness of your cutting edge or if you need to re-temper perhaps a few degrees hotter. Use the materials you originally planned on cutting with your new bowie to decide this.

For example, since the blade primarily will be a camp knife, simple tests such as splitting kindling, cutting rope and twine, and making the all-important hotdog stick will tell you what you need to know.

Time to Make the Handle

Click here to read how to make a handle for this knife.


Advertisement

Must Read Articles

Read this before you make a knife

Knifemaking 101 – Read This Before You Make a Knife

  by Wayne Goddard My experience has taught me that there's nothing like digging in and getting started. I've often said the hardest part of the...
how to forge damascus steel

How to Forge Damascus

Advertisement
Advertisement