The blade is perfectly flat and parallel and it is time to correct the pivot pin hole. After heat-treating, bending the steel, flattening and surface grinding, the pivot hole is not perfectly perpendicular to the two sides.
I run a ¼-inch carbide reamer in the hole to recondition it. I then take a barrel lap, charge it with diamond paste and run it in the pivot hole. With the barrel lap, I am not trying to enlarge the hole too much but I am trying to produce a smoother and more concentric hole. This will enhance the action of the blade.
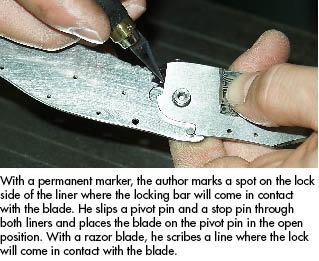
I take the two liners, and with a permanent marker, I mark a spot on the lock side. This is where the locking bar will come in contact with the blade. I slip a pivot pin and a stop pin through both liners. I use both liners because it will give me a little more support for the stop pin and pivot pin. I then place the blade on the pivot pin in the open position. With a shaving-sharp razor blade, I scribe a line where the lock will come in contact with the blade.
I carefully cut as close as I can in front of the scribed line. The band saw blade will come in contact with the ¼-inch hole in the liner, and since the band saw blade that I use is ¼-inch wide, the hole allows me to rotate the liner 90 degrees to complete the cut for the locking bar. The advantage of doing it this way is that you can keep your locking bar relatively parallel to the contours of the handle from one end to another.
If the locking bar is not parallel due to a straight cut, when you bend your spring, you will have thin and thick spots throughout your bar.
I split a 400-grit belt and I run it as a slack belt, enabling me to look at the liner while I clean the band saw cuts. After this is done, I grind the lock face to the scribed line. I de-bur my liner and bend the locking bar about 3/16-inch high. Now the knife is ready to be fitted.
I take the liner with the locking bar, insert a pivot pin, then I place my blade using the two washers and, finally, assemble the knife. At this point, I can open and close it to see if anything looks out of place. The two stop pin holes are exposed so I can insert pins and verify if the knife is working in both the open and closed positions.
Since the folder is of open-frame construction, the ball detent on the locking bar is exposed. When the blade is in the closed position, against the stop pin, I am able to locate and spot the blade where the ball detent will fall.
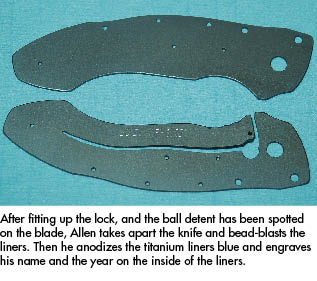
After I fit up the lock, and the ball detent has been spotted on the blade, I take apart the knife and bead-blast the liners. Then I anodize the titanium liners blue and engrave my name and the year on the inside of the liners. I place the completed liners with the rest of the parts already finished.
I take the blade, and with a carbide drill, I drill the ball detent hole. Next I polish the etched surfaces of the damascus one final time. This is to remove any type of scratches that might occur when fitting the lock. I clamp the blade onto a piece of steel so I can hand rub the flats. I take a flat piece of Micarta and hold wet/dry sand paper tightly against it. I then move it back and forth against the flats of the blade.
 NEXT STEP: Download Your Free KNIFE GUIDE Issue of BLADE Magazine
BLADE’s annual Knife Guide Issue features the newest knives and sharpeners, plus knife and axe reviews, knife sheaths, kit knives and a Knife Industry Directory.Get your FREE digital PDF instant download of the annual Knife Guide. No, really! We will email it to you right now when you subscribe to the BLADE email newsletter.


