Forge Beveling & Blade Tipping Are Necessary Skills For Any Fledgling Knifesmith To Learn. Here’s The Skinny On Both.

TIP: The most important principle in this section is to overlap hammer blows. The right edge of your previous hammer blow becomes the center point of your next hammer blow.
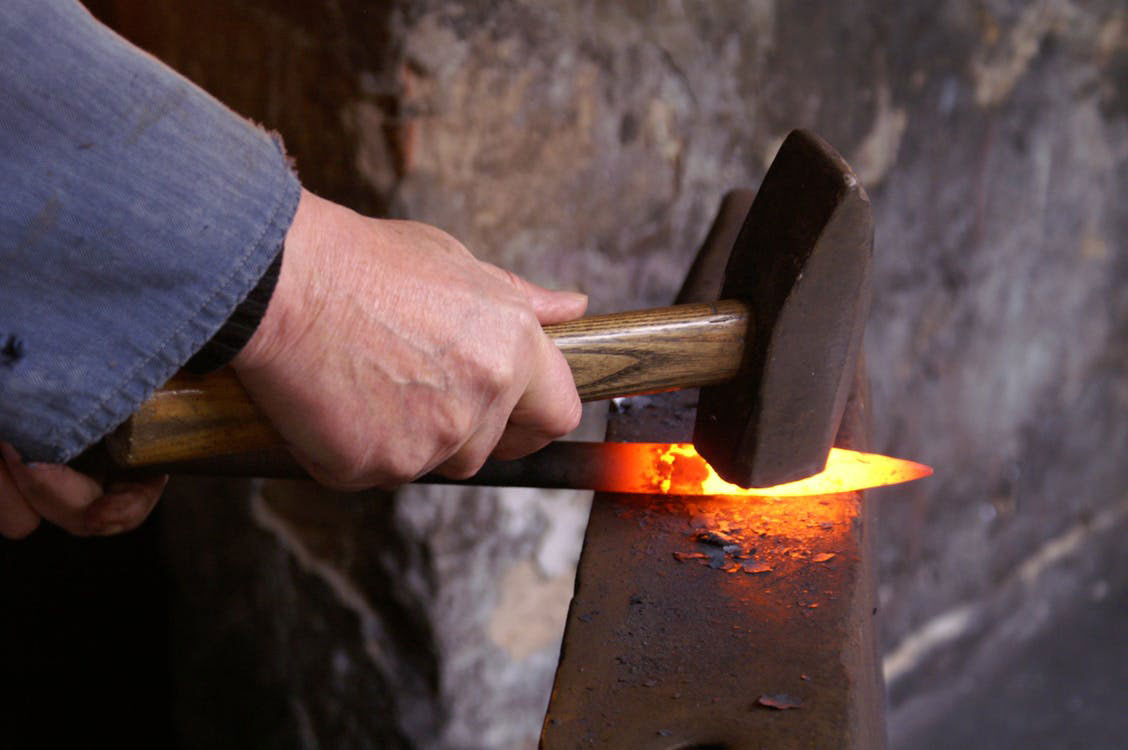
Forge-beveling allows a consistent pushing of the hot steel in all directions at each blow. The physics are consistent, predictable, and reliable. At each strike, the force of the rounding hammerhead pushes the bottom half of the blade and the spine in opposite directions. The tip-to-choil forces are contained for the most part by the blade’s mass.
It’s much like when the smith makes breakfast sausage patties. Imagine pushing the center of that sausage patty down with the heel of your hand (hammer) against the counter (anvil). The patty spreads out in all directions with a dimple in the center, the same as the steel. With repeated overlapping blows the bevel thins and widens downward as the spine stretches upward. The resulting geometry is a thinning and reshaping of the blade between the cheek line and the cutting edge. A bevel is forged and formed with your rounding hammer, anvil and blacksmith’s eye.
Once forge-beveling is mastered you can actually form a hollow “grind” by hollow forging (another lesson, another book).
NOTE: Look at a knife with the pommel to the left and the point to the right, cutting edge down and spine up. For reference and description, this is the right side of the blade.

Setting the Bevel
The forge-beveling procedure is advanced forging. Beveling with a hammer is a blacksmith secret used by few these days. Learn this method and you will certainly be connected to the smiths of old.
This forge-beveling procedure takes me six heats or more, at minimum; three on each side. Theoretically, one heat per line, three lines per side (explained below in Half, Fourth, Eighth). Make these passes down the bottom half of the blade traveling its full length. Because you might be a beginner it may take many more passes than six.
You may need more heats due to being hammer shy or because of rookie hesitation. You may start and stop frequently due to under-heating, overheating, dropped blades, re-positioning your piece or “Where’s my hammer?”. All of those are OK. We all do them.
Half, Fourth, Eighth
Let’s go through the forge-beveling principle. First think of cross-section geometry. Develop a visual in your brain of the relative distance from the center point of the hammer face to the bottom one-half of your blade as you travel along its length from ricasso to tip.
Do this by visualizing one-half, one-fourth, and one-eighth. If we were to saw a blade vertically in half and view its cross-section, we would see that its shape is thickest at the top, along its spine. It holds that dimension down to the cheek (about the halfway point) and then dramatically loses thickness as it approaches the cutting edge. This is the bevel. Your bevel. Think halfway from cheek line to cutting edge. This is the 1/2 line.
This traditional way to set this bevel can only be acquired with dozens of latitudinal hammer strikes passing from left to right at those three descending levels: 1/2, 1/4, 1/8. Remember one-half, one-fourth, one-eighth.

NOTE: This 1/2, 1/4, 1/8 business does not mean fractional inches. The fractions refer to the position of your hammer’s center face on the horizontal bar (i.e. halfway, a quarter of the way, and an eighth of the way from the edge to the cheek).
Remember this is a theoretical thing becoming a real thing. The blade is 1-inch wide, and the face of a 2.5-pound rounding hammer is about 1.5 inches. Think exact center of a hammer face on those latitudinal forging lines.
TIP: See the author setting the bevel on YouTube. Search for: Paul White FORGED.
Try not to strike above the imaginary cheek line that runs about halfway between the spine and edge. Your hammer passes will form the cheek line. The final cheek line usually falls well above the halfway point because maintaining that line exactly in the center is almost impossible with a round hammer face, your billet bouncing around on the anvil, and you’re trying to hit on exact points. However, the primary objective is to maintain the original thickness in the spine (1/8-inch) as far down to that halfway line as possible.
Blade Tipping
Each pass will require a slight upward tipping of the spine to acquire about a 10° to 12° angle to be set in the bevel as you hammer. It takes a simple inward twisting of the wrist to keep the blade from resting flat on the anvil face. It must be done at each horizontal pass. This smartly places just the right amount of bevel angle. After a few passes, the blade will “find” that angle as you place it down.
After a complete pass from choil to tip on the right side of the blade, flip the piece over, tip to 10° to 12°, place at the top of the anvil, and do the left side. This is the place to use your indexing skills. It takes most smiths some time and practice to fully master this concept. I’ll go over this beveling thing a couple more times. Read this whole section and look at the drawings and photos several times before doing this.
TIP: Sometimes it takes fewer total passes than I indicate in this book. This is due to the individual smith’s power and/or heat control and/or blade position and/or hammer penetration and/or steel composition. There are lots of variables. If your blade is almost straight after fewer than the recommended strikes or passes, back off on the heat and/or reduce the power or reduce the passes. If you place blows beyond what is needed, the blade will curve upward. Usually, fewer strikes per pass will be necessary as the beveling chore proceeds. This happens because the smith usually increases his or her power and confidence as time at the anvil is increased. Also, the bevel becomes thinner with repeated heats requiring less steel to be moved.
The forging sequence is as follows. Take a heat. Place the blade at the bottom of the anvil. Tip to 12°. Place overlapping blows down the blade on the right side at the 1/2 line. Take a heat. Flip to the left side of the blade at the top of the anvil. Tip to 12°. Forge down the left side at the 1/2 line at the top of the anvil. Take a heat. Flip to bottom. Tip. Place blows down the right side of the blade at the 1/4 line. Heat. Flip. Tip, down the left side at the 1/4 line at the top. Take a heat. Flip. Tip and down the 1/8 line on the right side. Heat. Flip. Tip. Then down the left side at the 1/8 line. Your blade should be nearly straight after three or five passes and however many heats as needed.
By hammering in this 1/2, 1/4, 1/8 method you will “set the bevel” of your knife in the traditional way, FORGING! Ninety-three percent of all bladesmiths set their bevels at the grinder. I have met only a handful of smiths that do this the old way. You’ll be the only blacksmith in the surrounding ten counties that sets the bevel with your three-pound hammer!
Do not strike randomly up and down the blade or space-out (i.e. not overlap) your blows and expect anything good to happen.
BLACKSMITH SECRET: To gauge forging heat have a wooden box close by and away from any direct light. Hold your blade in the box to see the true forging heat. Even when hot the “red” is sometimes difficult to see in a lighted room. However, the red will show in the shade of your box. This means you are above forging heat and will thus avoid potential edge cracks. Remember this is high carbon steel and your working parameters are narrower. Iron can be worked over a greater temperature without damage. At the end of each forging and before you lose forging heat in your blade use the last few seconds to straighten and align your work. Make all lines right with the world.

You can buy Forged: Making A Knife With Traditional Blacksmith Skills here
 NEXT STEP: Download Your Free KNIFE GUIDE Issue of BLADE Magazine
BLADE’s annual Knife Guide Issue features the newest knives and sharpeners, plus knife and axe reviews, knife sheaths, kit knives and a Knife Industry Directory.Get your FREE digital PDF instant download of the annual Knife Guide. No, really! We will email it to you right now when you subscribe to the BLADE email newsletter.


