Knife edges come in all different styles. We break down the major types in this quick guide to blade grinds.
Cutting performance is greatly influenced by the way in which the maker grinds the knife. Each grind will have different cutting characteristics. A good knifemaker will consider whether the grind of the knife is suited to the chosen task. You as a buyer will also need to consider if the grind of a knife will suit the tasks you have in mind.
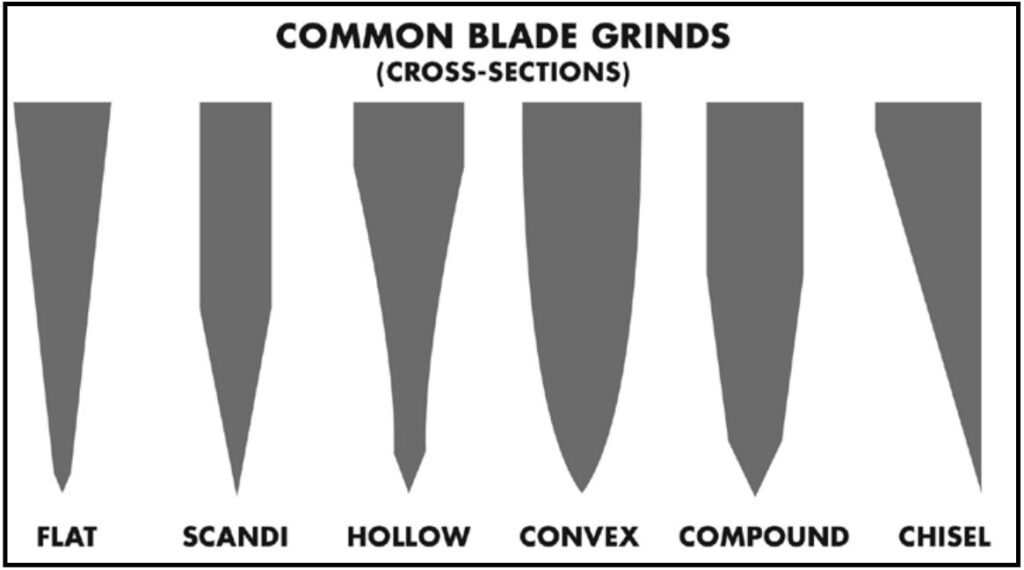
Blade grinds you’ll often come across can be seen here. (Image courtesy of Knafs.com)
Flat Grind
A flat-ground knife is a simple wedge and may be thick or thin. Flat grinds are good for slicing and deep cuts. I personally prefer a flat grind that goes all the way to the spine. A thinner flat grind will cut more smoothly than a thicker flat grind, where a thicker grind may be more durable.
Hollow Grind
A hollow-ground knife has a slightly concave bevel, which makes it thinner behind the cutting edge. This makes for good skinning and shallow cut work, without giving up overall blade heft or durability. Deep cuts or chopping are not well suited to a hollow grind.
Convex Grind
Convex grinds have slightly rounded bevels, which increases their edge stability. While they may not excel at slicing, they’re the way to go for hard use cutting and chopping.
Scandi Grind
Scandi grinds are a short flat grind with no secondary bevel. “Scandi” refers to the Scandinavian countries where that grind style is popular, especially Finland. This grind style cuts very well but can be difficult to sharpen properly.
Compound Grind
A compound grind may combine several of the basic grind shapes. Particularly on tactical and folding knives, many modern grinds are aesthetically interesting, but at the occasional sacrifice of performance. If you’re collecting for aesthetic reasons, however, these grinds could be all you ever wanted out of a knife.
Folks chase blades for all sorts of reasons. As a knife collector, what motivates you?
Have you ever taken one of those personality tests online or at work, like a Myers-Briggs, StrengthsFinder or Enneagram? You end up with a description of your personality tendencies, and invariably some of them are exactly how you see yourself.
While I have the nerd skills to put together a knife collector personality test like that, I don’t think it would be that useful. Instead, I’ll skip straight to the results and describe a few varieties of the “knife collector personality.” Maybe something in one of these descriptions will resonate with you.
Accidental Knife Collector
Collectors in this category are buying and accumulating knives because those knives do certain tasks well. They’re not afraid to buy a knife for one specific purpose and may find themselves in possession of more knives than they realized they had.
I got my first knife at around age 7; a small Case folder. This knife, like many others I’ve owned, was used and then lost. Fast forward 34 years, and I still use a knife. I started making knives because I didn’t have enough sharp knives to accommodate the tasks I was engaged in at the time. I hunt and use a knife to process my deer and other game animals. I use knives in the kitchen. I skin fish, slice vegetables and open packages. I carry a small Swiss army knife with me on my keychain. Am I a knife collector?
Just for kicks while pondering this question, I took a quick inventory. I have three custom and two quality production knives in my kitchen. I have five customs in my hunting pack, not counting the ones my sons have. I’ve got three or four spare keychain knives. I started a minor collection on purpose once and acquired 10 or 12 trapper pattern slipjoints and a few vintage folding knives in other patterns before I decided I wasn’t a collector, but I still have the knives.
In addition, I’ve got various junk knives stashed around in cars, trucks, shops and drawers, including the usual assortment of junk kitchen knives from big box marts, plus all the decent ones that I forgot where I put them. By quick count, I’ve got about a dozen customs and another 75 production knives.
Am I a knife collector? In my mind I am not a “knife collector,” but I figure I might be after all. You might be an Accidental Collector, too, and not even know it.
Investor
What motivates you to brave the crows at knife shows to collect?
Collectors of this type always have an eye on the bottom line. They’re familiar with the primary and secondary markets, and can instantly spot a good deal. They are always looking for the “next big thing,” the knife that is not hot yet but will be soon. They know the value of “buy low, sell high,” but they also watch which makers and knives appreciate over time.
Some folks invest in stocks or real estate, while others apply their knife knowledge as part of an investment strategy.
I think of my friend Jimmy McMahon as an example of this category. I remember back in 2010 when he invited me to my very first knife show. At the time, he was proud of a knife he had just purchased from Kyle Royer, then a 19-year-old journeyman smith. Given Kyle’s continued improvement and his current status in the industry, I’d say Jimmy made a good investment. If Jimmy were to sell that knife today, he’d make a handsome profit.
Philanthropist/Helper
Have you ever met a person who was a real people-person and just wanted to help everyone? When a person like this collects knives, they continue with that approach.
Some collectors buy from makers they know and have a relationship with. Some buy from makers whose story they know, makers for whom the buyer knows that every single sale makes a difference. These collectors may be biased toward purchasing from makers who are newer, younger or less well-established.
One fairly well-known example is knifemaker Lloyd Hale. Lloyd disappeared from the knifemaking scene in the early 1980s, only to reappear 20 years later. Lloyd tucked away for all that time in his shop working for his patron, Owsley Brown Frazier. Lloyd created over 300 knives, daggers and swords for Owsley, who just happened to be one of the country’s premier gun and arms collectors. Many of these knives along with a great number of historical pieces are on display in the Frazier Museum in Louisville, Kentucky.
Another good example is my friend, David Smith. He loves to talk, to share what he has and a good knife. Over the years as I developed in the craft, he has purchased 6 or 8 pieces from me. He’s given some as gifts, but all have been put to use.
One story stands out as a great illustration of David’s character and the Philanthropist/Helper.
One of my first forged knives was made from the tooth of a drag harrow that came from my grandfather’s farm. I’d held onto the tooth for many years until my forging skills were up to the task. The knife also included wrought iron and some figured red oak milled in 1955 that was recovered during a remodel from the floor of my house at the time.
Even though this knife was tied to me in many ways, with two small kids at home I found myself in an economic pinch, so I had to put the knife out for sale. I priced it at what was for me a high price at the time, and David snatched it right up. He also promised to give me the knife back when he passed away.
About four years later, I was able to travel across country and again visit David at his hunting camp where we used to hang out 15 years prior. True to his word, David gave me back the knife, saying that he didn’t want his wife to have to figure out where to send all the stuff he’d promised folks after he died. He’s almost died four or five times in the last 20 years, but as of this writing is still alive and well. I’ve since adopted that knife as one of my primary using knives, and it’s a treasure I’ll never part with.
Art Appreciator
Sure the canvas is different, but there’s no denying Andy Isaacks’ knife and Alice Carter’s engraving are works of art in their own right.
These people love art for art’s sake, who take the time to stop and admire the roses, who simply enjoy having beautiful things around them. That there would be people like this who gravitate toward knives-as-art is no real surprise. Just like those who collect paintings, sculptures or any other kind of art, these people buy knives simply to appreciate their beauty and the skillful craftsmanship that went into their creation.
I never met David Darom, but with some familiarity with his books, I assume he was an Art Appreciator. His books feature the best knives in the world from a variety of genres, from top makers both stateside and international. If you’re not familiar with his work, The Great Collections is a good place to start.
I remember as an incoming probationary member at the Guild Show in 2013 hearing a buzz in the room when a $30,000 knife was sold by Warren Osborne. As a young guy in the back row, I had no idea what kind of knife would bring that kind of price, nor what kind of customer would buy one. I later saw the knife, with gold and fine engraving on a damascus interframe folder. My guess is that it was purchased by an Art Appreciator.
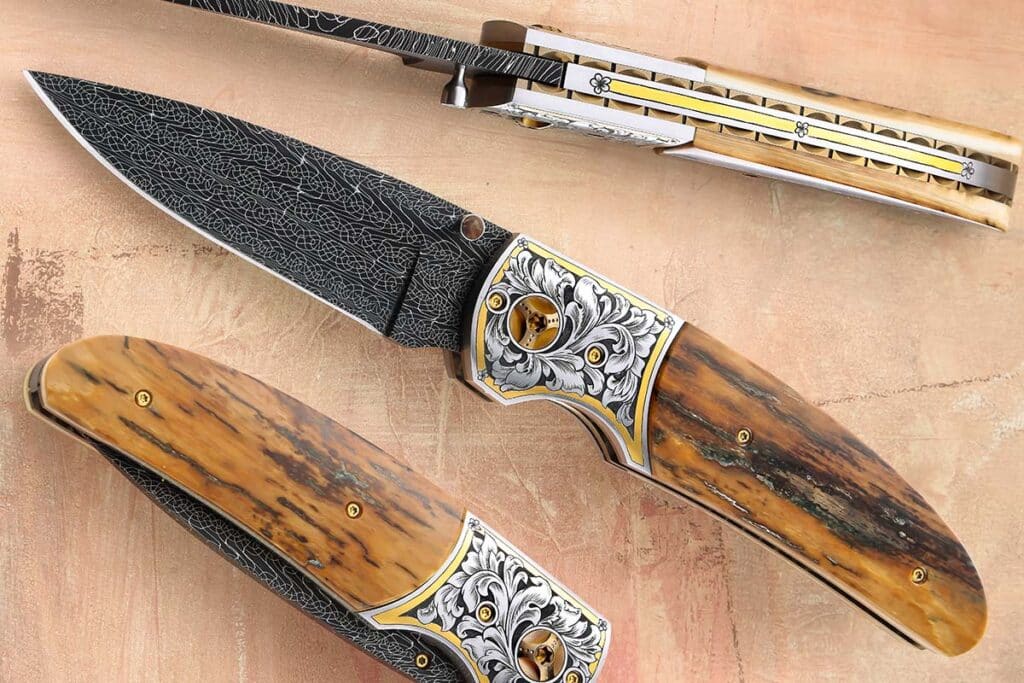
There are a few fine examples of this kind of knife in the center photo section.
“Squirrel!” Collector
Some readers will recognize the “Squirrel!” reference from the Disney movie Up. It’s a great illustration of the ADHD/impulsivity that goes along with some personality types, mine included. This type of collector simply buys knives that they like at the moment. Rather than a systematic approach, it’s more like “here a knife, there a knife, everywhere a knife knife!”
While some might argue that this isn’t a “real” collecting strategy, I believe that if it’s enjoyable to the collector, then it’s a legitimate pursuit. Even so, these stories don’t always turn out well.
My fishing buddy, Cliff, is a good example. He asked me once to sharpen his knives prior to an elk hunting trip. What he brought me was an imported Buck folder, a decent Benchmade fixed blade and two no-name folding knives from Bass Pro. Each one sharpened differently, and each was designed for a different purpose. None of them were well suited to skinning an elk. Cliff was happy to share them with me and glad for me to sharpen them, but no elk were harmed on his hunting adventure.
Historical/Sentimental Knife Collector
Some collectors specialize in history of one kind or another. Maybe they collect only Case “tested” knives like their grandpa or father carried. Maybe they have a collection of knives directly from their ancestors, or connected to a specific historical event (e.g. Civil War), a specific era (e.g. the American West) or an international genre that connects with their heritage. For these collectors, part of the value of the knife is the connection that it makes with something both personal and historical.
Master smith Jerry Fisk targets this kind of collector with his high-end bowies that include historical materials. He’s made knives from World Trade Center steel. He’s used wood from trees planted by George Washington. He’s made damascus with one layer for every person in the United States.Elements from Thomas Jefferson, Dr. Mudd, the Liberty Bell, the Alamo and Pearl Harbor have been worked into Fisk knives over the years. When a collector buys these knives, they’re buying a connection to a story, not just a knife.
My friend, David Patterson, of League City, Texas, fits this category. He’s been collecting knives for many years and has a great collection of the work of knifemakers from the 60s and 70s like Merle Seguine, Clyde Fischer, Gordon and Ruffin Johnson, Randall and Moreseth. He also has a long-standing collection of a knife from every single master smith in Arkansas.
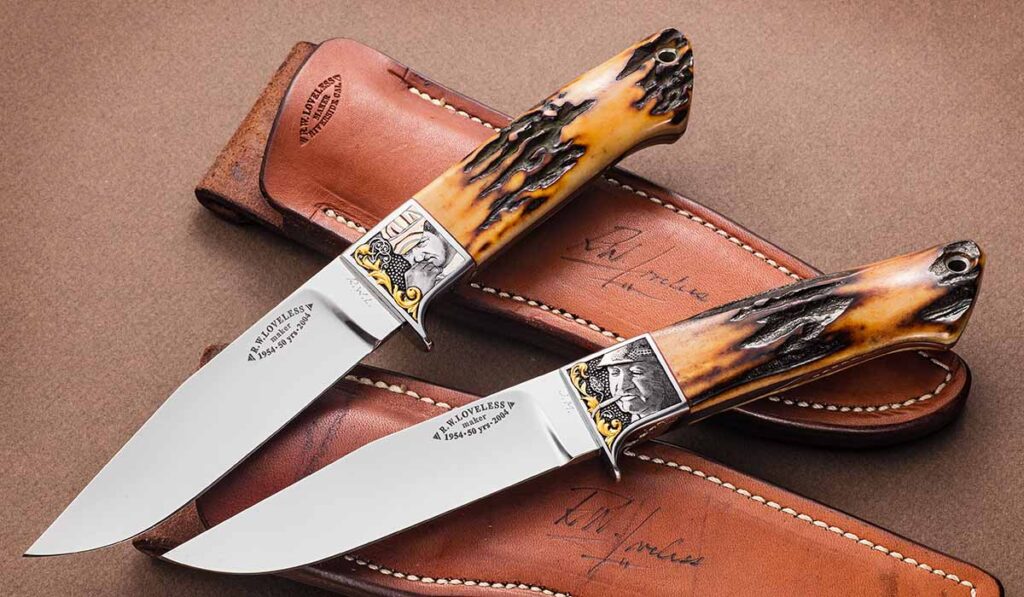
Grail Seeker
Engraved by C.J. Cai, it’s safe to say this Bob Loveless hunting knife set would qualify as a Holy Grail to many knife collectors. (SharpByCoop image)
There’s a personality type that loves the thrill of the hunt, for whom the journey is as important as the destination. These folks love to get the hottest new thing, or pursue the rarest or most sought-after knives. If you follow the trends and buy at the peak, you may be this kind of collector.
The market depends somewhat on people willing to play this role. The thrill of the acquisition can be as important as the knife itself. These folks developed the term “grail” knife, that knife for which you’d forsake all others, the knife at the top of the pinnacle.
All About The Knives
Whatever your personal reasons for collecting, and whatever personality traits encourage you down the path you’ve chosen, we all share one thing in common: the love of the knife.
We break down what common steel alloying elements add to a knife.
Alloy… in the knife world we hear the word often. Blade aficionados—many almost journeyman metallurgists in their own rights—pour over steel composition. Newbies to collecting and making, however, might be a bit perplexed over exactly what the material modification is all about.
With this in mind, we’ve boiled down what certain elements—when alloyed with iron—bring to the table for your knife. Now this isn’t a deep dive into the nitty-gritty of what each element does in a steel alloy, complete with phase diagrams and quenching charts. Honestly, if you need to cut to this quick, we recommend Larrin Thomas’ website KnifeSteelNerd.com. The son of BLADE Cutlery Hall of Fame member Devin Thomas and PhD metallurgist and material scientist, Thomas offers a much more in-depth look at steel from an engineer and knifemaker’s point of view.
What we have here is a quick and dirty guide to alloy elements and what they bring to a knife.
What An Alloy Is
If your high school chemistry class is a bit foggy right now, perhaps we should take a moment to do a quick review of exactly what constitutes an alloy. Quite simply, an alloy is a mixture of two or more elements, where at least one of the elements is a metal. Note alloys are mixtures, not compounds—the former is a physical combination, the latter a chemical. For a mixture, think of something like oil emulsified in vinegar to create a tasty salad topping, while a compound is two gases like hydrogen and water bonding together to form water.
Alloying elements is done to enhance the properties of a material. In the case of knife steel elements are combined to improve toughness, wear resistance, corrosion resistance or other factors. While we won’t delve that deep in this article, we’ll point alloys can be classified into two main types:
Substitutional Alloys: In these alloys, the atoms of one element replace or substitute for the atoms of another in the metal lattice. An example is brass, which is an alloy of copper and zinc.
Interstitial Alloys: In these alloys, smaller atoms fit into the spaces (interstices) between the larger metal atoms in the lattice. Steel, which is an alloy of iron and carbon, is an example of an interstitial alloy.
Since we’ve dusted off some of those long-lost materials lessons you learned, let’s get into the down-and-dirty of what each common alloying element brings to knife steel.
Knife Steel Alloy Elements
Carbon: This ingredient makes the difference between iron and steel; all steel will have some amount of carbon. It is the most important hardening element, but it makes hardness by combining with other elements. As a simple generalization, the amount of carbon in the steel tells you a lot about the quality of the steel. Low-carbon steel has 0.3% carbon or less, medium has between 0.4-0.7% and high-carbon steel is 0.8% and above, maxing out at around 1.2% carbon for knife steels. Up to a point, the higher the carbon content within the range, the harder the steel will get.
Chromium: Chromium combines with carbon to make chromium carbides, which are resistant to corrosion. Stainless steel knives will have chromium as a major ingredient, typically at a minimum of 12-13%. Chromium also increases the strength of a knife to a degree, but adding chromium in large amounts decreases toughness.
Cobalt: In small amounts, cobalt increases toughness.
Manganese: This changes the rate of hardening. Manganese in carbon steels yields “deeper” hardening, which requires a slower speed quench and gives a wider range of acceptable heat before quench. If added in high quantities, it can increase brittleness. Manganese makes steel etch dark in damascus.
Molybdenum: Adding this maintains the steel’s strength at high temperatures.
Nickel: Nickel adds toughness to steel. It also makes steel etch bright in damascus.
Nitrogen: This element is sometimes used as a substitute for carbon in steel.
Silicon: Silicon increases strength and removes oxygen from the metal while it is being formed. It’s typically present in small quantities in most steels.
Sulfur: This increases machinability but decreases toughness.
Tungsten: Adding this increases wear resistance and forms tungsten carbides that are very hard.
Vanadium: Vanadium leads to smaller grains within the steel. Vanadium carbides are very small and hard, which increases wear resistance and edge retention.
Bladesmiths outline which carbon steel combos they use and why.
Damascus steel is a broad category with nearly infinite variations. It includes everything from low-layer random patterns to powdered canister creations and complex mosaic patterns.
The basics of damascus include forge-welded combinations of steels. Changes in the steel choices, in the welding or forging processes, and even in the etching method result in a wide variety of patterns and looks. Let’s dive into the many levels of damascus through the work of a few excellent smiths.
Smiths Takes On Damascus Steels
ABS apprentice smith Chris McPherson began making knives only four years ago, but he had a strong start attending classes taught by ABS master smiths Jason Knight and Josh Fisher. Now he forges his own damascus. One of his fighters (IMAGE 1) features a blade of 1075 carbon and 15N20 nickel-alloy steels.
Image 2 ABS journeyman smith Brian Sellers used three steels instead of the standard two to help provide a darker look for his blade of ladder pattern damascus. As he observed, “Adding a third steel to damascus gives a unique depth to the finished blade, kind of like adding shades of gray to a tattoo.” (Jocelyn Frasier image)
“I made the knife for a local state trooper benefit, for the teenage son of an officer who lost his life in the line of duty in March 2023,” Chris explained. When asked about why he chose 1075 for his fighter, he said he “just wanted to try it out” after making other billets with 1095, 1084 and 1080 carbon steels. Though he’d heard that the 1075 may have a bit less contrast due to its lower manganese levels, it came out with beautiful contrast after a deeper etch.
Knifemaker Brian Sellers likes to mix things up a bit. In addition to the standard carbon steels of 1095 or 1084, Sellers occasionally includes 1080, 5160 or 52100. “Adding a third steel to damascus gives a unique depth to the finished blade, kind of like adding shades of gray to a tattoo,” he says. For example, in a recent Persian fighter (IMAGE 2), Sellers included 1080 and 5160 along with 15N20 in a ladder pattern blade. Brian indicated all the steels work well with his equipment. He uses a 50-ton Riverside hydraulic press and a 50-pound Little Giant power hammer.
Damascus is time and labor intensive, and the maker loses a good bit of the steel in the forging process. Bladesmith Blake Nichols knows this and is from the “waste not, want not” school of thought.
Robert Wayman uses a hydraulic press to weld and draw out his damascus billet.
“My mentor Greg Shahan gave me the end cut of a feather damascus billet a few years ago,” Nichols said. “It sat on my shelf for a long time before I incorporated it into [one of my] hunters.”
Regarding his damascus, he added, “I wish I had a profound scientific answer as to why I use 15N20 and 1095 but I do not. The simple answer is it’s what I learned on. I’m comfortable with the heat-treating process. I also feel like I get the performance out of that combination that I desire.” I agree with Nichols when he said, “No matter what it’s made of, it has to function like a knife. Even the fancy ones need to hold up to the performance standards.”
Why 15N20 In Damascus?
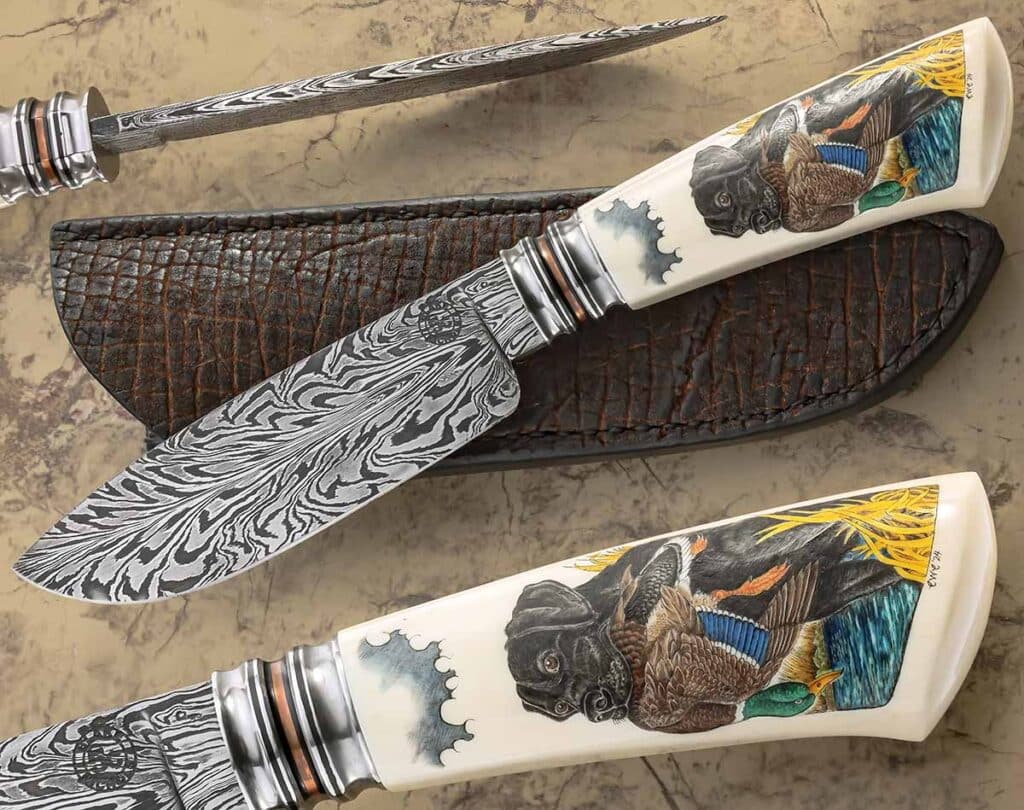
Image 3 For a great example of a go-mai (five layer) damascus blade with the visual “pop” of nickel, Robert Wayman provides the fireworks via his sujihiki. Damascus outer layers and a damascus core work together with the handle of live edge amboyna burl to make a stunning knife. Overall length: 16 inches. (SharpByCoop image)
You may have noticed one thing the featured bladesmiths all have in common: they include 15N20 in their damascus billets. The 15N20 is a simple carbon steel, basically 1075, but has a relatively large amount of a special ingredient: nickel. The nickel content makes 15N20 etch more slowly and show more brightly when polished. Because of the similar composition to the 10-series steels (1080, 1084, etc.), it welds well and hardens in similar temperatures, making it the perfect steel for high contrast in the damascus pattern.
Some smiths use pure nickel foil or sheet in their damascus for the same effect. The challenge is that the pure nickel won’t harden, so it must be kept away from the edge in the forging process. The contrast is great but the nickel itself won’t hold an edge. I like a nickel layer in between layers of san-mai or go-mai damascus. It really pops!
Bladesmith Robert Wayman illustrates the go-mai technique well on one of his kitchen knives (IMAGE 3). The blade was made from a patterned go-mai billet. There’s a core layer running down the center of the blade with two layers of material on each side. The core is 100-layer random pattern damascus forged from 1084 and 15N20. On each side of the core steel is a layer of nickel and on the outside of the billet is a layer of matching random pattern damascus.
Key Element Comparisons by Steel
Steel
1084
1075
1095
15N20
1080
5160
52100
C
.865
.750
1.000
.750
.75-.88
.60
.98-1.10
Mn
.750
.550
.450
.375
.06-.09
.80
.24-.45
N
—
—
.200
1.950
—
—
—
*C-carbon, Mn-manganese, N-nickel; the double hyphens indicate trace amounts. Note the relatively high amounts of nickel of the 15N20 and of manganese of the 1084, two elements beneficial for high contrast damascus. This chart is for the elements pertinent to the subject at hand only and does not list all the elements of each steel.
Once the final billet is forge welded, some of the cladding material is removed with a grinder to create a visual effect in the pattern, and then the billet is drawn out to length. Keeping the core material centered during the process is very important. “You want to take your time when laying out your billet,” Wayman advised. “I typically use a thicker core material and a thinner cladding material, but it’s definitely taken some time and practice to dial it in.”
Other Damascus Steels
Before 15N20 and 10-series combos became prevalent for damascus, one of the standard high-contrast combinations was O1 and L6 tool steels. While the latter combo makes great damascus, the two steels are harder to find in today’s market. Simply put, properly sized and affordable 15N20 and 10-series steels are much more available than all the other combos on the market.
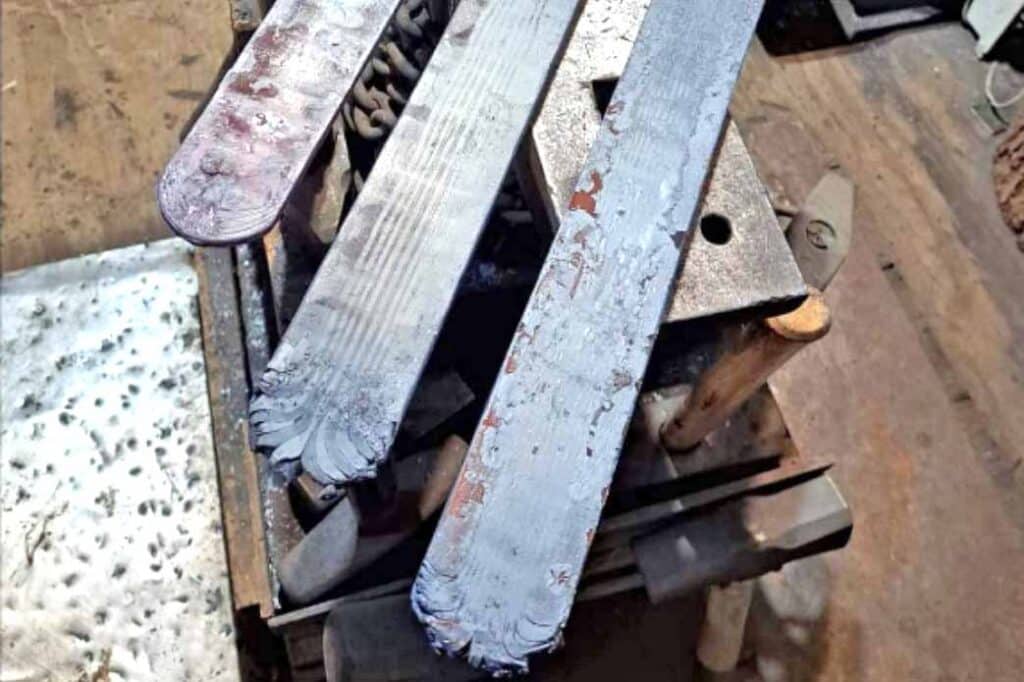
Damascus can be made of many things, including other damascus. These component bars became part of Robert Wayman’s chef’s knife.
Copper is another material that has caught on in the forging of copper-mai and other forms of copper damascus. Outfits like Baker Forge specialize in the process in which the copper is often clad over a standard carbon steel damascus core, as the copper itself won’t harden.
Titanium alloys have been pattern welded, often called Timascus™, and can be anodized in an array of wild colors. Unfortunately, it’s difficult to produce and doesn’t harden, so Timascus blades are probably not in your future. Instead, Timascus makes a great folder frame, bolsters and other non-blade knife parts.
What Metals To Avoid
Are there any materials that don’t make a great contrasting damascus? Sellers reports that the “S” series high silicon steels like S5 and S7 don’t work. He speculated that it was either the steel composition or improper heat control, but welds of S5 and S7 don’t stick during forging.
Robert Wayman welded these five pieces of steel together to make the go-mai damascus blade of his chef’s knife.
I can attest that meteorite is a tempting addition to damascus because various samples are often high in nickel and mostly made of iron. Unfortunately, every meteorite varies widely in terms of content, so that individual pieces of the same meteorite each may have a very different chemical composition. As another confounding factor, many meteorites contain high silicon or other elements besides iron, carbon and nickel. Each new element adds its own problems to the process.
I was able to produce a satisfactory pair of billets containing some meteorite by putting small chunks in a canister with 1084 powder, and then welding and re-stacking the billet with more 1084 bar stock until the final layer count was over 1,000. By adding only 1084, I was assured that any bright spots in the final pattern were from the nickel in the meteorite. Even with this process, there were a few inclusions/flaws in the final product. Could I have continued to push the layer count and minimized the flaws further? We’ll never know.
Some may think AEBL stainless steel is nice and shiny. Can it or another stainless steel be put in the mix with carbon steel? If you think that “shiny” makes sense for high contrast, that part is true. Unfortunately, the high chromium in stainless steels causes problems for damascus makers in two ways. First, chromium steels don’t like to weld together. The chromium oxidizes quickly and prevents the welds from sticking. Second, the chromium changes the hardening properties. In a hypothetical AEBL and 1084 billet, the AEBL hardens from 1,900°F while the 1084 hardens from 1,500°F. If you quench the hypothetical billet from 1,900°F, the 1084 will have huge, brittle grain. If you quench the same billet from 1,500°F, the AEBL won’t harden.
For the blade of his fancy hunter, Blake Nichols employs a damascus of 1095 carbon and 15N20 nickel alloy steels forged by Greg Shahan. Blake said he is comfortable with the heat-treating process and also feels like he gets the performance he wants from the combination of the two component steels. Overall length: 10 inches. The scrimshaw is by Charles W. Conner III. (SharpByCoop image)
While there are smiths who have figured out how to weld multiple types of stainless steel together in contrasting patterns, the process requires careful and precise heating and mitigation of oxygen, both procedures which are often beyond the scope of the backyard smith. Because of the complex process required to make it, stainless damascus commands premium prices.
Final Cut
Modern damascus retains strong demand in the knife market. By combining a choice of several standard carbon steels and 15N20, smiths can create damascus patterns that will make any knife stand out. Whether the pattern is random or ladder, raindrop or mosaic and more, a high-quality damascus knife is sure to be a winner.
Some lean traditional, others modern and others “whatever’s in my pocket is fine”.
There are times when a pocketknife is essential and times when it’s not pragmatic. Though I’m guessing most BLADE readers wouldn’t be the ones who’d cause a problem, have you ever had a knife confiscated by the Transportation Security Administration? Sure, it’s in the name of world peace or whatever, but if you find yourself frequently in airports the best pocketknife might be the one you leave at home.
I’m fixing to admit a heresy: As a knife writer and knifemaker with a work-from-home day job, I don’t often carry a pocketknife. I have a small imported Benchmade on my work desk, and some of my “knife collection” is in my office, but that’s all. In my house I’ve got knives everywhere I go—kitchen, bedroom, office, outdoor shop, all over the place. I rarely carry one yet rarely go without. I also fly occasionally, so even my keychain knife has become out-of-pocket.
Let’s drill down through all the “it depends” and get to the final question: What’s the perfect pocketknife? Of course, there’s no definitive answer but there are some perspectives.
Jordan Wagner of DLT Trading
The Les George VECM is clean and ergonomic and checks the boxes for a high-end modern pocketknife: premium CPM MagnaCut stainless blade steel, titanium framelock and easy opening.
When it comes to the modern high-end folder, Jordan Wagner of DLT Trading said, “My favorite would be the Les George VECP. What sets it apart for me is Les’s tremendous attention to detail in both design and execution. His designs are clean and simple without being pedestrian, and they perform phenomenally in use. The VECP handle has fantastic ergonomics and is comfortable in multiple hand positions, while still feeling safe and locked in during use. The blade shape is functional and handsome, and his grinds tend to be extremely slicey. The VECP really hits all the buttons I look for in an EDC knife.”
Ben Petersen of Knafs
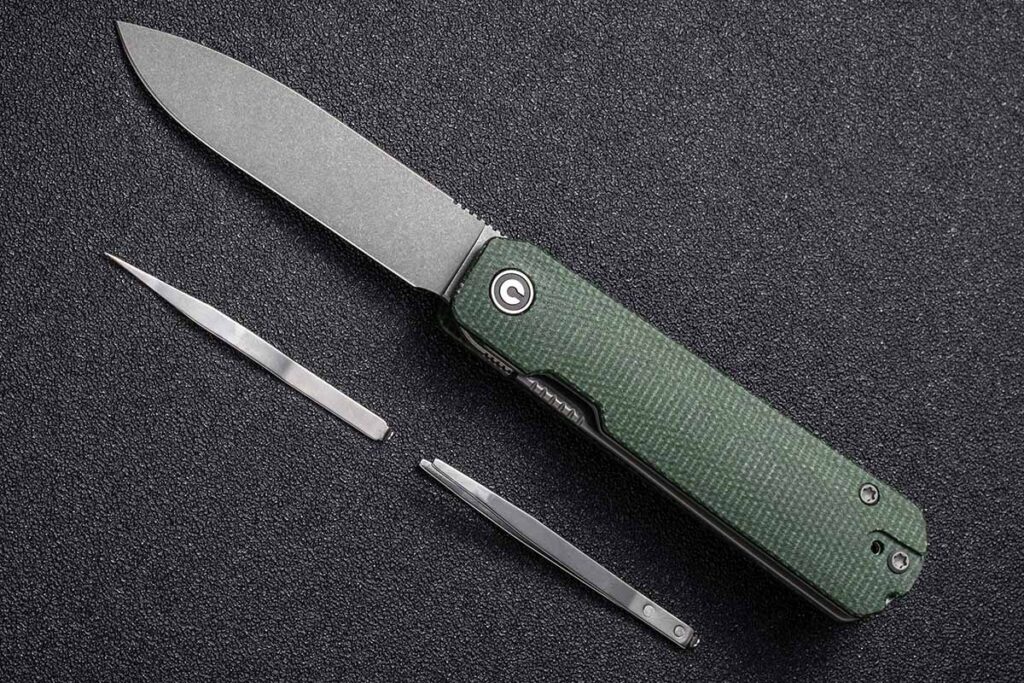
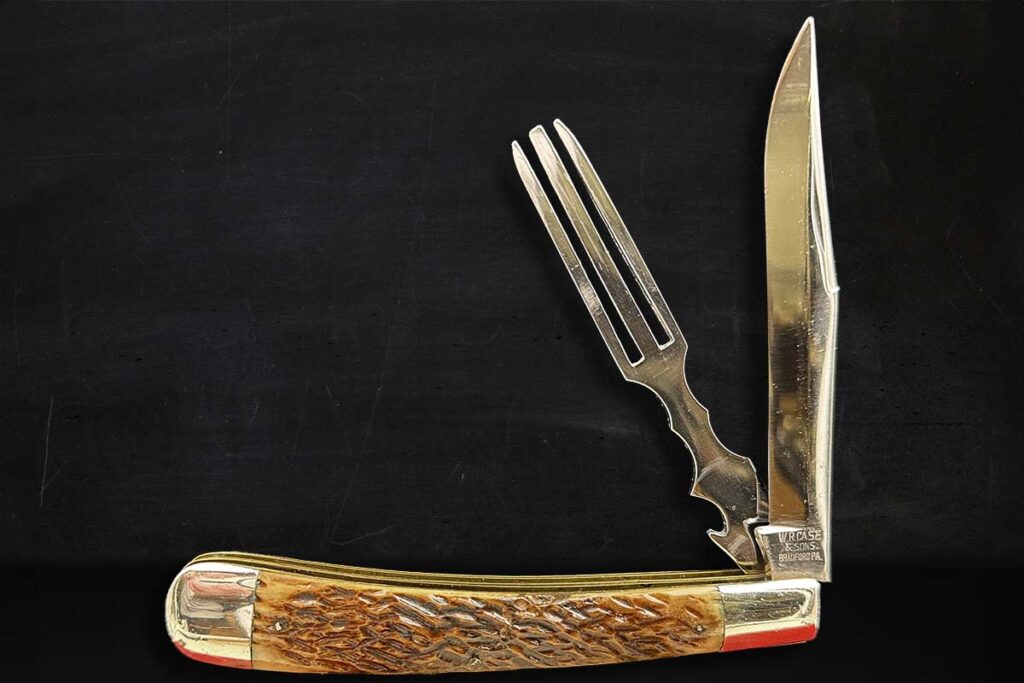
According to the author, the CIVIVI Sendy designed by Ben Peterson combines some of the best elements of traditional and modern design, including a barlow-shaped frame, choice of a clip-point (shown here) or spey pattern blade, Nitro-V stainless blade steel, a Micarta® handle, flipper tab, linerlock and the author’s favorite: a tweezers and toothpick that slides under the scales a la a Swiss Army knife.
In addition to being co-founder of Knafs, Ben Petersen also designs knives. His latest entry is a model produced under the CIVIVI brand called the Sendy. In an innovative genius kind of way, Ben combines some of the best elements of traditional and modern design. The knife comes in Nitro-V, a stainless steel that threads the fine line between ease of sharpening and edge holding. It compares favorably to the traditional carbon steel knives of old yet sharpens much easier than the newer powder-metallurgy super steels.
The Sendy’s overall profile resembles a traditional barlow, with straight lines and a butt end wider than the tip. The blade comes in both spey and clip-point patterns. Also thrown in are more contemporary features such as a front flipper tab, linerlock, ceramic bearings, and a deep-carry, reversible pocket clip. However, what really sends this one over the top for me is the inclusion of tweezers and a toothpick that slide under the scales in the traditional Swiss Army knife configuration. Ben successfully combined modern and traditional elements into a very versatile, user-friendly pocketknife.
Goldie Russell Of A.G. Russell
A pocketknife that appeals to the author is the Skinny Brute from A.G. Russell Knives, a traditional lockback in CPM S35VN stainless blade steel. There’s a choice of carbon fiber (2.6 ounces and $135 MSRP) or green G-10 (2.9 ounces and $99 MSRP) for the “skinny”—a half-inch thick at the swell—handle. Blade and closed lengths: 3.25 and 4 1/8 inches. Country of origin: China.
I reached out to BLADE Magazine Cutlery Hall-Of-Fame® member Goldie Russell, who with her late husband, Cutlery Hall-of-Famer A.G. Russell, basically invented mail-order knife catalogs. Over the years the A.G. Russell Knives brand has marketed a huge variety of pocketknives and fixed blades, domestic and imported. The current catalog includes some interesting designs that blend modern and traditional sensibilities. One that appeals to me is the Skinny Brute, a traditional lockback in modern materials.
“A.G. designed the Brute in the 1970s,” Goldie began. “He and handmade knifemaker W.C. ‘Bill’ Davis perfected A.G.’s idea that by using Micarta® a folder could be made without metal liners. The result of that collaboration was the A.G. Russell Brute. At some point in the late 1970s, A.G. stopped offering them. In the early 1990s, we began to work with Bill again and for a number of years they were again made by hand in the U.S.A. For over five decades our customers have loved the profile, the deep nail mark for one-handed opening, the weight and the rest of the features of the design. Now, after many years, it is back, with a handle that is just a little thinner.”
Joe Culpepper of Culpepper & Co.
Joe Culpepper of Culpepper & Co. and Old School Knife Works is a fan of the Case/BLADE Magazine Cutlery Hall-of-Fame® member Tony Bose collaboration swayback jack, as well as other swayback patterns, in either single- or double-blade configurations. (Old School Knife Works image)
When it comes to the traditional pocketknife, Joe Culpepper of Culpepper & Co. handle material supplies and Old School Knife Works is a fan of the Case/Cutlery Hall-of-Famer Tony Bose collaboration swayback jack, as well as other swayback patterns, in either single- or double-blade configurations. “I think the design is simple, clean and elegant, and,” Joe stressed, “jigged bone is a must!”
What’s In Your Pocket?
Even among industry insiders, not everyone has the same preferences or shares the same opinions on what makes a perfect pocketknife. Some lean more traditional, others more modern and others more “whatever’s in my pocket is fine.” No matter your preference, buy all the knives you can afford and carry them as often as you can. After all, you never know—the “perfect” pocketknife may just be the one you have on you when you need it most.
Decades ago in America the pocketknife was universal, with such patterns as the barlow, stockman, trapper and folding hunter well represented in the pockets of our fathers, grandfathers and great-grandfathers. But what about today, when the most likely pocketknife task is opening an Amazon box or trimming a string off a shirt? To find out not only what folks are carrying but why, BLADE® asked several industry insiders, “What makes the perfect pocketknife?”
Pocket Knife Funtionality
Let’s begin our hunt with a look at the past. Many BLADE readers know Joe Culpepper for his and wife Kristi’s knife handle material business, Culpepper & Co. For many years the Culpeppers have provided the knife industry with quality jigged bone, Sambar stag and other exotic materials. Joe is also a student of the slip-joint/traditional pocketknife in all its variations, and sells vintage knives under the business name of Old School Knife Works.
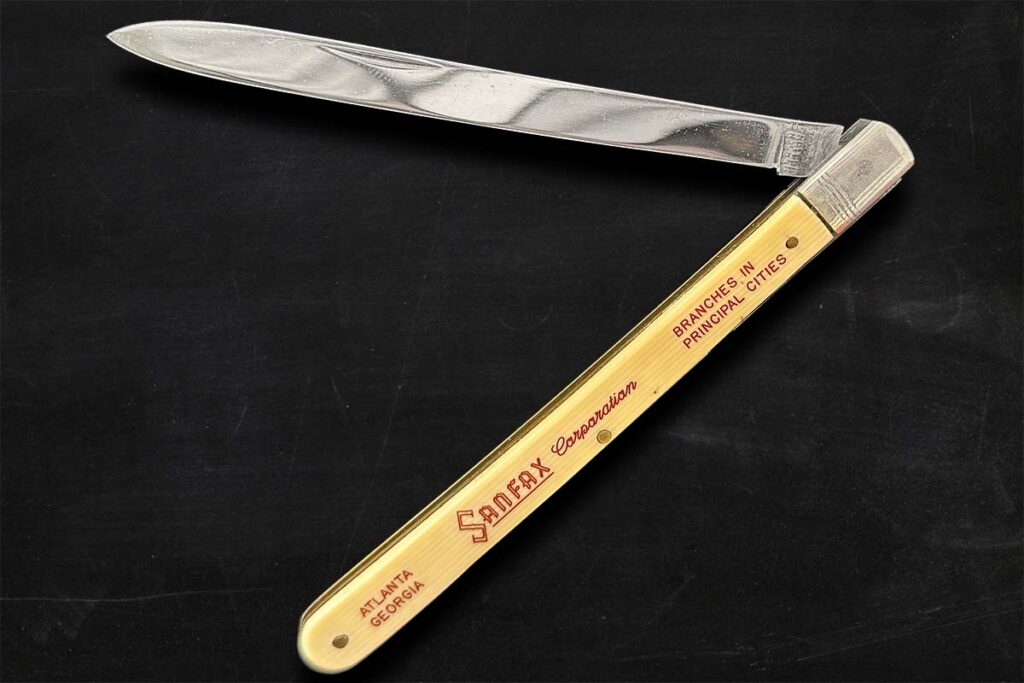
A Case knife in damascus is in the traditional fish knife pattern, an early folding fillet knife. (Old School Knife Works image)
“A good pocketknife first and foremost should perform and function reliably in the way it was designed,” he began. “Whether we’re talking about an electrician’s knife, fish knife, melon tester or trapper, the most important thing is that it does its job.”
The melon tester pattern, here in an advertising knife configuration, almost always has a long, thin single blade. (Old School Knife Works image)
It has been a while since I used a knife to test a melon and Joe, too, was quick to acknowledge that many of the knife tasks of yesteryear have fallen by the wayside. “Frankly,” he admitted, “many of our pocketknives are simply just really nice box cutters.”
Pocket Knife Blade Size
Sticking with the nice box cutter theme, Knafs co-founder Ben Petersen added that he likes knives suited to the “dad life”—cutting apples cleanly without splitting them, opening boxes and whittling the occasional stick. “I’m not out to stab people,” he grinned. “For me, I think a 2.9-inch blade is perfect. Being under 3 inches keeps you safe from most restrictive knife laws, and it also is the perfect length for the finger test.” Ben went on to explain. “Most of the time when I cut, I put my index finger along the spine of the blade,” he noted. “I want the point of the blade right in the middle of my fingertip where it won’t cut me, but also gives me very precise control.”
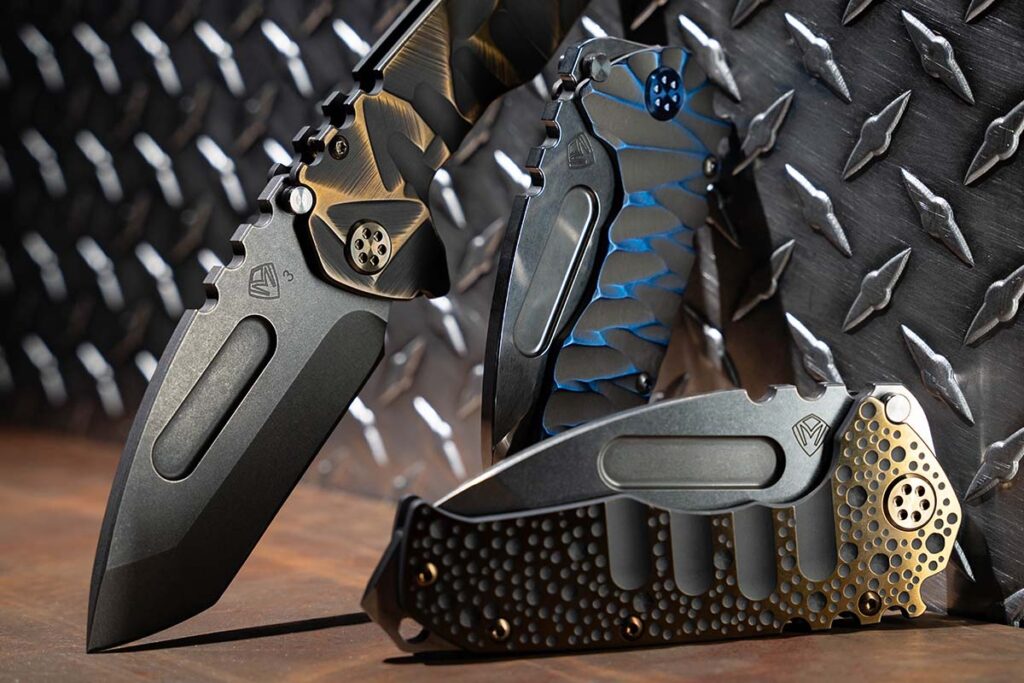
Medford Knife & Tool offers a range of titanium framelock folders, including the Praetorian T in CPM S35VN stainless blade steel. Weight: 9.3 ounces. Closed length: 4.9 inches. MSRPs start at $785.
Ben had a fun take on the perfect knife. “You know,” he reflected, “to a 12-year-old a gas station knife* is perfect. The perfect knife is totally different to everyone.” I smiled, remembering how much joy my 14-year-old son got from a rusty Bass Pro Shops framelock, missing a screw, that we found in a pasture on a dove hunt.
Types Of Pocketknives
Most of us BLADE readers probably already have a good idea of what we like in a pocketknife. We know if we like small ones or bigger ones for everyday carry. We know the steel types we like, and whether we prefer a single or multi-blade. Joe offered some generalizations that match my experience.
Tradional
Another older Case edition, the hobo knife features a blade and fork in a handy pocket-sized folding knife. (Old School Knife Works image)
“As we get more into knives we tend to evolve into one of two categories, and they’re often correlated with age,” he reasoned. “The older generation tends to go for the more traditional slip joints with natural materials and carbon steel like their dad or grandad carried.”
Joe considers some “classic” patterns and brands among his favorites, particularly the knives manufactured pre-1970 by the old American firms that mostly have gone out of business. “When you hold an old Schrade, Empire, Robeson or even a vintage Case you get a certain sense of nostalgia,” he noted.
Modern
Jordan Wagner said the market is strong for high-quality USA-made titanium framelocks. Among those fitting the niche is the XM-18 3.5 flipper folder from Rick Hinderer Knives. Closed length: 4.75 inches.
As for the other category, Joe finds that younger folks tend to lean toward modern conveniences like pocket clips, modern steels and the more tactical types of knives like Benchmades. Being just a bit on the older side myself, as well as a bit of a traditionalist, I reached out to Jordan Wagner at DLT Trading for some thoughts about what makes a “perfect pocketknife” from a modern point of view.
From an online merchant’s perspective, he said the market is very strong for quality USA-made framelocks. Titanium framelocks from makers like Rick Hinderer Knives, Chris Reeve Knives, Medford Knife & Tool and custom knifemaker Les George in the $400-to-600 price range continue to be popular.
Knives in the modern category tend to have a few common characteristics. They feature premium blade steels. They all have some kind of one-hand-opening device such as a thumb stud, blade hole, flipper tab, etc. In general, these are mid-tech production or small batch customs made in shops as often as in factories. The next level below the mid-techs are the larger-batch manufactured knives by companies like Zero Tolerance, Spyderco and Benchmade. They’re often high quality, built in factories to tight tolerances and most often made in the USA.
Often within these and other brands are quality, lower-price-point knives made overseas as well, such as the production Demko AD 20.5 made in Taiwan. There are also quality knives made by China-based companies like Reate, WE and its sister brand CIVIVI and others.
Case remains the leader in the current production of traditional patterns. But is it because there’s a demand by knife users for a two-blade trapper? Maybe, maybe not. The folks at Case know and understand that there are two big segments of customers that they serve—users and collectors—and they make patterns to please both groups.
The Perfect Pocketknife?
I think about “perfect” in terms of pragmatism. When was the last time the average knife user needed a hobo knife with a fork? Have you ever seen a titanium framelock melon tester? Culpepper has his finger on the vintage-slip-joint market, and his take is that the rise of social media has opened up huge new audiences to the vintage knives.
“The unique patterns always have a market and a strong following,” he said. “For the unique vintage knives there’s good demand, whether they’re made in the USA or even England or Germany.”
A clutch player in the knifemaker’s shop, the tire hammer gives more control than other D.I.Y. power hammers.
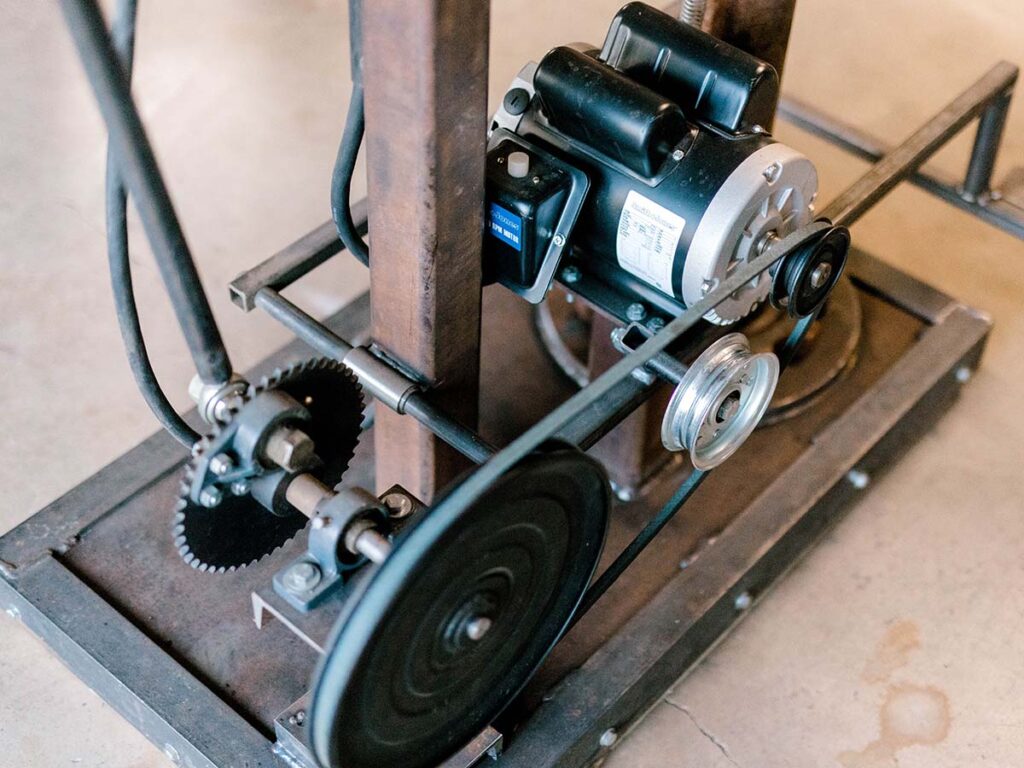
Like a variable-speed hand drill, your backyard power hammer should be able to run slowly, at full speed or in between, depending on the task. The simplest way to guarantee it does this is to use a slipping clutch.
There are two main designs of slipping clutch. One uses a slack belt, a flywheel and pulleys. The drive pulley rotates within a slack belt. The foot pedal linkage pushes an idler wheel into the slack belt, increasing the belt tension to the point that the belt begins to turn the pulley on the flywheel.
The author modified the spring-arm-to-pitman attachment to make it adjustable. Depending on which attachment point is used, the leverage of the stroke changes.
Another design uses a tire clutch, where the foot pedal linkage pushes a drive wheel into an automobile tire, with the hub of the tire serving as the flywheel. The most common “tire hammer” design uses a similar clutch but turned the other way and connected to a linkage. Your available parts will dictate your design.
Why A Clutch
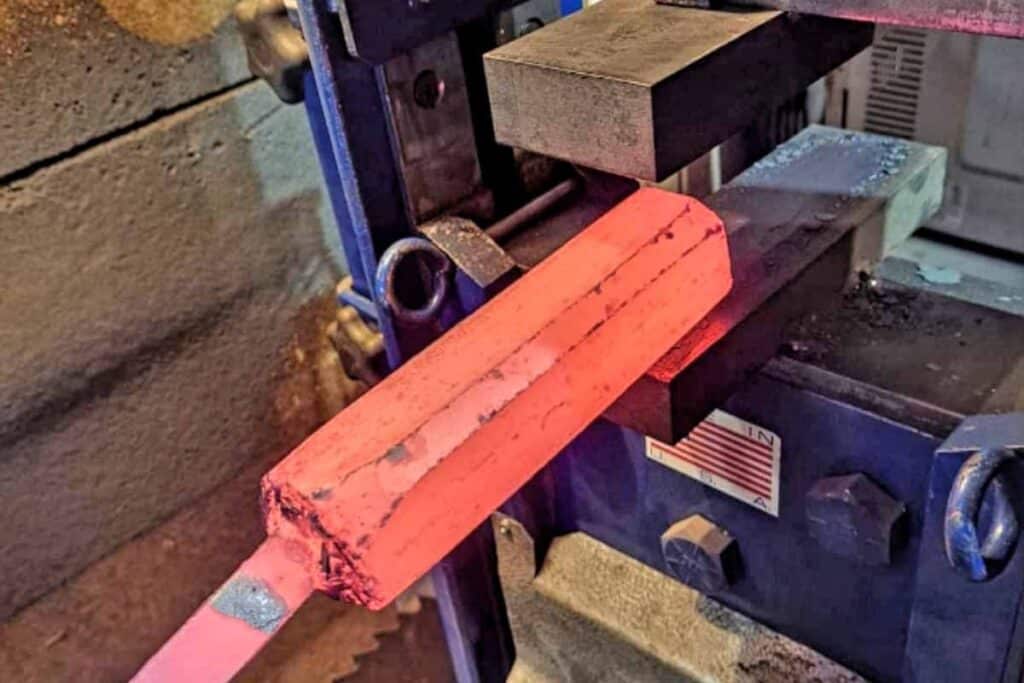
A function of the clutch is to reduce the RPM of the motor speed to get the hammer rate of beats per minute (BPM) into a safe and useful range. You want the hammer rate to generally end up between 150 and 250 BPM, though many variables change with each hammer. In general, a heavier tup (aka hammer head assembly) requires a slower BPM, whereas a lighter hammer can have a higher BPM. You do not want your hammer running faster than you can control it, nor so fast that the inherent forces tear it apart. My hammer uses a 24-inch tire and a 3-inch drive wheel for an 8:1 reduction of a 1750 RPM motor, yielding a calculated 218 BPM at full speed. Your hammer will run differently depending on your motor RPM, your drive and driven wheel diameters, and the hammer’s overall design. I rarely run my hammer full speed during general forging work, and the tire clutch gives good speed control. Full speed works acceptably well for drawing out damascus billets or breaking down large stock.
My tire clutch has an integral flywheel bolted to the hub. On the flywheel I welded several different nuts for attaching the pitman arm (for more on the pitman arm, see part three last issue). Each nut is a different distance from the center of the hub. This allows me to vary the length of the stroke, in my case between 6.5, 7 and 7.5 inches, based on where I connect the arm to the flywheel. Coupled with an adjustable-length pitman arm, this setup allows a degree of tuning to get the hammer hitting in a way that transfers the power directly to the workpiece with efficiency, yet in a way that doesn’t place undue stress on the hammer itself.
Choosing A Motor For Your Tire Hammer
As for motors, the size may vary a bit depending on the overall tup weight of your hammer. For most homebuilt hammer sizes, a 1 or 1.5 HP motor is plenty. My 40-pound hammer uses a 1.5 HP motor running on 110v and does not trip a standard 15-amp breaker, suggesting that 1.5 HP is more than plenty for a 40-pound head. Whether the motor runs on 110v or 220v will depend on your shop setup and what you have available, but you’d be best served either way with a motor that runs in the 1700 RPM range, not one that runs in the 3400 RPM range. There’s no need to go three phase or variable speed unless you’re already set up for either.
Doug Davis’ homemade hammer uses a series of pulleys and an idler. When you step on the treadle, the idler tightens the belt and engages the hammer.
You will need an on/off switch for your motor. To run the hammer, turn the motor on, then use the foot pedal linkage to engage the clutch.
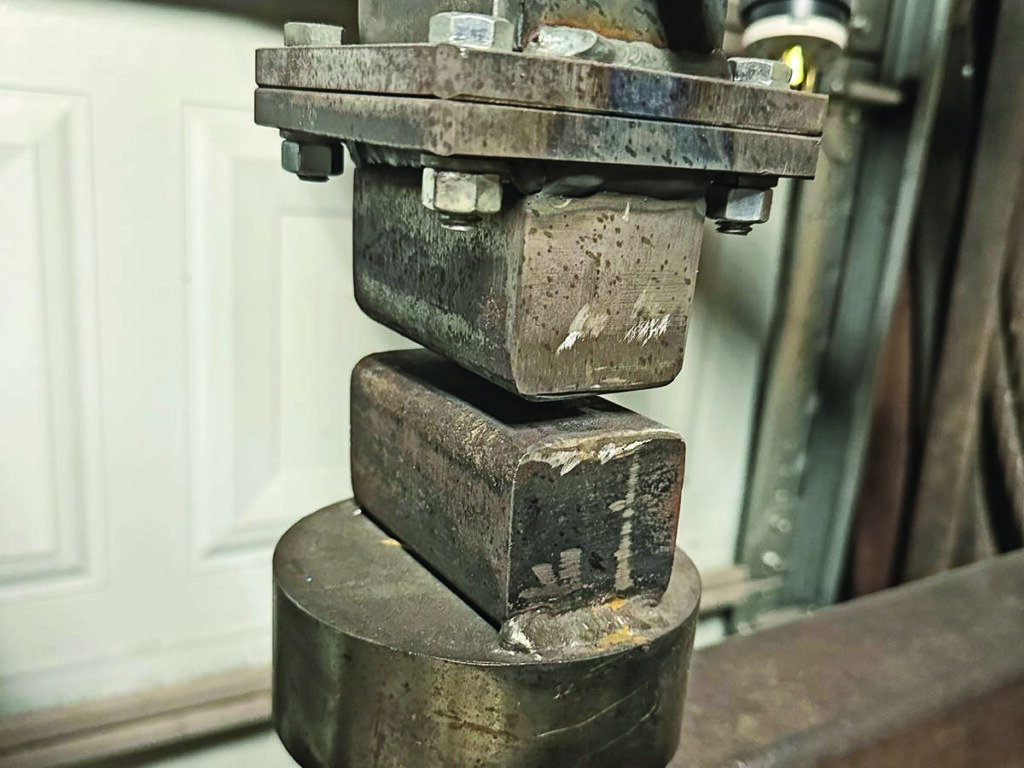
Sourcing Dies
Most power hammers have a set of dies in between the anvil and the hammer shaft. Dies may be built in a variety of shapes and sizes, depending on how you want your hammer to move the metal. Two basic die designs are flat and crowned. Flat dies move the metal somewhat equally in all four directions, while crowned dies will draw out the length of your workpiece perpendicular to the crown on the dies. Some smiths design their hammers to accommodate various top or bottom tools, or spring swages as well.
The die attachment on Doug Davis’ power hammer is more robust on the ram-to-die connection, but time will tell how the bottom-die direct-weld works out. (Erik Greiner image)
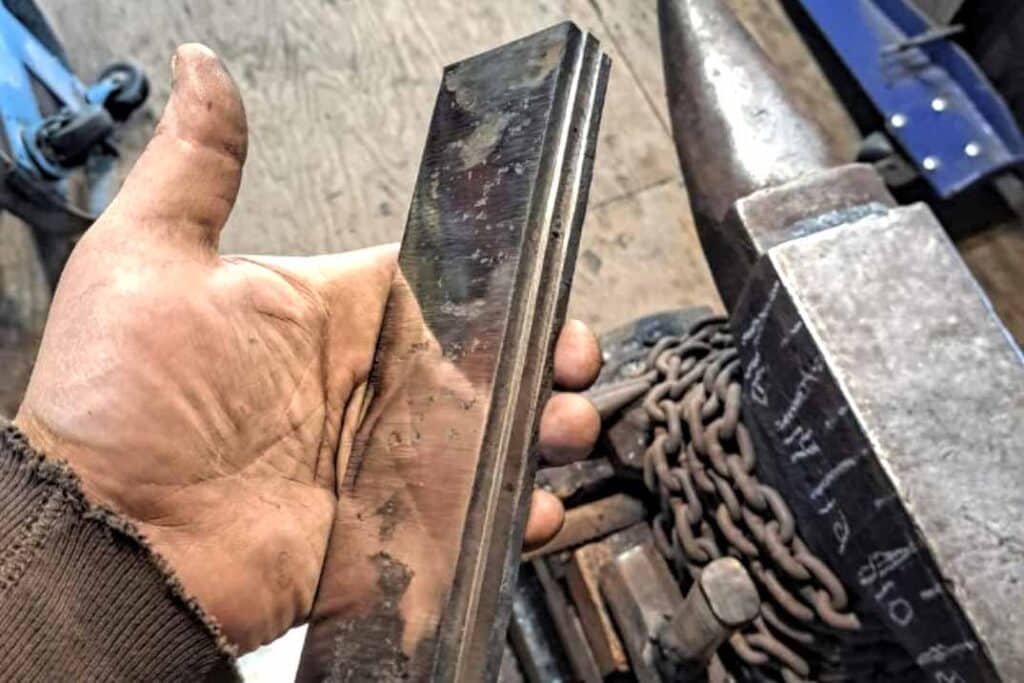
On my personal hammer, the dies are built out of 1.5-inch square 4140 steel bar stock, heat treated and ground essentially flat, with slightly radiused corners. Some hammers are set up with dies that are interchangeable but mine is not. Full disclosure: My die attachment is one point of weakness in my design. I ultimately welded my bottom die plate straight to the anvil, and I’ve had to reinforce the top die connection and re-weld it several times. Perhaps a more skilled welder could have done better!
Creative Necessity
I can’t emphasize enough the creativity necessary to build a functioning power hammer from scrap. It’s one thing to watch a YouTube video and think, “It must be nice to have a power hammer.” It’s another thing entirely to watch the same video and try to discern how the rocker arm connects to the center post, or how the tire clutch axle is set up.
At the time of my hammer build, there was an online gallery hosted in Czechoslovakia that had hundreds of pictures of various homebuilt and factory built hammers. I couldn’t have built mine without those examples. I don’t speak Czech but the pictures tell the story well.