


The Appalachian spring helve hammer, including springs, hammer head/tup and more.
Some people find great joy in precision and following rules and plans. For those of you who do, this is probably not your power hammer series. I enjoy the creativity of making a thing from scratch. It’s not the precision that turns my crank, it’s that eureka moment of, “It works!”
In this installment I’ll talk through the process of building a junkyard hammer in the Appalachian style. Junkyard refers to the DIY-type build made with what you can find. Appalachian refers to a common design that uses a spring helve. The most popular earlier Appalachian hammer designs were called the “Rusty” and the “Dusty.”
Rocker-Arm Springs
I used a set of leaf springs for my rocker arm. The arm is also called a helve. When it comes to selecting your springs, if you have several to choose from, choose a sufficiently stiff set. If you have the choice between sets that are more curved vs. those that are straighter, choose the straighter ones. If you have the choice between sets that are longer or shorter in overall length, either one will work, but you’ll have to consider whichever length you choose as you lay out the distance between the center post, the anvil and the drive wheel. The length of your spring pack coupled with your stroke length will impact the speed at which your hammer will safely run. The spring action and whip action of the spring set during cycling increase head speed at contact, which improves performance.
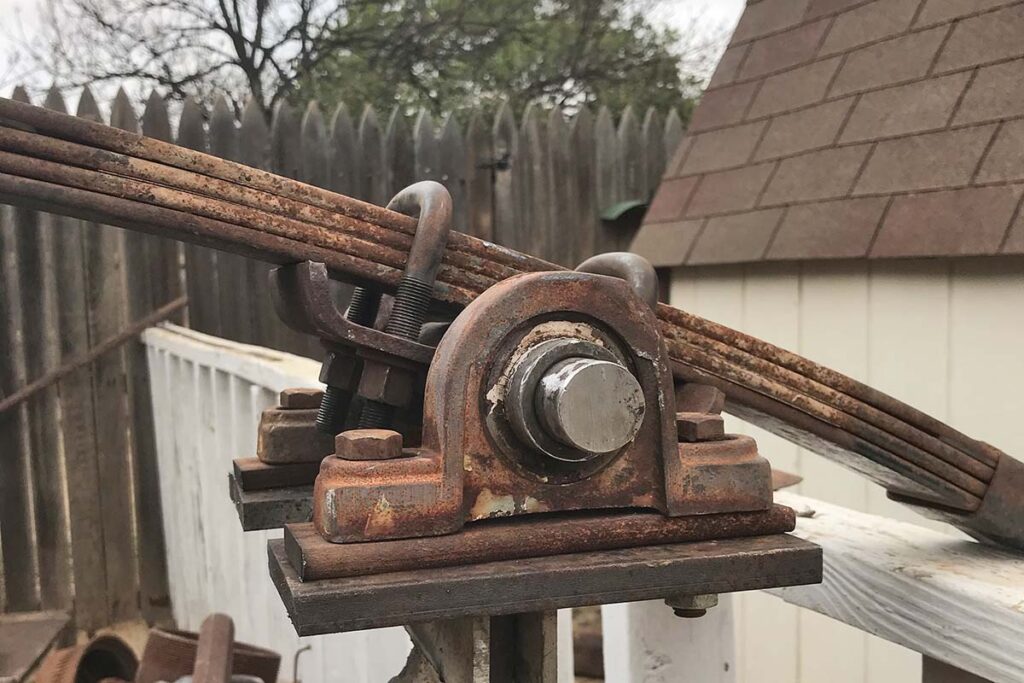
Your spring set needs to swivel or rock on top of your center post. I built my hammer with the springs riding on top of the shaft, and the shaft riding in pillow block bearings. Others are built with flange bearings, and others with the shaft above the springs. Any configuration is fine provided you have the clearance you need for the springs to rock back and forth as the hammer operates.
Your spring set will need a swivel on the end where it connects to the pitman arm (the rod that connects the spring arm to the drive wheel). Like the top pivot, there are as many different designs as there are guys building hammers.
The end of the spring set near the hammer head needs to be connected in a way where the arc of the spring travel is converted into direct linear up and down energy. Again, there are multiple ways to accomplish this. I went with a set of rollers on the hammer head, and the spring rides in and out on the rollers as it arcs up and down. I have seen designs with toggle linkage as well.
Hammer Head And Tup
The entire assembly that makes up the hammer head is called the tup. When a smith says he has a 25-pound power hammer, he’s referring to the tup weight. You are looking for a tup weight that is roughly 1/10 of your anvil weight. I built my hammer with a piece of 2-inch-solid-square stock long enough to make a 40-pound tup. For heads that weigh less, you can use a piece of solid stock for the contact area, and tubing or pipe to make up the extra length you need. While a solid anvil is critical to the function of the hammer, the hammer head itself only needs to be solid on the striking end to properly transfer the force.
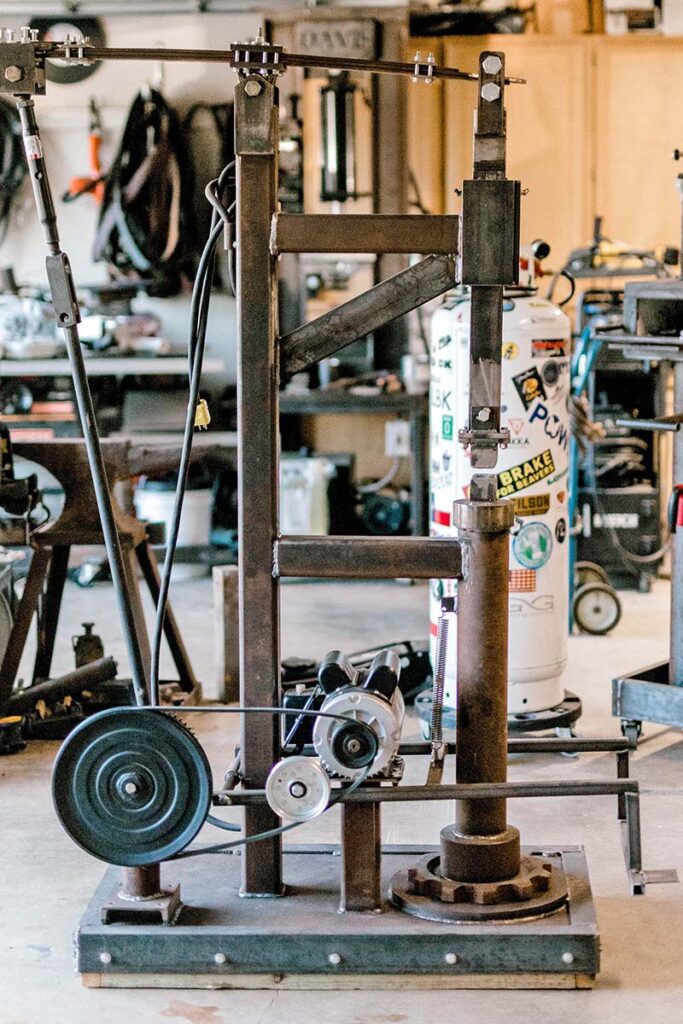
The tup rides up and down in a set of guides. You’re converting an arcing spring movement into a linear up-and-down hammer movement. One consideration is that your guides need to account for lateral movement in all four directions. The simplest way is for the guide to completely enclose the hammer shaft. Contact surfaces between the hammer head and guide should be lubricated, and steel on steel is not advised. Bearing surfaces should be made of UMHW (Ultra High Molecular Weight Polyethylene) plastic or of bronze. These surfaces benefit from a degree of adjustability to make sure that the hammer head is aligned properly with the anvil.
I used set screws and a UMHW plastic cutting board on my hammer, with lithium grease as well. My hammer runs well with fresh grease and less well without. I grease the hammer shaft at the beginning of every forging session. The vertical position and length of your guides should accommodate the various stroke lengths of your hammer. You don’t want the hammer head hitting the bottom of the guide on the upstroke, nor the spring connector hitting the top of the guide on the downstroke.
Pitman Arm
A stiff arm connects the spring pack to the rotating wheel, converting the rotary action of the flywheel to a straight up-and-down rocking motion. This arm is called a pitman arm. It is adjustable for length, as the dimension will ultimately be changed as you tune your hammer by trial and error, or as you adjust your hammer to accommodate varying thicknesses of stock, or the use of swages, or top and bottom tools. I used a toggle linkage on the top and for the bottom of the arm I used large bolts welded to a piece of plate, which I then bolted to the hub of the tire used for a clutch. This is another area where your available parts and mechanical experience will dictate your design.
Read More On Knife Steel:
- 3 Knfie Steel Basics
- What Are The Best Blade Steels?
- Is Steel Type Really The Most Important Factor In A Knife?
- San-Mai: Knive Steel Trinity
 NEXT STEP: Download Your Free KNIFE GUIDE Issue of BLADE Magazine
BLADE’s annual Knife Guide Issue features the newest knives and sharpeners, plus knife and axe reviews, knife sheaths, kit knives and a Knife Industry Directory.Get your FREE digital PDF instant download of the annual Knife Guide. No, really! We will email it to you right now when you subscribe to the BLADE email newsletter.


