Knives and knife people go wall-to-wall at BLADE Show ’24.
Wall-to-wall attendance, dynamite knife sales, sensational award knives and much more made BLADE Show 2024 June 7-9 at the Cobb Galleria Centre in Atlanta one for the record books. However, it took custom knife purveyor Dave Ellis of exquisiteknives.com to put things into proper perspective.
The long-time BLADE Show exhibitor of Vista, California, sold out of knives and had yet another whiz-bang show, but he said it’s the intangibles that make the BLADE Show the dynamic event it is year in and year out.
“It was a great show and the sales were fantastic, but the main thing about the BLADE Show is the camaraderie, the old friends you see and talk to that make the show so special,” he said. “It’s really rewarding, and though the sales are great, the people are better.”
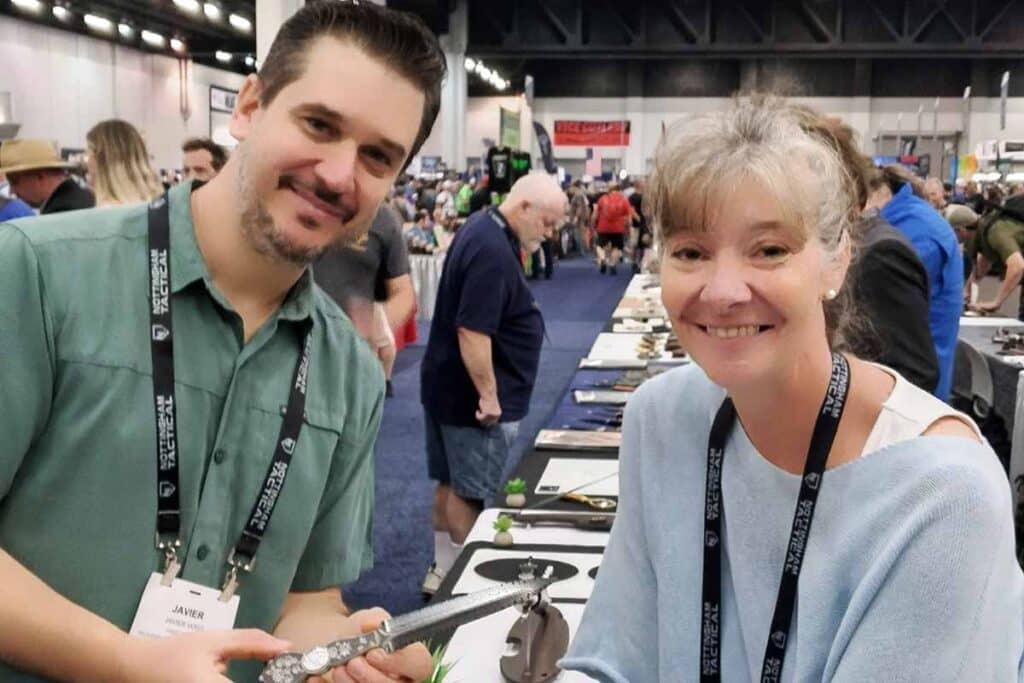
Argentina’s Javier Vogt and Belgium’s Veronique Laurent represented two of the 35 countries providing exhibitors for BLADE Show ’24. The knife is one of Veronique’s art daggers.
Speaking of people, ABS master smith Harvey Dean said it was one of the best if not the best attended BLADE Shows he’s ever seen. “At past shows there would be dead times when the crowd would thin out a little bit before increasing again,” he noted. “This show seemed crowded the whole time.”
The factory section enjoyed heavy traffic as well and patrons seemed to be buying knives.
“The BLADE Show was fantastic,” said Curtis Iovito of Spartan Blades, whose company won its first-ever BLADE Magazine Overall Knife Of The Year® with the Bill-Harsey-designed Clandestina. “Sales were the highest we have ever seen.”
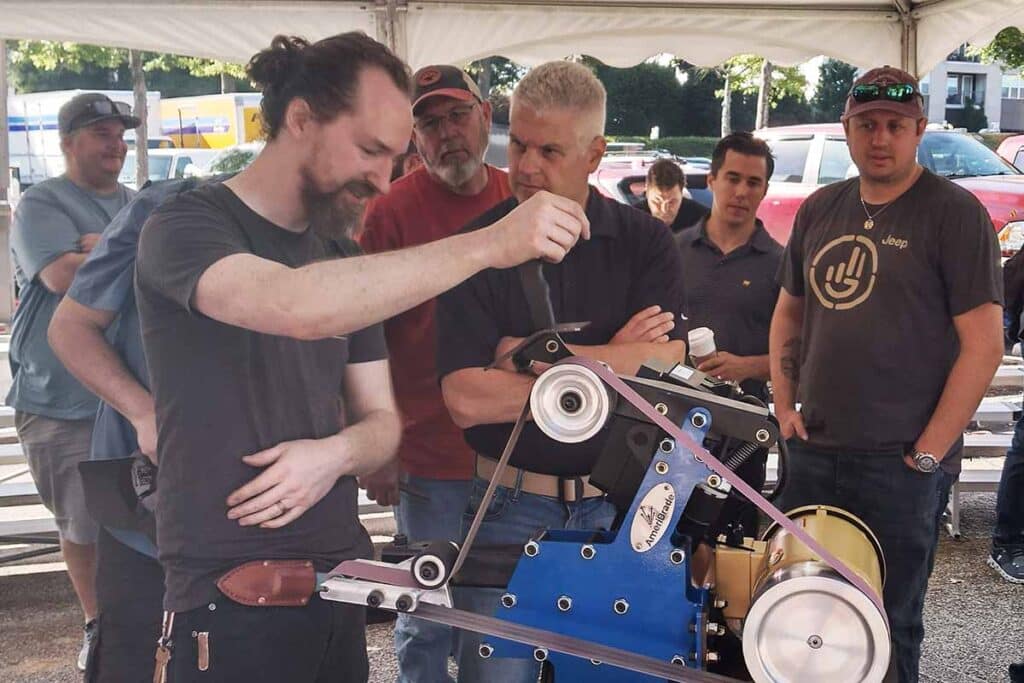
Charlie Ellis (left foreground) was one of the guest makers providing BLADE University instruction in the AmeriBrade grinding seminar.
As usual, Saturday was the busiest day, though Friday was very good for three members of the South Texas Slipjoint Cartel in particular, with Luke Swenson selling out in the first hour and Toby Hill, who brought nine knives, selling out in the first two hours. Another Cartel alum, Enrique Pena, sold out as well. Along with Javier Garcia and Jared Oeser, Enrique also won Best Collaboration in the custom knife judging competition.
Brazilian ABS master smith Dionatam Franco de Souza said the show was very good for him, as he brought four knives and sold three, all in the high-dollar range. He also won Best Utility Hunter in the custom knife judging competition.
As with all shows, other reviews were mixed. One purveyor said some exhibitors said the crowd seemed down this year. On a scale of one to 10, ABS master smith Jordan LaMothe gave show attendance a five. He brought 14 knives and sold only three, all in the three and low-four-figure range, with two going to regular clients and one going to a new one. He said 20 percent of those who visited his table seemed to be buyers. Meanwhile, Jordan won yet another custom knife judging award, this time for Best Kitchen Knife.
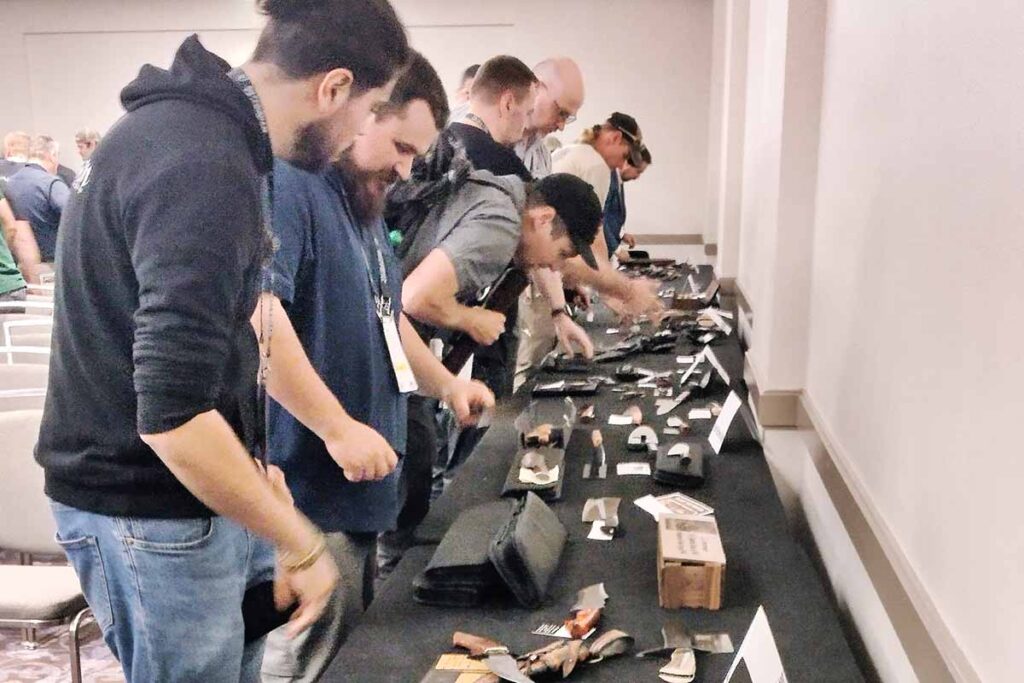
Makers entered their knives in the custom knife judging competition Friday afternoon.
If sales were down for some, part of the reason may be what one purveyor said is a slowdown in the sale of damascus knives. He attributed the slowdown to a “burning out” of demand due to a glut of the pattern-welded knives. While many current examples of damascus are outstanding, there’s just too many knives made from it and supply is outpacing demand, the purveyor observed. Replacing the damascus knives in demand are straight carbon steel knives with nice hamons, he added. How long the trend will last is anybody’s guess.
BLADE Show 2024 Highlights
To kick things off, a stout soul replete in Scottish kilt and playing the bagpipes led an energetic throng of patrons into the show hall Friday morning. Thousands of patrons were about to descend on the almost 1,000 exhibitors from 35 countries in the main show hall and Baller Room in the coming three days.
Meanwhile, BLADE University classes, which started the day before at 4 p.m. and earlier Friday morning, continued throughout the day and into Saturday. Friday afternoon witnessed the custom knife judging competition, with winners selected in 16 categories. The Knifemakers’ Guild announced its best knives of the BLADE Show and also named BLADE Magazine Cutlery Hall-of-Fame® member and BLADE editor Steve Shackleford winner of the Nate Posner Memorial Award in recognition of outstanding service in the promotion of handcrafted cutlery. The American Bladesmith Society held its awards ceremony after show closing Friday, including presenting Fabio Barros with his ABS master smith stamp and announcing 14 new journeyman smith awardees (for the names of all the new smiths, visit americanbladesmith.org, click on ABS News and Events and scroll to Congratulations to Our New Rated Smiths).
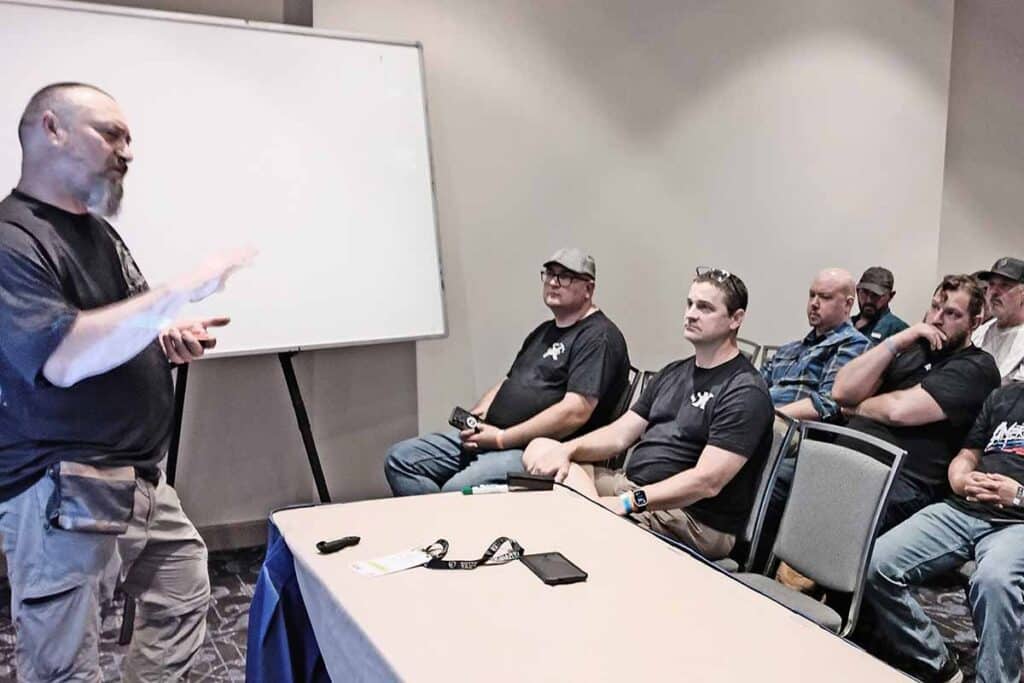
South African ABS master smith Neels van den Berg presented his BLADE University class, Symmetrical Quillon Dagger 101.
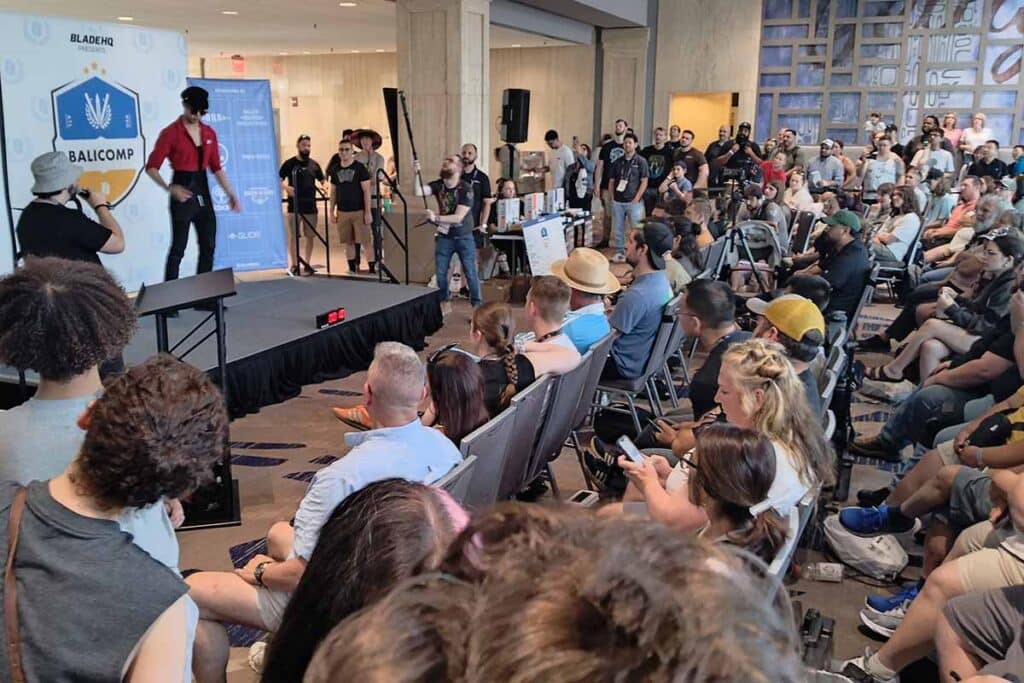
Saturday started early with the BLADE Magazine Cutlery Hall-of-Fame breakfast/induction ceremony, with Ted Dowell, Don Fogg and Bill Harsey being formally inducted in the Kennesaw Room of the Renaissance Waverly Hotel. The 8th Annual Battle for Bali-Champion conducted by Blade HQ commenced at noon in a new venue—the second floor of the Renaissance—before a packed house, with Steven Ash taking the title followed by Corbin Lovins in second place and Seiji Brown in third.
Capping off Saturday was the BLADE Magazine Awards Presentation. Held at 8 p.m. in a new venue—also on the second floor of the Renaissance—the ceremony officially recognized the BLADE Magazine 2024 Knife-of-the-Year Awards® and the BLADE Show custom knife judging award winners.
On Sunday morning, the winners of the knife collection display judging were named. Gene Merritt won Best in Show for his David Yellowhorse First 25 Years display. Judges Awards went to Dale Eichberg for his display, Preproduction Buck Knives, and Brian Hugh for Buck Tactical Knives. The Youth Award went to Caleb Lindsey for Custom Knives by David Yellowhorse.
Upcoming Shows
Next up on the BLADE Show calendar is BLADE Show West, Oct. 4-5 in Salt Lake City, Utah. For more information, visit bladeshowwest.com. After that will be BLADE Show Texas, March 7-8, 2025, in Fort Worth, Texas (bladeshowtexas.com).
Patrons enjoy the 8th Annual Battle for Bali-Champion conducted by Blade HQ in the event’s new venue on the second floor of the Renaissance Waverly Hotel.
As for next year’s BLADE Show, it returns to the Cobb Galleria Centre in Atlanta June 6-8. See you there!
Barret Chrisman puts a modern spin on a vintage Remington design.
Barret Chrisman’s contemporary take on the classic Remington 1306 Bullet lockback combines tradition and hi-tech in one handsome custom pocketknife.
Barret outfitted his repro with all cutting-edge materials, including a blade of Loki pattern damascus by Damasteel, a handle of checkered titanium that resembles jigging and a titanium bullet shield. “I’ve seen people jig titanium before but I wanted to try checkering, so I made up a custom pantograph template and tried it out,” he said. He anodized the handle a purplish bronze.
Barret Chrisman
“It’s a modern take on an old school knife everybody likes,” Barret noted, “and I’ll probably be doing the same kind of thing in the future.”
Remington 1306 Bullet Modern Reproduction Specs Maker: Barret Chrisman Blade length: 4” Blade material: Loki pattern damascus by Damasteel Blade grind: Full flat Handle frame: Titanium Handle scales: Checkered titanium w/inlaid titanium bullet shield Lock: Lockback Closed length: 47/8” Maker’s price for a similar knife: $1,500
As always, a slew of new knives are hitting the custom and factory markets. We scoured both to bring you some of the latest and greatest handmade and production gems. Keep your eyes peeled for these fantastic options hitting dealers’ shelves soon.
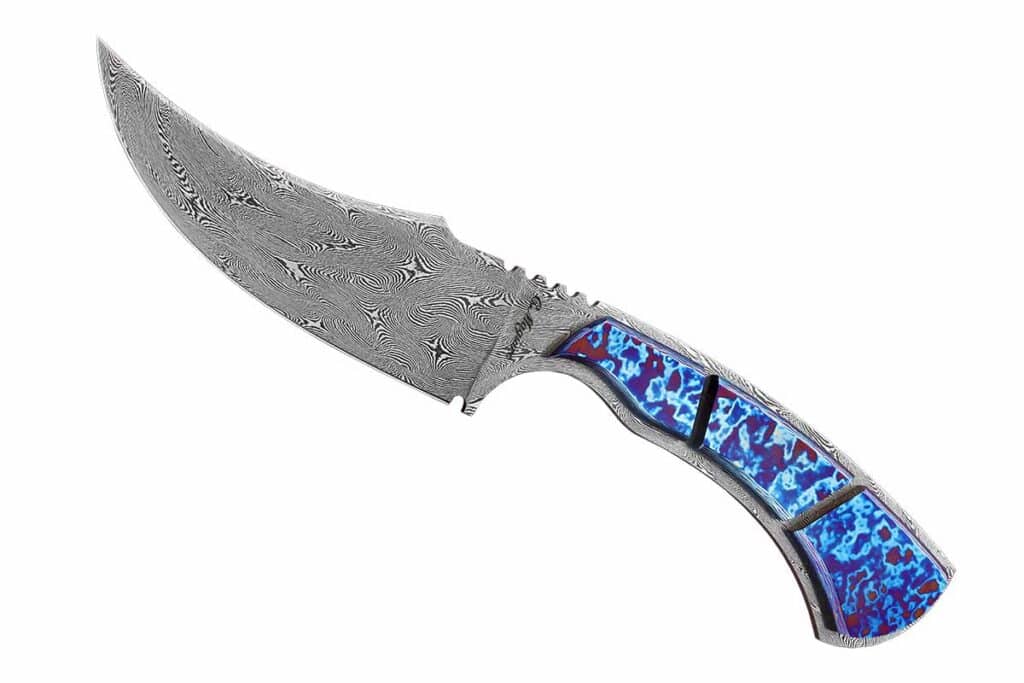
Collin Maguire Alien Vest Bowie
KNIFE TYPE: Fixed blade BLADE LENGTH: 4 1/8” from tip to plunge cut BLADE MATERIAL: 4-bar Turkish twist damascus BLADE GRIND: Flat BLADE PATTERN: Harpoon/trailing point HANDLE MATERIAL: Timascus™ OVERALL LENGTH: 8.25” CONSTRUCTION: Integral MAKER’S PRICE FOR A SIMILAR KNIFE: $1,200 MAKER: Collin Maguire, Dept., (SharpByCoop image)
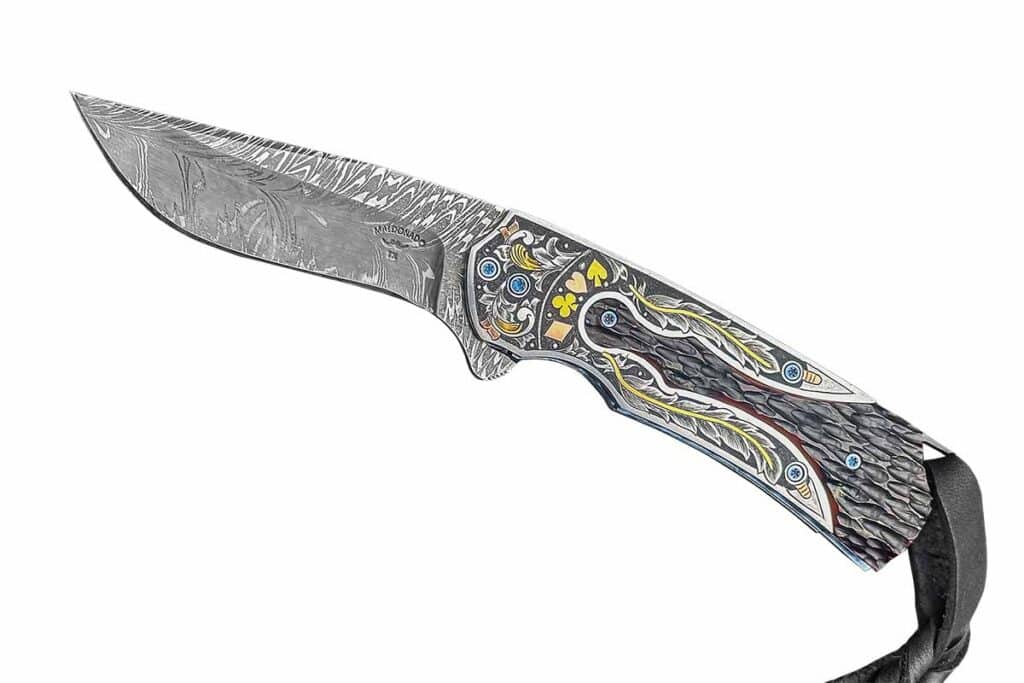
Eliot Maldonado Diamond Keyhole
BLADE LENGTH: 2.75” BLADE MATERIAL: A damascus pattern of 1084 carbon and 15N20 nickel alloy steels HANDLE: Amber jigged bone LINERS: Titanium BOLSTER: 416 stainless steel engraved by Dale Bass CLOSED LENGTH: 3.25” MAKER: Eliot Maldonado, (Jocelyn Frasier image)
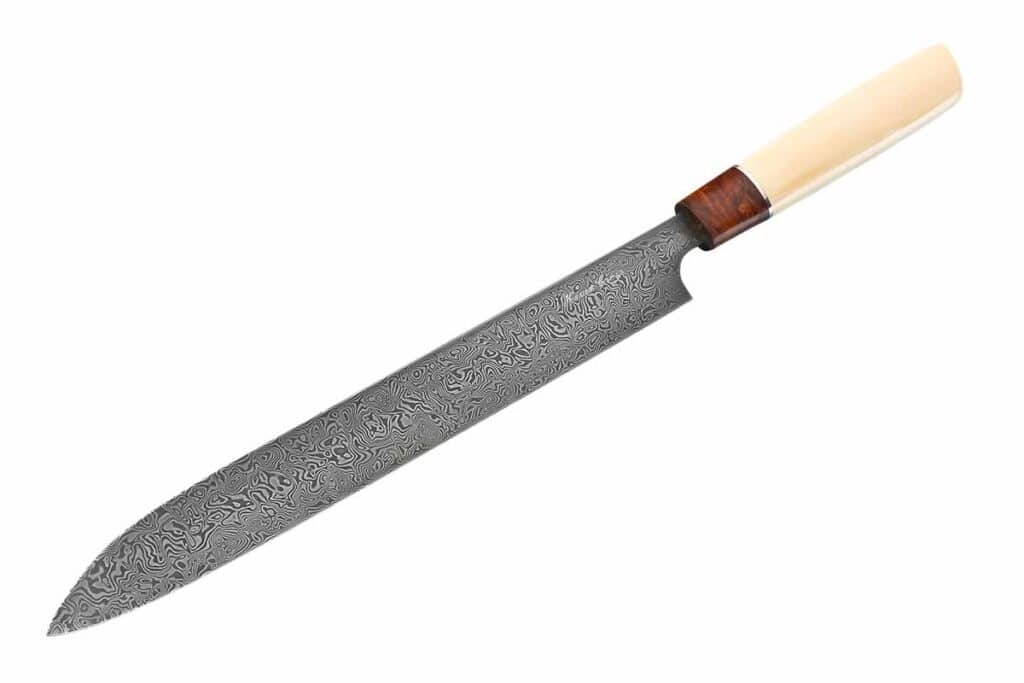
Kevin Cross Yanagiba
KNIFE TYPE: Sushi/sashimi knife BLADE LENGTH: 10.6” BLADE STEEL: Damascus forged by Damasteel BLADE GRIND: Single bevel on dominant hand side, concave on the other, aka urasuki HANDLE MATERIAL: Mammoth ivory BOLSTER: Honduran rosewood OVERALL LENGTH: 17” SAYA (sheath): Wood MAKER’S PRICE FOR A SIMILAR KNIFE AND SHEATH: $1,800 MAKER: Kevin Cross, kevincrossknives.net (SharpByCoop image)
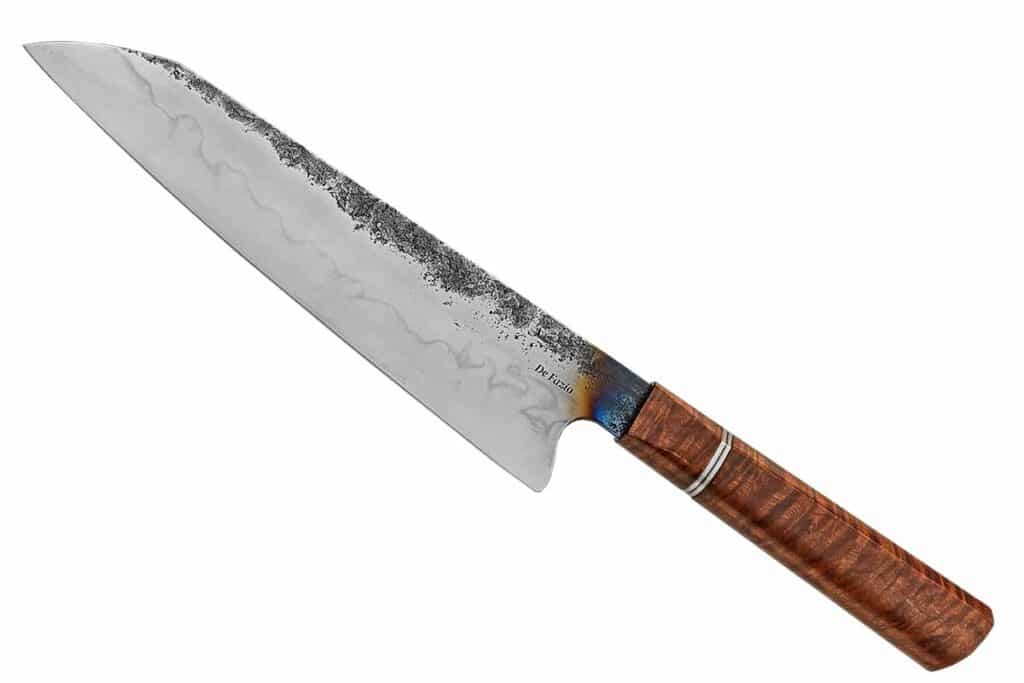
Aiden De Fazio Gyuto Chef’s Knife
BLADE LENGTH: 8.27” BLADE MATERIAL: W2 tool steel BLADE GRIND: Slightly convex BLADE THICKNESS @ RICASSO: .138” BLADE @ WIDEST: 2.05” HANDLE MATERIAL: Ringed gidgee SPACERS: San-mai damascus OVERALL LENGTH: 14.17” MAKER’S PRICE FOR A SIMILAR KNIFE: $470 at press-time exchange rate MAKER: Aiden De Fazio, (Rod Hoare image)
The Farmers Forge The Zebra
MODEL TYPE: Axe/hatchet BLADE LENGTH: 3.35” BLADE MATERIAL: Damascus of 1084 carbon and 15N20 nickel alloy steels BLADE GRIND: Convex HANDLE: Wedge is piened stainless steel FRAME MATERIAL: Australian cudgee OVERALL LENGTH: 14.2” MAKER’S PRICE FOR A SIMILAR PIECE: $1,000 at press-time exchange rate MAKER: The Farmers Forge, thefarmersforge.com.au (Rod Hoare image)
BLADE LENGTH: 3.75” BLADE MATERIAL: A 351-layer random pattern damascus of 1084 carbon and 15N20 nickel alloy steels HANDLE: Natural buckeye burl HANDLE SPACERS: Green G-10 and stainless steel OVERALL LENGTH: 8.37” KNIFE TO KNOW: Eric Hemker is an apprentice smith in the American Bladesmith Society MAKER: Eric Hemker, Armada, Michigan, hemkerblacksmithing.com (Jocelyn Frasier image)
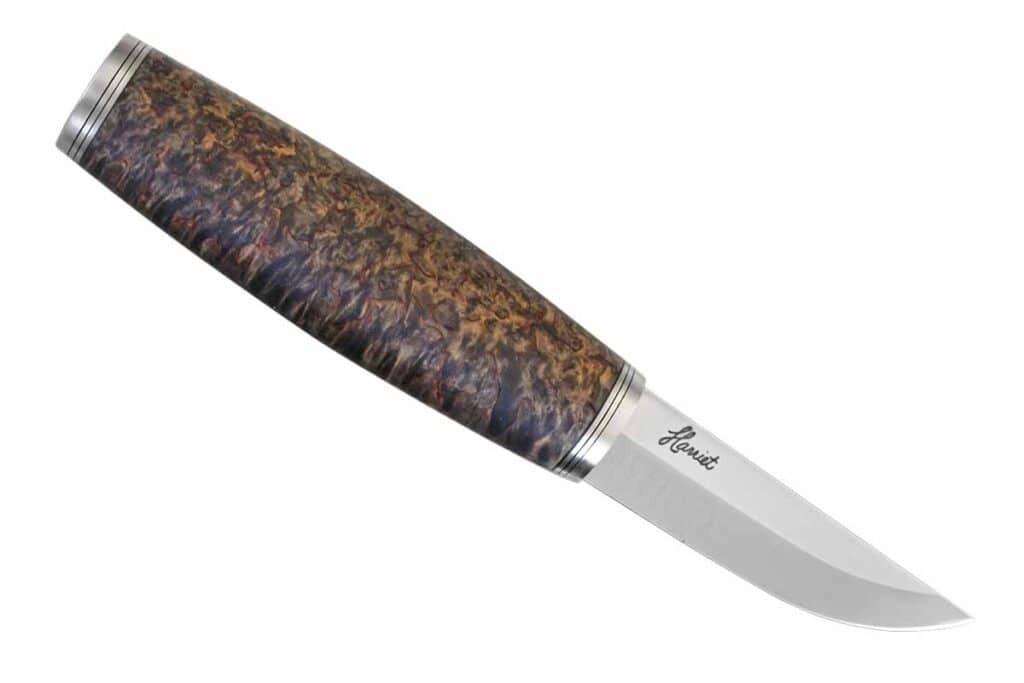
Kellam Knives Worldwide Harriet 70
KNIFE TYPE: Puukko BLADE LENGTH: 3” BLADE STEEL: Polished stainless BLADE GRIND: Scandi HANDLE: Dark-dyed Arctic curly birch BOLSTERS: Tri-layered nickel silver CONSTRUCTION: Full-tapered tang OVERALL LENGTH: 7.5” SHEATH TYPE/MATERIAL: Swinger style/dark-stained ox hide leather w/stainless band KNIFE TO KNOW: The knife is named for Harriet Mars-Kellokoski, wife of company headman Jouni Kellokoski; Harriet has worked with the company for many years, was involved in the knife’s design and her signature appears on the blade; the first 70 editions are numbered MSRP: $179.98 COMPANY: Kellam Knives Worldwide, kellamknives.com
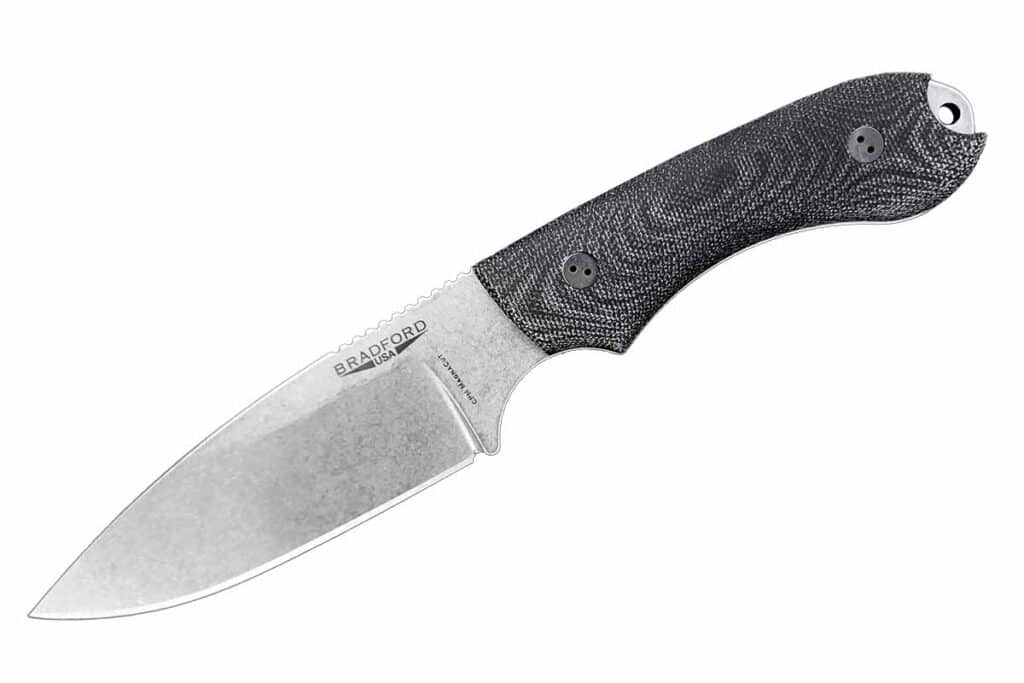
Bradford USA Guardian 4.2
KNIFE TYPE: Fixed blade BLADE LENGTH: 4.825” BLADE STEEL: CPM MagnaCut stainless BLADE GRIND: Sabre and full height HANDLE MATERIAL: Choice of G-10, Micarta® and carbon fiber WEIGHT: 6.7 ozs. OVERALL LENGTH: 9.375” SHEATH TYPE/MATERIAL: Vertical bridle/leather COUNTRY OF ORIGIN: USA MSRP: $269 COMPANY: Bradford USA, [email protected]
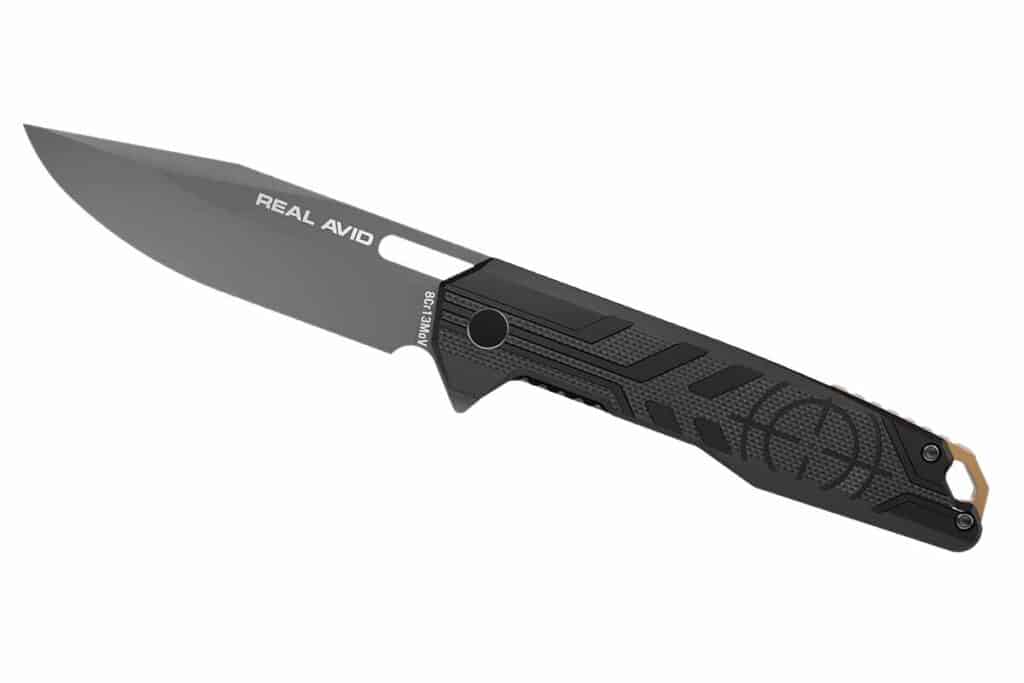
Real Avid RAV Series
KNIFE TYPE: Folder BLADE LENGTHS: Depending on the choice of drop point, tanto or modified clip point, 3.25 or 3.4” BLADE STEELS: A choice of 4Cr14 and 8Cr13MoV stainless BLADE FINISHES: Black oxide or titanium HANDLE MATERIAL: Choice of nylon, aluminum, aluminum/stainless steel, glass-filled nylon, aluminum/carbon fiber and G-10 POCKET CLIP: Yes LOCKS: Spring-assisted linerlock or AXIS lock KNIFE TO KNOW: The RAV series includes a variety of knives named RAV-1 through RAV-7 COUNTRY OF ORIGIN: Engineered in the USA, manufactured in China MSRPs: Range from $24.99 to $49.99 COMPANY: Real Avid, realavid.com
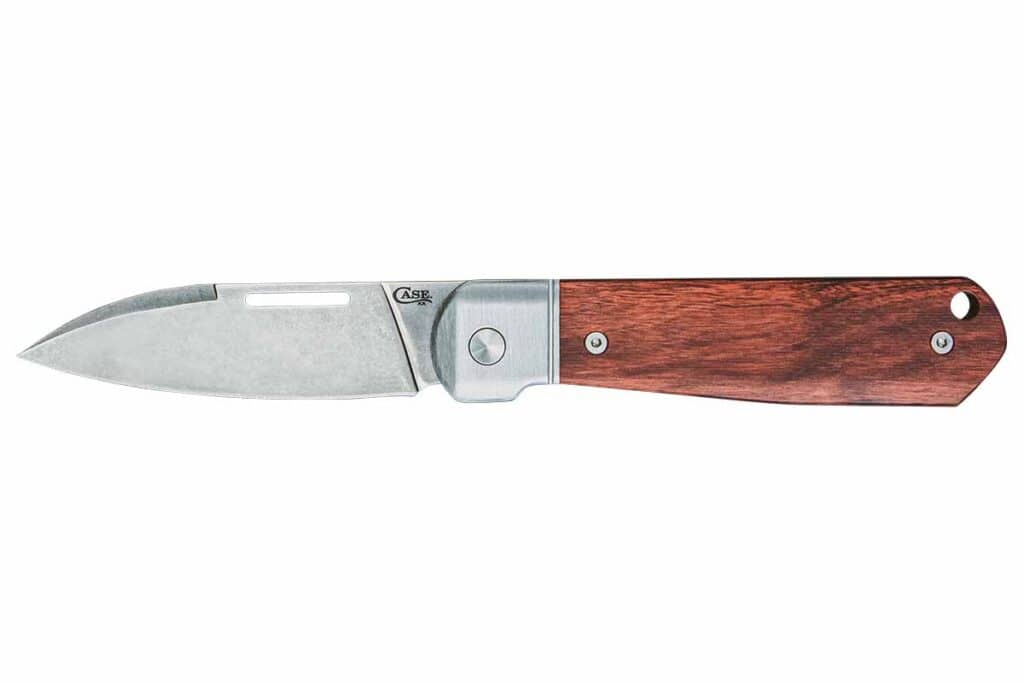
W. R. Case Longhouse
KNIFE TYPE: Slipjoint BLADE LENGTH: 2.75” BLADE STEEL: CPM 20CV stainless BLADE PATTERN: Modified wharncliffe BLADE FINISH: Stonewash satin HANDLE MATERIAL: Choice of black burlap and OD green Micarta® and rosewood BOLSTER: Pinched and fluted POCKET CLIP: Deep carry CONSTRUCTION: Screw design WEIGHT: 3.3 ozs. CLOSED LENGTH: 4” COUNTRY OF ORIGIN: USA MSRP: $189.99 COMPANY: W. R. Case, www.wrcase.com
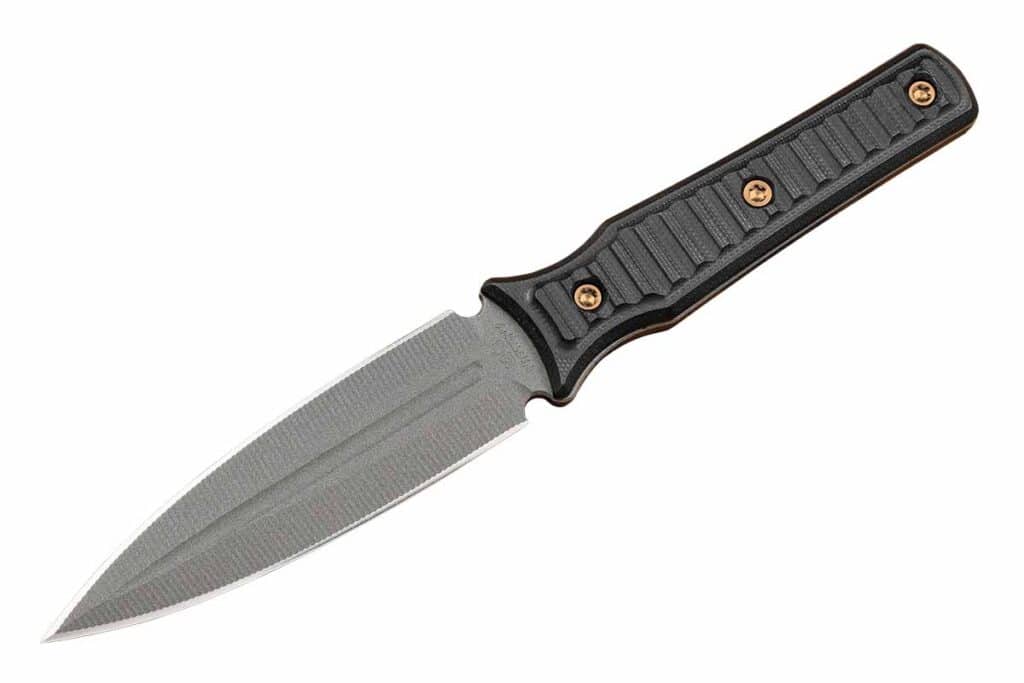
RMJ Tactical Orlando Special
BLADE LENGTH: 4.5” BLADE STEEL: Nitro V stainless ROCKWELL HARDNESS: 59-60 HRC BLADE @ THICKEST: 1/8” BLADE FINISH: Tungsten gray Cerakote® BLADE STYLE: Clovis HANDLE MATERIAL: Choice of black G-10, dirty olive and hyena brown HANDLE FASTENERS: Torx Grade 5 titanium anodized bronze WEIGHT: 4.6 ozs. OVERALL LENGTH: 8 7/8” SHEATH: Kydex w/1.5” belt clip COUNTRY OF ORIGIN: USA MSRP: $295 MAKER: RMJ Tactical, www.rmjtactical.com
Need to keep your edge? These top knife sharpeners are sure to keep your blades sharp and in good working order in no time at all.
It’s not much of a knife if it doesn’t have a sharp edge. To that end, 2024’s hottest sharpeners will make your favorite tool cut like it ought to. Plain to serrated, short blades to long, kitchen to deer camp and just about any blade worth using can get keen quick with one or more of this year’s fresh edge makers.
Spyderco Golden Stone and Webfoot Set
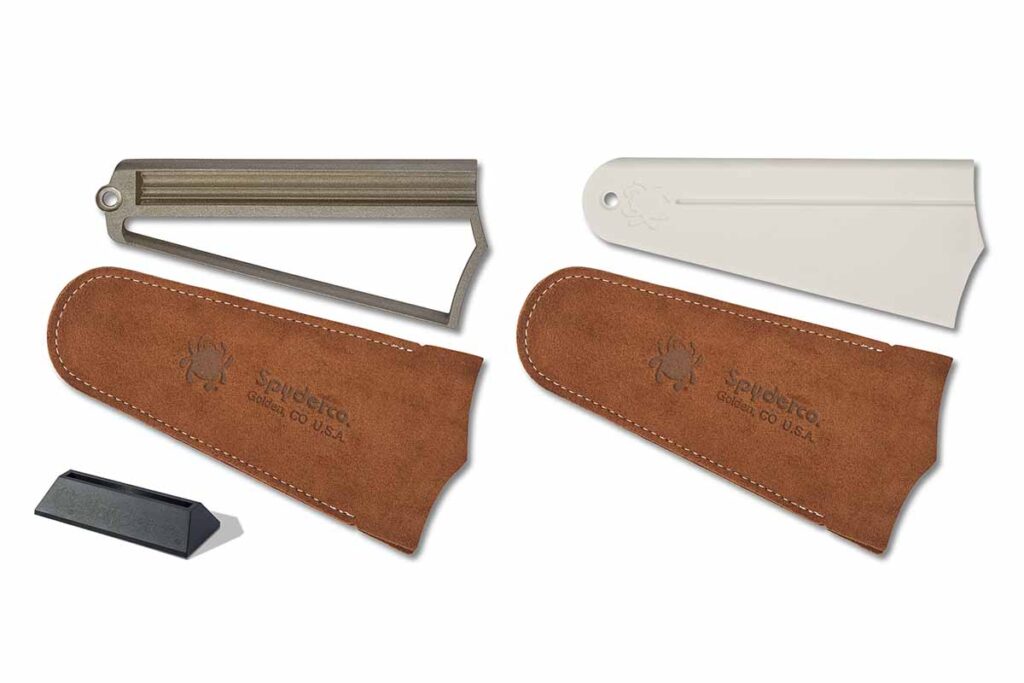
The Spyderco Golden Stone and Webfoot Set includes a Golden Stone (right), Webfoot (left), two suede pouches, one plastic base (lower left), and an illustrated instruction book that explains how to use the sharpeners to put an edge on practically any home cutting tool.
One of the coolest studies in sharp is the Spyderco Golden Stone and Webfoot Set. “The set offers a uniquely different approach to knife and tool sharpening,” began Michael Janich, Spyderco special projects coordinator. “Of similar design, they can be used anywhere, set up in seconds, and do not require oil, water, electricity or any complicated clamps or fixtures.”
Both sharpeners feature a distinctive “duck foot” design tapered on one end and that has twin scallops on the other. To use either sharpener, hold the narrow end in one hand and rest the wide end on a flat surface. The center point of the wide end, between the scallops, acts as a fulcrum.
“Rocking the sharpener from side to side until the outer points contact the surface aligns its outer edges to create a perfect 40-degree included angle,” Michael noted. “Simply keep the plane of your blade vertical and draw it from heel to tip down the outer edge. Then, rock the sharpener in the other direction and repeat the process on the other side of the stone. Alternating from side to side quickly creates a sharp, utilitarian 40-degree edge.”
For a thinner edge, the Webfoot and Golden Stone can also be used with the included ABS plastic base. Steps in the cavity of the base limit the rock from side to side, reducing the sharpening angle to 30 degrees. Laid on their sides, the sharpeners also offer a 12.5-degree angle for easily sharpening scissors and shears.
“The long edges of both sharpeners are tapered, so they naturally follow the contours of all blade shapes—even hawkbills and recurves—and can be used to easily sharpen serrated edges using the same sharpening technique,” Michael explained. “Their innovative designs also include rounded edges, grooves, and flat areas that provide multiple abrasive surfaces to sharpen tools of all shapes and sizes.”
The Webfoot is coated in an aggressive 600-mesh cubic boron nitride (CBN) abrasive. A form of synthetic diamond, CBN removes steel quickly and is ideal for reprofiling edges or sharpening very dull knives to a utility edge. For touch ups or to achieve a more refined edge after using the Webfoot, the Golden Stone features a fine-grit ceramic abrasive that is the equivalent of a 1,200 grit. Both sharpeners are supplied with suede pouches that protect them when not in use and do double duty as non-slip mats during the sharpening process.
The set includes one Golden Stone, one Webfoot, two suede pouches, one plastic base, and an illustrated instruction book that explains how to use the sharpeners to put an edge on practically any home cutting tool.
Spyderco Webfoot Specs Sharpener Type: Proprietary “rocking” design Blades sharpened: All, including scissors, pointed tools, gouges and serrated edges Abrasive Type: Cubic boron nitride Grit: 600 mesh Dimensions: 7” x 3” x 0.25” Construction Materials: One-piece carbon steel embryo Weight: 6.05 ozs. SPECIAL FEATURES: Includes multiple abrasive surfaces and shapes Country of origin: China MSRP: $89 ($270 in a set w/Golden Stone) Available: Now
Spyderco Golden Stone Specs Sharpener Type: Proprietary “rocking” design Blades sharpened: All, including scissors, pointed tools and serrated edges Abrasive type: High-alumina ceramic Grit: 1,200 grit equivalent Dimensions: 7.2” x 3” x 0.25” Construction materials: One-piece fine-grit ceramic Weight: 7.6 ozs. SPECIAL FEATURES: Includes multiple abrasive surfaces and shapes Country of Origin: USA MSRP: $210 ($270 in a set w/Webfoot) Available: Now
Work Sharp Ken Onion MK.2
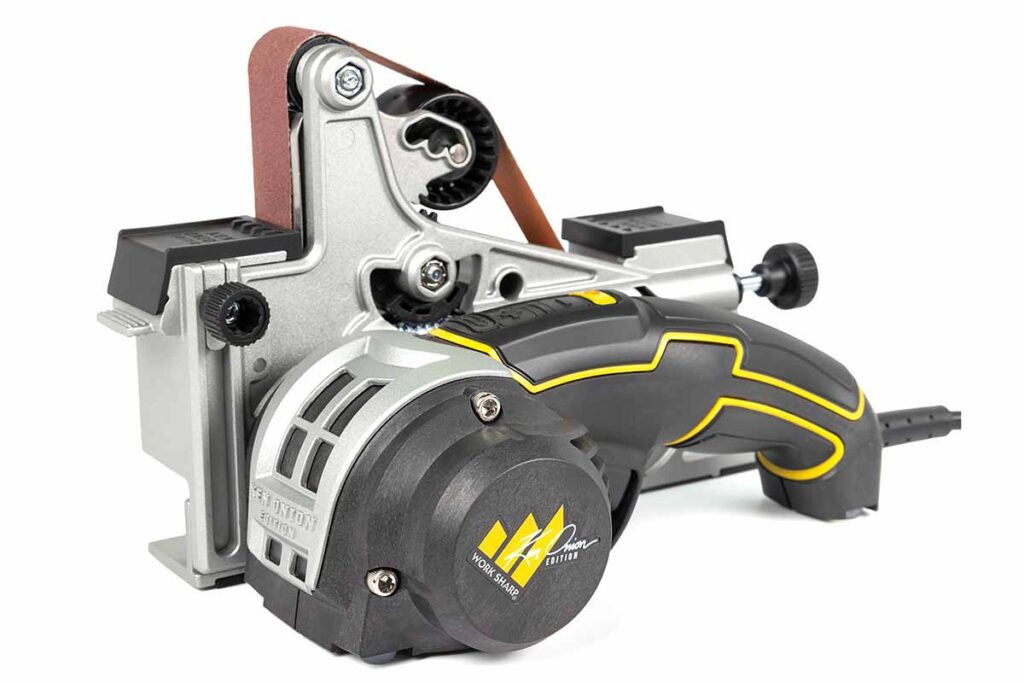
The Ken Onion MK.2 comes as a stand-alone sharpener or as one of the company’s Elite packages that includes the base sharpener along with a fully featured blade grinding attachment.
The new Ken Onion MK.2 from Work Sharp comes as a stand-alone sharpener or as one of the company’s Elite packages that include the base sharpener along with a fully featured blade grinding attachment.
The sharpener sports a fresh new look and improved ergonomics to make it feel better in the hand during use. A new motor speed control offers seven pre-set settings to provide a consistent and repeatable sharpening experience, while the new torque control delivers consistent power, even under load. Positioned prominently atop the unit, amber LED indicator lights make selecting belt speed fast and easy.
A sharpening guide has a scope click adjustment knob. Detent clicks in half degree increments from 15 to 30 degrees along the dial allow for improved precision, consistency and repeatability, meaning you get the exact same edge angle every time you sharpen.
New leather-lined angle guides offer protection for knives during sharpening, while the sharpener’s improved guide design allows for knives with thumb studs. A lock-out belt tensioner on the sharpening cassette helps make changing abrasive belts fast and simple. Five grits accommodate the full spectrum of sharpening, from repair to ultra-fine polishing.
The system includes the standard triangle cassette sharpener along with a complementary blade grinding attachment for those who want to elevate their sharpening game. It’s built on a rigid metal chassis designed to offer a stable platform and features metal components engineered to last.
An adjustable, three-position convex pulley system enables you to customize grind profiles depending on personal preference or the type of knives being sharpened. Grind profiles can be set to low, medium or high convex quick and easy, again without tools. An angle adjustment knob, now located in a more visible position, makes setting grind angles faster and easier than ever. At the turn of the knob, you can rotate the dial anywhere from 10 to 30 degrees to set your preferred angle and can even make precise adjustments while the machine is running.
Work Sharp Ken Onion MK.2 Specs Sharpener Type: Electric benchtop w/grinding attachment Blades sharpened: Pocketknife, kitchen knife, hunting knife, serrated, axe and scissors Grit Selection: ¾” x 12” Belt Kit: (1 ea.) P120 (extra coarse), X65 (coarse), X22 (medium), X4 (fine), 6000 (extra fine); also 1” x 18” Belt Kit (for grinder): P120, X65, X22, X4, 12000 and cloth belt for stropping. Dimensions: Stand-alone sharpener: 9 ¾” long x 5 ¾” wide x 5 ½” tall; w/blade grinding attachment: 10” long x 6 ¼” wide x 6 ½” tall Construction materials: Metal, plastic and tactile rubber; grinding attachment is built on a rigid metal chassis designed to offer a stable platform and features metal components throughout that are engineered to last. Weight: 7 lbs. SPECIAL FEATURES 7-speed motor control with LED display; Sharpening guide w/scope click adjustment knob. Detent clicks in half degree increments from 15 to 30 degrees along the dial; Leather-lined angle guides offer protection for knives during sharpening; Tool sharpening cassette with 65-degree angle scissor guide; Blade grinding attachment quickly and easily mounts to the MK.2 power base without tools or calibration. Once attached, the grinder boasts on-the-fly motor speed control and continuous run time with LED indicator lights that make selecting belt speed fast and easy; An adjustable, three-position convex pulley system enables you to customize the grind profile depending on personal preference or the type of knives being sharpened; Graphic user guide along with a quick start guide helps you understand and operate the sharpener successfully, and; Flexible abrasive belts and angle guides provide precision results on just about anything that needs sharpening. Country of origin: Made of foreign parts; designed, calibrated and quality checked in Ashland, Oregon MSRP: $300 Available: Now
Wicked Edge Cobalt WE64
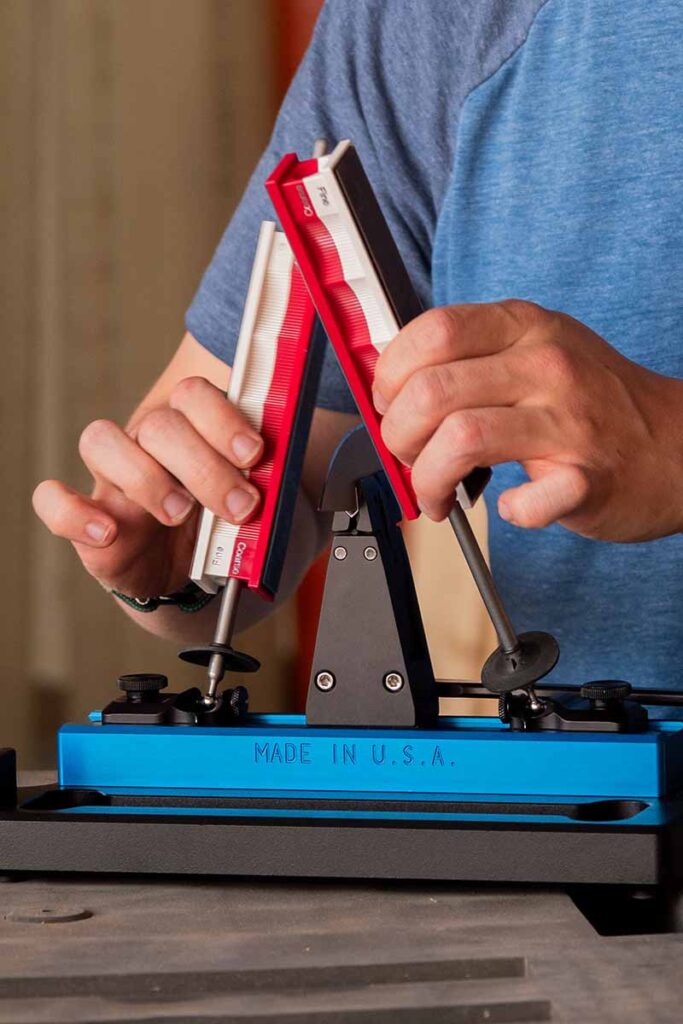
Wicked Edge’s patented Dual-Sided Sharpening Technology, DualCam Vise and more highlight the new Cobalt WE64.
The Wicked Edge Cobalt WE64 features easy clamping ability with the company’s DualCam Vise to the portable form factor of the company’s GO-WE60 sharpening unit.
According to Wicked Edge, the result is the fastest sharpening experience in the 60 Series line, including both standard edge maintenance and touchups.
The WE64 is lightweight and compact for storage and travel and can be secured to a hard, flat surface with the included C-clamp, or directly mounted to a work surface through the predrilled holes in the base. It is compatible with all Wicked Edge sharpening stones and strops and assorted other of the company’s sharpening accessories.
Wicked Edge Cobalt WE64 Specs Sharpener Type: Precision guided manual Edges sharpened: All but serrated Abrasive Type: Monocrystalline diamond stones Grit Selection: 200/600 diamond stones (2 each) Dimensions: 11.5” x 4” x 4.75” Construction Materials: Type 2 anodized aluminum, stainless steel and Delrin Weight: 3.5 lbs. SPECIAL FEATURES Patented Dual-Sided Sharpening Technology; DualCam Vise, included repeatability tools, lightweight, portable design, C-Clamp, standard alignment guide, guide rod shields, practice knife, limited lifetime warranty Sharpens blades up to 15” long Angle range: 13-31 degrees per side (26-62 degrees inclusive) Angle markings in 1-degree increments Able to clamp blades up to 3/16” thick and able to clamp thicker blades with the unit’s .25-inch jaws Country of Origin: USA MSRP: $499 Available: Now
AccuSharp Explorer Knife & Tool Sharpener and Outdoor Survival Tool
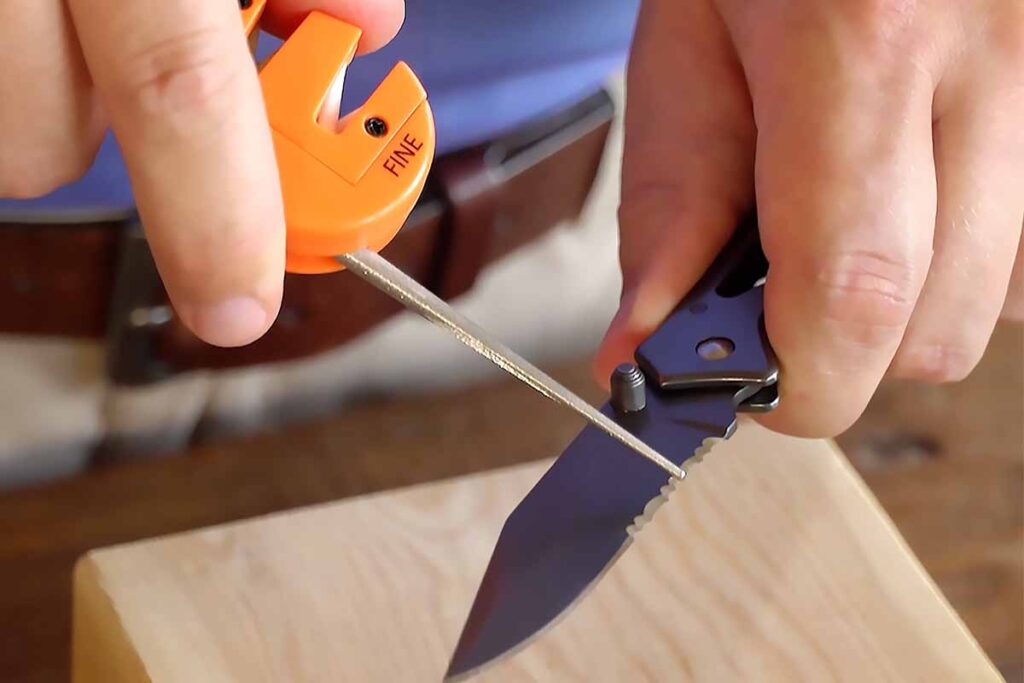
The AccuSharp Explorer Knife & Tool Sharpener and Outdoor Survival Tool not only sharpens serrated and plain edge blades, it also boasts a selection of survival/emergency tools
The AccuSharp Explorer Knife & Tool Sharpener and Outdoor Survival Tool has a wealth of sharpening and survival tools for outdoor enthusiasts. Diamond-honed tungsten carbide blades and fine ceramic rods address plain edges. The diamond-tapered rod sharpens serrations and gut hooks, while a center groove sharpens fishhooks and various pointed objects. The multifunctional tool also features a fire starter, compass, emergency whistle and SOS mirror for survival situations.
AccuSharp Explorer Knife & Tool Sharpener and Outdoor Survival Tool Specs Sharpener Type: Knife and tool w/survival tools Edges sharpened: Plain and serrated Sharpening Angle: Preset at 21 degrees Abrasives/Grits: Tungsten carbide and fine ceramic/1500; diamond coated rod/400 SPECIAL FEATURES: 2 V-notched sharpening slots; Reversible tungsten carbide blades preset at 21-degree angle; Fine ceramic finishing rods preset at 21-degree angle; Compact design; Retractable diamond tapered rod to sharpen serrations and gut-hook blades; A groove to sharpen fishhooks; SOS mirror; Compass; Fire-Starter; Emergency whistle; Sharpener Dimensions: 5” wide x 1.25” long x .5” deep Construction Materials: Hard plastic body, diamond-coated steel rod, fine ceramic rods, and tungsten carbide and metal screws Carry: A lanyard hole for easy attachment Weight: 1.6 ozs. Country of Origin: China MSRP: $16.99 Available: Now
AccuSharp 4-in-1 Knife and Tool Sharpener
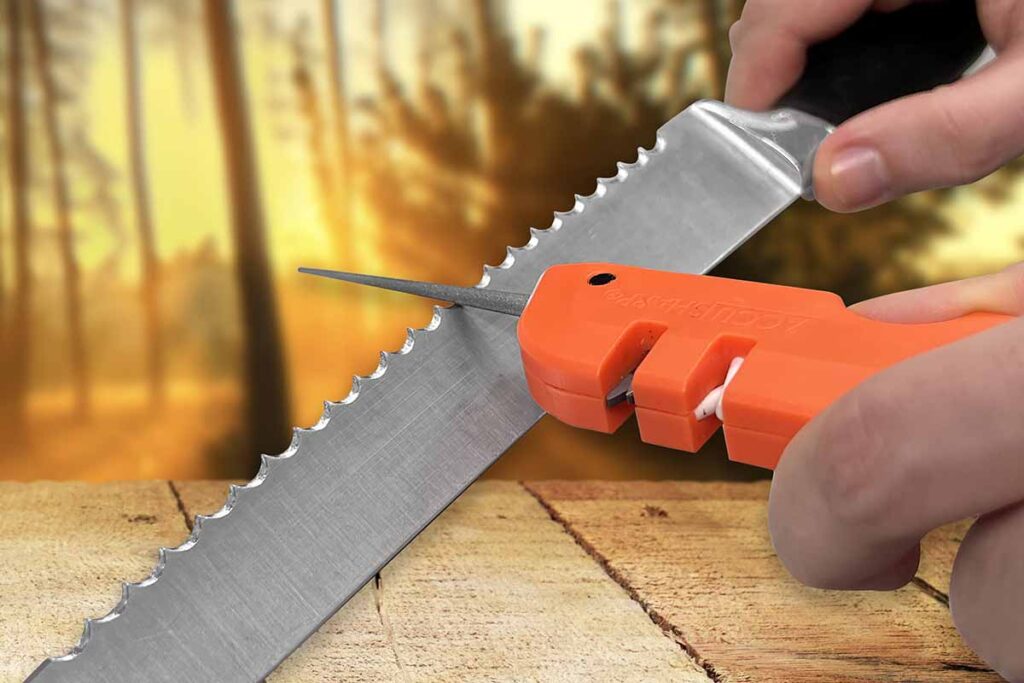
The AccuSharp 4-in-1 Knife & Tool Sharpener’s retractable diamond-tapered rod handles deep serrations.
The AccuSharp 4-in-1 Knife and Tool Sharpener is a keen companion for outdoor enthusiasts. The pocket-sized edge maintenance tool features pre-angled coarse tungsten carbide blades for initial sharpening and fine ceramic rods for refining the edge. A retractable diamond-tapered rod sharpens serrations and also features a groove for hooks and darts. If you prefer working on a flat surface, flip out the retractable diamond file for continuous sharpening. The unit’s rubber-molded feet ensure stability during use. Color options are black and blaze orange.
AccuSharp 4-in-1 Knife & Tool Sharpener Specs Edges sharpened: Plain and serrated Abrasive Type: Tungsten carbide, fine ceramic and diamond coated Grit Selection: Diamond rod: 400; diamond file: 400; ceramic fine: 1500 Dimensions: 1.5” wide x 4” long x 0.75” deep (closed) and 1.5” wide x 8.75“ long x 0.75” deep (open) Construction Materials: Hard plastic body, diamond-coated steel rod & file, fine ceramic rods, and tungsten carbide Weight: 1.6 ozs. SPECIAL FEATURES 2 V-notched sharpening slots; Reversible tungsten carbide blades preset at 21-degree angle; Fine ceramic finishing rods preset at 21-degree angle; Rubber-molded feet for stability; Compact design; Retractable diamond tapered rod; Groove to sharpen hooks and darts; Retractable diamond flat file Country of origin: China MSRP: $16.99 Available: Now
Cold Steel Benchtop Sharpener
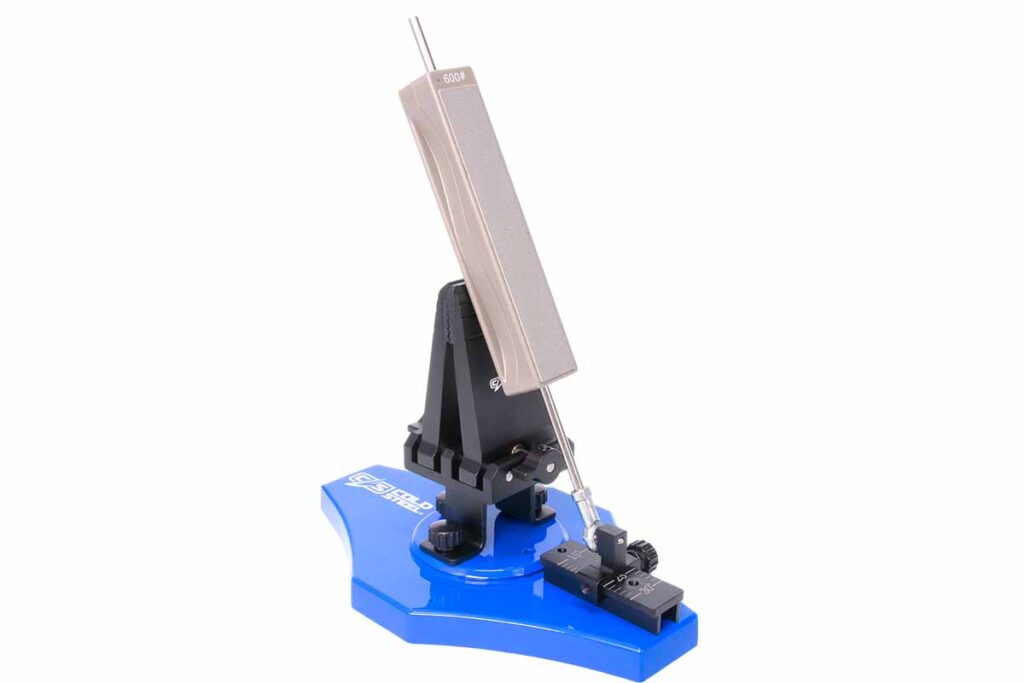
The Cold Steel Benchtop Sharpener has an ambidextrous clamp with a non-marring grip, and 180-degree rotation for sharpening two edges without removing the knife from the clamp.
The Cold Steel Benchtop Sharpener is angle adjustable from 15 to 30 degrees, and comes with four diamond sharpening grits. It has an ambidextrous clamp with a non-marring grip and 180-degree rotation for sharpening two edges without removing the knife from the clamp. The base is weighted with non-slip feet providing a stable pedestal for benchtop sharpening. The unit includes a hardshell carrying case.
Cold Steel Benchtop Knife Sharpener Specs Sharpener type: Adjustable benchtop stone Edges sharpened: Plain Abrasive Type: Diamond Grit Selection: 300, 600, 800 and 1000 Dimensions: 5” long x .95” wide x .82” thick Construction materials: Metal SPECIAL FEATURES: Adjustable sharpening stone; 15-30 degree angle; Ambidextrous clamp with even clamping force; 180-degree rotation for sharpening two edges without removing knife from clamp, and; Hard shell carry case Country of Origin: China MSRP: $149.99 Available: Now
Dunn and Miller left lasting impressions on ABS, students and custom knifemaking.
The American Bladesmith Society lost two of its finest leaders and bladesmithing instructors recently with the passing of ABS master smiths Steve Dunn and Hanford J. Miller.
Steve Dunn
Steve died on May 21. He was 68. Outgoing chairman of the ABS, he was a longtime Society member, receiving his master smith stamp in 1994 before going on to serve on the ABS board of directors and eventually being elected chairman.
“He was a craftsman of the highest level, as evident in the exceptional blades he made, and unsurpassed as an engraver, which he passed on to so many with his teaching,” americanbladesmith.org reported.
Many in the ABS were still recovering from the shock of the news as BLADE® was going to press, ABS master smith Billy Bob Sowell among them.
“I was stunned,” he wrote. “Steve was one of my judges for my master smith stamp. I took his engraving class and his folder class. I’ll miss him.”
According to his bio on the ABS website, Steve began making knives as a hobby in 1988. In 1990 he enrolled in the basic forging class at the Bill Moran School of Bladesmithing, where he started forging damascus. After achieving master smith, it wasn’t long before he began teaching at the Moran School. In 2003 he was selected to serve on the Society’s board of directors.
A strong believer in sole authorship of his knives, he enrolled in a basic engraving class at GRS Tools in 2002. He later studied with Chris DeCamillus on Bulino style engraving and was asked to be an instructor at the GRS school in 2005.
Hanford Dunn
Hanford passed away on March 25. He sold his first knife in 1968. He made knives in the Moran style, including bowies, fighters, camp knives and other large fixed blades, and also period pieces such as reproductions of the cinquedea. His mark was his initials or name within a bowie logo.
In addition to being an outstanding maker of forged knives, Hanford served on the ABS board of directors as treasurer for many years. According to americanbladesmith.org, he was best of friends with BLADE Magazine Cutlery Hall-of-Fame® member Bill Moran, with the pair being “like two peas in a pod.”
They first met in 1974 in Bill’s shop. Hanford read about Bill in a library book about knives and realized he was only a short drive away from Hanford’s home in Randallstown, Maryland.
“Bill was a great mentor,” the site observed, “and their friendship lasted long after Hanford moved to Colorado in 1976.”
Kevin Casey feathers his cap with an outstanding array of custom throwback blades.
Kevin Casey may have hit on a great idea for knives with both a custom touch and an antique look and feel.
Taking some old yet inexpensive late 19th/early 20th-century dinner knives with mother-of-pearl handles and silver ferrules, he replaced the original blades with those forged of assorted patterns of his feather damascus. The result, the Little Feathers, went fast at the Solvang Show, with two selling individually and five going to one shrewd buyer.
Kevin Casey
Kevin said similar versions of the original antique knives are available on eBay, Etsy, at jewelry stores, flea markets and the like. He cleaned the insides of the ferrules with acetone before epoxying his damascus blades into them. He cleaned the ferrules with Flitz and a toothbrush, polished the handles and the knives basically were ready to go. He plans to do more like them in the future.
Little Feathers Specs Maker: Kevin Casey Model type: Dinner knives Blade lengths: 2.5 to 4.25” Blade material: Assorted patterns of feather damascus in 1080 carbon and 15N20 nickel-alloy steels w/a thin layer of pure nickel; depending on the pattern, the layer count ranges anywhere from 50 to 500 Handle material: Mother-of-pearl Ferrules: Silver Overall lengths: 6.5 to 8” Maker’s list price range for similar knives: $600 to $900 each
Folder or fixed blade, EDC or kitchen and more, one of these will fill the bill.
In the wake of BLADE Show 2024 there is a slew of new knives hitting the custom and factory markets. We scoured both to bring you some of the latest and greatest handmade and production gems. Keep your eyes peeled for these fantastic options hitting dealers’ shelves soon.
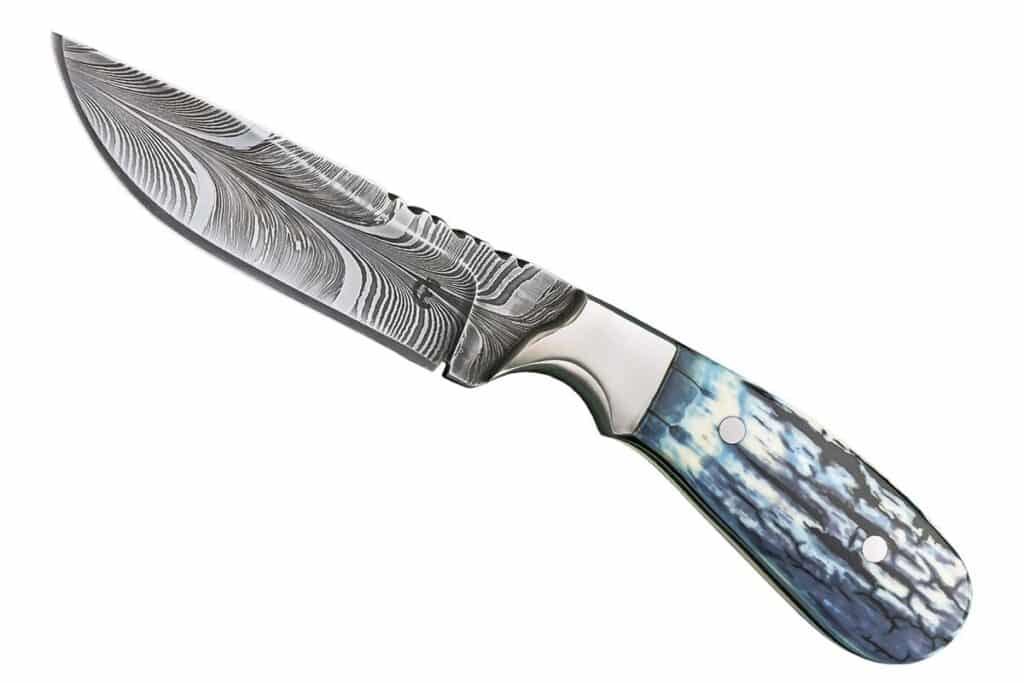
Triple C Knives Model #3
Knife pattern: Fixed-blade hunter Blade length: 4” Blade material: Damascus of 5160 carbon and 15N20 nickel-alloy steels Blade grind: Hollow Handle: Mammoth ivory Bolster: Stainless steel Overall length: 7.75” Maker’s price for a similar knife: $1,000 Maker: Triple C Knives (SharpByCoop image)
Bubba Crouch Trapper
Knife type: Slipjoint Blade length: 3 7/8” Blade steel: Damascus forged by ABS master smith Rick Dunkerley Blade grind: Hollow Handle material: African goat horn Handle frame: 416 stainless steel in an integral construction Bolster: 416 stainless Knife to know: The CPM 154 stainless backspring features filework; the arrowhead shield is damascus Closed length: 4” Maker’s price for a similar knife: $2,500 Maker: Bubba Crouch (SharpByCoop image)
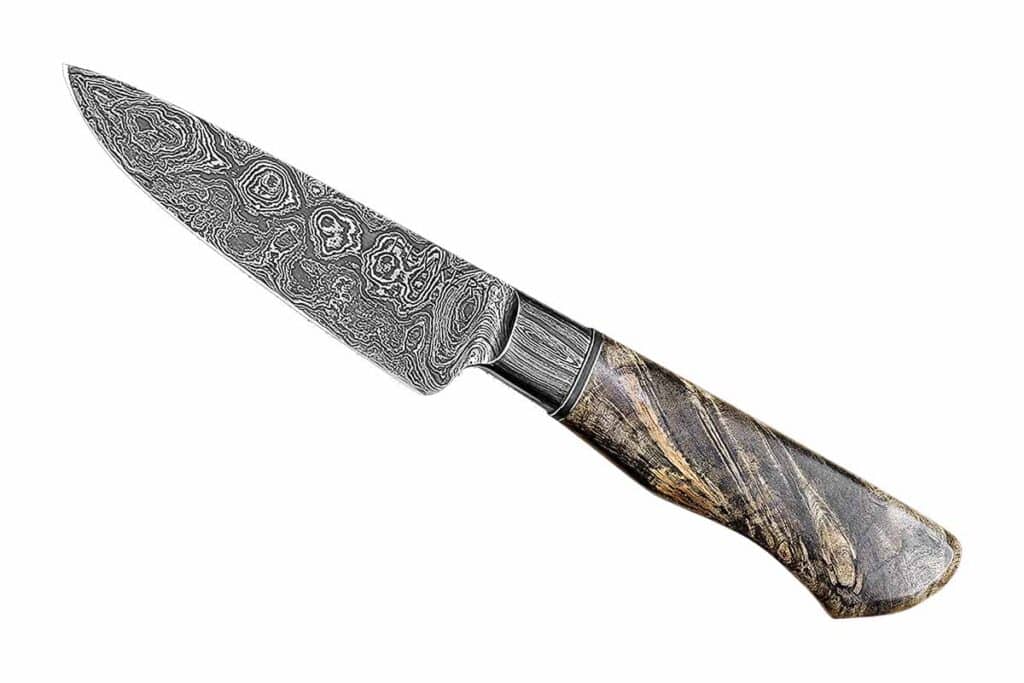
Erik Fritz Petty Chef’s Knife
Blade length: 6.5” Blade material: Triple-quenched 52100 carbon steel Blade grind: Flat w/convex edge Handle: Buckeye burl Bolster: 416 stainless steel Overall length: 11” Maker’s price for a similar knife: $400 Knife to know: Erik Fritz is an ABS journeyman smith Maker: Erik Fritz (Jocelyn Frasier image edit)
Ben Akin Bowie
Blade length: 83/8” Blade material: W2 tool steel w/hamon Blade grind: Flat Handle: Box elder burl w/carbon fiber and red G-10 spacers and a mosaic pin Guard: Wrought iron Overall length: 135/8” Knife to know: Ben Akin is an ABS apprentice smith Maker’s price for a similar knife: $800 Maker:Ben Akin (Jocelyn Frasier image edit)
Egginton Presentation George Wostenholm I*XL barlow
Knife type: Slipjoint Blade length: 2.16” Blade steel: 420S45 stainless Blade pattern: Clip point Blade finish: Crocus polished Scales: Stabilized birch burl in Cutlers Company green Bolster: Nickel silver marked w/400-year anniversary emblem Knife to know: Commemorates the 400th year of The Company of Cutlers in Hallamshire, UK; The Company of Cutlers was formed by an act of Parliament in 1624 to “protect and promote the cutler and steel products made” in Sheffield, England; made in a limited edition of 2024 in recognition of the company’s 400th anniversary year; each knife is serial numbered Weight: 2.18 ozs. Closed length: 3.16” Country of origin: United Kingdom MSRP: $185 at press-time exchange rate Company:Egginton
Boker Plus Gust Copper
Knife type: Manual one-hand folder Designer: Serge Panchenko Blade length: 2.87” Blade material: D2 tool steel Blade @ thickest: .14” Blade pattern: Drop point Blade finish: Stonewashed Blade opener: Thumb hole Handle material: Copper w/hole for a lanyard Lock: Framelock Pocket clip: Tip up, right-handed Weight: 4.44 ozs. Closed length: 3.7” Carry: Nylon pouch Country of origin: China MSRP: $119.95 Company:Boker Plus
Valhalla Blades Surtr
Pattern: Bowie Blade length: 11” Blade material: 1084 carbon steel Blade grind: Flat Handle material: Dyed, stabilized maple burl Guard: Brass Overall length: 16” Maker’s price for a similar knife: $250 at press-time exchange rate Maker: Valhalla Blades (Rod Hoare image)
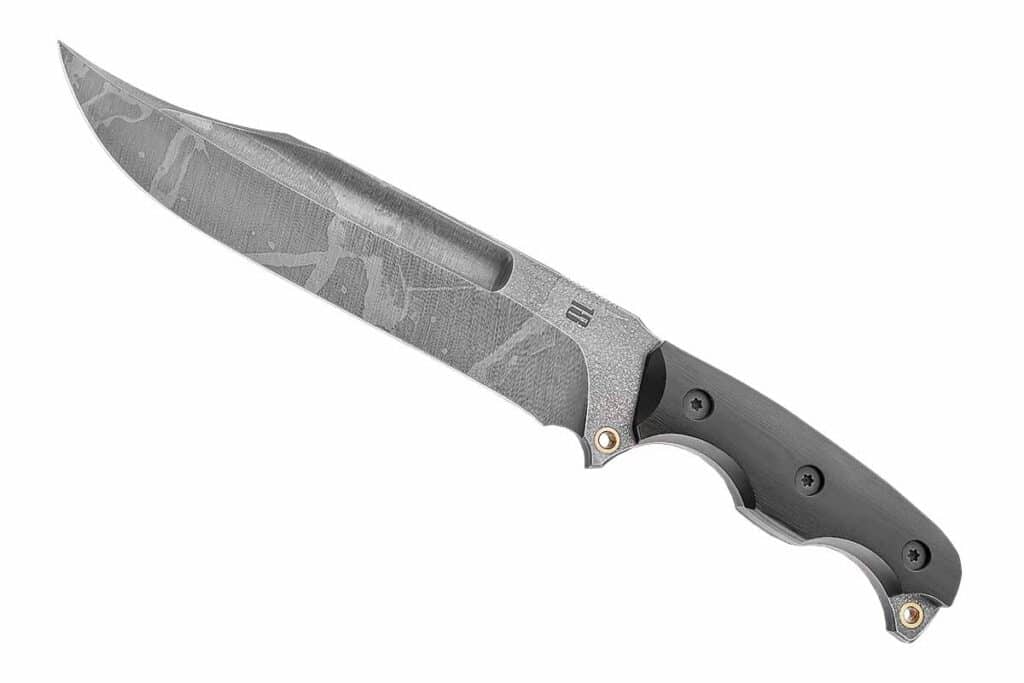
TOPS Knives Shadow Hunter
Knife type: Fixed blade Blade length: 4.5” Blade material: 1095 carbon steel Rockwell hardness: 56-58 HRC Blade @ thickest: .19” Blade finish: Tungsten Cerakote® Handle material: Black canvas and tan canvas Micarta® Weight: 10.1 ozs. Overall length: 9.25” Sheath: Tan Kydex Weight w/sheath: 12.8 ozs. Knife to know: While the original was a favorite of company founder Mike Fuller, the new iteration is fine-tuned for enhanced performance, including a more ergonomic handle, slightly extended blade and modernized finishes Country of origin: USA MSRP: $250 Company: TOPS Knives
Montana Knife Co. MKC Whitetail
Pattern: Hunting knife Blade length: 4” Blade @ thickest: .135” Blade steel: MagnaCut stainless Blade pattern: Drop point Handle material: G-10 Construction: Full tang Overall weight: 4.3 ozs. Overall length: 8 5/8” Sheath: Kydex, open carry, reversible quick-attachment belt clip, vertical handle down or horizontal carry, built-in retention screw to customize blade tension Knife to know: Also available in buck skin, black, green and black, tan and black, and grey handle colors; integral guard; gimping on blade spine Country of origin: USA MSRP: $315 Company:Montana Knife Co.
The Australian Cutlery Fixed-Blade Hunter
Blade length: 4” Blade steel: CPM S35VN stainless Blade grind: Hollow sabre Blade thickness @ ricasso: 1/8” Blade @ widest: 1” Blade finish: Bead blast Handle material: Hunter orange G-10 w/bead blast finish and custom Australian cutler mosaic pin Overall length: 8.5” Sheath: Matching hunter orange Kydex model made by Adam Grosskopf Maker’s price for a similar knife and sheath: $230 at press-time exchange rate Maker: The Australian Cutlery (Rod Hoare image)
Spyderco Manix 2 MagnaCut Lightweight Salt Knife Yellow Polymer
Knife type: Manual one-hand folder Blade length: 3.375” Blade steel: MagnaCut stainless Blade grind: Flat Blade @ thickest: .13” Blade pattern: Drop point Blade finish: Satin Blade opener: Thumb hole Handle material: Yellow polymer over stainless steel liners Lock: Ball-bearing lock Pocket clip: Reversible, tip up Weight: 3 ozs. Closed length: 4.625” Country of origin: USA MSRP: $232.99 Company:Spyderco
Cold Steel Espada XL
Knife type: Folder Blade length: 7.5” Blade steel: AUS-10A stainless Blade @ thickest: .137” Blade grind: Hollow Blade pattern: Clip point Blade finish: Black PVD Handle material: Ruby red G-10 Lock: Tri-Ad Lock Pocket clip: Blade tip up Weight: 14.8 ozs. Closed length: 9.25” Knife to know: The knife is inspired by the classic Spanish navaja folder and is a collaboration between Lynn Thompson and custom knifemaker Andrew Demko Country of origin: Taiwan MSRP: $299.99 Company:Cold Steel