Cold Steel’s Newest Fixed-Blade EDC Is A Multi-Purpose Tool That Is Perfect If You’re Looking For A Knife That Works Just As Well In The Kitchen As It Does In The Forest.
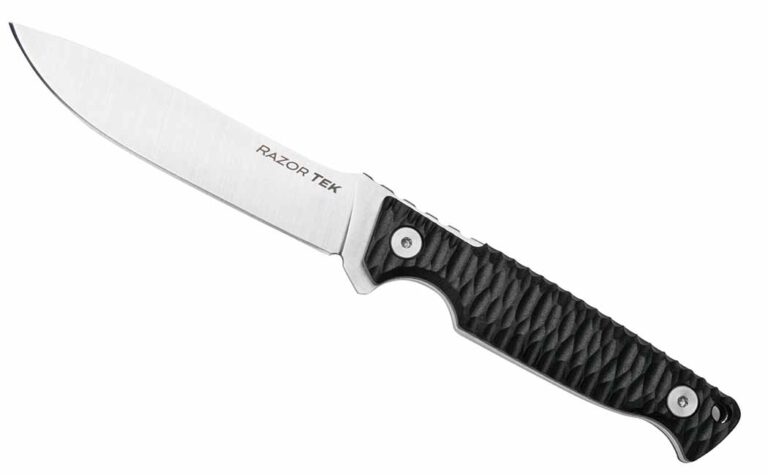
Sometimes you want an EDC that’s a bit beefier than a folder or a multi-tool. The Cold Steel Razor-Tek is a high-quality piece that can slice through branches like it can a cucumber.
This four-inch variety, one of three models to carry the Razor-Tek name, is made from 4116 steel and has an included sheath that can be carried on your neck or belt or lashed to your pack. The textured GFN scales on the handle allow for a confident grip and will stay secure in your hand.
Unlike the larger Razor-Tek models (one has a five-inch blade and the other a 6.5-inch blade), the four-inch is not a recurve and instead features a plain-edged clip point blade.
Overall, the entire knife is just eight inches which makes it great for cutting in close quarters and nimble enough to work precisely when fine slices are needed. And best of all, it comes at an affordable price that will keep your wallet happy.
MSRP: $59.99
Editor’s Note: This post was written by Mike Ableson.
The Victorinox Swiss Army Knife Is An Icon. The Small Red Knife Has A Remarkable History And Is Popular All Around The World
Few knives are as immediately recognizable as the Swiss Army knife. The small red multi-tool has been manufactured for over a century and is known around the globe for its versatility and durability. Still made in Switzerland today by Victorinox, the Swiss Army knife has evolved as a tool since the founding of Victorinox in 1884.
History Of The Victorinox Swiss Army Knife
Victorinox was founded in the small town of Ibach in the canton of Schwyz in central Switzerland by Karl Elsener. It was initially just a small cutler’s workshop run by Karl and supported by his mother Victoria.
Just seven years later, Elsener was able to deliver his first major batch of knives to the Swiss military, and six years later patented the original “Swiss Officer’s and Sports Knife. That set the stage for a whole range of knives, each of which would be included under the umbrella name of Swiss Army knife, or SAK for short.
The Victorinox brand name came into existence in 1921. After Victoria’s passing in 1909, Karl chose her name as the brand name, but 13 years later the innovation of stainless steel swept through the knifemaking world. At the time the steel was known as “Inox,” and by combining that with his mother’s name, Karl created the brand name of Victorinox that has endured for more than a century.
After World War II, American GIs stationed in Europe took a liking to the Swiss Army knife and bought many of them, turning them into a popular souvenir to bring back to the states.
Since then, and the brand has continued to grow. Victorinox now makes other types of cutlery along with outdoor gear and watches. Rival maker Wenger, which also made a claim to the Swiss Army knife, was acquired by Victorinox in 2005, and its knives were absorbed into the Victorinox brand eight years later. The Wenger brand lives on through watches and other licensed products.
In 2017 the company produced its 500 millionth Swiss Army knife, a testament to the quality and popularity of the brand.
What Is The Best Swiss Army Knife?
That question depends on what you want out of your knife. Most all operate the same way, a slip joint with tools coming out of both ends of the knife thanks to a special spring system innovated in 1897 that every Swiss Army knife still uses today.
If you’re looking for a tool that can solve simple, everyday problems, there are many smaller models that will handle your needs. Many of those even fit on a keychain.
If you’re more of an outdoors person or just want something more rugged and diverse, there are many models that have dozens of different tools in them. You’ll see one with 73 tools in it shortly. Regardless of your wants or needs, Victorinox will have a knife for you.
Swiss Army Knife Options
The Victorinox Swiss Army knife is a living, breathing tool. New models come out regularly, and the team in Switzerland continues to find ways to create new tools and designs for the knives. Below are a trio that shows off what the SAK is capable of, from something simple to the opulently extravagant.
Signature Lite
Signature Lite
This is a prime example of how much can be deftly fit into a space so small. The Signature Lite is 2.3 inches long and weighs just .8 of an ounce. Even in those tiny dimensions, there are seven tools including a ballpoint pen, screwdriver, knife blade, and scissors. This is a quintessential Swiss Army knife. It can fit on a keychain and follow you wherever you go.
MSRP: $39.99
Trekker
Trekker
The Trekker shows how robust a Victorinox Swiss Army knife can be. This model features a dozen tools including three different screwdrivers, a can opener, and a wood saw. It’s designed for the outdoorsman, the hiker, the person camping under the stars. The Trekker does have a keychain loop although it’ll probably be better folded up in your pocket. At 4.6 ounces it’s far heavier than the Signature Lite but still far lighter than many other factory knives.
MSRP: $69
Swiss Champ XXL
Swiss Champ XXL
Last on our list is the most expensive model sold by Victorinox not including limited edition pieces. The XXL has so many tools in it that it doesn’t feel real. It’s 3.6 inches long, and in that space there are 73 individual tools. That’s not a typo. 73 tools.
Seven screwdrivers. Six blades. Three wire strippers. Too many wrenches to count. All that’s missing is the partridge in a pear tree.
The XXL also features some of the most unusual Swiss Army knife tools made today. That includes the pharmaceutical spatula, watch opener, fish scaler, and hook disgorger.
At 12.5 ounces it is a beast, and it even comes in a lined, branded case. While it might not be necessary for you, the Swiss Champ XXL flexes the design and manufacturing capabilities that Victorinox has developed in its decades of existence.
MSRP: $379
Editor’s Note: This post was written by Mike Ableson.
The CRKT Oxcart Is A Strong Folder That Can Be Your EDC and Do A Whole Lot More Too.
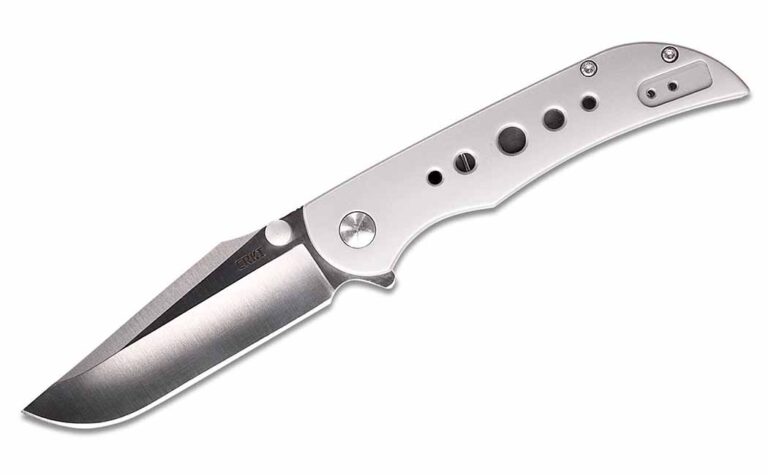
Designed by a Texan, Robert Carter, the new CRKT Oxcart is Lone Star tough. The assisted-opening folder is designed to be ambidextrous with a reversible pocket clip and can handle pretty much anything you throw at it.
The frame lock uses a thick lock bar to secure the blade in place once flipped open so you won’t have to worry about it coming back at you and nicking your fingers.
This is in no small part to the construction. The 3.05-inch blade is crafted from Japanese AUS-8 high-carbon stainless steel which is not only a strong metal, but it’s also exceptional at resisting rust too. The satin finish gives the OXcart a clean look too. The blade isn’t the only steel on this piece either. The handle is also made from stainless.
The strength of the Oxcart is remarkable considering that it weighs just under five ounces. When closed, the knife is just over four inches in length so it can easily tuck away on your belt line or into your pack. MSRP: $75
Editor’s Note: This post was written by Mike Ableson.
From Forging And Picking The Right Materials To Putting Together The Fairest Return Policy And How To Run Your Business, There Are Many Questions Fledgling Knifemakers Should Ask Veterans.
This is the first of a multi-part series about knifemaking
When you consider buying a custom knife, certain questions come to mind. Some are easier asked and certainly more easily answered than others. However, anytime money is forked over in exchange for a handmade, well-built knife, an exchange of information takes place. Still, there may be a fine line between the ordinary, the somewhat sensitive and the downright invasive.
BLADE® asked some well-established custom knifemakers and purveyors what they thought about playing 20 questions with a prospective buyer. In this round of discussion, we’ll tackle those questions that should be asked and answered.
Testing And Heat Treating
I like the questions about testing and heat treating,” commented American Bladesmith Society (ABS) master smith Mike Quesenberry. “As for heat treating, it’s good to know what the maker does. Do they do the work themselves, and what type of heat treating do they do? Is it in a forge, heat-treating oven, do they use a salt pot? Then, on the performance aspect of the knife, is the maker doing any testing, taking it out and beating it or something else depending on the intended use of the knife?”
Veteran ABS master smith and mosaic damascus pioneer Steve Schwarzer agrees. The heat-treating query is near the top of his list. If the makers did the heat treating, did they do it themselves?
“If so, have each maker explain the method. It is perfectly acceptable to ask this question because it is the heart of the blade,” Steve reasoned. “If the maker did not heat treat the blade, ask who did and check the reliability of the heat treater.”
When buying a hunting knife, it’s fair to ask if the makers are hunters themselves or use their own knives in the field. J.C. Provost’s hunter features a 4-inch blade of CPM 154 stainless and scrim by Joanna Provost. (SharpByCoop image)
Authorship
The origin of the steel itself, the aspect of sole authorship, and even asking a bit about the maker’s background is perfectly reasonable, according to longtime purveyor Les Robertson.
“Did the maker do all of the work on the knife? If not, which part of the process is outsourced and why?” Les offered. “If certain aspects of the maker’s knife are being outsourced, this may not be a true custom knife. There can be a fine line between a custom knife and a mid-tech knife. Often, makers grind knives in batches. Consequently, it is more efficient time-wise and more economical to send the blades to a reputable heat treater.
“If the knife features a forged type of blade, especially when it comes to damascus, ask the maker if he forged the steel,” Robertson added. “This question is more germane to those makers not in the American Bladesmith Society. Several people specialize in making damascus for makers to use in their work. Most do an excellent job and offer patterns that will give your knife a unique look. Asking the makers if they belong to a particular knifemakers’ organization is a fair question. But you, as the buyer, should understand what requirements have to be met to belong to the organization and attain certain ratings in each.”
How They Do It
Methods, maker preferences, and perspectives are good areas to probe when discussing the makers’ work. How do they do their thing day in and day out?
“I think buyers should ask whether a knifemaker is a stock removal maker or forger,” said award-winning maker David Broadwell. “That will start to determine what kind of knives people will want. But then, it may not make any difference as long as they like the knife and the maker. Then, the knifemaker should be asked if he or she does all their own work, and if not, what is done outside their shop. This is to determine honesty on the knifemaker’s part. There are other things to ask as well to get to know the knifemaker—full or part-time, family. I like people to know who I am.”
Knifemaker Guarantees
Purchases are often made with the understanding of a guarantee, a buy-back to ensure customer satisfaction.
“You can ask, but I don’t fault anyone if they don’t offer a [buy-back] guarantee,” Broadwell noted. “You can’t buy most any product, say a Harley-Davidson motorcycle, and decide you don’t like cruiser bikes and expect your money back! A deal is a deal, as they say. Now, some makers specialize in multiples of given models, and they may be happy to take a return if they believe they’ll sell it right away.”
The components that make the knife sometimes have a bearing as well. After stressing the sole-authorship point, BLADE Magazine Cutlery Hall-Of-Fame® member Dan Delavan of plazacutlery.com finds a warranty to be reasonable in some circumstances, and then adds a question on components as important to the sales equation.
“Warranty? Just workmanship,” Delavan offered. “The maker cannot guarantee materials as they shrink and expand. The maker should be willing to repair for a charge. Then, does he or she do all the work, and if not, what is done by others? Does the maker bring in outside parts that he or she does not make on her own, examples being such as parts that are made in China or elsewhere, even in the USA? Is the maker able to make modifications?”
For Robertson, the concept of a guarantee is implicit in the trust that develops between maker and buyer. An understanding of care and use is necessary when the question of the guarantee is posed.
“A lifetime guarantee comes with certain responsibilities for both the maker and the buyer,” Les related. “The makers should guarantee the work with regards to their craftsmanship and materials used. Your responsibility as the buyer is to use the knife as it was intended to be used. During normal use, if the blade breaks, yes, the maker should build you a new knife. Now, if you are using a folder as a pry bar and the blade breaks, you are not using the knife for its intended purpose. Subsequently, that is your fault and the maker does not owe you a new knife.”
Genre Specific
Vince Evans
Some makers specialize in historical pieces, reproductions of knives and swords that reflect the times in which the originals were active. Such situations might influence the dialogue between maker and buyer, according to maker Vince Evans.
“My little corner of the field is very different from most other makers,” he explained. “My work is mostly ‘historical’ in nature, so questions to ask could be, ‘Can you tell me more about this piece?’ or ‘What culture is this piece based on?’ or ‘Is this sword based on a specific find?’ When I first met [Cutlery Hall-Of-Fame writer] Ken Warner years ago at the BLADE Show, he walked up and asked, ‘Am I looking at antiques or did you make these?’
“When it comes to period pieces, a telltale sign that a maker hasn’t seen or handled an antique knife or sword is that his rendition is oversized or overweight. Most antique swords, daggers and knives were much more petite and delicate than you would imagine. I encourage makers to study original pieces firsthand, even if it is through a glass case in a museum, before making a period piece. Photos in books and online do not give you a true feel for the original, although many resources do give you measurements and weight. There is no substitute to studying originals firsthand.”
The genre or style that a maker pursues is often the first indicator that a discussion is at hand. Catching the customer’s eye naturally leads to inquiries. When conversation surrounds a custom order, there must be clear understanding related to the finished knife.
“There has to be an exchange between the maker and the customer,” Quesenberry noted, “and that relates directly to how the knife will be used. If it’s a hunting knife, will the customer be skinning only, or will they be breaking bone with it? The customer has to ask what the maker’s knife is intended to do, or if the maker can produce the using knife the customer wants.”
Communication is the key for both parties to be satisfied with the outcome of the buy-sell arrangement. For example, when purchasing a hunting knife, it’s fair to ask if the makers are hunters themselves or use their own knives in the field.
“Sure,” Delavan smiled, “but in some cases the knives can be too expensive for the maker to use. Most knifemakers are not rich!”
Knifemaking Mentors
One of the most important questions to ask makers relates to their background, where they learned their craft—particularly who their mentor, or mentors, in the industry might be. Identification of those who introduced makers to their life’s work or helped bring their skill set along will provide an insight into philosophy, work ethic and mindset, and, ultimately, quality.
“Ask who their mentors are,” Schwarzer advocated. “This is especially important if the maker is forging blades.”
Several people specialize in making damascus for makers to use in their work. Most do an excellent job and offer patterns that will give your knife a unique look. Del Ealy forged the ladder-pattern damascus for the Angel’s Wing art dagger by Steve Vanderkolff. (Caleb Royer image)
Added Quesenberry, “It’s always good to know a guy’s background and the schools they went to and whether the makers continue to educate themselves on newer methods or techniques, or are they becoming stagnant? Do they want to up their game and experiment with different things?”
Chipped in Broadwell, “Of course, I’m proud of the men who shared information and helped me in my earlier years, and if I learn something new I’m happy to share that person’s help as well.”
Open Dialogue
The best approach to discussing the buying or selling of a knife is for both maker and potential purchaser to have mutual respect for one another. In the end, talk may be cheap. However, real, honest and open dialogue develops trust and assurance that the process is working for each party.
Ask questions. Consider responses. Come to informed conclusions, and remember that the entire experience revolves around the knife itself, its quality, materials, looks, and price tag. Most makers welcome questions and are willing to provide candid answers. In that alone, the level of assurance is elevated.
Whether Three Pieces Or More Than A Dozen, A Great Kitchen Knife Set Can Completely Change How Work With Food.
Kitchen knife sets are extremely popular, and it’s easy to see why. They keep all your knives safe, easily accessible, and add a touch of style to your kitchen counter. It’s important to keep a few things in mind when shopping for a knife set, whether for the home or a professional kitchen.
The Block Is A Piece
When you see that a set is three, six, or 15 pieces, it’s important to remember the knife block itself will count as one of the pieces. So don’t fret if you think there’s a missing knife because there isn’t.
Get A Set That Fits
If you’re a parent looking for a good set of knives that will last and help cook the family’s meals for years to come, don’t feel like you need to spend hundreds or thousands of dollars on a set with dozens of specialty pieces. Sometimes less is more and that six-piece set might be the perfect one for you.
Follow The Maintenance Directions
Just because your butter knives go into the dishwasher doesn’t mean that your kitchen knives will necessarily need to as well. Follow the care instructions of your set carefully so you get the most out of your knives and don’t see rust spots start appearing on your blades.
Best Kitchen Knife Sets
Japanese, German, forged, and stamped. These are descriptors of our five best kitchen knife sets. Large sets, small sets. We made sure to select something for everyone with our list.
Calphalon 321
Calphalon 321
What’s better than an affordably-priced knife set? How about one with a sharpener built into the block itself. That’s what you’ll get with the Calphalon 321. This set includes half a dozen steak knives to go with an eight-inch chef’s knife, serrated utility knife, paring knife, shears, and santoku knife.
Made from forged high-carbon steel, the blades prove tough and are able to maintain an edge. And their full-tang construction adds balance to the knives.
The wooden block features a built-in ceramic sharpener in the slots for the chef’s knife, santoku, and paring blade. This means that every time you pull one out of the block, it passes through the sharpener to maintain its edge. Another handy feature is the printed label on the end of each knife so you’ll know what you’re grabbing at a glance.
In totality, this is an excellent budget knife block. MSRP: $169.99
Buck 13-Piece Cutlery Set
Buck 13-Piece Cutlery Set w/Rosewood DymaLux Handles
Buck? On a list of kitchen knives? Oh yes, and the set is just as high quality as the company’s famous folders. By far, this is the largest set on the list.
The set features an 8-inch chef’s knife, slicer, two different paring knives, a spreader, serving/grilling fork, and six steak knives. Buck constructs the blades from 420HC stainless, except for the spreader, which is 410HC. Triple-rivited, the handles are durable and attractive.
There are two styles of handles. The Slate PaperStone is dishwasher safe while the Rosewood DymaLux is hand-wash only. And everything safely stores away in the wooden knife block.
This set is lovely and meets the lofty expectations you would expect from any other Buck product. MSRP: $599.99 for the Slate Paperstone, $749.99 for the Rosewood DymaLux.
Henckels Statement 12-Piece Kitchen Knife Set With Block
Henckels Statement 12-Piece Kitchen Knife Set With Block
A leader in kitchen cutlery, Henkels‘ set hits home run.
The set features single-piece stamped stainless steel blades that are full tang and precision-honed to give them a perfect edge right out of the box. The polymer handle also provides an excellent grip and is easy to clean. The wood block fits all the pieces which include an eight-inch chef’s knife, santoku knife, paring knife, bread knife, sharpening steel, and a set of six steak knives.
This set covers nearly every scenario you’ll encounter in a home kitchen, and it’s also the most affordable set on our list. MSRP: $119.95.
Mercer Culinary Genesis Six-Piece Knife Block Set
Mercer Culinary Genesis Six-Piece Knife Block Set
This kitchen knife set from Mercer Culinary has the most unique appearance of the items on our list, but it is so much more than just looks.
The glass block allows for a 360-degree display of the knives. The windows are attached on either side of the beechwood block which holds five knives.
This set of forged knives includes an 8-inch chef’s knife, paring knife, bread knife, boning knife, and utility knife. All of them are made from high-carbon German steel ground to a 15-degree edge and outfitted with a Santoprene handle for comfort and grip.
It’s a conversation piece. It’s a quality knife set. It’s an absolute bargain for the quality of the product. MSRP: $156.
Shun Classic 5-Piece Starter Block Set
Shun Classic 5-Piece Starter Block Set
Shun makes professional-caliber knives, and its Classic Five-Piece set maintains that standard.
There are only three knives included in the set, but they are of the highest quality. The 8-inch chef’s knife, paring knife, and utility knife are all made from 68 layers of stainless damascus cladding around a VG-Max core. They all tuck away in the Slimline Bamboo Black knife block, along with a honing rod. The trio of Japanese-style knives has ebony-finished Pakkawood handles with a full tang.
A unique aspect of this set is there are more slots than knives. The block comes with two extra slots, one of which is designed for shears. This gives you to tailor your tools to your needs in the kitchen.
Even though this is the smallest set on our list, it is the priciest due to the time and craftsmanship that went into every element of it. MSRP: $593.
The CRKT Compano Sheepsfoot Is The Next Evolution Of The Compano Line And Follows In The Original’s Footsteps While Also Standing On Its Own.
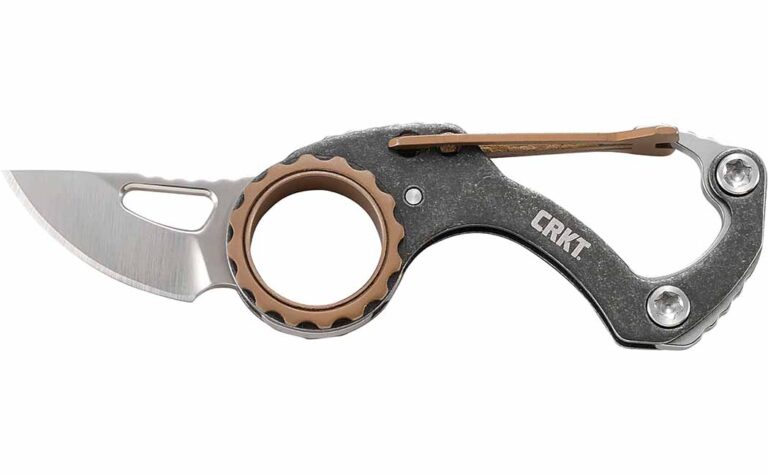
Designed by Mike Bond, the Compano Sheepsfoot builds off of the original CRKT Compano with a new style of blade and flashier design. The original knife featured a slipjoint with a carabiner to connect to your keychain or belt loop, and that’s carried over to the newer model. The Sheepsfoot blade on the newer version is excellent for precise cutting when needed.
Yes, it’s small at only 1.44 inches in length, but when you’re looking for a good keychain knife the name of the game is ease of use and being good in tight spaces. The Compano Sheepsfoot checks both of those boxes.
The blade is made from satin-finished high-carbon stainless steel, and the handle & carabiner clip is also made from stainless. The stonewashed black finished with blue titanium nitride accents make this model visually pop when you first see it.
The slipjoint ring doubles as a great place to rest your index finger to get leverage when manipulating the blade or opening & closing it. Overall, this is a fun piece that will look great on your keychain or belt loop.
MSRP: $44.
Editor’s Note: This post was written by Mike Ableson.
These 15 Pocketknife Brands Are Among The Most Diverse And Historic On The Planet.
A pocketknife is a legendary tool. Whether a folder or a fixed blade, with one blade or many, the pocketknife is used around the world for an endless amount of tasks.
The earliest pocketknives discovered date back to 600 BCE in Austria. Folding knives have been found dating to the Viking era and on the Iberian Peninsula from pre-Roman times. It shows that even millennia ago, people knew how usefulness and practicality of a portable knife.
For many, a good EDC knife is enough to satisfy their needs. For more intense knife users, they may need a blade that can handle processing a kill on a hunt or precisely carve a piece of cherry wood for a project.
Luckily, there are a ton of brands today turning out every shape and style of pocketknife. Honestly, factory offerings alone, there are too many to list here. Nevertheless, to better guide new buyers in a crowded marketplace, we’ll attempt to here.
Are these the best pock knife brands? We’ll leave that to the barbershop debate club. What is certain, these companies are a good starting point in finding the perfect pocketknife for your needs.
Along with the brands, we’ll also provide two choice knives that show off what the company is all about. Some may be best sellers, some may be historic models, but they’ll all be emblematic of the heart and soul of the brand.
Kershaw Knives
Kershaw Shuffle
Founded in 1974, by former Gerber Knives salesman Pete Kershaw, Kershaw Knives has grown to become one of the largest players in factory knives. Really, the company’s catalog is quite impressive, offering a full array of EDC knives, tactical models, fixed-blades and cooking knives. Yes, it’s a premier pocketknife brand too. However, the Oregon-based brand is perhaps best known for its assisted-opening models–such as the legendary Leek. Furthermore, Kershaw has won a number of BLADE® Knife of the Year® awards in different categories over the years.
Aside from selection, one of the more inviting aspects of Kershaw’s knives is their relative affordability, running anywhere from $26 to $200. Some of the price end is due to the fact many of its models are produced overseas. However, the Oregon-based company does continue to manufacture domestically, particularly automatics. Though, these options tend to come at a premium.
Kershaw Launch 13
Launch 13
A sleek, tactical EDC, the Launch 13 is a nimble auto knife made at a relatively affordable price. A blade made of CPM154 steel connected to an anodized aluminum handle makes for a lightweight, yet durable package. The Wharncliffe blade is great for precise work and versatile enough to handle more intense use. MSRP: $179.99
Shuffle
Small enough to fit on a keychain, this handy multi-tool is a steal for the price. The 8Cr14MoV drop point is a great EDC knife, and comes with some extras, such as a built-in bottle opener and flathead screwdriver. MSRP: $25.59
Ontario Knife Company
OKC Navigator
Founded in the late 19th century in New York, the Ontario Knife Company has proven a versatile manufacturer that’s intertwined in the nation’s history–the military end of things. Based about an hour south of Buffalo, in Franklinville, the company offers a wide spectrum of knives to suit nearly any task, from waging war to prepping food.
Where OKC perhaps made its lasting impression is its military knives, in particular the M7 bayonet. Still utilized–though partially replaced–the implement first saw service in the Vietnam War. While best known for its military heritage, the company offers a fairly wide section of quality pocketknives that run the gamut. From classy folders to military-inspired flippers, OKC has a solution for camping, EDC, utility work or any other chore you cook up for it.
OKC Navigator
Lightweight and convenient, the OKC Navigator is a budget folder that has the stuff to become a trusty EDC sidekick. The attractive stainless-steel blade is scalpel-sharp and sports an attractive satin finish. The liner lock has a plastic handle, which cause some concern at its overall longevity. But, for the price, if your Navigator does get busted up it costs next to nothing to replace. MSRP: $14.95
Opinel
Opinel #13
Opinel is a French icon and has made knives in the Alps since the 1800s. The knives are crafted from both stainless and high-carbon steel and are connected to quality wood handles. The handle has become the company’s signature of sorts, with Opinel perhaps the most recognized manufacturer of wooden-handled knives.
The company keeps the models of its famous pocketknife simple, numbering them 1-13. The higher the number, the larger the blade. However, the #1 and #11 are no longer made and are highly collectible. Overall, the knives have gained a reputation as solid camping and outdoors knife. However, more than one person has found them useful in the kitchen. While these are the original Opinel knives, its famous locking collar is a bit more contemporary–added to the design in the 1950s.
Opinel #8
#8
The knife that made Opinel famous, the #8 has a 3.28-inch blade and a beechwood handle. There are no bells and whistles, it’s just high-quality steel, high-quality wood, and a knife that’s perfect for almost any situation. In 1985 the #8 was recognized by the Victoria and Albert Musem as one of the best-designed items in the world. MSRP: $18.
#13
The #13 is the behemoth of the Opinel family. The blade is a whopping 8.75 inches, and the whole piece is 20 inches when opened. This isn’t an everyday carry. This knife would be a great wingman by the barbecue or in the kitchen. MSRP: $110
Buck
Buck 110 Folding Hunter
Ever since Hoyt Buck made his first knife back in 1902 and laid the groundwork for the company that bears his name, Buck Knives has been among the most beloved pocketknife brands in the world. By consistently innovating and pushing the envelope, Buck has evolved into one of the industry’s leaders and knife icon.
Buck pioneered the folding hunter, which continues to be a showpiece for the brand to this day. Creating a knife that could withstand the abuse of long hunts while also being able to fold away and fit in a pocket was revolutionary and turned the pocketknife industry on its head. More the famous folding hunter in a minute.
The company also allows customers to order custom knives. They can choose from customizing everything from cake knives and fixed-blade bowies to a whole suite of folders.
Buck 841 Sprint Pro – Carbon Fiber
110 Folding Hunter Knife
Developed in 1963 when Al Buck wanted to make a durable knife for outdoorsmen who didn’t want to carry big fixed blades, the 110 Folding Hunter propelled Buck to new heights and continues to be a popular model. The 3.75-inch 420HC stainless clip point is attached to a Crelicam ebony handle scales with brass bolsters. The lockback design keeps the knife firmly in place while in use. MSRP: $59.99
841 Spring Pro – Carbon Fiber
If the 110 is a timeless classic, the 841 Spring Pro shows how Buck continues to push the boundary with contemporary knives. Ball-bearing tech allows the knife to open fluidly and the liner lock keeps the blade securely in place. The S30V drop point is an ideal tool for many daily tasks, and the carbon fiber handle provides added strength. MSRP: $179.99
Microtech
Microtech Ultratech
One of the younger pocketknife brands on our list as it was founded only in 1994, Microtech has quickly become one of the nation’s premier pocketknife brands when it comes to auto knives. The brand helped pioneer out-the-front automatic knives in the mid-1990s. The company has worked extensively with the American military to develop knives for combat use, and some of those models are popular consumer options today.
The winner of numerous BLADE ShowⓇ awards, including American-Made Knife Of The Year in 2019, Microtech makes cutting-edge knives and keeps pushing the boundaries for what is possible in a pocketknife.
SOCOM Elite Auto
Ultratech
The flagship model of the company’s OTF line of knives, the Ultratech is made from M390 steel with a light, ergonomic handle made of aircraft aluminum. The dagger releases and retracts thanks to the double-action sliding button. With a 3.35-inch blade, and weighing just 3.5 ounces, the Ultratech has helped set the standard for quick, easy-to-use, auto knives. MSRP: $310
SOCOM Elite Auto
The SOCOM Elite Auto has been a popular choice since its inception over a quarter-century ago. The knife has undergone improvements over the years to make it adaptable to multiple environments and is sold in both auto and manual models. The 3.98-inch tanto blade is partially serrated and is made from M390 steel and an aluminum handle in-laid with composite materials from 3M. MSRP: $300
Victorinox
Classic Swiss Army knife
Victorinox makes high-quality kitchen knives and watches, but the knife that made them famous was the iconic red Swiss Army knife. Known around the world as one of the most versatile tools you can use, the SAK has evolved into the multi-tool of choice for millions of people.
Whether it’s a small keychain version, or a hulking large SAK with dozens of tools, the Swiss Army knife may be the most famous type of pocketknife on the planet.
Classic
One of the smaller models but one of the most well-known, the classic Swiss Army knife can fit on a keychain and can get you through most day-to-day tasks. With seven tools including a spear point, screwdriver, and scissors, the classic is the classic for a reason: it’s a compact EDC (it only weighs .7 of an ounce0 that can help solve most problems you’ll regularly encounter. MSRP: $19.99
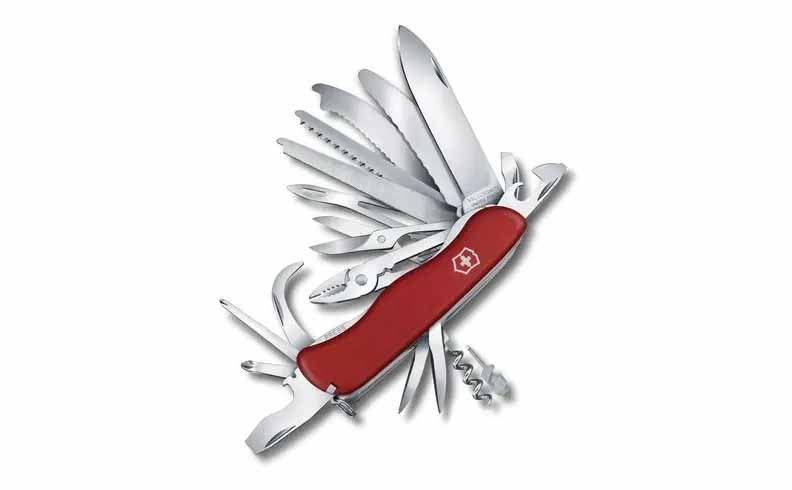
Work Champ XL
Work Champ XL
One of the beefier models, the Work Champ XL has 31 functions. It’s a massive 12-ounce piece that has multiple blades, screwdrivers, saws, and so much more. It’s closer to a portable tool chest than a classic pocketknife, but it all easily folds away and can slide into your pocket or even hang from a keychain. MSRP: $259.99
Cold Steel
Recon 1 Tanto
If there’s a weapon with an edge, there’s a good chance that Cold Steel makes it. The Texas-based brand makes everything from classic pocketknives to kukris to swords and blunt-edge tools. The company was founded in California in 1980 and helped popularize the American tanto. Cold Steel currently has plants on four continents. They make knives based on traditional designs and also work with some of the world’s top designers to make custom knives. Cold Steel’s swords are usually made from 1055 high-carbon steel or damascus, and their pocketknives are renowned for their lock strength.
Mini Leatherneck Tanto Point
Recon 1 Tanto
This folding knife is popular with law enforcement and the military and anyone looking for a dependable, long-lasting tool ready for any situation. The blade is customizable and comes in four versions ranging from 2-5.5 inches in length. Thin, light, and over-engineered to be long-lasting, the Recon 1 Tanto features the Tri-Ad lock, which keeps your hands safe and your blade secure when in use.
No matter what version you get, the blade is made from American S35VN with a DLC coating and a G10 handle. The lone exception is the Micro Recon 1, which has an AUS 8A Tuff-Ex coated blade and G-10 styled Griv-Ex handle. MSRP: $176.99
Mini Leatherneck Tanto Point
With a 3.5-inch fixed blade, the Mini Leatherneck swings above its weight. The 8Cr13 MoV steel blade comes in three different styles and has a stainless steel guard with broad quillons to protect your hands. The handle is made from Kray-Ex and the included Secure-Ex sheath can fit a lanyard or be used with a C-clip. This is a durable budget model that would please any knife owner. MSRP: $29.99
Emerson Knives
CQC-7BW Flipper
Emerson Knives was founded by, and named for, custom knifemaker Ernest Emerson and his wife Mary in 1996. Not a traditional pocketknife brand, Emerson specializes in tactical folding knives and helped pioneer the knife style 20 years ago. The CQC-7 set the standard for tactical knives when it debuted and is still just as popular today. Emerson knives have been used by special forces and police agencies around the world and are also highly coveted by collectors. A knife used in the raid that killed Osama Bin Laden fetched $35,400 at auction.
Sheepdog
CQC-7BW Flipper
The iconic CQC-7 has been paired with a ball-bearing pivot system that allows for rapid deployment and is another evolution of the classic knife. The S35VN 57-59 HRC tanto point blade is paired with a G-10 handle. Not only does it open quickly, but it’s nimble in the hand at just five ounces in total weight. MSRP: $273.95
Sheepdog
Just like how the dog is man’s best friend, the Sheepdog may be your new best friend. Coming in either a bowie or a spear point, the Sheepdog folder uses the same ball-bearing pivot system for quick opening. The black G-10 handle looks classy and provides an excellent grip. The 154 CM blade has a black stonewashed finish and is sharpened to a conventional V-grind with a chisel edge. MSRP: $263.65
CRKT
CRKT M16-04KS
CRKT, short for Columbia River Knife & Tool Company, was founded by a pair of former Kershaw employees. It has evolved into a pocketknife brand that’s built itself by working with custom knifemakers and producing quality products at quality prices. Like Kershaw, it’s headquarterd in Tualatin, Oregon, and since its founding in 1994 has grown to a company with $25 million in estimated annual sales. CRKT also makes multi-tools and fixed blades along with sharpeners and other knife accessories. Some of the designers they’ve worked with include Ken Onion, Michael Walker, Ron Lake, and Greg Lightfoot.
CRKT Provoke
M16-04KS
Designed by Kit Carson, this model is part of the company’s most popular series of knives. A tactically-inspired EDC, the M16-04KS has a 3.87-inch blade made of 12C27 Sandvik Steel with a plain edge. The handle is made from stainless, and the whole piece weighs just 6.2 ounces. MSRP: $79.99
Provoke
This exciting karambit was designed by Joe Caswell and is the company’s first knife to feature its Kinematic technology that allows for a lightning-fast deployment with the push of your thumb. The D2 blade has a titanium nitride finish for added toughness, and the aluminum handle is strong yet light. MSRP: $200
Gerber Gear
Sharkbelly – Plain Edge
Gerber Gear is among the largest maker of knives for the American military, and that ethos permeates their civilian offerings. The company makes everything from knives and multi-tools to axes and saws. They use high-quality steels to make long-lasting pieces that you can be proud of.
The company also has a long history with custom knives. They were the first firm to collaborate with a custom maker when they worked with David Murphy during World War II. Gerber has even worked with celebrities as they collaborated with TV star Bear Grylls on a line of survival knives.
Terracraft – Grey
Sharkbelly – Plain Edge
A 3.25-inch 420 HC sheepsfoot blade is the star of the Sharkbelly. It’s easily deployed with a thumb hole and weighs 2.3 ounces. The SharkSkin Grip helps keep weight down on this folder while also providing tremendous grip and ease of use. This is a fine EDC and built to last. MSRP: $47.
Terracraft – Grey
When slashing through brush you need to be confident that your blade can withstand the abuse and keep slicing. The Terracraft is a fixed blade that is up to the challenge. This knife features an extra-thick S30V steel blade with a full tang for added durability. Machined G-10 scales provide the needed grip so you feel safe while wielding the knife, and a 90-degree spine provides an edge for fire striking. An American-made leather sheath will keep this piece safe and secure in transit. MSRP: $220
Spyderco
Spyderco Bug
Founded by BLADE Cutlery Hall Of Fame® member Sal Glesser, Spyderco has been making knives since 1978 with the promise of high performance in each model. The company’s knives are known for their famous, large thumb-assist hole, and they have experimented with numerous different steel compositions. Spyderco ships knives all across the world and are popular both with civilians and police and rescue personnel.
Spyderco Military
Bug
One of Spyderco’s line of micro-sized slipjoints, the Bug is small enough to fit on a keychain and features a straightforward design. This is a small EDC great for regular day-to-day living, but definitely can punch above its weight in a switch. The 1.26-inch blade is made from 3Cr13 steel, and the whole piece weighs just .4 ounces. MSRP: $33.
Military
One of the brand’s iconic models and winner of American-Made Knife Of The Year® at BLADE Show 2022. The Military is an elite folding knife with a CPM S30V blade married to a handle with G-10 scales. The full-flat grind makes this knife great for sawing and making difficult cuts. It has a clip on the right side to allow for easy, tip-down carry. MSRP: $310.
Boker
Magnum Backpacker
Boker has been making knives in Germany since the 17th Century. A schism in the company in the 1860s sent some of the family to North America where they’re still making knives today. Both companies use the famous tree logo on their knives. Today, Boker has several brands beyond the original one still based in Solingen, Germany. Boker USA is based in Denver, and the Boker Arborlito brand of hunting and outdoor knives are made by hand at the company’s factory in Buenos Aries, Argentina.
Tripitz-Damast Gold
Magnum Backpacker
Beautiful, useful, and a classic pocketknife. That’s a fair way to describe the Magnum Backpacker. The satin finish on the 440A steel blade looks great, and the flat grind makes it perform great too. The grained wooden handle looks and feels excellent. This is a knife worth far more than its budget price. MSRP: $43.95
Tripitz-Damast Gold
This limited-edition blade is named for the German warship Tripitz, still the largest battleship ever built in Europe. The knife is a work of art. Utilizing some of the salvaged armoring from the ship, which was sunk in 1944, this model is truly a spectacle with its gold-plated blade. The blade has 300 layers of hand-forged damascus in the great pyramid pattern, and the walnut inlay on the handle features the coat of arms of the Tripitz. MSRP: $1,485
Hogue
Deka Manual Folder
Hogue originally began as a firearms accessories–mainly grips–company based out of California. Since 2011, the company has manufactured knives that, due to Califoria’s draconian knife laws, forced the company to pull up stakes for Nevada. Good move, as in the decade as a knifemaker, Hogue has become perhaps as renowned for its blades as its gun accessories.
The company’s autos, in particular, have developed a dedicated following, thanks to aggressive designs. Hogue knives have been issued to all branches of the military over the years, further adding to the company’s lore and credence. Still a family affair, Hogue is also well-respected for the quality of its products.
Deka Manual Folder
This manual folder with a modified Wharncliffe is a unique pocketknife. The CPM 20V stainless blade has a 59-61 HRC with a stone-tumbled finish. What stands out, even more, is the G-Mascus Blue Lava G-10 frame, which provides a splash of cover and allows for a confident grip on the knife. MSRP: $184.95
EX-01 Manual Folder
EX-01 Manual Folder
This classy drop point can be just as good as a tactical knife as it can be your standard EDC. The drop point blade is made from 154CM stainless and has a push-button lock for safety. The high flat grind makes this a top-tier model for cutting and slicing whether that’s a cardboard box or a side of beef. MSRP: $249.95
Benchmade
85 Billet TI Balisong
The company may have changed its name twice, but the quality of Benchmade knives has never wavered. Originally called Balisong in 1979 and then Pacific Cutlery Company in 1988, the company became known as Benchmade in the 90s. The company gained fame for its butterfly, or balisong, knives and today makes premium knives of all types.
85 Billet TI Balisong
An update to a Benchmade classic, the 85 features a titanium handle assembly and a drop point blade. The internal ball bearings allow the knife to open smoothly every time and will give you the confidence to go for it while releasing the blade. The blade is made from CPM S30V steel, and the handle does double duty of strengthening the entire construction while keeping the weight under six ounces. MSRP: $695.
535BK-4 Bugout
535BK-4 Bugout
The Bugout line is one of Benchmade’s most popular line of folding knives. This newest version features M390 blade steel with detailed patterning on the aircraft-grade aluminum handle. A 2.5-ounce gem, this premium EDC is crafted to serve you well and last for decades. MSRP: $275.






![Best Pocketknife Brands [2022]](https://blademag.com/wp-content/uploads/Screen-Shot-2022-07-22-at-3.15.20-PM-768x467.png "Best Pocketknife Brands [2022]")