For starters, honing a knife is different from sharpening a knife in one major way: how much steel is removed from the blade. Sharpening involves removing steel along the edge using an abrasive. It’s more aggressive than honing, which is a process by which the grains of steel on the edge are made uniform.
While honing isn’t a replacement for sharpening, it can extend the time between sharpenings. Honing is also a quick way to refresh a blade before use. Professional chefs will often use honing rods on their knives before getting to work.
You don’t need to be a five-star chef to hone your knives like a pro, though. No matter the task at hand, you can bring your knife back to life quickly with these simple steps.
Step 1: Buy A Honing Rod
In general, honing rods come in three styles: steel, ceramic and diamond. Each comes with different characteristics.
Steel is the least expensive. Because it’s softer than the other two styles, it won’t remove much metal from the blade. It’s great for beginners.
Ceramic carries more bite than steel. The honing will last longer because of this, but ceramic is also less forgiving of the novice.
Diamond honing rods are usually the most expensive of the three. The diamonds embedded in the rod remove a good amount of steel, so this style should only be used by the skilled knife enthusiast.
No matter which style you choose, aim for these features:
A secure, ergonomic grip
A sturdy guard that protects your hand
A ring on the handle for slipping a pinky through in case you drop it
Step 2: Find Your Angle
Place the rod perpendicular onto a non-slip surface. Hold the handle of the rod and plant the tip onto a soft yet durable surface, like a cutting board. Place the heel of the knife against the top of the rod at an approximate 15-20 degree angle. It’s important to match the angle of the edge already set on the blade.
If you’re not sure of the degree, angle the edge against the rod almost like you’re going to cut a long, thin slice of the rod off, and then apply light downward pressure until the edge catches.
Step 3: Time to Hone
Using light pressure, draw the knife down the rod. Use the full length of the rod (you paid to use the whole thing) and pull across the full length of the blade (you paid for that, too). Do your best to maintain a constant angle. Do the same for the other side of the blade.
Repeat eight to 12 passes on each side of the blade. Take your time. There’s no need to show off by honing quickly. That comes later.
With practice, honing will be like second nature to you. Honing will put your knives into a whole new light. You’ll be amazed at how quickly you can give your blade a new pair of shoes.
Looking For a Shortcut? Try Knife Aid
The next best thing to sharpening and honing on your own is to use a mail-in knife sharpening service, like Knife Aid.
Knife Aid makes it simple. After placing your order, Knife Aid sends you everything you need to send them your knives for sharpening. It’s as easy as dropping your order in the mail, waiting a little bit and receiving the knives back in the mail as good as new. You can read BLADE‘s review of Knife Aid here.
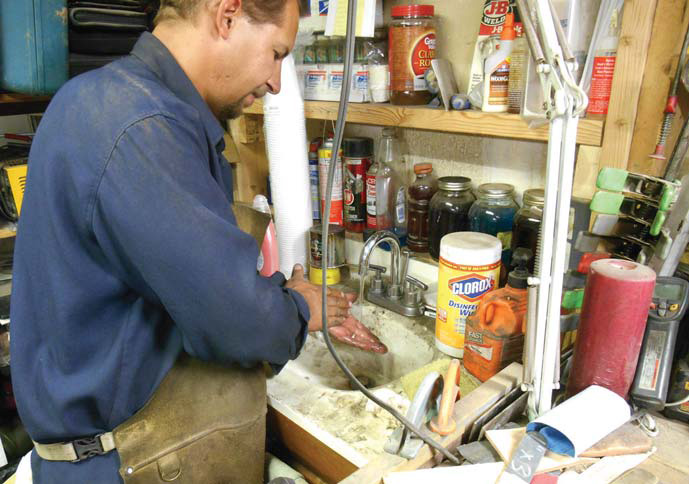
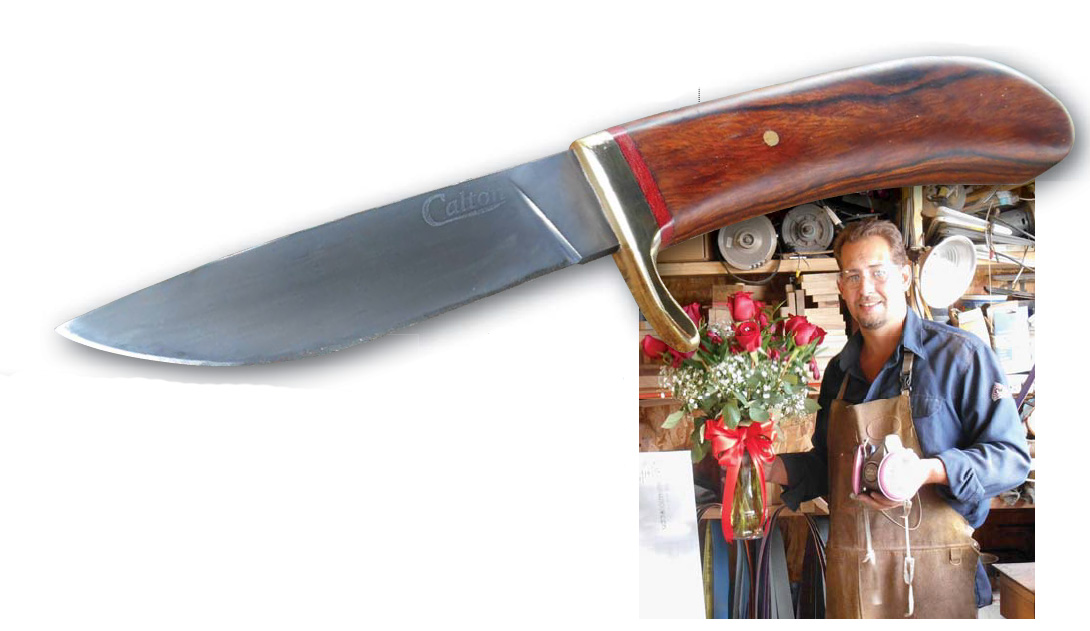
* Images by the author, Jeremy Spake and Austin Moody unless otherwise noted.
Pronounced “moe-ka-may ga-nay,” mokume-gane—or mokume as it is more commonly known—is all about layering. For me it’s simply another component of my work, but within itself it’s about color and pattern.
In short, you stack a variety of different metals, bond them together, forge them down, pattern the material by cutting then forging, or forging then cutting, and expose the various colors that lie beneath. It sounds pretty simple and much like damascus.
Neither is true. I do find mokume a bit more difficult and less forgiving. However, all of this is subjective and depends on the specific materials you’re working.
For damascus I use straightforward, low-alloy high carbon steel; for mokume I frequently use exotic alloys that are not forgiving. You can use exotic high-alloy steel, which makes damascus less simple, and straightforward metals for mokume, which makes it simpler.
But enough of my doubletalk—let’s get into the process.
What You Need
Torque plates: 1-inch-thick 316 stainless steel. The plates should be large enough to accommodate both your billet—with some wiggle room—and a half-inch bolt in each corner of the plate.
Bolts, nuts, washers: at least half-inch thick Grade 8 heat-treated, high-alloy steel bolts. Black oxide will help prevent the bolts from bonding to the nuts. I hope this goes without saying, but you will need the correct size of nuts and washers to accompany your bolts.
Boron nitride: It acts as a resist between bolts, nuts, washers, torque plates and your billet. It also acts as a lubricant.
Three plastic tubs at least 1 foot by 1.5 feet and 6 inches tall, or whatever makes the most sense with the size billet you’re making.
Distilled water.
Simple green® Concentrate All-Purpose Cleaner.
For cleaning, 7447 maroon Scotch-Brite™.
Scott® Shop Towel. .002-inch-thick 304 stainless steel sheet. Medium silver solder: It’s always important to have on hand and can help fix problems should they arise.
Activated charcoal pellets.
How to Make Mokume Step by Step
STEP 1: Cut all of the metal to the appropriate-sized sheets, deburr, and make sure they are relatively flat without denting or kinking the metal. You need each piece to be of a consistent thickness. All the sheets can be different thicknesses, but there must be no dents or tapers within individual pieces.
STEP 2: Take the torque plates with the holes already drilled and coat the inside faces with boron nitride. The inside faces of the plates should be dead flat. Also, coat the threads of the bolts and the faces of the washers. Set aside to dry.
STEP 3: Take the three plastic tubs and place them one next to the other. Fill tub number one and number three with 1 inch of distilled water and the center tub with 1.5 inches of the water.
STEP 4: Mix a couple of tablespoons of the simple green cleaner in tub one.
STEP 5: Using tub one and a small piece of Scotch-Brite, clean each side of the first piece of metal. Use a scratch pattern to track your progress. When finished rinse the piece in the first tub, being sure that the water skims cleanly and easily over the surface. If it beads up anywhere, clean again.
STEP 6: After cleaning and rinsing the piece of metal in tub one, rinse it in tub two and store it in tub three.
STEP 7: Clean all of the metal, dedicating respective corners of tub three to hold each type of metal.
STEP 8: Place the bolts through the holes in the bottom torque plate and set it close to tub three.
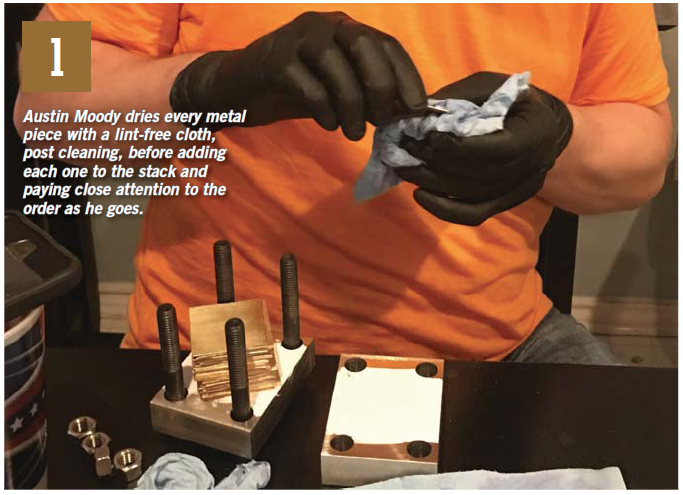
STEP 9: Remove each piece, gently dry using the Scott Shop Towel, and stack in the correct order on your torque plate (see image 1).
STEP 10: Your kiln should be preheated by this point.
STEP 11: Align the metal using a straight edge or square.
STEP 12: When you place the second torque plate on top, be careful to not knock around the billet. Re-align the sheets as necessary while tightening the nuts and bolts.
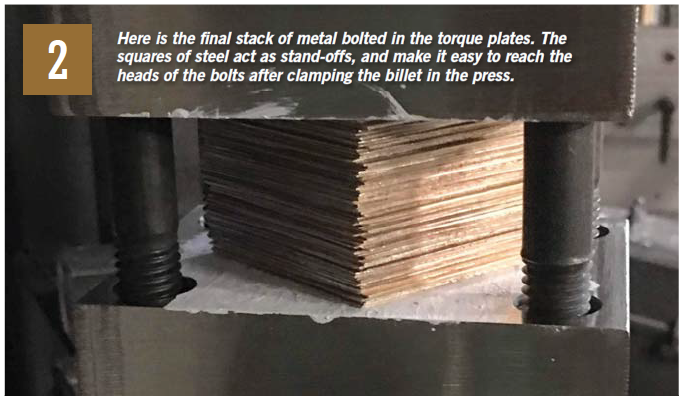
STEP 13: When everything is tight, go to your hydraulic press. Use steel standoffs to get past the nuts and bolts, and press down on the stack. Tighten the nuts with the billet under pressure (see image 2).
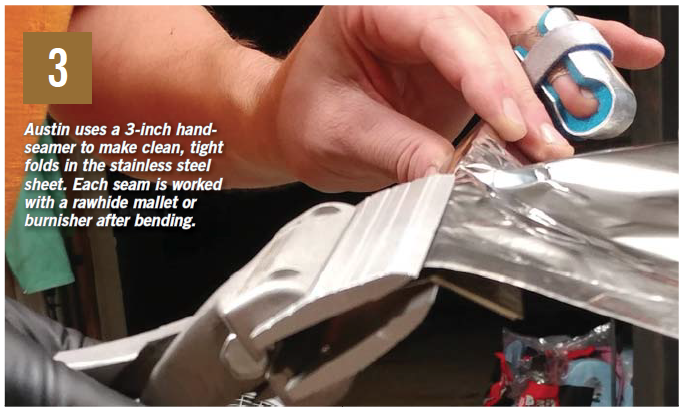
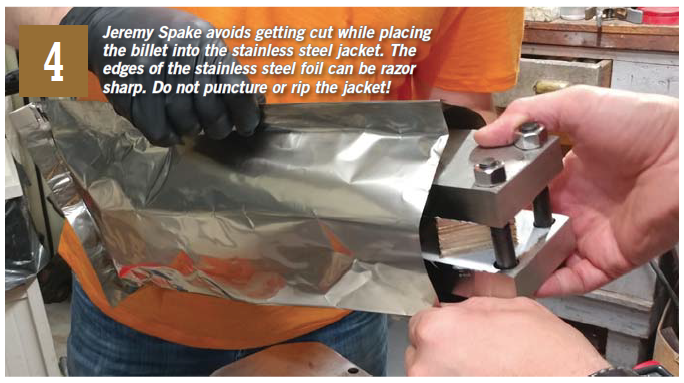
STEP 14: When you create the stainless steel jacket, you want all of the seams to be folded twice. After each fold, either work the seams with a rawhide mallet or burnish them with an appropriate tool (see image 3).
STEP 15: Activated charcoal is ideal for this process—use two tablespoons—but if you only have charcoal on hand, that’s fine. We used hardwood charcoal and crushed the chunks up a bit. You need only a small amount. The point is to seal the foil well enough where no oxygen can come in to cause combustion and burn up the charcoal. Prior to adding the charcoal to the packet, let it sit in the oven for one hour at 250°F to remove any moisture from the charcoal.
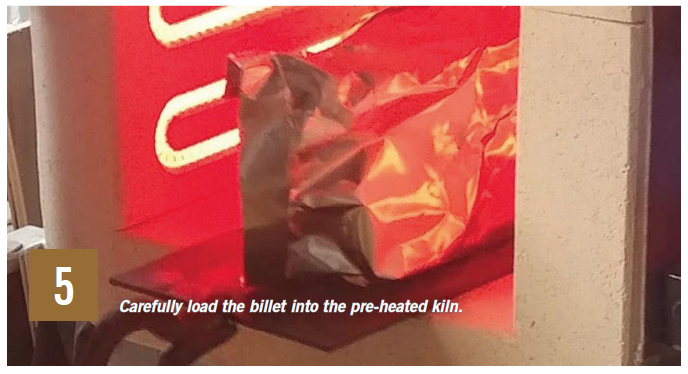
STEP 16: To prevent damage to the bottom of the kiln, we slid our packet in on a thin piece of steel (see image 5).
STEP 17: Kiln time varies depending on how large the billet and torque plates are. You really need everything to be at temperature for only a couple of hours. Larger billets obviously take longer to get to temperature. I recommend doing some research. The billet documented in the article was fired for three hours.
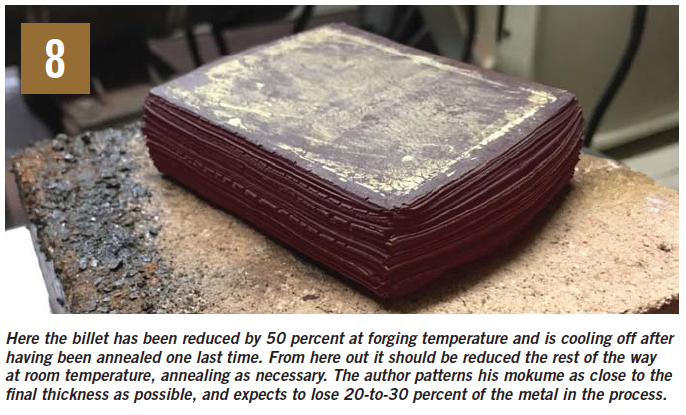
STEP 18: When you have fired the billet long enough, remove it from the kiln, remove it from the foil, and reduce the entire billet by 50 percent thickness at forging temperature. Reduce between 20-to-30 percent with each heat.
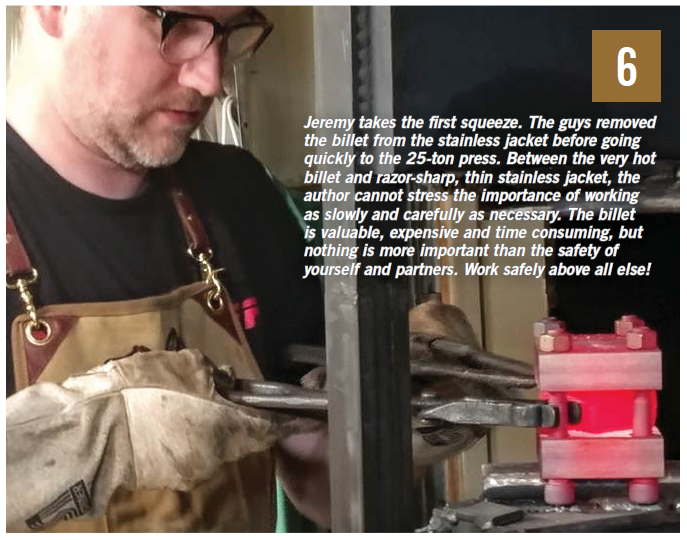
STEP 19: For the first forging process, leave the billet in the torque plates and go straight to the press (see image 6).
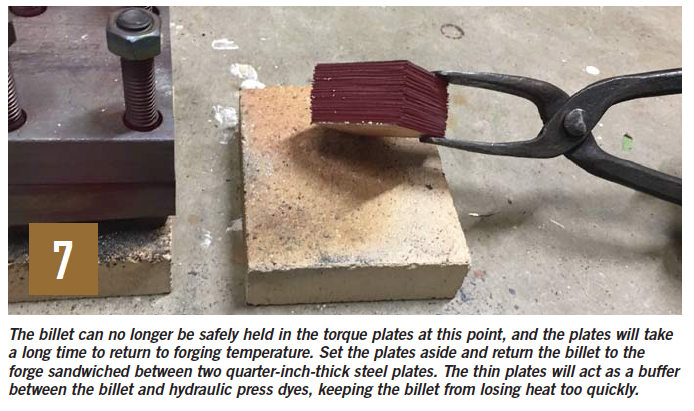
STEP 20: After the first reduction, the billet should slide out of the plates when tilted to the side. You can place the billet between two thinner steel plates—though only if you have a secure way to hold everything—and put them back in the kiln at forging temperature. The plates will help prevent the press dyes from chilling the billet too quickly. Continue until you have reduced by 50 percent from your starting point (see image 7).
STEP 21: Now you can go to cold working. Start out by reducing the billet no more than 10 percent prior to annealing. As you work the billet down, you can start to get closer to 20 percent between annealing cycles. The process for annealing depends on your metal combination. The relevant information should be easy to find with an Internet search.
STEP 22: When it comes to patterning mokume, the process is very similar to damascus. However, instead of using a milling machine or angle grinder to cut a pattern into the metal, tools such as a flex shaft or files would be more appropriate. After cutting a pattern into the metal, forge the billet flat to bring the low points to the surface. As with damascus you can also forge patterns into mokume, either with a hammer or specific coining dyes. Reveal your pattern by grinding down to the low points. As a rule of thumb, it’s not recommended to pattern deeper than one-third the thickness of the billet.
More than One Way to Do It
Full disclosure: there is more than one way to make mokume. I have made and know others who make mokume using processes that differ from what I am sharing.
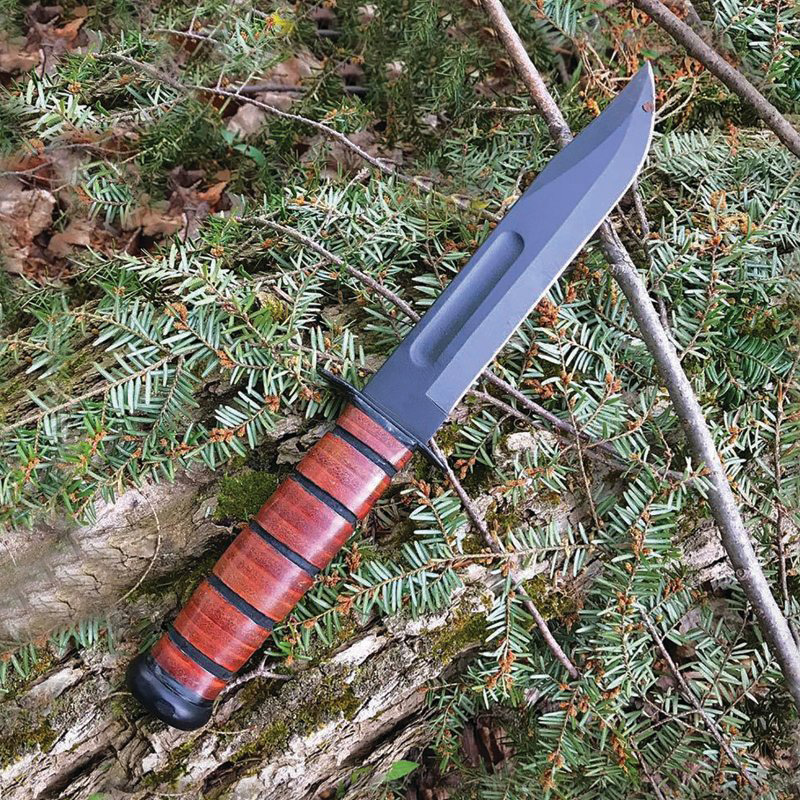
KA-BAR’s website says that the Single Mark KA-BAR is the knife for those who have “never been in the military.” That’s less of a dig at those who haven’t served than it is being true to the brand. Every KA-BAR knife traces its lineage back to the USMC Fighting/Utility Knife. As such, the Single Mark is made to the exact specifications of that legendary knife.
Unlike the military, however, you can personalize the Single Mark right out of the box. One side of the blade is stamped with, “KA-BAR, OLEAN NY,” while the other side is blank. That’s a perfect spot for an engraving.
Plus, this made-in-the-USA slice of history is built for the masses with an MSRP of $113.45.
As of this writing, the MSRP for the Single Mark is $113.45. (KA-BAR photo)
Manufactured: USA
Overall Length: 11.875”
Blade Length: 7”
Blade Width: 1.188”
Bulk Weight: 0.7 lb.
Handle: Leather
Blade Stamp: KA-BAR
Steel: 1095 Cro-Van
Thickness: 0.165”
Grind: Flat
Angle: 20°
HRC: 56-58
Sheath: 1217I – Leather
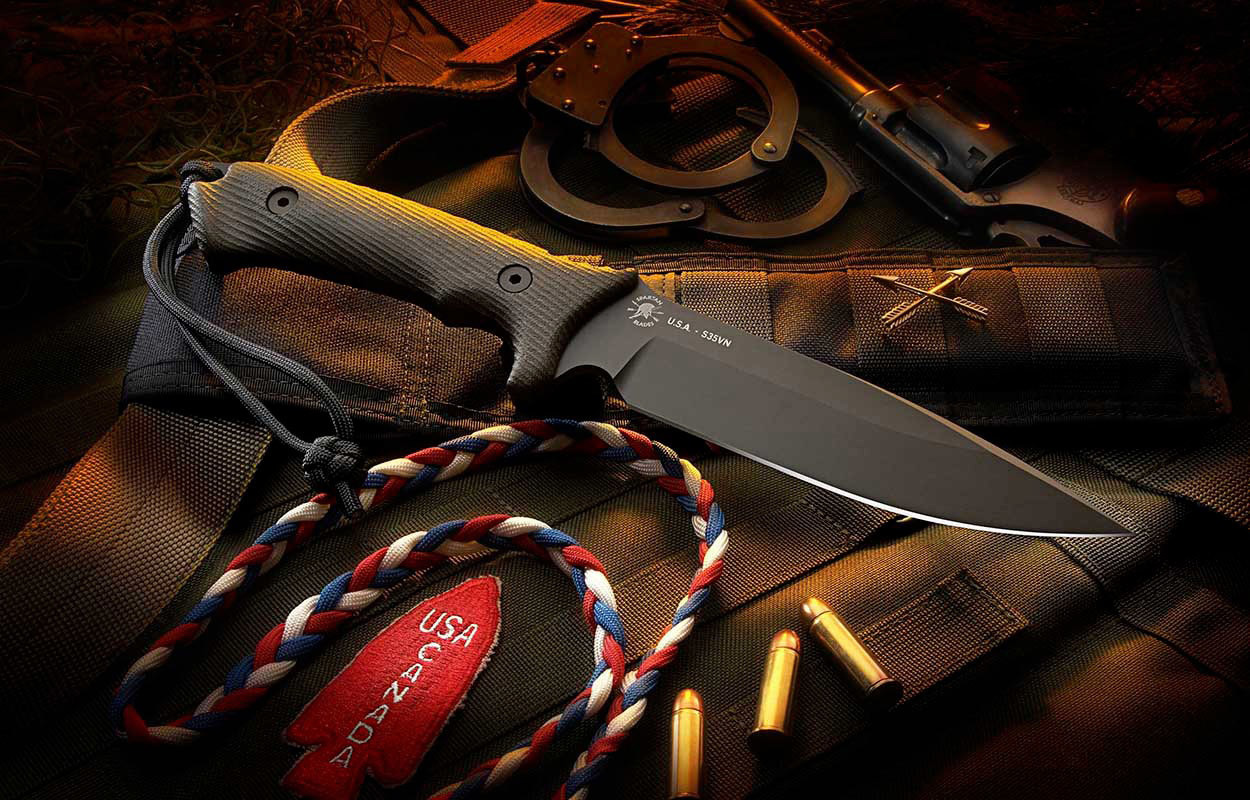
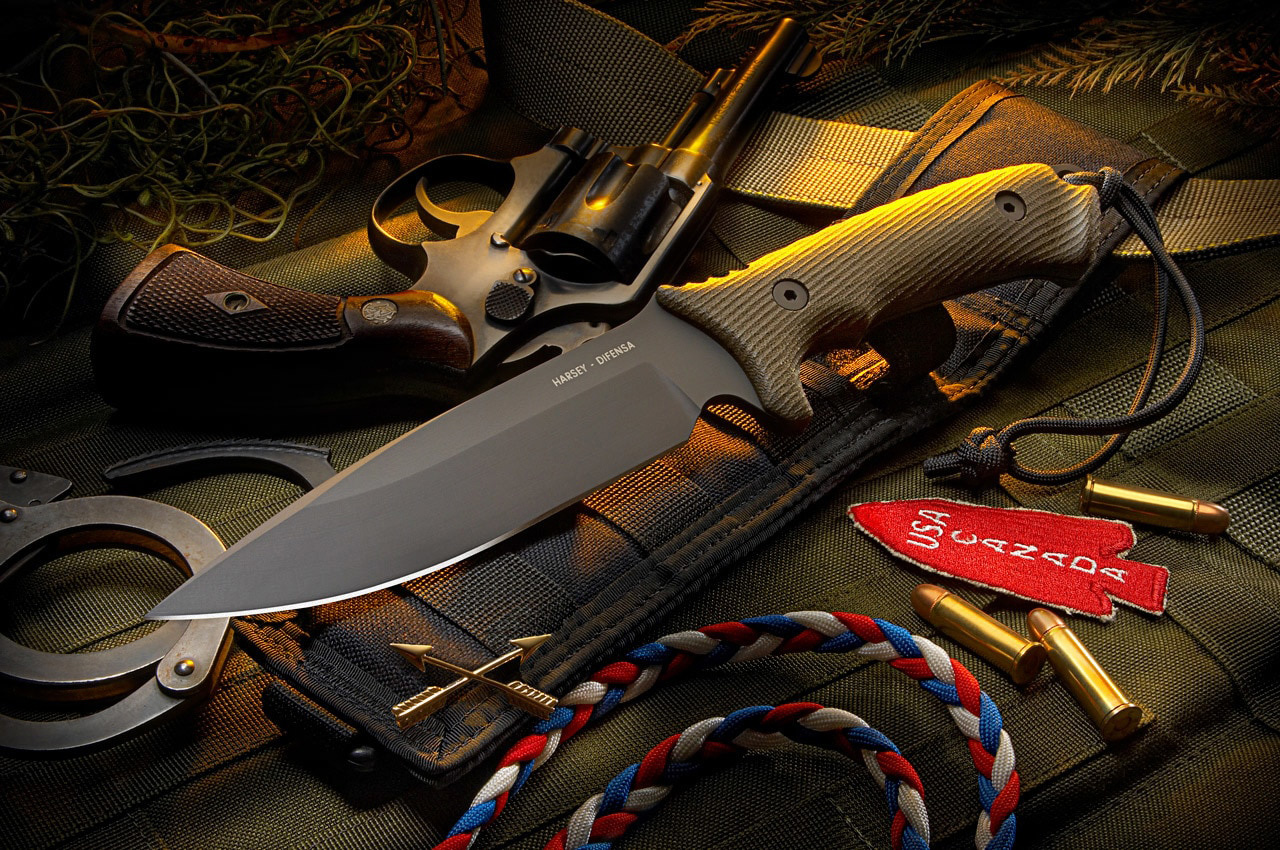
Spartan Harsey Difensa
The Spartan Harsey Difensa is named after a battle fought between the U.S./Canadian First Special Service Force and German troops in Italy. Known as the Battle for Monte la Difensa, the courageous performance of U.S. and Canadian forces there was essential to the eventual Allied victory in Italy. (Caption and photo via Spartan)
Named after the 1943 battle for Monte la Difensa in Italy during World War II, the Spartan Harsey Difensa is a prime example of military history meeting modern knifemaking.
The knife got its start when the Canadian special forces commissioned Spartan Blades and William Harsey to produce a blade for it. This U.S./Canada collaboration harkens back to the Allied heroism of that 1943 battle, so the result needed to be perfect.
From the looks of it, the spear-point Difensa hit its mark and then some. Its design wouldn’t be out of place in either country, or abroad for that matter.
The full tang and handle of the Spartan Harsey Difensa allow for a neutral balance in the user’s hand. Combined with the textured, ergonomic canvas Micarta handle (modified from Spartan’s Model II with no rear jimping) this custom combat knife offers the wielder a comfortable, confident grip whether wet or dry. (Caption and photo via Spartan)
Designer: William Harsey
Overall Length: 11 5/8″
Blade Length: 6 1/4″
Blade Thickness: 3/16″
Blade Steel: CPM S35VN
Blade Hardness: 59-60 HRC
Blade Style: Spear Point
Grind: Flat ground main bevel with tapered top edge.
Coating: SpartaCoat – PVD – Tungsten DLC (Black) or ZrN (Flat Dark Earth)
Handle Material: 3D Contoured CE Canvas Micarta® Black or Green
Weight: 0.710 LBS
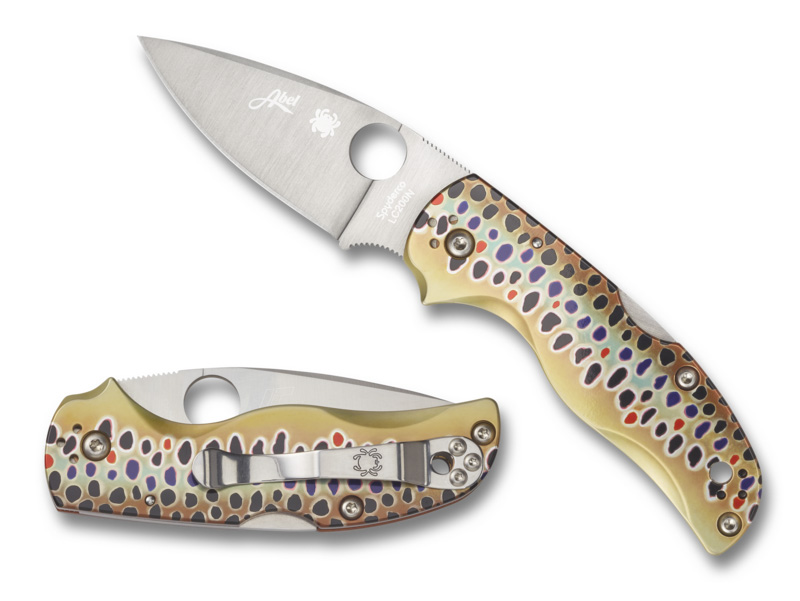
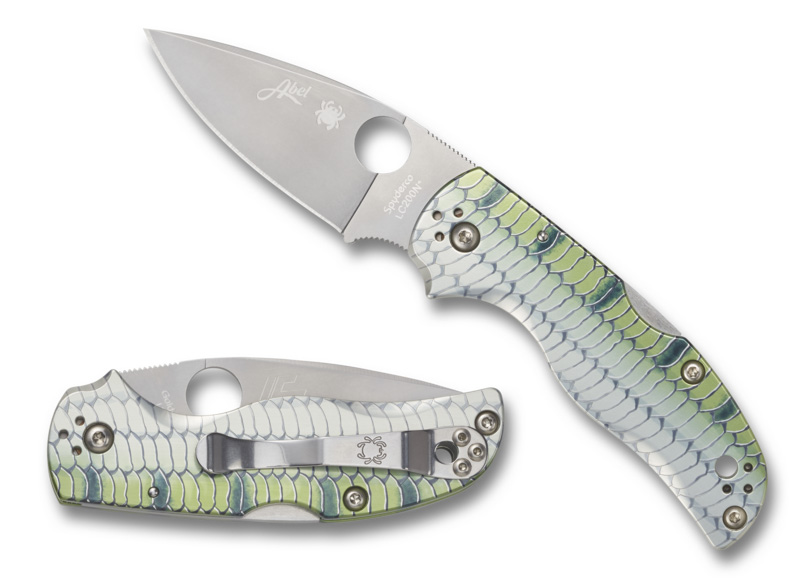
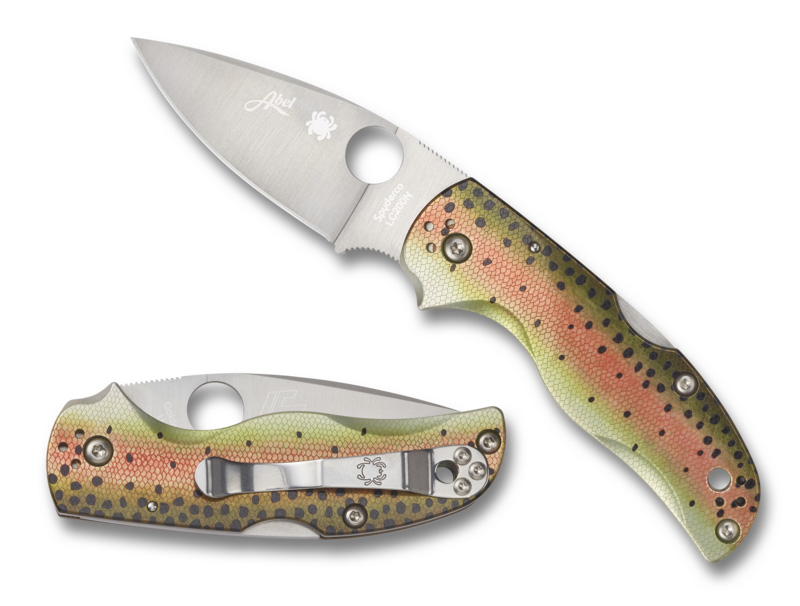
Spyderco Native 5 Abel Reels Exclusive Signature Series
The brown trout pattern. (Spyderco photo)The bonefish design. (Spyderco photo)
Spyderco’s collaboration with fine fishing tackle manufacturer Abel Reels has turned out a creel of keepers with the painstakingly detailed Native 5 Abel Reels Exclusive Signature Series.
One look will show you what makes this series of three knives stand out. The same proprietary process Abel Reels uses to make its tackle so realistic is also applied to the design of the knives. That’s not to say the knives can be used as fishing lures, but it’s pretty close.
Each work of art wraps itself around Spyderco’s popular Native 5 folding knife platform. These photorealistic knives might swim away if you don’t watch out.
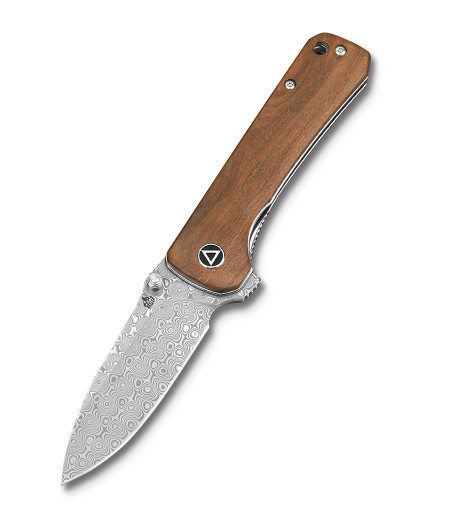
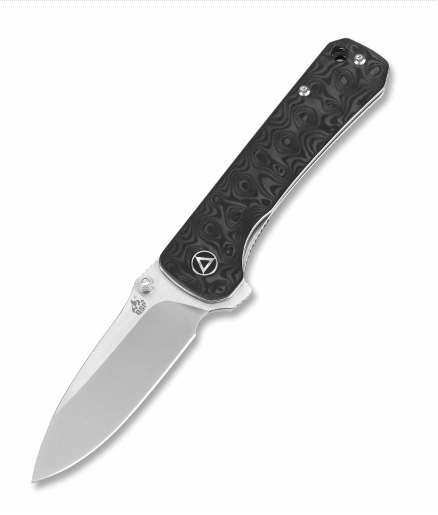
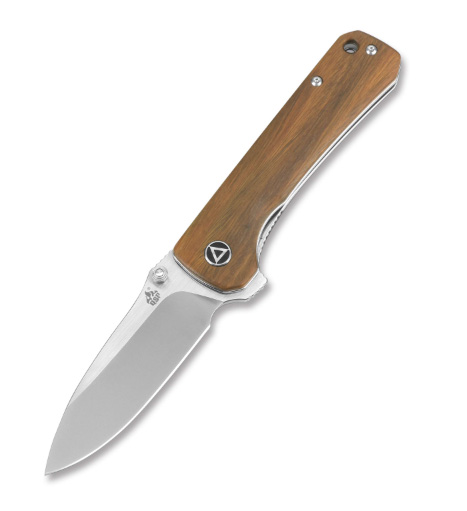
QSP doubles down on the growing interest in urban EDCs with the Hawk QS131 line of four knives (A, B, C and D). The handle and blade material separate each of the four, but the rest of the specs are roughly the same.
The squared off handle design in each Hawk softens the overall design, staying true to urban EDC’s non-aggression ethic. The same could be said for the damascus on two of the Hawk knives; urban EDCs need to have something to talk about.
Ceramic ball bearings mean no matter which of the four Hawk knives finds its way into your pocket, it’s sure to pop open like a true flipper every time.
QS131-C-Hawk (QSP photo)QS131-D HAWK (QSP photo)
Mechanism: Flipper (Ceramic Ball Bearing)
Blade: Chinese Damascus Steel or CPM35VN (Satin Finish)
Handle: Carbon Fiber (A), Verawood (B) or Carbon Fiber (C)
Lock: Locking liner
Overall: 7.35”
Closed: 4.125”
Cutting edge: 3.225”
Net weight: +/-3.6oz
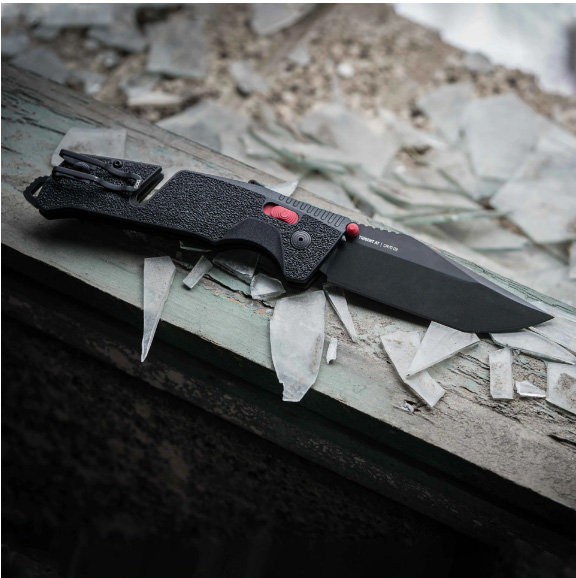
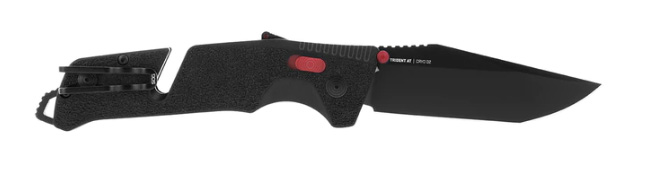
SOG Trident AT
(SOG image)
With flippers all the rage, is there still room for an assisted opener? Absolutely.
SOG’s Trident AT is an overbuilt example of the enduring assisted opening category, marketed as being “designed for professional users.” Anyone can order up the AT, though, and why wouldn’t they? The assisted mechanism opens rapidly, and the blade stays securely in place with SOG’s renowned AT-XR locking system, including an ambidextrous safety in the handle.
Why so much security? SOG anticipates you’re going to beat the heck out this knife. SOG prides itself on taking its folders to the limits, and this is no different.
Plus, the line cutter and glass breaker mean that no matter what you encounter in the field, you’ll be ready.
Editor’s note: This article originally appeared in the January 2010 issue of BLADE. However, the information presented is still relevant and useful to anyone interested in paracord-wrapped knife handles.
Advantages of Paracord-Wrapped Knife Handles
Affordable: Much less expensive than many natural and synthetic handle materials
Customizable: Available in a variety of colors
Convenient: Cordage is as near as your knife
Versatile: Paracord can be used in countless everyday and survival situations
Disadvantages of Paracord-Wrapped Knife Handles
Fixed blades only: Folders aren’t an option
Absorbent: Will soak up moisture (water, mud, blood), and may give off unpleasant odor as a result
Needs replacing: Wear and tear mean the wrap won’t last forever
Ergonomics: Some say gloved hands often find a better grip than bare hands
The Infinite Uses of Paracord
While for some it may be considered just a quick wraparound, for others it has proven to be a lifesaver. The simple paracord handle does more than meets the eye.
Functioning as a handle material that allows for the best fit for the size of the user’s hand, and one that can be added or removed in a matter of minutes, paracord is durable and relatively inexpensive. It also adds a dimension of survivability for those in the field.
Paracord pulls double duty as a bootlace, securing line, snare or even in a first-aid situation.
What’s the Best Kind of Paracord?
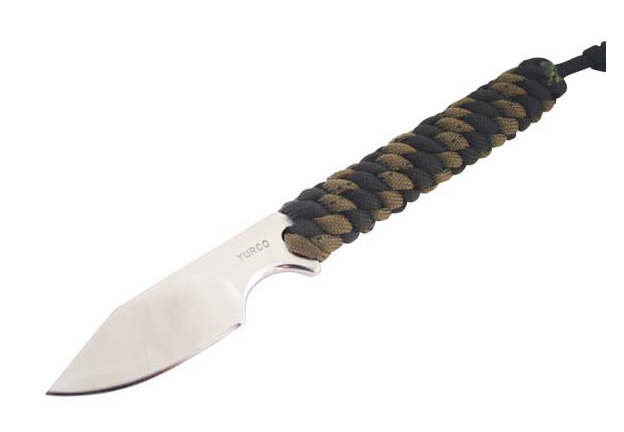
This Yurco model is available from Arizona Custom Knives. (photo courtesy of Arizona Custom Knives)
“The best paracord to use is military 550 cord,” explained custom knifemaker Mickey Yurco, who has employed paracord wrap for handles on as much as 40 percent of his knives. “It has seven inner strands of nylon cord, and the outer shell is tightly braided nylon. If you pull out the separate strands in a survival situation, you can make a bowstring, use it to catch a rabbit with a snare, use it for fishing line, and you can break down the inner core into three separate smaller strands for sewing a rip in a tent or as suture if you cut yourself.
“You can use the outer shell to lash branches together to build a lean-to or tie logs together for a raft. You can even use it to keep a fire lit because [paracord] will melt.”
Yurco also points out that when a paracord handle is unwrapped for another use, the gripping end of the knife is still intact. The entire piece is lightweight and, on the sheath or in a belt clip, as much as eight to 12 feet of additional paracord can be tightly wrapped as backup.
Two Schools of Thought
Interested in doing a wrap yourself? You certainly can. The Izula-B Kit includes the paracord wrap (upper right) and cod lock, and also the black molded sheath, large and small split rings, ferro fi re-starting rod, emergency whistle, plastic snap hook and MOLLE lock kit. (RAT photo)
Mike Fuller of TOPS Knives noticed its reputation rising around 2000.
“I first saw it during the Vietnam era, as some guys wrapped paracord around their sheaths just to have some extra cord if needed,” he commented at the time this article was published. “I did see a few homemade jeepspring knives with paracord wrapping.
“There are two schools of thought on the paracord,” Fuller continued. “In an emergency situation, you might have about 10 feet of cord to use for survival applications. In a wet situation, you might have a better grip, and some people feel that it assists when wearing gloves in the field.
“Paracord can in fact tear or become frayed and, if it gets soaking wet in really cold weather, some have said that their handles freeze and coat with ice. Several professional hunters have said that if you are field dressing an animal the blood may get into the cord and it’s difficult to clean and may carry a distinct odor.”
The Secret is the Simplicity
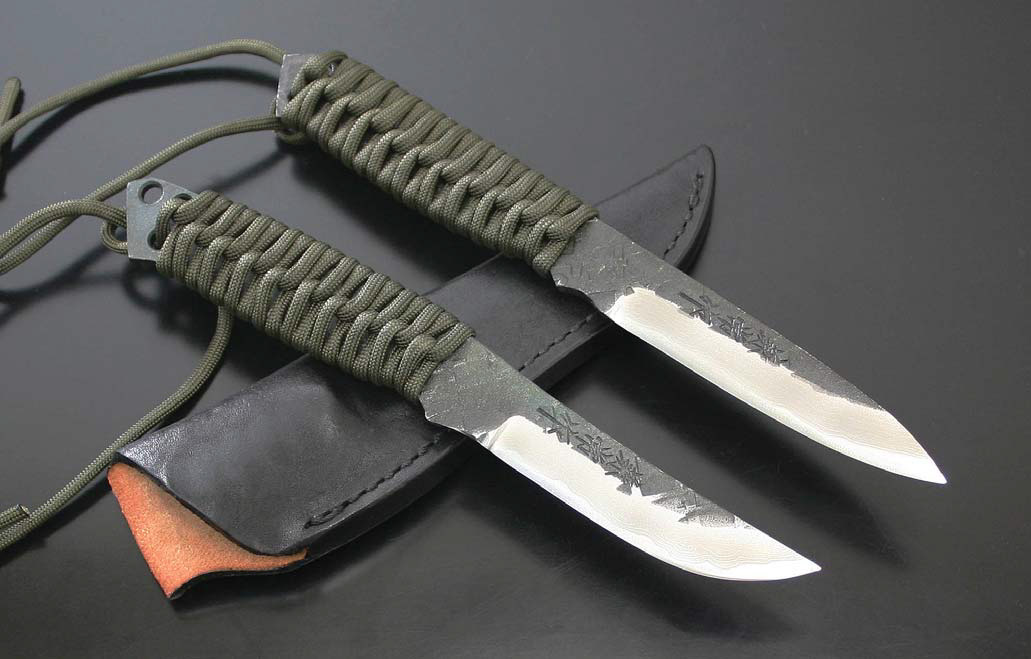
The Yumi (top) and Ya (bottom) from Kanetsune/Kitasho offer paracord-wrapped handles and blades of 15-layer White steel damascus. Each piece comes with a cowhide sheath. Overall lengths: 7.68 and 8.07 inches. (Kanetsune/Kitasho photo)
“People like paracord because it is so simple,” said Justin Gingrich, a consultant with Ontario Knife Co. “It allows them to customize a handle and still have a knife they can carry close to the body. You can wrap, rewrap and even change the cord to match the outfit you’re wearing.
“Paracord allows users to tailor the knife to themselves, beefing the handle up or thinning it out, and, if it gets dirty or frayed or messed up in any way, it’s easy to replace. It will absorb water and hold it, so you don’t want it on an unprotected high-carbon steel knife. You could get rusting issues with water or any other fluids. It will absorb blood if you are hunting, but then again, it’s a give and take since you can change it out pretty quickly.”
Conclusion
As with any knife feature, whether to go with a paracord-wrapped knife handle or not is up to the user. However, many knife collectors enjoy the versatility and customization that paracord offers. Far from a trend, paracord is here to stay as a handle option.
BLADE’s Cutlery Hall Of Fame Welcomed Five New Members In 2021 At Induction Ceremony In Atlanta.
BLADE Magazine Cutlery Hall-Of-Fame® member B.R. Hughes set a most appropriate tone for the Hall’s 2021 inductions early Saturday morning of the BLADE Show in the Kennesaw Room of the Renaissance Waverly Hotel.
“Over the years I’ve noticed one thing about the man and lady selected for the Cutlery Hall Of Fame,” said one of the co-founders of the American Bladesmith Society in his speech inducting Joe Keeslar. “They are not so interested in themselves so much as they are others.”
In addition to Keeslar, B.R.’s words apply equally well to the four other new inductees: Beverly and Billy Mace Imel, Jay Hendrickson and Jim Sornberger.
Joe Keeslar
Joe Keeslar
Speaking of Keeslar, along with Sornberger, Joe was voted into the Hall last year. However, since the pandemic canceled BLADE Show 2020, it also postponed their formal inductions until this year—none of which dulled Keeslar’s appreciation for B.R.’s speechifying ability.
“[BLADE® editor] Steve Shackleford contacted me last spring and told me I would be inducted into the Hall Of Fame … The first thing I did was call Mr. Hughes and asked him to do my induction speech. You can see why. I asked him to give his best $20 speech,” Joe deadpanned to laughter from the 60-or-so gathering of the inductees’ families and friends. “I think I’m going to have to give him a few dollars to make up for that.”
In his baritone voice and measured manner, B.R. outlined Joe’s early history as a United States Marine Corps veteran of the Vietnam War, marriage to Suzanne, making knives and also fine muzzleloading rifles, and getting his college degree. In 1989 Joe earned his ABS master smith rating and it was also about that time Suzanne, who, in her job as a professor at Murray State University, started taking her students to France in the summer to enhance their French language skills.
“Naturally, Joe had to build a shop over there so he could make knives, and he taught many Frenchmen how to make knives,” B.R. noted. “He also was asked to demonstrate at the Thiers Knife Show, the second largest knife show in France. This practice continued for years. He’s been a wonderful ambassador in preserving the art of bladesmithing.”
Joe went on to become chairman of the ABS, serving in the position longer than all but two others, ABS master smiths Bill Moran and Jim Batson, both members of the Cutlery Hall Of Fame. He’s taught knifemaking at the William F. Moran School of Bladesmithing, Haywood College, hammer-ins in Alabama, Arkansas, North Carolina and Ohio, played a lead role in the rapidly expanding ABS youth program, and taught classes for the first four years of BLADE University. He also authored two how-to books: Handles and Guards and Forging and Finishing the Brut de Forge Knife. Joe thanked three people in particular: Suzanne, their son, Kurt, and B.R.
“Suzanne and Kurt have given me so much over the years in terms of support,” he began, “but the thing they gave me most, they gave me time. Time is a special commodity. You can’t put it in a box or on a shelf and come back in a week and retrieve it. The time is gone. You have to use it when it’s available to you. They gave me time to be me, to do what I wanted to do, in this case the knives and some with the guns, too.”
He also credited B.R. for 30 years of friendship. “I trusted his judgment on the things that came up when I served on the ABS board of directors,” Joe said. “He was there as my mentor and savior, he was helping me decide on the things I needed to be involved in, understanding how the ABS works, what our goals are and all the things I needed to know.”
Jim Sornberger
Jim Sornberger
Cutlery Hall-Of-Famer Ken Onion gave the speech inducting Sornberger and outlined Jim’s pre-knife career, which was pretty impressive in its own right. “Guns, knives and tools were the things that molded Jim,” Onion began. “His grandfather gave him a Rudy Ruana knife when Jim joined the Boy Scouts, and his uncle in Redding, California, owned a gun shop with a large knife display. It was there Jim met Harry Morseth in the mid-fifties.”
Sornberger joined the Army in 1963 and became an advisor in Southeast Asia, moving around Vietnam, Cambodia, Thailand, Laos and other countries. After his discharge he joined law enforcement and shortly thereafter became a deputy with the Santa Clara sheriff’s office. From there he became an agent for a federally funded narcotics task force for several California counties, and later worked as a narcotics intelligence officer for military and other agencies in and out of the state.
Following a work-related injury, Jim focused on one of his lifelong loves—making jewelry—while recovering. One of the places that sold his jewelry asked him to make knives. He became a regular attendee and table holder at the San Jose gun show, where he met such storied knifemakers as D.E. Henry, Dave Pitt, Ron Richards and Bob Holt. They and others started a knife show—the Bay Area Knife Collectors Association Show—for which Jim wrote the bylaws. “BAKCA,” as it was known, enjoyed what Onion called “30 years of great shows and wonderful memories.”
Jim joined the Knifemakers’ Guild in 1976 and served on the board of directors, including a stint as vice president. By the late ’70s he’d won several awards for his knives, including his San Francisco-style dress bowies. In 1981 the industry was having quality control issues with 154CM stainless steel, so Bob Holt and Jim started H&S Supply and sold ATS-34 stainless in large quantities, as Onion noted, “essentially introducing it to the entire knife industry.”
Jim gave thanks to his two grandfathers for the time they spent with him and serving as his role models. “It’s really nice to be rewarded for something you’ve done a good part of your life and still enjoy doing—and I’m not quitting,” the 75-years-young Sornberger reassured the audience. “I’ve still got plenty of years left, I think.”
Indeed, for the man Onion called an encyclopedia of the history of the custom knife world, who continues to write for KNIFE Magazine and other outlets, and who travels worldwide, the best may yet still be to come.
Beverly & Billy Mace Imel
Beverly & Billy Mace Imel
Beverly and Billy Mace Imel served as secretary/treasurer on the Guild board of directors for 15 years and were rocks in terms of doing the behind-the-scenes work that was so important to the running of the organization. In fact, when Billy first started making knives in the early 1970s, Beverly did all the bookkeeping for Billy’s knifemaking operation and has ever since, the two celebrating their 61st wedding anniversary June 11. Notably, they are the first married couple to be inducted simultaneously into the Hall. (Cutlery Hall-Of-Famers, Mr. and Mrs. A.G. and Goldie Russell, were inducted separately.)
A tool-and-die maker by trade, Billy was inspired to make knives in 1972 before going on a hunt. He saw a Ted Dowell integral hunter and decided it would be a good knife for the trip, but it cost $100—too much for him to pay for a knife at the time. One thing led to another and Billy tried his hand at making knives, and soon discovered how much work it took to make a good one. Someone saw them and asked Billy how much he wanted for one. “Bill said he never thought about that but he wasn’t charging a hundred because that damn sure isn’t enough, so he said two hundred,” Jim Sornberger winked in his speech inducting the Imels.
Billy joined the Guild in 1973 and the Imels eventually exhibited at shows in Japan, Europe and elsewhere, basically doing everything together. In the process, Billy became one of the world’s best knifemakers. “In the mid ’70s there were several people I was really fascinated with who did a really good job on their knives, the fit, the finish, the detail and the sharp lines,” Sornberger recalled. “And Billy was No. 1 on my list.” A long-time member of the NRA, Billy also made knives for the speakers at the association’s annual convention, including one each for Presidents Ronald Reagan and George H.W. Bush.
In 1984 the Imels were elected Guild secretary/treasurer and Beverly in particular changed forever how the position would be viewed. “She was unbelievable,” Sornberger stressed. “This was in the day before portable phones and you didn’t have a stenographer to take notes, but no matter what we asked her during business meetings—How much did it cost? How many tables did we have? Who made a motion at this meeting?—Beverly had the answer. She’d just tell ya’, boom, who made the motion and who seconded it, and how she got all that stuff I’ll never know. She was the backbone of the Guild for 15 years.”
Regrettably, the Imels were unable to attend the ceremony but sent a heartfelt written thank you instead.
Jay Hendrickson
Jay Hendrickson
As inductor Johnny Perry noted, when Jay Hendrickson started making knives in Frederick, Maryland, in 1972, it wasn’t long before he learned there was another bladesmith in the neighborhood who just so happened to be the best in the world at it—Bill Moran. Jay met Moran, visited Bill’s shop now and again, and, through practice and dedication, became a bladesmith and joined the ABS.
Jay earned his ABS journeyman smith stamp in 1986—the same year being elected to the ABS board of directors—and his master smith stamp in 1989. Around that time, he was instrumental in establishing the William F. Moran School of Bladesmithing and also taught bladesmithing there, writing and illustrating the manuals used in some of the courses.
He was elected ABS chairman in 1991, succeeding the only chairman the ABS had ever known—Mr. Moran. In all, Jay served on the ABS board of directors from 1986-2018. He and his wife, Nancy, helped develop and coordinate the Bill Moran Hammer-In in 2003 in Frederick and kept it running for two more years before Mr. Moran’s passing in 2006.
Jay was co-chairman of the All-Forged-Blade Expo in Reno from 2003-07 and was instrumental in forming the William F. Moran Jr. Museum and Foundation in Frederick in 2006. He was president of it for 10 years, and today remains on its board of directors. The museum includes a number of Moran’s top knives, “a dressed-up version” of Moran’s knife shop and much more.
“All the effort Jay has put into the museum and foundation is immeasurable,” Johnny noted. “It required years and years of responsibility, but Jay bore it well and got the job done.”
The inductee gave special thanks to his wife, Nancy. “I wanted to thank her for all her help over the years, taking care of all the details, all the flight reservations, all the laundry, all the packing of suitcases. Sometimes when she gets tired she even lets me mow the lawn,” he said to audience laughter.
Jay went on to relate the story of when he was a kid shopping at a sporting goods store with his dad, who told the young Hendrickson to go pick something out for his birthday. Jay went to the magazine rack in the back of the store and saw the Gun Digest Book of Knives.
“I’d been making some knives, nothing big, but I’d been making them since I was a kid, and I looked at the book and it looked interesting,” he recalled. “And I looked down at the bottom and I see the names B.R. Hughes and Jack Lewis. Well, I didn’t know who these characters were but it didn’t matter, so I thumbed through it real quick and said this is a deal!”
Jay’s dad bought the book and Jay read it and told himself, “I can do this.” Looking at B.R. seated in the room, Jay remarked, “B.R., you helped me out a lot with that book and little did I know that one day I would get to meet you, serve on the ABS board with you, and over the years you would help me quite a lot with my knifemaking.
“I remember when B.R. got inducted into the Cutlery Hall Of Fame and he said something like he didn’t think he was worthy of this but he wasn’t going to give it back. Touché—the same with me.”
There have been tons of stories on how to be a knifemaker. Most are great and deal with subjects like taxes, suppliers, marketing, sales, bookkeeping and safety. Other great articles cover the technical side of how to make the knives you wish to sell, including stories on forging, grinding, heat treating, handles, sheaths and more.
My story will outline some things I have learned over the years as a full-time knifemaker in a home-shop setting that I think will benefit you, your knives and, most importantly, your family.
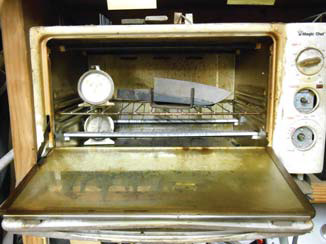
1) A Toaster Oven
Your kitchen will get messy in a hurry if you don’t take things outside. Buy a cheap toaster oven. Problem solved.
The kitchen is not the place to be tempering knives, warming up knife sheaths for waxing them, heating Kydex® for the molding, or burning out axe heads. A $5 toaster at the flea market will do all that in your shop and is a bargain.
2) Pots & Pans
Get a selection of pots and pans, cutting boards and a small scale from a thrift shop. Don’t be tempted to use a “good pan” for that one, little task.
3) A Shop Sink
Would you want to eat out of this sink? No. That’s why it’s the dedicated shop sink, not the one inside the kitchen.
Install running water in your shop, or at least have a five-gallon bucket handy. Make sure there’s a countertop, too, in case of spills.
On that note, wipe your feet off before re-entering a home.
4) A Coffee Thermos
If who like your coffee as much as I do, get a big thermos, fill it in the morning, and take it to the shop with you. This cuts down on the trips away from the shop, as a trip inside the house to grab another cup can turn into an hour away by the time you get the cup, peek in the fridge, check for phone messages, etc.
Plus, every time you re-enter the house, you track shop dirt and oils in with you.
5) Discipline/Knowing When to Stop
Know when to quit for the day. This is one lesson I’m still learning. You get wrapped up in your work and the next thing you know it’s 2 in the morning.
Not only will you spend that night on the couch, but you may spend the next one there too if, as a result, you also forgot the plans you made, dinner, one or more of the kids’ school activities, etc. Besides, it’s tough to make good knives after a rough night on the couch.
6) Do Something Special for Your Family
Make knives, buy flowers, repeat.
Use some of your knife money to buy your wife/husband/partner/significant other flowers. Buy them on a regular basis. Put it on the calendar if you must so you will remember. Think of the flowers as supplies, like grinding belts.
This is very important!
7) Mind the Dust
Know that what happens in your shop does not stay in your shop, and act accordingly. Dust from exotic woods will make it into your home. You may not be allergic to the dust but your wife, kids or family pets may be.
Keep an eye peeled for anything out of the ordinary when introducing new woods or materials into your shop. This also goes for smoke from quenching. Use “green” quenchants when you can, including vegetable-based oils and water. And keep the door to the rest of the house closed until you clear the air.
8) Consider Where Your Shop is Located
If you’re considering moving your shop away from your house, think long and hard about it.
Yes, a home-based shop offers some challenges. However, it offers quite a few benefits, too. Namely, the morning commute is a thing of the past, and people know how to find you.
Move the shop away, as some friends of mine have, and you may end up moving it right back anyway.
9) Make the Most of Breaks
Maximize the time between your work by throwing in a load of laundry, starting supper, taking care of a household task, paying bills, etc. This helps your family’s day-to-day quality of life.
10) Test Your Knives in the Kitchen
If you make them, there is no better test of the kitchen knives you create than to use them in making dinner. This is a twofer in that not only do you get the immediate feedback from hands-on testing, but also the household benefit of preparing meals.
11) Double Up Your Shop
With your shop set up, you have all sorts of tools on hand you can use for other projects. From fixing your kid’s bicycle to tuning up a lawn mower, you’ll find taking care of these everyday things can reset your focus for knifemaking later.
One of the more unusual patterns in the long history of folding knives is the marlinespike. It is a blend of the early rope knife—not the sunfish, but the wharncliffe version—and the singular, knitting-needle-like marlinespike.
These were combined into a single folder and have served many a sailor and diver well. The blade is a sure-handed rope cutter, and the spike is made for working with knots and splicing rope. In fact, there is a knot dubbed the marlinespike hitch that serves as a temporary knot for various needs.
Also known as rigging knives, marlinespike knives live today in the form of reproductions of the original folders and thoroughly modern send-ups. Climbers, who use a lot of different knots in their endeavors, also find marlinespike knives useful.
Example 1: Colonial Knife’s Marlin Spike
The press-lock is a common blade release for marlinespike folders that dates back to the knife’s early days. However, there’s more here than meets the eye: The Colonial Marlin Spike’s lock also serves as a bail and a shackle opener.
Colonial Knife’s Marlin Spike is a reproduction of the original marlinespike knife issued by the U.S. Navy in World War I—with some modern touches.
The locking, 440C stainless steel spike and partially serrated—a plain-edge version is also available—sheepsfoot slip-joint blade are both 3 inches long. The scales are a simulated brown jigged-bone Zytel and the bolsters are stainless. The spike locks via a press-lock on the base, which also serves as a shackle opener and bail for a lanyard.
Example 2: Boker Magnum Catamaran
The marlinespike hitch is a simple, temporary knot that can be easily removed once it has served its purpose. The knot is attached to the Boker Magnum Catamaran’s spike in a scenario for which it can serve as a handle.
The Boker Magnum Catamaran has the traditional profile of the old marlinespike folders, replete with a press-lock bail/shackle opener for the spike tool and a 4.375-inch stainless steel frame.
The 3.3-inch spike and 2.75-inch partially serrated sheepsfoot slip-joint blade are 440A stainless steel. You’ll find a nifty shackle opener on the handle, also stainless steel, pinned to the frame.
Example 3: Camillus Marlin Spike
While the plain edge of the Camillus Marlin Spike’s sheepsfoot blade might not quite match the speed of a serrated edge, when it comes to wood it vastly out-carves the rest of the pack. This is a big consideration if you need a knife that will step outside The Rope Zone.
The Camillus Marlin Spike is a modern take on the original. The stylized, 4-inch frame is black G-10 with stainless steel liners. The 2.75-inch sheepsfoot blade—the only one of the test group without serrations—is VG-10 stainless steel with a black, carbonitride titanium coating.
It secures via a linerlock. The folder’s 2.25-inch spike locks via the press-lock/bail and is black coated as well. It is the lightest (3.2 ounces) of the test knives.
Example 4: Fox Sailing Knife
The Fox Sailing Knife has a cutout in the blade that serves as a shackle release. A shackle’s screw tab is caught in the jaws of the blade’s open maw.
The Fox Sailing Knife delivers with a cool, 4-inch handle of textured blue G-10. Stainless liners house linerlock mechanisms for both the 3-inch modified wharncliffe blade of 420 stainless steel and 2.25-inch spike.
The partially serrated blade has a cutout that serves as a shackle opener, along with a hole in the base of the frame that can accept a lanyard.