The knife community lost three dedicated contributors recently with the passing of knifemakers Michael Holtschulte, Bernard Sparks and Ralph Turnbull.
Ralph Turnbull
A full-time knifemaker for almost 50 years, Ralph specialized in knives in the latest materials, including mosaic damascus, tigerwood, white and black ebony and others. He made a wide range of models, including though not limited to folders, fixed blades and even butterfly knives.
We had just published a story on one of his folders written by J.T. Hill (J.T.’s No. 1 Knife Hero) in the July issue when we got word Ralph had passed on June 6—the anniversary of D-Day. He was 85.
The last time I saw Ralph Turnbull was at the inaugural International Custom Cutlery Exposition in 2015 in Kansas City. Mrs. Raenelle Turnbull was there with him, as usual, and Ralph was smiling and sassy as he almost always seemed to be. Though he was 81 he looked at least five years younger—he always did look younger than his age—and talked about how he had beaten just about everything old age had thrown his way.
He said he’d had bypasses, diabetes and one other malady that I can’t recall, and talked about how the doctor told him he’d lived through the biggest killers.
While Ralph recently succumbed to the inevitable fate that eventually awaits us all, his attitude toward life is one I will always envy. To paraphrase the old sports saying, it wasn’t that anything beat him—he simply ran out of time.
Bernard Sparks
(Image via Bernard Sparks Facebook page)
Born in Dingle, Idaho, on the longest day of the year, June 21, 1931, Bernard Sparks began making knives part time in 1967.
According to Mrs. Vicki Sparks, Bernard was among 16 makers who met in 1969 to discuss forming The Knifemakers’ Guild. He served on the Guild’s board of directors for a time. His full-time job was as a teacher, which he retired from in 1996, at which point he turned to making knives full time until the spring of last year.
Over the decades, his obituary noted, he made several thousand knives. He was one of the first makers to use Vascowear, a high-speed tool steel, for blades. Bernard passed away on his birthday. He was 89.
BLADE field editor Ed Fowler remembers Bernard and Vicki, who survives her late husband.
“Bernard was one of the very early makers and a good one, totally honest, and made great knives,” Ed wrote. “They were high quality, well designed and each blade had a very practical geometry for its intended purpose. He and Vicki are a tribute to all that is good about our community.”
Michael Holtschulte
(Image via holtschultehandmadeknives.com)
Michael Holtschulte was born Nov. 17, 1956. He served three years as an Army combat engineer during the Vietnam War. He built knives for 28 years, making and selling over 12,000 of them over that span.
In a December 2013 BLADE® story that asked if a soldier had just one knife what it should be, Michael said he preferred a fixed blade with a 6-inch blade of 1095 or 5160 carbon steel.
“I would say that because a knife is a tool that becomes a multitool,” he reasoned. “One knife would have to do all the chores of self-defense, cutting, chopping and skinning game.”
He passed away May 10. He was 63.
I never had the pleasure of meeting Michael, though I did get to talk to him on the phone, and he was most professional. As his daughter Lisa wrote, he expired while forging a knife for a customer.
“My dad put his whole life into making knives and he passed getting to do what he loved,” she stated. “I remember how absolutely smitten he was that you guys did an article on him, and it was by far one of his proudest accomplishments.”
I’m sure I speak for the entire BLADE staff when I state we are humbled that we were able to inject a moment of pride into Michael’s short time on this earth.
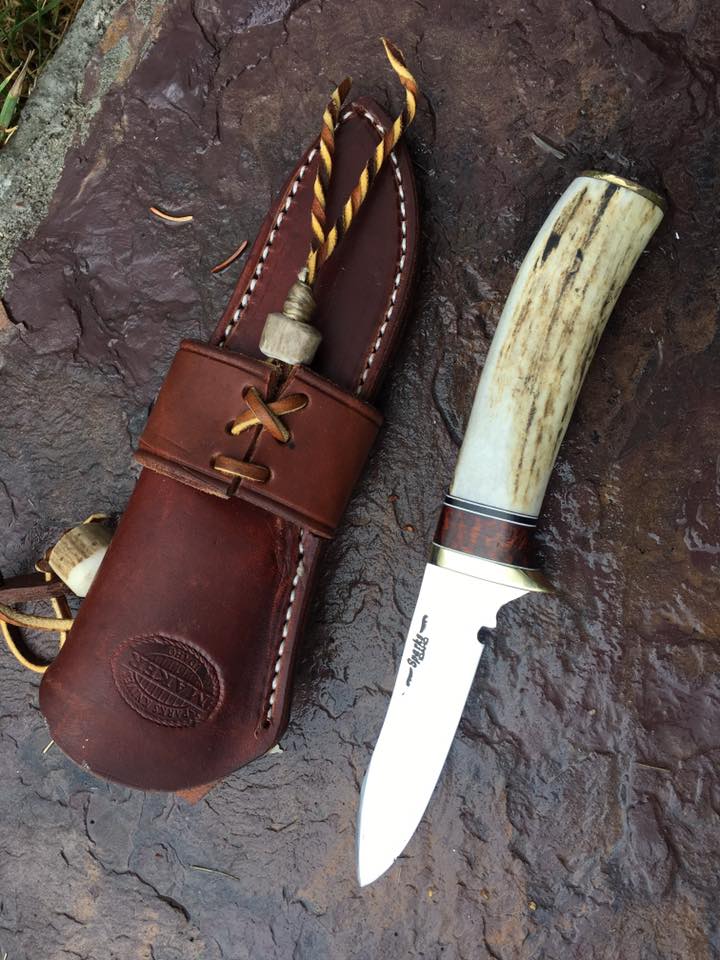
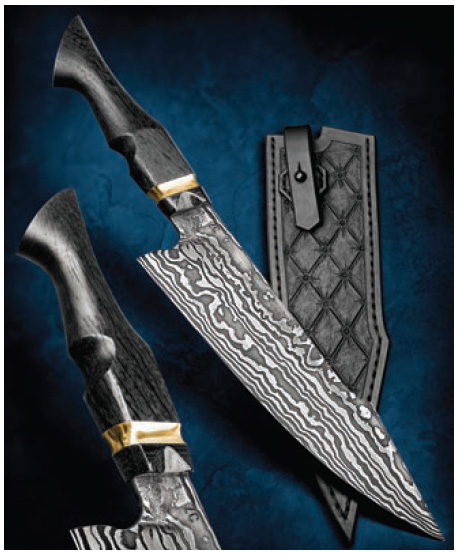
If the knife is well made, it will always have value. Josh Fisher’s bowie features a damascus blade of 1084 carbon and 15N20 nickel-alloy steels, and a handle of curly Tasmanian black wood. (Caleb Royer image)
Thinking of dipping your toe into the exciting world of collecting custom knives? Read these tips first.
What for Look for in a Custom Knife
Don’t buy or collect trends. Buying what’s “hot” today may mean selling at a loss tomorrow. Buy a knife because you like it, not because you think it will increase in value. If the knife is well made, it will always have value.
Decide what the knife will be used for and choose accordingly. Is it pleasing to your eye? Hold it and see how it feels in your hand.
Is it easy to carry? Is the edge geometry correct and are the grind lines even? Are there gaps at joints between the blade and guard? On a folder is there too much blade play—up and down and/or side to side?
Does the knife walk and talk? What about fit and finish?
Is the edge geometry correct and are the grind lines even? Are there gaps at joints between the blade and guard? Don Hanson’s folders exhibit tight fit and finish from stem to stern. (SharpByCoop image)
On a linerlock or framelock does the lock engage too late or too early? Is lockup tight? Feel the knife all over for hot spots and evaluate it in terms of quality construction and materials, creativity, etc.
If the knife is a fixed blade, a sheath can add value. However, the knife needs a sheath only if it is important to you, though it may affect resale value. A good sheath can cost $75 to $150 to have one made, so this is a good benchmark of value detraction.
On the other hand, some sheaths can be distinctive works of art that can add significantly to the knife’s overall appeal and value.
If the knife is a fixed blade, a sheath can add value. However, the knife needs a sheath only if it is important to you, though it may affect resale value. Zac Camacho offers a sheath with his zesty fixed blade in damascus and a handle of stabilized ancient bog oak. Overall length: 13.875 inches. (Caleb Royer edited image)
Commissioning a Completely New Custom Knife
Be wary of custom orders, as many things can go wrong, including long wait times before delivery, and makers who shun lengthy dialogue over what might be a healthy monetary investment on your part. Moreover, the finished knife may not meet your expectations.
Custom orders may be best for makers early in their careers. Veteran makers may wind up making a custom order that doesn’t represent their style, so the knife may not increase in value.
Place an order with enough time to pick the knife up at a time that works for you, such as during BLADE Show.
Determining Price of a Custom Knife
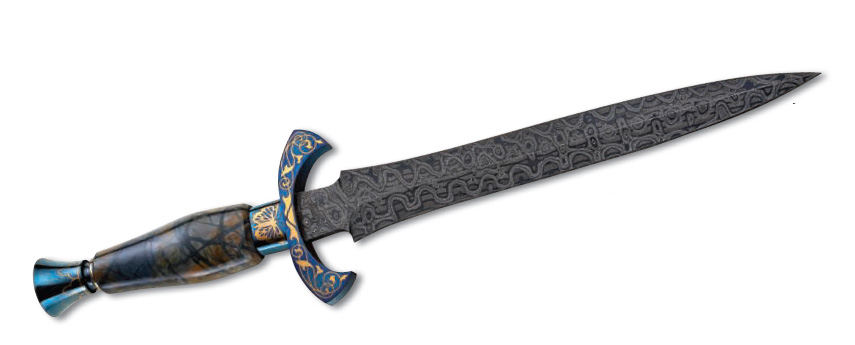
If you pay a high price for a knife, see if the maker has been in business for a number of years, has a strong following and that the knife is something special. Such a knife should be made of materials of a higher quality/more in demand than a less expensive model. An art dagger by Dennis Friedly with engraving by Gil Rudolph would appear to qualify on most all of these counts. (SharpByCoop image)
Never be afraid to ask a maker, purveyor or any seller why a knife costs what it does. Ask him/her for some background and history on the knife, both of which can embellish a knife’s value, especially if the knife is a vintage one.
If you pay a high price for a knife, see if the maker has been in business for a number of years, has a strong following and that the knife is something special. Such a knife should be made of materials of a higher quality/more in demand than a less expensive model.
If the maker is just starting out, be sure his knives are priced reasonably.
If the knife appears to be underpriced, be sure there’s not a mistake in its construction.
For a guide, check the prices of like knives on the sites of purveyors who have been in the business for a long time. They wouldn’t still be in business if they didn’t offer reasonable pricing.
Are Deposits Necessary?
One purveyor said you should never pay an upfront deposit on a custom order. No exceptions. Watch out for makers who claim to need the deposit to buy materials, etc. You are not a finance company.
Besides, as one purveyor said, “It’s unfortunately very human that it’s hard to get work done that is already paid for.”
Warranties
Ask for a written guarantee regarding what the maker will and will not cover in terms of damage caused by use/abuse, flaws in workmanship or materials (excluding natural materials that chip and crack), etc.
The warranty should last for the remainder the maker’s career.
The distinctive handle of the dog-bone bowie knife resembles a dog bone and allows the user to swing, slice, hack, stick and pull the knife without it flying or slipping out of the hand. A wrap of thin coin silver protects the end of the dog bone, or pommel. An oval-shaped silver ferrule supports the wooden handle at the guard. A metal ferrule is a characteristic of early American knives. It prevented the handle from cracking.
For decoration, thin coin-silver strips are pinned to the top and bottom of the handle from ferrule to pommel. Domed silver studs and rectangle escutcheon plates adorn the dark walnut handle. A thin silver cross guard decorated on each end provides protection to the user’s hand.
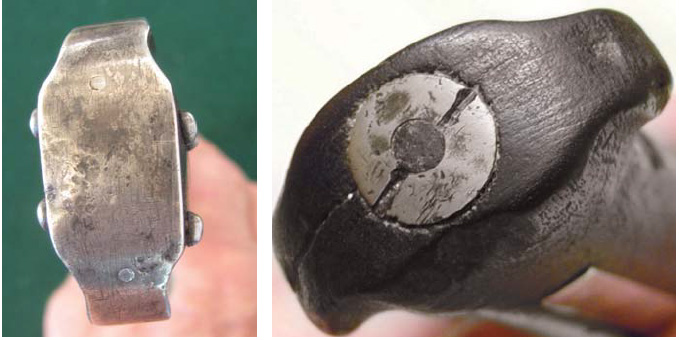
The decorated wooden handle without the silver pommel wrap slips over the blade’s hidden tang. A slotted cylinder nut secures the handle to the threaded tang. The photos accompanying this article show both the slotted nut on the handle with the silver pommel removed, and the silver pommel wrap covering this feature. The slotted cylindrical nut is a feature of knives made by the French cutlers of the time in New Orleans.
The decorated wooden handle without the silver pommel wrap slips over the blade’s hidden tang. A slotted cylinder nut (right) secures the handle to the threaded tang. A silver pommel wrap (left) covers this feature. (photo of exposed cylinder nut by, and courtesy of, Mark Zalesky)
The feature is evident on push daggers and on knives made by Blaise Pradel that originated in New Orleans. His mark of “PRADEL, A NEW ORLEANS,” is French for Pradel of New Orleans. A pupil of Charriere of Paris, France, Pradel lived on St. Charles Street in New Orleans. The blades were forged and flat ground into a triangular cross section.
They did not have a ricasso. The ricasso is the rectangular cross section of the blade before the guard on modern knives. Instead, they had a circular notch on the edge called a Spanish notch. It is a form of decoration. In the past, it may have had a purpose that is unknown today.
While the definition of the “perfect” or “4.0” military knife is subjective, those who have been there know well how their knives perform and what it takes to build confidence that the indispensable tool can deliver.
So, with a clean slate, how would veterans of the military and the knife industry construct the finest knife for their own use?
1) Easy
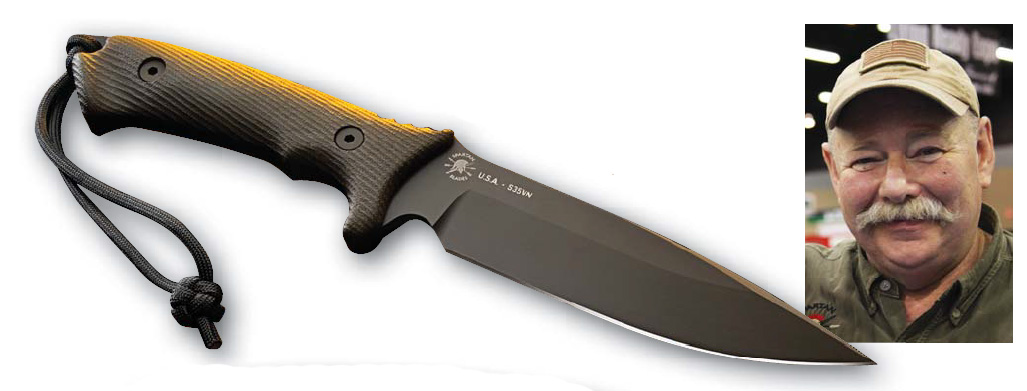
“Durability and maintenance are primary, as they are with any tool or gun,” assessed Rob Cude, who spent 24 years in the U.S. Navy and retired in 2006 as an Explosive Ordnance Disposal Chief after completing tours in Africa, Yemen, Afghanistan and Iraq, with combat duty as a member of the CIF (Commanders in Extremis Force), a group of exceptionally trained Special Operations personnel.
Retired Navy EOD Chief Rob Cude prefers any of the “SV” stainless steels such as CPM S30V and paper or canvas micarta with a thread exposing finish on his military knives. Stellite® 6K—such as that on this fighter by Kit Carson—is another Cude favorite for blade material. (Cude image)
“The knife must be easy to maintain and built of quality materials that stay sharp, are easy to sharpen, and strong,” Cude continued. “Any of SV [CPM S30V, etc.] series steels are really good, and Stellite® for some uses such as diving. High carbon can also be used as blade steel, but it’s all about finish and coating. My handle choice is paper or canvas Micarta with a thread-exposing finish, but the aggressive G-10 textures on fixed blades like those by Strider Knives are really good as well. The material needs to be durable and chemical resistant with a slip-resistant finish when wet.”
While on active duty, Cude carried a Spyderco Police, Benchmade and Emerson folders, and Gerber fixed blades.
“In 1996, I contacted a few custom makers to help us with a fixed blade that met a variety of needs,” he remembered. “Later, I carried Kit Carson, Jones Brothers, Strider and R.J. Martin, all excellent knives that withstood the test of time and extreme conditions.”
His friendship with Cutlery-Hall-Of-Famer Kit Carson and contributions to a military knife design resulted in variants of the U2, which Buck Knives picked up as the Intrepid.
“Kit was not only a friend but a mentor in military career,” Rob noted.
2) Simple
A Pacific Cutlery Fer-de-Lance designed by the late David E. Steele was always with Kim Breed on deployment. Breed also carried a Swiss Army knife Champion in no small part for its tweezers and scissors for removing thorns. (Breed image)
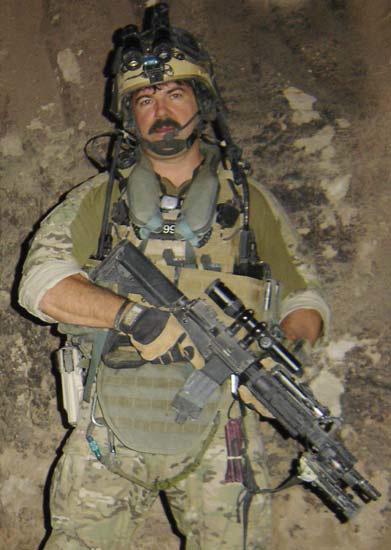
Retired 5th Special Forces Master Sergeant and BLADE field editor Kim Breed makes knives and has done design work for Spartan Blades. He applies the KISS principle, always keeping it simple.
“The more moving parts, the higher the chance of failure,” he reasoned. “I make it a point to serve the military by providing the best knife with the soldier’s interest in mind. They provide me with important feedback on how my knives have performed, which allows me to tailor their needs into my designs.”
While serving with the Special Forces, Breed preferred lightweight knives that could perform a wide variety of tasks since most of his active duty time was spent living out of his rucksack.
“A Ferde-Lance designed by David E. Steele was always with me on every deployment. I also carried a Swiss Army knife Champion, as the tweezers and scissors were the best for removing thorns.”
For Kim, experience still points to the multifunctional blade style with a comfortable handle, and high carbon steel and Micarta are the most requested materials from active service personnel. Comfort, edge-holding ability and ease of sharpening are the top priorities.
“The fixed blade will always have a place with the soldier,” he asserted, “and some folders will be used for smaller tasks. Kydex seems to be the sheath of choice, as it is approved for airborne operations and securely holds the knife in a variety of positions. Blade shapes run the whole spectrum, but most are a version of a drop point or slightly upswept blade. A few soldiers like guards, but as long as the knife has a finger notch to keep the hand from slipping, it’s good. A bead-blasted finish is a favorite. A non-reflective blade is a must.”
3) Environmental Versatility
The steel of choice for Bill Harsey (inset) is CPM S35VN, which he says mimics the traits of a true tool steel but with stainless characteristics. S35VN blade steel and a handle of another Harsey favorite, Micarta, help complete the Harsey-designed Difensa from Spartan Blades. (Spartan Blades knife image)
William “Bill” Harsey Jr. has been around military-style knives for decades and worked in design with legendary Cutlery Hall-Of-Famer Col. Rex Applegate, as well as Chris Reeve Knives and Spartan Blades.
He says canvas Micarta handles are tough to beat for control in harsh conditions, including wet and cold and even in darkness. They have been approved for cleanup after exposure to chemical or biological weapons, too.
“I also believe that a knife must be able to retain its sharpness in hot and humid conditions such as marine, riverine and jungle environments,” he commented. “This takes some amount of stain resistance, as an edge can ‘go away’ in the sheath without ever being used.”
The steel of choice for Harsey is CPM S35VN, which he says mimics the traits of a true tool steel but with stainless characteristics. While he adds that good makers can utilize a range of blade steels and produce outstanding knives, non-stainless steels require more maintenance.
“One thing I’ve learned about discussing knives with members of the military is that the topic elicits strong responses, kind of like which handgun is the best,” said Harsey, who has made knives individually and in collaboration with U.S. Army Special Forces, U.S. Navy Special Warfare personnel and Canadian Special Forces.
“Many of the warfighters I know carry several knives in the field and when not in the field. Folders, fixed blades and tools all count.”
Harsey sees the basics as the most important aspects of the ideal military knife.
“I think the requirements for a good military use knife, which can be mission and region specific, are that the blade has a point, cuts and can be carried in a good sheath that works with the rest of the kit carried by the warfighter,” he concluded.
Forget the Movies
An Army veteran of the 7th Infantry Division (Light) during the invasion of Panama, the 82nd Airborne Division during the Gulf War of 1991, the 173rd Airborne Brigade during the Balkans air war, and a special mission unit in Special Operations during the global war on terrorism in Iraq and Afghanistan, Jack Stottlemire retired with the rank of sergeant major. (Stottlemire image)
During stints with the U.S. Marine Corps and Army, Jack Stottlemire, who makes custom knives for military personnel at Fort Bragg, North Carolina, near his home, has seen many a global hotspot.
A veteran of the 7th Infantry Division (Light) during the invasion of Panama, the 82nd Airborne Division during the Gulf War of 1991, the 173rd Airborne Brigade during the Balkans air war, and a special mission unit in Special Operations during the global war on terrorism in Iraq and Afghanistan, he retired with the rank of sergeant major. Jack also has carried numerous knives.
He put away his Gerber Mk II after carrying it briefly and went with a KA-BAR that performed well in multiple functions. He also has used a Buck 110 folder, M7 bayonet, Leatherman multi-tool, Air Force survival knife, Benchmade Stryker auto, and a Horrigan Fighter made by his squadron mate, Bob Horrigan, who was killed in action June 17, 2005.
“Unlike what you see in the movies,” Stottlemire explained, “soldiers and Marines do not carry large crew-served knives like in Rambo or The Expendables. A knife is a cutting tool for everyday tasks. For silent killing when warranted, a spike hawk is used more often than not in lieu of a knife in Special Operations on today’s battlefield.”
Stottlemire’s custom knives are made under the Rustick Knives brand, and word of mouth drives his sales. He has a large following among Navy SpecWar Teams and Air Force Combat Control Teams.
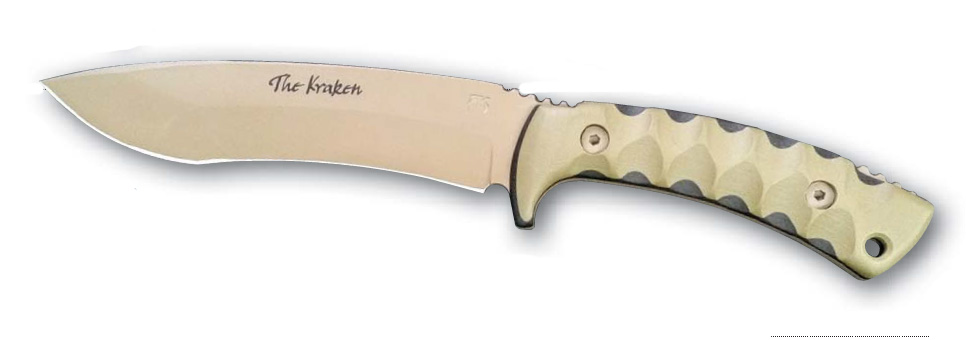
One of Jack Stottlemire’s best-selling knives for military personnel is the 6-inch-blade Kraken. The blade is finished in Cerakote™ with a flat-dark-earth color. The handle is G-10. (Stottlemire image)
“Carbon steel knives that are treated to 57-59 Rockwell are easier to sharpen in the field than most stainless steels,” he remarked. “Carbon is more affordable for the average ‘Joe’ also. I was surprised when a SEAL platoon ordered knives from me and did not want stainless. They preferred carbon with a Cerakote™ finish. Now, stainless does have its place, especially in a humid environment like Central America where you can actually watch an unprotected edge rust. But with proper maintenance and protective finishes, carbon can excel in these areas.”
Jack’s handle material of choice is G-10 and he uses that on all the custom knives he produces.
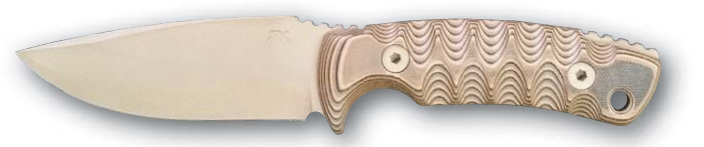
Another of Jack Stottlemire’s best-selling knives for military personnel is the 4-inch blade utility/combat knife. The handle is G-10 and the blade is finished in a flat-dark-earth Cerakote™. (Stottlemire image)
“It’s very tough and durable stuff that stands up to any abuse you throw at it,” he said. “Micarta would my second choice.”
From a military man’s perspective, Stottlemire says a knife needs to do one thing well—cut. Added options such as wrenches, screwdrivers or bottle openers are unnecessary in the field. A good point with a blade of 4-to-5 inches is usually more than enough to do the job well.
It Comes Down to Individual Preference
Overall, both fixed blades and folders useful in the field. Handles of durable synthetic such as Micarta are the top choice, while blade steel is a toss-up between carbon and stainless.
A blade length of up to 5 inches is ideal. Personal preference, though, remains a major factor, and the individual has the opportunity to decide what knife or knives to employ.
Shadow-pattern penknives form a distinctive niche in the pocketknife world and own a tradition related to their original purpose, which was, as with other forms of penknives, to sharpen writing quills or feathers.
Before the introduction of mass-produced, steel-pointed pens in the early 1800s, feathered quills were the only utensil available for writing with ink and paper. Since the smaller blade on penknives was almost always used to sharpen quills into “pens,” the blade became known as a “pen blade.”
Even after the development of steel pens, the penknife continued to be a most popular style found in the pockets of most townspeople, who used them for opening mail and trimming candle wicks.
What’s the Difference Between Jackknives and Penknives?
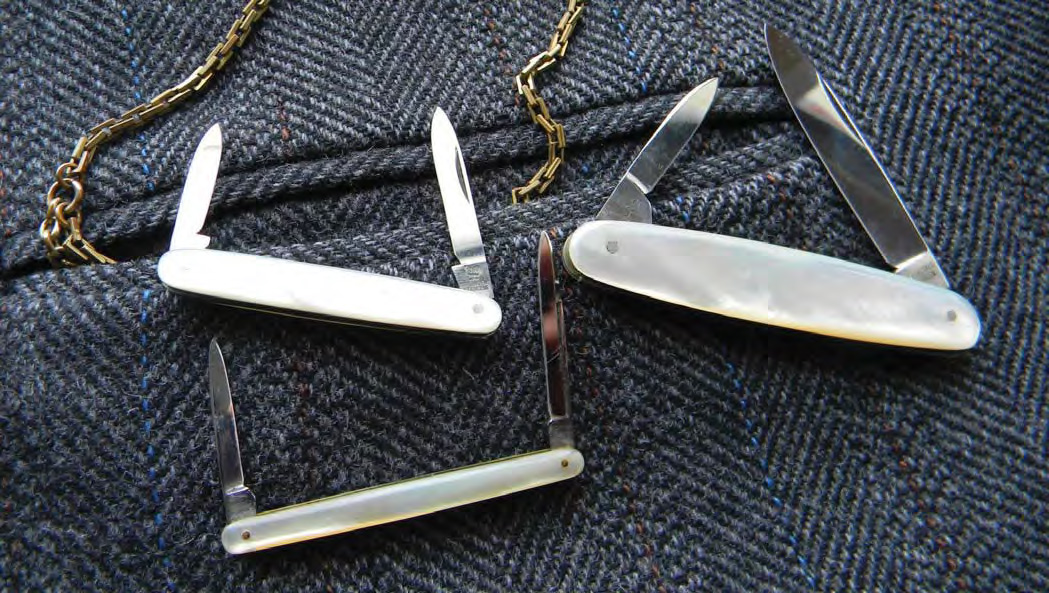
A pen style of pocketknife, shadow patterns have blades that open from opposite ends of the handle. These three in mother-of-pearl were all made in Solingen, Germany.
Before exploring shadow-pattern penknives, some categorization about pocketknives in general is in order. In basic terms, pocketknives fall into two large categories: jackknives and penknives. By examining a typical pocketknife, you can quickly discern the difference between the two styles.
Jackknives have both blades opening from the same end of the knife, while penknives have blades opposite each other and open from either end of the knife. During production, the cutlery worker must frequently “crimp” or slightly bend one of the blades sideways so the opposing pair of blades can pass each other in the same slot without one blade landing atop the other. This step results in a costlier knife.
It is interesting that penknives, being more expensive to produce, have not held their value when compared to jackknives. Collectible jackknives consistently have been priced higher than penknives because of their larger size. Hence, the old adage applies to jackknives: “Bigger is better.”
Shadow Pattern Definition
Western Cutlery addressed the lack of bolsters on these two- and three-blade shadow patterns by adding oversized bird’s-eye rivets.
In order for a knife to be a shadow pattern, it must have one important characteristic that separates it from other penknives. Unlike almost all other types of penknives, the shadow pattern does not have a bolster at either end. In fact, the shadow pattern is the only penknife style missing bolsters.
Why is that significant? Bolsters on each end strengthen the knife since the pin that goes through the pivot portion of the blade also goes through both sides of the knife and passes through a hole in the bolsters.
Since many knife users pry the blade sideways from time to time, this action dislodges the pin holding the blade in place, and frequently damages the knife. Shadow patterns defined as having no bolsters at either end of the knife are substantially more delicate than penknives that have bolsters.
Shadow patterns have blades held in place by a pin that passes only through a thin piece of brass and the handle material itself. When you use the knife to pry sideways you quickly widen the pin hole, and, frequently, crack the handle material.
Of special significance is that many of the expensive shadow patterns had either jigged bone, tortoise shell, or mother-of-pearl or abalone sides.
Given the fragile nature of the natural handle materials, an examination of many shadow patterns reveals cracks or missing handle parts.
Advantages
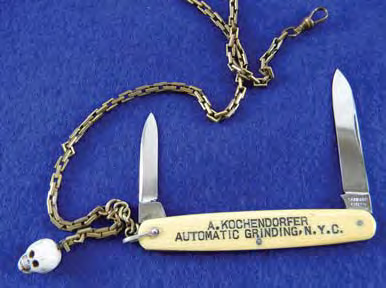
A Schrade Cutlery mint shadow-pattern advertising knife in French ivory celluloid sports a bail for attachment to a watch chain.
Why produce a pocketknife with no bolsters that is prone to the cracking or breaking of the handle material? The answer lies in the beauty of the vintage penknives. Handled in tortoise shell, abalone, mother-of-pearl or even fancy celluloids, the small shadow patterns have sides not limited by bolsters at each end.
A mother-of-pearl side with iridescent shades of pinks, purples, blues and greens are displayed without being “bordered” by bolsters. Even bone, especially those with peachseed- or Rodgers-style jigging, outfit the knives’ sides.
Another reason for eschewing the bolsters was understanding the knives’ general uses. Lightly constructed, small in nature and finely finished, the knives were never intended for opening paint cans or scraping rust from a piece of metal as with standard pocketknives.
Instead, they were designed to handle such delicate tasks as cutting a loose thread, cleaning fingernails, removing splinters, opening packages and loosening a stamp from a piece of mail.
Collecting Shadow-Pattern Knives
In terms of overall beauty, the shadow pattern has few equals. Because of its slight size and rather thin cross section, the knife can be fully appreciated for the work involved in producing such a subtle style. Because the blades oppose each other there is some fascination with the craftsmanship needed to produce a knife with limited clearance between blades.
Some manufacturers found yet another use for shadow patterns—as advertising knives. Because the sides of shadow patterns have no bolsters, the entire side could be used to advertise various products.
Western States Cutlery used the technique often. Western States also found that without the bolsters and by using less expensive handle materials, engraved “tourist knives” could be produced inexpensively and distributed to souvenir shops across the Western USA.
Shadow patterns are under collected and underpriced compared to other knives of similar size and handle material. As an added bonus to collectors, any number of American and foreign cutlery companies made the knives, especially those in mother-of-pearl.
When examining them, look especially close to where the pin comes through the handle material. Here is where the cracks will appear.
Meanwhile, you can amass an outstanding group of these delicate pocketknives for a reasonable price.
There’s a certain mystique to knives. They’re ancient, crafted with secret techniques and can instantly convey a message about the person in possession of them. It’s no wonder there are a few superstitions about knives out there. Here are four.
1) A Gifted Knife Can End a Friendship
The saying goes that a gifted knife will sever the ties between the giver and the receiver. To avoid the end of a friendship, the recipient needs to hand over a penny to the benefactor. Like that, the gift turns into a purchase and no harm will be done.
2) Ease Labor Pains During Childbirth
Placing a knife under the bed of a woman giving birth is believed to ease her pain during labor. Also, sticking a knife into the mattress of a laboring woman is supposed to help her birth a boy.
3) Don’t Lay One Knife Across Another
Crossed knives on a table will cause a quarrel. Crossing a knife with another piece of cutlery is a sign of witchcraft. And if you cross your knife with your spoon, you are implying the food didn’t taste good and that you wish bad luck on the chef.
4) Don’t Sharpen Knives After Dark
It was believed that sharpening knives after sunset was bad luck – which makes sense, considering that this superstition goes back to a time before electricity.
No matter if you follow the original advice or apply the antidote of keeping “a pinch of salt in the churn to keep the witches out,” we strongly advise against sharpening in the dark. Always.
Don’t Risk It! Knife Aid Will Sharpen Your Knives For You
No matter what time of day it is, Knife Aid can take care of your knife sharpening and repair needs. Knife Aid makes it easy to mail in your knives for maintenance.
Most beginning bladesmiths can hardly wait to forge out their first damascus blades. Making damascus is challenging and exciting, especially when you advance enough to try and create the more complex designs. I still enjoy the challenge forging intricate mosaic damascus patterns, and especially figuring out how to make new ones.
I also enjoy teaching and passing down whatever knowledge I have collected over the decades. So, in 2008 I opened a knifemaking school in Pine Plains, New York. Most of my classes are based on the forging technique.
The most exciting thrill of teaching is watching a few of my students advance to become competent bladesmiths in their own right. I can honestly say I have met a lot of very nice, talented folks over the years at my school. Some just want to be hobbyist or part-time makers, and others hope to one day become full-time knifemakers.
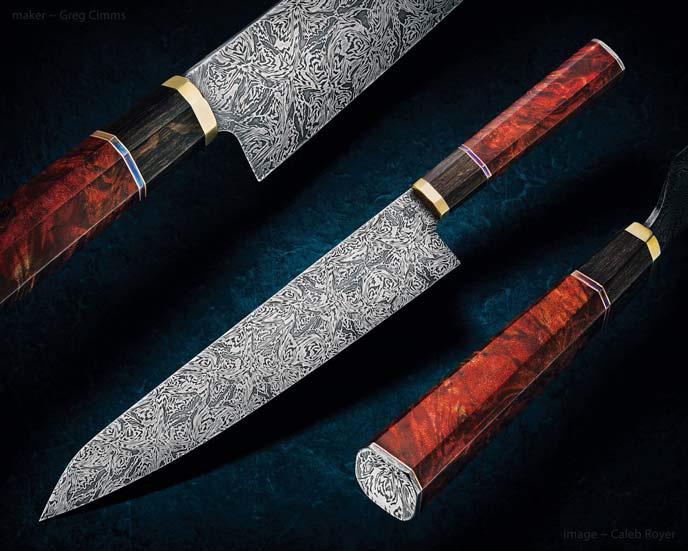
Greg Cimms forged the blade for his chef’s knife of multi-bar mosaic damascus in a pattern originally worked out in clay. (Caleb Royer image)
They are talented bladesmiths who have been doing incredible work so far. These gents have only been making knives a couple of years. They have learned the proper way to forge and forge weld and have made some nice damascus. I knew they were ready for the next challenge making more complex damascus. I decided it was time for me to hold a more advanced multi-bar mosaic damascus class for them.
The class was four days. On the first day we went down to the shop and I explained what multi-bar mosaic damascus was and how it is made. I also explained how powdered mosaic damascus is made, though it is a completely different process.
The Problem: “Shooting in the Dark” with Mosaic Damascus Designs
While we were sitting around the table I gave everyone a box of different colored clays. Some thought I was making a joke with the clay until I showed them some of the damascus patterns I had made. Some of those clay designs I made in the early 1990s.
Bill Greulich followed the same steps he used to develop his pattern in clay to forge his first billet of multi-bar mosaic damascus.
Back then I was working in an art foundry full time pushing a lot of hours, so I had very limited time to forge my knives and tomahawks, never mind work out new damascus patterns. At night I would work out damascus designs on paper. The weekends were often spent working hard at the forge making damascus from the paper designs.
Unfortunately, many times when I finished the mosaic damascus billet, even though some did turn out to be nice patterns, they were not quite what I wanted. Basically, when you work out designs on paper, at least for me, I felt I was shooting in the dark without night vision. I knew I had to find some answer or solution to my problem.
The Solution: Kids’ Modeling Clay
While I was thinking what would be the best solution, the answer was right in front of me. I was working on a sculpture using red and yellow wax, and that is when it occurred to me. I started cutting off a few slices of red and yellow wax and made a billet out of it. I folded, twisted and so on as I would do with steel. While the wax was not so pliable in the cold form, it still gave me the idea of what I had to do.
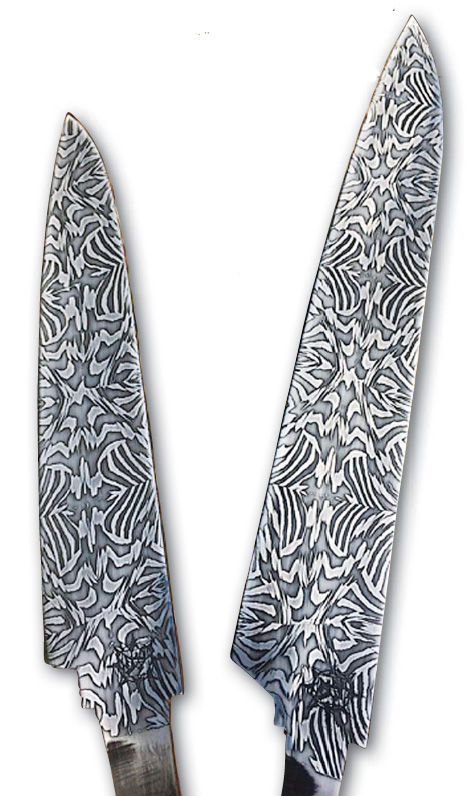
Greg Cimms forged these two blades from a billet he designed and made in the author’s Advanced Damascus class.
The next day during lunch break I ran out to the arts and craft s store and bought two boxes of multi-colored clay, the kind kids used to play with or use at school. I was very excited for my new finding and anxious to see how well it would work.
I made my first multi-bar mosaic clay billet that turned out better than expected in allowing me to preview the mosaic damascus designs. Making clay damascus does not mean you will like every pattern you create, but it is still a lot more efficient and easier on the pocketbook than forging all day long to find out the design is not what you wanted.
I could hardly wait to show my wife Lori that I had found the solution to my problem. Over the years, I probably came up with more designs in clay than I would ever be able to forge out in steel.
A Shortcut with a Long History
That is how I got started making clay damascus. I shared this technique with fellow makers. Actually, similar techniques have been done in glass beads for hundreds of years. I have many books on Indian trade beads in beautiful designs.
As kids we used to play with marbles that also had beautiful designs in them. It just never occurred to me to incorporate any of this into my knives.
Making Clay Billets
On the first day of class I demonstrated making a clay billet and explained, step by step, what to do and what to watch for.
Next I showed the group how to take the same starting multi-bar billets, and, by using different arrangements and folds, create two or three different mosaic damascus designs.
As the students started working out their designs in clay, I asked them to write down every step they took: how many layers they started with, how many times they cut the billet, how many times they folded it, in which direction they folded, in which direction they forged, and so on. This written reference is very important if you want to recreate the design in steel.
I got such a kick out of watching grownups having fun with clay, showing off to each other the designs they had created. It reminded me of back when I started making clay mosaic damascus and how excited I was.
That day everyone seemed on a diet because no matter how often I said “Lunchtime!” no one was hungry. Finally, Lori came home from work and we had dinner. At the table the only conversation was which of their designs they would choose to forge out on the second day of class.