First Look: GiantMouse ACE Corta Knife

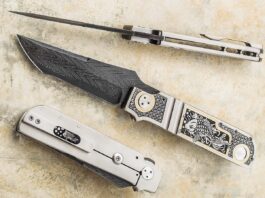
GiantMouse Releases New Set Of Sleek, Robust Folding Knives–the ACE Corta line–Made From Austrian Steel.

Stylish. Tough. Strong.

Those are just a few words to describe the newest folding knives released by GiantMouse. The ACE Corta Knife comes in three different styles and is as good as it gets when it comes to an EDC folder.

The showpiece is the blade, made of Böhler M390 stainless steel from Austria. Known as one of the ultra-premium stainless steel, martensitic steel is renowned for its and ease of sharpening. Essentially, it’ll take and keep an edge.

At 3.1 inches in length with a flat saber grind, the ACE Corta is a flipper inspired by GiantMouse’s limited-run GM6 knife.

The Natural Canvas version of the ACE Corta

The ACE Corta comes in three styles: a green-canvas-colored Micarta handle and a stonewashed finish on the blade, a natural-canvas-color Micarta handle with a satin finished blade and a black PVD finish blade itself with a black G10 laminate handle.

All three knives have an overall length of 7.3 inches, a handle length of 4.18 inches, and come in between 3.8-4 ounces in weight.

The knives open quickly and smoothly thanks to the ball-bearing pivot. They all have a wire clip so it can slide easily onto a belt, purse, or pocket. And each version of the knife has an MSRP of $195.

Given the engineering that has gone into the ACE Contra, the price should prove a value to most.

Editor’s Note: This article was written by Mike Ableson.

Read More

How To Use A Whetstone

Knowing How To Use A Whetstone, Or Sharpening Stone, Can Restore A Dull Blade And Should Be Part Of Regular Upkeep For Your Knives.

There are many inexpensive ways to sharpen your knives at home, but nothing feels the same as sharpening your knives on a whetstone. Used for centuries around the world to keep an edge on everything from swords to kitchen knives, the whetstone is an intimate, precise way to maintain your knife’s edge and bring it back to life.

The “whet” in whetstone has nothing to do with being wet or any type of moisture. It comes from the Old English term “hwettan” which means “to whet or sharpen.” Coincidentally, most whetstones do need some type of moisture for top performance. In all cases, this means water or oil. However, a majority of stones you’ll find in stores or online–particularly for kitchen use–will be waterstones.

Oil Stone Vs Waterstone

Honestly, in some cases, there is no difference.

The preference of lubrication–water or oil–is left up to the user. Both will do the same job, swarfing the surface of the stone so it does a better job sharpening.

However, there are other cases where one or the other must be used with a particular stone. Natural sharpening stones, for instance, mostly use water. Rub them down with oil and you’ll render them useless.

Manufacturers will spell out whether your particular whetstone is water, oil or both.

The main difference between whetstones that use oil and whetstones that use water is that waterstones are softer so the old abrasive material breaks off faster than an oil stone. This means you’re sharpening on fresh stone material more consistently.

Waterstones are also less messy and easier to clean vs oil stones, which adds another point in the bucket for waterstones. Waterstones also come in more grit varieties than oil stones.

Oil stones, especially those made of novaculite, are a traditional sharpening stone, and many are quarried in America, specifically in Arkansas.

Differences In Grits

You’ll see stones of all types come in a variety of grits. The lower the number, the more coarse the grit. The more coarse the grit, the more material gets removed with each pass of the knife.

For at-home sharpening, grits in the range of 1,000-8,000 should be more than enough. However there are stones that come as coarse as 120 and as fine as 30,000. Consider these specialists and stick to the common grits for most jobs.

Whetstone Accessories

While there are many gizmos and accessories out there to help with your whetstone sharpening, there are two that stand above the rest. You can see them in the photo at the top of this article.

The first is the stand for your whetstone. This should come with the stone when you purchase it. You do not want to lay your stone directly onto your table or countertop. It can slide, and mixing sliding things with sharp knives is a recipe for losing a finger.

The second is that little thing to the right of the stone. It looks like a chip clip, but it’s actually an angle guide. Some will clip onto the top edge of your knife while others might need to be strapped to the stone itself. Either way, the angle guide will help set your sharpening angle and allow you to maximize each pass of the blade across the stone.

I’ve used a 1000/6000 waterstone for years to keep my kitchen knives sharp. You can find plenty of quality 1000/6000 whetstones online for under $40. But having the stone doesn’t account for much if you don’t know how to use it. I pulled out my sharpening set up to help give you a step-by-step breakdown of how to sharpen your knives with a whetstone.

Step 1: Get Your Equipment

Things I use to sharpen on a whetstone

Ready to start sharpening? Hold up a minute. You’ll need more than a whetstone and your knife.

In addition to the obvious tools for the task, I start with a whetstone stand, a container of water and a spoon (you heard right).

There are special notes on a couple of these items.

The water container is to prep the whetstone and should have some specific attributes. I want a deep container so the stone can sit in it and fully soak. These babies are thirsty, so you can’t just dab water on one and expect it to work.

Here I’m using a baking dish, but a plastic tub or kitchen sink work equally as well.

The spoon … no, you’re not taste testing your knife’s edge. It’s there to literally spoonfeed the stone more water during sharpening to clear off the shavings.

Step 2: Soak The Whetstone

Soaking the whetstone

Here’s the speedbump of the process.

As mentioned, whetstones require a good soaking before use. This isn’t a splash-and-go process.

Plan to let your stone sit fully submerged for a good 10 to 20 minutes before it’s primed for use. There’s a simple way to tell it’s good to go.

Plunge that baby into water and you’ll see it bubble like an aquarium aerator. Quite literally, this is the stone drinking up water in its microscopic pores and displacing air in the process.

As time goes on, fewer and fewer bubbles pop out of the whetstone (see the above picture). When it’s none or next to none, you’re good to go.

Step 3: Secure The Stone

OK, this sounds obvious. But it must be said–you must secure your wetstone before sharpening.

Not only does this stave off a tongue lashing from your significant other, ensuring you don’t scratch up the counter or dinner table. It also keeps your digits from getting cut up.

In most cases, you’ll have a holder that, well.. holds the stone. If you don’t, never fear, a towel or rag makes a dandy impromptu stone holder.

Whatever the case may be, make certain your stone isn’t going anywhere before you actually begin sharpening.

Step 4: Determining The Sharpening Angle

Rubber, you’re almost ready to meet the road!

Before you actually start scraping away precious material to create a fresh sharp edge, you need to determine exactly what angle to sharpen at.

Some knives require a somewhat uncommon angle to sharpen. This is spelled out in the owner’s instructions if this is the case. Lose those, check the company’s website, these vital specs are usually there.

However, in most cases–a vast majority–20 to 25 degrees is the best angle to achieve a good cutting edge. And you don’t even need a protractor to determine this pitch.

Think of it this way, the edge pointing straight down at the stone is at 90 degrees. Tilt the blade halfway down, now the blade is at roughly 45 degrees. Tilt the knife halfway again and, there you are about 22.5 degrees–a sweet spot for a good edge.

Or you can go the easy route and use an angle guide, mentioned earlier in the article.

Step 5: Course Sharpening

Start with the lower grit, which in this case is 1,000. It takes off more material and gets the edge almost all of the way back to razor sharpness.

Usually, I do 10 passes on each side of the blade, but I fully sharpened my knives a few weeks ago and just did two here as a demonstration.

Keep the blade angled between 20-25 degrees to get the best possible results.

Step 4: Turn The Stone Over & Sharpen With The Finer Grit

I finish with the fine grit, 6,000 on my whetstone.

You’ll notice each time I pass there’s some new metal shavings on the stone. That’s the swarf. It’s fine for your knives if you leave the swarf on the stone as you sharpen, but you can also wash it away with some extra water.

Again, like the coarse grit, I usually do 10 passes on each side of the knife.

Step 5: Wash Off Your Knives & Clean Up

Once you’re done sharpening you should rinse your blades and wipe them dry with a towel. Once your knives are accounted for, give your water container a thorough cleaning. I used a baking dish, and it’s important to fully clean it so you aren’t ingesting microscopic metal shavings.

For the stone itself, I double check that it’s secure in its holder and leave it out overnight to let the water evaporate out of it. Once it’s completely dry I put it back in its spot in the drawer.

And there you have it, a simple, straightforward guide showing you how to sharpen your knives using a whetstone.

Editor’s Note: This article was written by Mike Ableson.

Read More

Heirlooms Of Time

Many Top Knifemakers Are Keeping Historic Styles And Methods Of Making Knives Alive Today.

Historical perspective is a relevant component in just about any undertaking. In the realm of cut, incorporating an appreciation of the past into the work of today brings another dimension to the custom knifemaker’s statement.

Interest in the knifemaking of a bygone era offers a window into the true artistry required to reproduce the knives of yesteryear, particularly with the absence of modern conveniences in the shop. Along with the interest in the historical knife, several custom makers bring famous designs, styles and patterns to life once again in tribute to those who have gone before.

The idea of the period piece blends old and new. “I’ve been making knives seriously since about 2002 when I took a class with the American Bladesmith Society in Washington, Arkansas,” related ABS master smith Lin Rhea. “Joe Keeslar and Greg Neely lit a fire under me and got me on my way. Since then the town of Washington has been like a second home, and I’ve even added to the personal connection between me and the area by interest in one of the town’s historical residents who was also a knifemaker. His name was James Black.”

A resident of Prattsville, Arkansas, Lin gained an appreciation for Black’s distinctive body of work*, using contrasting materials and techniques to create a bold, attractive look. “I’m grateful to get to know Mr. Black by studying his work,” Lin continued. “This intense study

Lin Rhea’s reproduction of the Carrigan Knife is based on a dress bowie James Black is thought to have made in the early 1830s in Washington, Arkansas. The original Carrigan includes a black walnut handle with coin silver pins and trim. The blade is about 6 inches long and the overall length is approximately 10.25 inches. (Whetstone Studio image)

led me to try to recreate one of his knives, the Carrigan Knife. The original knife, a guardless coffin-handled bowie, was made by Mr. Black in the early 1830s in Washington, Arkansas. I chose the Carrigan as my first attempt because of its less intimidating size; however, as is often the case I found it to be just as intimidating once I started into the project.”

The original Carrigan includes a black walnut handle providing a nice contrasting background to the coin silver pins and trim. The blade is about six inches long, and the overall length is approximately 10.25 inches. The full tang is virtually covered entirely by the walnut scales and the silver wrap.

When Rhea undertook his homage to Black and the Carrigan, he chose stabilized walnut, which he harvested himself several years ago, and trim in sterling silver. He forged the blade from 80CrV2 carbon steel and included at least 30 separate parts while attempting the same techniques used by Black nearly two centuries ago in fastening and assembling the finished knife.

“There is so much to be said about not only this knife but also Black’s work,” Lin concluded. “He was able to create a knife design utilizing only three materials yet impacting the knife world as few others could. His ability to arrange these materials into a functional, long-lasting, beautiful tool is only enhanced by the knowledge that he also built in other qualities like moisture resistance, logical assemblage and ergonomics. All of this was done in a historic setting without modern equipment and epoxies. In my opinion, his design is ingenious.”

Gold Rush Knives

Recently inducted into the BLADE Magazine Cutlery Hall of Fame® knifemaker Jim Sornberger has assimilated his gold and silversmith skill sets into custom knifemaking while helping introduce the modern world to the classic design, luster, and embellishment of the Gold Rush era and boomtown San Francisco of the mid-19th century.

 BLADE Magazine Cutlery Hall-Of-Fame® member Jim Sornberger’s interpretations of the Michael Price San Francisco/small dress bowie have won awards at various venues, including Best of Show at the 2019 International Custom Cutlery Exhibition in Fort Worth, Texas. This one features a blade in Vegas Forge stainless barstock AEBL and 412 stainless steels and san-mai damascus with a solid core. The guard and wrap handle are in Mike Sakmar mokumé barstock. Jim’s price for a similar knife: $3,500. (SharpByCoop image)
Jim Sornberger’s interpretations of the Michael Price San Francisco/small dress bowie have won awards at various venues, including Best of Show at the 2019 International Custom Cutlery Exhibition in Fort Worth, Texas. Jim’s price for a similar knife: $3,500. (SharpByCoop image)

“I’ve been making knives since 1975 with the help of the late Les Berryman, an early Guild member, and with some guidance from Bob Loveless, Herman Schneider and Barry Wood,” Jim recalled. “The last three signed for me to join The Knifemakers’ Guild.”

For Sornberger, the style, embellishment and decoration of the canes, jewelry and knives of the Gold Rush era are most appealing. “San Francisco from 1850 to 1904, the Gold Rush period, was one of the wealthiest cities in the world, attracting some of the greatest artists, jewelers, carvers, and engravers to ply their trade to a wealthy clientele. The work done in that period,” he opined, “rivals the best ever done.”

In the knifemaking genre, Michael Price and Will & Finck were among the most successful and prolific of the Gold Rush. Their work remains emblematic of the great migration to settle the American West, and the riches and ruin that were found with the experience.

“Price was Irish, and both cutlery firms hired workers who were English, German and possibly Scottish,” Sornberger explained. “Their dress knives are probably the most embellished American knives made in the 1800s-1900s. The dress knives had two common handles: an interesting, modified coffin shape and a more rounded, subtle taper shape. The blade shapes are spear-point dagger and San Francisco clip spear point.”

Sornberger is recognized as an authority on original San Francisco knives, as well as the magnificent gold quartz that was used so well by Gold Rush artisans. His modern interpretations of the Michael Price San Francisco/small dress bowie have won awards at various venues, including Best of Show at the 2019 International Custom Cutlery Exhibition in Fort Worth, Texas.

Jim’s dress fixed-blade bowie in the accompanying picture was made with Vegas Forge stainless barstock AEBL and 412 stainless steels, and san-mai damascus steel with a solid core. The guard and wrap handle are in Mike Sakmar mokumé barstock. Jim’s made such handles in gold and silver and nickel silver, also. The inlays are tortoise celluloid and California native gold/gold quartz.

According to Sornberger, the biggest challenge in his stunning creation was grinding the blade to show the distinctive pattern of the shell and the hardened core. The san-mai laminated blade was etched with ferric chloride, rinsed and color set with WD-40®.

The Frog Knife

“The style of Michael Price’s work is a really good canvas with flowing lines, and there is a lot you can do with it,” observed ABS master smith Jon Christensen, who is in his 22nd year of making knives. “I wouldn’t call my San Francisco-style knives replicas. I do like to keep to the original form and honor the style of the maker, though.”

The Frog Knife by Jon Christensen is a San Francisco-style dress bowie with a back story. “I had seen the Poppy Knife that Michael Price made and thought I would do my version,” he related. “I took the knife to the BLADE Show, and it didn’t find its owner. Then, the handle got ruined, and I just took the opportunity to rehandle it with the frogs and lily pads.” Overall length: 10 inches. (SharpByCoop image)

One of Christensen’s most evocative pieces to date is referred to simply as the Frog Knife. However, the piece is far from simple, and Jon manages to convey the spirit of the Michael Price style while also imprinting some of his own personality.

“I built the feathered damascus for the blade with 1080 and 15N20,” he advised. “It’s a canister damascus. I forged the bamboo leaves and placed them in the can, welded it up, reduced it, and feather cut it so it would produce feather-cutting smears and leaves, and form branches to look like a little grove of bamboo leaves.”

The 10-inch knife has a 5.5-inch blade and a frame and sheath incorporating 410 stainless steel. Christensen utilized the “canvas” of the handle to the fullest, carving the mammoth ivory into a pleasing vignette of frogs and lily pads.

“The handle has something of a back story,” he smiled. “I had seen the Poppy Knife that Michael Price made and thought I would do my version. I took the knife to the BLADE Show and it didn’t find its owner. Then, the handle got ruined, and I just took the opportunity to rehandle it with the frogs and lily pads.”

Christensen got his start making stock removal knives after a career as a horticulturist. He learned to forge while working with ABS master smith Ed Caffrey and visited with knifemaker Rick Eaton and ABS master smiths Shane Taylor and Wade Colter. Jon also makes San Francisco folding knives and enjoys swordmaking. Plans for the future include more period pieces.

Kimball Style

ABS master smith Josh Smith owes his little league baseball coach, ABS master smith Rick Dunkerley, credit with getting him started making knives about 30 years ago. From the beginning, Josh has appreciated the thought process and craftsmanship of custom makers from a bygone era.

“There’s something special about reproducing something that was built nearly 200 years ago,” he reasoned. “It’s easy to get lost in your thoughts while working on these knives, wondering what the makers were thinking about at the time. Was the knife going into battle? Was a rich man just wanting something unique? Was the maker just trying to be different and impress people? Were function and effectiveness of use the only factors that mattered? It’s really cool to think about.”

 Josh Smith’s dog-bone-handle dagger is a reproduction of a knife owned by Loring Kimball of Vicksburg, Mississippi, in the mid-1800s. The grip gets its name from its shape. “I never pretend to exactly reproduce these knives,” Josh noted. “I always put my own spin on the knife, trying to bring some of my style into it.” Overall length: 14.25 inches. (Eric Eggly/PointSeven image)
Josh Smith’s dog-bone-handle dagger is a reproduction of a knife owned by Loring Kimball of Vicksburg, Mississippi, in the mid-1800s. The grip gets its name from its shape. Overall length: 14.25 inches. (Eric Eggly/PointSeven image)

Josh has found the opportunity to consider historical context with a dagger in the distinctive dog-bone handle, recalling the mid-1800s when a gentleman named Loring Kimball of Vicksburg, Mississippi, owned several similar original pieces that were probably made by at least two different knifemakers in the New Orleans area. Knives in what many refer to as the Kimball style have been reproduced by a number of modern makers, mostly bladesmiths.

“The distinctive characteristic of the dog bone is clearly the shape of the handle,” Smith said, “but to me it’s more than that. The large domed pins and the flat facets on the handle provide such a neat look. One of the original Kimball daggers from the 1830s had silver wrapped around the butt of the handle and a small, thin silver guard. I never pretend to exactly reproduce these knives. I always put my own spin on the knife, trying to bring some of my style into it.”

Smith’s dog-bone dagger is fashioned from his own ladder pattern “W’s” damascus blade, African blackwood handle and 18k-gold pins and liners. The 9.5-inch blade is forged from 1080 carbon and 15N20 nickel-alloy steels, while a gold collar stretches over the back of the blade and bears the engraved name of the maker. Overall length: 14.25 inches.

“This particular knife was heavily influenced by Tim Hancock,” Josh said. “I feel Tim, Harvey Dean and James Batson are the three men who led the way in bringing these knives back to prominence, and Tim had the most influence on my construction of these knives. I love period pieces and definitely plan on doing more. There are so many incredible weapons from the past that would be fun to recreate.”

*While a number of top industry authorities attribute such original 19th-century pieces as the Carrigan Knife, Bowie No. 1 and others to Black, no knives with Black’s mark are known to exist.

Read More

How To: Forge Beveling & Blade Tipping

Forge Beveling & Blade Tipping Are Necessary Skills For Any Fledgling Knifesmith To Learn. Here’s The Skinny On Both.


Forged Knifemaking
This article is an excerpt from Forged: Making A Knife With Traditional Blacksmith Skills available at ShopBlade.com.

TIP: The most important principle in this section is to overlap hammer blows. The right edge of your previous hammer blow becomes the center point of your next hammer blow.

Forge-beveling allows a consistent pushing of the hot steel in all directions at each blow. The physics are consistent, predictable, and reliable. At each strike, the force of the rounding hammerhead pushes the bottom half of the blade and the spine in opposite directions. The tip-to-choil forces are contained for the most part by the blade’s mass.

It’s much like when the smith makes breakfast sausage patties. Imagine pushing the center of that sausage patty down with the heel of your hand (hammer) against the counter (anvil). The patty spreads out in all directions with a dimple in the center, the same as the steel.  With repeated overlapping blows the bevel thins and widens downward as the spine stretches upward. The resulting geometry is a thinning and reshaping of the blade between the cheek line and the cutting edge.  A bevel is forged and formed with your rounding hammer, anvil and blacksmith’s eye.

Once forge-beveling is mastered you can actually form a hollow “grind” by hollow forging (another lesson, another book).

NOTE: Look at a knife with the pommel to the left and the point to the right, cutting edge down and spine up. For reference and description, this is the right side of the blade.

This is the right side (i.e. right-hand side) of the knife blade.
This is the right side (i.e. right-hand side) of the knife blade

Setting the Bevel

The forge-beveling procedure is advanced forging. Beveling with a hammer is a blacksmith secret used by few these days. Learn this method and you will certainly be connected to the smiths of old.

This forge-beveling procedure takes me six heats or more, at minimum; three on each side. Theoretically, one heat per line, three lines per side (explained below in Half, Fourth, Eighth). Make these passes down the bottom half of the blade traveling its full length. Because you might be a beginner it may take many more passes than six.

You may need more heats due to being hammer shy or because of rookie hesitation. You may start and stop frequently due to under-heating, overheating, dropped blades, re-positioning your piece or “Where’s my hammer?”.  All of those are OK. We all do them.

Half, Fourth, Eighth

Let’s go through the forge-beveling principle. First think of cross-section geometry. Develop a visual in your brain of the relative distance from the center point of the hammer face to the bottom one-half of your blade as you travel along its length from ricasso to tip.

Do this by visualizing one-half, one-fourth, and one-eighth. If we were to saw a blade vertically in half and view its cross-section, we would see that its shape is thickest at the top, along its spine. It holds that dimension down to the cheek (about the halfway point) and then dramatically loses thickness as it approaches the cutting edge. This is the bevel. Your bevel. Think halfway from cheek line to cutting edge. This is the 1/2 line.

This traditional way to set this bevel can only be acquired with dozens of latitudinal hammer strikes passing from left to right at those three descending levels: 1/2, 1/4, 1/8. Remember one-half, one-fourth, one-eighth.

Note and maintain a mental image of the three all important forge lines.

NOTE: This 1/2, 1/4, 1/8 business does not mean fractional inches. The fractions refer to the position of your hammer’s center face on the horizontal bar (i.e. halfway, a quarter of the way, and an eighth of the way from the edge to the cheek).

Remember this is a theoretical thing becoming a real thing. The blade is 1-inch wide, and the face of a 2.5-pound rounding hammer is about 1.5 inches. Think exact center of a hammer face on those latitudinal forging lines. 

TIP: See the author setting the bevel on YouTube. Search for: Paul White FORGED.

Try not to strike above the imaginary cheek line that runs about halfway between the spine and edge. Your hammer passes will form the cheek line. The final cheek line usually falls well above the halfway point because maintaining that line exactly in the center is almost impossible with a round hammer face, your billet bouncing around on the anvil, and you’re trying to hit on exact points. However, the primary objective is to maintain the original thickness in the spine (1/8-inch) as far down to that halfway line as possible. 

Blade Tipping

Each pass will require a slight upward tipping of the spine to acquire about a 10° to 12° angle to be set in the bevel as you hammer. It takes a simple inward twisting of the wrist to keep the blade from resting flat on the anvil face. It must be done at each horizontal pass. This smartly places just the right amount of bevel angle. After a few passes, the blade will “find” that angle as you place it down.

After a complete pass from choil to tip on the right side of the blade, flip the piece over, tip to 10° to 12°, place at the top of the anvil, and do the left side. This is the place to use your indexing skills. It takes most smiths some time and practice to fully master this concept. I’ll go over this beveling thing a couple more times. Read this whole section and look at the drawings and photos several times before doing this.

TIP: Sometimes it takes fewer total passes than I indicate in this book. This is due to the individual smith’s power and/or heat control and/or blade position and/or hammer penetration and/or steel composition. There are lots of variables. If your blade is almost straight after fewer than the recommended strikes or passes, back off on the heat and/or reduce the power or reduce the passes. If you place blows beyond what is needed, the blade will curve upward.  Usually, fewer strikes per pass will be necessary as the beveling chore proceeds.  This happens because the smith usually increases his or her power and confidence as time at the anvil is increased. Also, the bevel becomes thinner with repeated heats requiring less steel to be moved.

The forging sequence is as follows. Take a heat. Place the blade at the bottom of the anvil. Tip to 12°. Place overlapping blows down the blade on the right side at the 1/2 line. Take a heat. Flip to the left side of the blade at the top of the anvil. Tip to 12°. Forge down the left side at the 1/2 line at the top of the anvil. Take a heat. Flip to bottom. Tip. Place blows down the right side of the blade at the 1/4 line. Heat.  Flip. Tip, down the left side at the 1/4 line at the top. Take a heat. Flip. Tip and down the 1/8 line on the right side. Heat. Flip. Tip. Then down the left side at the 1/8 line. Your blade should be nearly straight after three or five passes and however many heats as needed.

By hammering in this 1/2, 1/4, 1/8 method you will “set the bevel” of your knife in the traditional way, FORGING! Ninety-three percent of all bladesmiths set their bevels at the grinder.  I have met only a handful of smiths that do this the old way. You’ll be the only blacksmith in the surrounding ten counties that sets the bevel with your three-pound hammer!

Do not strike randomly up and down the blade or space-out (i.e. not overlap) your blows and expect anything good to happen.

BLACKSMITH SECRET: To gauge forging heat have a wooden box close by and away from any direct light. Hold your blade in the box to see the true forging heat. Even when hot the “red” is sometimes difficult to see in a lighted room. However, the red will show in the shade of your box. This means you are above forging heat and will thus avoid potential edge cracks. Remember this is high carbon steel and your working parameters are narrower. Iron can be worked over a greater temperature without damage.  At the end of each forging and before you lose forging heat in your blade use the last few seconds to straighten and align your work. Make all lines right with the world. 

The successful counter-bend is placed at the “bottom” of the anvil with the choil just at the anvil’s corner next to the table. Several hammer blows are placed at the halfway point/line and then the hammer travels down the blade to the smith’s right.

You can buy Forged: Making A Knife With Traditional Blacksmith Skills here

Bob & John Horrigan: Brothers In Arms And Blades

Bob & John Horrigan Made Knives Together. After The Former Died Defending The Country, John Kept Their Knifemaking Legacy Alive

It was a night mission, and it was dangerous—just like every mission, every moment in the deserts and villages of western Iraq or the mountains of Tora Bora in Afghanistan.
“You don’t have to come,” the others said matter-of-factly to Master Sergeant (MSG) Bob Horrigan. “You’ve only got two weeks left in the country.” The veteran Delta Force NCO, with 19½ years in the U.S. Army, three tours in Afghanistan, and a fifth in Iraq coming to an end, simply replied, “If you’re going, I’m going.”

True enough, Horrigan was just days away from returning to the USA, and he planned to retire from the Army in six months, then, in peace, to make custom knives in his shop and share that time with his twin brother, ABS master smith John Horrigan.

This night, however, there was dangerous work to be done. A raid was planned on a safehouse known to be frequented by terrorists, particularly Iraqi al Qaeda leader Abu Musab al-Zarqawi, a ruthless murderer pledged to support Osama bin Laden. Horrigan

A veteran Delta Force NCO, Bob Horrigan served 19½ years in the Army, including three tours in Afghanistan and five in Iraq. He was killed during a raid on a safehouse frequented by terrorists, including Iraqi al Qaeda leader Abu Musab al-Zarqawi. Bob was laid to rest with full military honors at Arlington National Cemetery.

When the call went out for someone to serve as a master breacher during the mission, blasting doors and first inside a building where hostiles might be hiding, Bob Horrigan said without hesitation, “I’ll breach.” In the town of al Qaim in western Iraq, the Delta Force team, accompanied by additional Special Forces personnel, moved toward the suspected Zarqawi safehouse. With MSG Michael McNulty at Bob’s side and the rest of the team close by, the two were first to enter the enemy compound.

Bob made it into a nearby room, and a machine gun opened up. McNulty was hit in the doorway. Bob was fatally wounded seconds later. Both died within a few hours.
“It was about 7 in the morning. I was at home, and Bob’s brother-in-law, Mark England, came to the house,” John Horrigan recalled. “Our sons were best friends, and I thought he was coming to tell me that my son had gotten into trouble. He said, ‘No, John. It’s Bob.’”
The news was devastating, and Bob Horrigan was laid to rest with full military honors at Arlington National Cemetery, following a funeral service in Austin, Texas. He left behind his wife, Denise; young daughter, Courtney; older sister, Lisa; younger brother, David; many friends and relatives; and, of course, twin brother John.

To say Bob and John shared a special bond, even as identical twins, would be an understatement. Their mannerisms and speech patterns were so alike, and they experienced the joy of growing up inseparable. They also shared their love of service to their country, and later came a great interest in custom knives.

First Drop Zone

The brothers were born in Limestone, Maine, on Jan. 13, 1965. “I came into the world seven minutes before Bob, so I cleared the drop zone. We always said he was a hung jumper,” John smiled. “We’re identical twins, so I got into fistfights for him, and he got into fistfights for me. It was like the Doublemint®-Spearmint commercial, and it was that way in school and in the Army. He continues to be half of me. He is still here, and I can feel his presence out in the shop now and then.”

John made his first knife in high school. Instead of making a planter as his shop project, he found a piece of O1 tool steel and went to work on the knife. His son carries the same fixed blade today, first with a cherry handle and later with one of maple. For 24 years now, John has worked as a firefighter with the Austin Fire Department, the family’s hometown after moving from Maine to Florida and then to Texas years ago.

John enlisted in the Army in 1984, six months ahead of Bob. The two became Rangers, elite soldiers engaging in demanding training programs and taking on the most hazardous combat operations. They served in the 3rd Ranger Battalion, 75th Ranger Regiment, and Captain Stanley McChrystal, who later reached the rank of general and commanded American forces in Afghanistan, led Company A.

John spent three years on active duty as an Army Ranger. Bob stayed in and spent about eight years with the 7th Special Forces Group and 9.5 years with Delta Force. Even among the elite of the 7th Special Forces and the clandestine Delta Force, Bob stood out. He attended just about every training school imaginable, including the Basic Airborne Course, Jungle Warfare Training Course, Special Forces Qualification Course, Military Freefall Jumpmaster Course, and several others. In 1987, he competed in the Best Ranger competition at Fort Benning, Georgia, and placed second.

He was a leader of hardened, highly trained military professionals, and among his numerous decorations were the Bronze Star, Purple Heart, Legion of Merit, Combat Infantryman Badge, and Expert Infantryman Badge. The full list of his accomplishments during a distinguished two-decade career is literally too long to include in this story.
Several well-known authors have written about his exploits, including Brad Thor, Pete Blaber, Sean Naylor, and George Hand IV. In writing of the funeral of a central character in one of his novels, Thor is actually describing Bob’s funeral, an all-too-real and somber event.

In his book The Mission, The Men, and Me, former Delta Squadron Commander Blaber remembered Bob and wrote, “After unshouldering his ruck, Bob H. scotched forward on his belly. He stopped behind a small pile of rubble. Canting his head slowly, he spied the valley below. His eyes and ears strained to detect any unnatural noise or movement; Bob was focused like a man whose finely tuned autonomic nervous system is programmed to maintain perfect equilibrium between the thrill of the hunt and the thrill of the chase. Bob understood his status as both the hunter and the hunted. He liked it that way … Courage has been called a contradiction in terms, meaning a strong desire to live manifesting as a readiness to die. It described Bob and his mates to a tee.”

During those long deployments to combat zones, Bob stayed in touch with John, mostly via email. “He would send one to me, and I would respond,” John said. “The next morning there was another one waiting for me. Robert downplayed a lot of what was going on. He’d say, ‘Not much happening here … I’m bored.’ But he was lying. They were in firefights every day; he just didn’t want people to worry about him.”

 In his book The Mission, The Men, and Me, former Delta Squadron Commander Pete Blaber wrote of Bob Horrigan (above): “Bob understood his status as both the hunter and the hunted. He liked it that way … Courage has been called a contradiction in terms, meaning a strong desire to live manifest as a readiness to die. It described Bob and his mates to a tee."
In his book The Mission, The Men, and Me, former Delta Squadron Commander Pete Blaber wrote of Bob Horrigan (above): “Bob understood his status as both the hunter and the hunted. He liked it that way … Courage has been called a contradiction in terms, meaning a strong desire to live manifest as a readiness to die. It described Bob and his mates to a tee.”

Meanwhile, there were those precious times that Bob came home, mostly during the Christmas season, and the twin brothers picked up where they had left off during a prior visit. One of their primary topics was—of course—knives.

$50 Sander

John was 21 when he left the military, and he visited a knife and gun show in Austin with a pair of his own custom knives and a couple of makeshift cardboard wheels under his arm that he used as sharpeners. He met Houston-based custom knifemaker Ed Thuesen, who also owned Texas Knifemakers Supply.

“Ed saw those under my arm and said, ‘Don’t use that crap!’” John recalled. “I told him I couldn’t afford a new sander, and he said that he had a used one in Houston that he would sell for $50, but I would have to drive there to pick it up, and he wanted cash. I said, ‘Deal!’” Later, John bought a brand-new Bader sander and sold the used one to Bob—
for $50.

“I got into knifemaking, and then I got Bob into it,” John smiled. “He mainly made military fighters for guys in his unit, for Navy SEALs or whoever. He had more business than I did.”
At Fort Bragg, North Carolina, home of the Army’s Airborne and Special Operations Forces, Bob set up a knife shop in a lawnmower shed. Power was supplied with an extension cord, running through a sliding glass door to the shop’s tools. He enjoyed working with 440C and 154CM stainless steels, but he couldn’t forge on the Army post. Hence, when he needed a piece of damascus, John gladly supplied it.

“He wrote me a letter once telling me how much he loved coming home, coming to the shop and learning new things,” John remarked. “He would tell me that copying someone else was the highest form of flattery, and if you look at Robert’s knives they were similar to the knives I made. But he’s my brother, and I don’t care. Later, he got into his own designs, and now my best-selling knife is one of Robert’s designs.”

That legacy design is the Robert “Bob” Horrigan Military Fighter, available from John today in the notable style that has become popular in the military as well as the general public. The fighter is 11.25 inches overall with a 6.375-inch blade of 440C stainless steel and a handle of black linen Micarta®. The knife weighs 8.7 ounces and is accompanied by a Kydex sheath.

“I actually didn’t make the Bob Horrigan,” John related. “I made my Model 1 and others, but there were some guys from the 160th Night Stalkers who were on the mission that night and asked if I would make the Bob Horrigan knife. Now I make the Bob Horrigan, and I make them the way he did.”

Through the years, John has established himself among the best bladesmiths and custom knifemakers around. His daggers, tomahawks, and fighters are acknowledged as fine work, and his dazzling inlay with precious metals is something to behold. “I tell everybody that is my Picasso work,” he laughed.

Tremendous Spirit

Living quietly in Burnett, Texas, about an hour outside Austin with Donna, his high school sweetheart and wife of 33 years, John works in a 30×40-foot shop on his farm, dotted with chickens, goats, and bees. Donna says the shop is as big as the couple’s first house. They have two grown children, Matthew and Krystal, and two grandchildren, whom they adore.
Reflecting quietly, John observes, “The greatest thing that has happened since Bob’s death is that he brought me back to God, and that is the best thing he could ever leave me. Being twins, it was pretty rough, and it felt like half of me was gone. Bob came to me at the BLADE Show* two years before he was killed and said, ‘I’m coming back to God. At the time I just said, ‘Great!’ but when he was killed, God was what got me through it.

 Designed by Bob Horrigan, the Robert “Bob” Horrigan Military Fighter is ABS master smith John Horrigan’s best-selling model. “I make them the way he did,” John said, including a 6.375-inch blade of 440C stainless steel, a black linen Micarta® handle and a Kydex sheath.
Designed by Bob Horrigan, the Robert “Bob” Horrigan Military Fighter is ABS master smith John Horrigan’s best-selling model. “I make them the way he did,” John said, including a 6.375-inch blade of 440C stainless steel, a black linen Micarta® handle and a Kydex sheath.

“I started living for Robert, for my family and doing what God wanted me to do,” John continued. “I know where Robert is now, and I know where I’m going. Bob killed a lot of people and that worried him. So he went to the chaplain, who told him that the Bible said not to murder. It didn’t say not to kill in defense of your country. So, he was good with that. I don’t think my brother ever had PTSD because he had God.”

John received his ABS master smith rating shortly before Bob was killed, and as he continues to live his dedicated life, he takes comfort in the fact that his brother, who also wanted the ABS designation, knew that John had achieved it.

In recent years, John has made presentation knives depicting the American flag for Delta Force and for former President George W. Bush, whom he met at Fort Bragg during a visit after Bob’s death. He presented the knife to “W” sometime later in Dallas.

John is generous with Honor Flight Austin, donating knives that raised $19,000 at auction, paying for 19 veterans of World War II to visit their memorial in Washington, D.C. At one auction event, he presented a Bob Horrigan fighter to Admiral William H. McRaven, commander of U.S. Special Operations Command. At an auction the following year, he presented a Bob Horrigan fighter to Medal of Honor recipient Sergeant Salvatore Guinta of the 503rd Infantry Regiment, 173rd Airborne Brigade Combat Team.

During each of these events, John has felt his twin brother right there with him. In service to his country, Bob made men. In the shop, he made knives with lasting, honorable attributes like those who carry them today. Noted John, “The sacrifice of these young men and women is incredible.”

For the elder Horrigan, every day is a tribute to his brother. Their love of the custom knife is an unbreakable link, and to be sure, every knife that John will ever complete carries something of Bob’s tremendous spirit with it.

Read More About The Horrigans

Modern Period Knife: A Link To The Past And Present

Blending old and new, the modern period knife brings history alive in masterpieces.

Historical perspective is a relevant component in just about any undertaking. In the realm of cut, incorporating an appreciation of the past into the work of today brings another dimension to the custom knifemaker’s statement.

Interest in the knifemaking of a bygone era offers a window into the true artistry required to reproduce the knives of yesteryear, particularly with the absence of modern conveniences in the shop. Along with the interest in the historical knife, several custom makers bring famous designs, styles and patterns to life once again in tribute to those who have gone before.

The idea of the period knife blends old and new. “I’ve been making knives seriously since about 2002 when I took a class with the American Bladesmith Society in Washington, Arkansas,” related ABS master smith Lin Rhea. “Joe Keeslar and Greg Neely lit a fire under me and got me on my way. Since then the town of Washington has been like a second home, and I’ve even added to the personal connection between me and the area by interest in one of the town’s historical residents who was also a knifemaker. His name was James Black.”

A resident of Prattsville, Arkansas, Lin gained an appreciation for Black’s distinctive body of work*, using contrasting materials and techniques to create a bold, attractive look. “I’m grateful to get to know Mr. Black by studying his work,” Lin continued. “This intense study led me to try to recreate one of his knives, the Carrigan Knife. The original knife, a guardless coffin-handled bowie, was made by Mr. Black in the early 1830s in Washington, Arkansas. I chose the Carrigan as my first attempt because of its less intimidating size; however, as is often the case I found it to be just as intimidating once I started into the project.”

Lin Rhea’s period knife, a reproduction of the Carrigan Knife is based on a dress bowie James Black is thought to have made in the early 1830s in Washington, Arkansas. The original Carrigan includes a black walnut handle with coin silver pins and trim. The blade is about 6 inches long and the overall length is approximately 10.25 inches. (Whetstone Studio image)

The original Carrigan includes a black walnut handle providing a nice contrasting background to the coin silver pins and trim. The blade is about 6 inches long, and the overall length is approximately 10.25 inches. The full tang is virtually covered entirely by the walnut scales and the silver wrap.

When Rhea undertook his homage to Black and the Carrigan, he chose stabilized walnut, which he harvested himself several years ago, and trim in sterling silver. He forged the blade from 80CrV2 carbon steel and included at least 30 separate parts while attempting the same techniques used by Black nearly two centuries ago in fastening and assembling the finished knife.

“There is so much to be said about not only this knife but also Black’s work,” Lin concluded. “He was able to create a knife design utilizing only three materials yet impacting the knife world as few others could. His ability to arrange these materials into a functional, long lasting, beautiful tool is only enhanced by the knowledge that he also built in other qualities like moisture resistance, logical assemblage and ergonomics. All of this was done in a historic setting without modern equipment and epoxies. In my opinion, his design is ingenious.”

The Gold Rush Period Knife

Recently inducted into the BLADE Magazine Cutlery Hall of Fame® (September BLADE®, page 52), knifemaker Jim Sornberger has assimilated his gold and silversmith skill sets into custom knifemaking while helping introduce the modern world to the classic design, luster and embellishment of the Gold Rush era and boomtown San Francisco of the mid-19th century.

BLADE Magazine Cutlery Hall-Of-Fame® member Jim Sornberger’s interpretations of the Michael Price San Francisco/small dress bowie have won awards at various venues, including Best of Show at the 2019 International Custom Cutlery Exhibition in Fort Worth, Texas. This period knife features a blade in Vegas Forge stainless barstock AEBL and 412 stainless steels and san-mai damascus with a solid core. The guard and wrap handle are in Mike Sakmar mokumé barstock. Jim’s price for a similar knife: $3,500. (SharpByCoop image)

“I’ve been making knives since 1975 with the help of the late Les Berryman, an early Guild member, and with some guidance from Bob Loveless, Herman Schneider and Barry Wood,” Jim recalled. “The last three signed for me to join The Knifemakers’ Guild.”

For Sornberger, the style, embellishment and decoration of the canes, jewelry and knives of the Gold Rush era are most appealing. “San Francisco from 1850 to 1904, the Gold Rush period, was one of the wealthiest cities in the world, attracting some of the greatest artists, jewelers, carvers and engravers to ply their trade to a wealthy clientele. The work done in that period,” he opined, “rivals the best ever done.”

In the knifemaking genre, Michael Price and Will & Finck were among the most successful and prolific of the Gold Rush. Their work remains emblematic of the great migration to settle the American West, and the riches and ruin that were found with the experience.

“Price was Irish, and both cutlery firms hired workers who were English, German and possibly Scottish,” Sornberger explained. “Their dress knives are probably the most embellished American knives made in the 1800s-1900s. The dress knives had two common handles: an interesting, modified coffin shape and a more rounded, subtle taper shape. The blade shapes are spear-point dagger and San Francisco clip spear point.”

Sornberger is recognized as an authority on original San Francisco knives, as well as the magnificent gold quartz that was used so well by Gold Rush artisans. His modern interpretations of the Michael Price San Francisco/small dress bowie have won awards at various venues, including Best of Show at the 2019 International Custom Cutlery Exhibition in Fort Worth, Texas.

Jim’s dress fixed-blade bowie in the accompanying picture was made with Vegas Forge stainless barstock AEBL and 412 stainless steels, and san-mai damascus steel with a solid core. The guard and wrap handle are in Mike Sakmar mokumé barstock. Jim’s made such handles in gold and silver and nickel silver, also. The inlays are tortoise celluloid and California native gold/gold quartz.

According to Sornberger, the biggest challenge in his stunning creation was grinding the blade to show the distinctive pattern of the shell and the hardened core. The san-mai laminated blade was etched with ferric chloride, rinsed and color set with WD-40®.

Frog Knife

“The style of Michael Price’s work is a really good canvas with flowing lines, and there is a lot you can do with it,” observed ABS master smith Jon Christensen, who is in his 22nd year of making knives. “I wouldn’t call my San Francisco-style knives replicas. I do like to keep to the original form and honor the style of the maker, though.”

Jon Christensen’s San Francisco-style folder includes a blade of feathered leaf damascus steel and a handle of carved mammoth ivory with inlay of 4,500-year-old bog oak. Quite a period knife. (ChantryLeePhotography.com image)

One of Christensen’s most evocative pieces to date is referred to simply as the Frog Knife. However, the piece is far from simple, and Jon manages to convey the spirit of the Michael Price style while also imprinting some of his own personality.
“I built the feathered damascus for the blade with 1080 and 15N20,” he advised. “It’s a canister damascus. I forged the bamboo leaves and placed them in the can, welded it up, reduced it, and feather cut it so it would produce feather-cutting smears and leaves, and form branches to look like a little grove of bamboo leaves.”

The 10-inch knife has a 5.5-inch blade and a frame and sheath incorporating 410 stainless steel. Christensen utilized the “canvas” of the handle to the fullest, carving the mammoth ivory into a pleasing vignette of frogs and lily pads.

“The handle has something of a back story,” he smiled. “I had seen the Poppy Knife that Michael Price made and thought I would do my version. I took the knife to the BLADE Show and it didn’t find its owner. Then, the handle got ruined, and I just took the opportunity to rehandle it with the frogs and lily pads.”

Christensen got his start making stock removal knives after a career as a horticulturist. He learned to forge while working with ABS master smith Ed Caffrey and visited with knifemaker Rick Eaton and ABS master smiths Shane Taylor and Wade Colter. Jon also makes San Francisco folding knives and enjoys swordmaking. Plans for the future include more period knife examples.

Kimbll Style

ABS master smith Josh Smith owes his little league baseball coach, ABS master smith Rick Dunkerley, credit with getting him started making knives about 30 years ago. From the beginning, Josh has appreciated the thought process and craftsmanship of custom makers from a bygone era.

A period knife reproduction of the I*XL George Washington Hunting Knife by Doug Noren gets the full treatment in a 13.5-inch blade of 5160 carbon steel, a mother-of-pearl handle and 18k plated nickel silver. Overall length: 21.5 inches. (Whetstone Studio image)

“There’s something special about reproducing something that was built nearly 200 years ago,” he reasoned. “It’s easy to get lost in your thoughts while working on these knives, wondering what the makers were thinking about at the time. Was the knife going into battle? Was a rich man just wanting something unique? Was the maker just trying to be different and impress people? Were function and effectiveness of use the only factors that mattered? It’s really cool to think about.”

Josh has found the opportunity to consider historical context with a dagger in the distinctive dog-bone handle, recalling the mid-1800s when a gentleman named Loring Kimball of Vicksburg, Mississippi, owned several similar original pieces that were probably made by at least two different knifemakers in the New Orleans area. Knives in what many refer to as the Kimball style have been reproduced by a number of modern makers, mostly bladesmiths.

“The distinctive characteristic of the dog bone is clearly the shape of the handle,” Smith said, “but to me it’s more than that. The large domed pins and the flat facets on the handle provide such a neat look. One of the original Kimball daggers from the 1830s had silver wrapped around the butt of the handle and a small, thin silver guard. I never pretend to exactly reproduce these knives. I always put my own spin on the knife, trying to bring some of my style into it.”

Smith’s dog-bone dagger is fashioned from his own ladder pattern “W’s” damascus blade, African blackwood handle and 18k-gold pins and liners. The 9.5-inch blade is forged from 1080 carbon and 15N20 nickel-alloy steels, while a gold collar stretches over the back of the blade and bears the engraved name of the maker. Overall length: 14.25 inches.

“This particular knife was heavily influenced by Tim Hancock,” Josh said. “I feel Tim, Harvey Dean and James Batson are the three men who led the way in bringing these knives back to prominence, and Tim had the most influence on my construction of these knives. I love period knives and definitely plan on doing more. There are so many incredible weapons from the past that would be fun to recreate.”

*While a number of top industry authorities attribute such original 19th-century pieces as the Carrigan Knife, Bowie No. 1 and others to Black, no knives with Black’s mark are known to exist.

Knifemakers’ Key Equipment

0

Shop Dump: Top makers reveal the key equipment that helps them get the job done

“Shop Dump” is a new BLADE® feature showcasing the special knifemaking equipment of some of today’s leading knifemakers and bladesmiths. The new feature kicks off with ABS master smith Rick Dunkerley and knifemaker Jason Fry.

Rick Dunkerley

Rick Dunkerley

“I’ve been making knives for almost 40 years,” Rick Dunkerley observed, “and in that time I think I’ve developed a style that is recognizable as my own.” It’s specific equipment that plays a crucial role in him making knives in that style. There are many more tools that help along the way, but he uses seven in particular on every knife.


1. Propane Forge

Dunkerley’s propane forge

His propane forge is homemade and the burner is over 20 years old. “It’s a vertical Don Fogg design,”he commented, “lined with ceramic wool lining. Since 99 percent of my knives are damascus steel, they begin in this forge.” Dunkerley began using his hydraulic press built by Billy Bob Sowell to forge damascus in the early 1990s. It’s Rick’s third hydraulic press, incorporating a larger cylinder, motor and hydraulic pump than his earlier models. The press helps him finish the damascus he forges.

2. eBay Bargain Surface Grinder

Surface grinder

An eBay-bargain ($300) surface grinder has served Rick well for 20 years. “I don’t know the make or the model,” he said, “and I changed it to a single-phase motor and converted it to run 2×72 belts with an aluminum contact wheel. It works on the damascus as it’s being made, and then precision grinds the blade and back bar material for my folders.”

3. Craftsman Drill Press

Dunkerley’s small Craftsman drill press “has drilled the holes on almost every folder to come from my shop,” he declared. “It’s very accurate and small, which is convenient as I can place it on my bench right next to my disc sanders. I added a keyless chuck to speed up the bit changes.”

4. Tru-Grit Disc Sander

Tru-Grit Disc Sander

Rick’s 9-inch Tru-Grit disc sander is another machine he’s had for 20 years. “The disc is great for flattening material, dovetailing bolsters, shaping handles and grinding blades. It’s reversible and set up with a foot switch to allow me to place the material against the disc and then turn it on,” he explained. “I wouldn’t want to make knives without a disc sander. I actually have three in my shop and would like one more.”

5. TW-90 Belt Sander

TW-90 Belt Sander

Dunkerley follows up with a TW-90 belt sander. “The versatility of this machine makes it one of the most used in my shop,” he remarked. “From rough grinding all types of material to fine finish work, this thing saves me huge amounts of time. The small wheel attachment and the fact that it turns into a horizontal grinder help me eliminate other machines that I would only use for specific jobs. The first time I saw one of these machines work, I knew it would make me a better knifemaker.


6. GRS Engraving Equipment

GRS Engraving Equipment

Rick uses his engraving equipment to give his knives an unmistakable quality and aesthetic. “Nearly every folder I make has engraving and some gold inlay,” he noted. “That happens here. My equipment was made by GRS and has served me very well. I continually think of new ways to use this equipment to add details to my knives.”


Jason Fry

Jason’s shop-proven equipment serves as a milestone along the way

Jason Fry

Jason Fry follows a direct route to excellence and each of his shop-proven pieces of equipment serve as a milestone along the way.


1. Wilmont Grinder

“My number one machine is my 2×72 Wilmont grinder,” he explained. “After 13 years on a homemade machine, I recently upgraded to the Wilmont Quattro.

Most of the recent high-end grinders will have variable speed, horizontal tilt, adjustable tool rests and specialty fixtures. This is the only ‘brand new’ machine I have ever purchased.”

Jason’s Wilmont Grinder

Fry adds a comparison of his heat-treat oven choice, relating, “You can argue Ford vs. Chevy or Evenheat vs. Paragon, but all the modern production ovens have digital temperature control. This gives the maker the ability to precisely dial in the heat treat of their chosen steels, and to heat treat stainless steels that require longer soaks at high temperatures.” Jason acknowledges that he bought a used Evenheat oven but he’s friends with all the folks at Paragon. “I got a good deal on the oven,” he smiled. “I had an old dental oven that I sold for three-fourths the price of my Evenheat, and it was a good upgrade.

2. File Guide

A file guide, such as this one by ABS master smith Bruce Bump, has carbide inserts that allow the maker to grind up against the guide and create a square shoulder on the blade. 

“Another important tool is the file guide. I use a Bruce Bump file guide  with carbide inserts. Bruce was an inspiration to me with his epic WIP threads in the forum days before Instagram, so I wanted one of his file guides when it came available.

3. Power Hammer

Jason’s power hammer

“My power hammer is a homemade ‘junkyard’ hammer in the ‘Appalachian’ or ‘Rusty’ basic design. It has a 40-pound head and hits at around 200 beats per minute. It makes the forging process faster and also allows me to efficiently make my own damascus. I chose the design because it was simpler to build from scrap than the tire hammer design.

“I competed on Forged in Fire back in May 2018 and my episode aired in September,” Jason added. “As I was preparing for the show, practicing forge welding and such, it came to mind to build a hammer. I prepared for Forged in Fire by building a hammer because even if I lost in the first round, I’d still have a hammer I could use for the rest of my career. This hammer took me about two months of intense weekends to build, and other than the initial test run, the first time I ran it was when I filmed the final [FIF episode] at my house. I still use it every forging session almost three years later, and having the hammer has made forging much more enjoyable and greatly expanded my capacity.”

Capitalizing on the right shop tools and equipment has made an enormous contribution in knifemaking, and listening to those who have been down the road gives others the opportunity to test, refine and choose what works best in their own shops. Meanwhile, the knife buyer can have an enriched ownership experience knowing more about the process and the pride that goes into each finished knife.

Advertisement

Must Read Articles

Read this before you make a knife

Knifemaking 101 – Read This Before You Make a Knife

  by Wayne Goddard My experience has taught me that there's nothing like digging in and getting started. I've often said the hardest part of the...
how to forge damascus steel

How to Forge Damascus

Advertisement
Advertisement