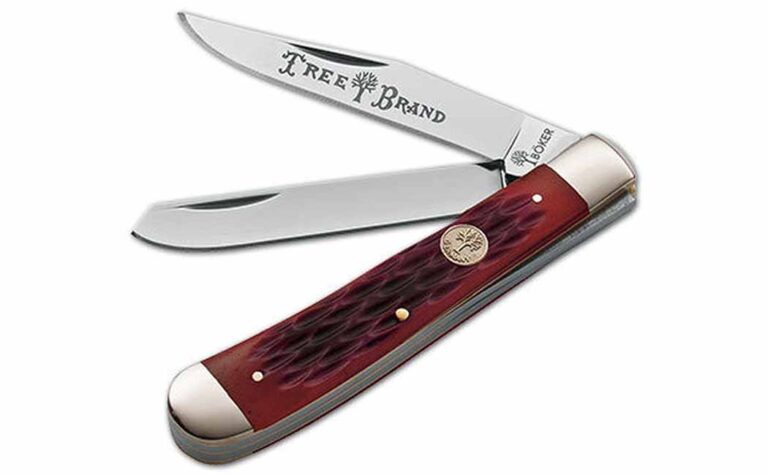
Boker Has Made A Beautiful Two-Blade Slip Joint That Is Both A Great EDC And Excellent As A Knife For The Outdoors.
New from Boker is the Trapper Red Bone slipjoint. Made of C75 carbon steel, the Trapper Red Bone looks good, feels good, and is an incredibly versatile knife. Both blades are 3.31 inches and length, and the whole piece weighs just 3.39 ounces. With a handle made of redbone with nickel silver bolsters, the knife looks the part.
Featuring a spey blade and a clip point. The Trapper Red Bone is a great EDC and can handle the day-to-day tasks around your home or office. It’s also a quality outdoors knife to handle fine detail work in your shop, whittling, or while camping or hiking. At just 4.25 inches while closed, it will easily fit into your pocket or into your outdoor pack.
The Trapper Red Bone comes with an MSRP of $99.95 and is worth it for someone looking for a high-quality, multi-faceted blade.
Editor’s Note: This post was written by Mike Ableson.
The Swiss Army Knife Is Iconic, And Over The Years It’s Featured Many Different Tools. Most Are Useful, But Some Are Just Plain Odd.
The Swiss Army Knife has become a utilitarian icon. Manufactured by Victorinox, and formerly Wegner, the knife got its name due to American GIs in World War 2 being unable to pronounce the proper German name of the name, the Offiziermesser, which translates to “officer’s knife.”
Traditionally clad in red, the color of the Swiss flag, the knife is a versatile multi-tool filled with different implements ranging from knives and screwdrivers to corkscrews and nail files. Below is a selection of some of the most useful tools in the Swiss Army Knife and some tools that are a bit more unique.
The Original Tools
The first Swiss Army Knife, simply called a Modell 1890, featured four tools. Those four are still a part of many SAK models today and immediately come to mind when you think of the tool.
Spear Point Blade
While a larger Swiss Army Knife may feature multiple blades, every model will feature a spear point. An icon in its own right, the SAK spear point will appear on the largest models all the way down to tiny ones meant for keychains.
Made of stainless steel, the spear point can cut thread just as well as it can cut meat. However, I wouldn’t want to butcher much with one that’s keychain size.
Reamer
The reamer is probably the least-known of the four original tools but is no less important. It is two functions. The first is to drill small holes into wood to give screws a head start. The second is to help with sewing. The hole in the middle of the tool is meant to be used to slide thread through to help give a stable anchor point while sewing materials together.
While this might not be the most necessary tool today at home, it’s incredibly important for a soldier on the march or on the battlefield.
Screwdriver.
Nowadays you can find some Swiss Army Knives with as many as four different screwdrivers inside. They all can tie their lineage to the screwdriver that made it onto the original model. Important for a soldier trying to fix a rifle in battle, important to a homeowner trying to reinstall an outlet cover in the kitchen, the screwdriver is one of the implements that sets the SAK, and other multi tools apart from other types of tools.
Can Opener.
Yet again, a great all-rounder tool with military use in mind. A can opener is a necessary tool for a soldier to have in the field to open rations. While most homes today have either a crank or an electric can opener, the original handheld version still remains in many Swiss Army Knives.
Other Necessary Tools
Swiss Tool X Plus Ratchet
Some of the larger Swiss Army Knives today have as many as 15 layers and dozens of tools inside of them. As the knives have grown larger, so has the roster of tools within them. These may not be the originals, but they sure are just as useful.
Needle Nose Pliers
Great for prying and pulling things apart, the needle-nose pliers are a standard tool in the larger SAK models. As the knives became more and more associated with outdoorsmen and tradesmen, the tools evolved to meet those demands.
Made of stainless like so many of the other tools, it’s a great pair of pliers, and the fact that they fold away into the knives makes them invaluable when you’re outdoors.
Saws
Over the years the SAK has grown to include multiple types of saws. The main two are a wood saw and a metal saw. The wood saw is a smaller version of a classic handheld saw, great for cutting small pieces of wood or through small, thin brush.
The metal saw features files on both sides, which compare to a standard, flat file. The serrated edge is analogous to a hacksaw. It will cut through metal, but it’ll take a while to do it.
Scissors
What’s better than a pair of scissors? If you’re looking to cut paper or fabric, not much. That’s why scissors are included today on the largest Swiss Army Knife (38 tools) and the smallest (seven tools).
Like the majority of the other tools, it’s made of stainless steel. Of course, they are quite small so it’ll take a minute or two to finish cutting, but when you need scissors no other tool can match up.
Toothpick
Currently a standard tool on the smaller SAK models, the toothpick is great because no one likes having food stuck in their teeth. Unlike most of the other tools in the knives, this one is not made from metal. It’s made from hard plastic and slides out of the body of the knife. However, it is easy to clean and stow back away so while it may seem like a reusable toothpick might not be the most sanitary tool, Victorinox has engineered it in such a way that it is easy to disinfect.
The Outrageous Tools
Over the years there have been plenty of tools in the Swiss Army Knife that range from maybe being a bit overkill to being completely out of left field. Two of these are still available on some SAK models while the other tools are just relics of bygone knives.
Cigar Cutter
The cigar cutter is the most eye-catching tool from the past. Cigar smoking isn’t as popular as it was, but there were once five models of Swiss Army Knives that featured a cigar cutter. It was unique because it was not spring-loaded. It featured a lever that would slice the cigar with a blade like a guillotine.
Toilet Paper Holder Key
That’s not a joke. A limited number of Swiss Army Knives in Europe were made with this incredibly specific tool to open industrial paper towel holders in public/commercial bathrooms.
Pharmaceutical Spatula
You’re reading that right. Some knives feature a pharmaceutical spatula. This tool is meant to stir ointments and creams as well as safely move pills into bottles. It’s as specific as it gets when it comes to tools on a Swiss Army Knife. Well, there might be one tool more specific.
Hoof Cleaner
If you’re a farrier and need to clean out some horse hooves, there’s a tool for you. The small hook features no sharp edge so as to not hurt the horse as you clean out their hoof before putting on a new shoe.
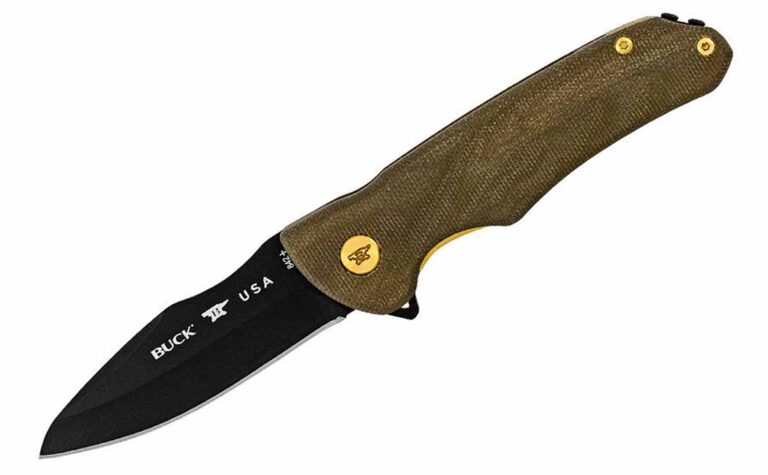
Buck’s Newest Knife Is A Beautiful Limited-Edition Folder Of The Highest Quality.
Part of its 2022 Legacy Collection, Buck’s newest knife is beautiful and only available until the end of the year. The 842 Sprint Ops Pro can be your EDC just as well as it can be your bush knife.
The Cerakote S45VN drop point blade has a black finish and easily flips open thanks to its ball-bearing design. It’s been strengthened with a Paul Bos heat treat that tempers and hardens the blade through two heats that sandwich a freezing process. This blade is going to last you a long time.
The handle is made from green canvas Micarta and comes with a removable pocket clip. The fasteners and liners have a titanium nitride coating for added wear resistance.
This is everything you would expect from Buck. Every stone has been turned over, and there is no hole in this knife’s construction. Considering it’s only for sale for the next six months, it’s worth the MSRP of $304.99.
Editor’s Note: This post was written by Mike Ableson.
There Are So Many Types Of Kitchen Knives It’s Hard To Know Which Are Necessary. We’ll Set You Straight.
Watch any cooking show or pursue the cutlery section of a kitchen store, it’s easy to wonder why chefs have so many knives. Are they all necessary? Are some there just so they can show off?
Far from it. Each has its place in the kitchen. But before groaning over the cost and space constraints of procuring each and every type of kitchen knife take solace, you don’t need them all.
That’s what this guide is for. We’ll walk you through some of the most important types of kitchen knives and a few of the oddballs. Afterward, you should stand ready to stock your galley with the tools that count.
Types Of Kitchen Knives: The Must-Haves
When it comes to the necessities, these four types of kitchen knives are the ones everyone should own. Whether you buy them individually, or as part of a knife set, these are the ones you absolutely need.
Chef’s Knife
Wusthof Classic 8-Inch Chef’s Knife. MSRP: $170
To use a sports analogy, your chef’s knife is your quarterback/point guard/ace pitcher. If you can only have one knife, this is the knife you need to buy. A good chef’s knife should be able to handle almost every task in the kitchen.
Since chef’s knives are usually 8-10 inches long, they are great for slicing meats and cutting produce. The wide, weighty blade is good for crushing aromatics like garlic and ginger. You can choke up on your grip to do more precise, fine knifework although that puts your hand closer to the cutting edge–not ideal. Some use a pinch grip, “pinching” the blade between the tips of the thumb and index finger near the spine just forward of the handle, for precise cuts.
Made from either stainless or carbon steel, the stainless varieties will be easier to maintain at home. The chef’s knife is the ultimate all-rounder, thus why it is without question the most important knife in the kitchen.
Bread Knife
Dexter Russell SofGrip 8″ Scalloped Bread Knife. MSRP: $29.10
The bread knife, aside from being excellent at cutting bread, is the go-to knife for cutting fragile food items like tomatoes. The serrated blade can get a better bite on thin-skinned produce with a fragile core. Of course, the crunchy exterior of a loaf of bread is no match for it either.
An extremely sharp chef’s can also do these softer tasks, but if it’s dulled it tends to be more destructive than beneficial while cutting. Most bread knives are quite long, but no matter the length, it’s your best option in the kitchen for safely cutting softer foods.
Paring Knife
Misen Paring Knife. MSRP: $35
Rounding out the main trio of types of knives is the paring knife. The nimble little slicer is much shorter than the chef’s knife and is designed for small cuts and precision. Looking to hull a strawberry or thinly slice garlic? Choose the paring knife. Want to devein shrimp or score a steak? Choose the paring knife.
Many paring knives have blades similar in size to pocketknives. This limits its utility. Much as you wouldn’t want to clear brush with a pocketknife, you wouldn’t want to butcher a whole slab of ribs with a paring knife.
A point to consider: a good handle is as important as a quality blade with paring knives. Control is the name of the game, and that comes from the handle.
While not a kitchen knife in the sense it’s a famous cutter, having a good set of steak knives is incredibly important. Whether you realize it or not, how you slice meat affects its overall taste and enjoyability. A set of blunt-edged knives can reduce the savor of a ribeye to that of a cubesteak.
Steak knives come in both serrated and plain-edge varieties so you won’t necessarily be locked into one style of knife.
Most knife blocks come with steak knives as part of the package, yet there are many quality options available individually. Don’t skimp on these. Six to 10 quality steak knives, made of good high-carbon stainless steel, ensures all your hard work in the kitchen doesn’t go to waste at the table.
Types Of Kitchen Knives: Nice To Haves
Once you have the main four types of kitchen knives, you can start filling out your collection with some specialty pieces. These five are the next group of models to look at buying.
Santoku
MAC Professional Series 6.5-Inch Santoku With Dimples. MSRP: $175
The santoku is a Japanese knife designed to handle the tasks of chopping, slicing, and cutting. It’s smaller than a chef’s knife and sometimes features small dimples, or a Granton Edge, on the blade to help shed pieces of food and aid cutting.
The advantage of the knife is its flexibility, moving seamlessly between culinary tasks. Additionally, the generally shorter blade makes it easier to control than the traditional chef’s knife. Also, the santoku’s ample blade safely facilitates a pinch grip for those who use this particular technique.
When it comes to types of kitchen knives, this one resides right on the line of must and nice to have. If you like to learn more, we have a great breakdown of some of the best Santoku knives.
Boning Knife
Victorinox Fibrox Pro 6-inch Boning Knife. MSRP: $22.40
As its name suggests, a boning knife is meant for one task: deboning meats. Whether it’s butchering a chicken thigh or getting bone out of a pork chop, the boning knife is up for the task. A good boning knife will be thin, sharp, and, most importantly, flexible so it can bend around bones and get into crevices to free the meat.
For most this knife isn’t an everyday necessity. However, if you happen to buy sides of beef or process wild game, you do well to have one at your beck and call.
Meat Cleaver
Zhen VG-10 67-Layer Damascus Large Cleaver, 8-Inch. MSRP: $135
If the chef’s knife is the quarterback, the meat cleaver is the massive, brawny linebacker. The cleaver features a thick, heavy blade so it can chop right through the breastplate of a chicken or break down a whole cow.
Super fun and satisfying to use, the cleaver is great if you’re looking to butcher cuts of meat at home. Furthermore, if you deal with frozen foods–say a tube of breakfast sausage–it really lightens the work.
All that said, not everyone requires a meat cleaver. The exceptions again are folk who buy partially butchered meat or hunters with a freezer full of wild game. On the other hand, you might find if you add one to your collection it could turn out more versatile than expected.
By the way, we have an excellent piece about the best meat cleavers available today.
Carving Knife
Classic 8″ Hollow Edge Carving Knife. MSRP: $150
A classy kitchen tool, the carving knife can be a showpiece brought out to carve the Thanksgiving turkey or the Christmas ham right on the table. Other than that, it’s pretty one-dimensional.
Many times carving knives come in sets complete with a matching carving fork to keep what’s being carved in place. Don’t confuse the carving knife with its close cousin the slicing knife. The former has a point, the latter is blunted and longer. Its whole jam is to slice girthier cuts of meat uniformly.
Unless you serve a slew of prime rib, you want a carver. The tip makes it more useful at the table, particularly on fowl. Try getting a turkey thigh off with a slicer. Even if the knife’s sporadically used, spend the money on a quality blade made of steel that holds an edge. You want to carve during the holidays, not sharpen.
Bench Scraper
Ateco Dough Cutter. MSRP: $7.95
The bench scraper is a great multi-purpose tool, particularly if you bake. It can precisely cut through doughs and it can quickly help clean a messy, dusty workspace. Nothing corrals rogue flour as quickly as a bench scraper. But if you prefer buying your baked goods, you can take a pass.
Types Of Kitchen Knives: The Specialist
These types are knives are great at doing one particular task and not much more. Unless you really love doing these things in the kitchen, you probably won’t need these. But they are all distinctive blades in their own way.
Mezzaluna
Fantes Mezzaluna Rocking Chopper. MSRP: $20.61
You rock this back and forth to chop herbs and other soft, mostly leafy, greens. While it may sound like the name of an opera, this knife only sings one tune.
Tomato Knife
Winco Acero 5-Inch Tomato Knife. MSRP: $9.54
Do you really, really, really like tomatoes? Do you wring your hands over making sure you perfectly cube a tomato for a salad or make precise slices for a BLT? Then this is the knife for you. Otherwise, your bread knife should work just fine. By the way, since everyone is dying to know, the forked tip aids in peeling tomatoes without cutting the pulp.
If you’re looking to skin or slice salmon, or most other types of fish, or if you want to make sushi at home, look no further than the salmon knife. Long, thin and flexible, it’s great at cutting through the fragile flesh of fish.
Cimeter
Victorinox 14″ Cimeter Knife with Rosewood Handle. MSRP: $138.99
This massive meat-cutting knife is great if you want to feel like a marauding pirate or just want a big butcher’s knife specifically to cut large pieces of meat. A chef’s knife or carving knife would also work here.
Oyster Shucker
OXO Good Grips Oyster Knife. MSRP: $10.99
This rounded blade is necessary if you want to open and eat oysters and not your thumb. If you’re not a fan of raw shellfish, there isn’t a reason to have this knife.
Mandoline
OXO Good Grips V-Blade Mandoline Slice. MSRP: $45.95
The mandoline is great at two things: cutting produce into thin slices and removing a knuckle from your fingers. If you get one of these always remember to use the guard. Otherwise, take your time with a paring knife to cut your veggies thin.
Cheese Knife
Different types of cheese require different types of cheese knives. The folks at Epicurious have a great video showing the correct way to cut dozens of different cheeses. I’ll stick with slices or just futzing with a butter knife.
Do you like cake? Of course you do. Do you want a knife specifically for cutting cake? Maybe you do, and if so, this is the type of knife you would want to use.
Inspiration And Guidance From Jerry Fisk Has Helped Forged In Fire Champion Ricardo Vilar Continue His Rise To Steel Stardom.
It’s hard enough to make it to top bladesmith status in the USA but even harder if you are from another country. Brazilian bladesmith Ricardo Vilar is one of those who worked hard, persisted like hell, and has been rewarded with both high accolades and fame for his efforts.
Starting with humble beginnings and a love for knives at an early age, Ricardo resides in the USA now and is living the dream.
“Growing up in the countryside of Brazil, for some reason I always loved knives,” he recalls. “At that age as Boy Scouts, we were allowed to use knives—and more, the knife was part of the uniform—so I was able to carry one on my belt. But my family wasn’t wealthy enough for me to be able to buy the knives I wanted, so making my own was a natural progression.
Ricardo’s love for carrying belt knives as a Boy Scout in his youth carries over into his stag hunter in damascus. (Image courtesy of @digitalbladesmith)
“I started with stock removal because 30 years ago in Brazil it was very difficult to find a blacksmith, and impossible to find a bladesmith. They were people considered rare and with ‘magical’ knowledge. I started following other makers who were ahead of my knowledge. But something really interesting I would like to say, at that age at least in Brazil, the sharing of information wasn’t very popular. Also, remember, we had no Internet, so my progress was really slow.”
Inspiration From A Legend
Ricardo knew if he was going to progress at a more rapid pace, he had to go outside Brazil to get help. He did so by reaching out to one of America’s most famous and lauded bladesmiths: Jerry Fisk. He invited Jerry to Brazil, offering to pay his expenses.
“I asked Jerry if he would stay at my home because we had no money to pay for a nice hotel room,” Ricardo states. “He accepted my offer and with his help we were able to set up a better workshop, which was the turning point for my knifemaking in Brazil. We have become great friends ever since.”
Jerry remembers his first visit to Ricardo’s home country and the South American bladesmith’s sacrifice to get him there.
“I met Ricardo in the fall of 2001,” he said. “He and some other makers wanted to get someone to come to Brazil to help them start looking around at what the world was doing in the knife business. Ricardo sold his car to get the funds together to have me flown there.”
This flowing bowie by Ricardo Vilar shows the design influence of his mentor, Jerry Fisk and also Ricardo’s own creative approach to knife construction.
The American and Brazilian immediately bonded.
“I realized right off how good he was as a businessperson,” Jerry said. “And the fact that he had a really good sense of humor started things off with a bang. Though neither of us spoke the other’s language well, we both managed to come up with enough jokes and pranks that it made learning and sharing cultures fun together.
“On the first trip—others followed—we would stay up till 1 to 3 in the morning talking about how the world worked regarding knives. On the first trip I helped Ricardo and other Brazilian bladesmiths form a knifemakers’ group, with the rules being a blend of both The Knifemakers’ Guild and the American Bladesmith Society bylaws mixed in with what would work for them. We worked on forging carbon steel but, more important at the time, we went down to the junkyard, gathered up all kinds of materials, made gas forges and made damascus. We were using vacuum cleaners, hair dryers, anything that would work.”
Jerry’s impact on Ricardo has been immeasurable. “If you pay attention to my designs, it is clear to see Jerry’s influence,” he said. “I like the style and the functionality of his knives and this is what I like to pay attention to when I design a knife.”
Forging In The USA
The next few years Ricardo’s hard work began to pay off. In 2005, he became the first-ever ABS journeyman smith from South America. The same year he began working with the Brazilian Army Jungle War Instruction Center designing and producing knives for the military. “I still have my little company in Brazil which makes knives for law enforcement, firefighters, first responders and the like,” he notes.
In 2017 he was faced with the biggest decision of his life. “I had been visiting Arkansas since 2003, more specifically the Nashville area—yes, there is a Nashville, Arkansas,” he smiled. Such a move would allow him to be closer to Fisk’s home as well as the cutlery action in the United States. The Vilars also were keenly attracted to the Razorback State’s splendid beauty. “When my family and I decided to immigrate to the U.S., we felt like the Arkansas area would be awesome for us to be connected with nature,” Ricardo explains, “so Nashville, Arkansas, was our top option.”
“His success in knives is quite simple, really,” Jerry Fisk says of Ricardo. “Work your butt off doing the best you can do until you get done what the client deserves. Repeat next week, but better.”
Once situated stateside, Ricardo and his knifemaking blossomed, propelling him to new heights. Not only did he start winning awards for his work the world over, he had an opportunity to collaborate with Jerry. The two friends were recruited to produce limited edition knives for the Arkansas Game and Fish Foundation. As the foundation’s press release states, “The Arkansas Game and Fish Foundation was proud to work with Ricardo Vilar in establishing the first-of-its-kind limited edition knife collection. The Foundation chose Mr. Vilar for his outstanding craftsmanship and love of the outdoors. We tasked him with making and testing a blade that not only would meet the demands of use in the field, but could also be displayed in the board/trophy room. With several of the board members owning a custom Vilar knife already, they knew he would make something they would all be proud to own.”
Ricardo also enjoyed the publicity of appearing on, and winning, an episode of the popular Forged in Fire television series in March of last year. “It was an awesome experience and I need to tell you, it is not as easy as you might think,” he relates. “I made a very interesting African weapon called an ikakalaka. I made two instead of one and I had the difficult job of deciding which one I was going to compete with.” Ricardo won the competition with ease and most likely would have done so with either sword.
Fisk shares Ricardo’s secret to making it in the knife world.
“His success in knives is quite simple, really. Work your butt off doing the best you can do until you get done what the client deserves. Repeat next week, but better. Be honest enough that the client knows he can play poker over the telephone with you and get a fair hand. Then after all that, have the sale come in at 10 percent below market price,” Jerry advises. “I have had Ricardo help me set up for the cutting competitions that I work with simply because his knives cut very well. Yes, Renata, his wife, often engraves and does gold inlay, but the knives will also cut well.”
Ricardo’s story is one of hard work, dogged determination, taking chances—and winning.
The Meat Cleaver Is The Heavyweight Of Kitchen Tools And Can Cut Things As Hard As Bone. These Five Are Among Some Of Today’s Top Models.
Today we’re talking cleavers, specifically meat cleavers. Industry folks prefer the shorter form when referring to the cutting implement, but we’re going with the longer, common man vernacular for this piece.
Why? Because cleaver abound nowadays, but we’re specifically talking about the type meant to cut meat. And with the way folks find stuff online, going long is likely to get the right person to the right information. Sorry if that bends any noses out of place.
What Is A Cleaver?
The cleaver is a fascinating tool that has existed in some form for millennia. Tools described as cleavers date as far back as the Acheulean period more than 1.5 million years ago, and probably date back even further. It’s a stout, heavy piece that differs from the standard kitchen knife in numerous ways.
The most obvious difference is the shape. A cleaver doesn’t taper to a point but is usually rectangular in shape. It may have a curve along the spine, but the basic shape of any cleaver will be a rectangle.
Many cleavers, and almost every one on our list, have a large hole in the corner opposite the handle. This is because many butchers prefer to hang their cleavers on a hook rather than leave them on a flat surface to avoid potentially damaging the blade.
Five Top Cleavers Available Today
The best meat cleavers all have one thing in common: toughness. They’re all able to stand up to the abuse of the job. These five are among the top cleavers available today at a variety of price points.
Wusthof Classic 6-Inch Cleaver
Wusthof Classic 6-Inch Cleaver
When it comes to kitchen knives there are few companies with more history than Wusthof, and they have once again made a leader in the field with their Classic 6-inch Cleaver. Forged in Germany, the Classic looks like the archetype of what you expect a cleaver to be.
The blade is 6.3 inches long and 2.8 inches wide, which allows you to do things like crush garlic and ginger or use it like a bench scraper to scoop up ingredients. It comes with a triple-riveted handle that is easy to grip and feels good in your hand.
It’s a bit pricey, with an MSRP of $300, but this is a cleaver that should last you years.
Messermeister Four Seasons Heavy Cleaver
Messermeister Four Seasons Heavy Meat Cleaver, 6-Inch
If you’re looking for a quality cleaver at an affordable price, Messermeister has you covered. The Four Seasons (no connection to the hotel chain) is stamped from a single piece of 1.4116 stainless steel with a 56-57 HRC and features a molded polypropylene handle.
The fact that it is stamped, rather than forged, keeps the costs down tremendously, and it comes in two versions: a 6-inch and a 7-inch. It’s a good tool. It might not have the fanciest steel or hand-carved wood handle, but if you’re looking for a tough cleaver at a fair price, this is the one for you.
The MSRP of the 6-inch is $47.95, and the 7-inch costs $59.95
Zhen VG-10 67-Layer Damascus Large Cleaver, 8-Inch
Zhen VG-10 67-Layer Damascus Large Cleaver, 8-Inch
This one is beautiful. The Damascus Large Cleaver from Zhen Premium Knives is visually stunning and one heck of a cutter. The blade was made with VG-10 stainless steel (60-62 HRC) and features a Pakkawood handle.
The damascus pattern waves and curls across the blade to give it a dynamic, kinetic energy. That’s not even discussing the caliber of the cleaver, which is professional grade and comes with a lifetime warranty against defects.
Four inches wide, this cleaver is large in terms of overall area and is a phenomenal multi-use tool in the kitchen. At an MSRP of just $135, it’s actually a bargain for a professional-quality model of this caliber.
Dalstrong Obliterator Cleaver 9-Inch With Stand
Dalstrong Obliterator Meat Cleaver 9-Inch
From Dalstrong’s Gladiator series comes the Obliterator, a massive cleaver built to withstand anything you can throw at it in the kitchen. The massive blade is made from heat-treated 7Cr17MoV steel with a 60 HRC. It weighs 2.9 pounds and is .236-inch thick. It truly lives up to its name.
The handle is made of thick G-10, which is great to withstand the forces of cutting up a rack of ribs or spatchcocking a turkey.
The Obliterator also comes with an acacia wood stand so you can proudly show off your chopper. With an MSRP of $120, the Obliterator won’t obliterate your wallet.
Henckels Classic 6-Inch Cleaver
Henckels Classic 6-Inch Meat Cleaver
Forged from German stainless steel, the Henckels Classic is a quintessential cleaver. Not as girthy as the Obliterator, the Classic is well constructed and designed to be used every day. The blade isn’t as hard as most of the others on this list, with a 55-58 HRC, but this is still an excellent tool.
The satin-finished blade is sharpened and honed to stay sharper longer, and the full-tang, triple-riveted handle gives the cleaver balance in your hand. You’ll feel confident using this one each and every time
It’s a lightweight piece, at just around 12 ounces, and is about 10.5 inches in overall length. MSRP: $64.99.
Deeply Rooted In Scandinavian History, The Seax, AKA “Scramasax” Or “Sax,” Was The Blade Shape Of Choice For The Much-Feared And Revered Vikings.
Typically the Norsemen were associated with their famous axes, but, truth be known, they also carried a knife that saw more general use: the seax.
The Scandinavians usually lived in villages, farmed the land and raised animals. In such an agrarian society, they also needed tools to help them work the land and harvest the fruits of their labor. This is also where a knife came into play.
“Their personal knife was called the seax and it never left their side because it was their version of an EDC,” begins Ernest Emerson of Emerson Knives, Inc. “The knife was tasked with a myriad of chores, from skinning a freshly taken deer to cutting up the turnips they grubbed out of the ground with the same knife.”
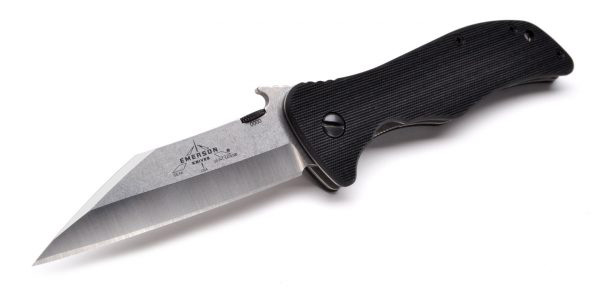
The folding Emerson Knives Seax puts a modern twist on this age-old blade design. (Image via Emerson Knives)
Emerson said the seax also could be employed as a self-defense weapon if needed. It was truly a blade for all seasons: Harvest produce in the morning, fend off the enemy after lunch, and then prepare supper in the evening—all with the same blade.
Seax Designs
All joking aside, the seax was a handy blade.
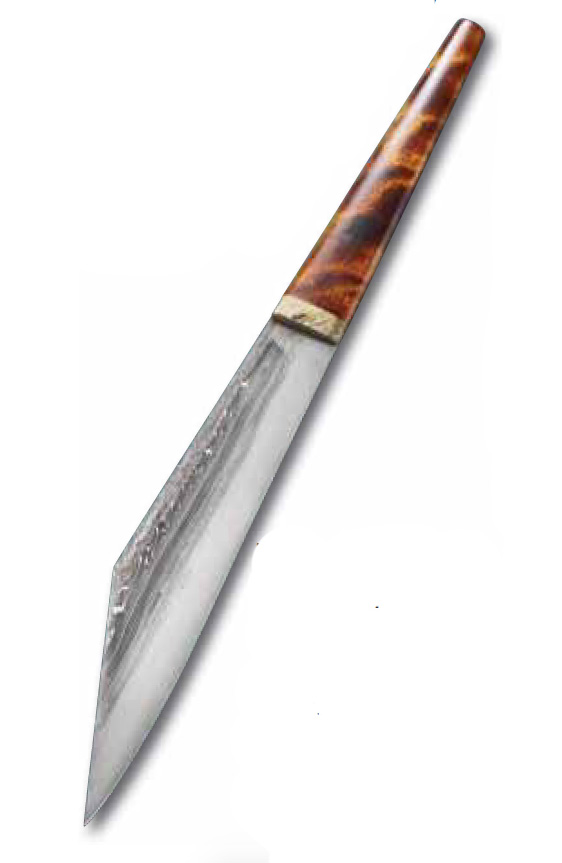
“It is a bowie-style blade, a spear-point type of blade, a Loveless drop-point hunter-style of blade, and, of course, the well-known ‘broken-back’ style featuring a severe clip close to the front, finishing in a point well below the center line,” Emerson said.
He said the broken-back seax style is the most common and appears in TV shows and movies depicting Vikings.
The Broken Back Seax by Aidan Garrity of Iron Lion Blades features a 10-inch damascus blade of 1095 carbon and 15N20 nickel alloy steels, and wrought iron. The handle is maple and the bolster is moose antler. Overall length: 18 inches. (SharpByCoop image)
Blade lengths varied wildly from seven inches on the short end and topping out at 30 inches, the latter Emerson called a short sword, basically.
“The seax needed to be an all-around utility tool that could chop, cut, slice, and sometimes stab, all with equal ease of application,” he said. “A Viking’s livelihood depended on self-sufficiency, resourcefulness, and the quality of his toolkit.”
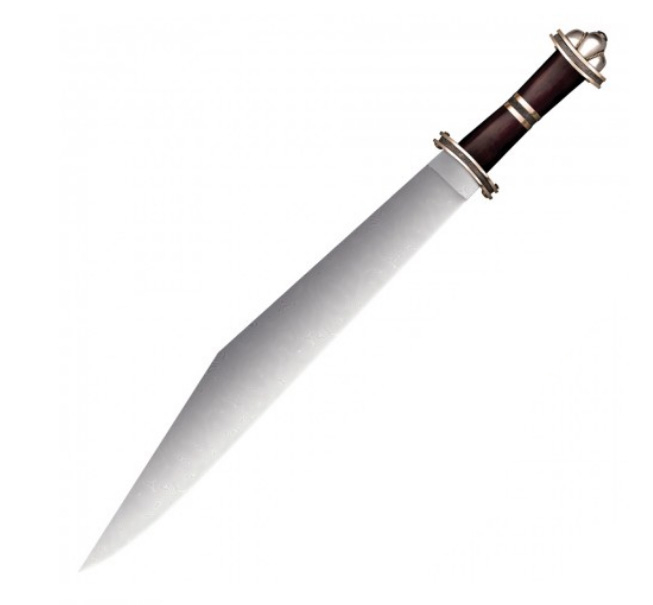
The Cold Steel Damascus Long Sax features a 17.25-inch blade with an edge that curves up toward the tip. MSRP: $635.99. (Cold Steel image)
At first glance, the seax may not seem as exciting as a recurve blade, but looks are not always everything. The beauty of such a blade lies within its ability to tackle cutting chores.
The straight-line cutting edge tackles a variety of tasks easily, and the point of the blade is both precise and powerful, with the ability to score as well as penetrate.
5 Best Seax Knives
The long history of the seax is still going strong today as companies young and old are making new versions of the historic blade.
These five are some of the more unique and exciting seax knives available today.
Terävä Skrama 240
Terävä Skrama 240
Direct from the Finnish brand Terävä, the Skrama is a rugged bush knife great for chopping, slicing, and building shelters in the outdoors. The 9.4-inch blade is made from 80CrV2 steel with a 59 HRC. It comes married to a textured rubber handle for easy grip in any weather conditions.
The blade has a full tang and a flat edge but with a twist. It’s sharpened to a 34-degree edge except for the two inches closest to the hilt. That small section is sharpened to a finer 25-degree edge for more meticulous, precise knifework.
The Skrama comes with either a leather sheath or a plastic cover and has an MSRP of $69.99-109.99.
SZCO Supplies Brass-Studded Seax
SZCO Supplies Brass-Studded Seax
SZCO Supplies has made a fun, durable knife with its Brass-Studded Seax. The piece features a 10-inch blade married to a wooden handle. The knife is adorned with brass studs on the handle as well as a brass guard and pommel.
For a budge knife, it does have some weak points. The two main ones are that the leather sheath may need some working in to be at its best, and the knife may need a sharpen out of the box to have a pristine edge. Other than that, this is a good knife for the money.
Strong enough for a log, sharp enough for a piece of chicken, SZCO Supplies has made a seax that is well priced at an MSRP of just $27.63.
Medieval Collectibles Viking Seax Knife
Medieval Collectibles Viking Seax Knife
This seax from Medieval Collectibles has the look and feel of a knife from the Viking era. It’s made from 5160 tempered carbon steel with a full tang, which is peened over the end of the handle’s metal end cap.
Just over 17 inches in length, and a blade length of 12.1 inches, the Viking Seax comes with a handle that has a wood grain finish and a hand-stitched leather scabbard with a belt hanger.
At just 14.4 ounces in weight this is a utility knife great for everything from chopping through wood and brush to defense and protection. The Viking Seax comes with an MSRP of $169.
Grimfrost Broken Back Seax, Type IV
Grimfrost Broken Back Seax, Type IV with scabbard
From Grimfrost comes a full-tang seax made of 1045 carbon steel. A reproduction of a 1,000-year-old seax found in London, the Broken Back Seax is 16 inches in length with an 11-inch blade.
The handle is handmade ash and the included leather scabbard is hand-stitched. It also features “Grimfrost” stamped in runes on the side of the blade.
Lots of time and care went into making this knife as authentic as it could be and it shows. So whether you want to feel like Leif Eriksson exploring new lands or just want a strong knife while chopping, Grimfrost has you covered.
The Broken Back Seax has an MSRP of $132.
Lunar Light Forge Damascus Sanmai Seax
Lunar Light Forge Damascus Sanmai Seax
This amazing seax is from the husband & wife duo of Nathaniel and Megan Everett at Lunar Light Forge in Akron, Ohio.
The damascus blade is made from 42 layers of 1095 and 15n20 steel around a 5160 core. It is paired with a handle made of Buffalo horn and Cocobolo wood, and it comes with a hand-tooled & hand-stitched leather sheath.
It’s just as much an art piece as it is an excellent utility knife. The 7-inch blade can process an animal, hack off tree limbs, and chop in the kitchen. It does have an MSRP of $722.50, but for the amount of craftsmanship and care that went into the piece, you’ll know you’re getting a knife of the highest quality.
Editor’s Note: Mike Abelson contributed to this piece