Tony Cetani has left his mark in the kitchen knife niche grinding it out at Hourglass Knives.
When asked why he makes knives, Anthony “Tony” Cetani of Hourglass Knives grinned and states, “It’s cheaper to make them than buy them.” It was while recovering from knee surgery that he got the idea to make one. “After weeks of reading forums and watching YouTube videos I bought a single-burner forge, a 4×36-inch belt sander, a set of files, a hacksaw and a bar of 1084, and in March 2017 made my first knife,” he recalls.
Tony Cetani specializes in such kitchen knives as his Honesuki. It features a 9-inch blade of Riptide cu-mai copper damascus from Baker Forge & Tool and an amboyna burl handle with cu-mai pins and liners. (Baker Forge & Tool knife image)
“It took me a few years to figure out what my niche in the knife world was going to be,” Cetani continues. “With so many amazing makers and designs I wanted to try and set myself apart. In late 2020 I made my first kitchen knife and fell in love. I started with some traditional Japanese styles and put my own spin on them. I love a knife where everything flows together and there are no straight lines in the profile. Though I love making all types of knives, kitchen knives have become a huge part of what sets Hourglass Knives apart.”
In seven short years, Tony has made his mark in the custom knife realm.
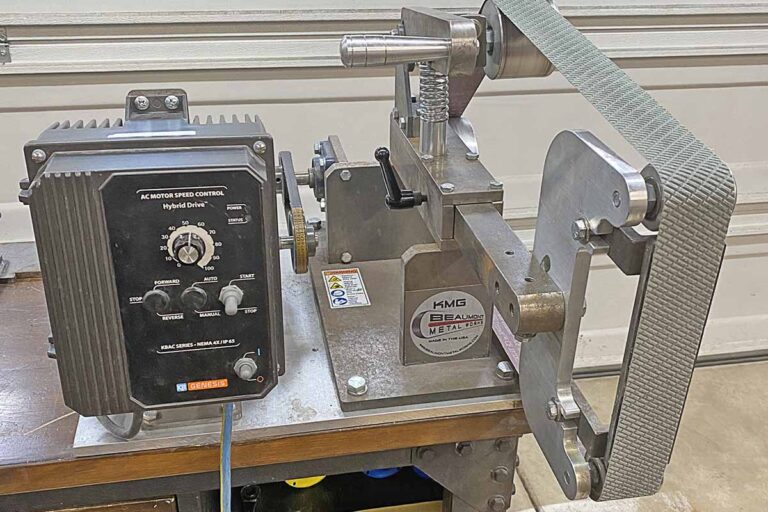
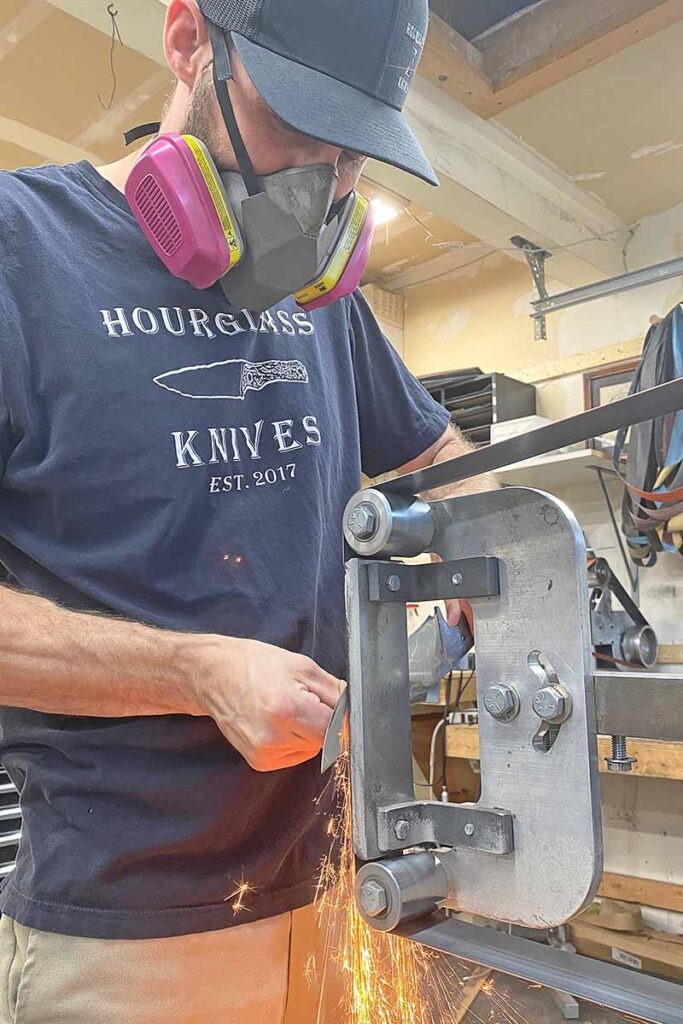
“My grinders are my most-used machines in the shop,” he offers. “Whether I’m grinding bevels, contouring handles, getting in tight corners with my small wheels, sharpening a pencil, or chasing scratches on a finished blade that I end up ruining, I use my KMG grinders for everything. Both of these machines have been invaluable to me. Having 1.5-inch tooling-arm slots gives me a ton of different options for attachments and fixtures. Switching belts is quick and easy with no tracking issues. Beaumont makes a tough and very reliable machine.”
From grinding bevels to chasing scratches on a finished blade or what have you, Tony uses his KMG grinders for most everything. This is his classic variable speed model. (In his rush to have the picture taken of him grinding for the story, Tony forgot to don his safety glasses.)
Cetani lauds his Foredom SR flexible shaft rotary tool. “There’s a few rotary tools out there I’ve tried but the Foredom has been my favorite. It has tons of different attachments, bits, accessories and the hand pieces can fit most rotary tool bits,” he explains. “The Foredom has given me the ability to do fine detail work on plunge lines, spines, tangs and the like that no other tool can. This rotary tool has helped my finish work immensely.”
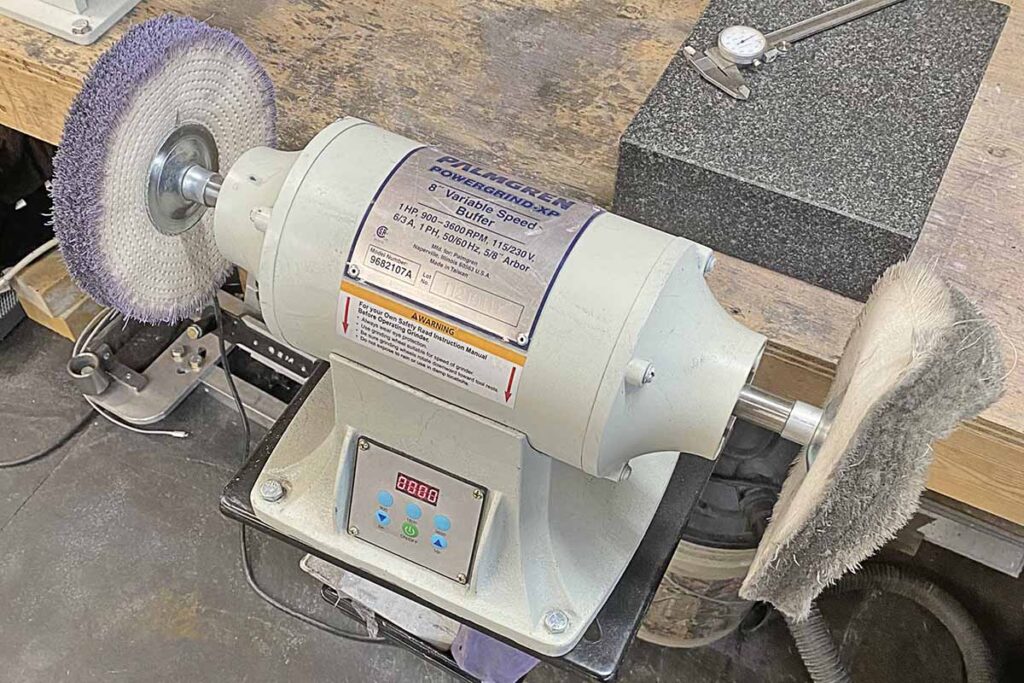
For his exquisite knife grips, Tony shares his key to success. “The Palmgren Powergrind-XP 8-inch, 1-horsepower, variable-speed buffer has changed my handle game. For years I ran a 3600-rpm buffer and was really happy with my results,” he reports. “I only use buffing compound when finishing my handles, and the change I saw after using the Palmgren variable speed buffer was phenomenal. Starting at 3600 and being able to drop it down slowly to 900 rpm really helps bring the most out of the wood. Being able to adjust speeds when buffing oxides off or polishing steels has been huge as well. The variable speed buffer is the one tool I wish I would have bought early on in knifemaking.”
The Palmgren Powergrind-XP 8-inch, 1-horsepower, variable-speed buffer has changed Cetani’s handle game. “I only use buffing compound when finishing my handles,” he notes, “and the change I saw after using the Palmgren variable speed buffer was phenomenal.”
For sanding Cetani uses a Edward Braun hand-sanding fixture. “I always disliked hand sanding because of the amount of times I stabbed and/or cut myself. When I first saw Edward Braun had a few hand-sanding fixtures for sale,” he recalls, “I knew I needed one. The fixture makes it fast and easy to secure your knife and start hand sanding. Adjusting the clamp is quick and allows for multiple holds for the specific knife you are working on. Since buying one I still don’t like hand sanding but I haven’t hurt myself!”
Looking to learn the proper names for everything that makes up a knife?
Like sailors, stagehands, and sommeliers, knifemakers have some very particular terms for the tools of their trade. It helps to know the lingo if you’re getting into knives, or just want to know what the hell “jimping” is when you read it in a product description.
Most of us use knives regularly, and some of us may even be sharpening pros, but there’s still a lot of knife terminology out there that doesn’t come up that often and some of it can be confusing.
Today, we’re going to clear all that up with a primer on all the major parts of modern knives. This is Knife Anatomy 101.
We’re not going to cover everything because you probably don’t need to know the exact name for the type of guard commonly found on a 14th-century German langmesser, but for those of you shopping for a new kitchen or pocket knife, this should cover everything you need to know.
Blade Essentials: Things (Most) Every Knife Has
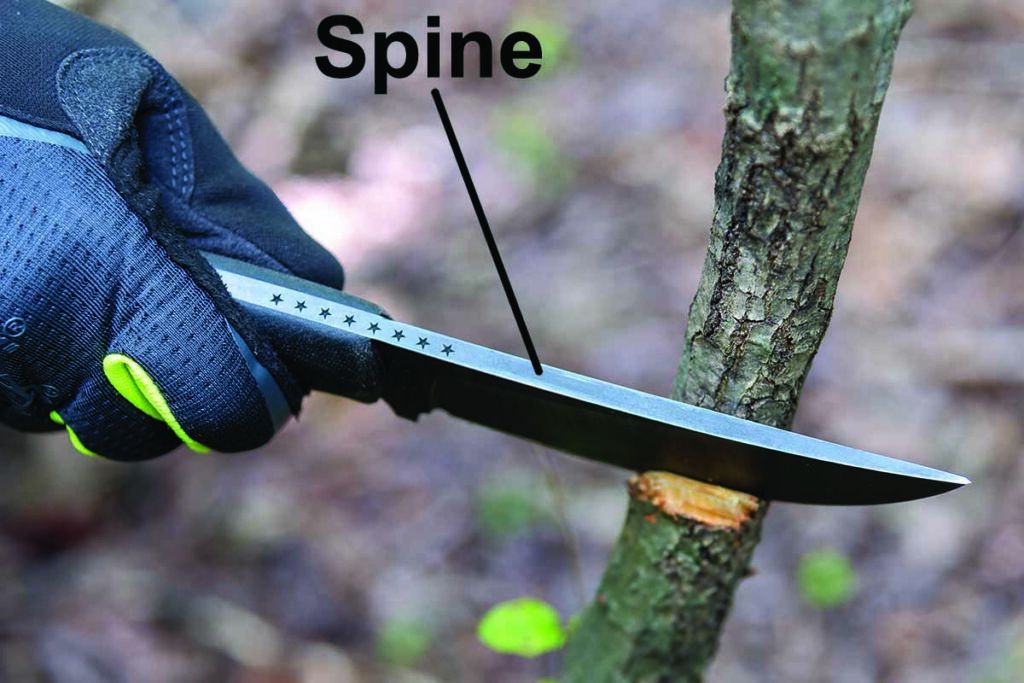
Spine
The spine of the blade is the part furthest from the edge or edges. On a single-edged knife, this would be the side of the blade opposite the edge, and on a double-edged knife or dagger, this is the middle of the blade between the edges.
The spine on a good knife will typically be heat-treated differently than the edge. The goal is usually to make the spine of the knife softer, and therefore allow it to flex and absorb energy while keeping the edge harder and more resistant to wear so it stays sharper longer.
This is called a differential heat treat and is especially important on larger, hard-use knives or other blades that might have to take impact forces.
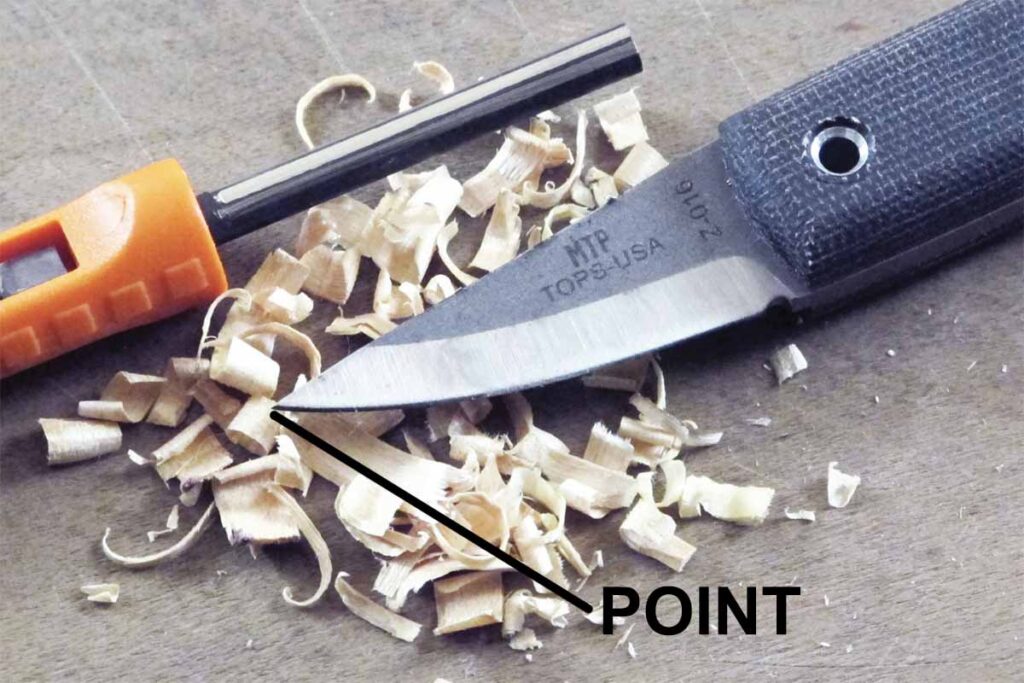
Point
You probably know this one, I won’t lie, but technically the point is the place where the edge and the spine or opposing edge meet, typically at a very sharp (pun intended) angle. This is what you use for piercing, and most knives have one.
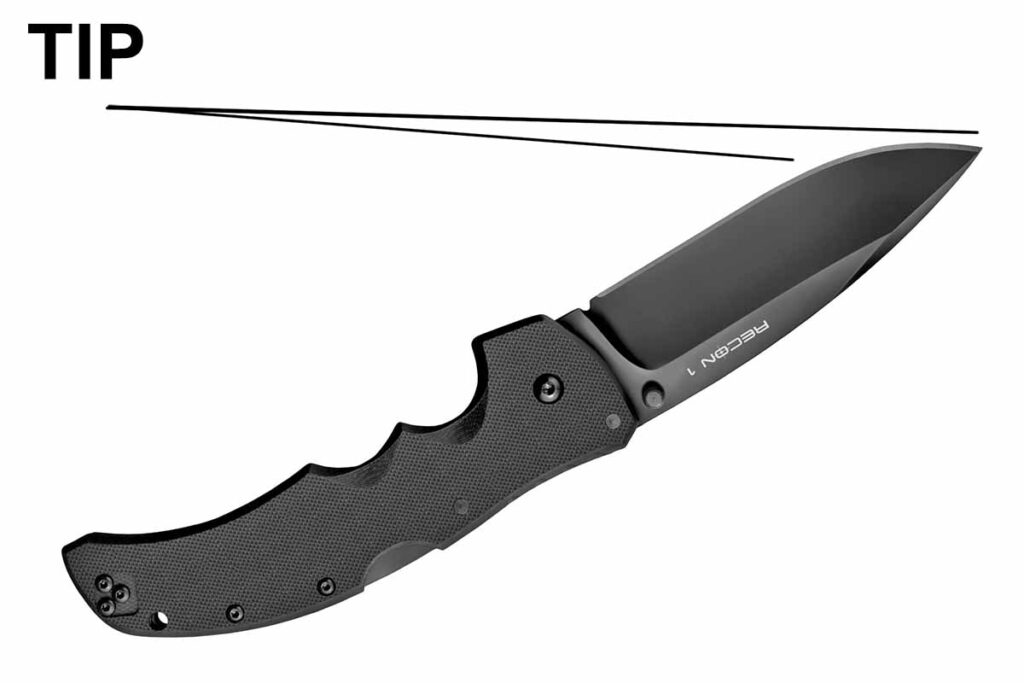
Tip
Technically different than the point, the tip of the blade is the forwardmost section of the blade, usually considered to be the last 20% or so of its length.
This section may be sharpened differently, have an unsharpened false edge along the spine, or be heat-treated differently to achieve different results. It includes the point of the blade.
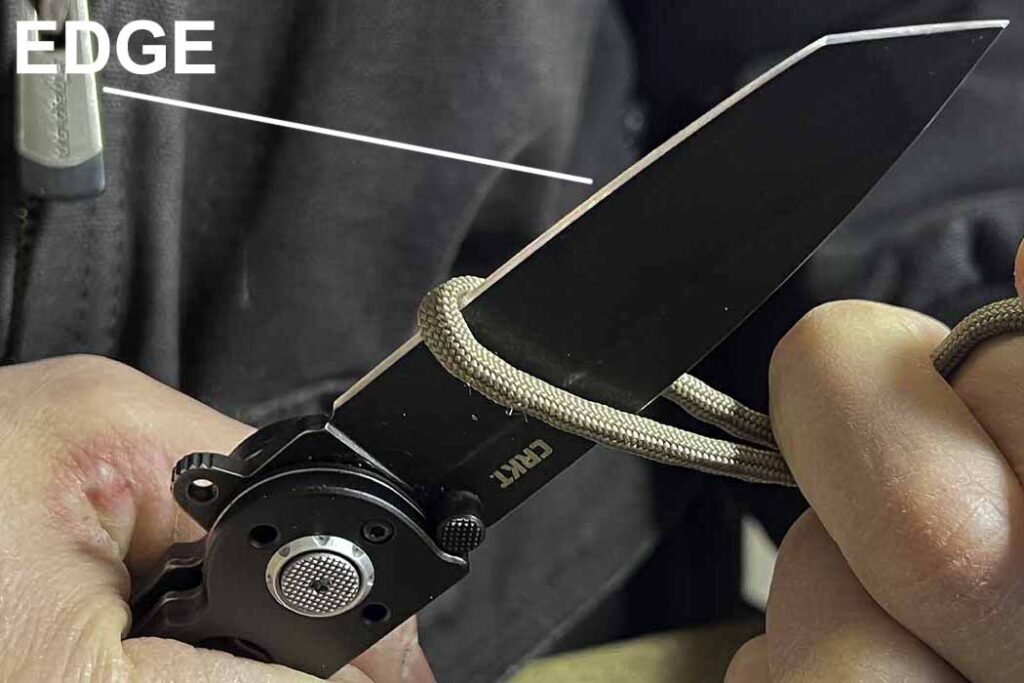
Edge
The edge of the knife is the (usually) sharpened portion furthest from the spine. It includes everything from the point to the heel, which we’ll get to later. Basically, this is the part you cut with, and on most knives, the whole thing will be sharpened the same.
There are some knives that have serrations for part of the blade, or certain fighting knives that leave sections unsharpened for the user to grip, though this fell out of fashion around the time the pilgrims landed in America. Today, most fighting or tactical knives are sharp from handle to tip.
One related term you will see is “edge geometry” or “edge angle” which refers to the angle at which the knife is ground or sharpened. Typically, this will be 20 degrees for something like a pocket knife or Western-style chef’s knife, or around 17 degrees for Japanese knives.
If you aren’t sure, a simple bevel gauge will tell you what the original edge is that you should be sharpening towards.
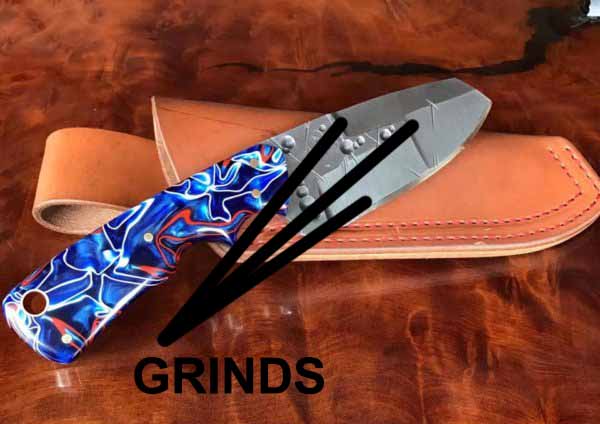
Grind
The grind of a blade, also called the geometry of a blade, refers to its cross-section and how the blade was ground by the maker. There are many different ways to grind a blade, with the most common being some form of hollow or flat grind, with convex grinds being a fairly distant third.
Every grind is a balance between strength and sharpness and is used for different things depending on the type of blade.
Some grinds lend themselves to a more robust edge that is less sharp, and some grinds, like the hollow grind you’ll find on most kitchen knives, give us an edge that is more susceptible to damage if misused, but better at slicing.
Various common grinds you’ll see frequently are hollow, flat, sabre (or saber), chisel, convex, and Scandi. All have their uses and are worth looking into further if you really want to dive into blade geometry and have the very best knife for the job.
Living on the Edge: Parts of the Sharp Part
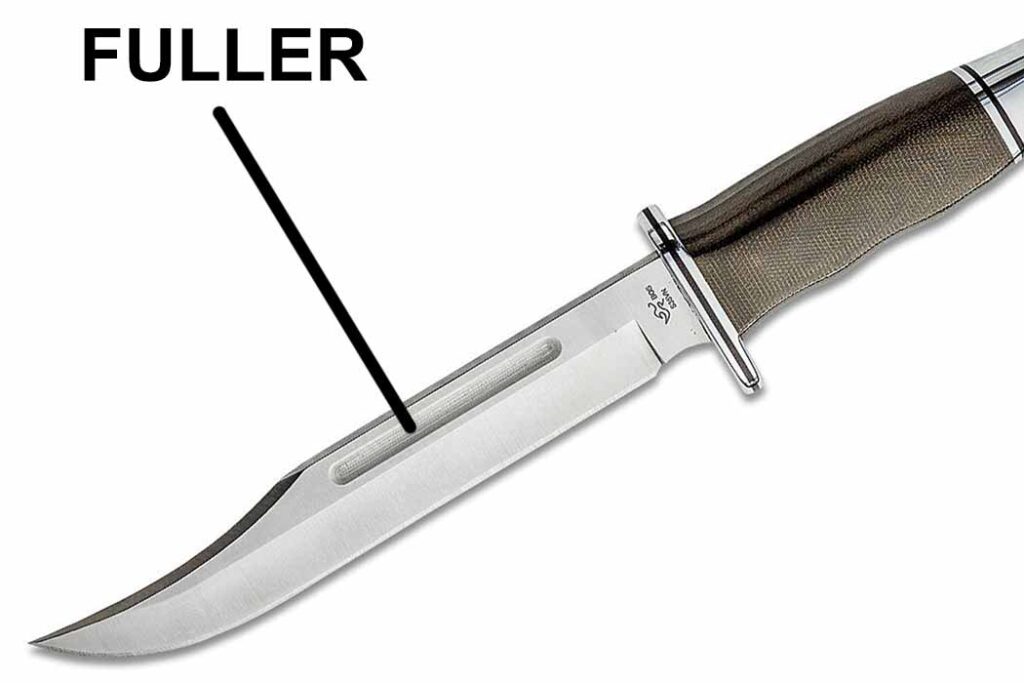
Fuller
A fuller is a rounded or beveled section of the blade that is either added as part of the forging process or ground in before the blade is heat treated. The purpose is to reduce weight and if forged, to strengthen or widen the blade as needed.
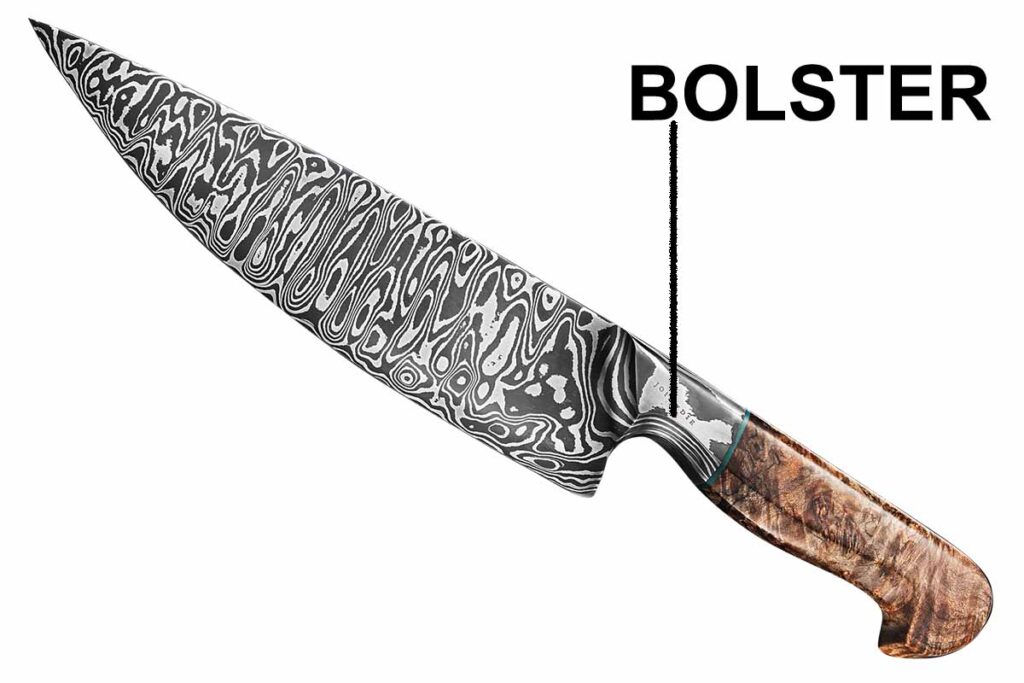
Bolster
The bolster of a knife, usually found on a kitchen knife or other fixed blade, is a thickened section of the blade that flows smoothly into the handle. This adds strength to one of the weakest areas of any knife (the junction between blade and handle) and helps with ergonomics by providing a smooth transition.
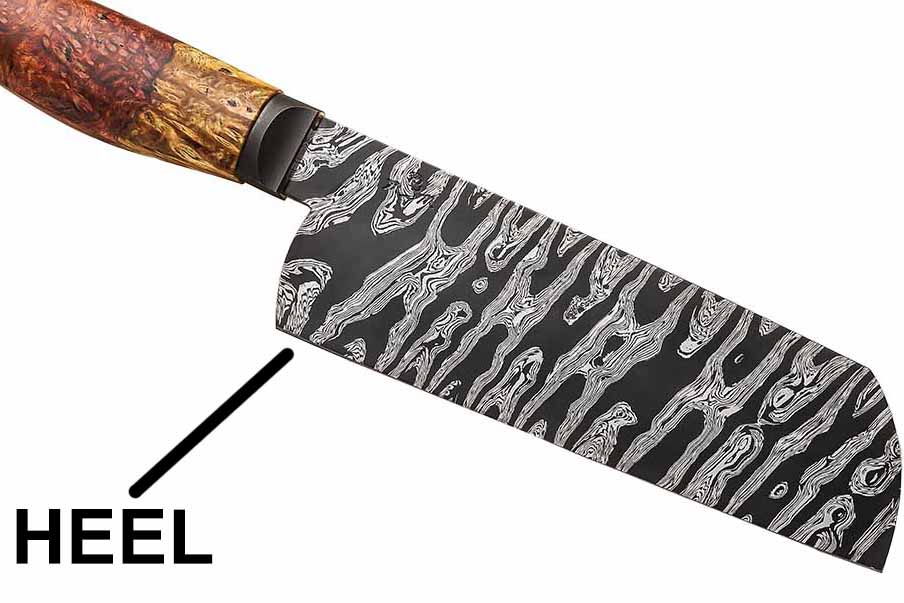
Heel
Not all knives have a heel, but if your knife has an edge that extends down and away from the handle, then you can think of the “bottom” of the blade furthest from the tip as the heel.
This is most common on kitchen knives and is typically rounded over or left rather wide to keep your middle finger comfortable when using a pinch grip. Japanese blades are notorious for having a prominent heel.
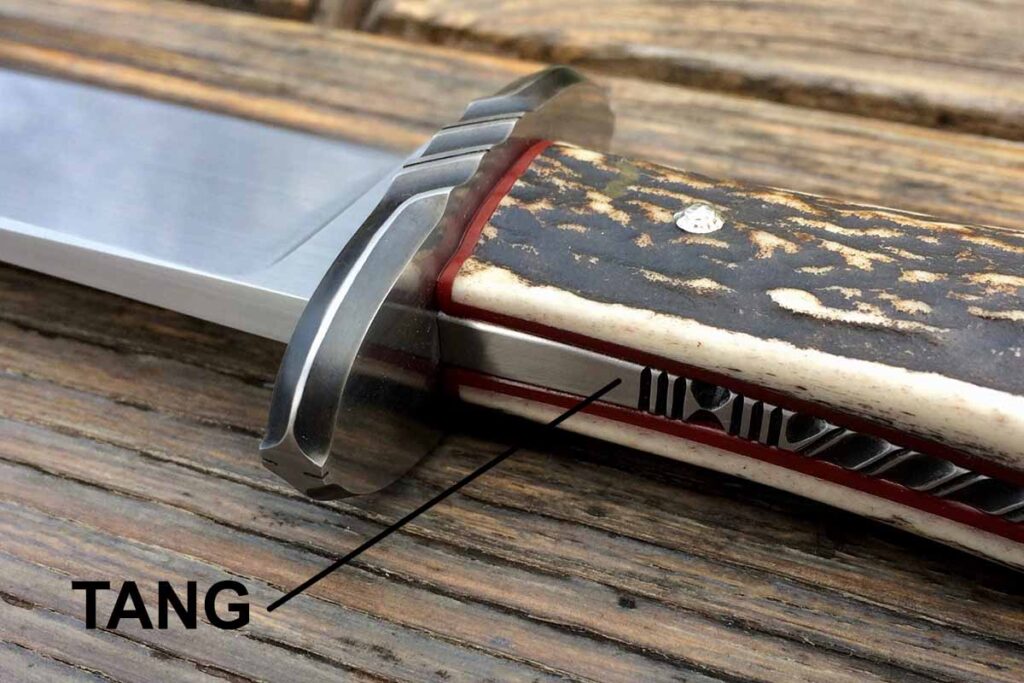
Tang
The tang of a knife or sword is the portion that extends into the handle. This can be the back of a folding knife blade that is drilled for a pivot, or the longer unsharpened rectangular section of a fixed-blade knife that the handle is attached to.
A “full tang” is when the tang extends all or most of the way through the handle, and adds a great deal of strength, making it the preferred style for hard-use or high-end fixed-blade knives.
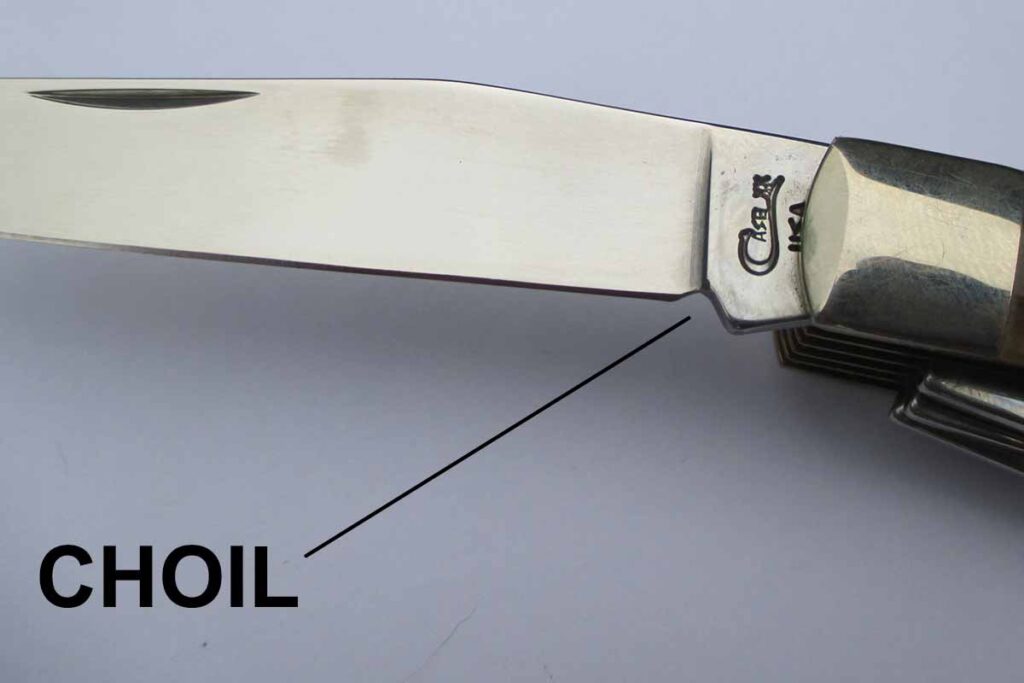
Choil
The choil of a knife is the space at the bottom of the edge, furthest from the tip and nearest the handle, and is left unsharpened and hollowed out. On some knives, it’s large enough to accommodate your index finger when using the knife in order to give you a bit more control.
However, the main purpose of the choil is so that the whole length of the edge can be sharpened without any issues.
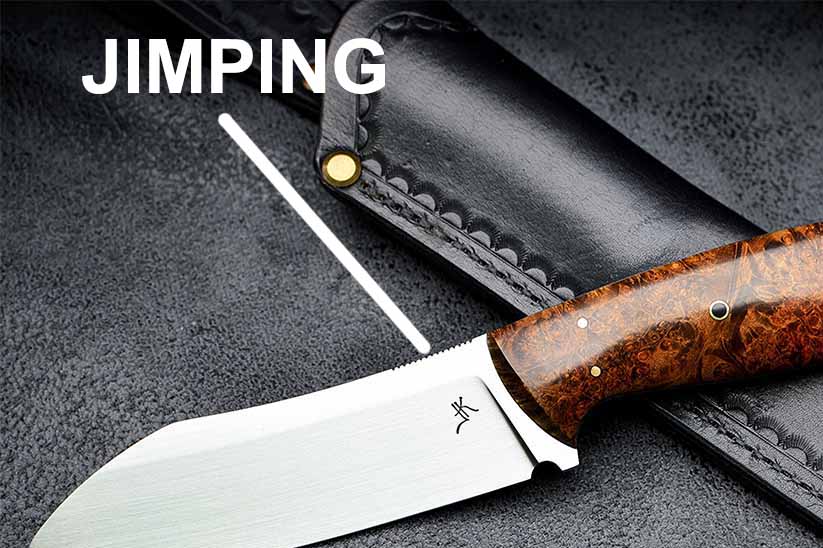
Jimping
Jimping is the name of the grooves or notches added to the spine of a knife in order to increase grip. The most common places you’ll see this are on pocketknives and hard-use fixed blades, on the spine right where the blade meets the handle.
By having a grippier, high-friction surface there, you can better manipulate the knife, especially with wet or dirty hands
Getting a Handle on the Rest
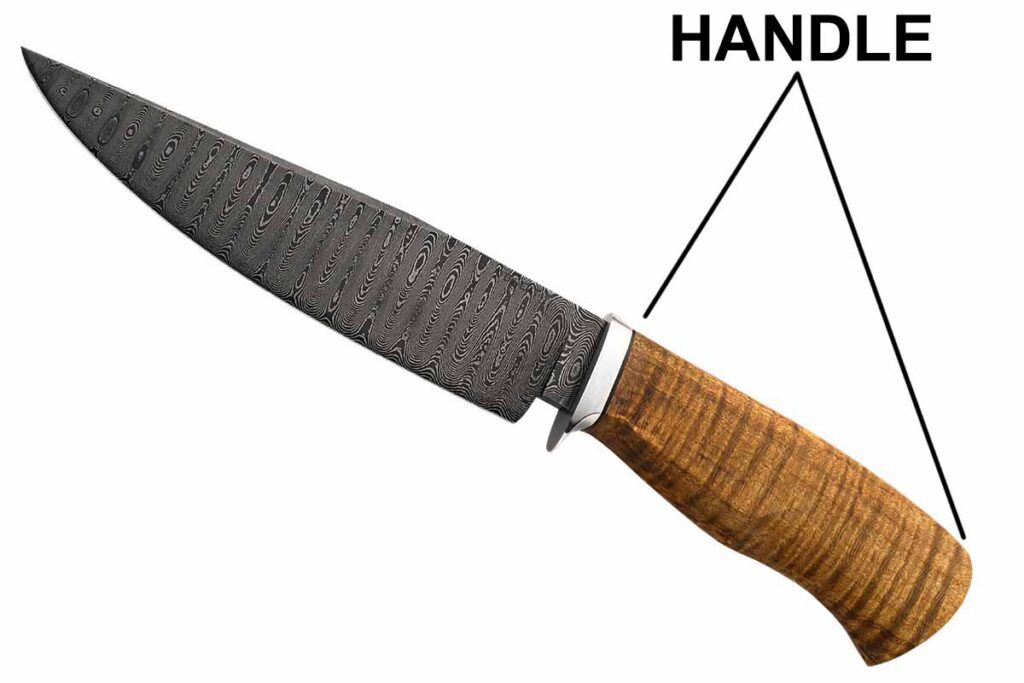
Handle
As you probably know, the handle of a knife is the part you hold. On a sword, or longer martial weapon, you will typically see the handle referred to as the hilt, but there’s not really much of a technical difference here.
It includes the guard, the grip, and the pommel if present.
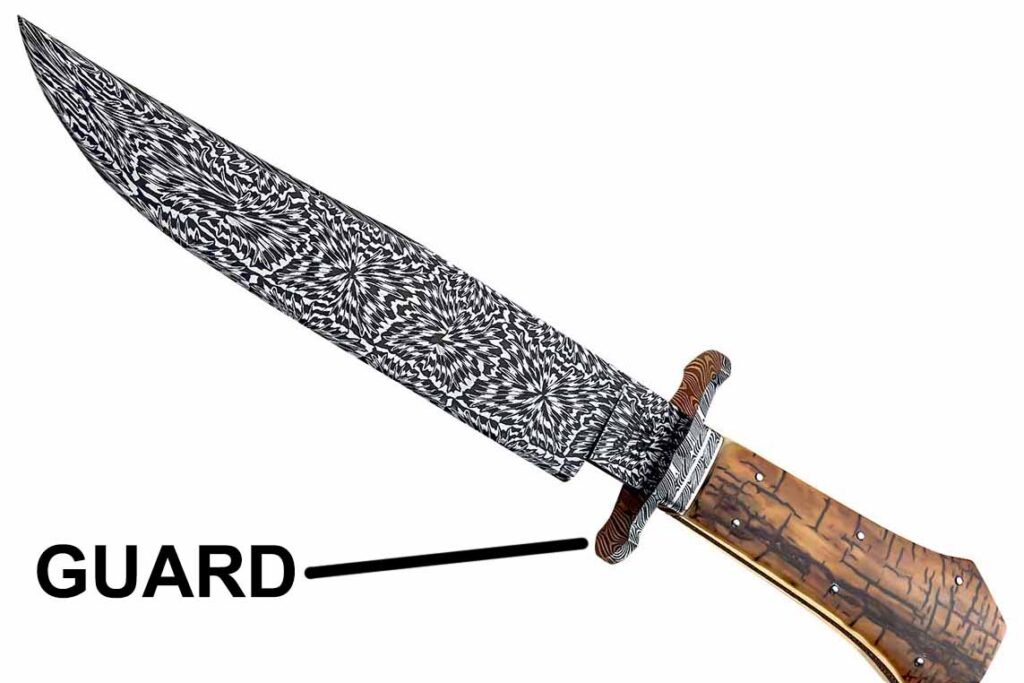
Guard
The guard of a knife is the bit that stops your hand from sliding forward and generally keeps you from hurting yourself with the knife. Many kitchen knives forgo a guard because you aren’t really supposed to stab them into things while fighting knives…well let’s just say swords had crossguards for a reason.
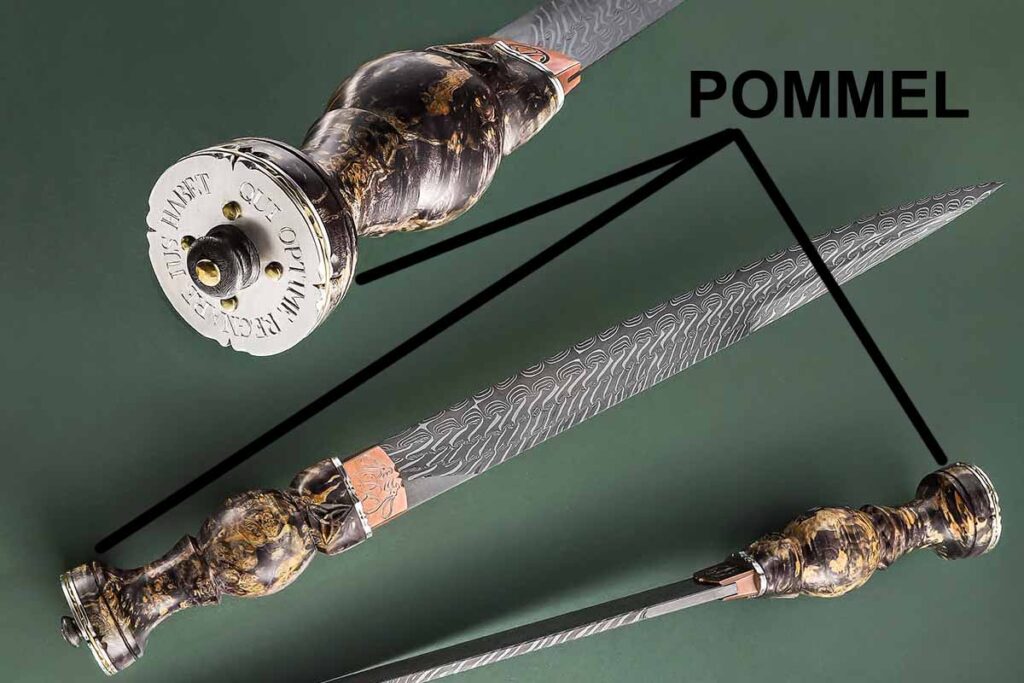
Pommel/Butt
Historically, the pommel of a knife refers to a weighted cap or round at the end of a handle that was meant to balance out the weight of a knife or sword blade. These days, few knives have one, but you may still see the bottom of a knife’s handle furthest from the tip be referred to as a pommel.
More commonly (and correctly) you’ll see this referred to as the butt of the knife.
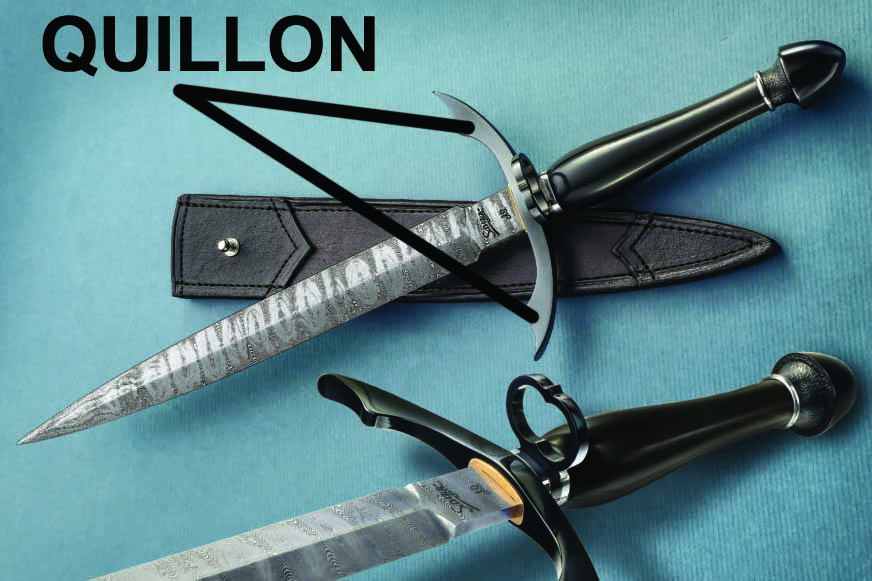
Quillon
On a sword or knife, the quillons are part of the guard that extends outwards at a right angle to the blade to keep the user’s hand from sliding up the blade when using it. These would often be very ornate on a more elaborate piece but would often be very simple.
Final Thoughts
And that does it for this one folks, thanks for stopping by. You should now know everything you need to know about the different (common) parts of knives.
There’s some other stuff out there that might come up if you start getting beyond Western-style knives or branching out from kitchen and pocketknives, but this is definitely 99 percent of what you’ll ever need to know when it comes to knife anatomy.
Also, the very distinctive nail-like guard that protrudes out on a messer is called a nagel and it is designed to stop parried enemy blades from sliding down and cutting your hand. In case you were wondering.
Just in time for Christmas, CRKT adds a pair of sleek and stylish options.
Little surprise, CRKT’s insatiable march of designs continued in November with a couple of wickedly lithe designs.
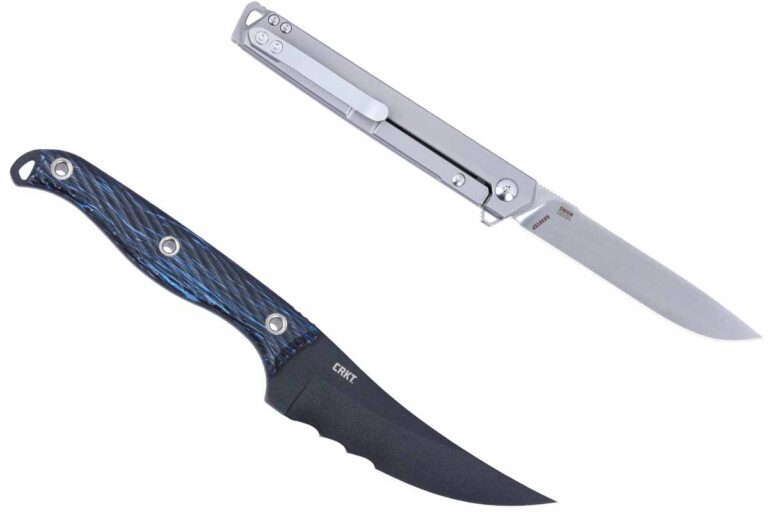
The Clever Girl Fixed and Stylus most certainly cut different profiles from each other and seem different as night and day. However, the new release certainly mimics each other in their sleek and slender designs, with their nimbleness apparent even out of hand. Additionally, both are in time for the impending Yuletide season, making them both perfect additions under the tree.
Let’s take a look at what each of these new CRKT drops brings to the table.
Clever Girl Fixed
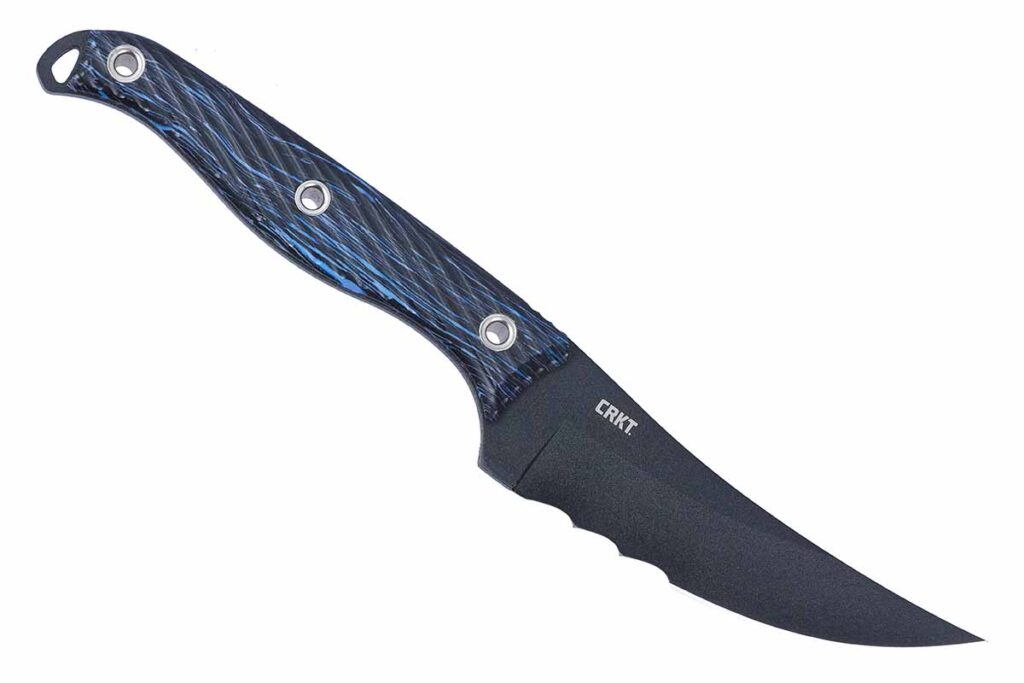
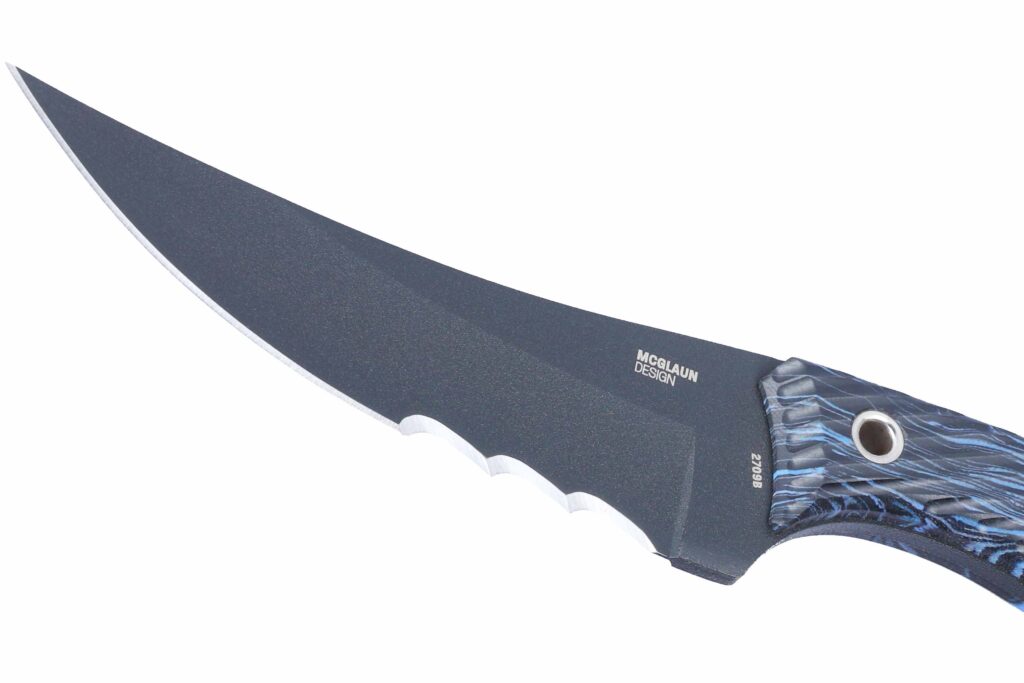
This knife somewhat returns to its roots, taking the Clever Girl back to the fixed-blade configuration. However, the Austin McGlaun design has some new twists that keep the Persian-style trailing point fresh. In particular, partial serration of the blade.
These are a series of three large, scalloped Veff serrations (CRKT proprietary and created by professional sharpener Tom Veff) running near the midpoint of the 4.6-inch blade. This enhances the knife’s sawing power, particularly against materials such as rope or fabric—think seatbelts. But let’s face it, it also takes a pretty menacing original design and makes it look a dash more ominous.
The other change on the Clever Girl Fixed is the handle, with CRKT bidding adieu to black G-10 scales and replacing them with marbled blew G-10. Not a huge switch-up, but one adding a touch of flair to the knife, particularly when offset by the black powder-coat finish on the blade.
As to the finer points of the knife, the blade is made from SK-5 steel, providing a good balance between toughness and ruggedness. It comes with a molded Kydex sheath for ease of carry. And it the Clever Girl Fixed watches her weight, tipping the scales at a very nimble 6.3 ounces. CRKT lists the knife at $114 on the company’s website and a portion of every sale—as with every knife in Columbia River’s Forged By War collection—is donated to the Green Bret Foundation.
CRKT Stylus
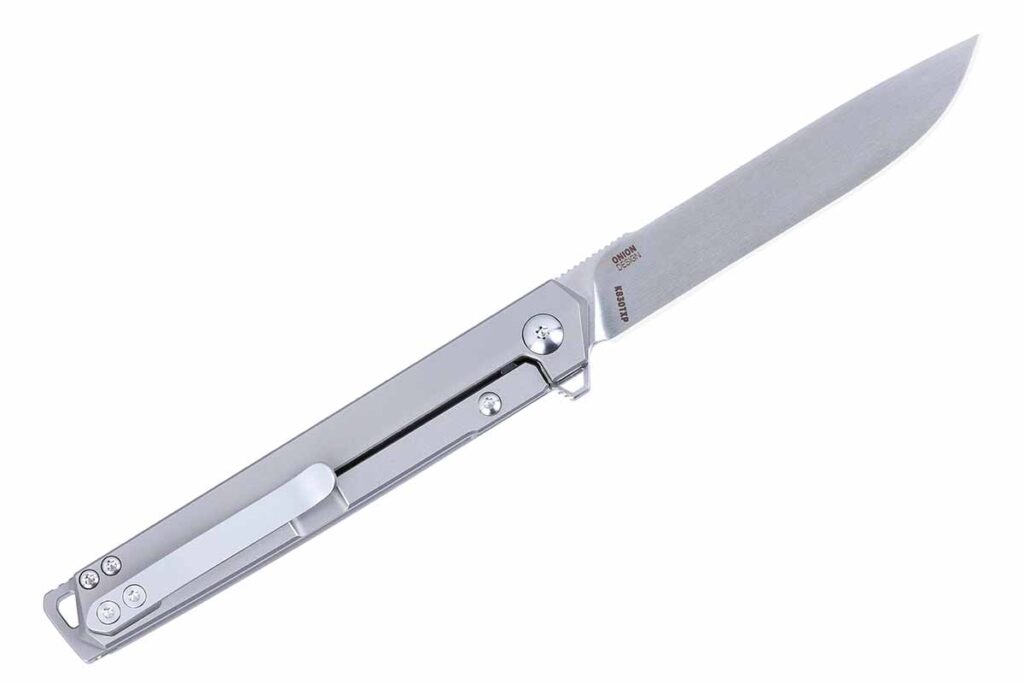
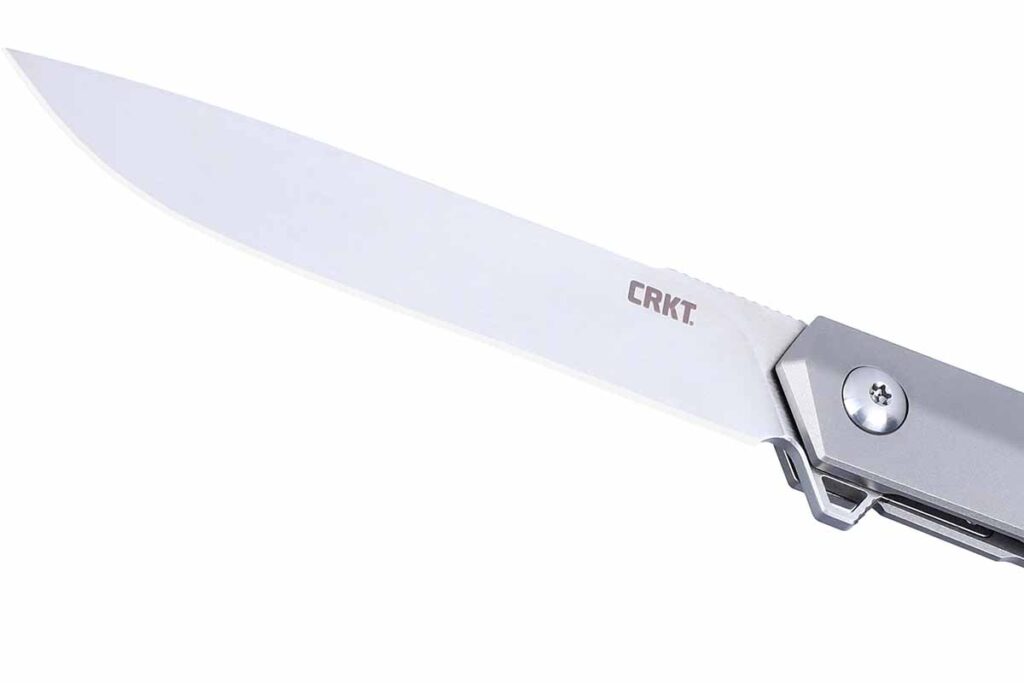
A Ken Onion classic CRKT brought to the masses a few years back, the Stylus has proven a popular addition to the company’s catalog. Unable to leave well enough alone—lucky for knife nuts—CRKT has released an updated version of the classy and svelte, assisted-open. In particular, the new version of the Stylus offers several upgraded materials, including a titanium handle and powerful CPM S35VN blade steel. The handle is especially nice, accentuating the crisp lines of the knife, making the already clean and sleek design seem even more so
The updated Stylus offers the points that have made the flipper a favorite of many, such as an IKBS ball bearing pivot for a silky blade deployment, a thick locking bar to secure the frame-lock’s blade and an extremely low profile. At present, CRKT lists the new Stylus listed at $195 on the company’s website.
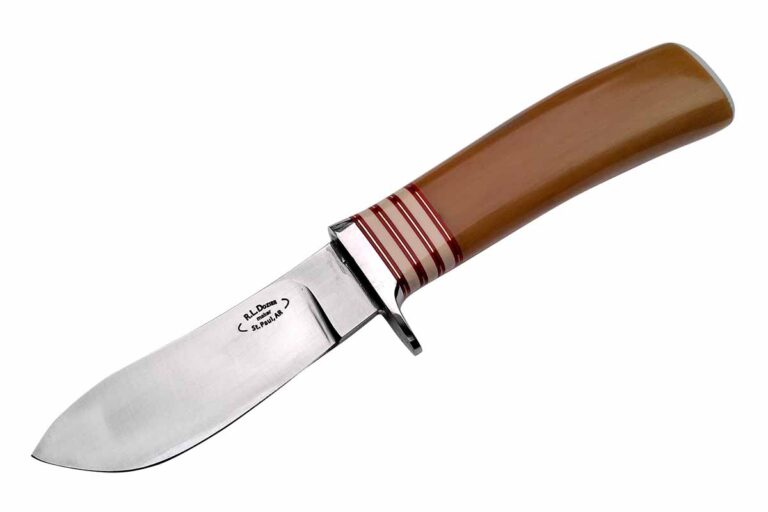
Once in a blue moon I get lucky. This time I get to cut with a knife by Bob Dozier, winner of the BLADE Magazine 2023 Industry Achievement Award and one of the legends of the custom knife industry.
I’ve known Bob since my first BLADE Show in 1992. He’s made his mark in the knife world time and time again, always willing to help a new knifemaker out with great advice. D2 is Bob’s favorite steel, so to test one of his knives made from a different steel type makes my day. I know of the extensive testing that Bob does on the steels he uses, so I was excited to see how well his humpback skinner in CTS 40CP performs.
Dozier Skinner Light Cutting Tests
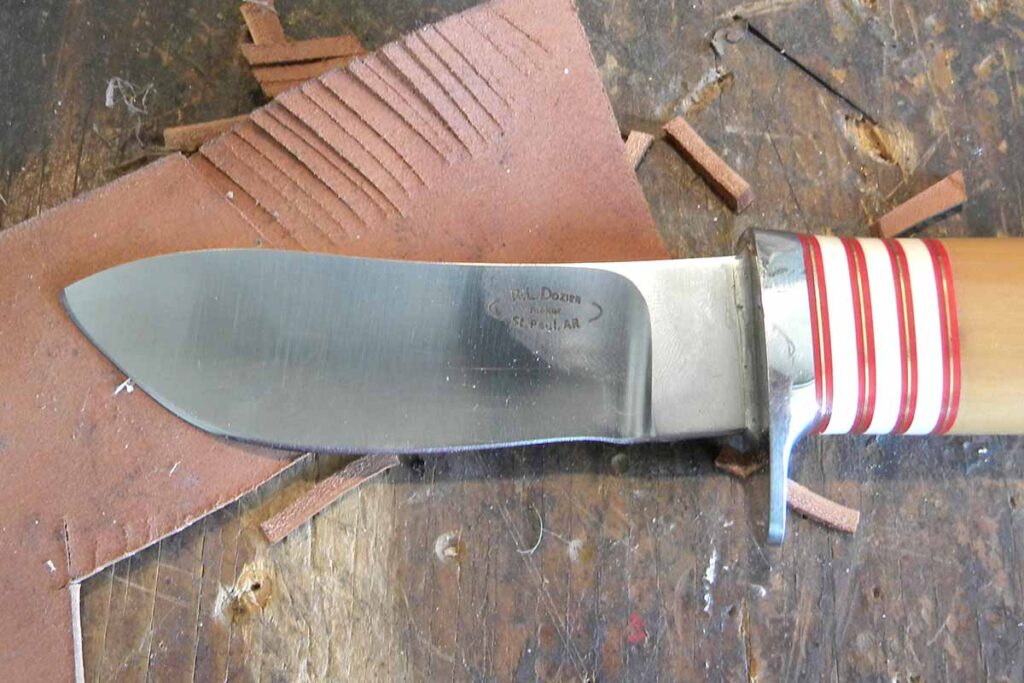
The knife zipped through the wide leather quite forcefully.
I checked the edge first with a slice of 20-pound bond paper. The “humpy” sailed through the slicing very fast with push cuts. The handle is extremely comfortable and makes controlling each slice easy. The knife is handle-heavy, so I felt no resistance on each slice.
On deck: double-walled cardboard. The CTS 40CP was very aggressive in cutting the material. You could hear the zipping sound on each cut. I really like the overall grip shape for cutting control; it provides good, positive handling.
To check the knife for what I call the “crunch effect,” leather skiving was next. The humpy was very aggressive slicing leather, crunching loudly on every cut. The high hollow grind made for easy thickness control on each slice. Just for kicks I grabbed some wider leather to cut. The knife zipped through the leather quite forcefully. I barely managed to keep my fingers out of the way of the sharp edge.
Dozier Skinner Heavy Cutting Tests
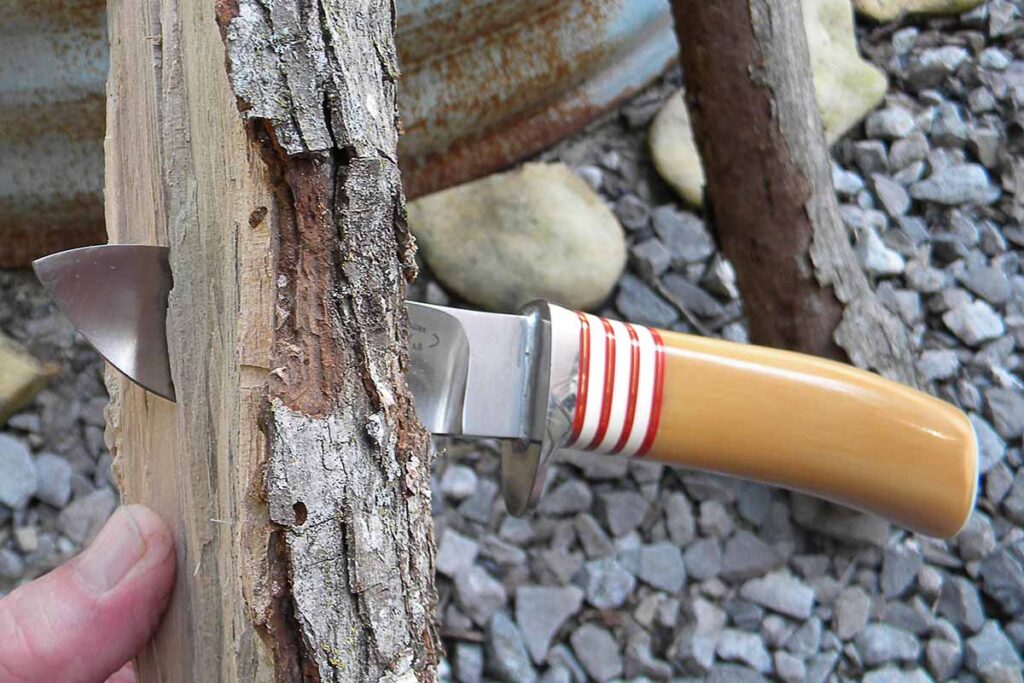
During the baton through firewood, the handle absorbed the shock and didn’t transfer it to the author’s hand. The humpback design provided a high spot to baton the blade. There was no damage to the handle or the edge.
It was time to whittle a firestick. The high hollow grind made controlling the depth of each cut simple. The blade produced good curlicues, both fine and thick. Again, the comfortable handle provided positive blade control.
I just had to smack the humpy through firewood. The handle absorbed the shock and didn’t transfer it to my hand. The humpback design worked out as it provided a high spot to baton as the blade bit into the wood. There was no damage to the handle or the edge.
It was time for my favorite all-around test medium: sisal rope. The humpy smoked through 200 crunching cuts before my hand started to tire. I experienced no hot spots from the handle. It was very comfortable. The blade just kept on crunching. Very nicely done, Dozier Knives!
Normally when I have a knife that cuts like a razor blade, the steel can be brittle along the fine edge. Thirty edge whacks on a whitetail deer horn would let me know if the heat treatment was on point. There was no damage whatsoever. I even returned to slicing 20-pound bond paper to see if the edge would hang up. Nope, nothing but smooth slices.
Overall Take On The Skinner
This is a very nice knife in form and function. It has an extremely comfortable handle design with a stainless blade that keeps on cutting. Excellent job, Dozier Knives. I might make the blade a tad thicker to even out the balance of the humpy.
Dozier Classic Nessmuk/ Dozier Knives Specs Blade Length: 37/8” Blade Steel: CTS 40CP stainless Blade Grind: Full hollow Blade Style: Modified humpback skinner Blade Thickness: .156” @ thickest Blade Finish: Satin Guard: Stainless steel Handle: Butterscotch Micarta® w/ivory Micarta®, brass, red and melamine spacers Overall Length: 8.5” Sheath: Custom-fit and molded-leather Snap-Lock belt/pouch model all handsewn by Bob Dozier; features custom-molded Kydex liner inside Maker’s Price: $725
These beauties look as good to the eye as they feel in the hand.
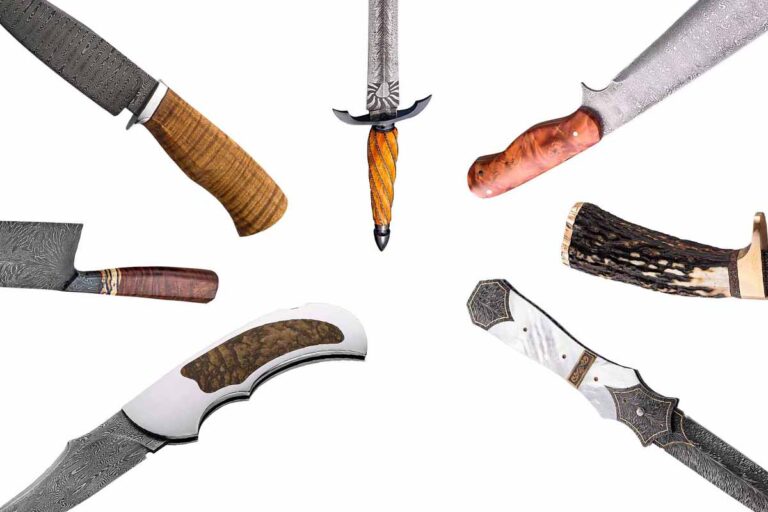
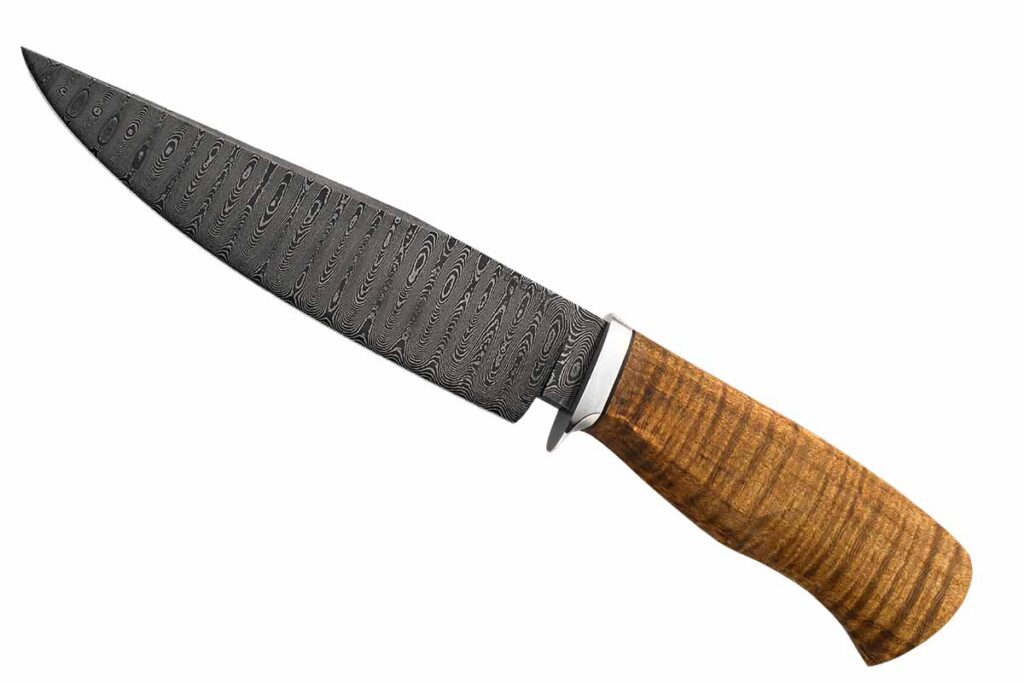
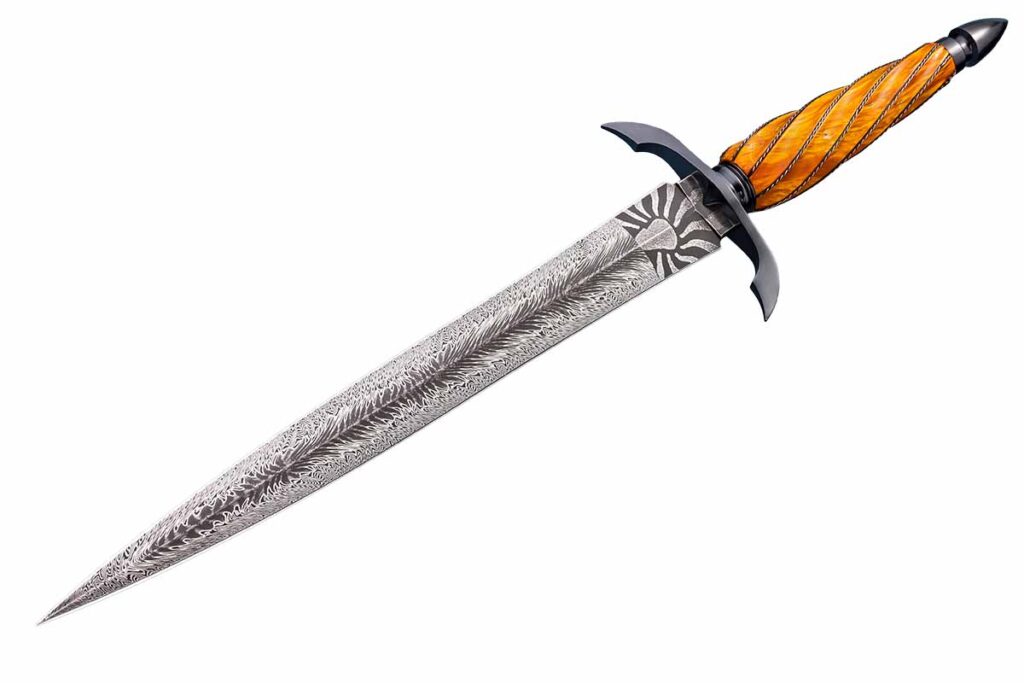
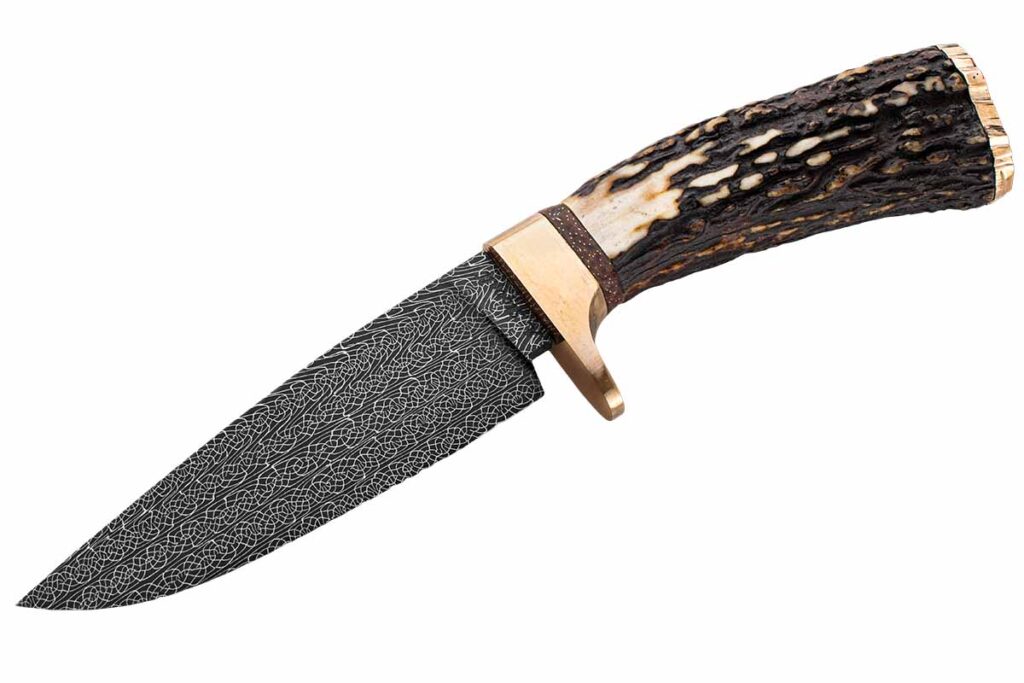
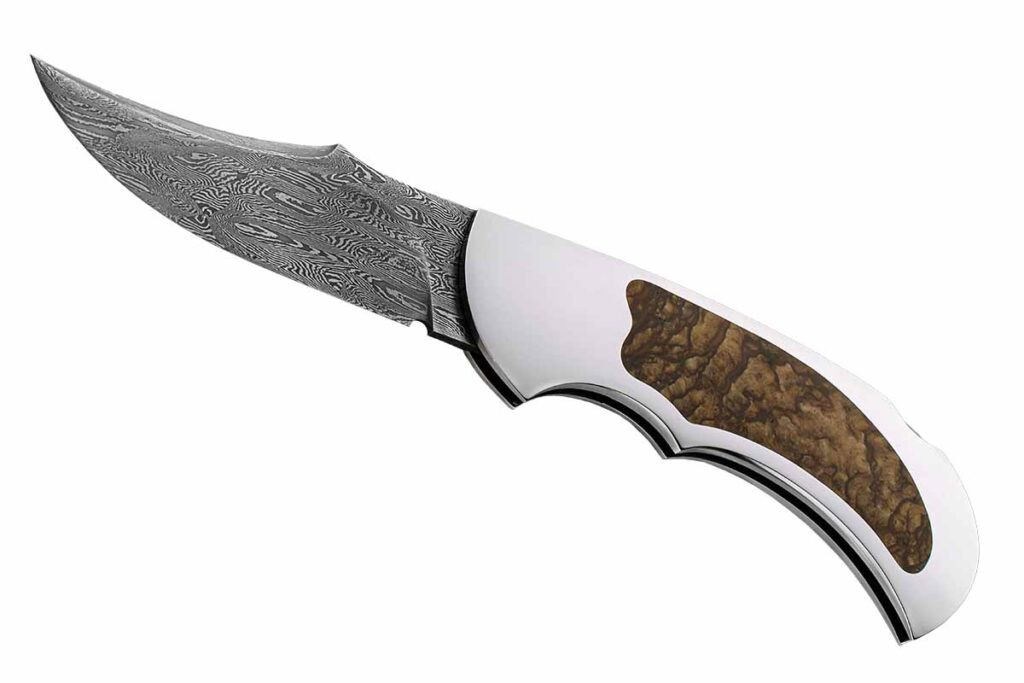
Synthetics have made great strides in knife handles and rightfully so. They can be tough, ergonomic and attractive. But there’s something about the innate beauty and warm feel of natural handle materials that synthetics, try as they will, probably will never duplicate—not that they won’t keep trying.
Michael Deibert: Curly Maple
A curly maple handle on the steering end of a 6-inch ladder-pattern damascus blade gives ABS journeyman smith Michael Deibert’s hunter a rich natural look. The guard is stainless steel. (Jocelyn Frasier image)
Denis Tyrell: Maple Burl
A maple burl handle fluted and wire wrapped and a 10-inch blade of spectacular Ocean Sunset damascus forged in a collaboration with Rick Hall top off Denis Tyrell’s dagger. Overall length: 16 inches. (SharpByCoop image)
Anthony Stovall: Sambar Stag
Anthony Stovall opts for a Sambar stag handle and a bronze guard and buttcap for his hunter in a blade of Robert Eggerling damascus. Overall length: 9 inches. (Jocelyn Frasier image)
Scott Gallagher: Biggs Jasper
ABS master smith Scott Gallagher goes what for him is a different route with the Escalante, a lockback folder in a mirror-polished frame of 416 stainless steel and inlay of Biggs jasper stone. Blade and closed lengths: 3 and 4.5 inches. (Jocelyn Frasier image)
Frank Edwards: Mother-Of-Pearl
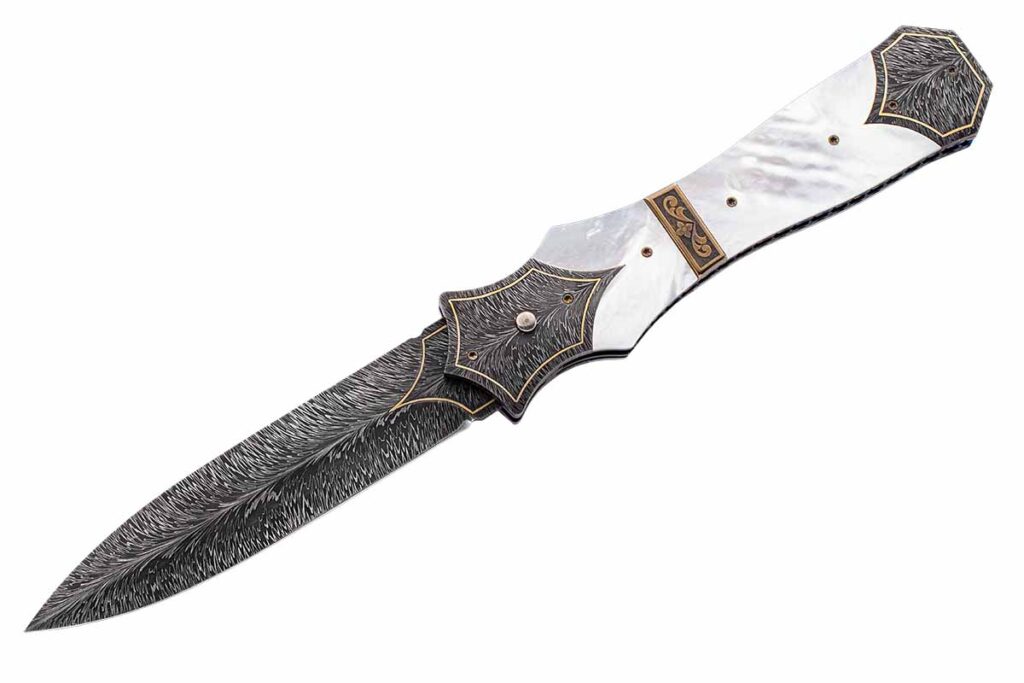
A handle of mother-of-pearl with 24k-gold borders and nitro-blued liners and a 4-inch blade of feather damascus highlight an automatic folding dagger by Frank Edwards. Closed length: 5 inches. (Jocelyn Frasier image)
Jim Perkins: Stabilized Maple
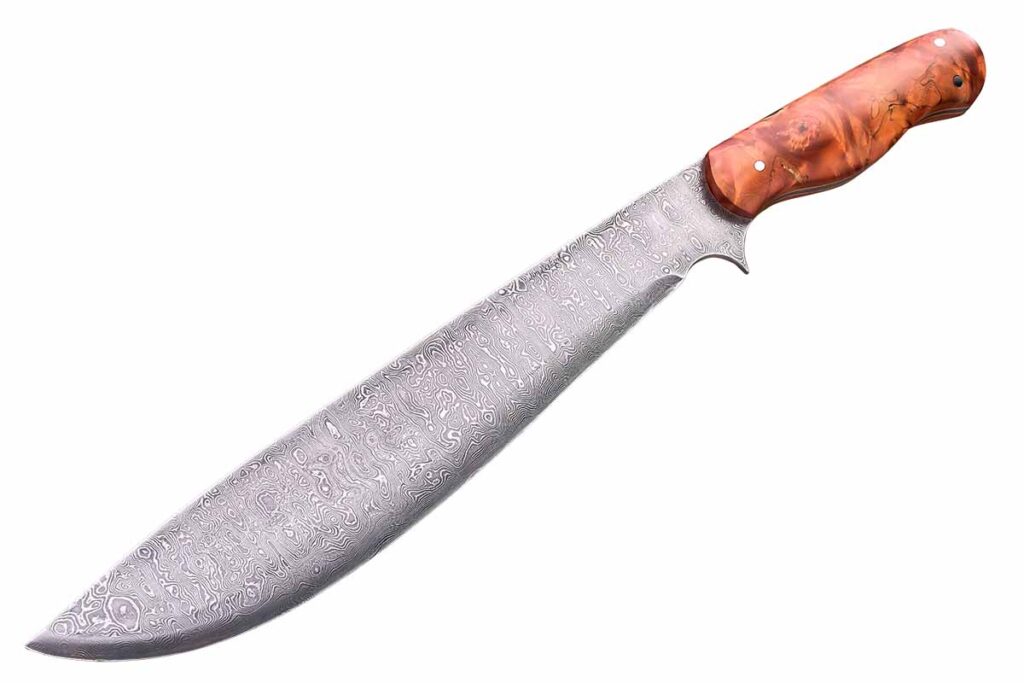
An orange stabilized maple handle and a 9-inch blade of a damascus of 272 layers of 1095 carbon and 15N20 nickel-alloy steels complete a Filipino barong by Jim Perkins based on one his wife used as a child. Overall length: 13.5 inches. Blade grind: convex. (SharpByCoop image)
Casey Vilensky: Koa Wood & Mammoth Tooth
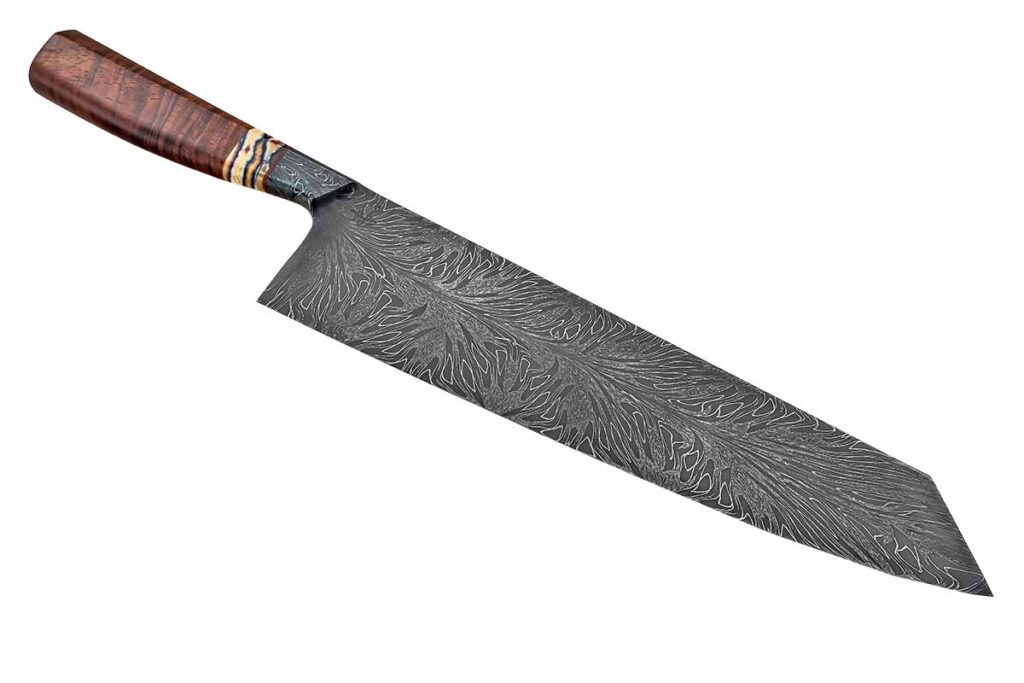
Koa wood and a mammoth tooth bolster complete the handle of Casey Vilensky’s gyuto. The 12.5-inch blade is carbon damascus. Casey’s list price for a similar knife: $4,000. (SharpByCoop image)
Is there a perfect EDC knife? If not, the Benchmade Bugout will do until perfect shows up.
When it comes to EDC folders, without a doubt the Benchmade Bugout is the king of the hill.
Its compact profile and just-right length make this model a popular hit with knife guys. It is all made in the USA with excellent fit, finish, and—perhaps key to EDC—Benchmade has cut its weight to the bone. Furthermore, the blade steel is premium level. In short, the Bugout is geared to go the distance.
So, if you haven’t yet checked out this icon, it’s high time you did. Because, if you take your everyday carry seriously, you owe it to yourself. We’ll lay a foundation for the knife in this article.
Bugout Blade
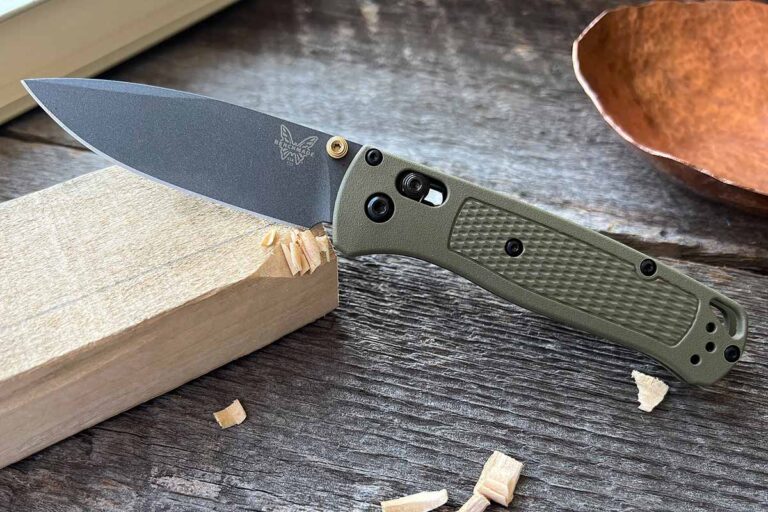
The Bugout is offered in two sizes—the Model 535, the company’s standard-sized version boasting a 3.2-inch blade, and 533 Mini, which pars the blade down to a very manageable 2.8 inches.
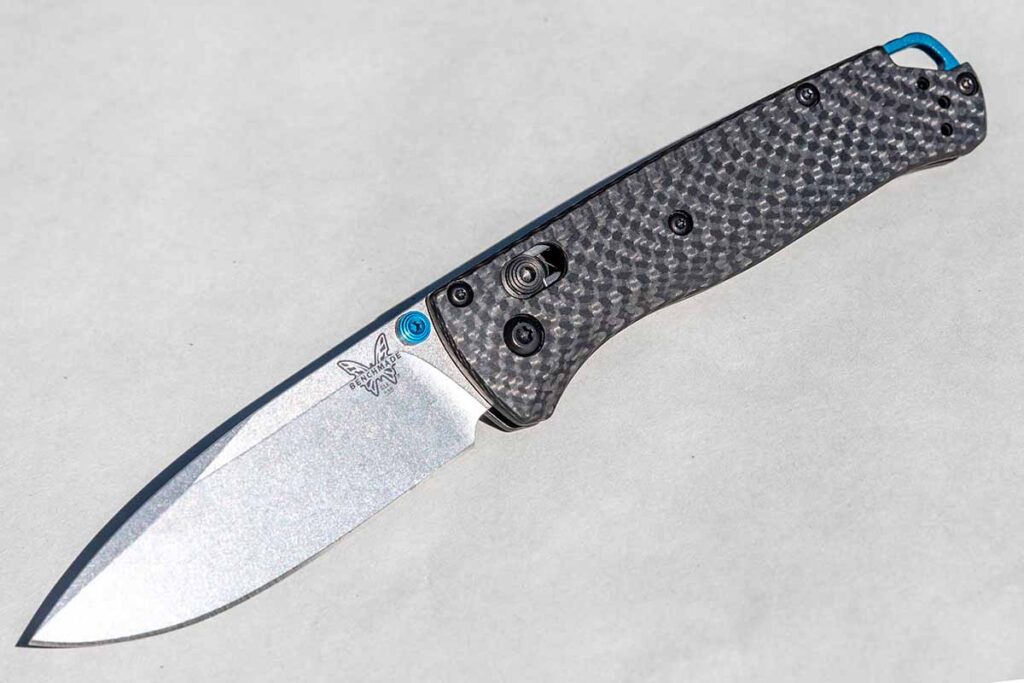
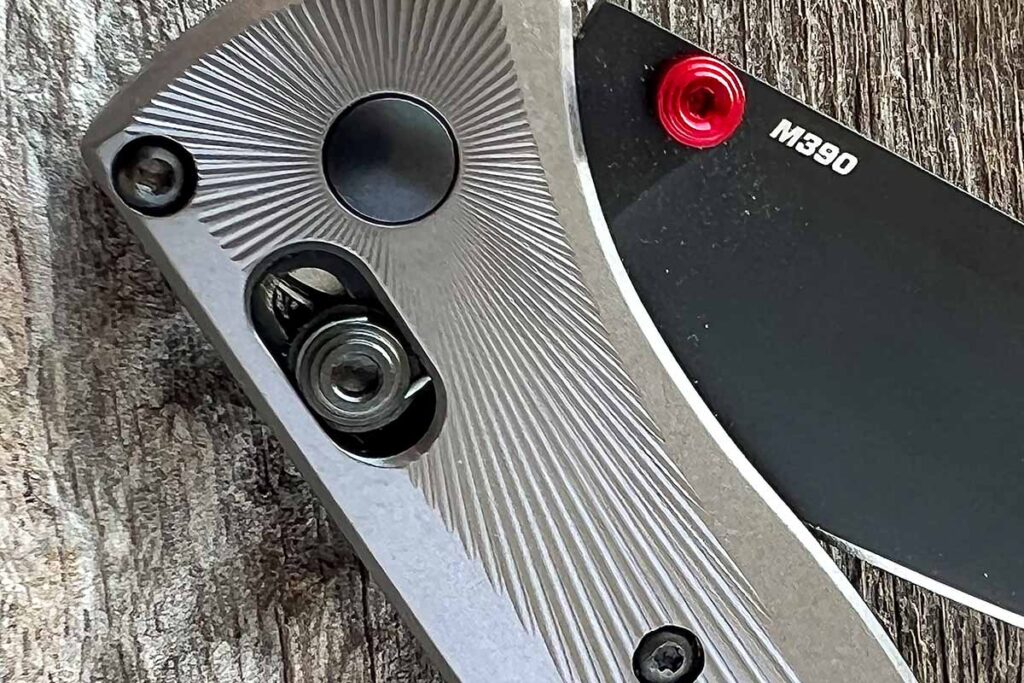
Standard-model Bugouts sport CPM S30V steel blades, however, S90V and M390 are available on higher-grade models. Photo: Marty Stanfield
The base models Bugouts use premium CPM S30V steel, a steel that is used widely for high-end factory knives. This is mainly due to its ability to hold an edge for an extended period, longer than most blade steels. Additionally, it is highly resistant to stains and corrosion.
As for the blade profile, the Bugout is a modified drop point and is highly adaptable to many tasks. Nicely, Benchmade outfits the knives with thumbstuds on either side of the blade, permitting ease of opening with either hand.
Getting A Handle On The Bugout
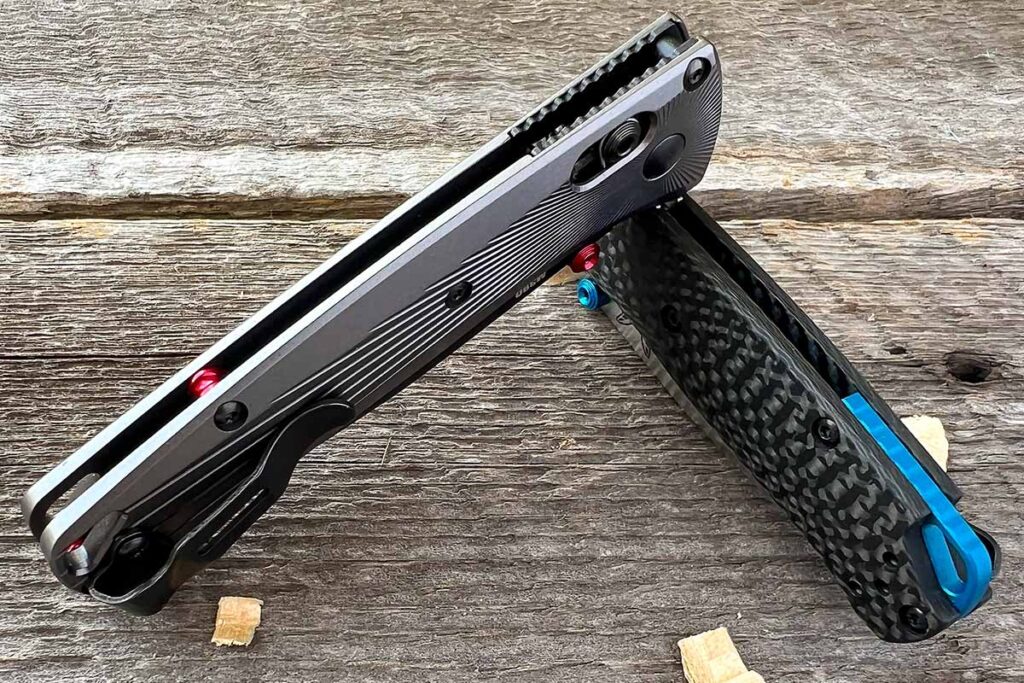
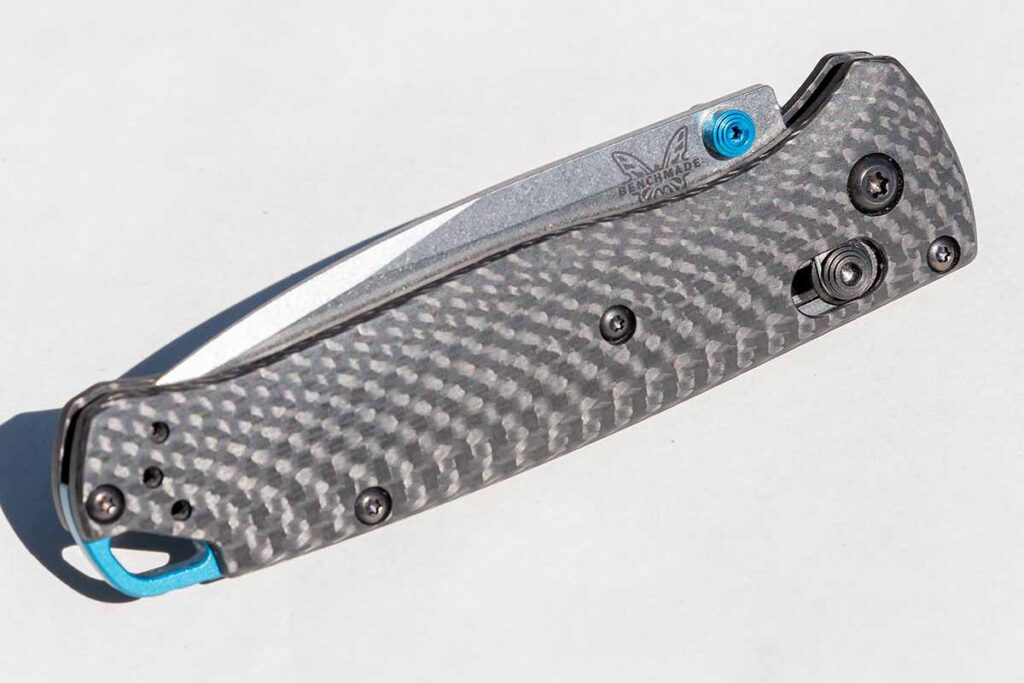
The handle of the base Bugout is made from molded Grivory, making the Bugout a very lightweight folder. The standard size tips the scales at 1.85 ounces and the Mini at 1.5 ounces. Benchmade offers other handle material options, including anodized aluminum, carbon fiber, and CF Elite (a glass-reinforced nylon synthetic material that is lightweight and stiff).
Given there is a thriving aftermarket for Bugout scales, the sky is the limit on the knife’s handle. Photo: Marty Stanfield
And if you have to have custom, there are aftermarket scales for the knife in a host of materials—titanium, copper, brass, bronze, G-10, and Micarta. In turn, you can truly have a one-of-a-kind feel and look to your Bugout.
Bugout Action
The Bugout uses Benchmade’s critically acclaimed Axis Lock crossbar lock, hailed by many as ultra-strong yet extremely safe because you don’t put any fingers in the path of blade travel. Add on to this, it’s easy to unlock with either hand, and you have a naturally ambidextrous across the board. The lock is simple, just pull back on one of the exposed lock bar ends at the back of the handle and then rotate your blade closed. Internally, two Omega-shaped springs provide constant tension for the lock bar on the blade tang to ensure positive lock engagement.
The Bugout is outfitted with Benchmade’s rock-solid Axis Lock crossbar lock, which has the added benefit of being ambidextrous. Photo: Marty Stanfield
As for other odds and ends, the handle’s checkering does a great job of preventing your hand from slipping. A deep carry, fold-over pocket clip carries the Bugout deep in your pocket and can also be switched to provide easy carry for left-handers. Integrated lanyard hole permits the use of Paracord for a lanyard if you are into that sort of thing.
Using The Bugout
In use, the Bugout hits hard in spite of its ultra-lightweight stature. The flat ground blade bites in and is very effective. Opening mail, opening packages, peeling an apple, cutting up hose, cutting cardboard, or stripping wire—the Bugout won’t break a sweat. Perhaps the best way of thinking about the knife is as a minimalist working folder.
The higher grades of the Bugout have carbon fiber handles and milled aluminum handles, paired with S90V and M390 blades respectively. These upgraded blade steels offer high-performance cutting with excellent edge holding. The higher-grade handle materials give a bit more heft to the Bugout as well as an enhanced, high-tech appearance. It only makes sense to have upgraded blade steel with upgraded handle material.
Overall, the knife is lightweight, rugged and more than capable of tackling most task. In short, it’s dang near the perfect EDC option. Photo: Marty Stanfield
Even with the base model’s S30V, you still pack plenty of muscle for those long-cutting jobs. I like how thin the Bugout’s blade stock is combined with the flat ground blade bevel giving it plenty of bite to it.
Some knife folks favor not a high performance without the bulk. I get it, it all makes for a comfortable everyday carry folder. For those of you who favor these kinds of knives, the Benchmade Bugout is for you. You have a high-end blade steel with a proven and popular blade lock, with a no-frills handle design.
MSRP for the full-size Bugout starts at $180 and varies up from there depending on handle material and blade steel. There is also a Mini Bugout which scales the size down some to an even more pocket-friendly size.
Go here for more information on the Benchmade Bugout.
Learn what the latest BLADE Show custom knife award is all about.
Some people are familiar with “Mack Daddy,” the 1992 Sir Mix-a-lot album with the smash hit “Baby Got Back.” On the other end of the cultural spectrum is the Mack truck, the reliable American long-haul vehicle revered by truckers and country songs. Knife enthusiasts may also be familiar with the Bobby Darin’s classic Mack the Knife: “O the shark, babe, has such teeth, dear …” Just now coming into the knife culture is the idea of a “M.A.C.K” knife, which stands for “machine assisted custom knife.”
Custom, Production And M.A.CKnives
Savvy BLADE® readers know the difference between a “custom” and a “production” knife. A custom knife is made by a craftsman using a combination of skill, experience and tools. The maker grinds the blade, polishes it, installs a handle and fittings, and so forth. Custom knives are often made one at a time or in small batches. Sometimes portions of the process are outsourced, such as waterjetting blade profiles or using a professional heat treater. In general, the maker’s name is prominently featured on the blade, such as Tom Overeynder, Gary Langley, etc. The price of custom knives can be quite high, particularly as the complexity of the knife and the magnitude of the maker’s reputation increases.
By contrast, a production knife is made in bulk using modern or traditional manufacturing techniques. Blades are made by the hundreds or thousands, ground and polished by machines, and assembled in a factory or large production shop. In general, the name of the company is prominently featured, like Case, Benchmade, White River Knife & Tool, etc. Sometimes a production knife will feature the name of the designer, such as the various CRKT production knives that have BLADE Magazine Cutlery Hall-Of-Fame® member Ken Onion’s name. Production knives may be expensive but are generally more affordable than custom knives of similar materials and construction.
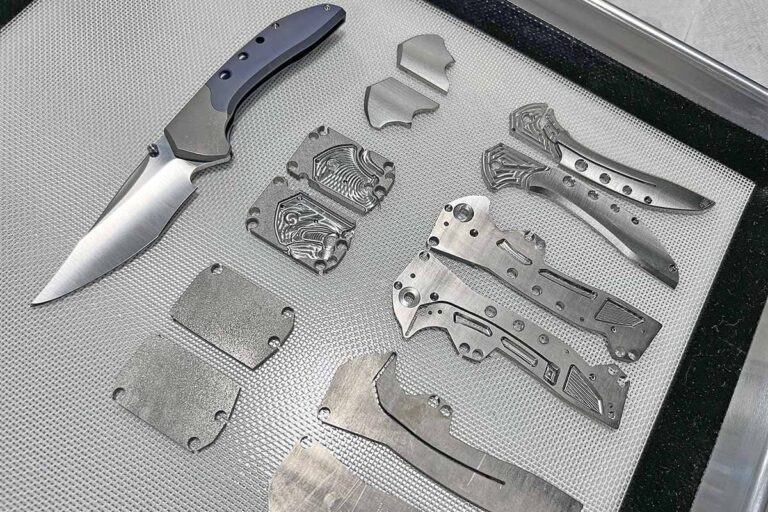
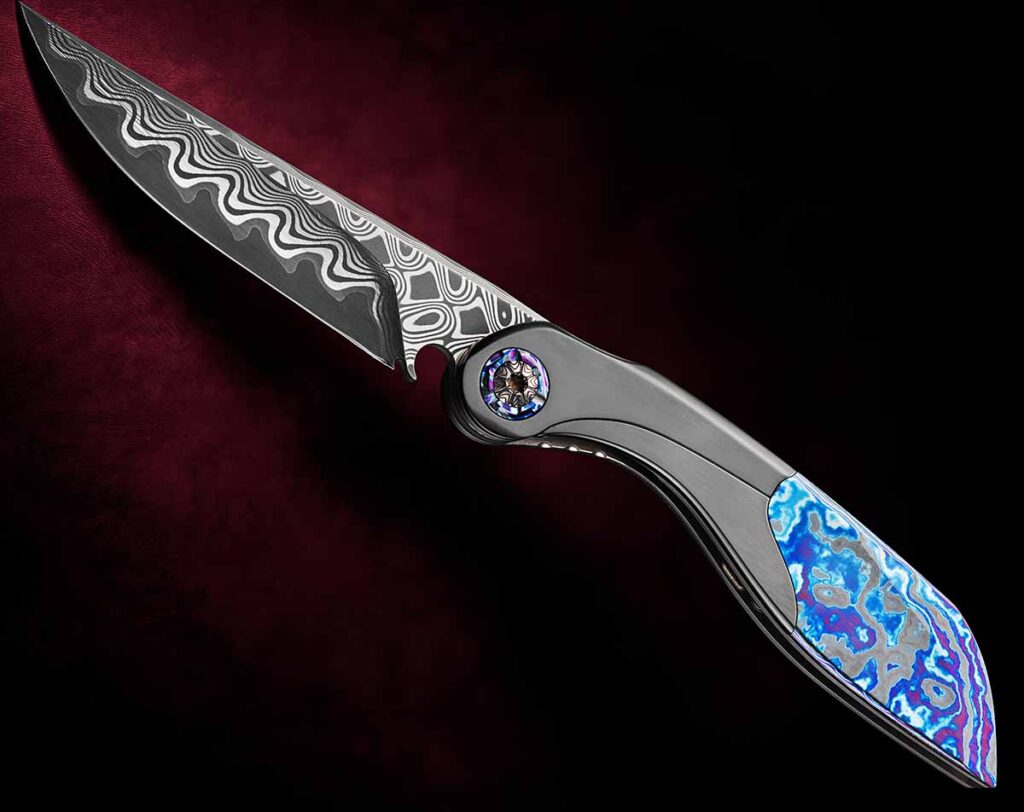
Princeton Wong has a five-axis waterjet in his machine shop, so he makes everything but the screws. An example of his work is this award-winning knife from the 2021 International Custom Cutlery Exposition, now known as BLADE Show Texas. (Caleb Royer image)
In between custom and production is a vast world described by the umbrella term mid-tech. It describes knives that use both production and custom techniques or methods in varying proportions. Some would say that any knife that has production techniques like waterjet is a mid-tech, while others would argue that as long as a person does the final assembly and fit up, a knife can be called a custom.
It takes talent, practice, education and skill to make a knife by hand. Many makers of such knives have no problem with using machines like a band saw, 2×72 belt grinder, manual mill or pantograph. At some level, almost every modern handmade, aka custom, knife is “machine assisted.” At the same time, the industry recognizes that when it’s primarily the maker’s dexterity and artistic vision that makes the knife, the label of custom or even “handmade” applies.
It also takes talent, practice, education and skill to program a series of CNC (Computer Numerically Controlled) waterjets, grinders and mills to make a knife by machine. Custom guys often make “polished turds” and “boat anchors” at the beginning. Beginner machine guys break tooling and crash expensive machines. In neither case does a person wake up one Tuesday and immediately become a competent knifemaker.
Think about the amount of variability in custom/handmade knifemaking. Each steel, each belt, each grinder speed, each brand of sandpaper, and every variable changes the process. If you heat treat your own steel, you must master temperature control, soak time, quench speed, decarb, warpage and tempering, and must use a different formula for each steel. After dealing with all that, is making a knife by machine any easier?
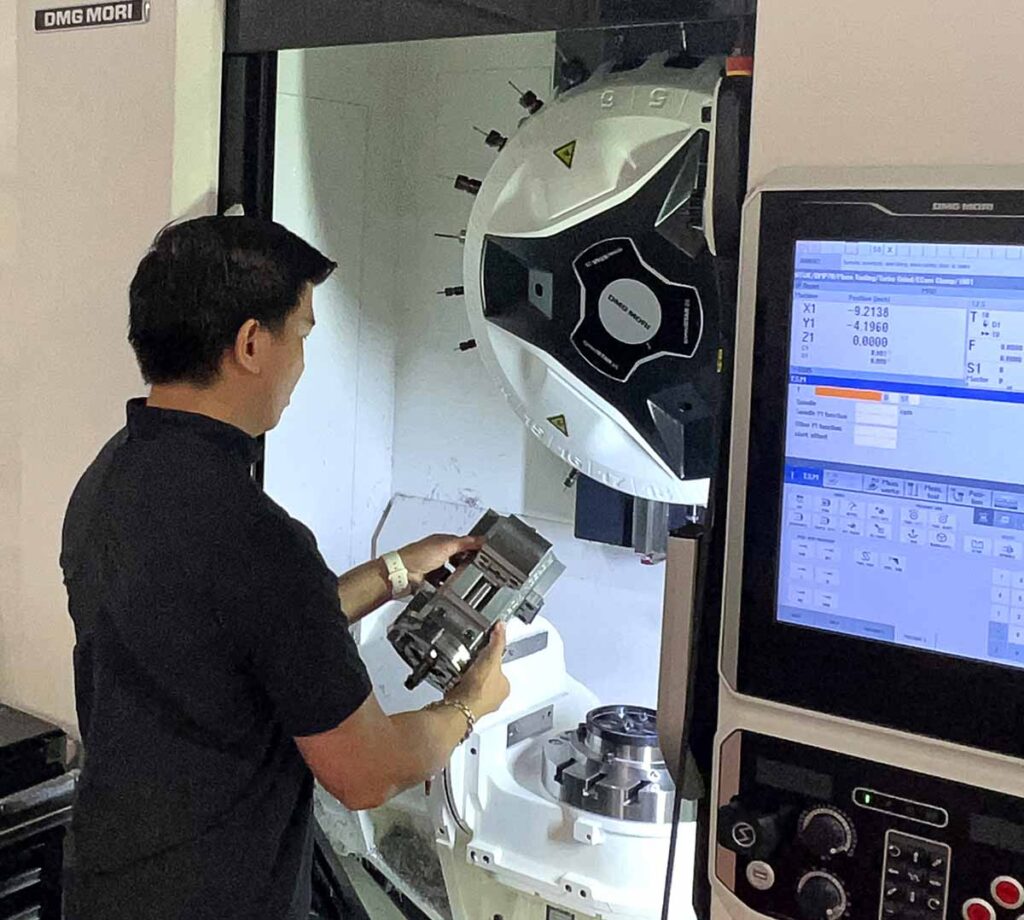
Princeton Wong operates the CNC mill. It can cut complex 3D shapes in metal and handle material.
Not according to M.A.C.K. knifemaker Princeton Wong. In CNC you deal with the geometry and composition of various cutting tools, plus the speeds and feeds at which you apply them. You must figure out fixturing to hold your workpiece, and how to work the tool in a way that leaves the desired surface finish. “It’s the same idea as using different belts or different files for each task,” Princeton explains, “but the variables are infinitely more complex. And then on top of that, you still have to learn and master all of the different hand-finishing techniques.”
So how does the knife industry show respect to the skills and talent of the makers who artfully combine programming with handwork? How do you showcase the ability of a maker who can run both a HAAS CNC mill and a belt grinder?
Defining M.A.C.K. Knives
BLADE Show 2023 included for the first time an award category for M.A.C.K. knives. According to the category rules:
The knife must be of the folding/locking, non-slip-joint, EDC variety that is first and foremost a cutting tool. It must be functional, beautiful and have great ergonomics, yet still have practical applications and uses. It must consist of both at least one handmade feature—such as hand-ground blades, hand-contoured scales, manually machined parts, etc.—and of automated features such as waterjet-cut liners/scales, CNC’d handles, etc. The judges will assume that the knife’s parts that are not handmade are made through a machine-aided process.
What background education and experience does it take to make a quality M.A.C.K. knife? Just like with any other skill set, the path is quite diverse. Take Princeton for example. Knifemaking for him growing up was a passion.
“As an Asian kid into martial arts, I’ve always had a love for bladed implements,” he notes.
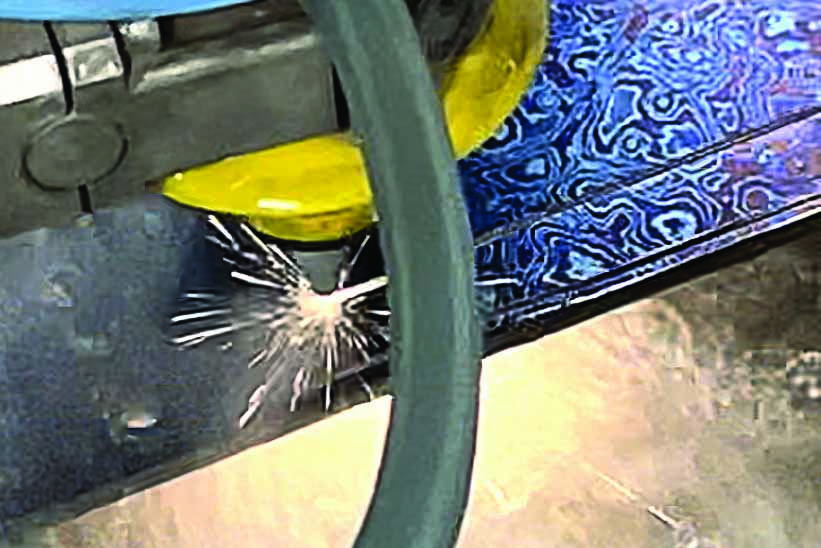
A waterjet machine uses a high-pressure stream of water and abrasives to cut profiles in flat stock. Princeton Wong uses his waterjet here to cut Timascus™ for folder handles.
He bought a Sherline mill after high school that had been converted to CNC, and learned by trial and error from there.
“After years of fiddling with stuff, breaking endmills and crappy software, I finally started figuring it out,” he observes. But for Princeton, learning wasn’t all trial and error. He studied mechanical engineering and graphic design in college. He had jobs in print, web, graphics and fabrication. Eventually, he started his own machine shop serving automotive and architectural clients. In 2018 he decided to use his machining skills to make knives.
“I didn’t know the knife industry or knife people but had a machine shop, so I gave it a shot,” he recalls. “I didn’t own a ‘real’ belt grinder until I was two years into making knives. I had a 4×36 from Lowe’s but was able to do very close work on the CNCs. By focusing on an intentionally machined look, I was able to get by.”
Princeton has a five-axis waterjet in his machine shop, so he makes “everything but the screws.” Earlier in his progress, he would bandsaw blanks and then fixture them in his CNC mill.
“I never had a need to outsource, but most people don’t have 70 amps of 480-volt three-phase electricity to run a $100,000 waterjet,” he says.
A waterjet cuts steel and other plates into shapes, “but it doesn’t make knives.” It’s a highly efficient profile-cutting tool.
Bridging The Gap Between Custom And Production
Most people don’t take Wong’s path and start out as fully equipped and capable machinists when they begin making knives.
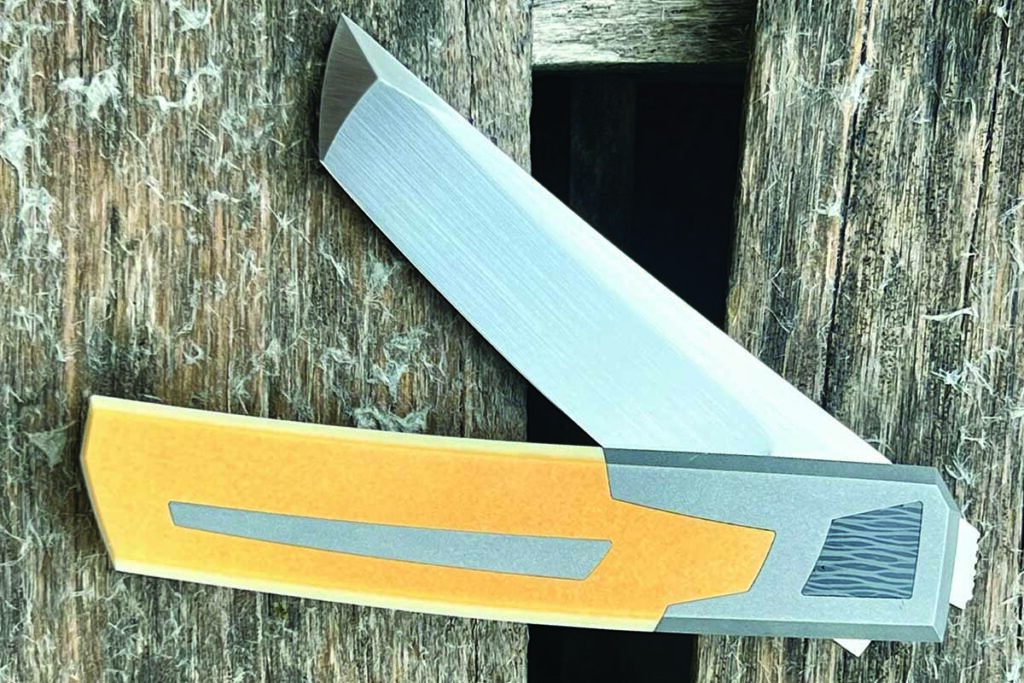
Consider the precise fitting and complex geometry of the joints on Jared Oeser’s “Tachi” folder. Integral bolsters and Westinghouse Micarta® come together quite well.
M.A.C.K. knifemaker Jared Oeser started like many makers, with a mentor, a few tools and a new hobby. As a homebuilder, his business took a hit in the 2011 recession. Faced with spare time, he took up knifemaking. After a few fixed blades he moved fairly quickly into slip joints, merging modern materials into traditional designs at a time when that was a new thing. He continues to push the limits and bridge the gap between traditional designs and the “modern” folding knives.
About five years ago a friend needed a place to store a CNC mill. Oeser agreed to store it in exchange for lessons and use of the machine in the meantime. By the time the friend needed the machine back Oeser was hooked and bought his machine shortly thereafter.
After five years, he considers himself not good enough to make a knife completely on the machine. Coding for CNC is quite a different skill set, far beyond traditional knifemaking.
“I don’t want to go 100 percent machine,” Jared says. “I like the hand work, and I’ve gone about as far as I want toward machine-made. Everybody kind of finds their ‘spot,’ but the key is to disclose it, to say it. Don’t say ‘mine’s handmade’ if you’re afraid to say how you did it. At the end of the day, you’ve got to be good at hand work and have a skill set to make a quality knife.”
Handmade Vs Machine Assisted Knives
So what’s the difference between a “custom/handmade” and a “machine assisted” knife?
Wong suggested that a machine assisted knife should have a bit more precision than the typical custom knife. Because you can machine to exact tolerances and fit, there’s less room for error. He also suggested that the maker should try to push the boundaries of the machine’s capabilities. Just like there are a few knifemaking operations that can only be done by hand, such as Wolfgang Loerchner’s amazing hand-filed creations, there are also machinable features that people wouldn’t realistically try by hand. Creativity isn’t limited to hand tools.
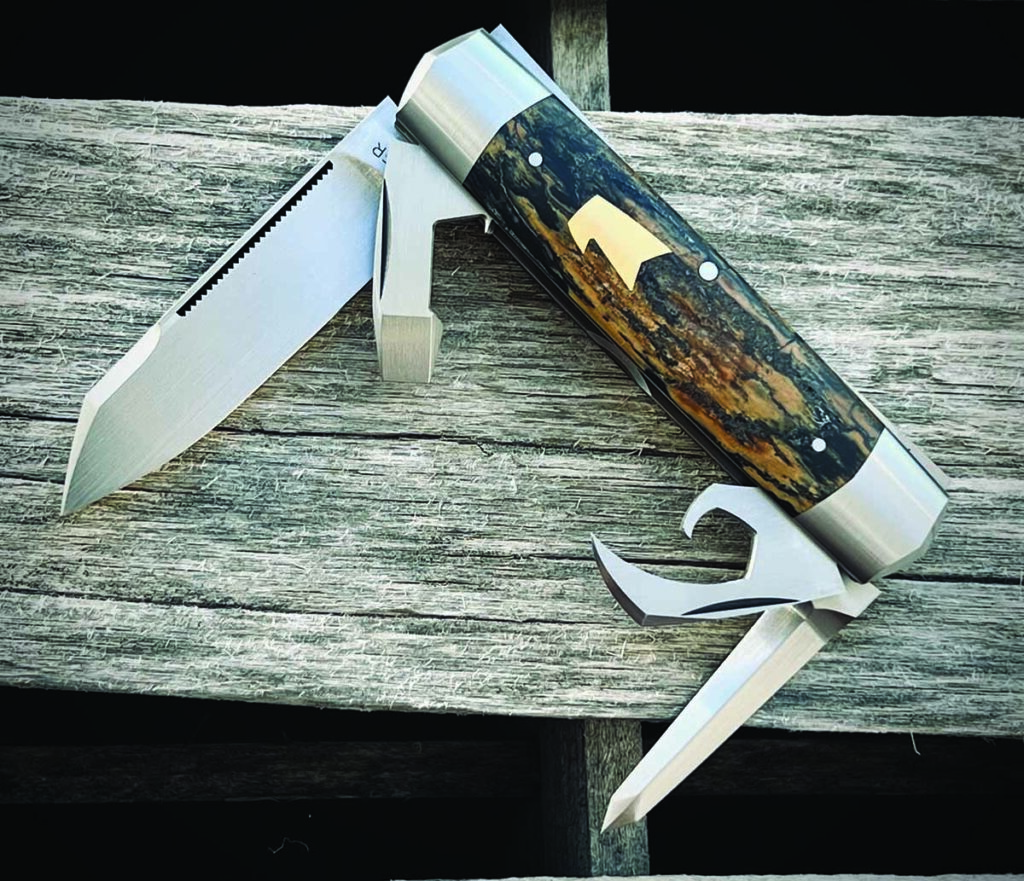
Jared Oeser’s “Eagle” is a four-blade slip joint. This one has mammoth ivory handles and a 14k-gold shield, combining modern techniques with traditional materials.
According to Oeser, “Among the makers and collectors I know, we’re OK with whatever a knife is, as long as you honestly disclose how you built the knife.”
He considers his knives machine assisted. On a slip joint, he uses a HAAS CNC mill to cut out the shapes of the liners, the shield inlay pocket, and to profile the blade and spring. Even though he uses a CNC mill that is squarely in the “machine assisted” category, using it primarily to cut profiles is pretty much the same thing as a waterjet.
Taking The Plunge Into M.A.C.K.
As a mostly one-off knifemaker myself, I was curious what it takes to build a knife that falls squarely into the M.A.C.K. category.
After talking with some M.A.C.K. makers, I found the process seems to typically begin with waterjet cutting. Either the maker has used a waterjet before and has his or her own CAD (Computer Aided Design) files, or the contracted machine shop will have a CAD expert on staff. Experienced CAD folks can work from a drawing or PDF for things as simple as profiles, and may use modeling software for contours and handles.
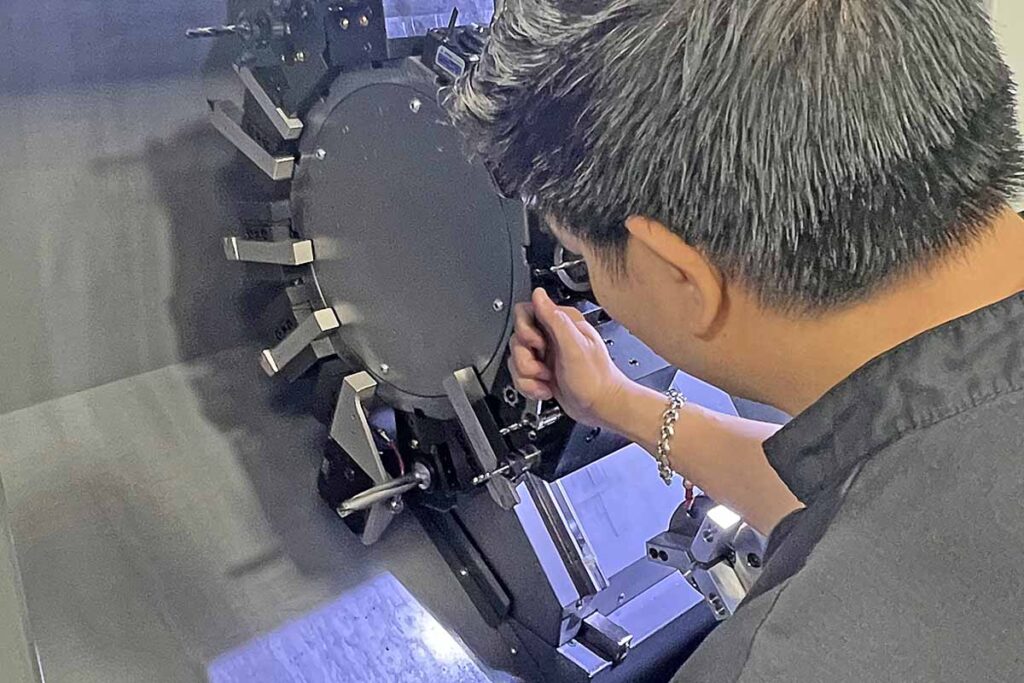
Princeton Wong checks the tooling on a CNC lathe. The lathe cuts precise round stock, such as screws and folder pivots.
Typically the liners are cut and the holes spotted, or are occasionally fully drilled and tapped. Pocket clips and backspacers come pre-cut. Handle profiles and contours are cut with a ball end mill, leaving a fairly clean finish. Sometimes this finish by itself is sufficient, while other times more hand polishing is necessary to achieve the final effect. Blades are typically delivered cut to contour, and the maker often does the bevel grinding by jig or by hand on a traditional belt grinder. Other times the blades come with machined bevels at varying degrees of surface finish. Once again, it’s up to the maker to decide if the machined finish is sufficient or if further hand work is necessary.
If you’ve ever used waterjet or milled parts, you know that the edge finishes are not precise. If you’ve had holes spotted but not drilled, you still have to drill and tap the holes. All in all, even in a knife that comes to you in a bag from a machine shop, there’s more to a cleanly finished M.A.C.K. knife than just assembly. If you want to be a winner in the M.A.C.K. category, you’ve got to have the hand finishing techniques down pat.
If you want a firsthand look at a quality M.A.C.K. knife, check out the applicable tables at a BLADE Show. Whether you prefer the events in Atlanta, Texas or Utah, there’s no doubt that “M.A.C.K. is back in town.”