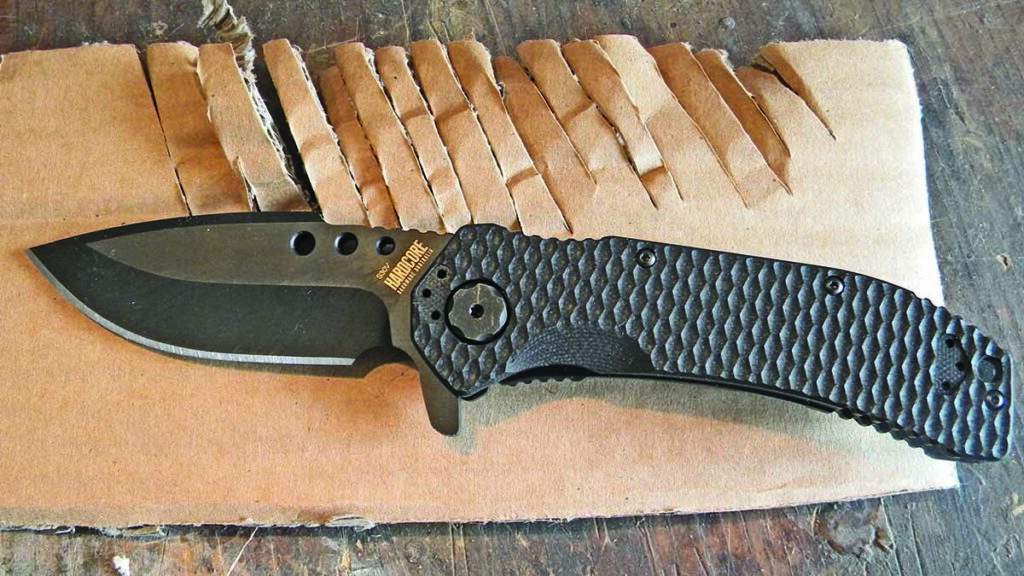
The Hardcore Hardware MILF-02 Is A Heavy-Duty Folder That’s Designed For Any Challenge Users Can Throw At It.
The MILF-02 folder from Hardcore Hardware is made for hardcore users. It’s big and beefy all the way around, has a dimple-textured handle and frame for an excellent non-slip grip, and a classic drop-point-blade shape.
The hollow grind extends halfway up the blade. Blade steel is CPM S30V stainless with a PVD (Physical Vapor Deposition) coating. It offers a classic black color on a framelock design with a flipper tab on the blade. It’s built heavy duty but it still has to cut.
Testing The MILF-02
The first inch of the cuts of the double-walled cardboard went well until the author had to use more pressure to push the cardboard over the thickness of the blade where the hollow grind stops. Once he got used to that, it was easy to overcome the twisting.
Right off the bat, the MILF sliced 20-pound-bond copy paper smoothly. The knife’s weight made the push cuts very easy. There were no snags or hang ups and it was simple to control the width of the slices.
Next: double-walled cardboard. The first inch of the cuts went well, then I had to use more pressure to push the cardboard over the thickness of the blade where the hollow grind stops. Once I got used to hitting this spot, it was easy to overcome the twisting. There were no edge hang ups at all.
I grabbed some 8-ounce leather for some skiving. The MILF was aggressive on every cut and emitted a crunching sound each time. Control was excellent in making fine slices and the handle filled my hand.
Cutting The Hard Stuff
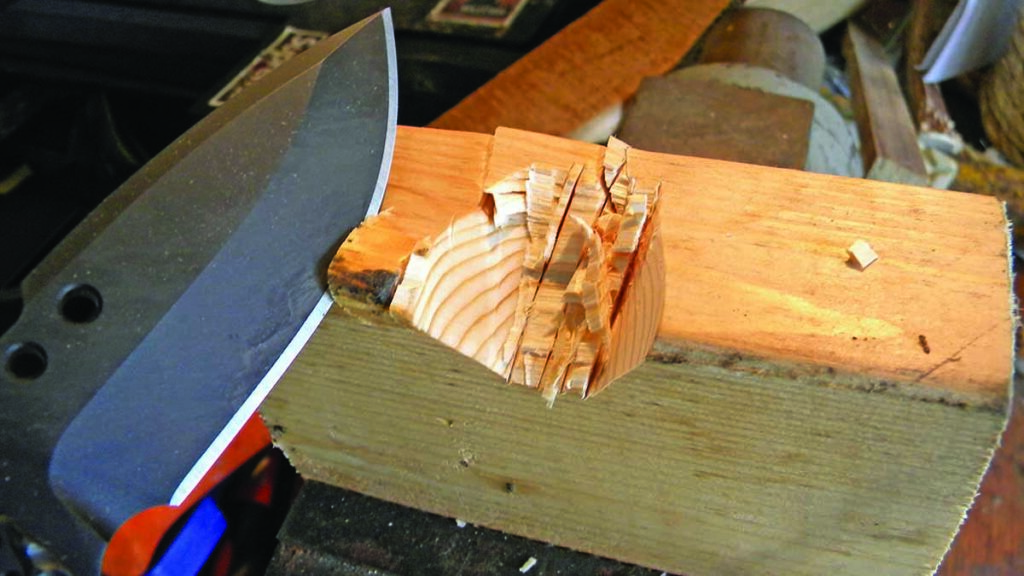
The author gave the 2×4 chunk 20 hard chops and the MILF bit deep on every whack. The edges of each chop were smooth.
It was time for some whittling. The folder seemed to want to bite deep into the wood. I started off with a fine curly-cue and by the end of the cut the edge was well into the wood. The MILF didn’t hesitate at all on the deeper cuts; it just kept curling the wood. It is a heavy cutter for sure.
I put a 2×4 chunk in my vise and gave the wood 20 hard chops. The MILF bit deep on every whack. The edges of each chop were smooth. Lockup was still at 100 percent. The knife is a great chopper with the bigger handle and all, but the inside edges of the handle need softening. They’re a tad on the sharp side
I took the same 2×4 and used the folder to split it into smaller pieces. All it took was a light tap from a dead blow hammer and the wood split with a pop. The thicker blade worked great for this phase of the testing. Lockup was still at 100 percent.
Half-inch sisal rope was next on the slicing block. The MILF crunched through 200 clean cuts very quickly, showing no signs of slowing down. I stopped cutting to save on rope. Edge holding was excellent and the heat treatment was great.
To take the testing further, I grabbed a deer antler for some more whacking. I gave the antler 20 hard wallops and the blade edge suffered no rolling or chipping. I did manage to remove a very thin wire edge on the blade. However, the main edge was still very sharp.
I returned to the paper slice to recheck the edge. I noticed a few hang ups and found more of the wire edge still intact. Two strops on some leather and the edge was back to original sharpness. Excellent job on the heat treat!
Final Thoughts
I would soften the inside edges of the handle for a smoother grip. Beyond that, the MILF is a heavy-duty using folder that holds a great edge. It’s too big for my tastes but a cutter it is.
Whether You Call It Copper San-Mai, Cu-Mai, Or Anything Else, Copper Damascus Is One The Trendiest Ways To Forge Knives Today.
By now most knife enthusiasts are familiar with pattern-welded steel, commonly called damascus, whose re-invention for use in knife blades is attributed to BLADE Magazine Cutlery Hall-Of-Fame® member Bill Moran.
The damascus world has since exploded with complicated mosaics, exotic-tiled canister billets, and, more recently, even some interaction between pattern welding and 3-D printing. These new techniques are mind-blowing for sure.
Copper San-Mai
A 2.75-inch go-mai blade with a wrought-iron cladding over an Aogami2 core and a copper shim layer highlights Joe Edson’s frameback straight razor. The frame is copper with a forced patina. The scales are crosscut mammoth ivory on a G-10 backer with a forged-patina-copper-wedge spacer. Closed length: 3.25 inches. (SharpByCoop image)
One of the hottest new trends in damascus is the inclusion of copper into pattern-welded billets. Commonly called copper-mai, copper san-mai or cu-mai, the technique has been brought to near perfection by Coy Baker at Baker Forge & Tool.
In 2019 at the request of a customer, Baker created his first copper damascus billet. Starting with Baker as a one-at-a-time weekend garage craftsman, the business exploded. Baker Forge & Tool now has a 3,000-square-foot shop and 10 employees, and they can’t keep up with demand.
Baker says the welding of copper in stacked configurations has been around for centuries in the form of mokumé gané, aka mokumé. While he’s the first to blow up Instagram with welded copper damascus, he is certainly not the first to attempt the cu-mai technique.
He primarily uses 80CrV2 carbon steel for the cores of his billets, and also various patterns of a damascus of 1080 carbon and 15N20 nickel-alloy steels. ABS master smiths Steve Schwarzer and Jason Knight helped him along in his early damascus-making journey.
How To Forge Copper Damascus
To forge a copper damascus billet, Baker typically uses a core of 80CrV2, a layer of 20-gauge pure copper shim stock, and a cladding of 1080/15N20 damascus.
“It’s important that the core and cladding stay in a 1-to-1-to-1 thickness ratio,” he said. “The copper doesn’t harden, and it’s critical to keep the core centered so that the cutting edge of the knife will be hardenable steel.”
He hasn’t experimented with copper alloys other than pure copper, though he has used some bronze and nickel with good results.
It’s no surprise that there are trade secrets that Baker didn’t volunteer, and I was polite enough not to ask. Copper stacked in a billet oxidizes quickly, similar to stainless, and so the welding must be done very precisely. For the welds to stick, the surfaces being welded also must be exquisitely clean, with not even a trace of oils or fingerprints.
The Different Types Of Copper Damascus
Baker did reveal that there are two basic versions of the process. In one, the layers are welded around the perimeter as in canister or stainless welding, and then the entire billet is welded at once. In this method, the temperatures are enough to liquefy the copper, and the perimeter welding keeps the liquid in.
In the other version, the billet components of core, copper and clad are stacked together and held at brazing temperature. This is Baker’s preferred method, as the copper doesn’t liquefy and so performs more consistently when it comes to thickness. Such exact brazing requires precise temperature control, as a 10-degree variation in either direction from the proper brazing temperature can produce failure.
While there are no doubt smiths who have attempted and maybe even successfully welded copper damascus by hand, Baker acknowledges that the aspiring smith is much more likely to be successful using a press or power hammer to set the weld. Precision temperature control also gives increased chances of success.
Dion Damascus
A 10.25-inch blade of NBC san-mai, black ash burl handle with an ebony bolster and a white G-10 spacer help complete Andrew Mochado’s kitchen model. Overall length: 16 inches. (Eric Eggly/PointSeven image)
While Baker is the best known and most common source for copper damascus, another variation is available from Dion Damascus. Florida knifemaker Andrew Mochado recently made a knife from a bar of Dion Damascus that included brass, copper, and nickel clad over a core of 52100 carbon steel.
“It is my take on a gyuto-style chef’s knife,” he said. It has a box elder burl handle with an ebony bolster. Mochado heat treated the blade in a gas forge. “The outside layer of the billet was nickel, so it was very difficult to get it all up to temperature,” he explained. “The nickel buckled up a bit and I thought I had a failure. I was able to successfully grind off all the buckling, and the blade was still perfectly forged together.”
Baker pointed out that the melting points of copper and nickel are above the heat-treating temperature of carbon steel. However, in a forge, the outside layers come in contact with a forge atmosphere that’s well above the desired hardening temperature, thus causing problems with the non-ferrous layers.
How The Copper Affects Knifemaking
Jordon Berthelot is a Texas maker known for kitchen knives and intricate carved and sculpted blade plunges. He’s also made dozens of blades with Baker’s cu-mai. He has been Coy’s “guinea pig” for testing new patterns for months. When Baker develops a new pattern, Jordon builds the prototype.
“I’m pleased with how the cu-mai grinds. You might expect the copper to be gummy or soft or to grind differently when you sculpt it, but it pretty much grinds the same as steel,” Berthelot observed. “You always have to pay attention to get the carving right, but the copper poses no problems.”
Makers will notice the copper being softer if they hand-sand it aggressively, but overall the copper layers are no more difficult to finish than regular steel.
When it comes to finish work, Berthelot recommends sanding to at least a clean 600 grit prior to etching. “Regular” ferric chloride doesn’t perform well, and etching copper in it will leave a copper tint on standard damascus steel blades later. Instead, Berthelot prefers a 20/20/60 mix of ferric chloride, muriatic acid and distilled water. The addition of the muriatic acid keeps the copper from looking blurry, and keeps the material out of the solution for future etching. After the etch, Berthelot buffs with “black magic” rouge so the copper will “pop” nicely.
Forged in Fire season 1 episode 2 “OG” winner Chris Farrell of Fearghal Forge in Austin, Texas, took advantage of the bold copper line in his piece of Baker Forge damascus. The copper makes a dramatic, bold statement, and so do the curves and lines of Farrell’s fancy faceted fighter.
“People see my faceted handles and think they’re kinda funny until they pick one up and realize how well it fits their hands,” Farrell said. He is fascinated by innovations in the knife industry and is always looking for his own ways to innovate. He’s experimented with forging Baker’s copper damascus bar stock: “It can be done, but you really have to be careful. It’s real easy to mess up!”
Copper Damascus Around The World
Australian maker Adam Fromholtz crafted a cake knife of copper damascus from the Japanese steel company Takefu. Takefu steel can be hard to find in the USA, but there is a reliable Australian distributor. Adam’s knife is copper, nickel and brass clad over a V-Toku-2 carbon core. Handle: Tiger myrtle. Blade and overall lengths: 9.25 and 14 inches. His list price for a similar knife: $1,800. (SharpByCoop image)
The cu-mai trend is not limited to the United States. Australian knifemaker Adam Fromholtz of Canberra crafted a cake knife of copper damascus from the Japanese steel company Takefu. Takefu steel can be a challenge to find in the USA, but there is a reliable Australian distributor.
Adam’s blade is copper, nickel and brass clad over a V-Toku-2 carbon core. Regarding the steel, Fromholtz noted that it was near impossible to forge due to the differences in ductility between the materials. Because of the softer cladding, he noted that the blade tends to gall a bit, so makers should take note of this when fitting a slotted guard on a blade of such a material. Overall, the steel is simple to finish but shows handling marks easily.
How Do Copper Damascus Knives Perform?
Is copper damascus all flash and bling or does it perform? Copper does not harden the way steel does, which makes you wonder how it impacts knife performance. First of all, copper damascus is used with a monosteel—that is, one layer of steel—or a regular carbon damascus core.
Using a steel core makes it where the copper has absolutely no impact on the blade’s cutting performance, edge stability or toughness. Baker said he knows of two makers who have used his cu-mai material to complete American Bladesmith Society-style performance tests of rope cut, 2×4 chop and 90-degree bend.
When it comes down to it, the copper layers are very thin. Considering that the final weld-up of clad/copper/core/copper/clad may be as much as 2 inches thick, and that the copper starts out roughly .03-inch thick, the overall final billet has very thin layers of copper. It’s enough for a dramatic pattern but not enough to impact knife performance in a negative way. “I made a knife with it then beat the hell out of it,” Farrell said. “So long as it’s heat treated properly, it’s good stuff.”
Availability Of Copper Damascus
The 9-inch blade of Jordon Berthelot’s chef’s knife is Baker Forge & Tool auro-mai damascus with a core of 80CrV2 carbon steel. “It has my carved ridge that adds great weight reduction and a nice ergonomic flow, and decreases the drag coefficient,” Berthelot wrote. “It also allows me to alter the pattern.” Overall length: 14 inches. Maker’s price for a similar knife: $1,700. (image courtesy of Jordon Berthelot)
If you’re a maker looking to capitalize on the copper damascus trend, get in line. Baker Forge releases approximately 70 billets a week to the public, in addition to what it produces for commercial use. The billets “drop” Saturdays on Instagram and are usually gone by the end of the day.
Most billets are 2-2.5 inches wide and come in thicknesses from ⅜ inch all the way down to 3/32 inch. Pricing currently runs up to $25 per linear inch, but as in all things post-pandemic manufacturing, the supply costs for raw materials keep increasing.
As for consumers, check knife shows, magazine stories such as this one, and Instagram and elsewhere on the Internet. Cu-mai knives are out there—you just might have to do some digging to find them.
The Subhilt Provides An Additional Element To Make A Knife One Of A Kind. These Makers Show What A Subhilt Can Be.
The subhilt adds a little extra. Its form is expressive and its function is useful. It takes its share of the spotlight and provides another avenue of artistic approach for custom knifemakers who choose to build it.
A few of the makers who accept the challenge of the subhilt put their finest work forward. They use bold, sleek lines, and high-quality materials to bring the best of the subhilt to the market, and the combination of aesthetic and utility blends in a delightful presentation.
Subhilts In Italy
Daniele Ibba was already a goldsmith and “transferred” his skills in that pursuit to making knives. He describes himself as an “autodidact,” a self-taught subhilt maker.
Residing in a small town near Milan, Italy, Daniele Ibba has been making knives since 2004. He finds the subhilt a perfect approach to both usefulness and beauty as evidenced by his integral Medusa Gorgona.
“Although the knife has a clear artistic connotation, it was developed as a not-artistic knife,” he explained, “and the purpose of this subhilt is to have a stable grip, especially in the lunge, and consequently the possibility to hit the target/threat harder.”
Grip options are plentiful, and Daniele calls his subhilt pleasant to handle in any position, with the best control in the standard or reverse grips. The subhilt allows the user to always know where the blade and edge are located, and offers more protection to the hand.
In the Medusa Gorgona, Ibba collaborated with Lana Gorska and took home best in show from the September 2021 SICAC Knife Show in Paris.
“We are very proud of this,” he smiled, “because in every international show the competition is always very high and winning such a prize is never easy.”
The Medusa Gorgona is made from a single piece of 440C stainless steel hardened to a Rockwell hardness of 58-59 HRC, and is embellished with 13 mother-of-pearl inlays—four on the front of the handle, eight in the spine and one in the pommel. It also has 20 green diamonds, eight yellow diamonds, two blue diamonds, and three rubies—one round cut and two marquis cut. The fine engraving was done by Italian master Roberto Bruci.
“Lana and I had done many models in Plastiline® [a high-precision modeling clay] searching for the best ergonomic shape,” Daniele related. “Being a subhilt, it was not simple to reconcile design and easy handling. I do not have a [pantograph] or automated machinery, so it was very difficult to realize the handle and the slots for the mother-of-pearl inlays, but with time and patience I was able to achieve a beautiful result. Before designing the knife, Lana and I decided to engrave the mother-of-pearl with the mythological theme of Medusa.
“The story tells that she was one of the three sisters called the ‘Gorgoni,’ daughters of the Gods Forco and Ceto, and they had the power to petrify anyone with their gaze. So, we decided to make the name of the knife with the theme of the engraving, and Gorgona is like a nickname.”
An exquisite award-winning showpiece, the Medusa Gorgona stands out. Ibba’s price for a similar integral presentation without diamonds and extensive engraving would be roughly $13,000.
Marc Aldrich
Marc Aldrich mirror polished the undersides of the 416 stainless steel quillons of the subhilt on his bowie in a blade of 80CrV2 carbon steel and a handle of artificial ivory. Blade and overall lengths: 10 7/8 and 16 1 /8 inches. (Photo: SharpByCoop)
ABS apprentice smith Marc Aldrich has been making knives since 2013 after taking a couple of courses from ABS master smith/BLADE® field editor Joe Szilaski. Marc admires the work of Dave Loukides, Sam Lurquin, and Jan Hafinec which gave life to his ideas for a subhilt bowie with dazzling results.
His featured piece includes a blade of 80CrV2 carbon steel finished to a grit of 1500, a stainless subhilt with copper spacers, and a handle of artificial ivory accented with a copper pin. Marc made the sheath of hand-stitched leather with a quilted and copper-studded front panel, copper-studded frog and pigskin lining. A trace of a hamon is visible on the blade, and he explained that he chose not to etch the line but appreciates the discerning eye that catches sight of such detail.
“Of course, a subhilt adds retention and looks cool,” he offered, “but it helps if it is placed and shaped well. If we think of a knife as a sculptural object, the subhilt is another compositional, visual and tactile element we can use to add interest and function. I think my subhilt bowie is a mix between a bowie and fighter. Although not having a sharp swedge, the slender blade profile, added retention of the subhilt and excellent balance would make it formidable. The blade finish is actually bright and nearly mirror.”
Marc says his goal with every knife is to distill the lines down to their “pure essence.” His formula is “lines, flow, proportion and a tasteful balance of detail backed up with quality workmanship.”
The subhilt, he added, is an interesting subset of the bowie genre that is also seen in other knife styles. However, in all cases it must be properly spaced and integrated to avoid a clunky look and awkward handling. His price for a similar piece would run about $2,200.
Japanese Influence
Robert Appleby based his subhilt on a Tom Maringer-styled-and-designed fighter. Exhibiting a strong Japanese influence, the takedown model is comprised of 17 parts as a reflection of the 17 syllables in a Japanese haiku poem.
When Robert Appleby started making knives 27 years ago, he did so as a self-taught craftsman. He studied the work of other makers in similar styles prior to launching a piece of his own, and contacted other makers in person or by telephone to exchange information and gain understanding.
Appleby’s featured subhilt is a Tom Maringer-styled-and-designed Haiku fighter. Exhibiting a strong Japanese influence, the takedown model is composed of 17 parts as a reflection of the 17 syllables in a Japanese haiku poem.
A customer approached Robert a few years ago asking to make a 6-inch version of the original Maringer knife. After gaining permission, Robert borrowed an earlier version from a gracious customer and studied it closely. Robert has since made two knives in this fashion. The featured one sports a 9-inch blade of 154CM stainless steel mirror polished and double hollow ground.
Robert Appleby’s fighter (Photo: SharpByCoop)
The habaki is forged 416 stainless, while the tsuba (guard) consists of four layers of 410 stainless, and the handle sports 416 stainless fittings. The subhilt is formed of approximately 60 feet of twisted 304 stainless steel wire.
The handle and blade are joined by a toggle or link, and a pin attaches the tang to the threaded toggle. A 10-24 socket head cap screw is fed through the pommel and threaded into the toggle. For pricing on a similar piece, contact Robert directly.
“In my opinion, a subhilt provides increased retention, a more secure grip and increased control,” Appleby commented. “I don’t see the subhilt as impeding any grip style, as the blade is also double edged, and the subhilt also provides more positive extraction from the sheath. Each spacer is marked by a series of dots, one, two, three, etc., to hold the upper right of the tang hole. As I fit them, only the top and bottom of the tang hole contact the tang so they are self-aligning, as well as the front endcap of the handle. Indexing pins are set into the handle and align the last spacer, handle and pommel.”
Subhilts For Rugged Use
Knifemakers’ Guild voting member Gary Langley said his reproduction of a Bob Loveless Big Bear subhilt fighter is the only Big Bear he’s seen with a rear bolster. Blade and overall lengths: 8 3/8 and 15 inches.
Gary Langley built his reproduction of a Bob Loveless Big Bear subhilt for action.
“This was designed to be a fighter,” he said. “I have sold one that was going to be used to hunt wild hogs, though this particular piece resides in a collection in Florida. It’s pretty much a straight grip, but I suppose you could hold it however you’re comfortable with it.”
After building a new house, Gary started making custom knives in 1977. His new neighbor was Don Dollar, and it was Don who revealed fit and finish to Gary for the first time.
“Don showed me a few books and The American Blade Magazine [today’s BLADE®], and I was off,” Gary smiled. “I haven’t built a lot of knives compared to some, and this one is number 603. I’m 68 now and hope to get to 1,000 before I’m done.”
His Big Bear has a CPM 154 stainless blade and 416 stainless guard and subhilt with a mammoth ivory handle. Alice Carter did the engraving. Langley said this is the only Big Bear with a rear bolster he’s seen.
“I’m basically self-taught,” he commented, “and I’ve had a lot of inspiration, but have never taken a class or worked with anyone. [Steve] Johnson’s DVD on building a fighter was a big help—lots of trial and error! It’s not a simple knife to grind, and the things I learned trying to grind it have reshaped my process and equipment.
“The challenge on this blade with a rear bolster is to fit eight edges without a gap,” Langley concluded. “You just have to slow down. I would use my flat disc and rather than turn the motor on, I would turn it by hand so I didn’t go too far too fast.”
Depending on the engraving requested, Gary said his price for a similar knife would be around $3,000.
Denis Tyrell’s Ice Blue Bowie Showcases The Journeyman Smith’s Skills At Forging A Blade And Stylizing A Knife
Denis Tyrell’s Ice Blue Bowie is one cool sub-hilt fixed blade—so cool, in fact, that it recently won The Bowie Knife Challenge shown on 18 different YouTube channels.
The 14-inch bowie features a near-full-flat-ground blade of Tyrell’s Snowflake mosaic damascus, a stabilized wood handle and hot-blued fittings of a twisted damascus. The bowie is in a takedown construction with the pommel nut securing the handle and guard to the knife.
Tyrell, who helped organize the challenge along with a friend, won the first challenge this past June too, which consisted of competing gyutos shown across 10 different YouTube channels. Each winner was determined by a vote of viewers watching the makers.
You can search “Tyrell Knifeworks” on YouTube to watch the past challenges and see the knifemakers in action. You can watch Tyrell make the Ice Blue Bowie in all its glory below.
Tyrell Knifeworks
Tyrell is a journeyman smith who moved to California in 2001 from his native Canada. He specializes in custom damascus knives. From his shop in Livermore, a moderate-sized city on the Eastern edge of San Francisco Bay, Tyrell runs a series of forging courses.
His courses range from introductory classes in how to forge or how to make your first damascus pattern all the way up to more intense fare. He teaches specific classes on mosaic and feather damascus as well as, one of his most popular courses, a course teaching folks how to make copper-layered damascus.
For more information, go to YouTube, enter “Tyrell Knifeworks”, and look for the challenge of your choice.You can watch Denis make the Ice Blue Bowie in the video below.
Ice Blue Bowie Knife Specs Knife: Ice Blue Bowie Bladelength: 8 inches Blade material: Snowflake damascus Handle: Stabilized wood Fittings: Twisted damascus Steels: 1095 and 15N20 (both the blade and fittings) Overall length: 14 inches Maker’s list price for a similar piece: $2,000
The M-1 Folding Pocketknife From MECHFORCE Takes A Licking And Keeps On Cutting No Matter What’s In Front Of It.
Most people don’t like carrying a thick knife. They already have enough stuff without a bulky folder blocking access to the other goodies in their pockets.
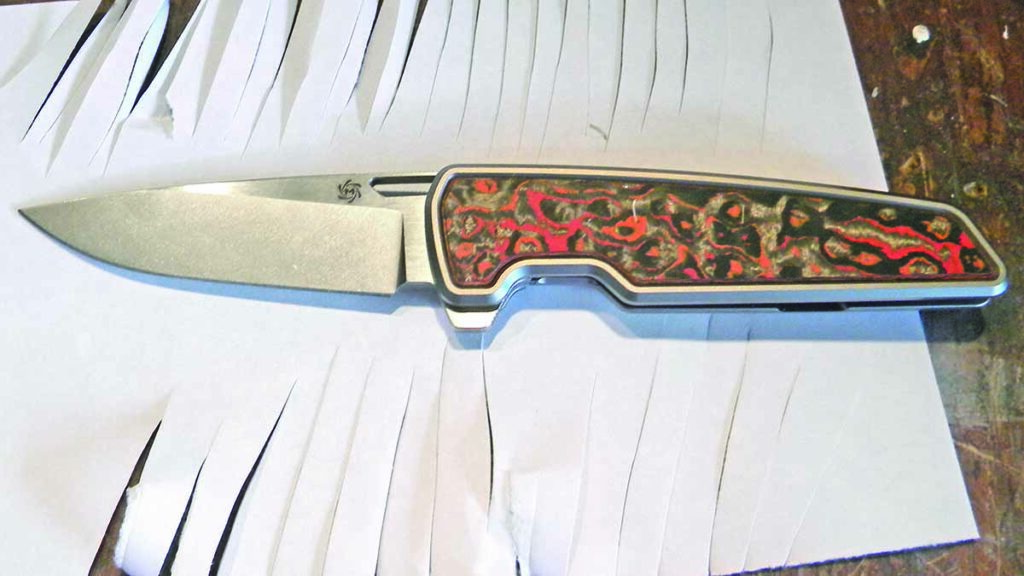
I really like the blade thinness of the M-1 folder by MECHFORCE. Add a deep-set pocket clip and the M-1 is low profile when attached to the lip of your pocket. Meanwhile, the handle feels great.
The blade is a classic drop-point shape and cuts like … well, let’s see!
M-1 Folder Takes On Paper And More
The M-1 sliced the 20-pound bond copy paper smoothly and quickly.
Twenty-pound bond copy paper is the first way to test the factory edge. The M-1 sliced the stationery smoothly and quickly. I put a few nicks in my fingernail by moving too slow. I could hear every slice in the paper. Very sharp!
On to double-walled cardboard. The blade bound a tad at the bottom of the cut and during withdrawal. The thicker slice is where I noticed the binding. Thinner slices were not a challenge. It sliced the cardboard fast overall.
I used some plastic board for the next medium. The M-1 sailed through every slice. It was easy to control the width of the cut. I like the shape of this handle a lot. It really gives me control with my sidewinder cutting style.
The M-1 bit into 8-ounce leather and did so with gusto. I could hear the aggressive sounds of the edge biting through the material—this is very addictive to do as you crunch away. The knife would excel at skinning game.
I did some skiving to check the control of the depth of the cut. There were no issues whatsoever on the leather—super thin cuttings every time. The flat grind really helped in cut-depth control.
Pushing The M-1 Folder
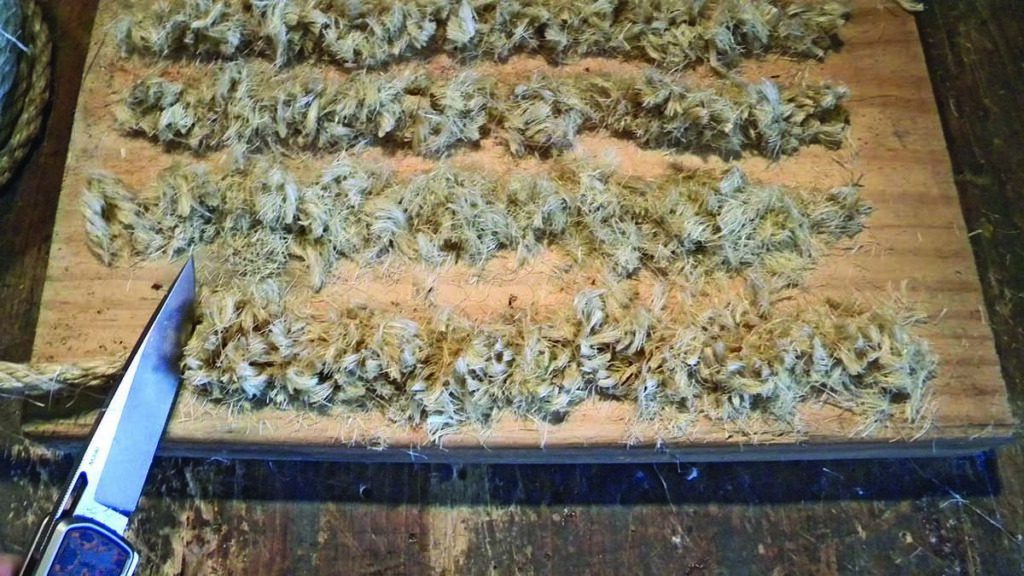
The M-1 Folder wore the author’s wrist out after 250 crunching cuts of half-inch sisal rope.
Next up: half-inch sisal rope—time to use more pressure on the M-1. The knife wore my wrist out after 250 crunching cuts. It still had more bite but I was done for the day on rope cutting. The knife gave me no hot spots and I found zero sharp areas on the handle. It was very comfortable with pressure cutting. Excellent work, MECHFORCE!
To give the edge a heavy workout, I grabbed an old whitetail antler and gave it 30 whacks. I expected to see a few small chips in the edge but none showed. The edge was still sharp with no snags, sure signs of tough steel and excellent heat treatment.
I switched back to slicing 20-pound bond paper to see if the edge was still field ready. It sliced cleanly throughout to the end of the testing.
The M-1 comes with a maintenance kit that includes how-to instructions, two sets of replacement adhesive strips, take-down wrench and a bandage. It’s well thought out.
Final Thoughts
Not much to say here—maybe add some skateboard tape inserts for a no-slip grip. The M-1 is a high-performance knife that takes a licking and keeps on cutting. It makes a great pocket addition.
M-1 Folder Knife Specs
Knife style: Flipper folder Blade length: 3.5 inches Blade steel: M390 stainless Blade thickness at thickest: ⅛ inches Blade grind: Full flat Blade finish: Matte Blade pattern: Drop point Handle frame: 6Al4V titanium Handle inserts: Mars Valley carbon fiber Pocket clip: Deep set Lock: Framelock Weight: 5 ounces Closed length: 4-11/16 inches Knife to know: Features hidden-screw design Country of origin: Partially made in the USA MSRP: $385
This Texas-Based Maker Has A Shop Full Of Grinders And More To Make His Traditional-Style Pocketknives
Tom Ploppert has been building knives only since 2009, but he’s made up for lost time in spades. He is a member of the South Texas Slipjoint Cartel, a group of makers who all studied under BLADE Magazine Cutlery Hall-Of-Fame® member Bill Ruple.
More recently Tom has been an acolyte of another legend, the late Cutlery Hall-Of-Famer Tony Bose, who he credits with helping achieve a milestone in his knifemaking career: making a lockback whittler.
Not surprising given his mentors, Ploppert specializes in traditional pocketknives, both single- and multi-blades, in stag, bark ivory, and jigged bone, as well as more modern standbys such as Micarta® and carbon fiber. Blade-wise Tom works with both damascus and a variety of stainless steels and, like his mentor, his work is clean and crisp as an ironed linen sheet. He keeps his shop in similar order.
Tom Ploppert’s Tools
In addition to his big belt grinders, Ploppert also uses a Hardcore horizontal grinder and two 9-inch disc grinders—one horizontal and one vertical.
He starts off the tour with a host of grinders.
“Like most knifemakers I have an array of equipment that I use every day,” he notes. “I guess the most-used tools and equipment are the grinders. I have three Baders, one Northern Tool and a 20-inch Burr King dedicated to grinding blades. I also use a Hardcore horizontal grinder, and two 9-inch disc grinders, one horizontal and one vertical. Something that is also important is a quality light source. I’ve changed all shop lights to LED and use Steris examination lights that show everything.
“When making slip joints things must be flat, parallel or perpendicular. My Jet surface grinder has been an invaluable piece of equipment at the shop. After heat treating with my Paragon Oven I can grind everything flat if there is any movement during the heat-treat process. I traded an old Dodge farm truck for the surface grinder. The grinder hasn’t had the first transmission issue either!
“I use a Servo precision drill press to accurately drill small holes,” he continues. “I use my Jet machining mill to drill larger holes for bushings and lanyard holes. My mill also serves to machine integral liners and cut tang reliefs in liners. Like most of the other slip-joint makers, I’m learning to use my Deckel pantograph to cut and inlay shields.
“Probably the most important and overlooked piece of equipment is my vacuum system. It is a three-phase, 5 horsepower Torit-Douglas system that will filter the air to two microns and re-circulates it back into the shop. It’s nice not losing your temperature-controlled air in the shop.”
Ribbing his mentor, Ploppert concludes, “Lastly, I believe in keeping the shop organized and clean to a high standard. I can’t work in a dirty shop like Bill Ruple’s!”
Finding Inspiration During the Covid-19 pandemic, Shane Magnussen Created The Sinnsyk With The Help Of His Fans.
The long days of the COVID-19 pandemic may be mostly past us, but the cabin fever drove many people crazy. However, for some, those days inside proved to be a cauldron of creativity. For one knifemaker in Arizona, the creative juices flowed forth and gave birth to a one-of-a-kind knife.
Shane Magnussen was looking for ways to keep from going bonkers during the pandemic and found one with his “personal renaissance challenge.”
The challenge consisted of him sketching one new knife design per day for 75 days and then putting them all up for a vote on social media. The folder winner was his Sinnsyk model.
Who Is Shane Magnussen?
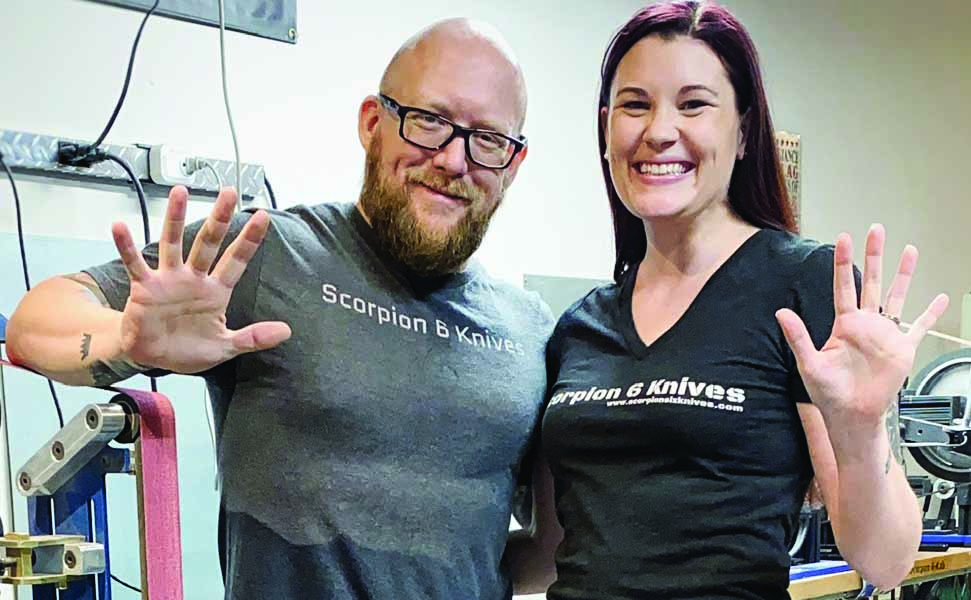
Shane Magnussen—here with wife Katie in the shop—said the lock, detent and bearings all fit tight on his Sinnsyk folder. In the right lighting, you can see the electro-anodized blade through the elliptical handle holes.
Shane is a former serviceman who led over two dozen successful operations in Afghanistan for the United States Army. After receiving an honorable discharge, Shane went into the automotive field and worked in numerous parts of the industry.
Eventually, he began working at a knife manufacturer and caught the knifemaking bug. From writing manuals about free hand grinding to innovating custom finishing methods Shane gained the experience needed to launch his own knife company, Scorpion 6 Knives.
What Is The Sinnsyk
Shane is first-generation Norwegian and sinnsyk is Norwegian for insane or crazy, which most people have been driven at least half during the troubles. His wife, Katie, helped with the zig-zag texturing on the titanium handle, which they did on a half-inch wheel of a Travis Wuertz TW-90 grinder.
The elliptical holes are a standard Shane design and enhance looks, lightweight and texture. The line down the center of the electro-anodized pocket clip serves as a kind of truss to keep the clip from grabbing neither too tight nor too loose.
Sinnsyk Knife Specs
Knife: Sinnsyk
Knife type: Folder
Blade length: 3.66 inches
Blade steel: Nitro-V stainless
Blade pattern: Spear point
Frame: Grade 5 titanium
Lock: Framelock
Closed length: 4.94 inchesMaker’s price for a similar knife: $1,200
For more information contact Shane Magnussen, Dept. BL3, 914 W. Belmont Red Trail, San Tan Valley, AZ 85143 [email protected].