Now in its second iterations, the Yojimbo 2 nails exactly what a straightedge folder should be.
It isn’t hard to review a Spyderco knife.
Anyone who has ever used one can tell you the company has an uncanny ability to nail the making of folders as well as fixed blades. What is even more uncanny is how the company can do it so consistently while being so prolific. Hence, if you want to talk about good straight-edge knives and also the features of folding EDCs in comparison to fixed-blade EDCs, you might as well include one of the best folding knifemakers in the business. If you’ve ever talked to BLADE Magazine Cutlery Hall-Of-Fame® member Sal Glesser, you quickly realize the thing that drives Spyderco’s outstanding record of knife offerings is Sal’s passion for the trade.
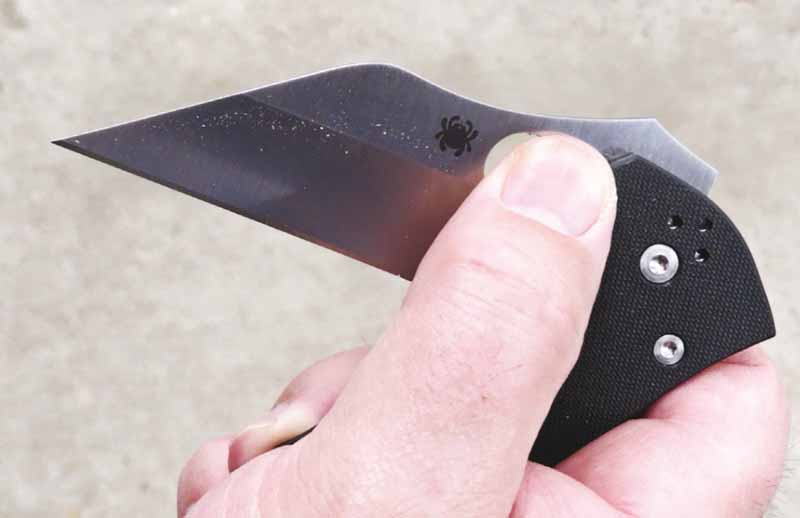
The wide blade on the Spyderco Yojimbo 2 gives plenty of real estate for your thumb to clear the scale and fi nd its way into the hole so you can open the knife easily.
Yojimbo 2 Rundown
The Yojimbo design has been out for years, but to be truthful I am just getting around to reviewing it now in the Yojimbo 2 iteration. At 7.55 inches open, it’s in the midsized folder range. I prefer a small-to-midsized folder because once I get into the large folders, I start asking myself why I didn’t just choose a fixed blade. The blade has a sharp-angle execution of a wharncliffe style, resulting in a very articulated tip. With a blade width starting at 1.5 inches, the steep angle still provides a sturdy tip. Spyderco uses a hollow grind that results in a thin geometry.
The handle is subtly textured G-10. The texturing for me has that Goldilocks feel to it—just right. Sometimes because of new machining technology companies do things they can do and don’t think about whether they should. One of the things I most often find is over texturing of handles to the point the knife is uncomfortable to use. This isn’t the case with the Yojimbo 2. The texturing is very slight but undoubtedly present.
Straightedge’s Performance
Opening and closing the folder is smooth. It features Spyderco’s compression lock system, which has a crisp lock up. There’s no doubt your blade is locked thanks to a crisp snap as the lock engages. A handle profile with a number of broad finger grooves provides a secure grip. The broad grooves allow the knife to remain nimble in your grasp.
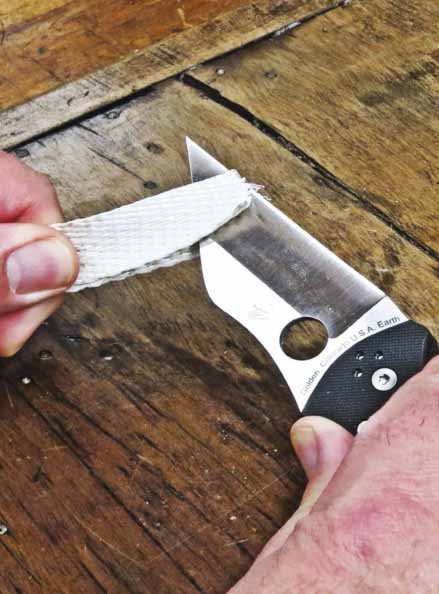
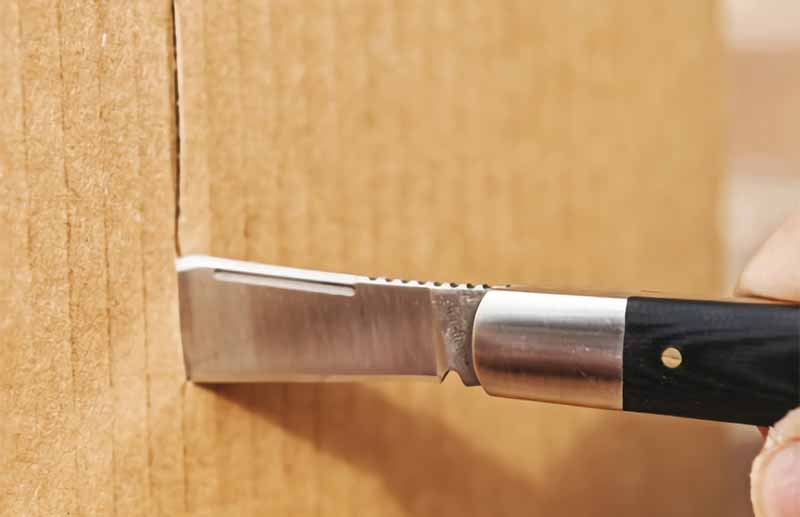
Out of the box, the Yojimbo 2 was razor sharp. It made eff ortless cuts through this packing crate strapping like the medium wasn’t even there.
If I were to mention only one issue I have with the knife it would be something particular to me and people who suffer the same affliction: fat hands. My hands are beefy. On occasion, the compression lock, because it is located on the spine, catches me ever so slightly between the lock and the liner. Would this version of Spyderco’s would be No.
1 every time. The overall profile makes it easy to capture the rim on tight and loose pockets alike. Not every knife I have reviewed over the years comes back around to be a personal carry. I can tell you, though, the Yojimbo 2 will be making it into my EDC rotation.
Spyderco supplies one of its full-metal pocket clips for the Yojimbo 2. I can’t say this enough: If you had to make a list of the top-five-designed pocket clips, this version of Spyderco’s would be No. 1 every time. The overall profile makes it easy to capture the rim on tight and loose pockets alike. Not every knife I have reviewed over the years comes back around to be a personal carry. I can tell you, though, the Yojimbo 2 will be making it into my EDC rotation.
For more information on the Yojimbo 2, please visit spyderco.com.
Probably no pocketknife pattern has as rich of an American history as the barlow. It is perhaps one of the most well-known patterns even among non-knife people, because their fathers or grandfathers carried and used one.
What exactly is a barlow? It’s a simple pocketknife comprised of either one or two blades, a lengthened steel bolster, and a teardrop-shaped handle, usually of bone. There’s nothing fancy about the barlow. It was and still is a workhorse knife that gets the job done.
If you trace the barlow’s U.S. lineage, it goes back at least as far as John Rus sell, an American entrepreneur who established Green River Works in 1834 in Greenfield, Massachusetts. One of the knives his company was famous for is the barlow. Green River Works manufactured barlows in mass quantities, and even today vintage Green River Works barlows are highly sought after by collectors. The bolsters are distinctly marked with an “R” pierced horizontally by an arrow.
The Lionsteel CK01 and Böker Barlow Expedition have half stops (page 28), meaning the blades pause midway through the blade rotation cycle. Half stops allow safer closing of the blade and provide good tactile reference of where the blade is even if you can’t see it when opening or closing the knife.
Aside from manufacturing excellence, the barlow was immortalized with appearances in literature (Mark Twain’s Tom Sawyer and Huckleberry Finn and James Fenimore Cooper’s The Pioneers); in music (bluegrass legend Doc Watson); and even Abraham Lincoln was said to have recounted a story from his past that included a barlow. Few patterns have as rich a history. Even in today’s knife market where aerospace-grade materials and advanced blade steels rule the day, slip joints remain popular, including the bar low. They simply are great working tools stripped down to the bare essentials.
BÖker Dalichow
“Traditional patterns like the camp knife or barlow have been a part of our product line from the very beginning onward, and they always will be,” says Carsten Felix-Dalichow, CEO of BÖker Germany. “In the last couple years, those patterns enjoyed a renaissance in the international knife markets.” Dalichow adds that both modern interpretations and classic versions sell well—including the BÖker Barlow Expedition (manufacturer’s suggested retail price [MSRP]: $199.95).
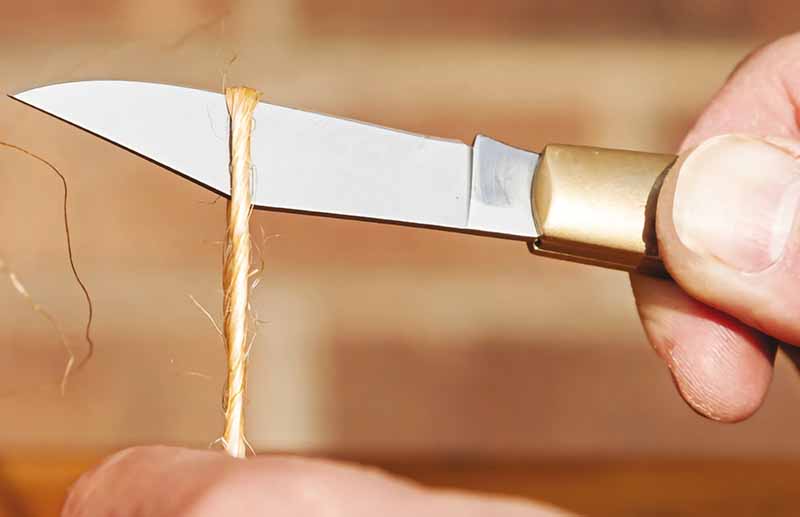
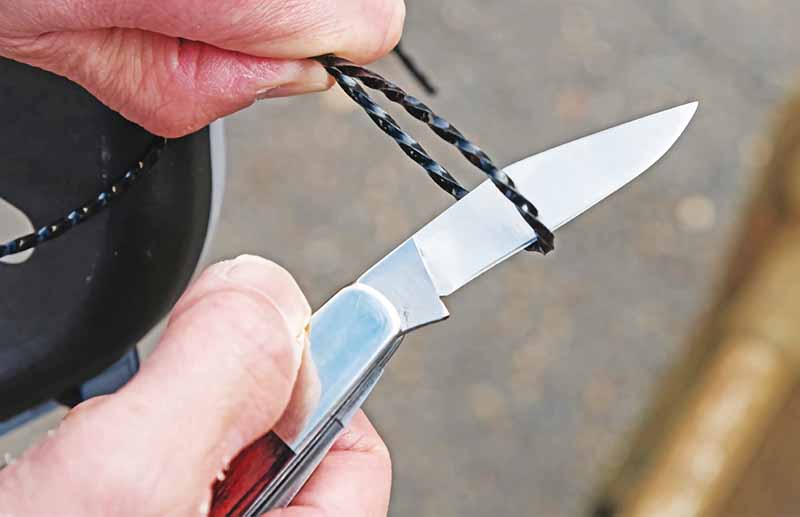
Böker’s Barlow Expedition is a smaller barlow that rides in the pocket easily and is ready for general tasks like cutting a length of twine.
The 2.5-inch clip point blade is 440C stainless, which at one time was aboutthe best knife steel money could buy. It remains a great blade material even by today’s standards. It exhibits superb edge retention and enhanced corrosion resistance, and is fairly easy to resharpen. The blade opens via a long-pull nail nick. The action is nice and stiff. The extended-length bolster is brass, and the scales are green canvas Micarta®, the left one inlaid with the BÖker Tree logo shield. Brass liners complete the overall color combination, which looks marvelous. The blade is bead blasted, not satin finished, which rounds out the subdued appearance.
Size-wise, the Expedition is pretty much average for barlows. It’s a great balance of utility and pocket-friendliness. The thin profile carries well and is not heavy at all. The Micarta is lightweight, weather/impact resistant and an excellent choice for any working folder. I did note during heavy cutting when a tighter grip is required that the thin handle left me wanting a handle thicker and perhaps longer as well. However, for large or extensive-use cutting tasks, select a knife with a more appropriate handle size.
“The response of the international knife markets on this new product line of modern traditionals is tremendous,” Dalichow says, and BÖker will continue to develop new iterations of classic favorites using both up-to-date materials and modern knifemaking techniques. “The trend will be long term. We at BÖker are happy to be a part of it.”
Kershaw Culpepper
The Kershaw Culpepper ushers the barlow into the modern-day knife market in contemporary materials and economy pricing. “Opening mechanisms, blade steels, handle designs—a lot has changed since the peak in popularity of barlows,” says Dominic Aiello, marketing manager at KAI-USA, manufacturer of Kershaw and Zero Tolerance knives. “I don’t believe that barlow-style knives will see the popularity they once had. However, they are still enjoyed by many users, and we want to provide them with a quality, affordable option.”
The Kershaw Culpepper has a 3.25-inch clip-point blade suitable for larger and tougher cutting tasks. The 7Cr17MoV stainless steel provides good edge holding abilities. The long, large handle offers a good grip.
The 3.25-inch clip point blade is 7Cr17MoV stainless steel for increased strength, toughness, and wear resistance. The Culpepper is a larger modern barlow suited to heavier cutting tasks. The blade spine boasts gimping for a non-slip rest and extra control when cutting, a feature often found on tactical folders. The satin-finished blade has long-pull nail nicks milled into each side. This offers ease of opening with either hand, but also the convenience of using a pinch grip to pull the blade open as opposed to digging your fingernail into the nail nick and pulling up as you would with a traditional slip joint.
The handle is black G-10, a lightweight, strong synthetic associated with tactical and outdoor knives. It’s a stable material and resistant to fluids, impact, and weathering. The finish is polished, giving an ultra-smooth look and feel. The black and silver appearance is timeless and never gets old. In my opinion, the 4.15-inch closed length pushes the limit of how big a pocketknife should be to carry comfortably in the bottom of a pocket. When you carry it, you’ll know it’s there. The trade-off is the extra blade length to tackle tough, tradesman-like cutting jobs. My only complaint lies with the back spring. Ideally, I would like to have a stiff spring action and a half stop (page 28). The half stop provides great tactile reference as to where the blade is during opening and closing. If not a half stop, then a stiff er spring would suffice.
The Culpepper’s spring tension needs to be increased. I found that if the blade hangs up on what you’re cutting, and you lift up a bit on the handle trying to free it, sometimes the blade will close slightly. Normally you apply downward pressure, so during most use this isn’t an issue. Otherwise, it seems to make a great work knife for tasks unsuitable for a higher-end slip joint. And, in case you lose the Culpepper, the price is such that you can procure another one easily due to the low MSRP ($39.99). One of three traditional slip joints Kershaw offers, the new barlow is made in China.
Bear and Son’s 2281R Rosewood
Bear and Son’s 2281R Rosewood Barlow is the only two-blade of the test bunch, sporting a small pen pattern (21∕16 inch es) in addition to the larger clip point (2.75 inches). The pen gives the option of a shorter blade for smaller cutting tasks or to get into tighter areas. It is also good for scraping, thus saving the main blade’s edge for traditional cutting jobs. Ground from 440A stainless steel, both feature matching long-pull nail nicks for ease of opening. Nice satin finishes round out the overall look and hide scratches.
Trimming string is one of the general utility tasks performed by working knives like the Bear & Son 2281R Rosewood Barlow.
The handle features nickel silver bolsters paired with rosewood scales, adding a touch of class. Some prefer the look and feel of a wood handle as opposed to bone or a synthetic. Moreover, rosewood has a reddish-brown hue some find quite attractive, kind of like finely crafted upscale furniture. Granted, the two-blade barlow has a wider handle but the trade-off is the extra width makes the knife easier to grip and bear down on to apply pressure to the cut. The knife’s pocket presence is more noticeable due to the added weight and width, though no more noticeable than some other popular multi-blade slip joints.
The 2281R Barlow balances value with function in a good ol’ USA-made pocketknife. It adapts well to a variety of tasks, from wire stripping to cutting cardboard. It might not be as fancy in appearance as some of the others in this article, but it works well. The blades are easy to resharpen as well. MSRP: $53.75.
Lionsteel CK01
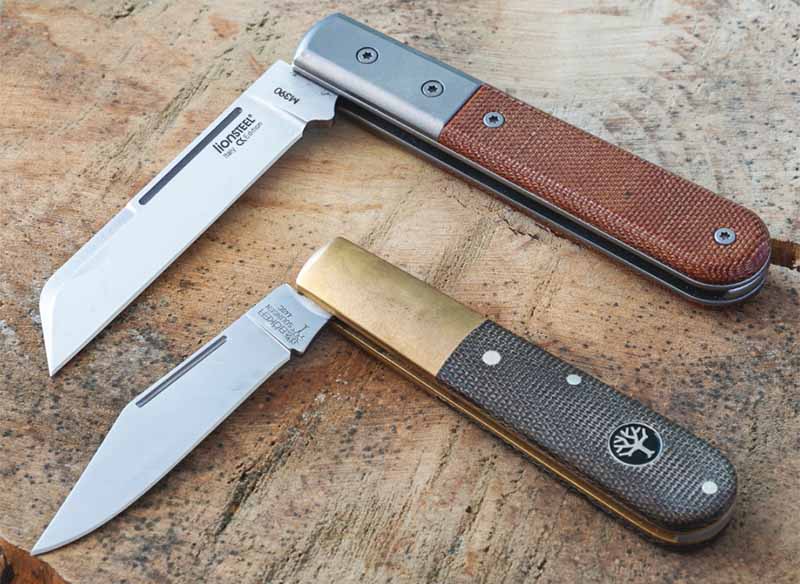
Offering four different blade shapes, the Lionsteel CK01 series is about as high end as you can get for a production barlow. Built from Bohler M390 super steel, titanium liners, and bolsters, and a variety of higher-end natural and synthetic handle materials, the CK01 barlows are show stoppers.
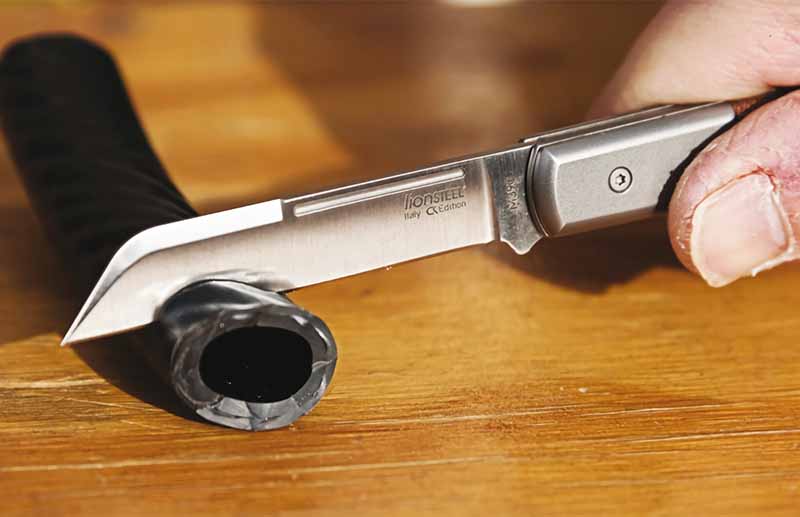
The M390 blade of the Lionsteel CK01 Don model was super sharp right out of the box. It provided plenty of bite for tough tasks such as cutting thick rubber hose.
The Don model has a 2⅞ -inch sheeps-foot blade. The 3.75-inch closed length makes the knife large enough to tackle tough cuts while small enough to be carried comfortably in a pocket. The light brown Micarta® scales are handsome.
The bead-blasted titanium bolsters sport a subdued appearance. Torx-screw construction and a half stop augment the mix—and so do the crowned liners and titanium handle spacer. The knife’s overall slightly rounded/not flat appearance lends an interesting visual appeal. I really dig the crowning—any manufacturer who does this on its knives definitely pays special attention to detail.
The sheepsfoot blade is less common in barlows but is a highly effective pattern for a variety of cutting and slicing chores. The straight-line edge severs cardboard, tape, and plastic sheeting quickly. It also strips electrical wire easily. The pattern is rather easy to resharpen due to the straight-line edge—that is, there is no blade belly with which to hassle. Since the sheepsfoot lacks a defined blade point, there is enough tip left for effective scoring. The Don’s sheepsfoot incorporates a couple of visual features that stand out. First is the long pull on each side of the blade for easy ambidextrous opening. A swedge on the blade spine is a refreshing look. The knife slices like a dream and the M390 steel really holds an edge well. MSRP: $122, plus shipping, and is available exclusively through CollectorKnives (collectorknives.net).
This about as high end as you can get for a production slip joint, integrating titanium, a high-end super steel, and a lightweight, high-tech handle material. For an additional $9.95, you can order the optional leather slip sheath available in multiple color options
Are you up to the challenge of frame handle construction?
Frame handle construction for knives has been around for centuries. Historical examples of many Eastern styles like the kard, khyber and yataghan often feature ornamented frame handles. Nineteenth-century knives attributed to James Black and some of the early American bowies also had frame handle construction. Though it’s been around a long time, the frame handle remains a viable modern construction method for today’s custom knifemakers.
There are many ways to crack the nut/skin the cat on frame handle construction. This article will walk through the frame handle process and point out particular problems and potential solutions for those who wish to pursue building a frame handled knife.
3 REASONS WHY
Frame handle construction is best defined as using a wrap-around “frame” to conceal the tang of a hidden tang knife. The first question many people ask regarding a frame handle construction is, “Why would you want to do it that way?”
My first thought goes back to the earlier days of the internet when forums were at their peak, and fine makers like ABS master smith Bruce Bump took the time to document “work in progress” (WIP) threads. Bruce had a fine frame handle WIP on the KnifeDogs.com forum in 2013, and the consensus at the time was that you build a frame handle for quite a few reasons, though the first one is “because you can!”
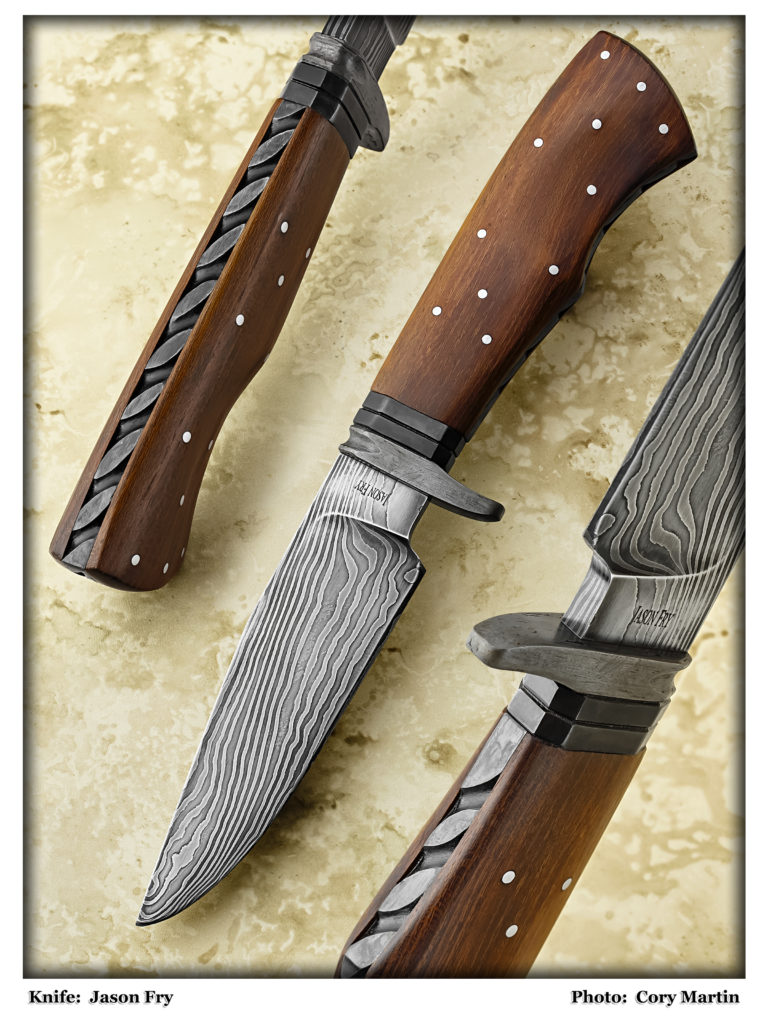
The author used frame handle construction for his hunter in a blade of 33-layer damascus, a wrought iron guard and scales taken from a fence post made in 1912 from bois d’arc wood, aka osage orange. The spacers are World War II practice bomb material. (Cory Martin knife image)
A frame handle is a much more complex build process than your standard full- or stick-tang knife. However, in addition to the show of skill by the maker, frame handle construction has a few distinct advantages that make the complexity worth the effort:
A frame handle allows for the look of a full tang, but with the guard-fitting techniques of a stick tang. For a forged stick-tang-knife design that needs a guard, a frame handle allows the use of full-tang-style handle construction;
A frame handle is a good way to use scales or slabs on a stick-tang knife. If you have a good set of stag or mammoth slabs, or if you have stabilized wood slabs that might be too fragile for through-tang construction, the frame handle allows you to use the materials on a stick-tang knife; and;
The use of a frame handle gives the maker another area to embellish the knife. Some frames are great for engraving, while others may highlight a damascus pattern. Either way, the frame makes the embellishment stand out in ways that are harder to accomplish on a full-tang knife.
HOW to DO IT
At a basic level, the frame of a frame handle is a piece of material, usually metal, that wraps around a stick tang and mimics the look of a full-tang knife. This presents some challenges that have resulted in a few different creative solutions.
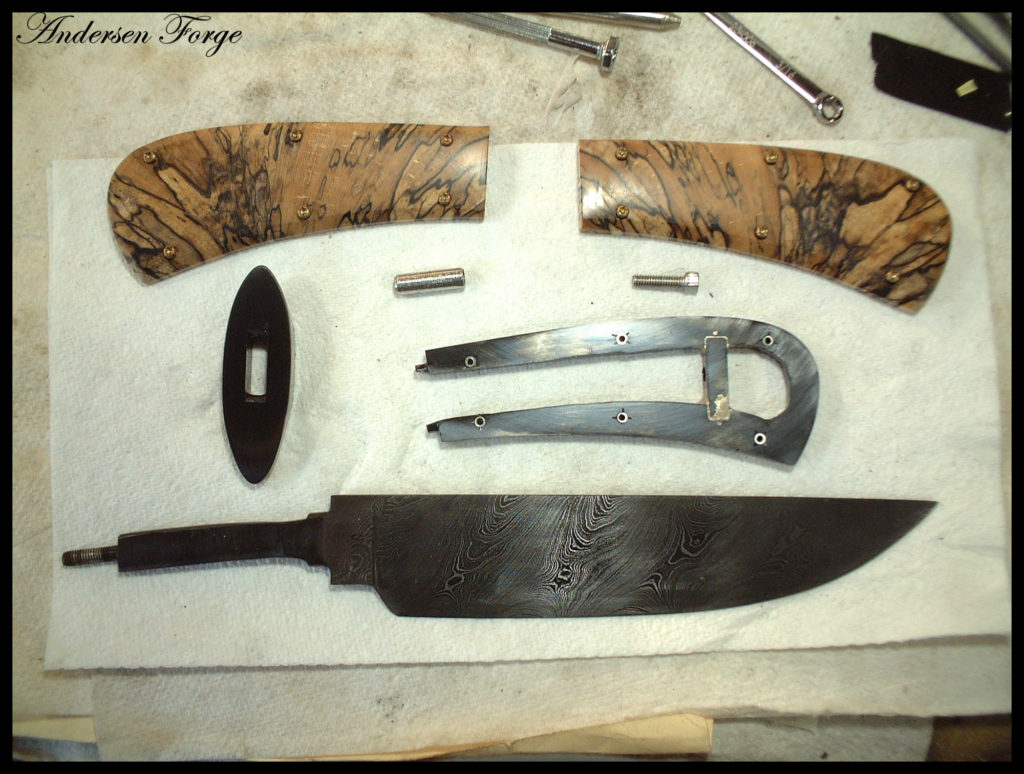
An exploded view shows an ABS journeyman smith Karl Andersen frame handle construction knife before assembly. (Karl Andersen image)
Challenge 1: The tang must fit inside the frame. Some makers insist on precision so there are no gaps and the fit is tight. Others concede that the handle will be held together with mechanical fasteners and sealed with epoxy, so a precise fit between the frame and the tang is not necessary.
Challenge 2: All parts of the handle must be securely fastened together. I sat through a class with ABS master smith Mike Williams in which he admonished the students, “Don’t trust in the magic of chemistry” by putting your faith only in the strength of glue. Likewise, veteran bladesmith Jerry Fisk challenges makers to think ahead to what their knives might be like in 100 or 1,000 years, and recommends a mechanical connection that won’t fail over time.
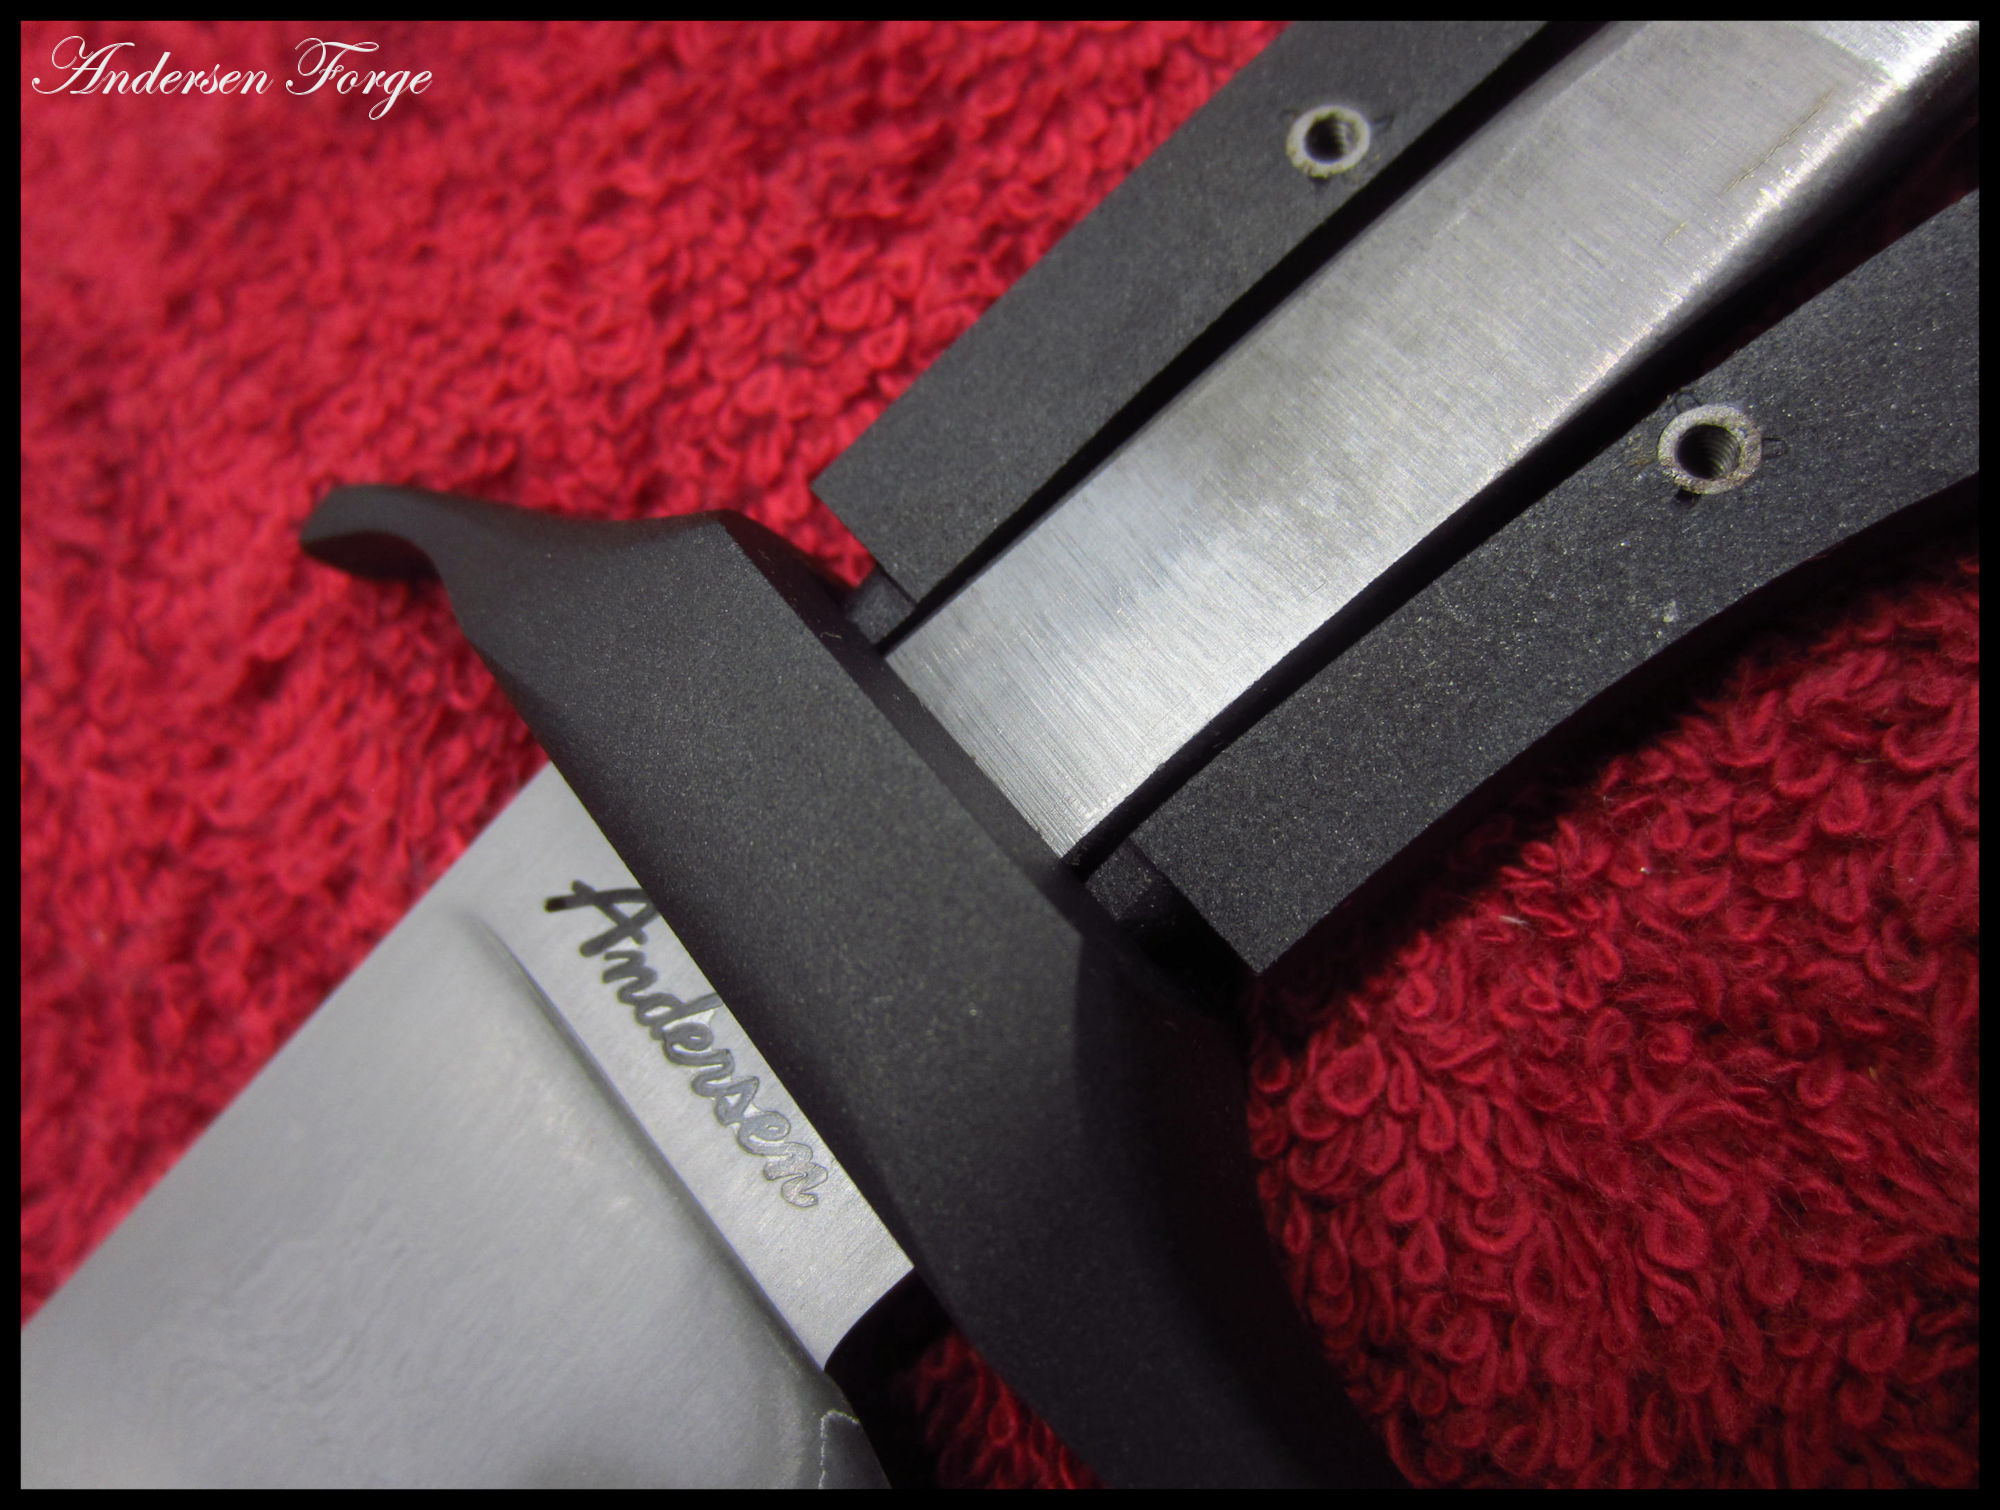
One way to address this challenge is to use pins. If you pin the scales to the frame, pin the completed handle assembly to the tang and follow up with glue, there’s no opportunity for failure. Some choose to make all the pins visible as an artistic element, while others take advantage of hidden pins for all but the one through the tang. Another way is to use a threaded fastener. Bladesmith Salem Straub recently illustrated the technique on a frame handle WIP on his Instagram feed. Salem used a threaded fastener in an internal slot in the frame to mechanically lock all the parts together tightly (Image 1). The handle material is relieved on the inside to accommodate the fastener.
Another way to use a threaded connection is to thread the end of the tang and use a fastener on the handle butt. An advantage of this approach is that the fastener itself can become part of the embellishment.
Challenge 3 is the complex fit-up between all of the knife’s elements. Frame handle construction naturally doesn’t excuse a poor guard fit, but it also provides other places for gaps and misalignment. Once again, there are several potential solutions to alignment problems.
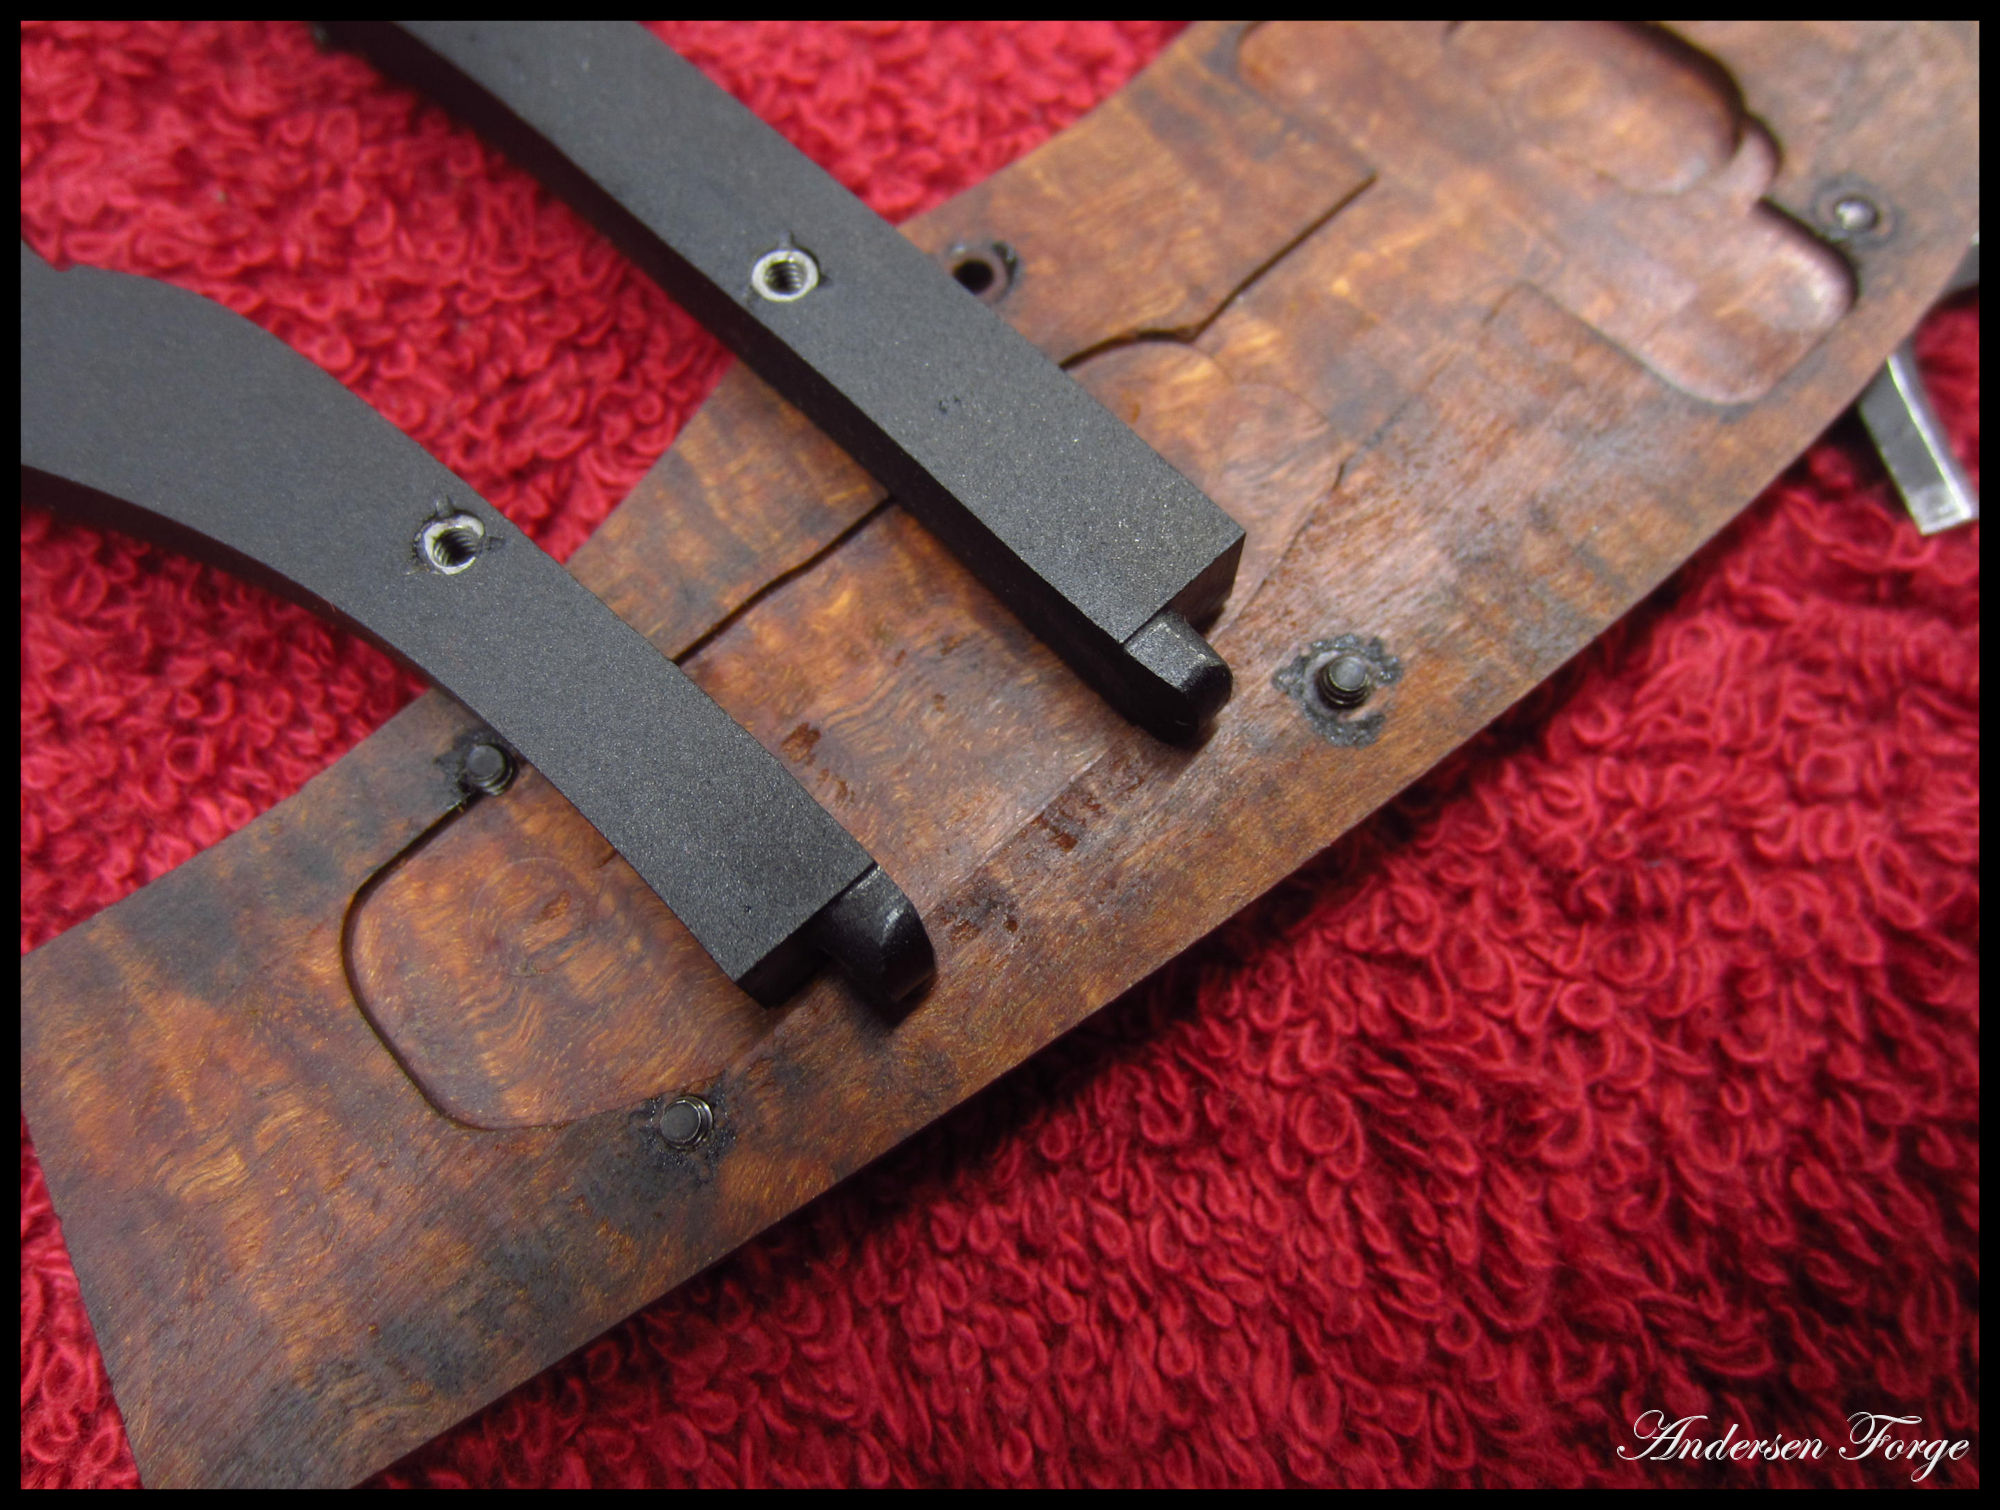
One is the use of alignment pins to make sure everything is secure. Pins on the end of the frame go through any spacers and into holes in the back of the guard so that each part indexes the same during assembly. Some makers, including Bruce Bump in the aforementioned epic WIP, advocate for leaving metal tabs on the end of the frame and fitting the tabs into similar holes on the back of the guard (Images 2 and 3). In both cases, there’s a mechanical connection that prevents the guard, spacers and frame from rotating out of alignment around the center axis of the handle. Either way, when you build a frame handle, the construction will require you to assemble and disassemble the knife repeatedly, so you’ll need some mechanical way to keep things lined up.
1 of 2
Above: Some makers advocate for leaving metal tabs on the end of the frame and fitting the tabs into similar holes on the back of the guard. In both cases, there’s a mechanical connection that prevents the guard, spacers and frame from rotating out of alignment around the center axis of the handle. (Karl Andersen images)
Another fit-up challenge is the overall requirement for clean-fitting joints with no gaps. It sounds simpler than it is, but two surfaces that are dead flat will join together without a gap. The challenge of a multi-piece frame handle with a guard and a few spacers is that you are creating a multitude of surface joints, and every single surface must be dead flat. At a minimum, you’ll have a joint between the guard and frame, and also between the frame sides and the handle material. Any bump or wiggle on any surface and you’ll have a gap in the final product. Flatness comes in degrees. You can get a fairly flat surface on a platen, flatter on a disk, and still flatter on a surface plate or surface grinder. You have to make the joints as flat as you can with the tools you have available if you want a gap-free fit.
I tend to prefer the look of a tapered tang on a full-tang knife, so I’ve started tapering the frame of my frame handles as well. Others stick with a full thickness frame, where the thickness closely matches that of the blade at the ricasso. Some add spacers between the tang and handle material, while others choose to go with the frame and handle slabs only.
Another fit challenge is presented by the frame itself. In order to adequately finish the visible surface of the frame, whether by simple polishing, bluing or etching, or by engraving, the frame must be 100 percent at final-grit finish prior to final glue up. Many makers learned to make a full-tang knife by finishing the front edge of the scales, gluing the knife together, shaping the scales down to the exposed tang, and then polishing the handle and the tang at the same time. That method will not work for a frame handle that needs to be blued or etched. Personally, I tend to use dummy pins to fit the entire handle assembly together, then grind the scales down to the frame. In his recent Instagram example, Salem Straub used small screws to hold the handle material to the frame.
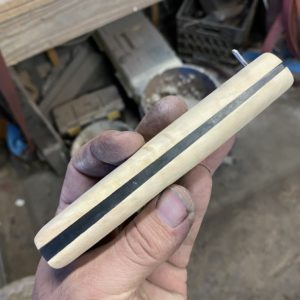
With regard to the relationship between the handle material and the frame itself, whichever method you choose, it is important that the fit be maintained consistently all the way around the frame. (Jason Fry image)
With regard to the relationship between the handle material and the frame itself, some choose to leave the material slightly proud of the frame for a “museum” or “heirloom” fit. Others prefer the material to fit flush to the tang. Less commonly, some makers round the frame and leave it slightly proud of the material. Whichever you choose, it is important that the fit be maintained consistently all the way around the frame, from the joint at the guard on the top all the way down to the joint at the guard on the bottom.
Once the profile is set, I polish the handle and the frame together down to final grit, and then apply any surface finish to the frame itself. Once all parts are 100 percent complete, they can be glued together as a final step.
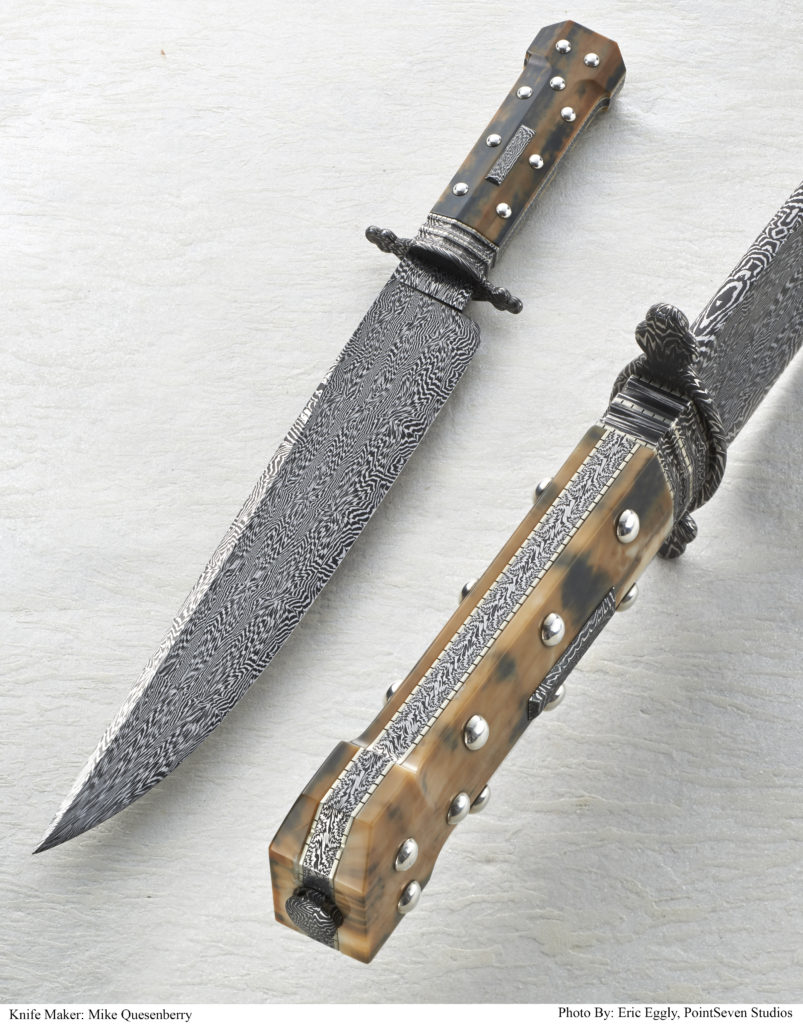
ABS master smith Mike Quesenberry used frame-handle construction on his dog-bone bowie. (Eric Eggly/PointSeven image)
WHEN to DO it
So when should you try making a frame handle? In my mind, if you can make clean full- and stick-tang knives, you could be up to the challenge. If you have slabs of exceptional handle material that deserve more than a simple full-tang knife, a frame handle is a way to step up and put the materials on full display. If you have a knife in mind where the frame and guard need to be blued, damascus or engraved, a frame handle is the way to go.
A frame handle knife has its advantages, but the complexity of the construction presents plenty of challenges. As a skilled maker, you may choose to rise to the challenge of a frame handle just to show that you can.
For more information on frame handle construction contact the author at [email protected].
The proper angle is key to a sharp blade. Here are the angle-guide sharpeners that ensure you’ll always get it right.
A big part of sharpening, aside from proper sharpener selection, is how to select and maintain the proper angle of the blade to the sharpener. In fact, the key to successfully sharpening any blade regardless of the grade of steel is being able to maintain that angle. Ever try sharpening freehand on a bench stone with little experience doing so? The reason folks get frustrated with learning to sharpen is they don’t keep the angles consistent. It’s all about the angles. You must take into account what use your knife will see and sometimes that determines the specific angle to use.
You probably know of the angle guide kits with a metal clamp that affixes to the blade and has uprights on either end with a series of holes that correspond to various degrees of angles. Such kits all help instill confidence and the ability to subtract guesswork at maintaining the desired angle.
SHARPENER TYPES
There are plenty of sharpeners capable of reproducing keen edges. Avoid the pull-through types that require you to drag the blade through. Those are set at one angle and use carbide to get the job done. These will ruin a blade in time, and I don’t recommend them. You need a sharpening kit that’ll help establish and hold a consistent angle. All you need to be concerned with is making the motions to get the edge sharp.
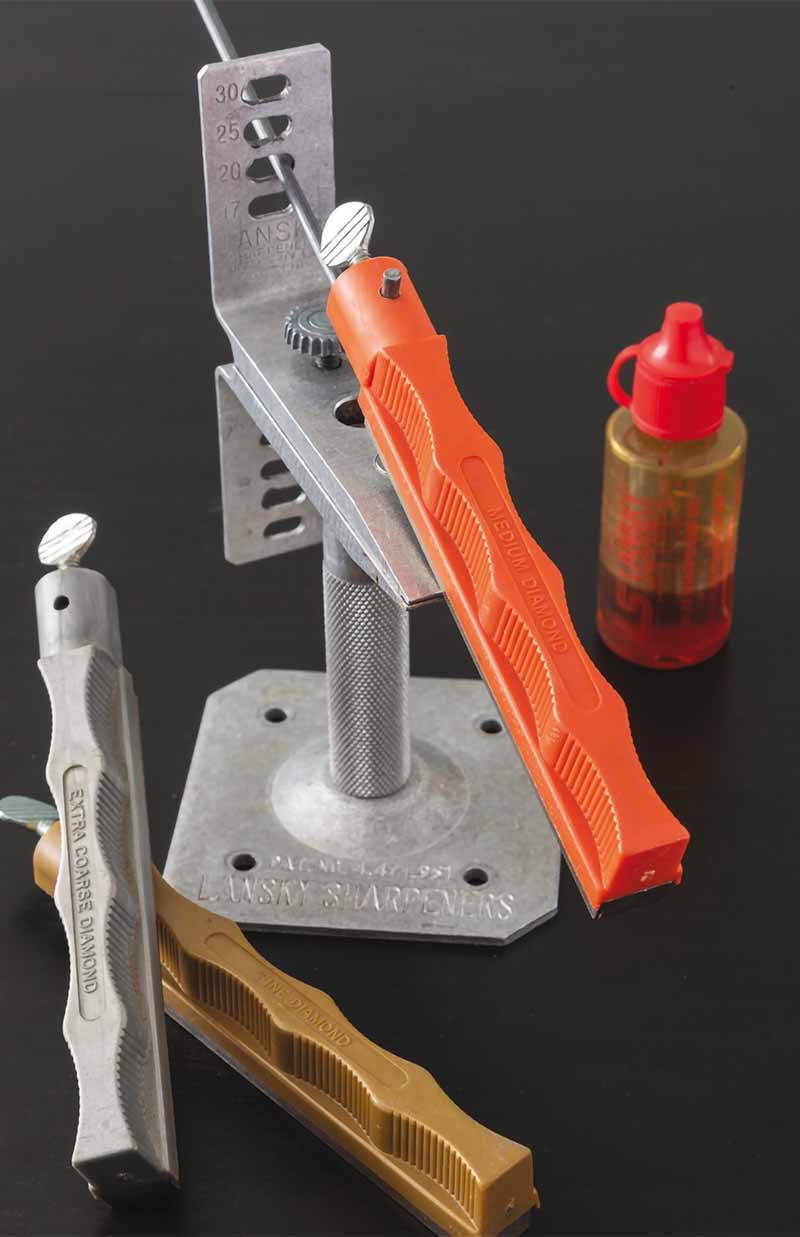
The Lansky Deluxe Diamond Knife Sharpening System is one of the oldest angle guide kits on the market. Four various grits of diamond-coated hones are featured, including extra-coarse for fast work of reviving dull blades. The sturdy aluminum clamp holds the knife securely.
Lansky’s four-stone Deluxe Diamond System Precision Knife Sharpening Kit is the best the company offers in angle guide clamp units. It includes an extra coarse hone great for reprofiling edge angles. It also has coarse-, medium-, and fine-grit diamond-coated hones for fine-tuning the edge once it’s been established. The aluminum clamp is sturdy and offers four edge angles: 17, 20, 25, and 30 degrees. The kit stores in a sturdy plastic storage case. MSRP: $114.99.
GATCO offers the Ultimate Diamond Hone Sharpening System, which is similar to the Lansky. Featuring coarse-, medium-, and fine-grit diamond-coated abrasives, the kit includes Ultimate Finishing and triangular-shaped serration hones, too. It works on plain, serrated, and partially serrated edges. The hones are wider and longer for more effective use and have molded-in integral handguards for safety. There’s also a plastic storage case. MSRP: $119.99.
To sharpen the CPM S90V blades with the SelectEdge 14 degree angle of its Hidden Canyon Hunter and Saddle Mountain Skinner, Benchmade offers the model 50082 14 Degree SelectEdge Guided Hone Tool. Designed in conjunction with and manufactured by Work Sharp, this compact sharpener incorporates a fine grit ceramic rod and a leather strap on the backside. Built-in guides set the blade at the correct 14-degree angle. The idea with this one is to apply frequent edge touchups. A premium steel, S90V is notoriously difficult to resharpen, a difficulty negated via frequent edge maintenance sessions with the 50082. MSRP: $25.
DMT’s Magna-Guide angle kit includes a magnetic guide rod and sturdy blade clamp with adjustable angles. Use any model DMT Double Sided Diafold folding fi le and you have two sharpeners in one—a freehand fi le and an angle guide kit.
For knives without the SelectEdge technology, Benchmade offers the Edge Maintenance Tool, also designed with and manufactured by Work Sharp. It uses a fine-grit ceramic rod and a leather strop but in a more compact folding format with a pocket clip for easy carry. As with the 14 Degree SelectEdge Guided Hone Tool, built-in guides assist in achieving the optimal angle for edge restoration. The Edge Maintenance Tool works well with pocketknives, fixed blades, and tactical folders—pretty much any knife. MSRP: $50.
DOWNSIZED 2X72
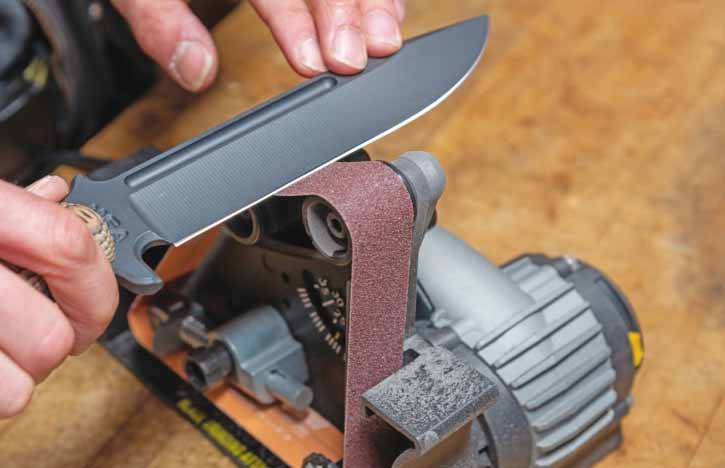
For the more advanced sharpeners among you, Work Sharp offers the Ken Onion Elite Sharpening System, a variable speed motorized unit employing long-lasting flexible abrasive belts made by Norton Abrasives. It’s pretty much a downsized version of a larger and much more expensive 2×72 slack belt grinder used by many knifemakers.
The Work Sharp Ken Onion Elite sharpener is pretty much a downsized version of a larger and much more expensive 2×72 slack belt grinder used by many knifemakers.
Designed by BLADE Magazine Cutlery Hall-Of-Fame® member Ken Onion, the Elite makes quick work of bringing completely dull and/or damaged knife edges back to life and is fully adjustable for applying edges between 10 and 35 degrees. The abrasive belts measure 1 by 18 inches and make quick work of any sharpening task. Once you become comfortable with how the sharpener operates, you can consistently grind an even edge on your blades. (Author’s note: Motorized sharpening is best left to those with sharpening experience.) MSRP: $199.95.
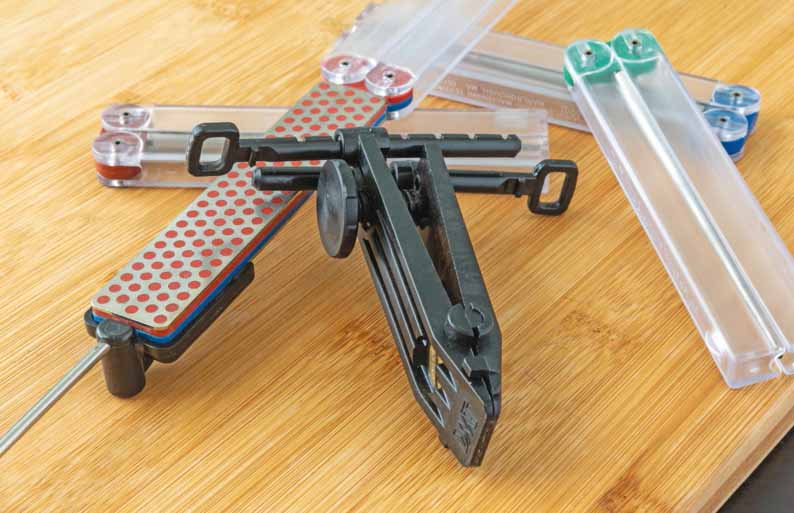
Diamond Machining Technology (DMT) offers the Double Sided Diafold Magna-Guide Sharpening System centered around the company’s Double Sided Diafold folding diamond files. The Magna-Guide System features the Aligner Blade Guide clamp with integrated, adjustable angle guides. A metal guide rod affixes securely to the Double Sided Diafold file via a large rare earth magnet. Attached to an FWCX Extra Coarse/Coarse Double Sided Diafold, the manual system can easily reprofile an edge to any one of seven pre-set angles.
DMT’s Double Sided Diafold diamond files are built well, highly effective, and among the best compact sharpeners on the market. One of the best things about the Magna-Guide is you can use the Double Sided Diafold files as stand-alone sharpeners without the guide rod and angle guide clamp. Consequently, you get a guided sharpening system and a standalone sharpener for the price of one. The Magna-Guide Kit’s MSRP: $27.49 (works with any Double Sided Diafold file).
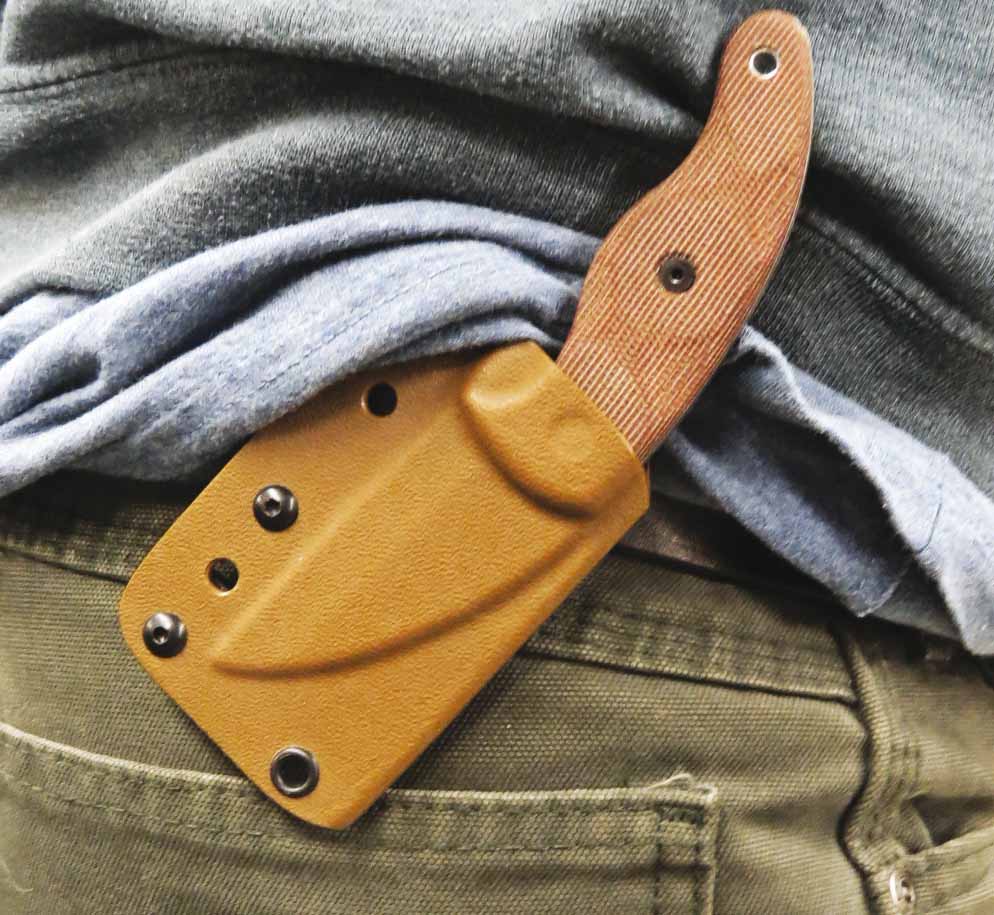
Ultra-thin and razor-sharp, the TOPS Little Bugger makes for a nimble and practical EDC fixed blade.
What The Little Bugger Has To Offer:
Thin blade makes for a light and nimble knife.
Straight edge with a saber grind makes quick work of most jobs.
Sturdy Micarta handle is ample enough for a solid purchase.
I have reviewed more TOPS Knives models than I can remember. Some have been hit-and-miss and others have been pretty good with just an issue or two. My biggest complaint with TOPS knives over the years has been their blade geometry. Blade profiles, handles, and sheaths have all worked out in some of the designs. As for the blade geometry, I have always thought, But only if they went a little thinner!
The Little Bugger’s sheath makes for a great little belt carry that provides quick, easy access to the blade.
Thin isn’t the issue with the company’s Little Bugger fixed blade. The blade is thin and cuts like a razor. I couldn’t be more ecstatic with it—seriously. As a knife reviewer, sometimes I find it hard to share what I think about a knife—if I hate it, someone will say I don’t know what I’m talking about, and if I really like it, someone will call me a paid shill.
Well, let the haters hate.
The Skinny
The Little Bugger has a nice wharncliff e-style blade that gives a good articulated tip very similar to a utility knife. TOPS uses a saber grind to form the geometry—oh, and did I mention it was thin? TOPS not only puts a nice, high grind on the blade but starts out with thin stock. To begin with, the blade measures only .9-inch thick. The Little Bugger cuts like a razor. It was a sheer pleasure to use right out of the box. For once, I’m not even going to complain about the choil, though when I first started cutting with it I couldn’t resist the what-if urge and strapped the blade.
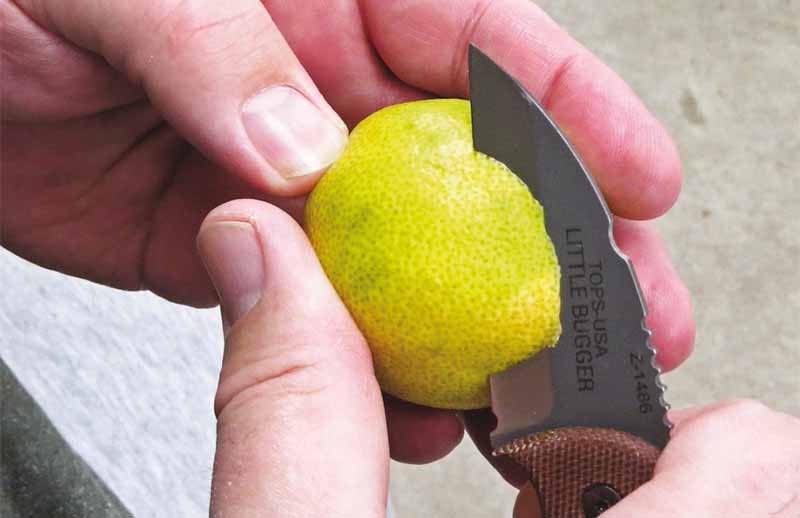
You can peel a lime with many knives, but the straight edge of the Little Bugger excels at the task. A little knife with a fi ne edge can do a range of chores, from semi-heavy to delicate
Accessories
The sheath is spot on. It is not big and clunky but snug fitting with a crisp lock. Best of all, the fit is so good there was no notorious plastic rattle during carry—it is quiet as a church mouse. (Though oddly enough, I can’t really tell you how quiet a church mouse is because I’ve never heard one.)
I know many like the Little Bugger style as a neck knife but TOPS includes a belt clip with this knife, and I see why. Between belt-carry clip and a tether carry system, you can EDC this little fixed blade with no problem. I won’t summarize what I think of the Little Bugger. If you haven’t got that by now, I haven’t written well enough. I will say, however, that now that TOPS has found this level of thin, I am excited and filled with anticipation as to see what other small fixed EDCs the company releases in the future.
We used a variety of throws to fully test the knives: handhold, blade hold, overhand, underhand, no-spin from three-to-five paces, half-spin from five to seven paces, and full-spin from seven to ten paces. Throwing at longer distances than this is, for me, frivolous and fruitless. Our targets were the sawn end of a pine stump on its side and a pine tree we are planning to take down. The stump was from a cut last year when we were clearing an area. It had seasoned somewhat and was a tougher target than the standing tree, so penetration was deeper in the standing tree.
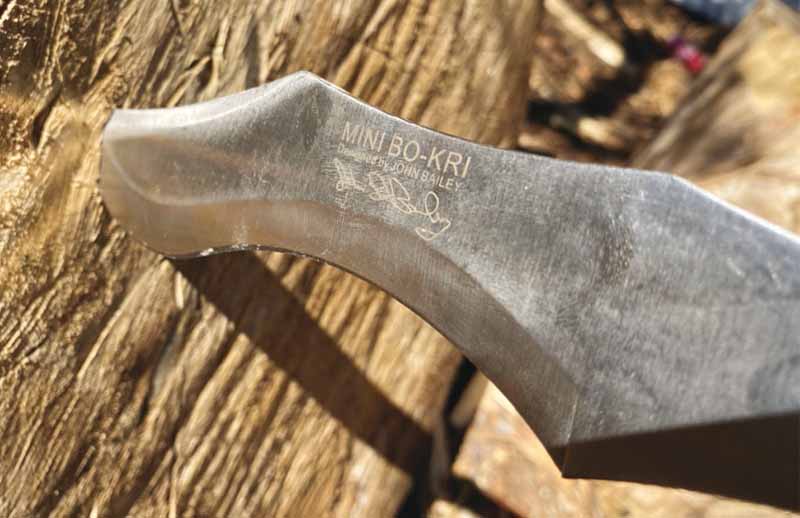
Boker Magnum Mini Bo-Kri
Designed by veteran knife thrower John Bailey, the Boker Magnum Mini Bo-Kri is the kind of throwing knife a performer would choose to use on stage.
It has a flashy, fierce-looking recurve blade and you know at first glance it’s a throwing knife. The largest and heftiest of the three review knives, the Bo-Kri is well balanced and flew true with each throw, handle hold or blade hold. Its weight aided penetration in both stump and standing tree. Its design is best for handle throws—it just feels better that way.
CAUTION: A thing to keep in mind is that with the Bo-Kri’s recurve blade there’s a good deal of spinning edge, which means that not only the point is sharp. You should ensure your target area is clear of people when throwing any knife, but in this case a deflection would send a long edge spinning wildly. A nice leather sheath is included.
Boker Magnum Mini Bo-Kri Specs Blade Length: 5.71” Blade Steel: 420J2 stainless Blade Thicknes: .25” Blade Pattern: Drop point Blade Grind: Sabre, recurve Blade Finish: Brushed Edge Type: Plain Weight: 8.1 ozs. Overall Length: 10.71” Continent Of Origin: Asia MSRP: $34.95
Kizlyar Supreme Strij
I have the strong impression that Russians are serious about throwing knives and actually use them in the field. The Strij by Kizlyar Supreme would be my choice if I were going to hunt rabbits with a throwing knife like that 10-year-old kid—which I would not. Now I know enough to use the knife to make a throwing stick, spear, bow, etc. Nonetheless, the Strij appears to have been designed with field use in mind. Kizlyar’s information says the knife was designed by Russian “Throwing Knife Instructor Grandmaster” V.S. Kovrov. I think it’s amazing there is such a thing as a Throwing Knife Grandmaster, and it illustrates just how serious Russians are about this skill.
The Strij is balanced precisely in the middle, which facilitates both handle and blade throws, as well as spin and no-spin throws. Kizlyar’s promotional material also says that “the Strij definitely requires a master’s touch to be accurate.” I disagree. My son, Justin, stuck it deep in the center of the target with his first throw. This one is a keeper.
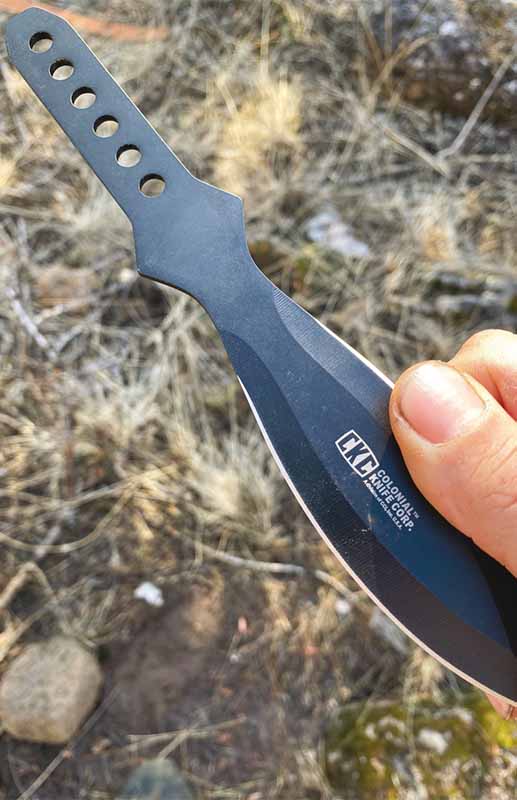
My impression of Colonial’s throwing entries? They look like ninja knives—black, radically curved, lightweight, perfect for a ninja. Colonial promotes these as “sport” or “pastime” knives to be used like darts. I get that. They’re balanced like darts, weight forward, which makes accurate handle-hold, no-spin throws easy. Even so, we also threw them with a blade hold and a spin, which worked fine. I can see a group of folks with a handful of these knives and a dartboard-like target. I can also imagine a ninja slinging a handful of these at pursuing samurai. (I have an active imagination.)
If you’re going for penetration with these knives, velocity is the thing. With little mass and weight, velocity is what will give them the power to penetrate. Whipping your arm—not your wrist—adds velocity. These little guys are fun to throw. Well-made nylon sheaths house each of the two Colonial throwers (they come in a set) until needed.
Colonial Throwing Knife Blade Length: 4.5” Blade Steel: 440A stainless Blade Thickness: .08” Rockwell Hardness: 57 HRC Blade Style: Dagger Blade Grind: Sabre Blade Finish: Brushed Edge Type: Plain Weight: 3.2 ozs. Overall Length: 8.5” Country Of Origin: China MSRP: $29.99 (set of two; includes a nylon carry case and sheaths)
Tips On Throwing Knives
The Bo-Kri and the Colonial knives are clearly designed as dedicated throwing knives, not all-around tools. The Kizlyar Strij, though also designed as a throwing knife, is quite usable as a general-purpose knife. None of the test knives came with paper-cutting sharp edges, as is proper for throwing knives. They can, however, be sharpened. They are also tempered fairly soft, as is proper so they won’t break if a powerful throw misses the target and the knife hits something hard. This means they won’t hold an edge long if used much. That’s OK. Edge holding is much overrated. If you want these knives to have a sharp edge, a few strokes on a good stone will do it. So, too, when they go dull—a few strokes will re-sharpen them.
If you want to throw knives, here’s a couple of tips: keep your wrist stiff when releasing the knife. Do not snap your wrist. Let the power come from your body, as when throwing a football, baseball, or javelin. Throw at a big, soft target and make sure there’s a large, safe backstop for when you miss—as you will at first if you’re new to the game. Even veterans miss on occasion. As you progress you can move on to smaller targets and moving targets. Have patience and, most of all, have fun.
Wherever folks live close to the earth, they use big knives
Little knives are convenient to carry but, if you have a lot of work to do, big knives are it. I’ve lived and worked with indigenous peoples in Latin America and Southeast Asia and found that wherever folks live close to the earth, they use big knives—machetes, parangs, goloks, bolos and the like. They use them for everything from rough work such as cutting poles and opening coconuts, to dressing out pigs and game, to delicate work such as slicing mangoes.
The advantage of the big blade was illustrated to me one day when I was working alongside a villager who, with his bolo and its 14-inch blade, cut wood for a fire, bamboo poles for a cooking rack, lopped off a banana leaf on which he filleted two large fish and sliced them thin as a sushi chef—all in the time it took me to bring down a few stalks of bamboo with my hair-shaving-sharp Randall Model 1.
We reviewed the test knives with that standard in mind. We chopped and split wood and sliced meat and tomatoes. We also, just because, cut hanging rubber hose and slashed through water-filled plastic bottles.
LONG, TALL & HANDSOME: Boker Arbolito El Gigante
The Boker Arbolito El Gigante is a handsome classic bowie with a stonewashed blade, comfortable handle and nice leather sheath. Balance is excellent, all very much in the bowie tradition. Construction is top quality; so is performance. It cleaved 2-inch pine saplings with one stroke. The quarter-inch-thick spine was brought down to a well-supported edge fine enough to slice tomatoes, and slice meat thin enough to see light through the slices. We slashed rubber hose and the water bottles with ease.
Like all well-designed and crafted bowies, this is a versatile all-around knife.
A tree branch succumbs to the reflective blade of the Boker Arbolito El Gigante. It cleaved 2-inch pine saplings in one stroke.
BOKER ARBOLITO EL GIGANTE
Blade Length: 9.25”
Blade Steel: Bohler N695 stainless
Blade Thickness: .24”
Blade Grind: Flat
Blade Finish: Stonewash
Handle Thickness: .94”
Handle Material: Green Micarta®
Weight: 15.75 ozs.|
Overall Length: 14.75”
Sheath: Leather
Country of Origin: Argentina
MSRP: $229
The El Gigante also proved its mettle after chopping wood by slicing a tomato nice and thin.
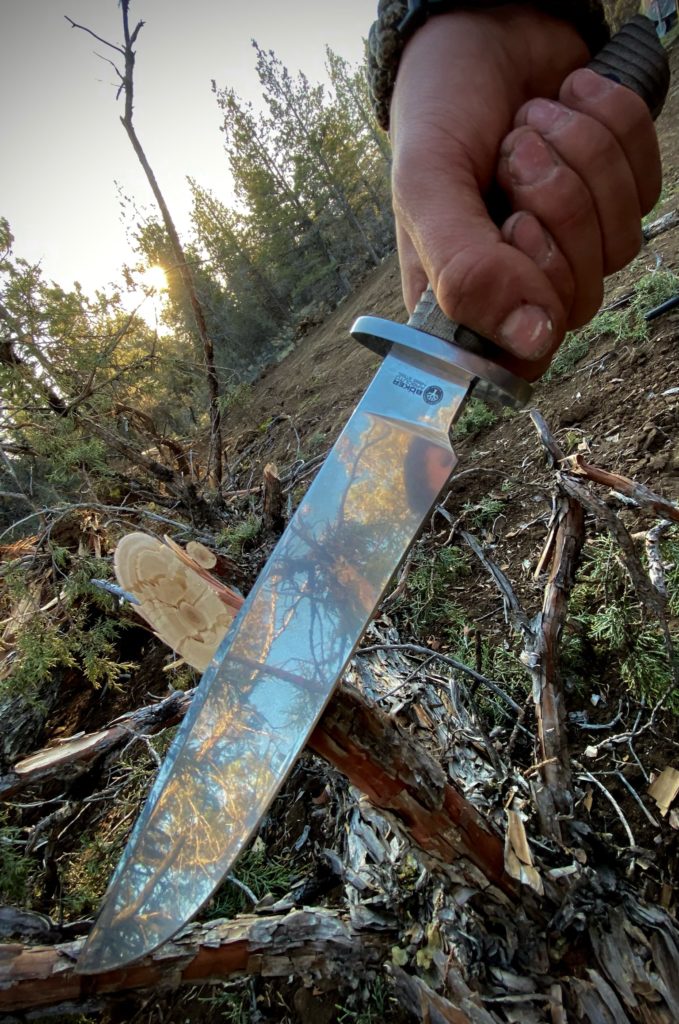
SEMPER FI! The KA-BAR Gunny
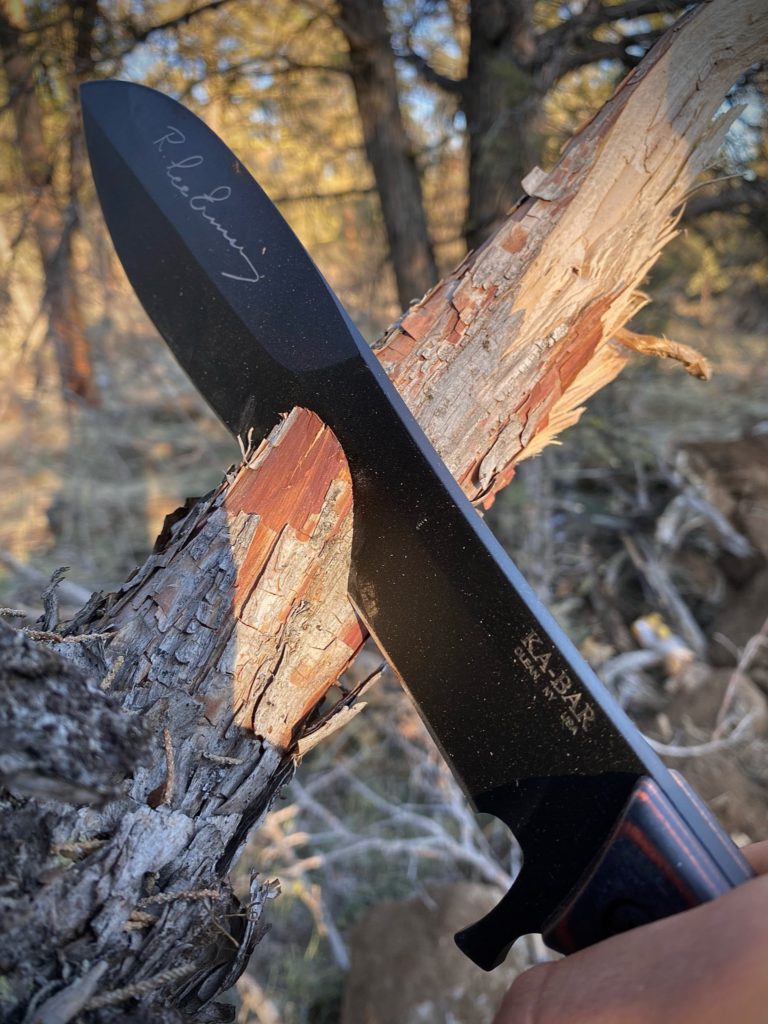
The KA-BAR Gunny is a hybrid design that resembles a bolo. I suspect R. Lee Ermey, the unforgettable Gunny who serves as the knife’s namesake, spent some time in jungles because this combination chopper/slicer’s performance is on par with village-forged bolos I’ve used in Southeast Asia, and that’s a high compliment. Its forward weight and terrific blade design promote efficient chopping.
The KA-BAR Gunny chomps into dry pine. Its forward weight and blade design promote efficient chopping.
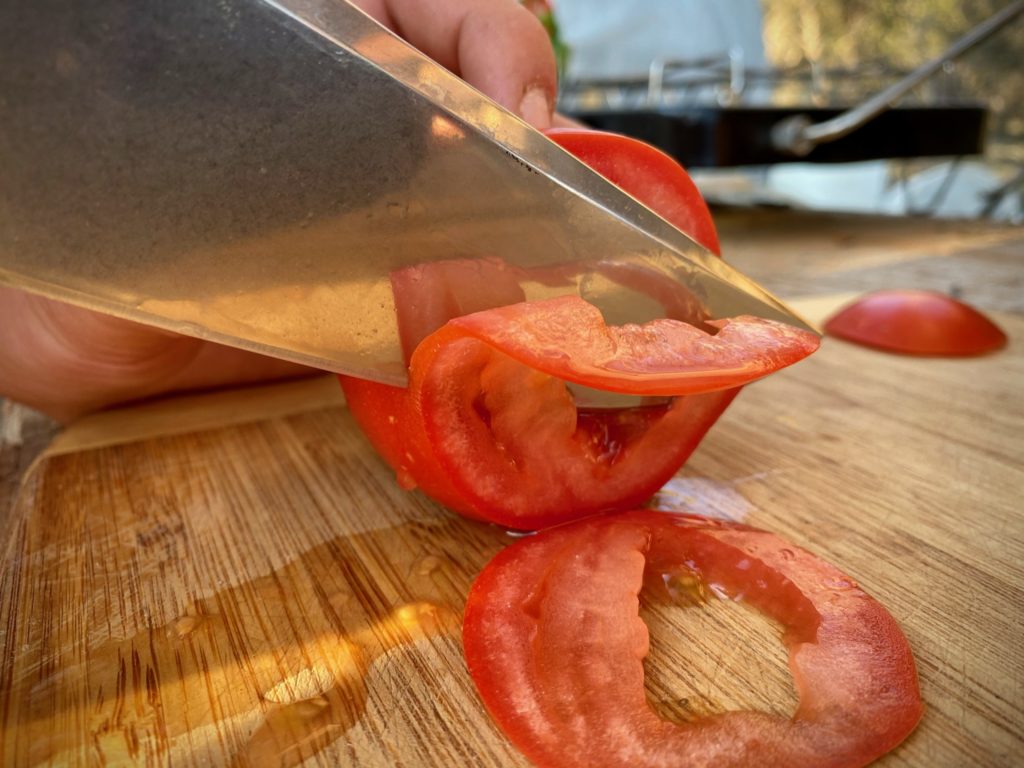
We cut through 3-to-4-inch-thick saplings with two strokes. We took down a tree with a 6-inch-thick truck just because we could. After the chopping the blade was still sharp enough for camp kitchen work. The belly, good balance and fine edge combined to make slicing meat and vegetables a pleasure. Slashing hanging rubber hose and the water bottle were a piece of cake. The comfortable handle lends itself both to heavy chopping and fine meat cutting, which is unusual.
The Gunny is an excellent all-around bush knife. The sheath has a pocket for a sharpening stone, which was not included with the review model.
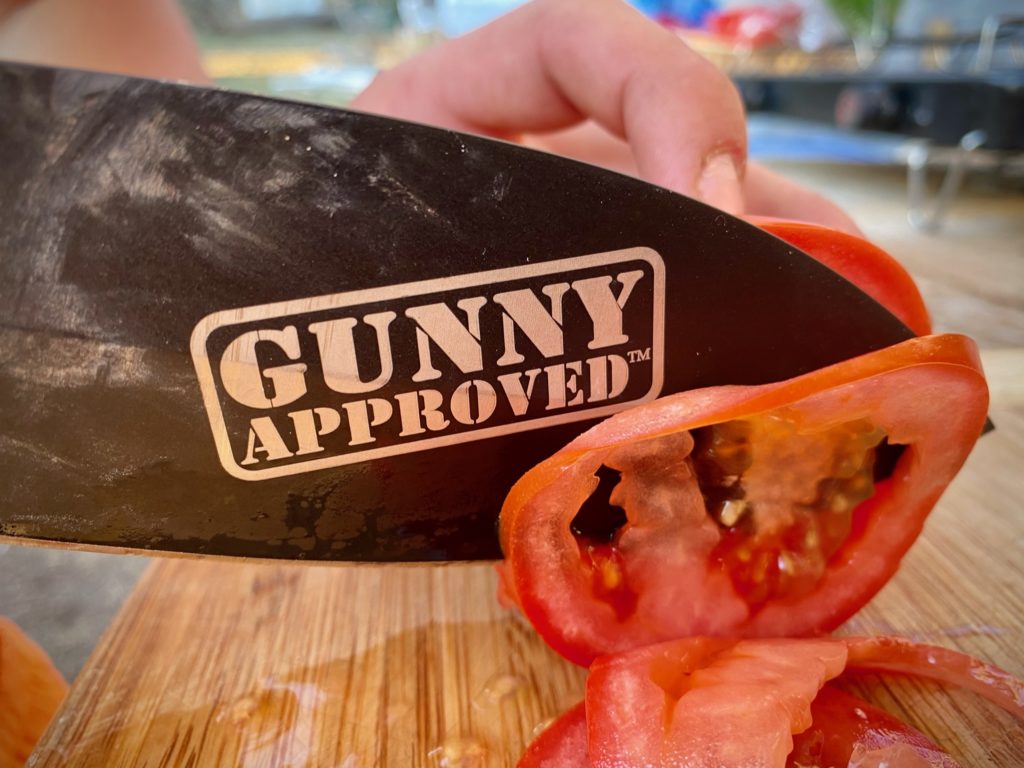
After chopping wood, the Gunny sliced tomatoes like a chef’s knife.
KA-BAR GUNNY
Designer: R. Lee “Gunny” Ermey
Blade Length: 9.75”
Blade Material: 1095 Cro-Van carbon steel
Blade Width: 2”
Blade Thickness: .2”
Blade Grind: Flat
Handle Width: 1.5”
Handle Thickness: .94”
Handle Material: Wood
Weight: 15.29 ozs.
Overall Length: 15.5”
Sheath: Leather
Country of Origin: USA
MSRP: $292
RAZOR SHARP: Medford Knife & Tool Bonfire
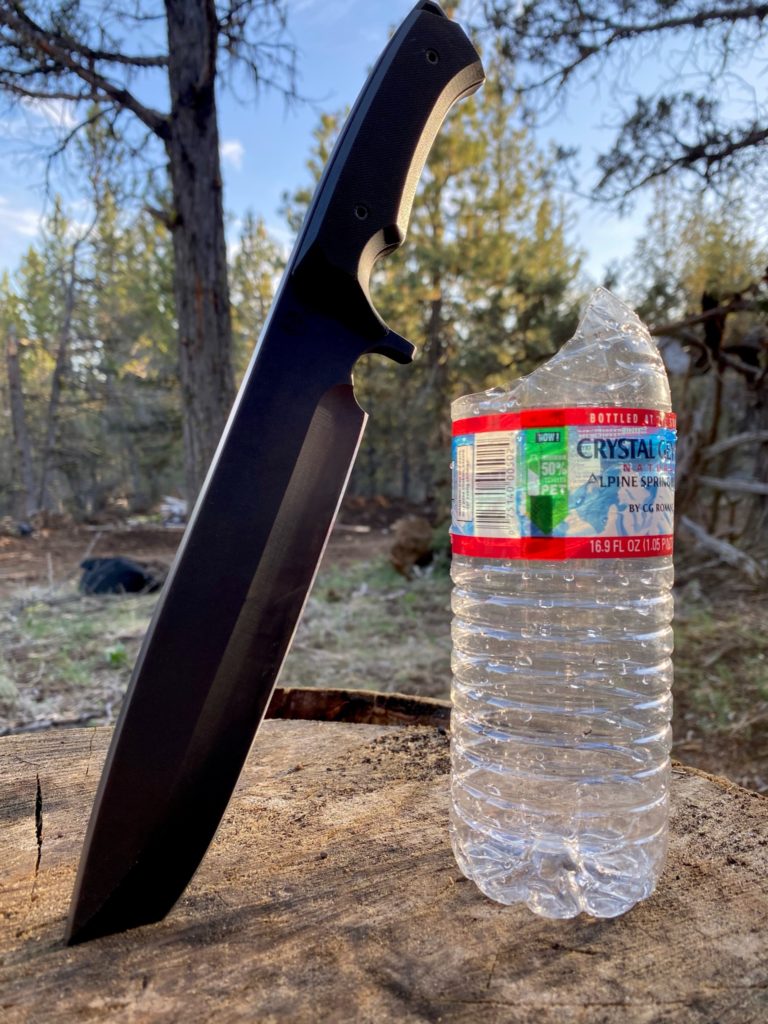
The Medford Knife & Tool Bonfire came from the maker absolutely razor sharp! The blade design is interesting in that we do not often see a contemporary styled drop point and hollow grind on such a big blade. I don’t know the Rockwell, but the steel is hard and tough. It was just as razor sharp after we put it through its paces as when we started.
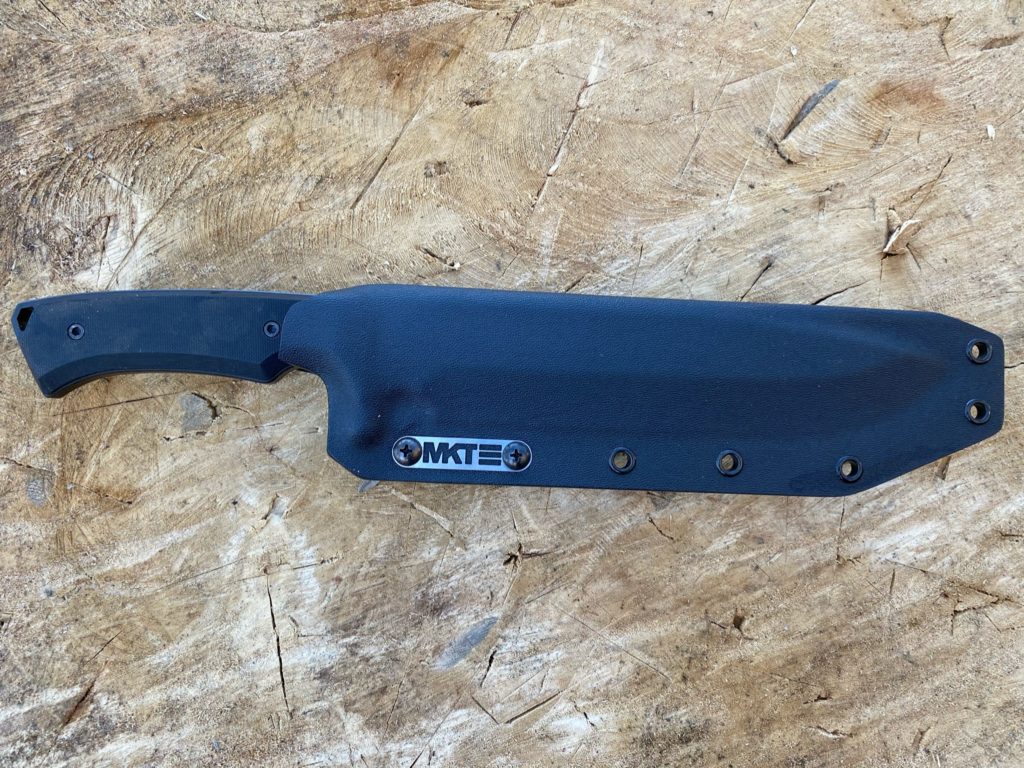
The Bonfire comes with a well-fitted Kydex sheath.
The fine edge made for a very good slicer and slasher and lopped off thin branches with one cut. The hollow grind tended to bind when chopping wood, though that’s to be expected—hollow grinds aren’t chopping designs. It’s better to think of this knife as a well-designed and crafted big knife rather than a bush tool such as a panga or kukri. It sliced rubber hose with a snap of the wrist and slashed through water bottles with more consistency than the other review blades and cut meat just fine. You probably could dress out a bear with it.
Use it as a big knife on soft materials and you won’t be disappointed. It comes with a well-fitted Kydex sheath.
The Medford Knife & Tool Bonfire slashed through water-filled plastic bottles with more consistency than the other review blades.
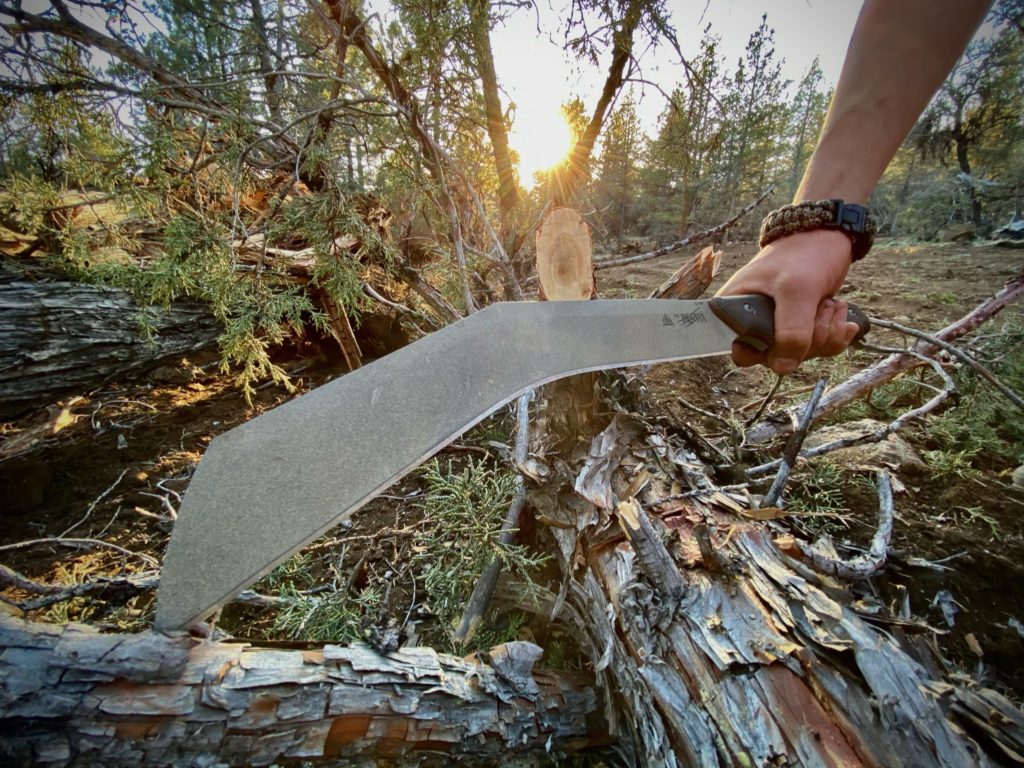
The TOPS Bestia is just a beast. A kukri-styled 13-inch blade and hefty weight make it the blade of choice for serious chopping or zombie cleaving. We hacked though a 3-inch sapling with one stroke, and used it to clear a stand of saplings and brush. The handle remained comfortable during an hour or so of work. Heavy as a small hatchet, it is more versatile and safer in use, especially in thick brush. During many survival classes, I’ve seen more injuries from hatchets than from big blades with their longer cutting edges.
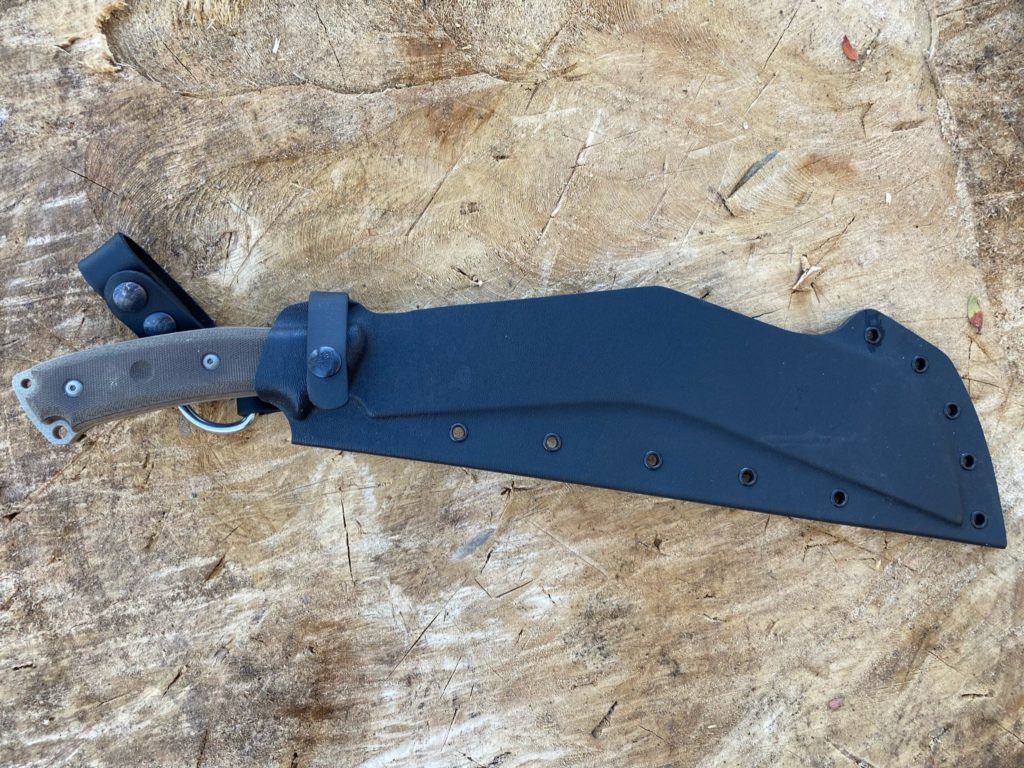
The Kydex sheath is formed to fit the unmistakable kukri-style blade of the Bestia.
Given its heft, blade design and chopping ability, the Bestia is surprisingly usable in the camp kitchen. We found it could slice meat quite well, allowing for adjustments in maneuverability due to its blade length.
The TOPS Knives Bestia’s kukri-styled 13-inch blade and hefty weight made it the blade of choice for serious chopping or, as the author puts it, “zombie cleaving.”
VERSATILE BUSH TOOLS If you haven’t spent much time with a big blade, try one. Work with it for a while. Direct close attention to your work and you’ll find a good big blade to be a terrific, versatile bush tool.