Home Blog Page 52

Puukko Perfection: Hot Scandi-Ground Options For Sportsmen

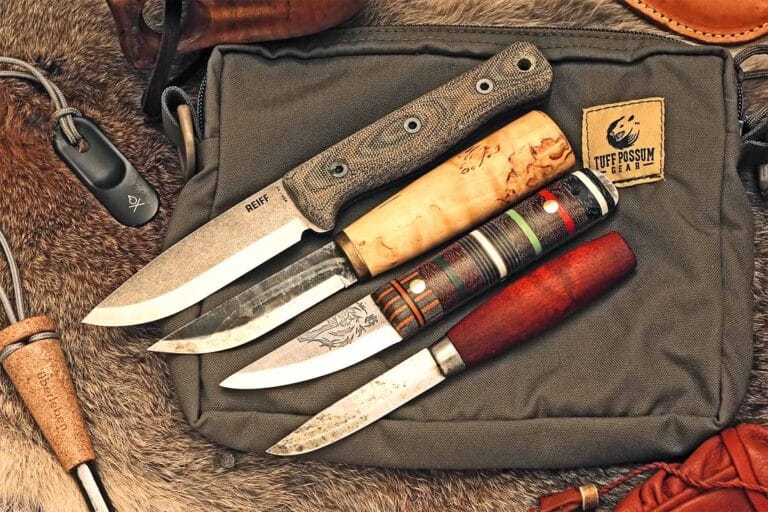
See how well four hot Scandi-ground puukkos cut and handle.

A multifunction knife, the puukko is integral to Nordic life, revered by scouts and symbolizing adulthood in Finland. The design—a palm-sized blade with a single edge and flat back—facilitates various tasks. It is ideal for carving and cleaning but lacks a guard because it’s crafted for slicing, not stabbing, with some models featuring finger grooves for wet conditions.

While men’s and women’s puukkos differ slightly in size and are ornately sheathed, both are equally esteemed. The puukko’s deep-carry sheath, easily attached to a belt or around the neck, makes it a practical tool for everyday use.

Puukko Grinds
Assorted grinds
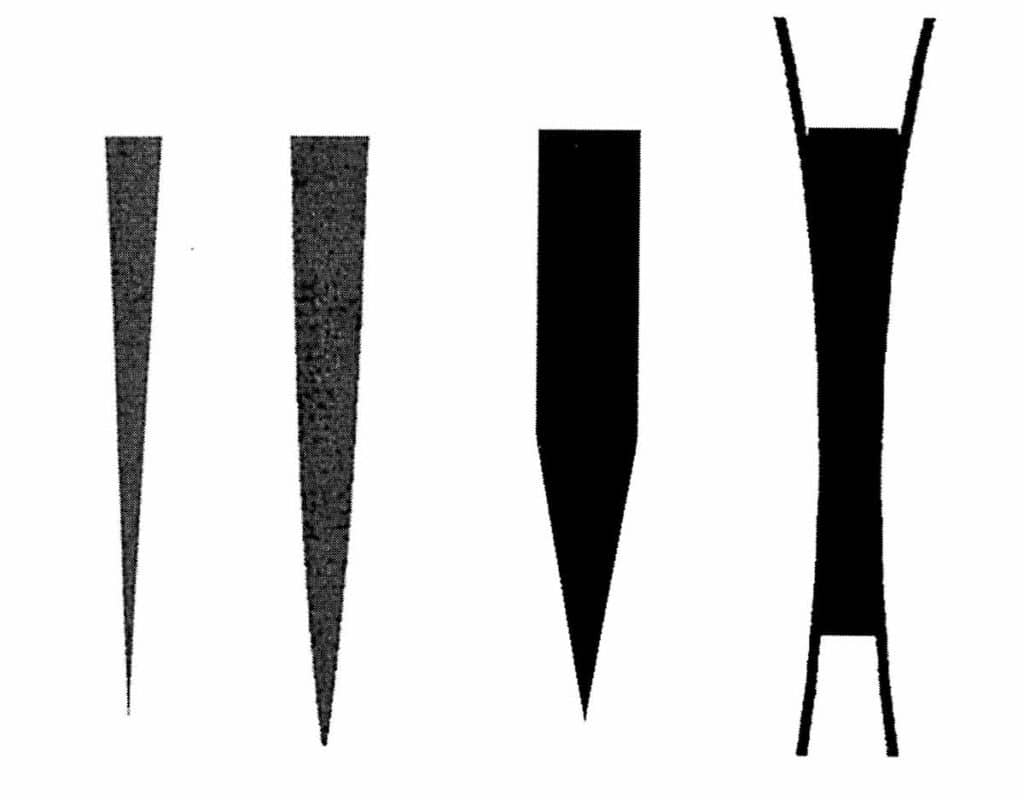
Assorted grinds, from left: flat, convex, Scandi and hollow. (from the BLADE® files)

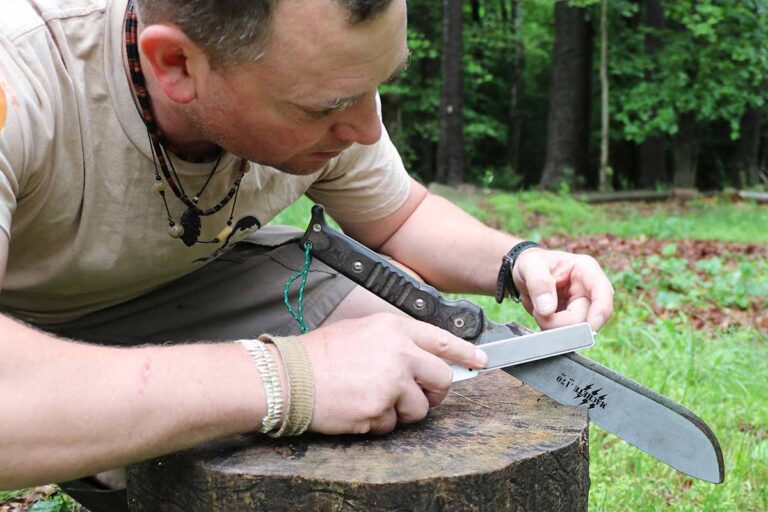
Scandinavian knives are renowned for the unique grind that sets them apart from other knives with flat, hollow, saber and other grinds. Most knives have primary and secondary bevels that meet at the cutting edge. However, Scandinavian or Scandi grinds feature just one bevel that starts near the blade center and tapers to the edge. The design creates an acute angle that produces a razor-sharp edge, making it incredibly easy to slice through even the most rigid materials. Additionally, sharpening Scandi knives is a breeze, as you don’t have to worry about getting the correct angle. Simply lay the blade on the stone with the edge against the honing surface, and voila!—you automatically get the perfect angle.

Marttiini Arctic Bush Knife
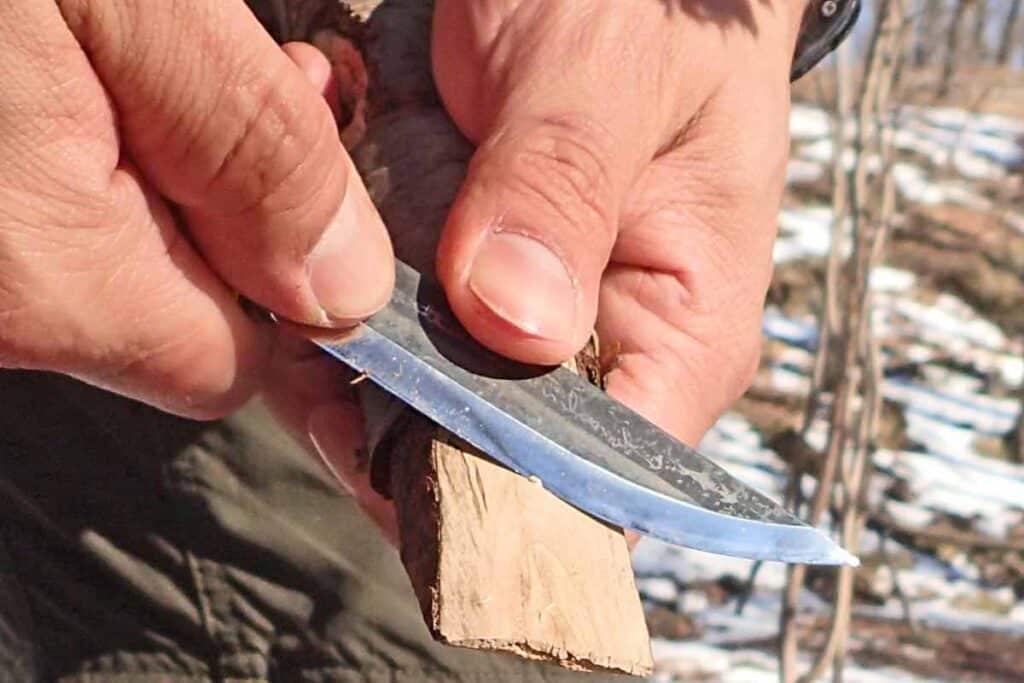
Fine-tuning a wooden wedge using the chest-lever grip with the Marttiini Arctic Bush Knife.
Fine-tuning a wooden wedge using the chest-lever grip with the Marttiini Arctic Bush Knife (ABK) is effortless for precise and challenging cutting tasks.

Marttiini knives are Nordic puukkos crafted in the Arctic Circle using generations of craftsmanship and modern technology. Founded in 1928 by blacksmith Janne Marttiini, the company produces high-quality utility knives made of natural materials like leather, curly birch and reindeer antlers, along with ultra-sharp blades of carbon steel. The knives are designed for use in harsh conditions.

Also known as Kiehinen in Finland, the Marttiini Arctic Bush Knife (ABK) is a beautiful, traditional stick-tang-style knife with a 3.5-inch blade. Made of stunningly grained curly birch, the handle is handsome and incredibly comfortable, a characteristic common to all top puukkos.

The ABK is an excellent choice for those who prefer a blade under 4 inches and have other tools for chopping or sawing. It is easy to use in winter conditions, even when wearing wool mittens or leather work gloves. The deep pocket carry sheath ensures the knife is easy to grip and deploy. Overall, it is an excellent choice for anyone looking for a traditional yet functional knife that offers both comfort and aesthetics.
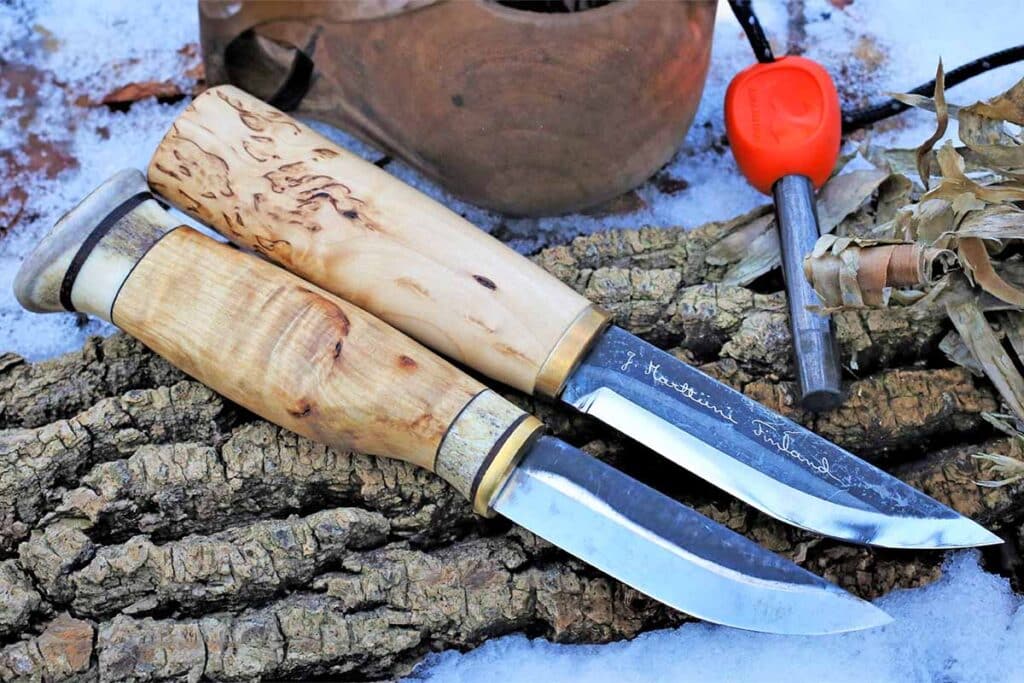
Puukko Marttiini and Wood Jewel.
Finland is known for crafting high-quality puukkos that can withstand harsh conditions. It is the world’s largest producer of puukkos. Two of the most popular brands are Marttiini (top) and Wood Jewel (bottom).

This past winter I had to carve hardwood wedges for splitting logs in camp. While axes (page 48) are the traditional tools for the task, I decided to use the ABK instead. It features an oval, tapered grip designed to provide a secure hold during challenging cutting tasks. The Scandi edge sliced through the dry maple with ease, even when encountering knots.

I was pleasantly surprised at how comfortable the knife was in a chest-lever grip for fine carving. I wanted to tackle the task while the knife was still sharp before moving to more knife-suitable camp craft such as making stakes out of beech and maple. In addition to carving wedges, I usually try to turn out about six good fuzz sticks before leaving camp for the next fire—sort of an early set-up. The ABK excels at the task as much as any Scandi blade would, making it a valuable addition to my gear.

Morakniv Classic
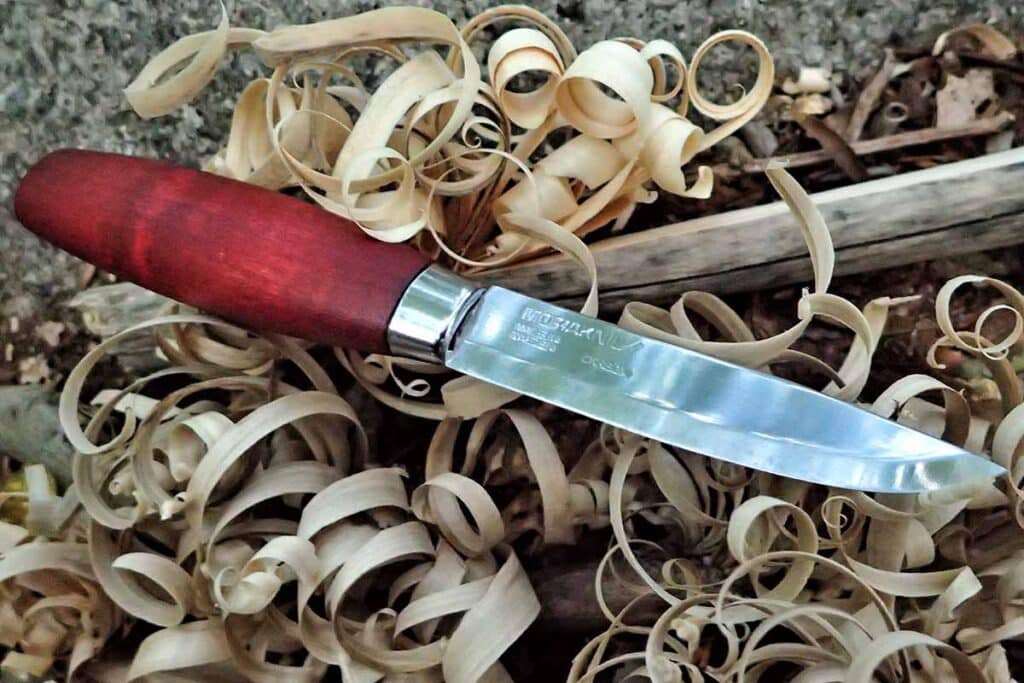
Classic No. 1/0
The Classic No. 1/0 has a 3-inch blade designed for carving feather sticks and whittling, making it great for fire preparation.

Morakniv knives are made exclusively in Mora, Sweden, where the company has been for centuries. Combining the benefits of handforged blades with industrial manufacturing, Morakniv is known for quality, consistent, sharp knives. They are recognized as a national symbol of Sweden and have been granted a Royal Warrant of Appointment by the King*.

The Morakniv Classic knives are a popular choice among outdoor enthusiasts and professionals alike. The blades are carbon steel and the distinct barrel-shaped handles are red-stained birch. The Classic knives have been around for nearly a century, and while some changes have been made over the years, the basic design has remained essentially unchanged.

In 2020, Morakniv updated the Classic series. The edge angles and blade shapes remain the same but all the knives have rattail tangs. The new polymer sheath is sleek and polished and features the Swedish Coat of Arms. The belt strap is Swedish vegetable-tanned leather designed to last generations.

The Morakniv Classic No. 1/0 has been renamed and upgraded from the Classic No. 2/0, with slight differences in handle width and blade thickness. The blade is .078 inch at the thickest. I like the trim blade. It is a hair longer than the 2/0 at 3 inches.
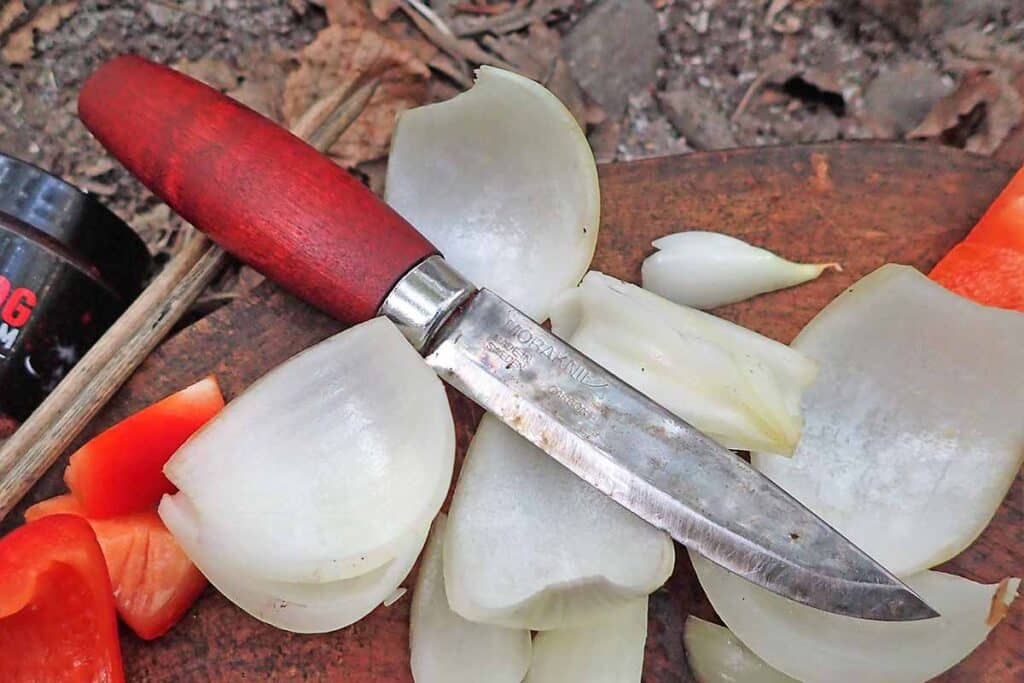
The Morakniv Classic No. 1/0 has a thin .078-inch blade useful for slicing onions, peppers, mushrooms and tomatoes.

I carried the bite-sized knife on a small carabiner hooked to my belt loop. I used it on dry poplar, hickory and maple to make feather sticks. It performed precisely as a Morakniv Classic should, slicing and curling wood with every stroke. Sitting by the fire, whittling and filling up my tinder/kindling coffee can with shavings was my nighttime routine with the 1/0.

The small, very able cutter regularly sliced peppers, onions and mushrooms for camp kabobs or morning omelets. Due to its kitchen knife-like thinness, the blade sliced food exceptionally well for a Scandi grind.

Bear Forest Knives Simple 3
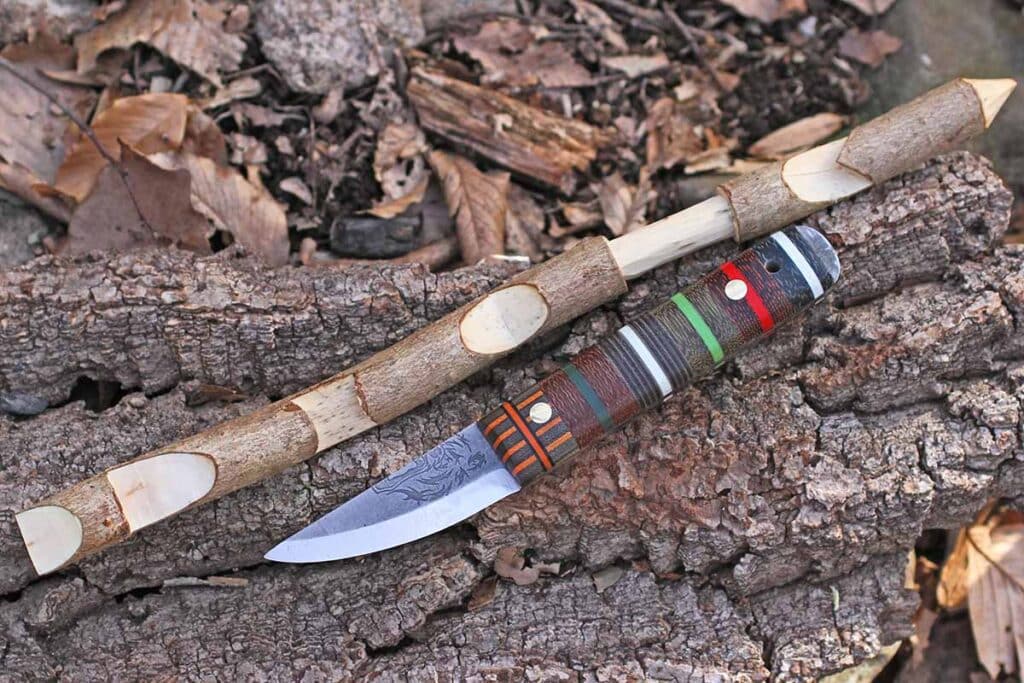
Bear Forest Knives Simple 3
The author used the Bear Forest Knives Simple 3 to carve a seven-notch try stick from semi-dry wood. The sharp zero grind excels on green and dry wood.

Based in the USA, Bear Forest Knives is keeping the puukko knife alive and thriving. The company recently released its latest addition to the Simple series, the Simple 3.

The full-tang Finnish puukko-style knife packs a compact and convenient 3-inch blade of 8670 carbon steel. Its straight-back 90-degree spine and zero Scandi grind ensure remarkable control and precision, making it ideal for intricate tasks. The Simple 3 features an exposed pommel perfect for light hammering tasks, which wasn’t an option on previous knives in the series. The 8670 is typically found in large circular saw blades, much like old-timey puukkos made in Scandinavia. The Simple 3’s compact size makes it highly versatile for various woods tasks.
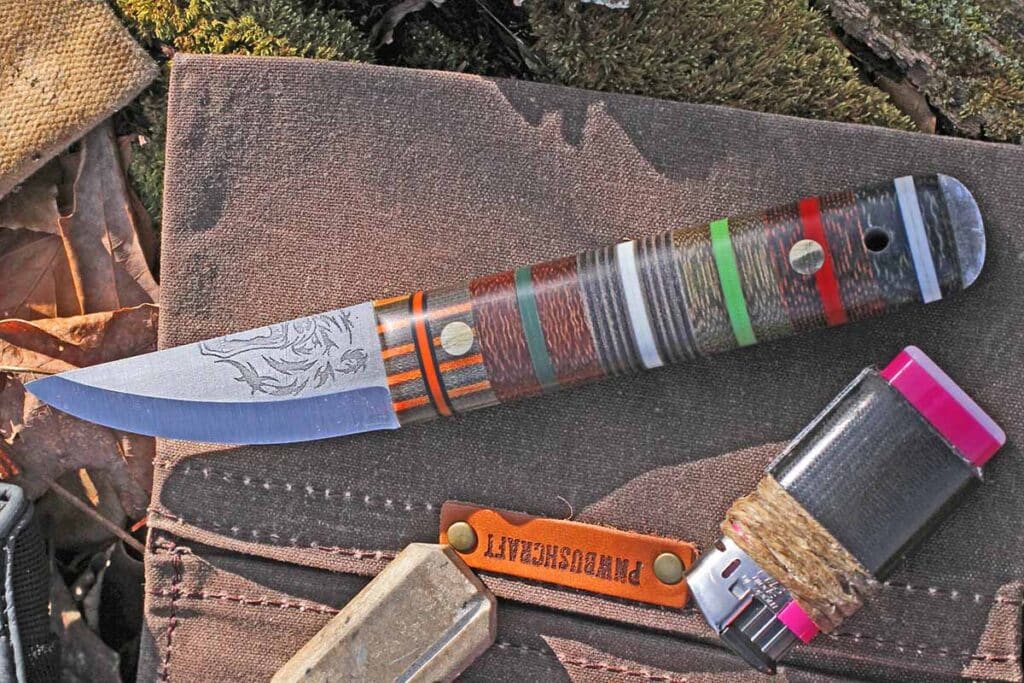
Simple 3 Puukko
The Simple 3 is a versatile puukko for camping, bushcrafting or hunting. The 3-inch 8670 carbon steel blade has a straight back, 90-degree spine and zero Scandi grind for control and precision.

Using the knife, I created a mini try stick and enjoyed some woodcarving. The handle was comfortable and filling, while the zero Scandi was perfect for removing a lot of material. I used semi-dry wood, which the Scandi grind works better on than a flat or saber grind. I continued crafting tent stakes and making fuzz sticks, which a puukko excels at most. Additionally, the super sharp spine was exceptionally helpful, as it helped me to ignite the nicely feathered shavings for fire using my ferro rod.

Reiff Knives F4 Scandi Bushcraft
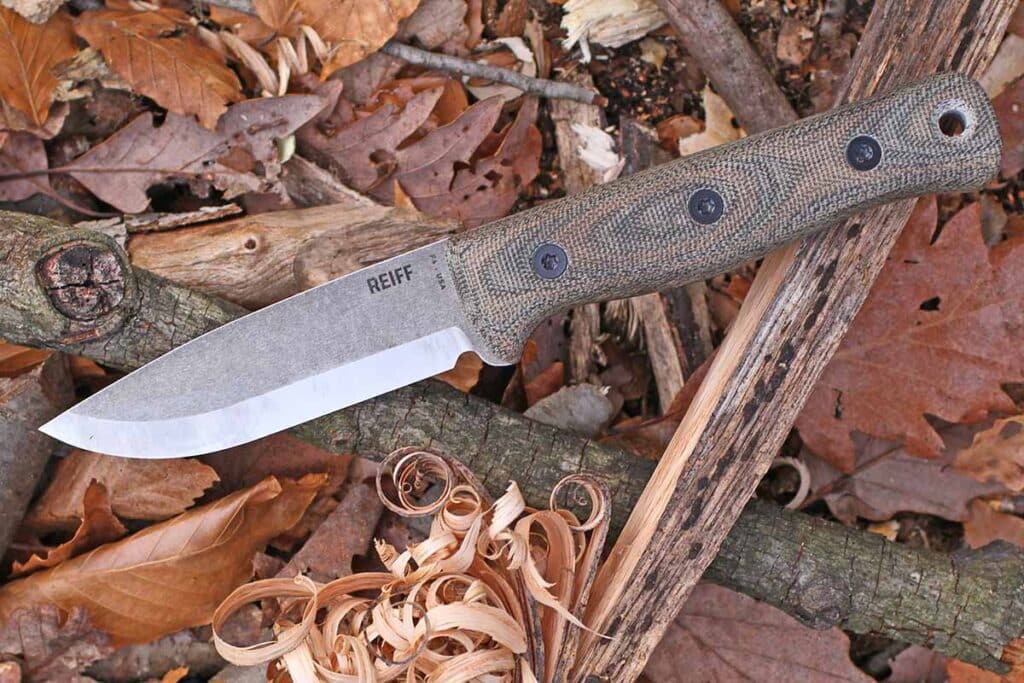
Reiff F4 Scandi Bushcraft
The Reiff F4 Scandi Bushcraft made feathering wood a breeze. The large handle helped ease the blade through hard oak to make thin, curly feathers.

The F4 Scandi Bushcraft is the latest homage to the puukko from Reiff Knives. The company keeps the contemporary rendition of the famed knife alive with modern craftsmanship and materials in a full-tang construction.

A knife with a Scandi-ground blade is a must-have for bushcraft enthusiasts. The F4 blade is CPM 3V carbon steel 5/32 inch thick at the thickest with a steep grind angle of 12.5 degrees per side. Its ability to effortlessly slice through wood, animal hides and food is remarkable. The textured canvas Micarta® scales are available in four colors.
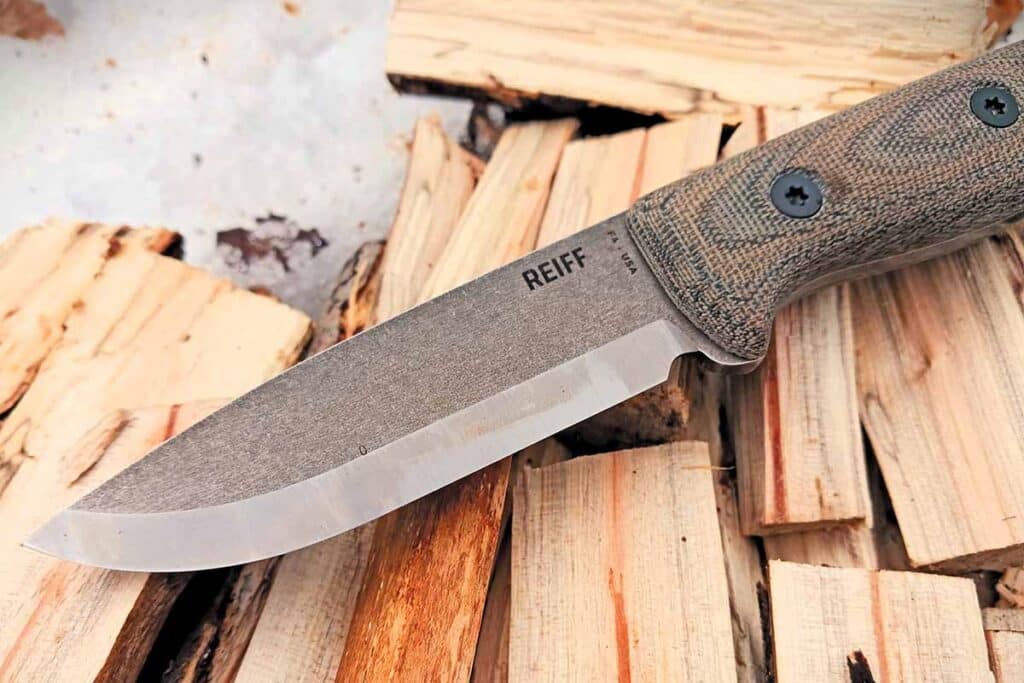
F4 Scandi
The F4 Scandi is a new breed of knife that, thanks to the tough CPM 3V carbon blade steel, had no problem batonning through frozen wood in the winter.

The robust F4 Scandi helped split several chunks of maple, oak and poplar with a baton for my winter cookouts. It also kept an Uberleben wood stove and one cold hiker well-fed. The Scandi edge was not damaged when used on frozen wood in freezing weather. After heavy splitting—not usually recommended for a Scandi blade—it was time for tinder shavings. I made several fuzz sticks and marveled at how comfortably the 5-inch handle navigated the edge, elegantly feathering the wood. Reiff has it going on!

*Royal warrants of appointment have been issued for centuries by royal families of assorted European countries to tradespeople who supply goods or services to a royal court or certain royal personages. The royal warrant enables the suppliers to advertise the fact that they supply to the issuer of the royal warrant, thus lending prestige to the suppliers.

Check Out More Outdoor Knives:

What Makes A Good Hamon?

Know the visual tells of whether a hamon is done properly or not.

For centuries, the hamon has served as a mark of excellence in the forging of blades.

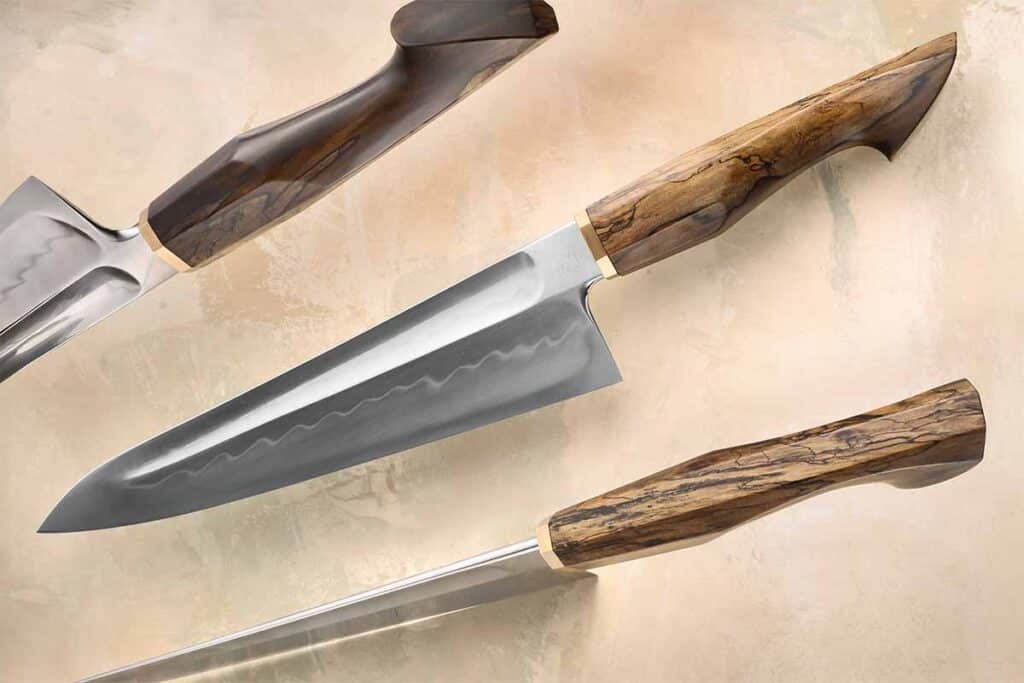
Conspicuous by its picturesque line generally dissecting the midsection of a differentially heat-treated blade, it demonstrates a skill set highly valued among top bladesmiths and swordsmiths. Moreover, the difference between a good hamon and one that doesn’t hit the mark can help the maker, owner and user in understanding the prospective performance of the blade itself.

Basically, think of a hamon as the equator between the hard and softer or more malleable areas of the blade. Everything above the hamon is softer, which translates as making the back of the blade malleable and thus tougher. In other words, the blade will bend but not break. Meanwhile, everything below the hamon is harder, which is better for holding an edge.

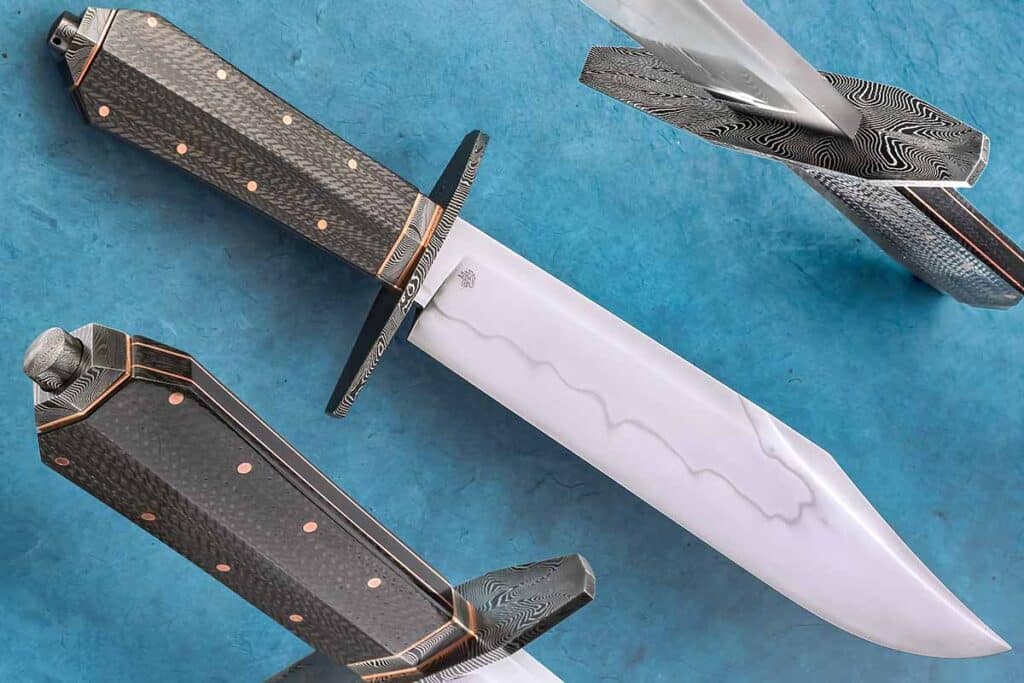
Francesco Piccinin and Denis Mura provide hamon on their bowie collaboration.
Emiliano Carrillo indicated a hamon should be continuous, with no areas falling off the edge of the blade. Francesco Piccinin and Denis Mura provide such a hamon on their bowie collaboration. Blade material is C130 carbon steel, according to Eurotechni (eurotechni.com) a grade that makes it possible to obtain “pretty hamons.” Overall length: 13 inches. (Jocelyn Frasier image)

“There are several things that make the edge pattern successful,” explained bladesmith Emiliano Carrillo of Sun and Stars Forge. “The first two are practical.

The hamon should be continuous; there should be no areas of it that fall off the edge of the blade. It should be high enough that the knife can support a lifetime of sharpening and removal of edge material without biting into soft material. For kitchen knives this can be somewhat low to the edge, as the geometry will have to be adjusted if a large amount of edge material is removed.

“The rest are my own opinion and are purely subjective. I’m a bladesmith who works in the historical tradition and therefore my work draws on traditional Japanese metalwork when it comes to hamon aesthetic and technique.

“I think a good hamon should be active and rippling, showcasing your imagination and artistic vision,” Emiliano continued. “It should have good undulations and look like it’s been drawn on the blade with an ink brush. There should be ashi [legs], which are areas of hardening within the hamon that drip down towards the edge. Sometimes a repeating motif, like sanbonsugi [three cedars] or choji [clove] can be utilized to guide the way you want to design the hamon.”

ABS master smith Mike Quesenberry agrees that there are hallmarks to a good hamon that are readily discernable.
“First and foremost, a good hamon will not come down to the cutting edge,” he remarked. “That is a no-no because it is bringing down soft steel where you want hard steel. I want a bigger transition area, and you can credit the Japanese for starting it. As the technology evolved over hundreds of years, they found bits and pieces coming down from the hamon, giving strength to the edge.”

ABS master smith Brion Tomberlin adds that the proper hamon is visible to the eye even when the maker is finishing the grinding process at 120 grit.

“The Japanese have many terms for effects you see and want to see in a nice hamon,” he commented. “And you can spend years studying these. For our purposes, you want it to be very visible and make a very visible demarcation from the hardened area to the softer area. Additional effects such as ashi, which are wispy cloud-like formations hanging down from the main line, are nice and show control.”

Steel Selection

Brion Tomberlin stated that low-alloy carbon steels such as W2, W1, 1095 and 1075 yield the greatest success in producing good hamons.
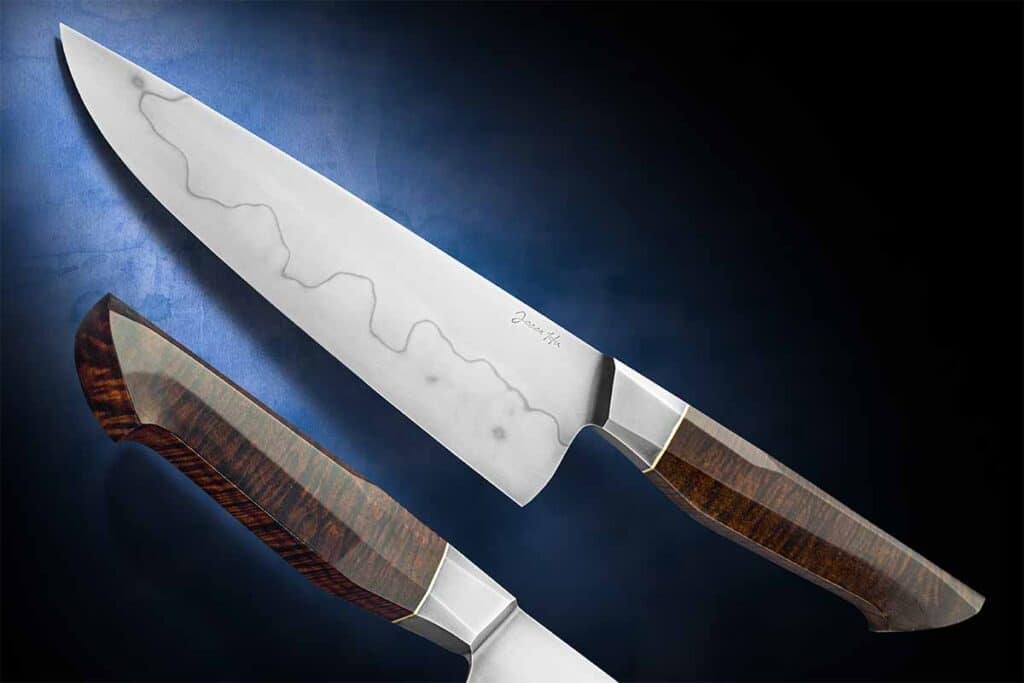
Brion Tomberlin stated that low-alloy carbon steels such as W2, W1, 1095 and 1075 yield the greatest success in producing good hamons. ABS apprentice smith Jesse Hu forged the 8.5-inch blade of his classic integral chef’s knife from W1. Overall length: 14 inches. (Jocelyn Frasier image)

Success or frustration in the hamon process begins with the proper steel, and BLADE Magazine Cutlery Hall-of-Fame® member/ABS master smith Steve Schwarzer emphasizes that point.

“Steel selection is critical,” he observed. “You want a simple carbon steel with .70 to 1 percent carbon, and guys are doing ‘gee whiz’ work using a formula with W2 steel, which is a very simple steel. The time-temperature-transformation curve is important, and alloy widens the curve. Too much alloy in the steel won’t transform fast enough to achieve the hamon pattern you want.”

Tomberlin added that low-alloy carbon steels yield the greatest success, and these include W2, W1, 1095 and 1075.

“The maker should look at the certifications for the steel to see the composition,” he recommended. “You want a steel low in manganese, as manganese promotes deep hardening instead of shallow hardening, which we want. We want the transformation of austenite to martensite to be fast upon quenching in order to achieve a hamon, and shallow hardening steels are what is needed. Can you achieve hamons with other steels? Yes, in some cases where the manganese is lower, but they usually do not have the activity or effects you would like to see. My go-to steel is W2.”

Creating A Hamon

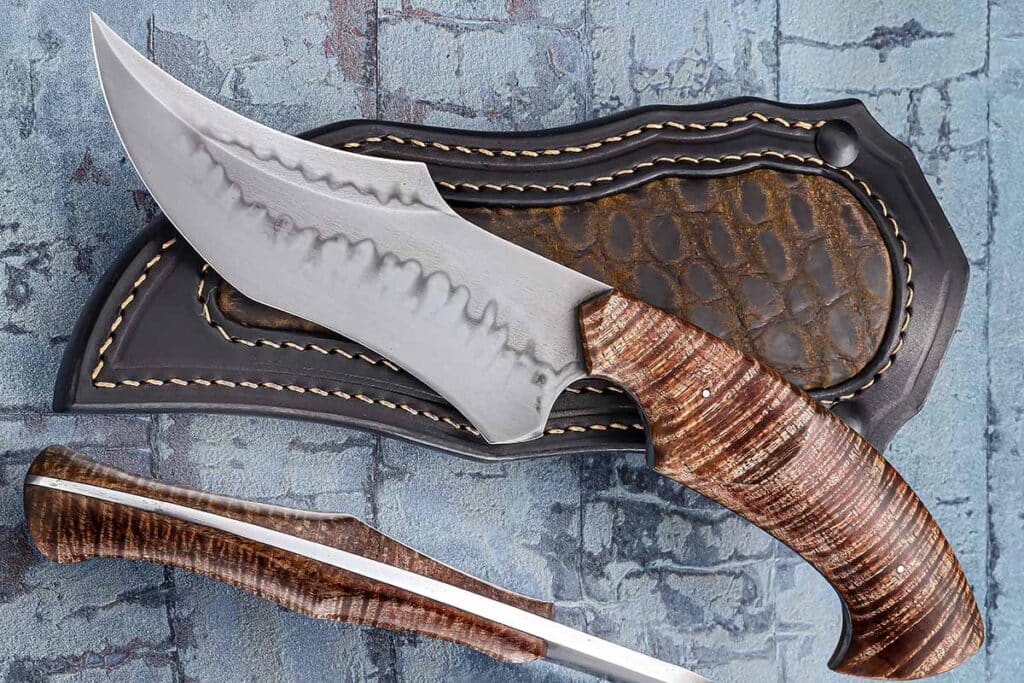
Eliott Robinson provides ashi in ample supply on the 5-inch blade of his fighter.
Ashi, which Brion Tomberlin describes as “wispy cloud-like formations hanging down from the main line [of the hamon], are nice and show control.” Eliott Robinson provides ashi in ample supply on the 5-inch blade of his fighter. Blade material: U10A carbon steel. (SharpByCoop image)

After the heat treating and hardening process develops the desired hamon, bringing out the robust visual aesthetic is a process in itself that, according to Carrillo, varies from bladesmith to bladesmith.

“All makers have different ways of polishing out their hamon, and these methods evolve over time or to suit a particular project or aesthetic need,” he observed. “My technique has evolved over time but works for 90 percent of the work I do, and is a good way to practice bringing out all the activity you want to see in the steel.”

For his technique, Carrillo grinds the blade to 220 grit; polishes it to 800 grit using a hard backer for the sandpaper; cleans the blade completely using acetone, dish soap or rottenstone while making sure water does not bead up on it; etches it in ferric chloride; removes oxides completely using fine grit sandpaper; assembles; and then oils.

Quesenberry follows a similar protocol.

“I have a blade in front of me and I’m going to a hammer-in this weekend. I will take it up to 800-grit finish and dip it in ferric chloride,” he said, “and then I’ll wait until it turns black depending on the strength of the ferric. Once it’s black I neutralize it with Windex and then pull with a gray 3M polishing cloth in nice, even and straight lines, removing the black to get the white for the ashi to pop.”

Faux Hamons

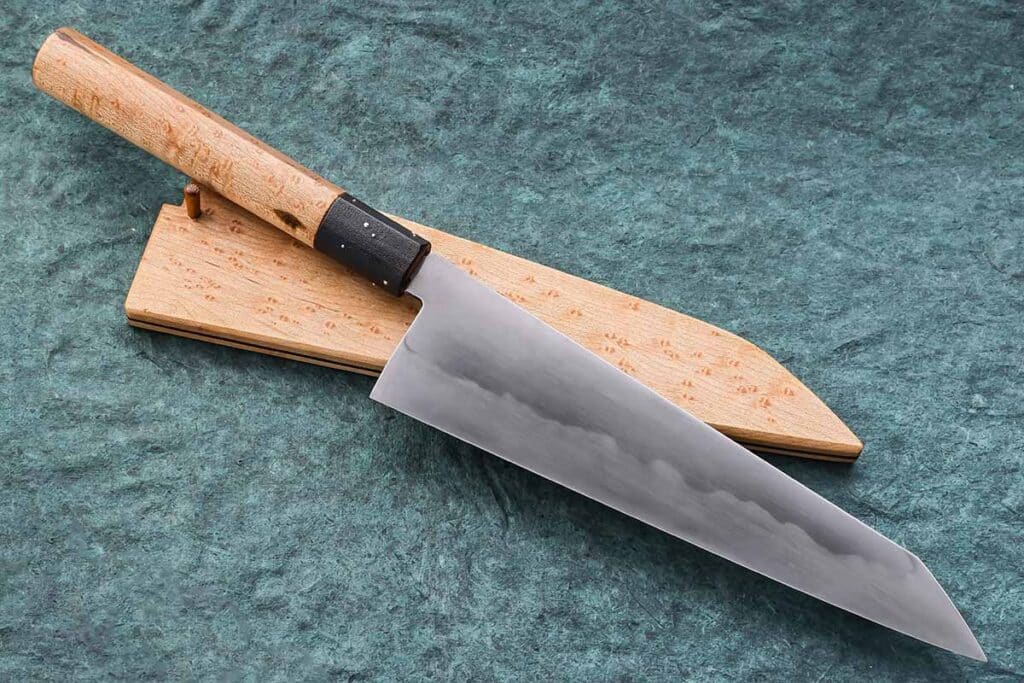
Emiliano Carrillo outfitted the blade of his K-Tip Gyuto with a clayed hamon.
Emiliano Carrillo outfitted the blade of his K-Tip Gyuto with a clayed hamon. The handle is bird’s-eye maple, as is the saya (sheath), which includes a black walnut liner and a bamboo menugi (ornament) to keep the blade in place. (SharpByCoop image)

To dispel one common question, bladesmiths confirm that all knives do not have hamons. As Carrillo says, “There may be areas of decarb on the blade that may be mistaken for a hamon, but it is only surface level.”

At the same time, some factory-produced blades may have a fake hamon etched onto the blade to make the piece more attractive to the potential buyer.

“If a hamon has been etched on, a perfectly clean line is generally seen,” he added. “It doesn’t have any of the cloudiness or desired fuzziness seen in the line on a real hamon. The fake ones are generally very white and too regular to be a metallurgical effect.”

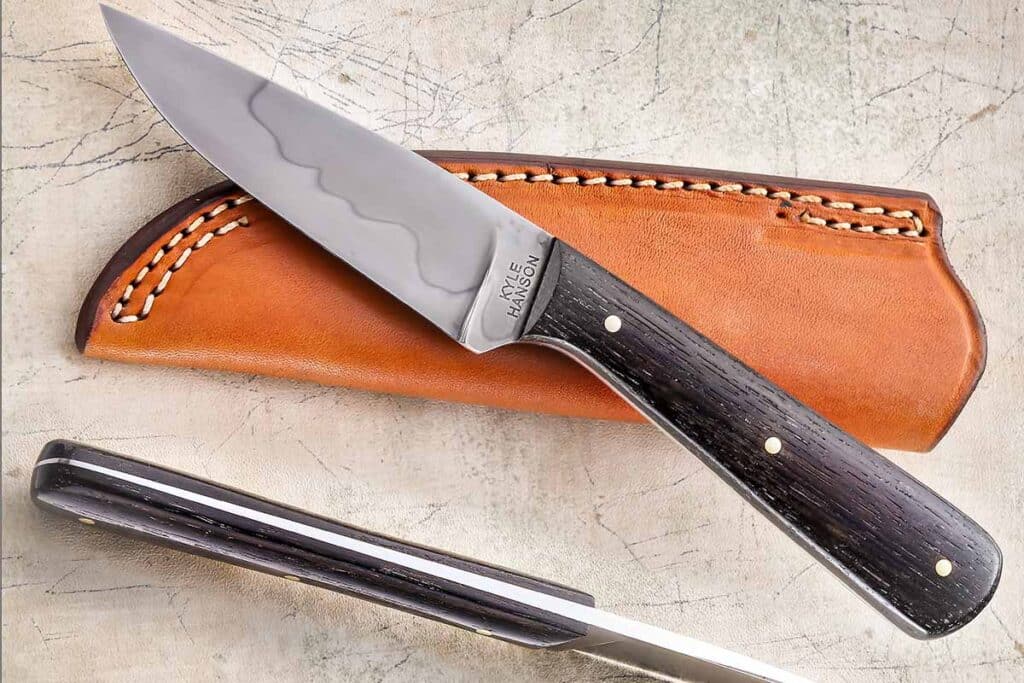
Kyle Hanson demonstrates a hamon here on his no-nonsense hunting knife.
The blades even of smaller knives such as folders and hunters provide a solid canvas for a hamon, as Kyle Hanson demonstrates here on his no-nonsense hunting knife. (SharpByCoop image)

Tomberlin has seen a false hamon from time to time and says the technique to achieve one is quite different from the genuine article.

“This is usually done by selective etching or different polishing techniques,” he advised. “It is hard to explain how to tell, but if you see one versus a true hamon it stands out immediately, usually as too regular with no effects at all. Also, there is usually a very sharp demarcation line from highly polished to etched, and this is especially prevalent in some pieces from overseas.”

What Makes A Good And Bad Hamon

Separating the good hamon from the bad hamon may require practice. In some cases the differences are obvious but in others, they are more subtle. The professionals have seen it all.

“The biggest issues of a poorly done hamon are things like fading away in some areas or, yes, going off the edge of the blade,” Tomberlin related. “If the hamon fades off the edge that means your edge is not hard in that area, which is not good. The main causes of this are clay coating being too thick and improper heating of the blade when bringing it up to quench temperature. The main issue I have seen is the hamon going off the edge. As long as you have the edge hard you have a hamon.

Will Newham achieved a hamon on his Best Chef’s Knife winner from the 2023 Sydney Knife Show.
According to Emiliano Carrillo, a hamon should be high enough that the knife can support a lifetime of sharpening and removal of edge material without biting into the soft material above it. Will Newham achieved such a hamon on his Best Chef’s Knife winner from the 2023 Sydney Knife Show. (SharpByCoop image)

“Poorly done polishing will show up also. A well done hamon takes time both before and after quenching. Trying to cut corners on polishing will definitely show. As for a lack of activity in the hamon, such as being straight instead of having hills and valleys, someone told me a number of years ago that one of the hardest things to do well is a simple straight hamon called a suguha.”

Schwarzer sees crispness in the boundaries of a good hamon and acknowledges that heat treating and polishing techniques are critical in bringing that out.

“In the early ABS [American Bladesmith Society] we used an edge quench to get a hamon, and that is the mainstay of the ABS today,” he said. “In testing now you rarely see a hamon because you don’t see as much polishing as necessary to get you through the test. You can’t bring it out with a buffer. It’s almost like a metallurgical polish so you can see the grain in the steel.”

The well done hamon represents an art form in itself, and Quesenberry is impressed with the current wave of artistic impression.

ABS apprentice smith Aidan Garrity outfits the hamon of the 10.5-inch blade of his V-44 repro with hints of ashi
ABS apprentice smith Aidan Garrity outfits the hamon of the 10.5-inch blade of his V-44 repro with hints of ashi. Blade material: W2 tool steel. Handle: carbon fiber. Overall length: 15.5 inches. (SharpByCoop image)

“People have ‘Americanized’ it I guess you could say, and I can do a decent hamon. But some guys out there have absolutely nailed it,” he smiled. “They can paint pictures with theirs using the clay and the heat treating process. You have to be careful not to over-refine the steel grain structure, especially in W2 shallow hardening steel, or you won’t get good results. There is a dance to it.”

The perfection of the hamon process, start to finish, steel and clay, temperature to quench and harden, has fascinated the bladesmith and the admirer of the finished product for centuries. Looking down the road, the possibilities are infinite.

Yet being aware of the good versus the inferior product adds even further to real appreciation of the process.

More On Hamons:

How To Sharpen Recurve Knives

0

We outline how to put an edge back on a recurve knife, both by manual and automated systems.

Editor’s note: In addition to holding down a full-time job, being a BLADE® field editor for many years and conducting several sharpening seminars and BLADE University classes on the subject, the author also runs a sharpening service. All the sharpeners illustrated in the story are in his collection.

Face it—recurve blades are just plain sexy. The way the cutting edge adopts a sinewy figure is unlike most any other blade pattern and definitely catches the eye. 

A fun fact about recurve blades: the cutting edge is always longer than a standard blade of the exact same size. How? If you were to take the recurve edge and straighten it out and compare it with a more conventional blade of the same length, the recurve cutting edge would always be longer. Why? The curves pack in more steel real estate in the same overall blade length. Recurves are practical as well, as the curved part presents itself at an angle to whatever is being cut and therefore slices it more efficiently.
  
While recurves are attractive and functional, some folks tend to steer clear of them because they assume the edges must be difficult to sharpen. It’s the curvature that throws them off. I’m here to tell you that recurves are not hard to sharpen at all if you have the right sharpener. Once you have the right sharpener, the steps you follow are exactly the same as if you were sharpening a standard blade.   

Type Of Recurve Sharpeners

Sharpeners with rounded profiles
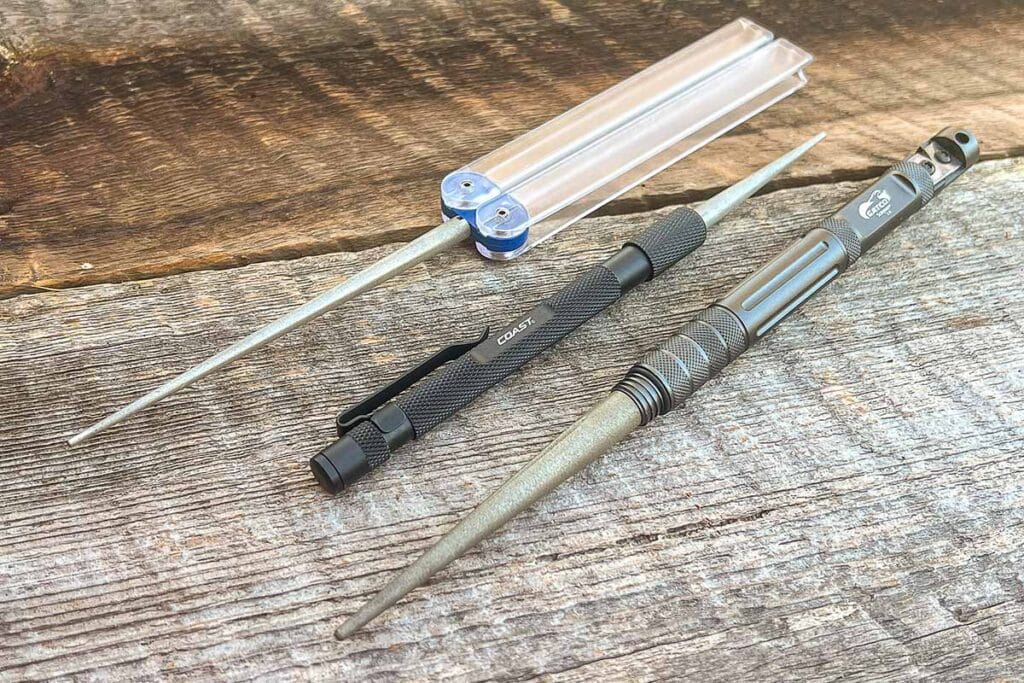
These manual sharpeners with rounded profiles not only are good for serrations but are for recurve blades as well. From top: DMT FSKC Diafold Serrations Sharpener Coarse Grit, Coast SP245 and GATCO Scepter 2.0.

What sharpener do you use for recurve blades? There are actually quite a few sharpeners that are best suited. Some you may already have and didn’t know they would do the job. The appropriate sharpener has a round profile, as the round part always makes contact with the cutting edge regardless of how recurved the blade gets. I recommend that the sharpener be diamond coated since diamond works exceptionally well with the harder, more wear-resistant steels popular today such as—though not limited to—the CPMs of S30V, 20CV, S35VN, S45VN and MagnaCut.

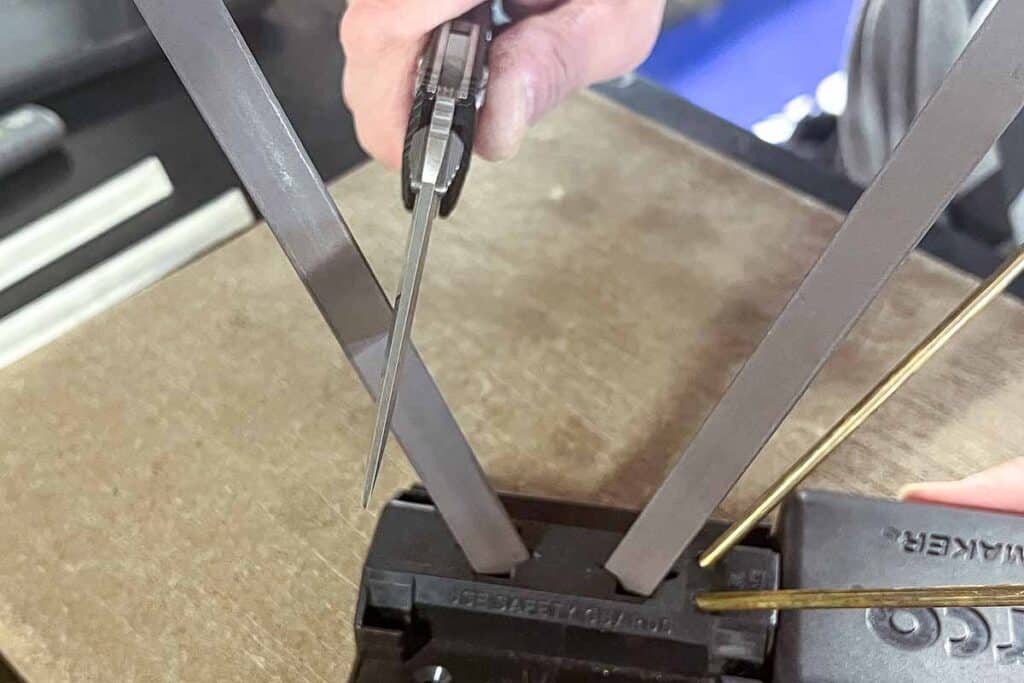
The “V” approach of the Spyderco Tri-Angle Sharpmaker is another effective way to sharpen recurves manually.

In this article, I first show you how to properly sharpen recurve knives using a manual sharpener. The technique is the same regardless of which sharpener you use. Then I demonstrate how I sharpen recurve blades using a powered method. As the editor was so kind to point out, I run a sharpening service on the side as well, and I have years of experience sharpening all sorts of blades. My way is reserved for more advanced and more accomplished sharpening skills only.

How To Sharpen Recurve Knives

Manual Sharpening

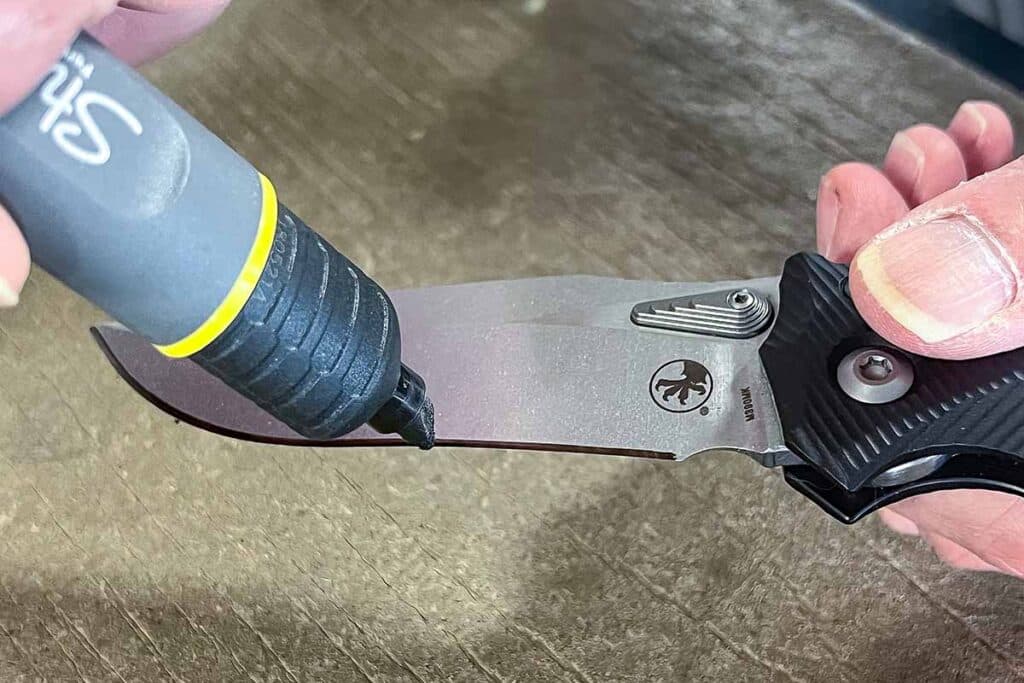
Using a black permanent marker, preferably with a chisel tip, color in the entire length of the cutting edge on both sides of the blade.

Manual Step 1: Using a black permanent marker, preferably with a chisel tip, color in the entire length of the cutting edge on both sides of the blade.

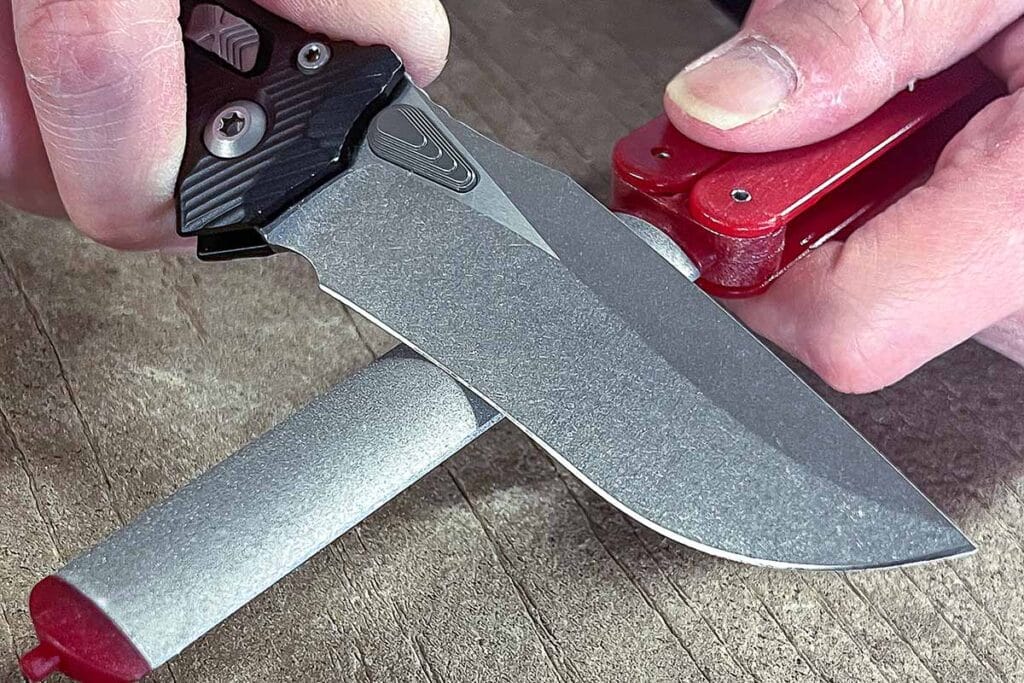
Manual Step 2: Take a round profile sharpener—the author uses the EZE-Lap folding diamond sharpener—and, holding the blade to it at approximately a 20-degree angle, start at the tang and move your way down to the tip in one fluid motion.

A round profile sharpener
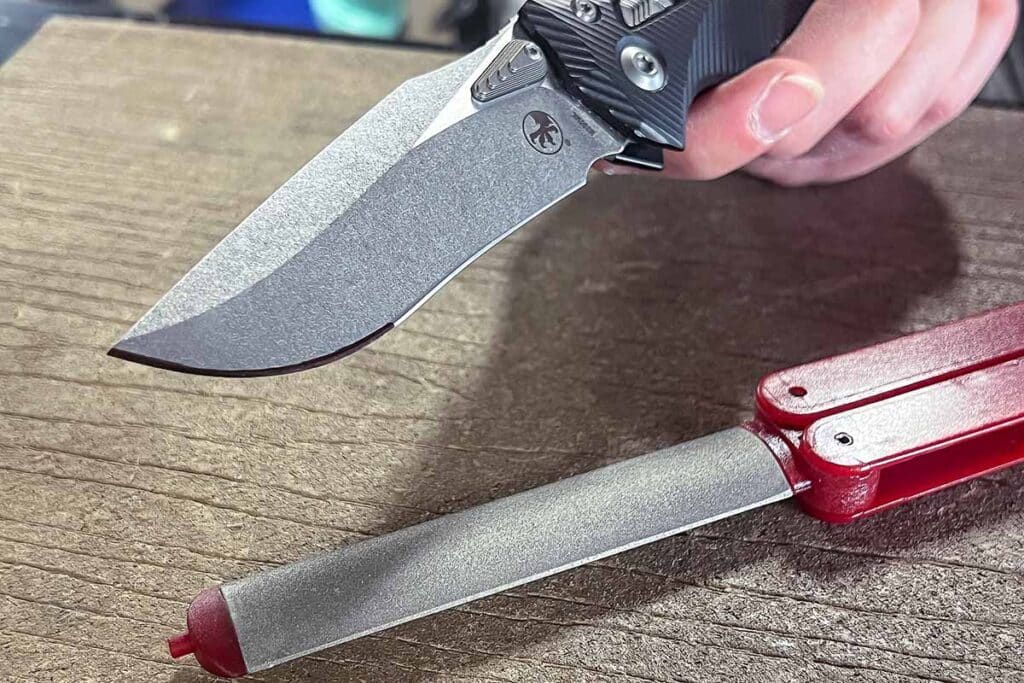
Evaluating the blade

Manual Step 3: Stop after a few strokes and look to see where the marker ink remains. This is an indicator of the need to adjust your angle more or adjust it less. And that, my friends, is pretty much how to sharpen recurves. Simple, safe and effective. This is a failproof method.

Automated Sharpening

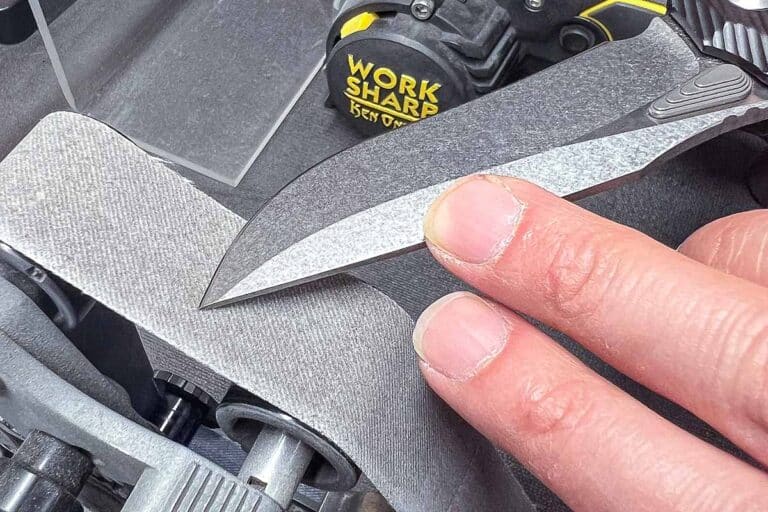
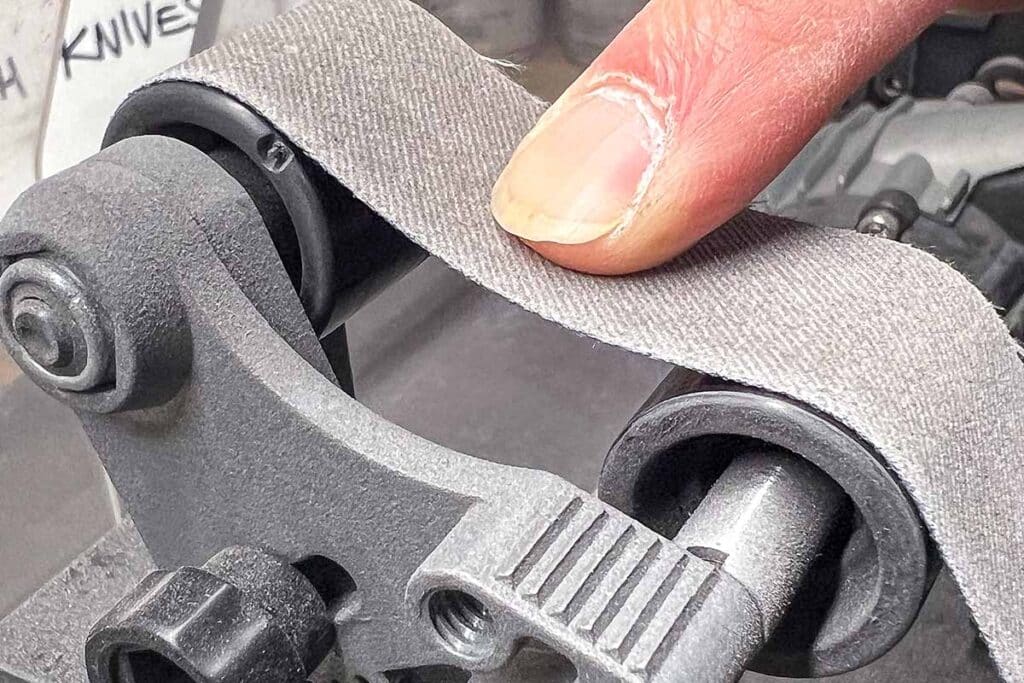
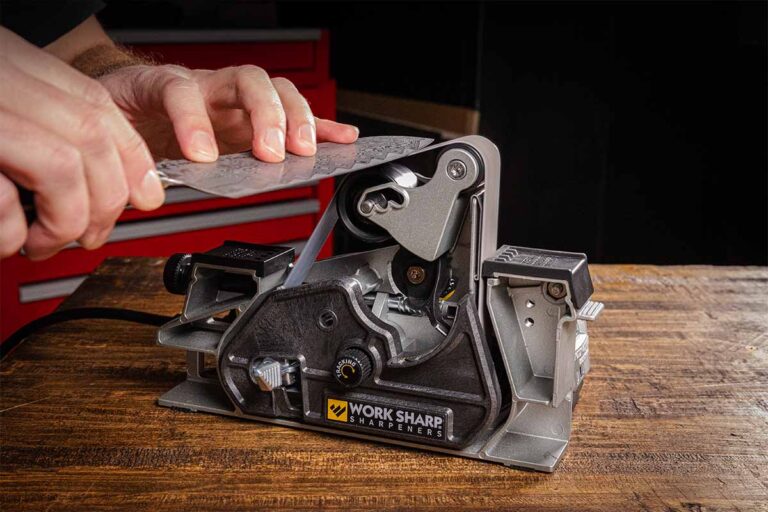
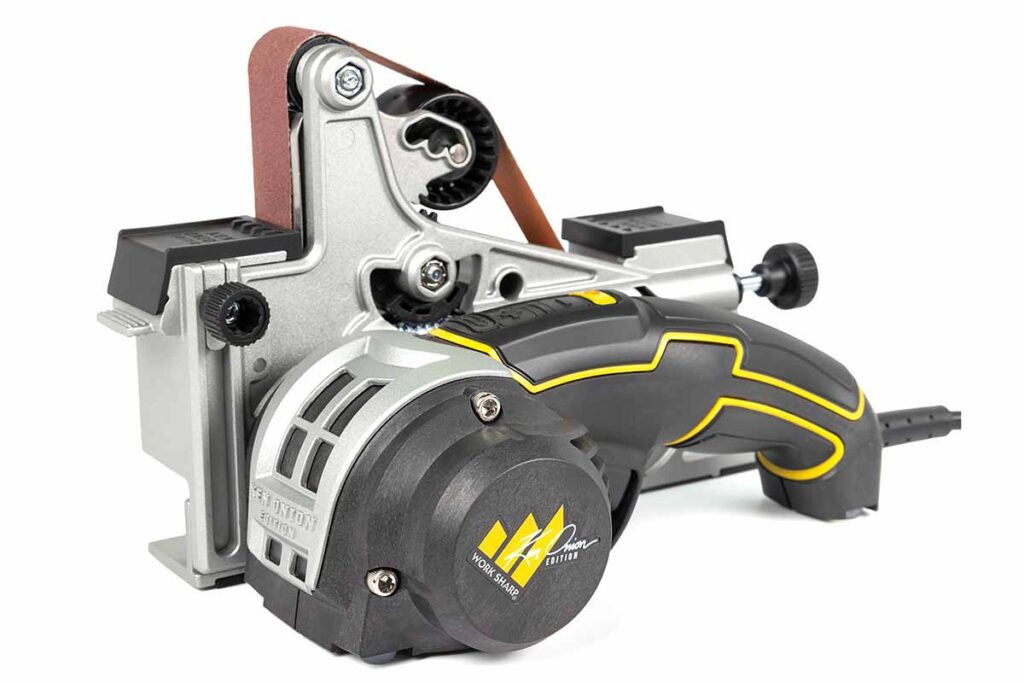
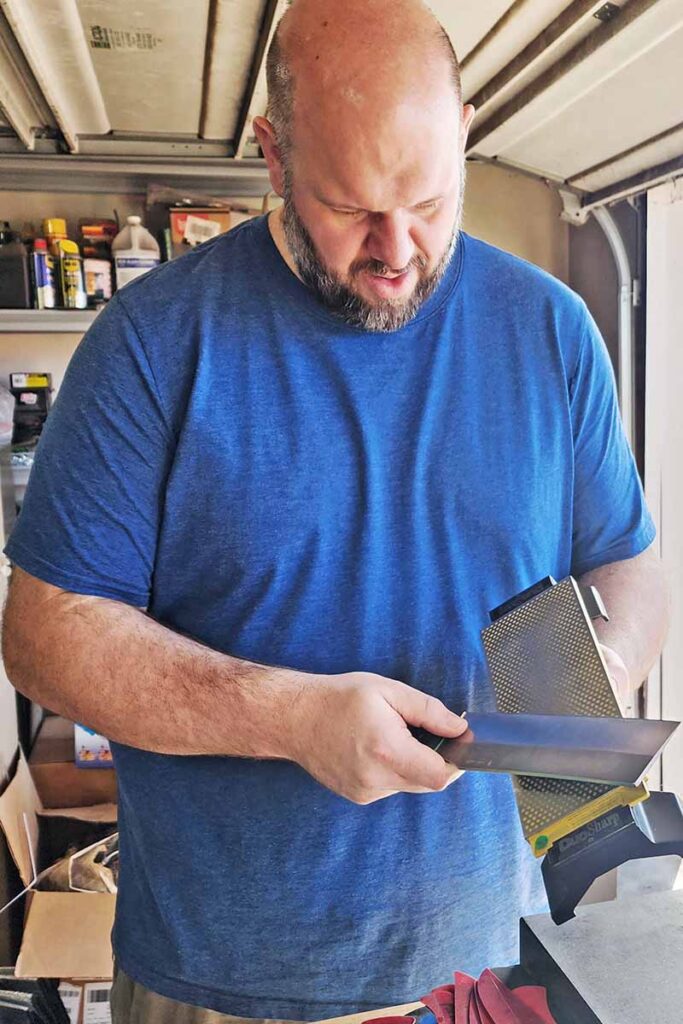
Automated Step 1: The author uses his Ken Onion Elite Sharpener from Work Sharp with the blade grinding attachment to sharpen recurves. The illustrated belt deflection helps the belt to conform to the cutting edge as it curves.

The author uses his Ken Onion Elite Sharpener from Work Sharp
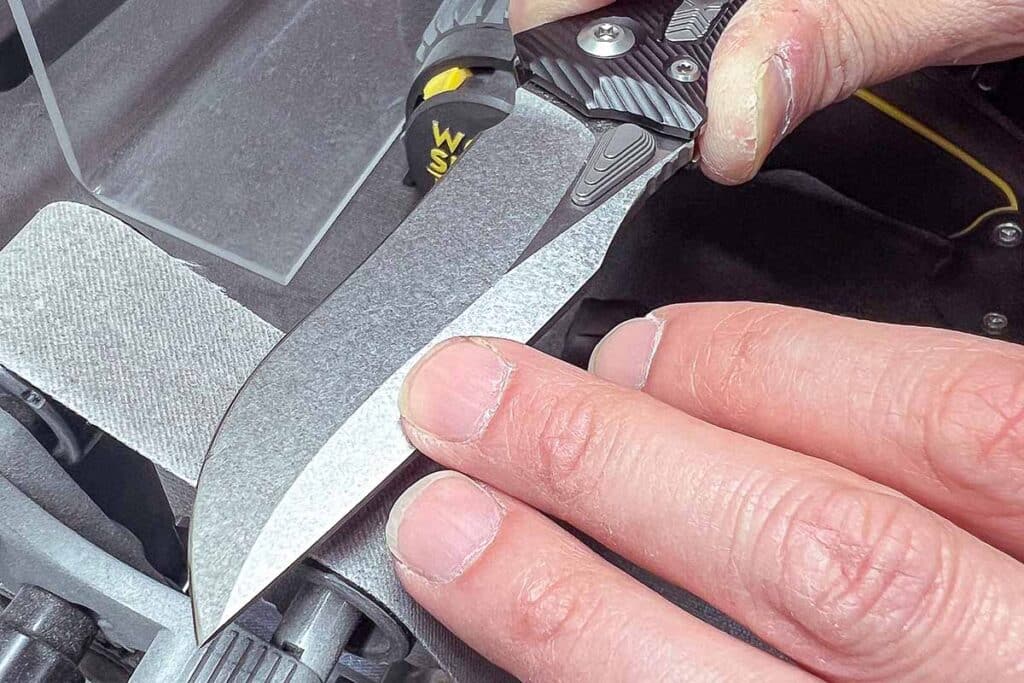
Sharpening the recurve knife on a machine

Automated Step 2: The author sharpens the recurve blade as he would any standard blade by pulling it across the belt from choil to tip on both sides. Use the same motion when sharpening a recurve on a manual sharpener.

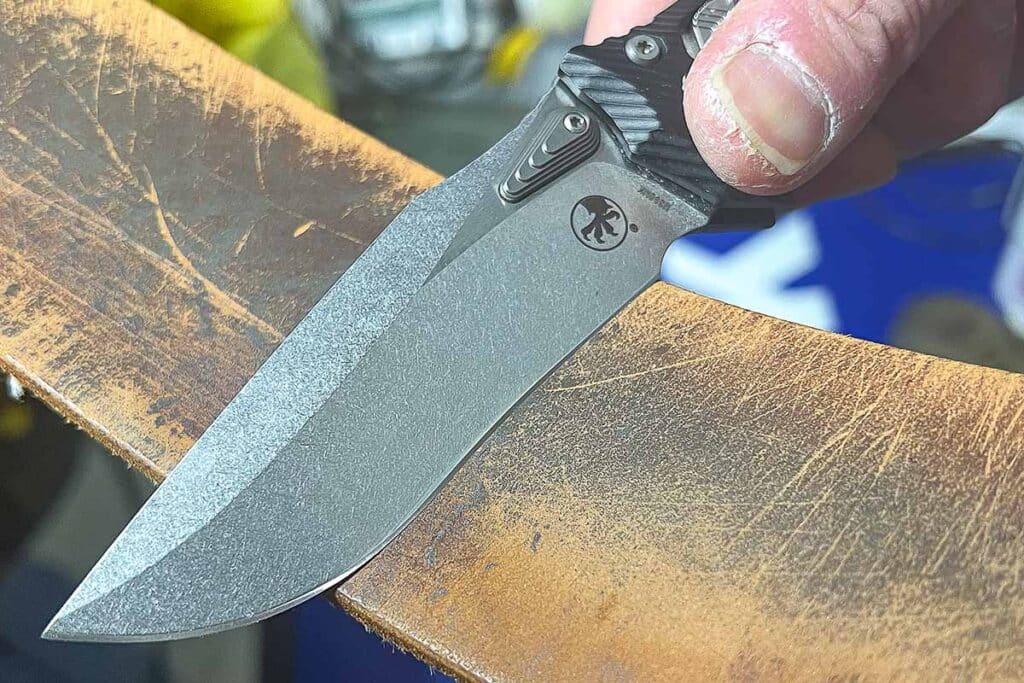
Automated Step 3: After sharpening, the author strops the edge using a leather strop to wipe off any micro burrs that form.

stroping the edge
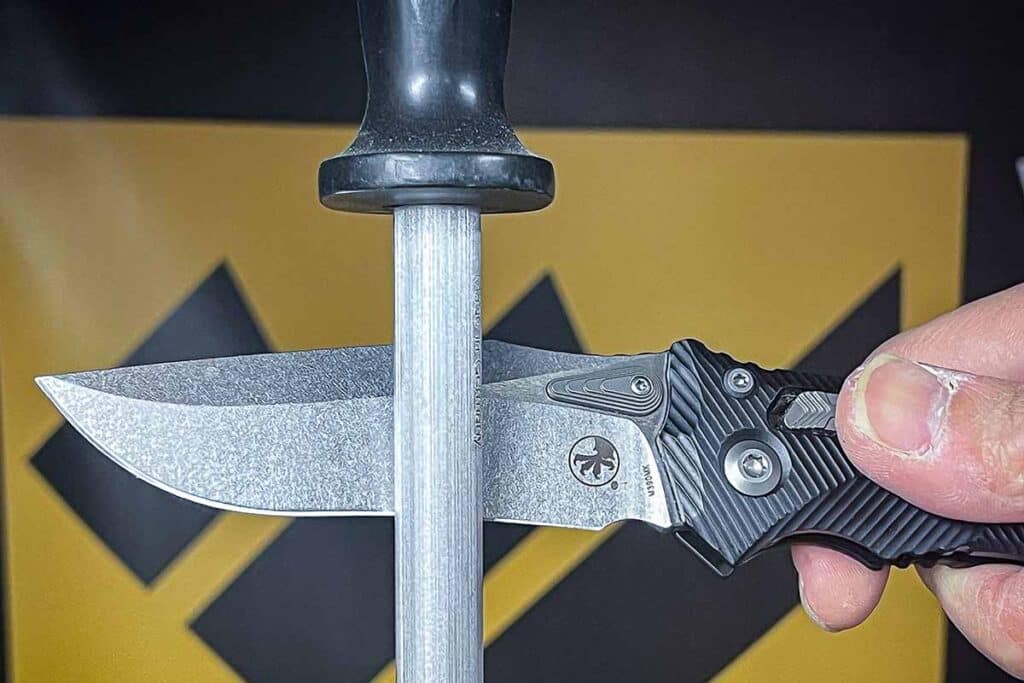
Giving the recurve a few swipes on knife steel

Automated Step 4: After stropping, the author gives the recurve a few swipes on a hanging kitchen knife steel to give the edge extra bite.  

More Sharpening Articles:

Recurve Knives: Top Options In These Curvy Carvers

The sexy shape of three U.S.-made recurve blades addresses both performance and aesthetics.

As blade patterns go, the recurve is right up there in the “flair department.”

Just as the curves of a Ferrari add irresistible styling to the classic sports car’s appearance*, so does the curvature of a blade’s edge add to that of the look of the knife. It also changes the geometry of a blade—sometimes radically—in some ways better and other ways not so much. That’s the beauty of blade design and why there are so many different styles from which to choose.

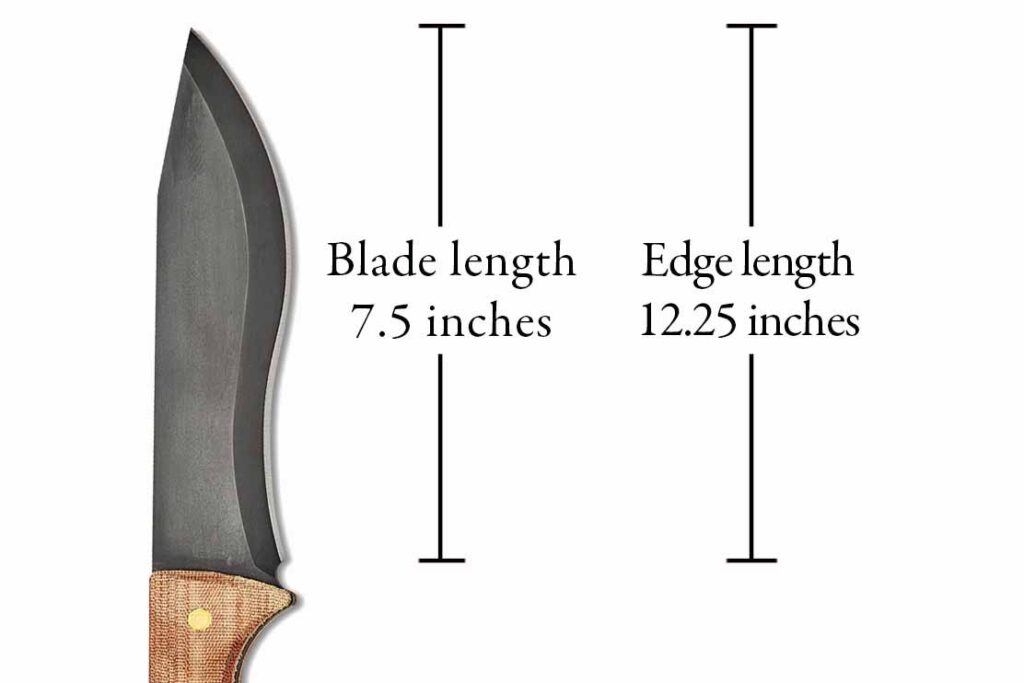
How much length does a recurve add to the edge of a blade? This chart compares the length of the ’Squatch blade to the length of the actual sharpened edge. The curved top edge blade of a straight blade might add 2-to-3 inches to the edge. The Sasquatch’s recurved edge stretches the increase to 4.75 inches.

The waisted recurve design shifts the weight of the blade toward the tip, which while excellent for chopping also reduces the blade’s effective chopping length. The recessed area on the lower part of the recurved blade adds the benefit of being able to trap or gather in its subject when performing chores like debarking and taking slivers from wood, but it also makes sharpening more difficult with flat-surfaced media such as whetstones.

Sharpening A Recurve

Like any blade design, there are trade-offs. To get an idea of how radically the recurve lengthens the edge of a blade, see the accompanying chart of the Case Sasquatch bowie. The height of the sharpened portion of the blade is 7.5 inches, but when the length of the curvature is factored in the number swells to 12.25 inches!

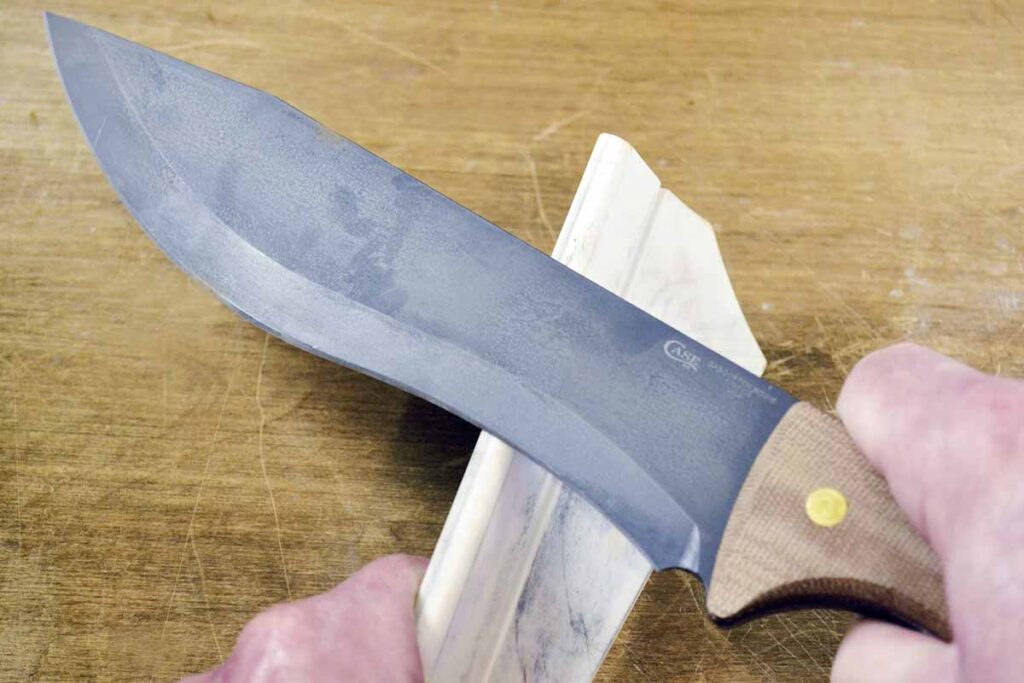
Recurve blades require a rounded or ovate sharpening medium to properly hone the curvaceous edge. Hand-held sharpeners similar to those used by chefs or the common V-sharpeners work well on curved edges, as do stones with curved edges such as the Spyderco Golden Stone ceramic.

When sharpening these blades the concave lower curve does not conform to a flat plane, so an ovate or rounded surface grit is required for sharpening. Fortunately, there are plenty of these to choose from, such as handheld sharpeners similar to those used by chefs or the common V-sharpeners that use alternating rods set at opposing angles in a base. The Spyderco Golden Stone and/or Webfoot works as well. Now, on to the recurves!

Bear Forest Knives Custom Recurve

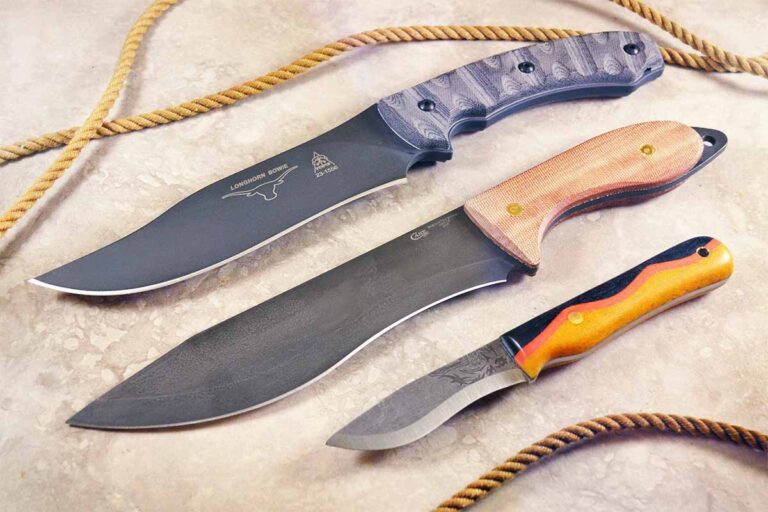
The Bear Forest Knives Custom Recurve is a small fixed blade built like a tank, owing much to the 3/16-inch thickness of its acid-dipped 52100 carbon steel blade. At 7.75 inches overall, the knife is geared toward light-to-medium camp chores and could conceivably be used as an EDC. The full-tang handle boasts colorful scales of a wavy sandwich of black, orange and natural cross-cut canvas Micarta®. Weight is a hefty-for-its-size 5 ounces. Bear Forest provides a black Kydex sheath with a nifty black coated 2.25-inch spring steel belt clip.

Bear Forest Knives Custom Recurve Specs
Blade length: 3.25”
Blade material: 52100 carbon steel
Handle material: Crosscut canvas Micarta®
Gripping feature: Tri-color Micarta handle material
Sheath: Black Kydex w/belt clip
Weight: 5 ozs.
Overall length: 7.75”
Country of origin: USA
MSRP: $249

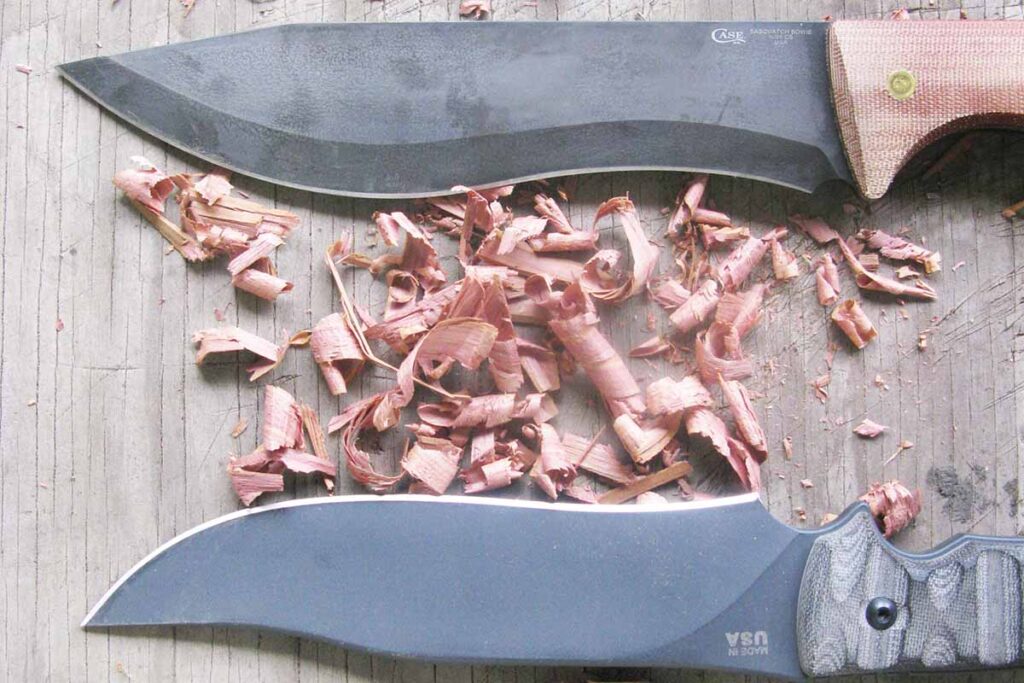
Recurves shine when performing shaving tasks. Both the TOPS (left) and Case (right) did a nice job rendering cedar curls for fire starter.

Case Laramy Miller Sasquatch Bowie

The Case Laramy Miller Sasquatch Bowie is a study in understated good taste. The large 13-inch Jim Bowie namesake flows from stem to stern, from the break in its flat-ground 1095 carbon steel blade to its rounded combo lanyard hole and pommel. The matte-black Caswell finish gives the bowie a rustic look. The bag-style handle is topped with natural canvas Micarta scales affixed with 5/16-inch brass pins. Case provides a double-stitched natural leather belt sheath that matches the knife in clean styling.

Case Laramy Miller Sasquatch Bowie Specs
Blade length: 7.75”
Blade material: 1095 carbon steel
Handle material: Natural canvas Micarta®
Cutter keys: Clip-point blade, Caswell finish
Sheath: Natural leather belt model
Weight: 14.5 ozs.
Overall length: 13”
Country of origin: USA
MSRP: $219.99

TOPS Longhorn Bowie

The TOPS Longhorn Bowie is a thoroughly modern recurve with such classic touches as its upswept clip-point blade—always welcome on a bowie. The flat-ground 1095 blade is coated in dark sniper gray Cerakote®, matching the gray/black layered linen Micarta scales nicely. The black nylon MOLLE-compatible sheath carries on a belt or a pack and other gear. It includes a front pouch for stowing a sharpener or fire-starting accessories.

TOPS Longhorn Bowie/Sniper Gray Specs
Blade length: 6.75”
Blade material: 1095 carbon steel
Handle material: Canvas Micarta®
Cutter keys: Trailing-point blade, sniper gray Cerakote® finish
Sheath: Black nylon, MOLLE compatible w/pouch
Weight: 18.1 ozs.
Overall length: 13”
Country of origin: USA
MSRP: $305

Testing The Recurve Knives

The TOPS Longhorn and Case Sasquatch bowies begged to be reviewed together because they are exactly the same length and share the same 1095 blade steel, yet are two very different knives. The TOPS blade has a more casual recurve while the Case is full tilt. The handles couldn’t be more different as well, with the Case opting for a clean, traditional bag-style grip while TOPS chose a modern tactical design a full inch longer than its counterpart, resulting in a slightly shorter blade. Let the fun begin!

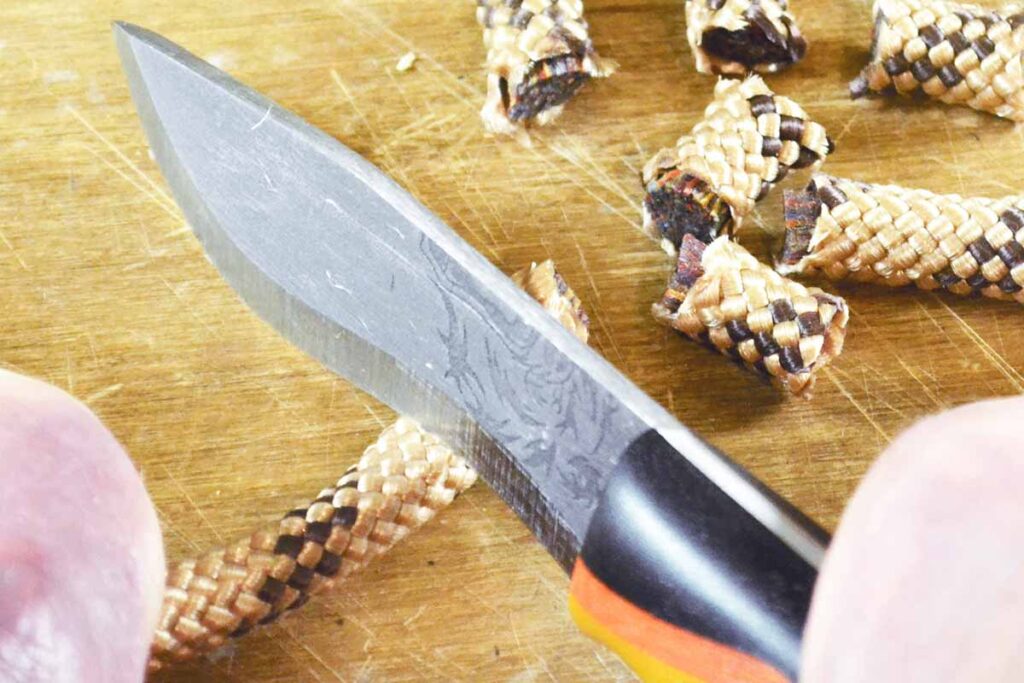
The Bear Forest Custom Recurve is small compared to the two larger test knives, though the same blade geometry applies. Note how the upper curve of the edge ensnares the rappelling rope as it slices through it.

I started with some basic chopping on a 5-inch diameter oak log. The Sasquatch brought the hammer down with its weighted fore-end but the Longhorn had the advantage of more working area on the blade for chopping. Both manufacturers chose 1095 and have loads of experience at maximizing the steel’s benefits. I found both knives excelled in the pure blade bite and performed well chopping. The Sasquatch weighted front end is an advantage for sheer power but the Longhorn is 3.6 ounces heavier, so it closes the gap significantly.

I did some shaving doing push cuts on 1×3 cedar planks. As expected, the concave edge of the Case excelled at trapping the wood through the straight cuts. Advantage Sasquatch. However, the TOPS has a grip a full 1-inch longer than the ’Squatch and is textured as well, offering superb purchase. Advantage TOPS. Bottom line, both recurve bowies performed very well. The choice is yours.

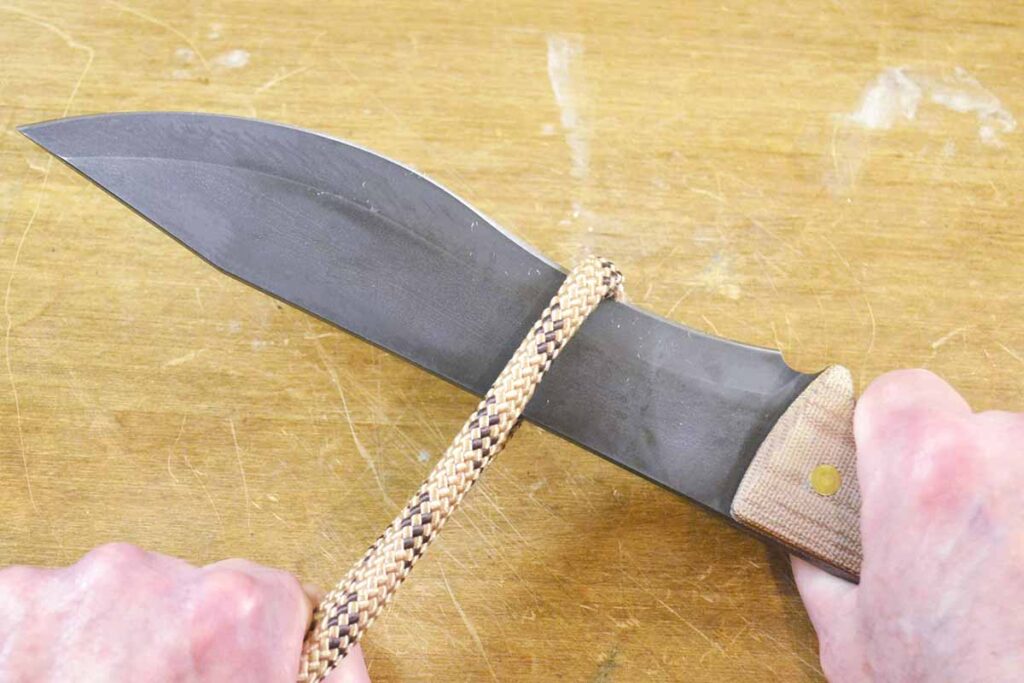
It's a trap! The lower concave area of the Case blade traps the rappelling rope during a pull-through. The deeper the concave curve, the better it performs this function.
It’s a trap! The lower concave area of the Case blade traps the rappelling rope during a pull-through. The deeper the concave curve, the better it performs this function.

The sheaths for both are well done. The Case belt model is natural leather designed in a simple, tasteful manner. The TOPS is unabashedly rock ’em, sock ’em tactical all the way.

The Bear Forest Custom Recurve punches up in its size class thanks to thick 3/16-inch blade steel and a healthy handle length, a trait often missing on smaller fixed blades. I tested the blade for its ability to capture 3/8-inch rappelling rope in its concave maw. Thanks to its overbuilt steel, the blade never wavered while producing slice after slice. It also took off nice, healthy curls of cedar just like the big boys. The curves of the cross-cut canvas Micarta scales made for excellent purchase and are attractive to boot. I also did some bark skinning on seasoned oak, took slices off other kinds of rope, and batonned fatwood pine fire starter.

Bear Forest provides a nifty Kydex sheath. It has a 1.5-inch spring clip on the back that not only mounts on the belt for vertical and cross-draw carry/deployment, but doubles as a pocket clip on either side, something seen more and more from the fixed-blade EDC crowd lately. All in all, I was impressed with the whole package.

Final Cut

The recurve isn’t just for whacking stuff. It requires a little more finesse and is typical of blades that don’t walk the straight and narrow. However, the benefits of recurves will reward you dearly when kept in their lane. All three of the test candidates performed admirably and are well worth your consideration.

*Editor’s note: Long-time custom knife purveyor J. W. Denton, who was a champion racecar driver in his younger days, was fond of comparing the knives of Steve Johnson, BLADE Magazine Cutlery Hall-of-Fame member Bob Loveless and others to curvaceous sports cars. J. W.’s comparison, however, was largely between the handle butts of the knives and the rear ends of the cars. However, both comparisons are accurate.

  1. Bear Forest Knives Custom Recurve
    Blade length: 3.25”
    Blade material: 52100 carbon steel
    Handle material: Crosscut canvas Micarta®
    Gripping feature: Tri-color Micarta handle material
    Sheath: Black Kydex w/belt clip
    Weight: 5 ozs.
    Overall length: 7.75”
    Country of origin: USA
    MSRP: $249

Check Out More Outdoor Knives:

Knife Sharpeners: Top Options Available Now

0

Need to keep your edge? These top knife sharpeners are sure to keep your blades sharp and in good working order in no time at all.

It’s not much of a knife if it doesn’t have a sharp edge. To that end, 2024’s hottest sharpeners will make your favorite tool cut like it ought to. Plain to serrated, short blades to long, kitchen to deer camp and just about any blade worth using can get keen quick with one or more of this year’s fresh edge makers.

Spyderco Golden Stone and Webfoot Set

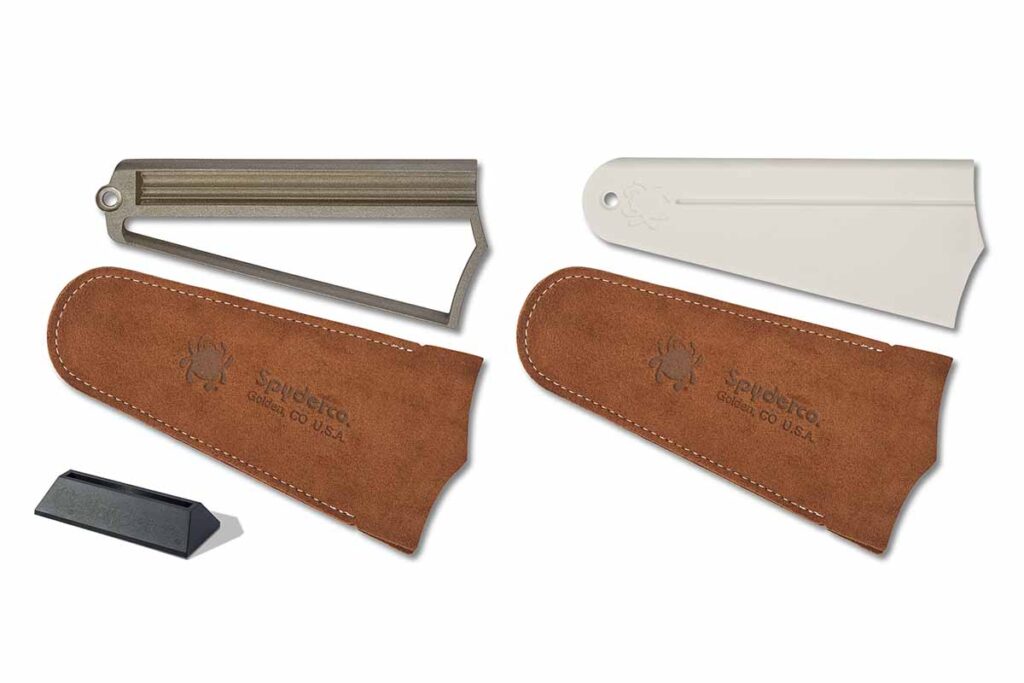
pyderco Golden Stone and Webfoot Set includes a Golden Stone, Webfoot
The Spyderco Golden Stone and Webfoot Set includes a Golden Stone (right), Webfoot (left), two suede pouches, one plastic base (lower left), and an illustrated instruction book that explains how to use the sharpeners to put an edge on practically any home cutting tool.

One of the coolest studies in sharp is the Spyderco Golden Stone and Webfoot Set. “The set offers a uniquely different approach to knife and tool sharpening,” began Michael Janich, Spyderco special projects coordinator. “Of similar design, they can be used anywhere, set up in seconds, and do not require oil, water, electricity or any complicated clamps or fixtures.”

Both sharpeners feature a distinctive “duck foot” design tapered on one end and that has twin scallops on the other. To use either sharpener, hold the narrow end in one hand and rest the wide end on a flat surface. The center point of the wide end, between the scallops, acts as a fulcrum.

“Rocking the sharpener from side to side until the outer points contact the surface aligns its outer edges to create a perfect 40-degree included angle,” Michael noted. “Simply keep the plane of your blade vertical and draw it from heel to tip down the outer edge. Then, rock the sharpener in the other direction and repeat the process on the other side of the stone. Alternating from side to side quickly creates a sharp, utilitarian 40-degree edge.”

For a thinner edge, the Webfoot and Golden Stone can also be used with the included ABS plastic base. Steps in the cavity of the base limit the rock from side to side, reducing the sharpening angle to 30 degrees. Laid on their sides, the sharpeners also offer a 12.5-degree angle for easily sharpening scissors and shears.

“The long edges of both sharpeners are tapered, so they naturally follow the contours of all blade shapes—even hawkbills and recurves—and can be used to easily sharpen serrated edges using the same sharpening technique,” Michael explained. “Their innovative designs also include rounded edges, grooves, and flat areas that provide multiple abrasive surfaces to sharpen tools of all shapes and sizes.”

The Webfoot is coated in an aggressive 600-mesh cubic boron nitride (CBN) abrasive. A form of synthetic diamond, CBN removes steel quickly and is ideal for reprofiling edges or sharpening very dull knives to a utility edge. For touch ups or to achieve a more refined edge after using the Webfoot, the Golden Stone features a fine-grit ceramic abrasive that is the equivalent of a 1,200 grit. Both sharpeners are supplied with suede pouches that protect them when not in use and do double duty as non-slip mats during the sharpening process.

The set includes one Golden Stone, one Webfoot, two suede pouches, one plastic base, and an illustrated instruction book that explains how to use the sharpeners to put an edge on practically any home cutting tool.

Spyderco Webfoot Specs
Sharpener Type:
Proprietary “rocking” design
Blades sharpened: All, including scissors, pointed tools, gouges and serrated edges
Abrasive Type: Cubic boron nitride
Grit: 600 mesh
Dimensions: 7” x 3” x 0.25”
Construction Materials: One-piece carbon steel embryo
Weight: 6.05 ozs.
SPECIAL FEATURES: Includes multiple abrasive surfaces and shapes
Country of origin: China
MSRP: $89 ($270 in a set w/Golden Stone)
Available: Now

Spyderco Golden Stone Specs 
Sharpener Type: Proprietary “rocking” design
Blades sharpened: All, including scissors, pointed tools and serrated edges
Abrasive type: High-alumina ceramic
Grit: 1,200 grit equivalent
Dimensions: 7.2” x 3” x 0.25”
Construction materials: One-piece fine-grit ceramic
Weight: 7.6 ozs.
SPECIAL FEATURES: Includes multiple abrasive surfaces and shapes
Country of Origin: USA
MSRP: $210 ($270 in a set w/Webfoot)
Available: Now

Work Sharp Ken Onion MK.2

Ken Onion MK.2
The Ken Onion MK.2 comes as a stand-alone sharpener or as one of the company’s Elite packages that includes the base sharpener along with a fully featured blade grinding attachment.

The new Ken Onion MK.2 from Work Sharp comes as a stand-alone sharpener or as one of the company’s Elite packages that include the base sharpener along with a fully featured blade grinding attachment.

The sharpener sports a fresh new look and improved ergonomics to make it feel better in the hand during use. A new motor speed control offers seven pre-set settings to provide a consistent and repeatable sharpening experience, while the new torque control delivers consistent power, even under load. Positioned prominently atop the unit, amber LED indicator lights make selecting belt speed fast and easy.

A sharpening guide has a scope click adjustment knob. Detent clicks in half degree increments from 15 to 30 degrees along the dial allow for improved precision, consistency and repeatability, meaning you get the exact same edge angle every time you sharpen.

New leather-lined angle guides offer protection for knives during sharpening, while the sharpener’s improved guide design allows for knives with thumb studs. A lock-out belt tensioner on the sharpening cassette helps make changing abrasive belts fast and simple. Five grits accommodate the full spectrum of sharpening, from repair to ultra-fine polishing.

The system includes the standard triangle cassette sharpener along with a complementary blade grinding attachment for those who want to elevate their sharpening game. It’s built on a rigid metal chassis designed to offer a stable platform and features metal components engineered to last.

An adjustable, three-position convex pulley system enables you to customize grind profiles depending on personal preference or the type of knives being sharpened. Grind profiles can be set to low, medium or high convex quick and easy, again without tools. An angle adjustment knob, now located in a more visible position, makes setting grind angles faster and easier than ever. At the turn of the knob, you can rotate the dial anywhere from 10 to 30 degrees to set your preferred angle and can even make precise adjustments while the machine is running.

Work Sharp Ken Onion MK.2 Specs
Sharpener Type: Electric benchtop w/grinding attachment
Blades sharpened: Pocketknife, kitchen knife, hunting knife, serrated, axe and scissors
Grit Selection: ¾” x 12” Belt Kit: (1 ea.) P120 (extra coarse), X65 (coarse), X22 (medium), X4 (fine), 6000 (extra fine); also 1” x 18” Belt Kit (for grinder): P120, X65, X22, X4, 12000 and cloth belt for stropping.
Dimensions: Stand-alone sharpener: 9 ¾” long x 5 ¾” wide x 5 ½” tall; w/blade grinding attachment: 10” long x 6 ¼” wide x 6 ½” tall
Construction materials: Metal, plastic and tactile rubber; grinding attachment is built on a rigid metal chassis designed to offer a stable platform and features metal components throughout that are engineered to last.
Weight: 7 lbs.
SPECIAL FEATURES
7-speed motor control with LED display;
Sharpening guide w/scope click adjustment knob. Detent clicks in half degree increments from 15 to 30 degrees along the dial;
Leather-lined angle guides offer protection for knives during sharpening;
Tool sharpening cassette with 65-degree angle scissor guide;
Blade grinding attachment quickly and easily mounts to the MK.2 power base without tools or calibration.
Once attached, the grinder boasts on-the-fly motor speed control and continuous run time with LED indicator lights that make selecting belt speed fast and easy;
An adjustable, three-position convex pulley system enables you to customize the grind profile depending on personal preference or the type of knives being sharpened;
Graphic user guide along with a quick start guide helps you understand and operate the sharpener successfully, and;
Flexible abrasive belts and angle guides provide precision results on just about anything that needs sharpening.
Country of origin: Made of foreign parts; designed, calibrated and quality checked in Ashland, Oregon
MSRP: $300
Available: Now

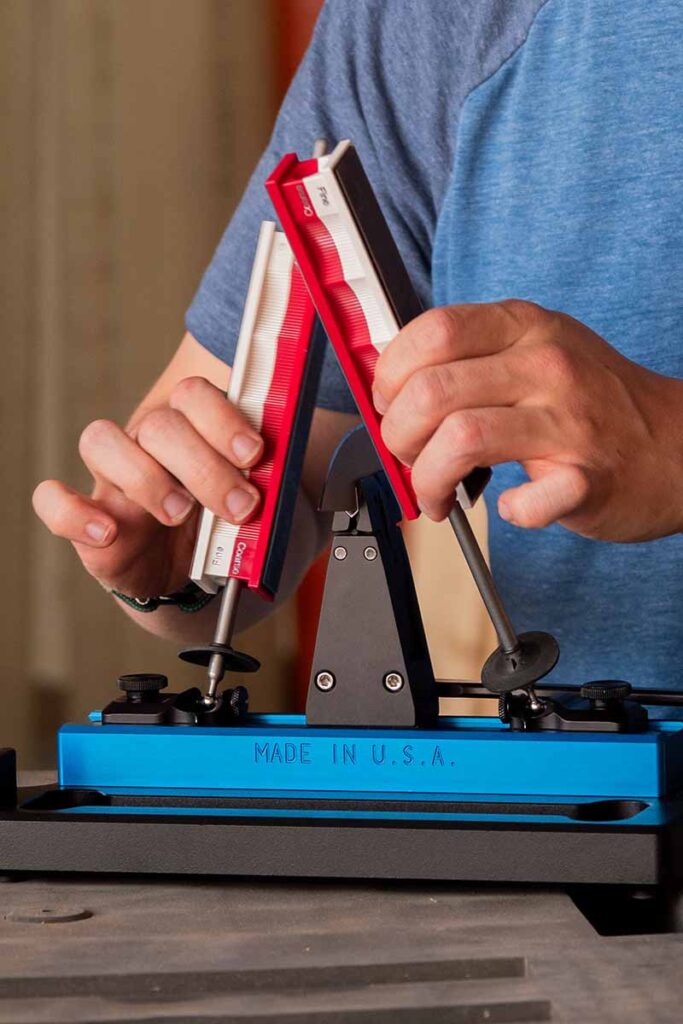
Wicked Edge Cobalt WE64

Wicked Edge’s patented Dual-Sided Sharpening Technology
Wicked Edge’s patented Dual-Sided Sharpening Technology, DualCam Vise and more highlight the new Cobalt WE64.

The Wicked Edge Cobalt WE64 features easy clamping ability with the company’s DualCam Vise to the portable form factor of the company’s GO-WE60 sharpening unit.

According to Wicked Edge, the result is the fastest sharpening experience in the 60 Series line, including both standard edge maintenance and touchups.

The WE64 is lightweight and compact for storage and travel and can be secured to a hard, flat surface with the included C-clamp, or directly mounted to a work surface through the predrilled holes in the base. It is compatible with all Wicked Edge sharpening stones and strops and assorted other of the company’s sharpening accessories.

Wicked Edge Cobalt WE64 Specs
Sharpener Type: Precision guided manual
Edges sharpened: All but serrated
Abrasive Type: Monocrystalline diamond stones
Grit Selection: 200/600 diamond stones (2 each)
Dimensions: 11.5” x 4” x 4.75”
Construction Materials: Type 2 anodized aluminum, stainless steel and Delrin
Weight: 3.5 lbs.
SPECIAL FEATURES
Patented Dual-Sided Sharpening Technology;
DualCam Vise, included repeatability tools, lightweight, portable design, C-Clamp, standard alignment guide, guide rod shields, practice knife, limited lifetime warranty
Sharpens blades up to 15” long
Angle range: 13-31 degrees per side (26-62 degrees inclusive)
Angle markings in 1-degree increments
Able to clamp blades up to 3/16” thick and able to clamp thicker blades with the unit’s .25-inch jaws
Country of Origin: USA
MSRP: $499
Available: Now

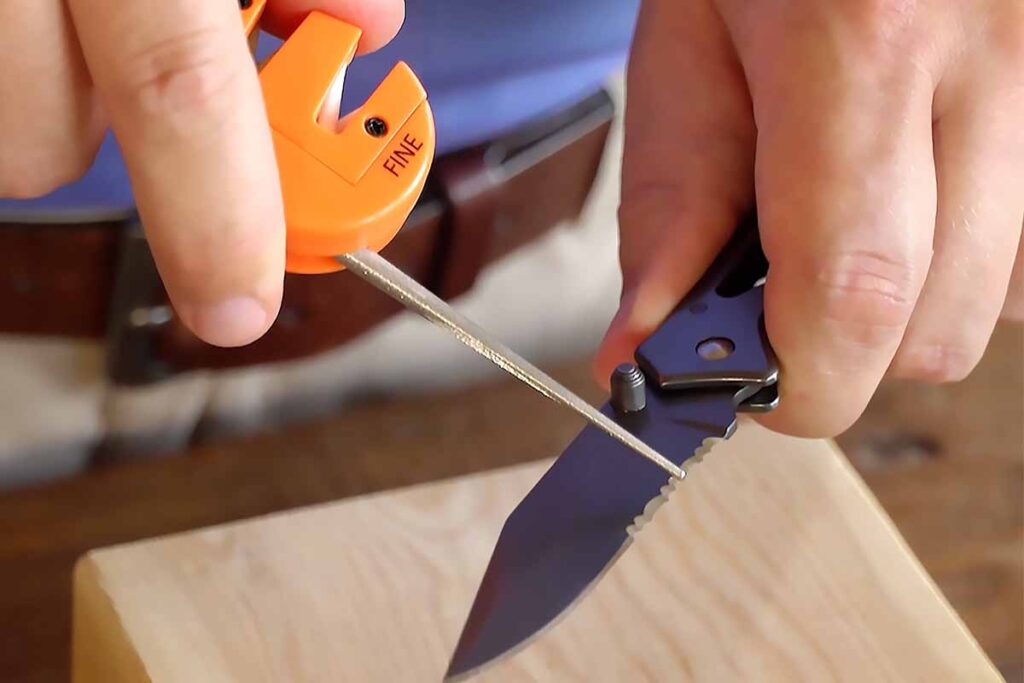
AccuSharp Explorer Knife & Tool Sharpener and Outdoor Survival Tool

AccuSharp Explorer Knife & Tool Sharpener and Outdoor Survival Tool
The AccuSharp Explorer Knife & Tool Sharpener and Outdoor Survival Tool not only sharpens serrated and plain edge blades, it also boasts a selection of survival/emergency tools

The AccuSharp Explorer Knife & Tool Sharpener and Outdoor Survival Tool has a wealth of sharpening and survival tools for outdoor enthusiasts. Diamond-honed tungsten carbide blades and fine ceramic rods address plain edges. The diamond-tapered rod sharpens serrations and gut hooks, while a center groove sharpens fishhooks and various pointed objects. The multifunctional tool also features a fire starter, compass, emergency whistle and SOS mirror for survival situations.

AccuSharp Explorer Knife & Tool Sharpener and Outdoor Survival Tool Specs
Sharpener Type: Knife and tool w/survival tools
Edges sharpened: Plain and serrated
Sharpening Angle: Preset at 21 degrees
Abrasives/Grits: Tungsten carbide and fine ceramic/1500; diamond coated rod/400
SPECIAL FEATURES:
2 V-notched sharpening slots;
Reversible tungsten carbide blades preset at 21-degree angle;
Fine ceramic finishing rods preset at 21-degree angle;
Compact design;
Retractable diamond tapered rod to sharpen serrations and gut-hook blades;
A groove to sharpen fishhooks;
SOS mirror;
Compass;
Fire-Starter;
Emergency whistle;
Sharpener Dimensions: 5” wide x 1.25” long x .5” deep
Construction Materials: Hard plastic body, diamond-coated steel rod, fine ceramic rods, and tungsten carbide and metal screws­
Carry: A lanyard hole for easy attachment
Weight: 1.6 ozs.
Country of Origin: China
MSRP: $16.99
Available: Now

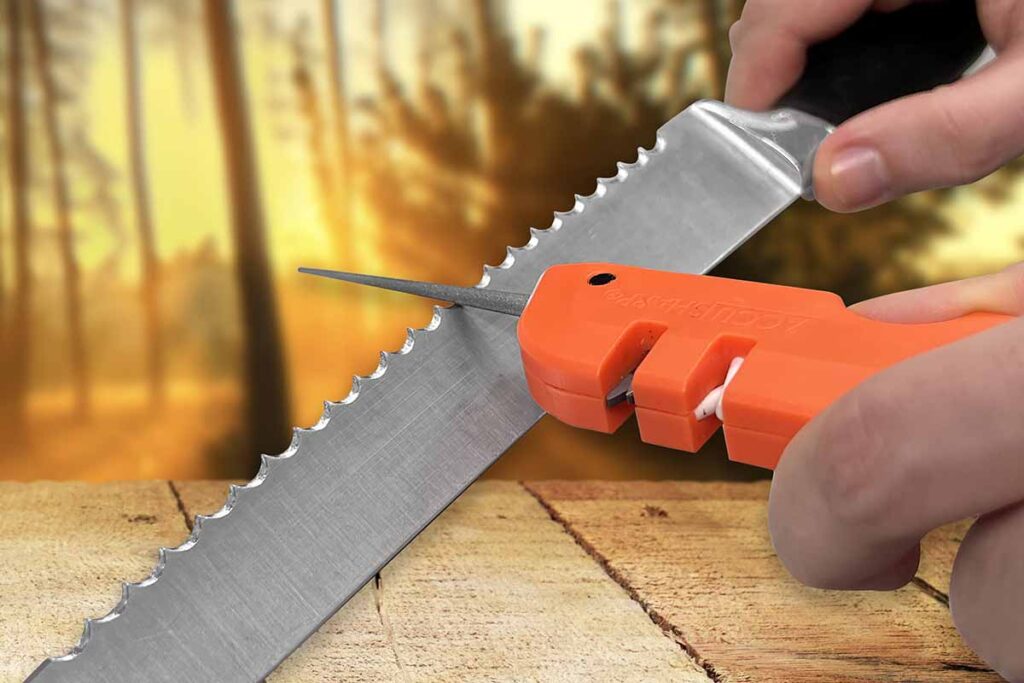
AccuSharp 4-in-1 Knife and Tool Sharpener

AccuSharp 4-in-1 Knife & Tool Sharpener
The AccuSharp 4-in-1 Knife & Tool Sharpener’s retractable diamond-tapered rod handles deep serrations.

The AccuSharp 4-in-1 Knife and Tool Sharpener is a keen companion for outdoor enthusiasts. The pocket-sized edge maintenance tool features pre-angled coarse tungsten carbide blades for initial sharpening and fine ceramic rods for refining the edge. A retractable diamond-tapered rod sharpens serrations and also features a groove for hooks and darts. If you prefer working on a flat surface, flip out the retractable diamond file for continuous sharpening. The unit’s rubber-molded feet ensure stability during use. Color options are black and blaze orange.

AccuSharp 4-in-1 Knife & Tool Sharpener Specs
Edges sharpened: Plain and serrated
Abrasive Type: Tungsten carbide, fine ceramic and diamond coated
Grit Selection: Diamond rod: 400; diamond file: 400; ceramic fine: 1500
Dimensions: 1.5” wide x 4” long x 0.75” deep (closed) and 1.5” wide x 8.75“ long x 0.75” deep (open)
Construction Materials: Hard plastic body, diamond-coated steel rod & file, fine ceramic rods, and tungsten carbide
Weight: 1.6 ozs.
SPECIAL FEATURES
2 V-notched sharpening slots;
Reversible tungsten carbide blades preset at 21-degree angle;
Fine ceramic finishing rods preset at 21-degree angle;
Rubber-molded feet for stability;
Compact design;
Retractable diamond tapered rod;
Groove to sharpen hooks and darts;
Retractable diamond flat file
Country of origin: China
MSRP: $16.99
Available: Now

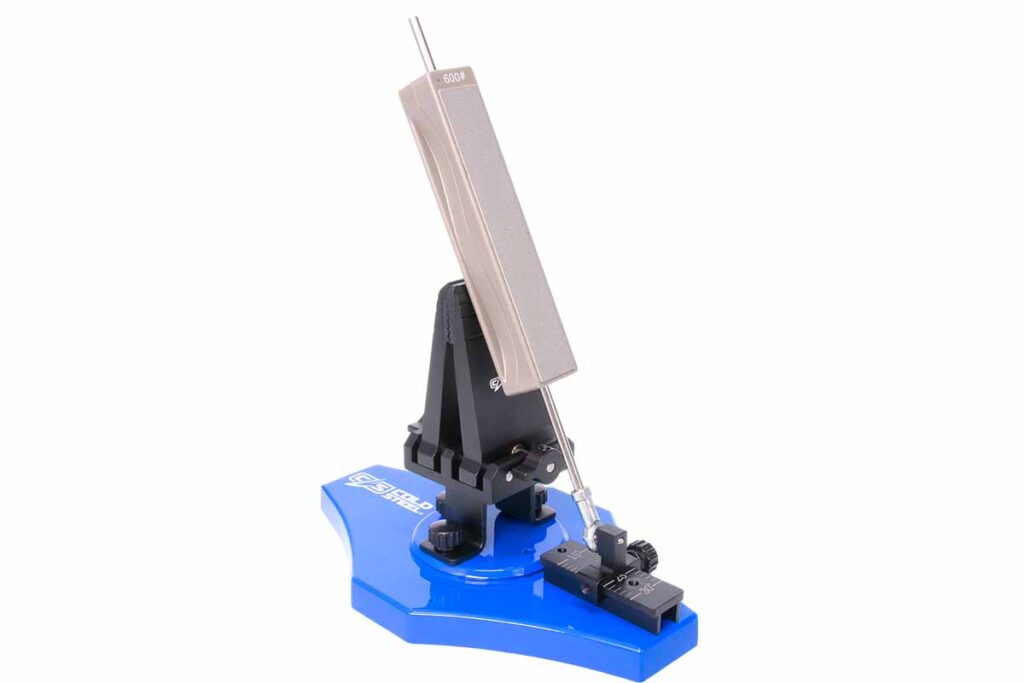
Cold Steel Benchtop Sharpener

 Cold Steel Benchtop Sharpener
The Cold Steel Benchtop Sharpener has an ambidextrous clamp with a non-marring grip, and 180-degree rotation for sharpening two edges without removing the knife from the clamp.

The Cold Steel Benchtop Sharpener is angle adjustable from 15 to 30 degrees, and comes with four diamond sharpening grits.  It has an ambidextrous clamp with a non-marring grip and 180-degree rotation for sharpening two edges without removing the knife from the clamp. The base is weighted with non-slip feet providing a stable pedestal for benchtop sharpening. The unit includes a hardshell carrying case.

Cold Steel Benchtop Knife Sharpener Specs
Sharpener type: Adjustable benchtop stone
Edges sharpened: Plain
Abrasive Type: Diamond
Grit Selection: 300, 600, 800 and 1000
Dimensions: 5” long x .95” wide x .82” thick
Construction materials: Metal
SPECIAL FEATURES:
Adjustable sharpening stone;
15-30 degree angle;
Ambidextrous clamp with even clamping force;
180-degree rotation for sharpening two edges without removing knife from clamp, and;
Hard shell carry case
Country of Origin: China
MSRP: $149.99
Available: Now

More Sharpening Articles:

ABS Lose Two Long-Time Leaders In Passing Of Steve Dunn & Hanford Miller

Dunn and Miller left lasting impressions on ABS, students and custom knifemaking.

The American Bladesmith Society lost two of its finest leaders and bladesmithing instructors recently with the passing of ABS master smiths Steve Dunn and Hanford J. Miller.

Steve Dunn

Steve died on May 21. He was 68. Outgoing chairman of the ABS, he was a longtime Society member, receiving his master smith stamp in 1994 before going on to serve on the ABS board of directors and eventually being elected chairman.

“He was a craftsman of the highest level, as evident in the exceptional blades he made, and unsurpassed as an engraver, which he passed on to so many with his teaching,” americanbladesmith.org reported.

Many in the ABS were still recovering from the shock of the news as BLADE® was going to press, ABS master smith Billy Bob Sowell among them.

“I was stunned,” he wrote. “Steve was one of my judges for my master smith stamp. I took his engraving class and his folder class. I’ll miss him.”

According to his bio on the ABS website, Steve began making knives as a hobby in 1988. In 1990 he enrolled in the basic forging class at the Bill Moran School of Bladesmithing, where he started forging damascus. After achieving master smith, it wasn’t long before he began teaching at the Moran School. In 2003 he was selected to serve on the Society’s board of directors.

A strong believer in sole authorship of his knives, he enrolled in a basic engraving class at GRS Tools in 2002. He later studied with Chris DeCamillus on Bulino style engraving and was asked to be an instructor at the GRS school in 2005.

Hanford Dunn

Hanford passed away on March 25. He sold his first knife in 1968. He made knives in the Moran style, including bowies, fighters, camp knives and other large fixed blades, and also period pieces such as reproductions of the cinquedea. His mark was his initials or name within a bowie logo.

In addition to being an outstanding maker of forged knives, Hanford served on the ABS board of directors as treasurer for many years. According to americanbladesmith.org, he was best of friends with BLADE Magazine Cutlery Hall-of-Fame® member Bill Moran, with the pair being “like two peas in a pod.”

They first met in 1974 in Bill’s shop. Hanford read about Bill in a library book about knives and realized he was only a short drive away from Hanford’s home in Randallstown, Maryland.

“Bill was a great mentor,” the site observed, “and their friendship lasted long after Hanford moved to Colorado in 1976.”

Pros’ Secrets To Sharpening Knives

0

Four knife industry pros share the secrets of how they keep their edge when sharpening.

A knife is made to perform its function as a tool, and job number one is to cut.

It follows that the development and maintenance of the edge is the most important aspect of knife ownership and use. When users are in the shop, around the house, at the office or in the field, keeping the edge in top form and working order makes the task at hand easier and often saves time and effort.

Custom Knifemaker: Chris Berry

Chris Berry sharpens freehand
Chris Berry sharpens freehand, holding the DMT bench stone in one hand and his modified cleaver in the other. (Chris Berry image)

A custom knifemaker for 15 years, Chris Berry has made a name for himself in heavy-use choppers with blades of high-wear-resistant steel.

“When I finish a knife and get ready to sharpen it, I break the edges on the grinder to start the process and then work freehand after that,” he explained. “I’ll start with an extra-coarse DMT diamond stone and then go from extra coarse black to red medium and then green extra fine.”

In the field Berry carries a Spyderco cubic boron nitride (CBN) sharpening stone along with a Spyderco Double Stuff pocket stone.

“It has medium and fine ceramic for the edge,” Berry continued, “and then I’ll have some piece of leather to strop the blade and remove the burr.”

Chris knows it’s time to touch up an edge when it starts to drag through the cut.

“A blade is dull when it won’t cut printer paper,” he said, “so I’ll sharpen it before it reaches that point. I’m not obsessively sharpening a knife blade, but I’m just hitting the medium edge of the Double Stuff and going to the strop to bring back that popping edge. I usually only go back to the grinder if the edge is damaged, but, if the blade is really dull, starting with the extra coarse diamond and going through the grits will make it like a new knife.”

As Berry noted, the burr is the little, fine piece of steel that rolls up to the edge of the blade and is rough on one side and smooth on the other.

“If the burr isn’t gone after sharpening [the edge is] not sharp,” he advised. “In my opinion, it is the key to whether a knife is sharp or not. I tell people on social media that sharpening a blade is broken down to apexing the edge to raise the burr, refining the edge with progressively finer grits, and then removing the burr by stropping. If you progress through the grits and have the burr removed, you should be able to cut newsprint, phone book paper and even paper towels. That is as sharp as you are going to get.”

Knob Creek Forge: James Gibson

James Gibson of Knob Creek Forge designs knives for ESEE and teaches classes on bushcraft and survival.

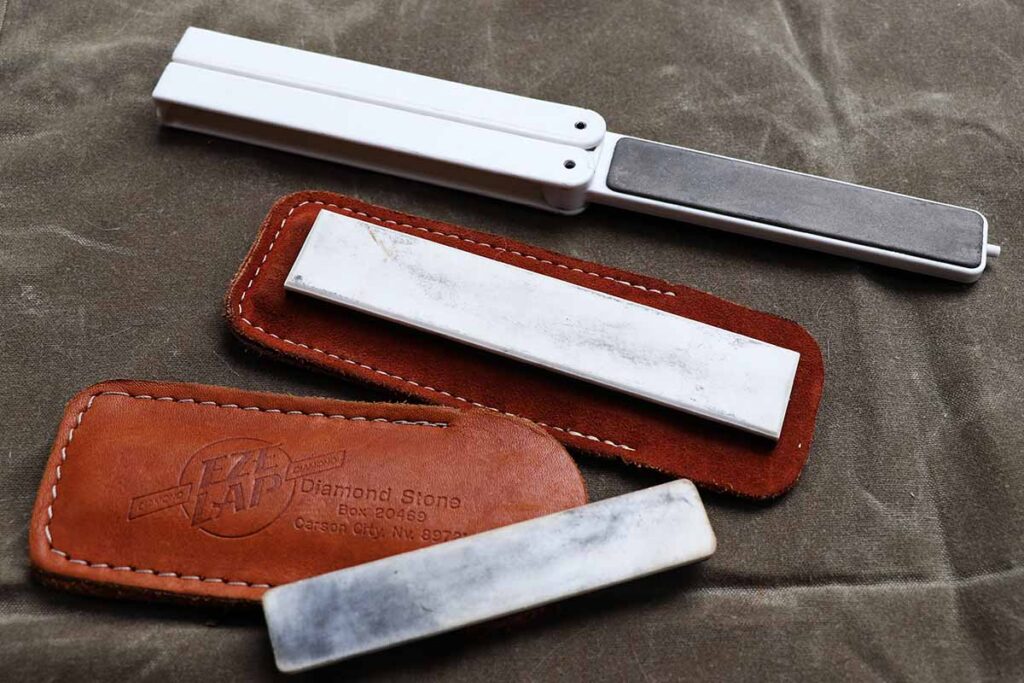
Some of the favorite field sharpeners of Joe Flowers include the EZE-Lap 530 Super Fine Diamond/Ceramic Folding Sharpener
Some of the favorite field sharpeners of Joe Flowers include the EZE-Lap 530 Super Fine Diamond/Ceramic Folding Sharpener (top) with a folding handle. “The Spyderco Double Stuff [middle] is a fantastic field sharpener,” Joe wrote. “It and the EZE-Lap Double Sided Sharpening Stone [bottom] both have a leather sleeve which can work as a strop.” (Joe Flowers image)

“I like a full flat grind with a convex edge,” he remarked. “They say the convex edge is the best, and when I have an extremely dull blade I use these little diamond files and then a ceramic rod or stone that will stand the edge up.”

An ABS journeyman smith, Gibson cautioned, “A dull knife will hurt you quicker than a sharp knife because you tend to lose control when you apply more pressure to get a job done. Most of the time I will sharpen a knife at the end of the day, but if it is not performing I will touch it up right then and there. If you ever watch a carver, they will carve for 15 minutes or so and then strop the blade to bring the edge back right quick. After a few days of stropping, they will have to do a bit of sharpening.”

Gibson sometimes uses a marker to spot the blade about a quarter inch up from the edge and then “floats” the edge up and down the diamond sharpener. He then moves to the leather strop and notes that if a compound has been used to keep the leather in shape the process will turn the leather black.

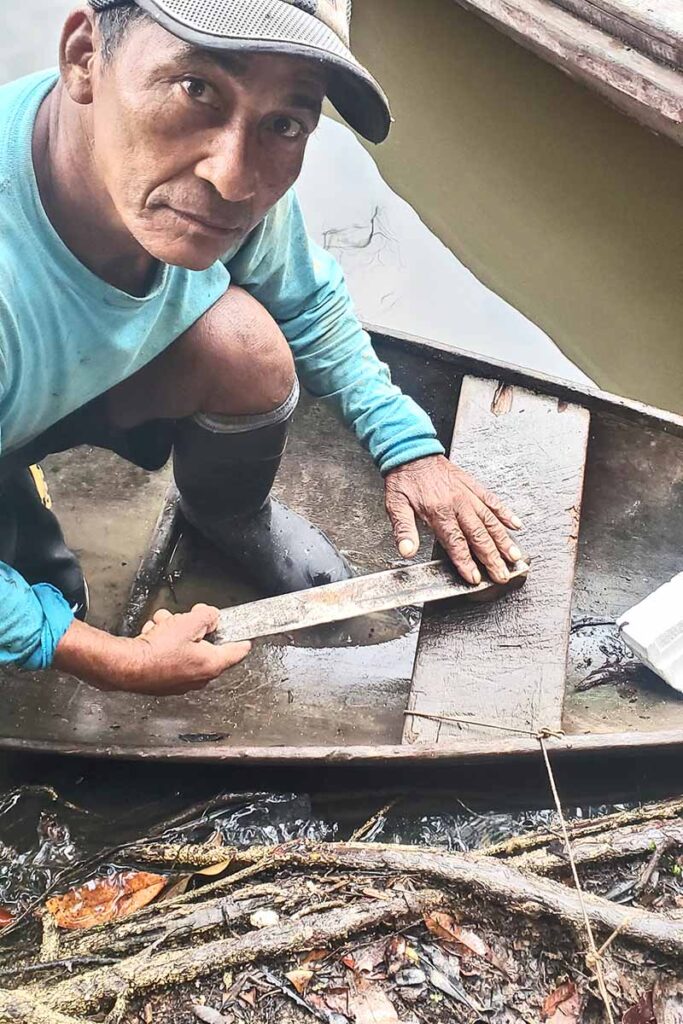
A Brazilian bushman files his machete on a stone
A Brazilian bushman files his machete on a stone, taking out the burrs and nicks in the edge. (Joe Flowers image)

“That means you are pulling steel off the edge,” he commented, “and where the two polished edges meet that will give you the sharpest blade you can get.”

Safety is a constant concern for Gibson and he stresses this aspect of knife use in his classes.

“We train people on the knife, and one of the first things we tell them is never to cut toward yourself. Keep everything out in front of you, or use a bench, log or stump so that everything is out of the way.”

CRKT: Russ Kommer

As a knife designer for Columbia River Knife & Tool (CRKT) and a hunting guide, Russ Kommer keeps blades sharp on a regular basis.

“When I finish up a custom knife, I run the blade on a brand new 400 grit slack belt with a real slight radius,” he remarked. “Then I will take it over a used 400 grit belt so that when the edge is curled and there is a little white line, I can use a leather strop or a 10-inch wheel and break off the burrs.”

Kommer carries a diamond sharpener in the field to touch up an edge.

“That will stand that line back up and remove some steel to get the edge back to infinity,” he said. “The only way to get a blade sharp is to remove enough steel. In the field you can use a leather strop or even the leather heel of your boot or something to help. When guiding, I have done two moose and a caribou in one day, and working on big animals is a big job. Sometimes I will carry two knives and touch both up to be ready for the next week, and I carry a pocketknife for cutting rope or other camp chores. It’s not good to use your hunting knife to cut burlap and dull it up on something like that.”

Testing for sharpness is a varied exercise, and Russ likes the simple standard.

“Guys like to shave their arms and that is all cool and dandy,” he smiled. “I just rake it across the back of my head, and when I feel it grab that hair I know the blade is sharp. There is also the fingernail task—if you feel the blade grab right there on the fingernail, then it is sharp. If you have practiced sharpening a blade enough, then you know quickly just how sharp a knife blade is.”

Condor Tool & Knife: Joe Flowers

As a knife designer for Condor Tool & Knife, Joe Flowers has sharpened thousands of blades through the years. The sharpening process is dependent largely on the work at hand.

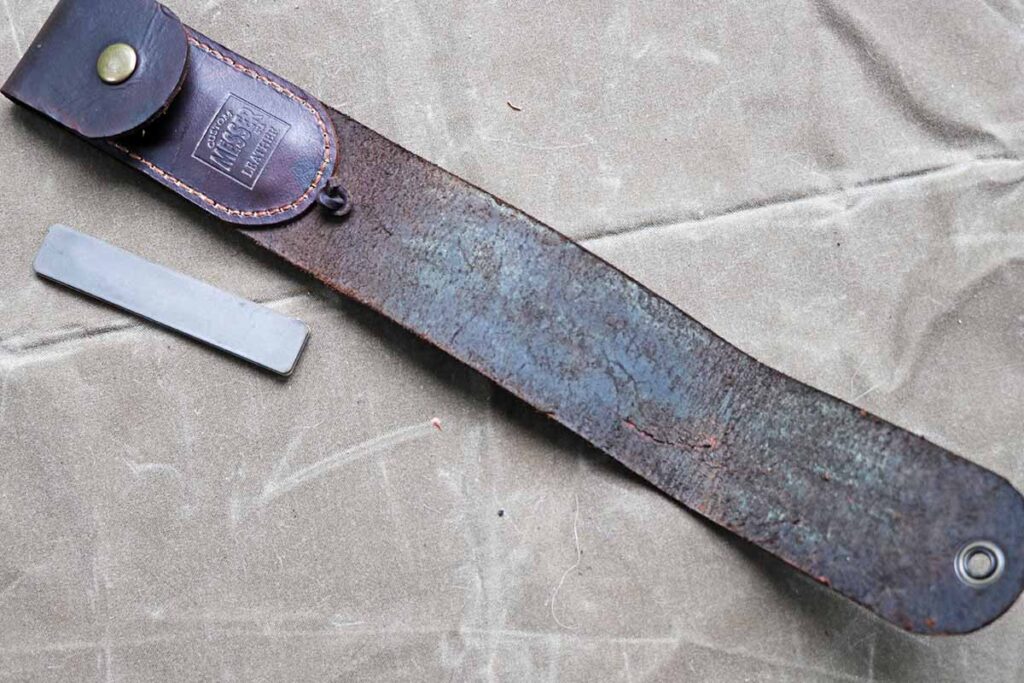
This combination of an EZE-Lap ceramic and diamond stone tucks into the JC Messer strop
This combination of an EZE-Lap ceramic and diamond stone tucks into the JC Messer strop, providing Joe Flowers with a large range of media in a small package. The large strop helps balance out the smaller stone. (Joe Flowers image)

“It can vary between jobs,” he explained. “I just have a 2×42 grinder that I do edge modification on—with every belt imaginable—but by far I use the leather belt the most because I am always using the blades and getting a fast strop. Most of the time, I try and use my field sharpeners and also complement them with the finer stones like my King stones or Spyderco ceramics.”

When Flowers ventures into the field, he is prepared for the occasional sharpening task.

“I really like EZE-Lap’s double sharpener,” he advised. “The files really bite down on carbon steel, and the ceramic on the other side keeps a finer edge. I’ve even used the sheath as a strop. That and the Spyderco Double Stuff are my two favorite compact sharpeners, although Work Sharp’s setup is great, too.”

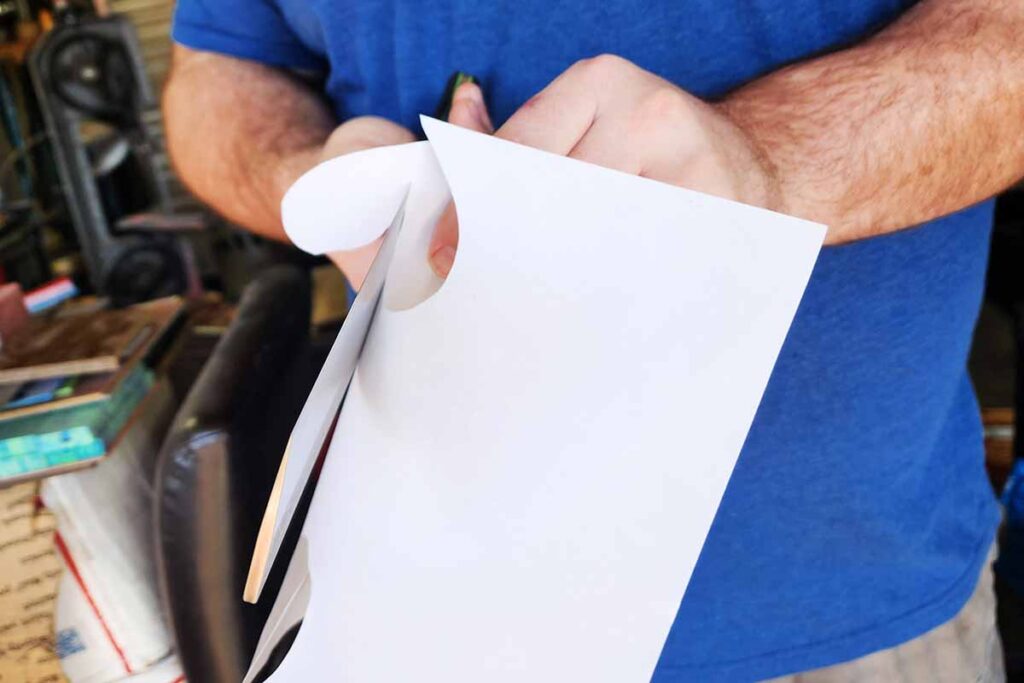
Chris Berry cuts a figure 6 in a sheet of paper
Chris Berry cuts a figure 6 in a sheet of paper. “A blade is dull when it won’t cut printer paper,” he said, “so I’ll sharpen it before it reaches that point.” (Chris Berry images)

When in the field, Flowers likes to settle down before taking on the sharpening of his knives.

“Normally, in camp situations, unless I’m working hours on a game animal or on a bushcraft project, I leave my sharpening to nighttime around the campfire. I also have my field sharpeners around my desk at work to use to understand how they work on different steels more. I like using EZE-Lap and diamond stones with harder-use bushcraft [carbon] steels like 1095. It can get an edge fast and you can go about your day.

“For machetes,” Joe continued, “I stick with what the locals use, and that’s a file. Generally, I’m working with softer steels for machetes so a triangular single cut bastard or double cut bastard file about 6 inches long is a nice addition to my sheath. I’m finding better results in super steels on diamond stones until I move into these new crazy preloaded diamond powder strops. Those look incredible to try.”

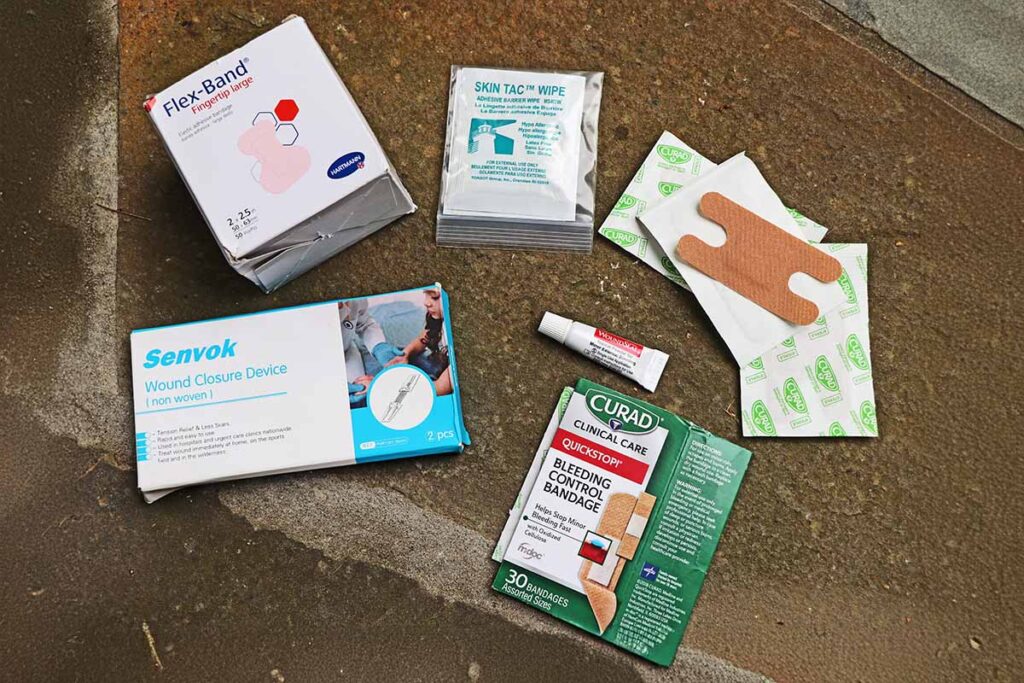
These items are extremely handy if you do anything with knives. The fingertip bandages are good anywhere on the bop
These items are extremely handy if you do anything with knives. The fingertip bandages are good anywhere on the bop, aka a survival experience, and bleed control Band-Aids® can also be handy. They have a coagulant. Besides a tourniquet, noninvasive wound closure devices coupled with a tape adherent like Skin Tac™ can save a trip to the emergency room for those annoying cuts. (Joe Flowers image)

When sharpening a dull blade, Flowers is known to use 60- to 80-grit belts to re-form edges when large chunks have been taken out of a machete, for example. He maintains that it can take the steel off the blade fast but there must be a bucket of water or a spray bottle handy to keep the grinding surface cool.

Bringing a knife back from dead dull involves a proven process.

“At home I would reprofile gently on a 1×30 Harbor Freight special I’ve had from the old days,” Joe commented. “Depending on the steel and use and the comfort of the hardness, I’ve reprofiled knives from dead dull with homemade sandpaper and mouse pad backing and keep heavier grits there as well. You can definitely over sharpen a knife by stropping so much you roll the edge. In the technique, you need to be able to tell when you have just the right amount of pressure.”

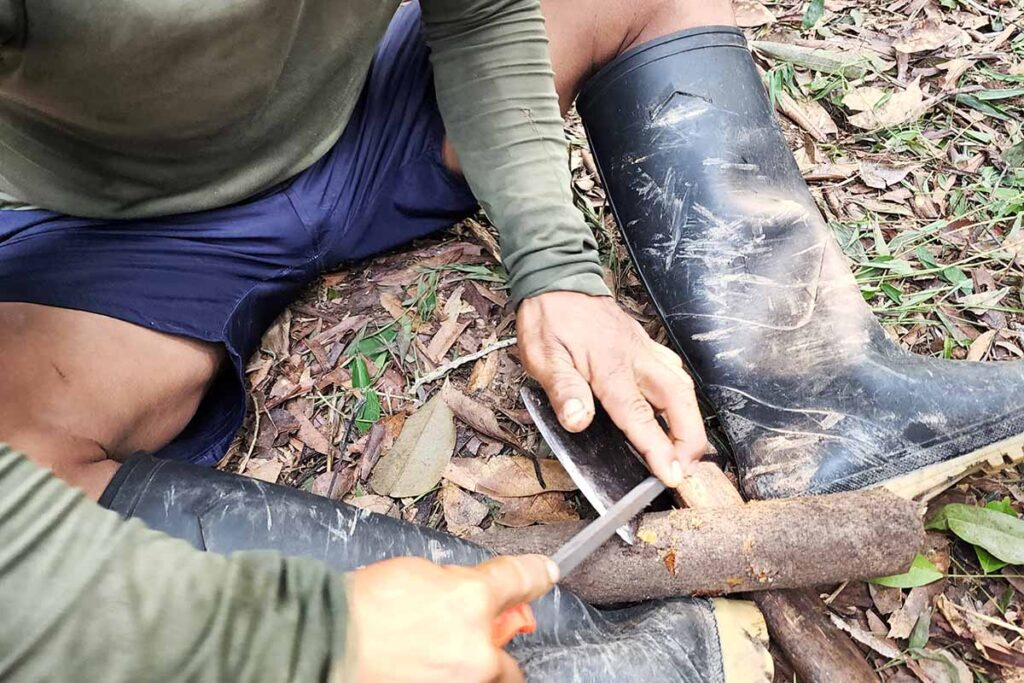
tribesman from Colombia, uses a common triangular file on the axes and machetes
Hari, a Huitoto tribesman from Colombia, uses a common triangular file on the axes and machetes on Bushcraft Global (bushcraftglobal.com) trips. For the final edge, the file is drawn from the edge to the poll. (Joe Flowers image)

Sometimes the type of sharpening medium used depends on the blade steel, the style of blade and the common utility of the knife.

“On many higher-end-steel kitchen knives, I stick with King stones because they are tried and true,” Joe related. “However, I like many different media for various steels, going for the extra-fine edges or a strop loaded with compounds for the final edge. For things like serrations, I use thinner round diamond rods for getting the radius, but I don’t deal with them much. I really like the flattest surface possible when I sharpen Scandi as it helps keep the angle straight.”

Retaining a sharp edge makes life easier wherever and whenever a knife is needed. A few minutes to shape up a blade is always time well spent.

More Sharpening Articles:
Advertisement

Must Read Articles

Read this before you make a knife

Knifemaking 101 – Read This Before You Make a Knife

  by Wayne Goddard My experience has taught me that there's nothing like digging in and getting started. I've often said the hardest part of the...
how to forge damascus steel

How to Forge Damascus

Advertisement
Advertisement