
Home Knifemaking

Knifemaking

Knifemaking is the building of a knife, which includes the blade, handle and other accouterments. Blades are made by either removing metal from a steel blank via a grinder – known as stock removal – and the forging to shape of hot steel into a blade in the process known as bladesmithing. Other parts, including bolsters, guards, pommels, etc., are needed to complete the finished knife.

Featured Knives – – Knife Collecting – – Tactical Knives – – Survival Knives

Feather Damascus: Blades Forged Light And Airy

The variations on damascus steel themes are endless. The possibilities are tempered only by the maker’s time at the forge and his or her desire to create.

Among these many variations, one pattern has recently captured the spotlight. These days, feather damascus is trending and custom makers are producing knives that turn heads, captivating buyers with the intricate layering that produces hard steel intertwined with the look of the light and wispy. Feather damascus offers a medium of both performance and artistic expression that influences every aspect of the maker’s creativity.

Ethan Kolar of Plummer, Idaho, describes his interest in feather damascus as “chaotic flow.” He explains, “The pattern’s center seam, where the jagged W’s converge, creates a flow in the blade which really adds to the overall confluence of the knife as well as creating a controlled chaos as the pattern explodes from the center filling out the blade.”

Kolar enjoys the hint of “jaggedness” and the center line that ties the blade together, and in the making of his feather damascus, his focus lies in test etching every restack from the forge. He sees the pattern in many different forms with the observation that “a pattern is not right or wrong but more of what the maker envisions and creates and what is right to him for his knife.”

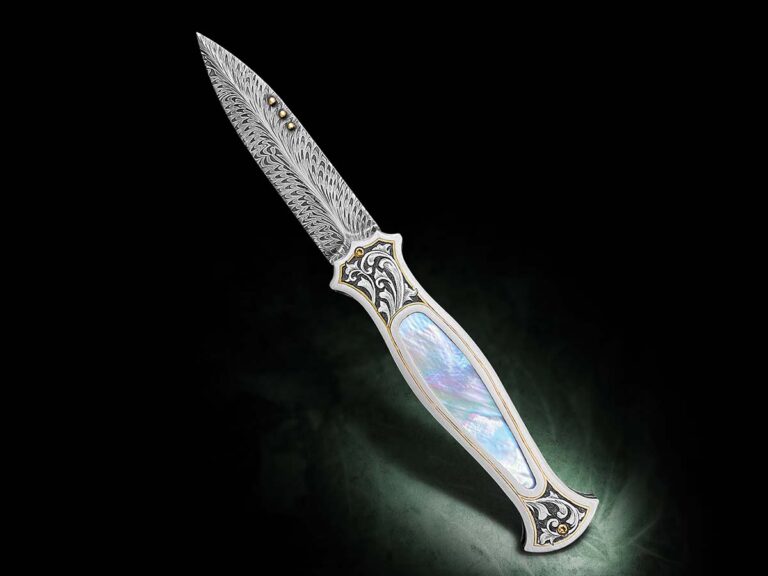
The folding dagger Ethan composed includes a 3-inch feather damascus blade of 1084 and 15N20 steels with an engraved gold inlay and scroll worked 416 stainless steel window frame fitted with exhibition-grade white-lip mother of pearl. Liners are 15N20 file-worked and nitre blued, while the backbar of 416 stainless is engraved and sports delicate file work. Its overall length is 7 inches.

“Most of the inspiration I have while making damascus comes from envisioning my final product,” Ethan remarked, “what engraving will go with it, the handle embellishment, and a lot to do with the overall color of the knife, deciding whether the pattern will be brighter or darker.”

Steel On Fire
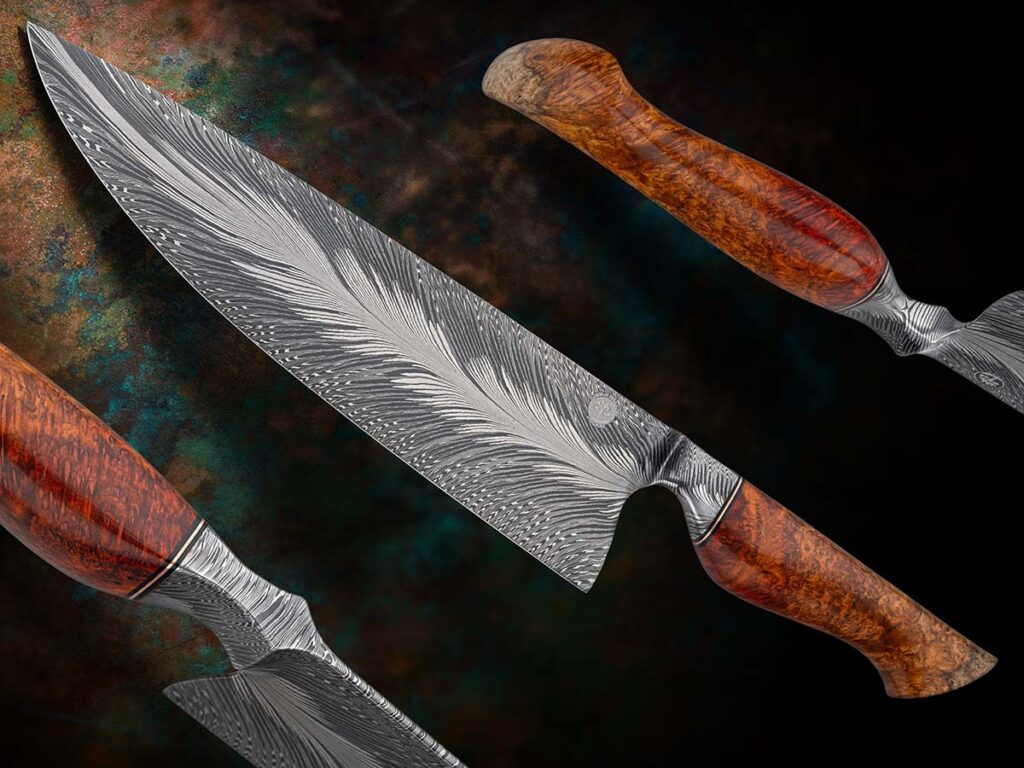
Winning Best Damascus at the 2025 BLADE Show West, Trevor Morgan’s “Torrent of Fire” chef’s knife includes a 9.25-inch blade of 1084 and 15N20 in a mix of W’s and straight layers with a fat core of 15N20. The knife’s overall length is 14.2 inches, and the handle is dark red tiger’s blood amboyna burl with a splash of sapwood for contrast. (Jocelyn Frasier image)

Another contemporary artisan exploring the feather damascus pattern is ABS journeyman smith Trevor Morgan. Having attended the Bill Moran School of Bladesmithing in Texarkana, Texas, in 2020, his goal with each feather damascus blade is to make the pattern “pop.” To achieve that look, his hand follows an artistic eye.

“Contrast, for sure, really makes any pattern cool,” said Trevor, “especially feather or mosaic damascus, larger pieces of dark and bright steel, gradients and that kind of thing. Also, out-of-the-ordinary stuff like feather [damascus] can be really cool to look at. Symmetry is always great with a feather pattern because it’s pretty easy to notice when something is out of whack with a feather due to the defined center. Complexity is also great. If it’s hard to figure out, all the better.”

According to Morgan, a resident of Apple Valley, California, the feather pattern can be challenging due to the hot-cut process, which puts enormous stress on the billet in somewhat weird ways and causes every forge weld to want to split open. The problem, however, can be mitigated by mig welding all the way around the seams. But this is his least favorite method of achieving the integrity of the billet because it requires grinding away the welds, wasting material and consuming time.

Trevor’s inspiration for feather damascus pieces comes from the world around him. “It’s places and people,” he commented, “from nature and the endeavor to make something organic and as lifelike as possible in steel. I regularly get swept up in the general zeitgeist surrounding the making of complex patterns. I see something on social media or somewhere, and I think, ‘Man, that’s really awesome! I’d love to try to make something like that.’ Then comes the real creative part, where I just get an idea of something that might look really cool and put it together.”

Morgan’s method is readily revealed in his featured piece, named “Torrent of Fire.” The knife includes a 9.25-inch blade of 1084 and 15N20 in a mix of W’s and straight layers with a fat core of 15N20. The knife’s overall length is 14.2 inches, and the handle is dark red tiger’s blood amboyna burl with a splash of sapwood for contrast.

Organic Appeal
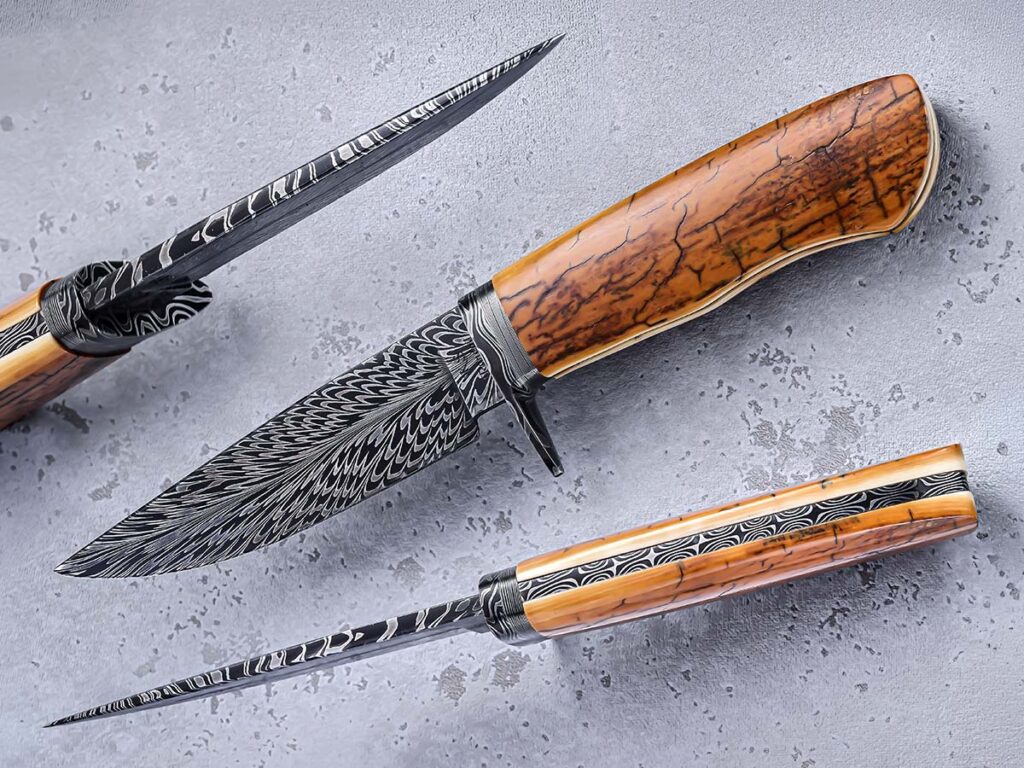
Splitting the billet down the center to maintain symmetry is among the trickiest aspects of feather damascus to Steve Randall. He nails it on his frame-handle hunter, with the axis of the pattern fountaining from the mastodon scales in a balanced and spectacular fashion. (SharpByCoop image)

Feather damascus has been a staple steel for ABS master smith Steve Randall for some time. He seeks a continual flow of the steel from the handle to the tip, and oriented so that the handle appears to actually hold a feather. “I was attracted to the feather pattern because of it’s a very cool, organic look,” he advised. “Like a snowflake, there are no two exactly the same. I’ve been forging feather damascus for at least seven years, and I’ve made several bowies and hunters.”

Randall, of Estancia, New Mexico, presents his feather damascus piece with frame-handle construction, showcasing mastodon scales with an overall length of 9½ inches and a blade of 4¾ inches. “Feather damascus is a more challenging pattern,” he said. “My tricks are patience and concentration. There are many welds involved in the pattern, which can contribute to cold shuts, which can destroy hours of hard work. The trickiest part is splitting the billet right down the middle and maintaining symmetry.”

While he describes the feather damascus forging process as complicated and labor-intensive, Steve sees the payoff in the harmony of the pattern and its related materials in the finished knife. “I always try to complement it with the best handle materials I have available,” he reasoned. “I prefer stag or ivory. If using wood, I avoid busy patterns and colors. I draw inspiration from many other makers. There are so many accomplished makers who produce a variety of feather patterns. It is one of my favorite patterns to forge because it can really accent the flow of the blade and give it a great overall look.”

Movement And Flow
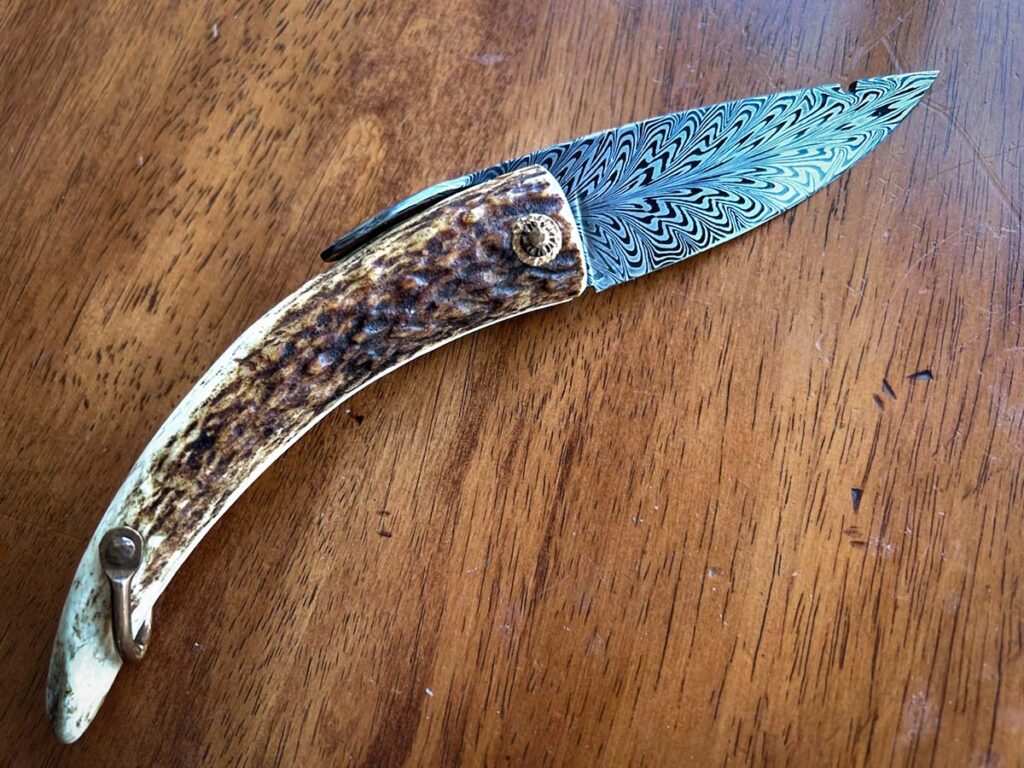
While David Lisch doesn't feel he's hit the limits of his Mountain Man folder, the style of knife is striking with its feather damascus blade set in stag-tip handle. Copper hardware and pivot give the knife its antediluvian look, while the flowing pattern of the blade anchors it in modern forge techniques. (David Lisch image)
While David Lisch doesn’t feel he’s hit the limits of his Mountain Man folder, the style of knife is striking with its feather damascus blade set in stag-tip handle. Copper hardware and pivot give the knife its antediluvian look, while the flowing pattern of the blade anchors it in modern forge techniques. (David Lisch image)

It took a single demonstration by the great master smith Harvey Dean to convince David Lisch, who earned his ABS journeyman stamp in 2009 and his master stamp six years later, to try the feather pattern. “I was always attracted to feather damascus,” he remembered, “but around 2008 I had the chance to see Harvey Dean demonstrate it at an event at Josh Smith’s, and I went right home and made the tools needed and gave it a go. I’ve been making feather damascus since his demo, and my hat is off to Harvey.”

For David, the making of feather damascus is challenging, but he says book matching the blocks really helps with the constant flow of the pattern. Sometimes, he says, makers will intentionally disrupt the flow by spinning one block one way and one the other to enhance the look. If it is done intentionally, he advises, there is no wrong way to stack the blocks. Forging all begins with the initial stack, and David starts with a 12- to 15-pound billet, acknowledging that the pattern can be wasteful in material. He tries not to go too far or stop too short in the forging process and offers that sometimes less is actually more.

“I love feather damascus because it looks different from maker to maker,” added Lisch. “I like a feather with movement and flow, not too bold and not way too fine, something that is easy to look at. For me, the more the pattern follows the forging, the more I like it. The center should lift up into the bolster or ricasso, showing that the blade was forged rather than running off the blade under the ricasso, showing it was just ground into a shape that disrupts the flow.”

Lisch gained a measure of popularity with his Mountain Man 2 folder, and the pictured knife is an example of what he describes as a “deep dive” into the style while using stag tips. “I set out trying to create my own version of one of the oldest knife designs in America,” he remarked, “and I believe I did just OK. But I’m not finished. So far, I’ve made several versions of the folder and have taken it even further with help from my friend and mentor [master smith] Mike Vagnino.”

Lisch had brought together his feather damascus touch and innovative design composition by introducing a clocking adjustable pivot that he has incorporated into a slipjoint, linerlock, lockback and flipper, all in the Mountain Man style with bronze, copper, stag and, of course, feather damascus. He has yet to reach the outer limits of his Mountain Man creativity and says that more will come in due time.

Check Out More Cool Customs:

Brazilian Bonanza: A Bevy Of Brazilian-Made Custom Blades

Hot custom knives from Brazilian makers.

There must be something in the Amazonian water. In the global phenomenon of custom knives, there are few geographic locales that sizzle hotter than Brazil. The country has sharp makers and attracts talent, creating some of the world’s most desirable knives. Here is a look at some of the steel expertise emanating from the equatorial nation and its cutlery shows.


Romário Ribeiro Fighter

Romário Ribeiro Fighter

Sleek and dark, Romário Ribeiro’s 12-inch fully integral fighter of 52100 carbon steel won the Best Handle Award at Salão Paulista de Cutelaria 2025. It’s no wonder, with a seamless and intricate keyhole-style construction, and jacaranda wood and 24k gold inlays creating a boundless night sky motif, complete with a rising crescent moon.


Gustavo Schuenck Fighter

Gustavo Schuenck Fighter

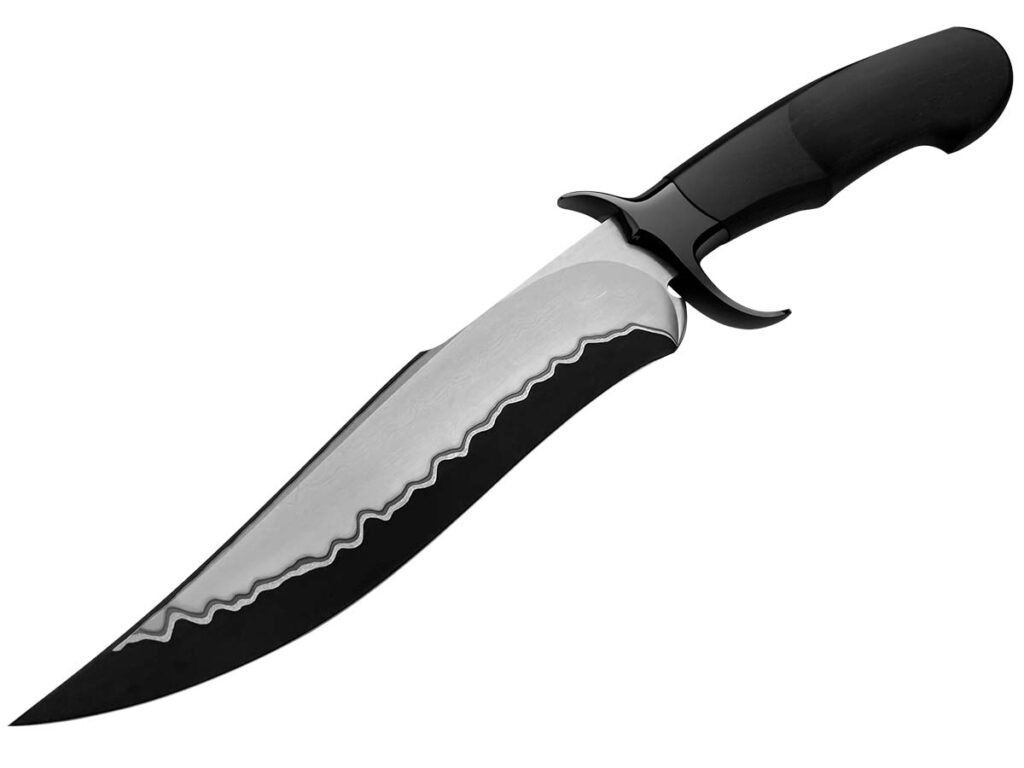
Winner of the Best Fighter Knife Award at Salão Paulista de Cutelaria 2025, Gustavo Schuenck’s blade is aggressively beautiful. San mai steel of 9½ inches with a black phosphate finish ties together with the knife’s pitch-colored jacaranda handle. The nuanced recurve toward the heel offers flow in the build, paired with an understated yet sweeping guard.


Alexandre Biguna Bowie

Alexandre Biguna Bowie

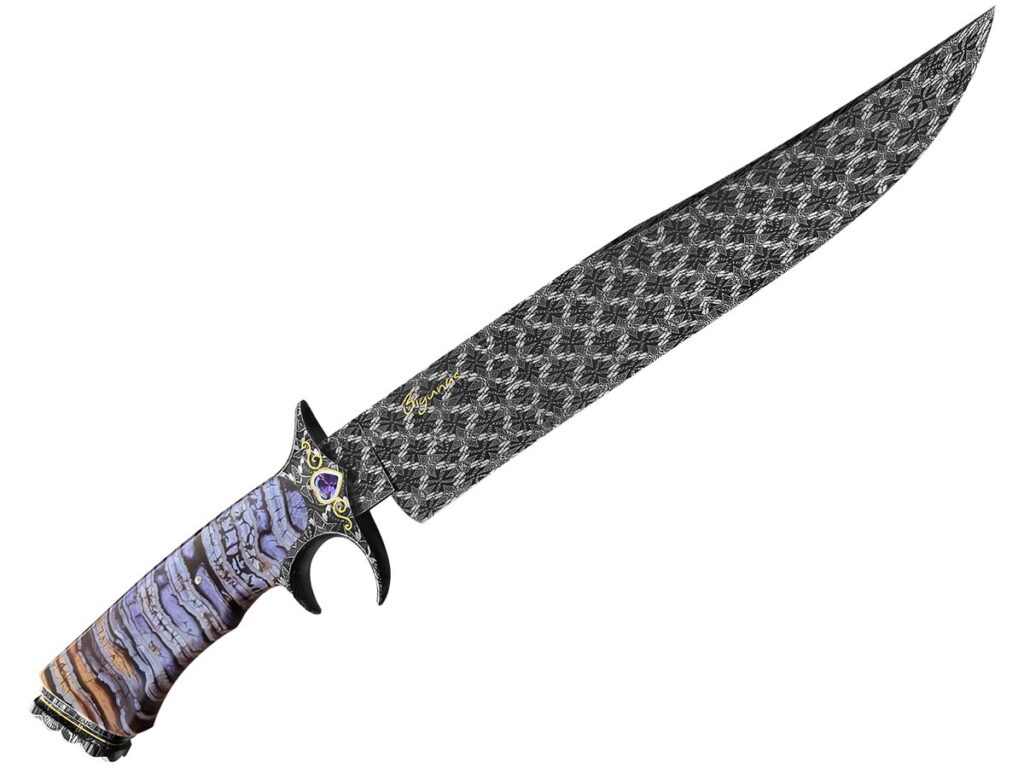
Near-perfect symmetry of Alexandre Bigunas’ basketweave mosaic damascus bowie can’t help but fascinate. The meticulous work on the 10-inch blade is contrasted by the striking color of the sub-hilt’s mammoth-molar handle and pair of amethyst stones on either side of the guard. Topping off Bigunas’ work, 24k inlay, including his signature on the blade.


Júlio Cézar Ribeiro Gentleman’s Slip Joint

Júlio Cézar Ribeiro Gentleman's Slip Joint

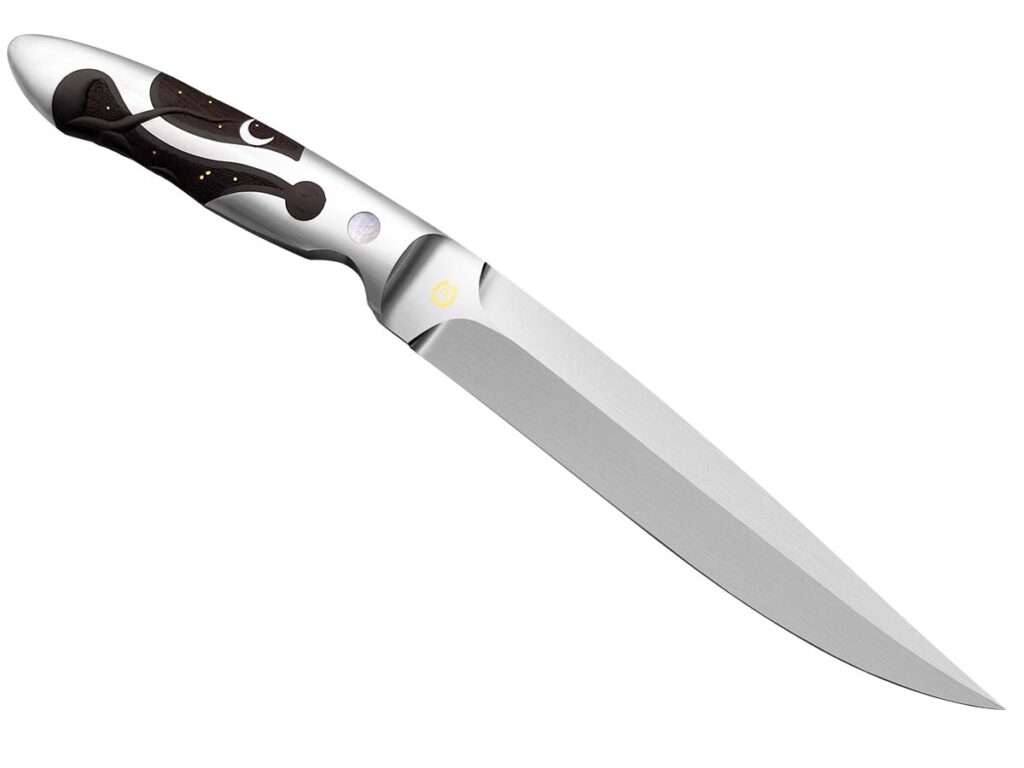
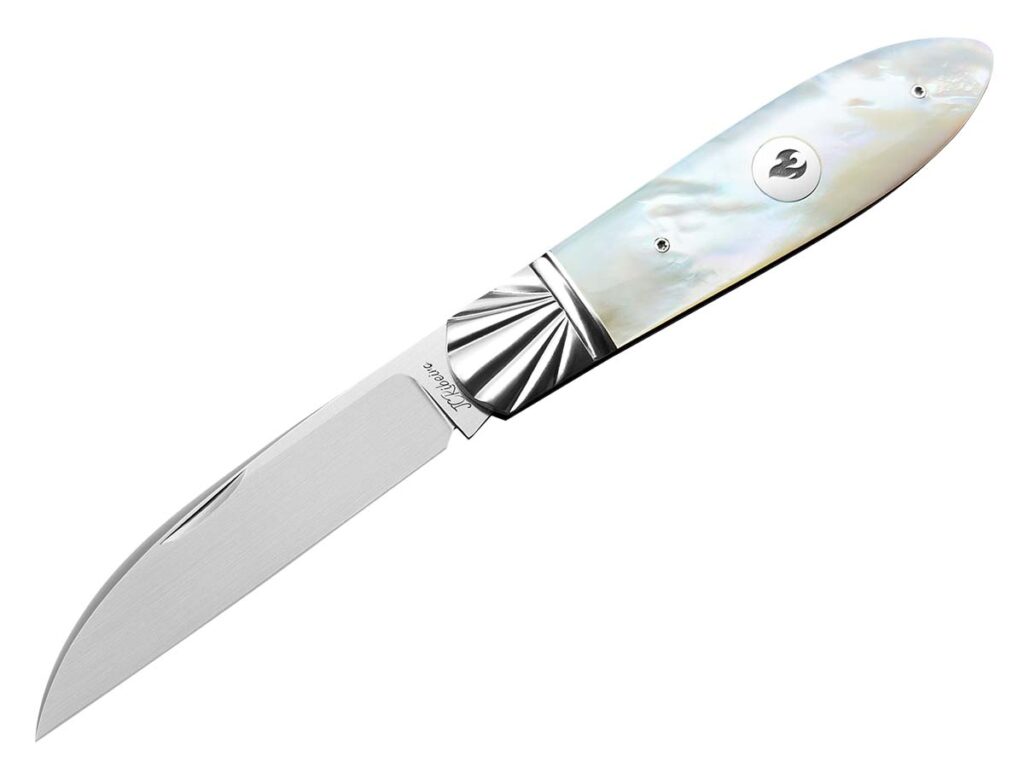
Simple, clean and classy are the driving ideas behind Júlio Cézar Ribeiro’s gentleman’s slip joint. The Brazilian’s spotless execution also caught the judges’ eyes at Salão Paulista de Cutelaria 2025, with the knife winning Best Traditional Folder. Notable aspects of the knife includes the swooping spine of the RWL 34 steel Wharncliff blade, maintaining the knife’s overall geometry with its teardrop mother-of-pearl handle.


Lizandro Bertoni Bowie

Lizandro Bertoni Bowie

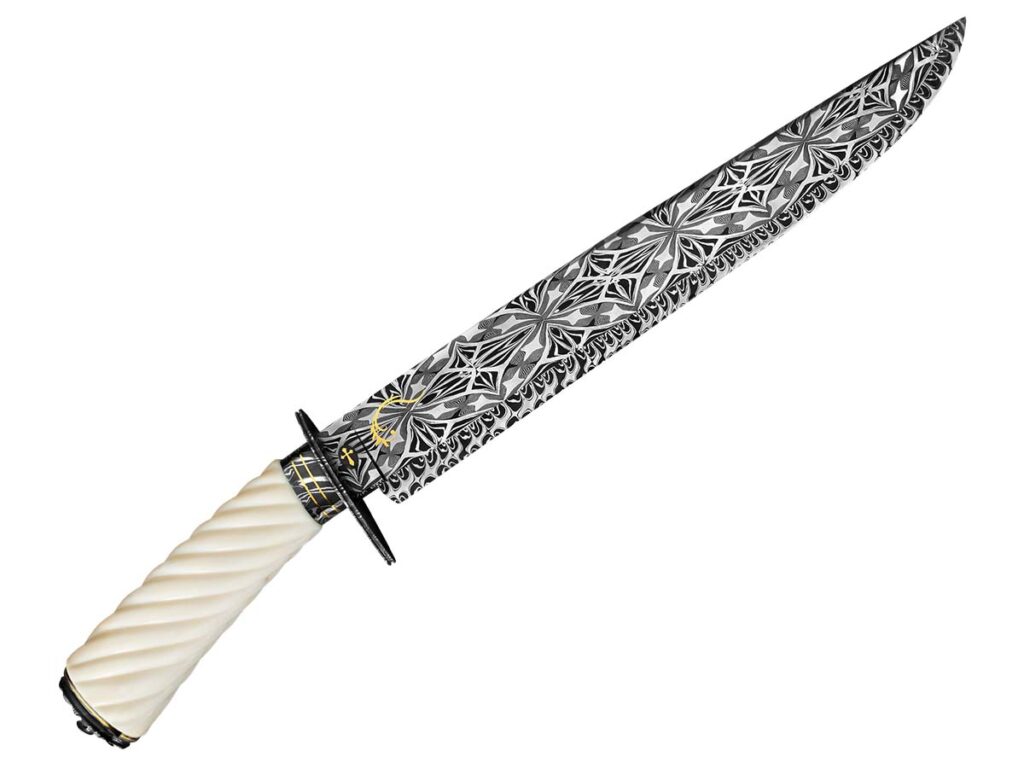
Lizandro Bertoni’s bowie is a study in contrasts. The flats of the 16-inch, 1085 and 15N20 damascus blade dominate with a starburst-like mosaic pattern, but give way to a cross pattern at the edge. Further, the busy ornamentation of the blade is contrasted with the calmer design of its walrus-ivory handle and the smooth lines of its texturing.


Vanuti Fiori Dagger

Vanuti Fiori Dagger

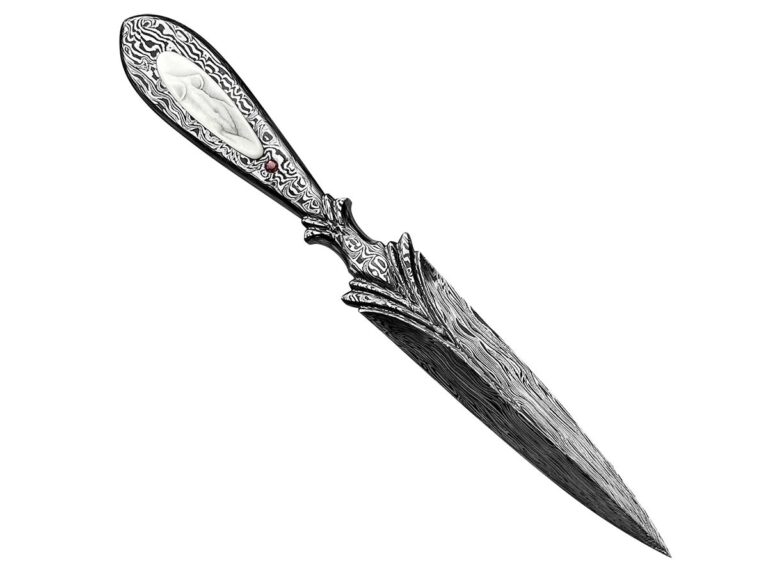
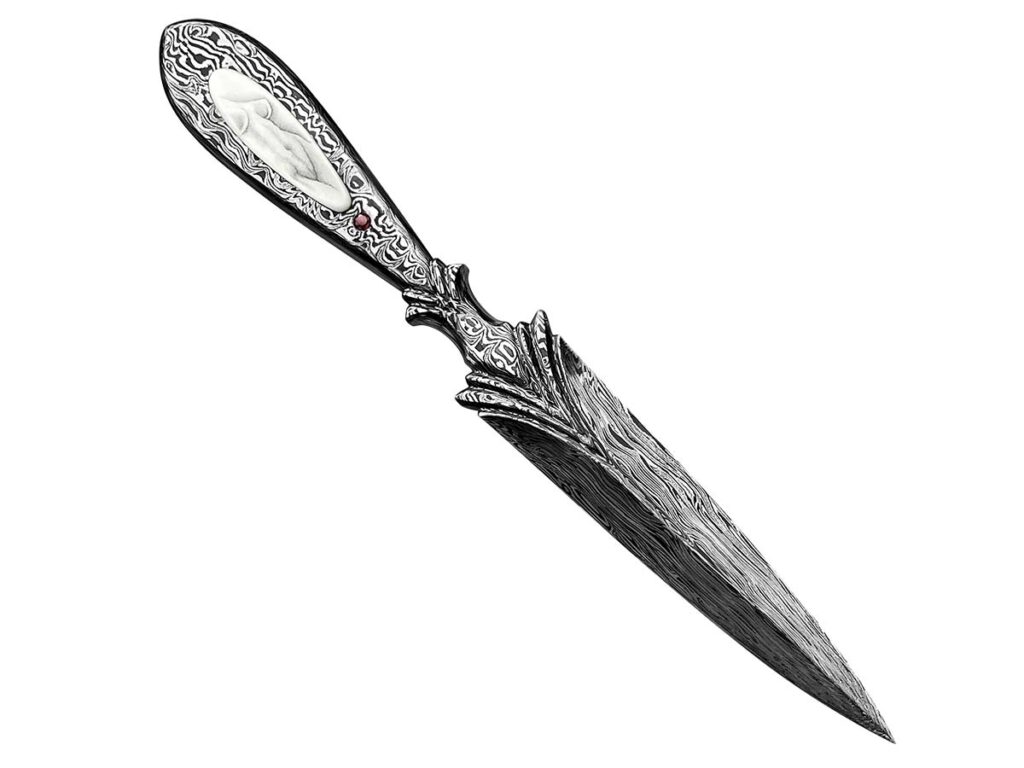
Dang sexy is all that can be said of “Lady of the Night,” a collaboration between knifemaker Vanuti Fiori and engraver Gabriel Krebs. It’s not only the lines of Fiori’s integral dagger that drip sex appeal, but also Krebs’ alluring feminine -form scrimshaw on its mother-of-pearl inserts.


Francisco Wlach Gaucho

Francisco Wlach Gaucho

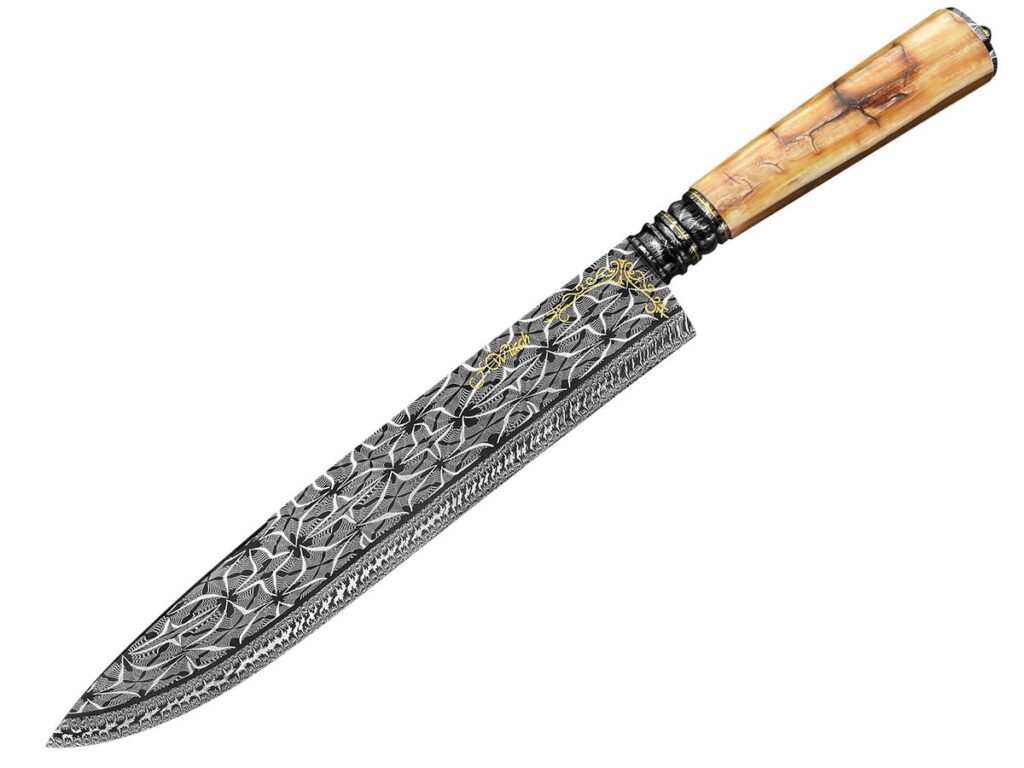
Francisco Wlach takes the workingman’s gaucho knife to a different level with the execution of his knife’s 10-inch laced mosaic blade. Wlach creates movement on the blade with a very uniform pattern over the majority of the steel, contrasted by a more subtle pattern along the edge. Gold inlay, integral bolster and mammoth-tooth handle would make this blade any gaucho’s pride.


Check Out More Cool Customs:

Secrets Of The Shop: Fisk and Sibert

0

Mortised handles and excellent accidents.

This issue highlights the expertise of the national living treasures, Jerry Fisk and tactical maker Shane Sibert. Their insights focus on the construction of mortised-style handles and the professional mindset required for success.

Getting A Handle

A trailblazer and visionary since becoming the 17th ABS master smith in 1989, Fisk’s philosophy centers on the idea that a knife isn’t just an art piece; it is a tool that must survive the most extreme (and sometimes bizarre) conditions.

To this mindset, the mortised handle has served him well, consisting of two flush-matching scales equally inletted to create a tight pocket for a hidden tang, then positioned directly against the guard. He mechanically secures the scales by pins or screws with epoxy. Fisk prefers this method because it offers the profile of a full-tang knife incorporating a narrow-tang guard.

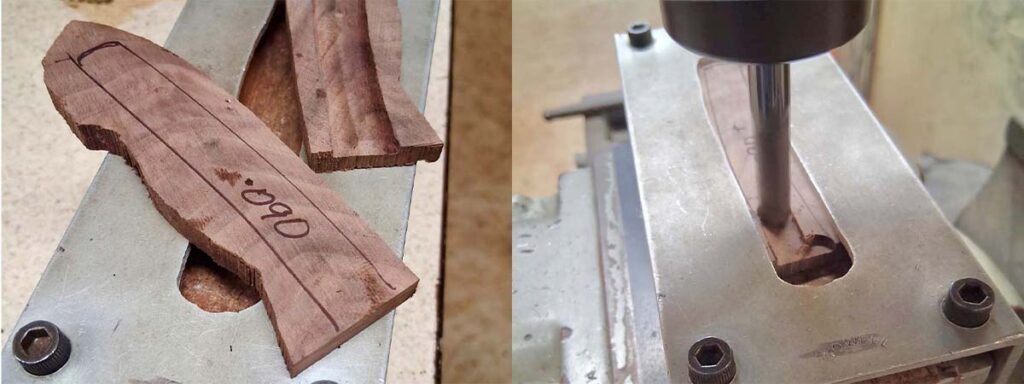
  • Precision Prep: Grinding a tang taper aids in fitting the slip-on guard. Radiusing blade corners and edges prevents stress fractures in the handle. Fisk routs cavities along the tang outline to a depth of 0.004 inch beyond half the tang’s thickness.
  • The Dovetail Secret: Using a Dremel to undercut the inner corners of the handle cavities creates a “mechanical lock” for epoxy, strengthening the bond significantly like an internal pillar.
  • Mechanical Retention: Fisk advocates for screws over pins to provide superior clamping force.
  • Minimal Epoxy: Epoxy should act as a sealer and secondary bond, not as a structural gap-filler. Using as little epoxy as possible is key.
According to the columnist, Fisk prefers a mortised handle consisting of two flush matching scales, equally inletted for a tight hidden tang. No easy task. Not only does it require precise placement of the tang outline (left) on the scale, but exacting router work (right). (Images courtesy of Jerry Fisk)

Destruction Testing

Fisk’s designs are forged through failure. After a customer drove a cement mixer over his knives—finding that only the mortised handles survived versus narrow tang—the value of testing was clear: If you don’t test, you won’t know your knife’s limits. In his first year, Fisk sacrificed 54 knives to find their failure points. And he continues to utilize a panel of professionals (trappers, police and military) to vet designs for real-world skinning, tactical and survival use.

Press Fit Guards

Fisk treats the guard as a structural component rather than just decorative. In turn, he goes the extra mile in their construction. Despite having a milling machine, he file fits the guard slot by feel—practiced precision to ensure a seamless transition. He believes retention should never rely on solder or epoxy—these seal but do not hold. Fisk hammers the guard into place using a slotted Micarta block to ensure a true mechanical fit. And he uses JB Weld to seal seams, noting its robustness and machinability compared to standard epoxies.

Business Of Bladesmithing

Fisk warns that many makers fail by focusing 100 percent on the steel while ignoring the sale. To be a full-time maker, you must understand how to move product. Fisk emphasizes that marketing is often the missing element in a maker’s strategy. Without it, you risk becoming the primary collector of your own work.

At shows, you are the brand ambassador for your knives. Stand up and make eye contact. Sitting down signals a lack of energy. Further, your attire and interaction should reflect the quality of your blades. Buyers are purchasing you as much as they are the knife.

For Jerry Fisk, his philosophy as to why he makes knives captures the legacy of a master smith—every hammer blow is a permanent record of existence. A well-crafted knife serves as a testament to the maker’s life and skill, surviving long after they are gone.

Technical Signature Features

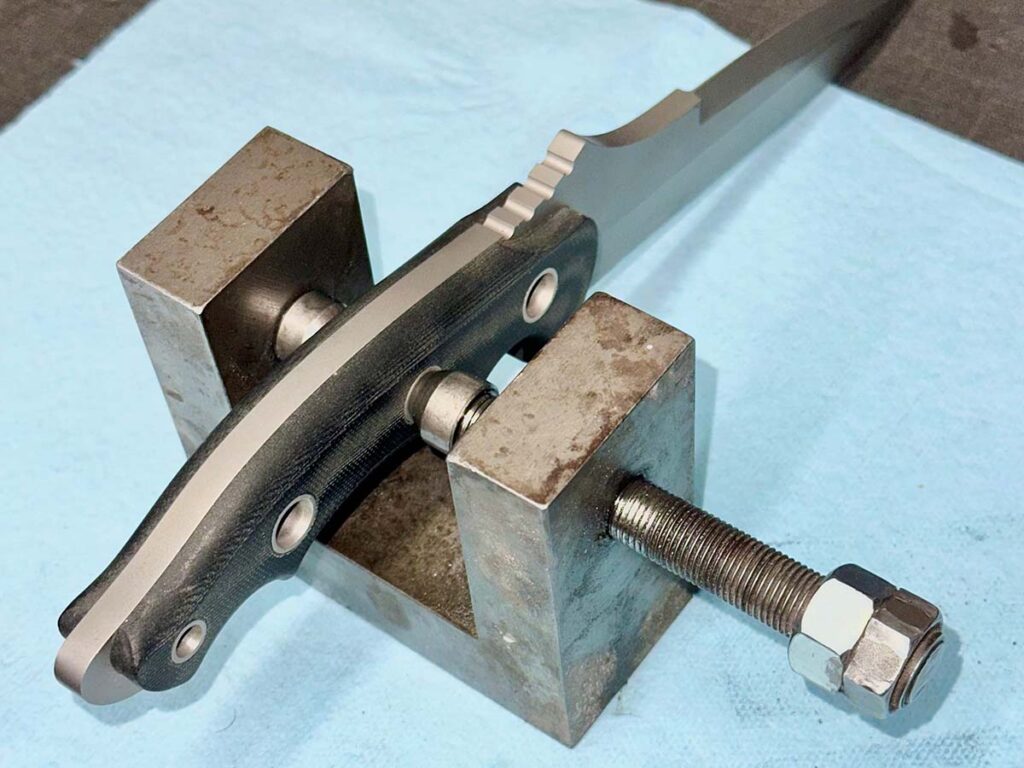
Sibert came up with a custom jig (left) to compress and flare 3/8-inch Grade 2 seamless titanium tubing on mortised scales. (Image courtesy Shane Sibert)

Shane Sibert has been a full-time maker since 1994, building innovative fixed-blade and folder designs for hostile environments.

Inspired by my use of 3/8-inch tubing as a signature design element in my SEALTAC™ fighting knives, Shane wanted to do a similar feature—but with a different twist: a mortised-style handle with flared 3/8-inch Grade 2 seamless titanium tubing.

  • The Problem: Straight-walled tubing can allow for handle-scale separation over time.
  • The Preparation: Use a single-flute tapered reamer to create a shallow flare in the handle material.
  • The Solution: Use a custom jig to compress and flare the extended tubing into that taper to create a mechanical rivet effect that sandwiches the mortised scales to the tang.

Accidental Pivot Accent

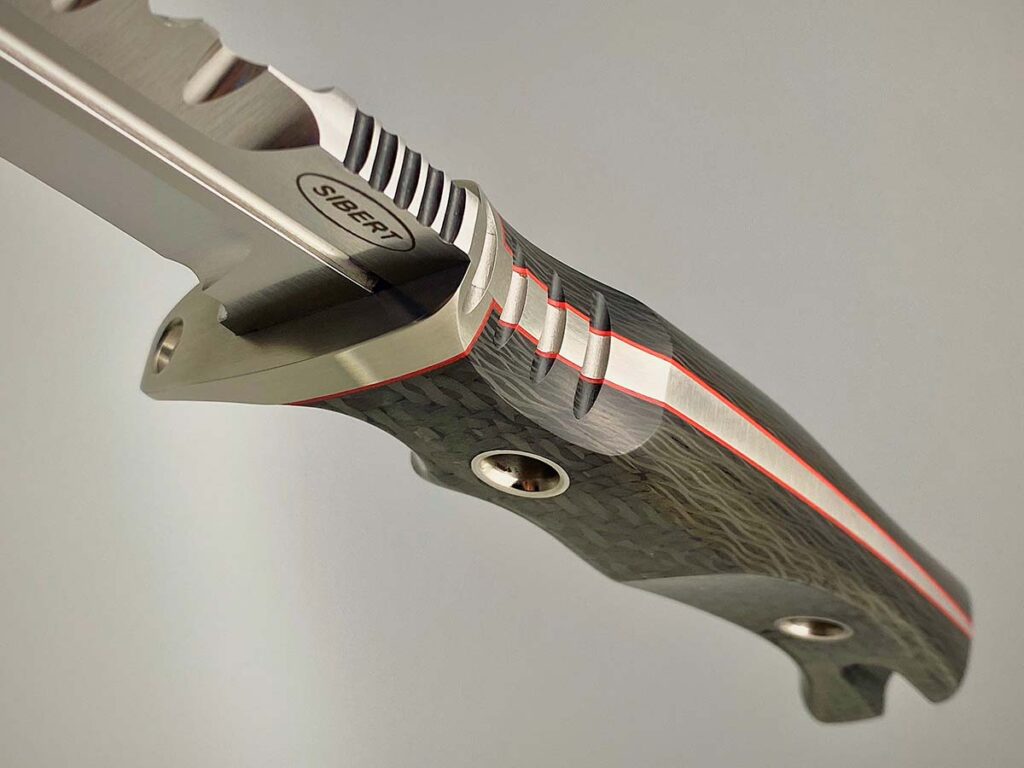
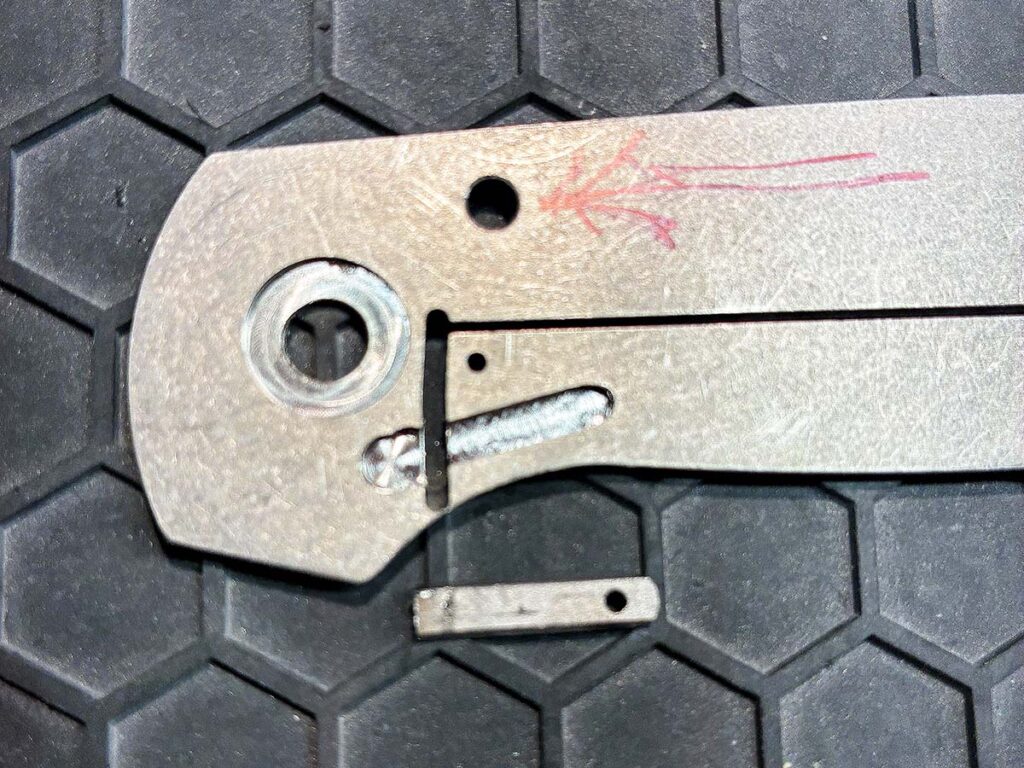
A hallmark of many of Sibert’s knives—fixed and folder—is an accent fuller (right) running into the handle. This causes an issue with fixed-blade knives, one he cures with a bit of JB weld to cover up the gap. (Image courtesy Shane Sibert)

Born from a mistake (drilling a pivot screw head hole too large), Shane pivoted by creating ½- to 5/8-inch bottoming pocket inlays around it. For aesthetics, he uses contrasting materials around the pivot-pin head. Further, he uses a decorative blind pivot screw on the obversed side with an embedded disc of color, hiding the mechanical nature of the fastener.

Famed sole-authorship folder maker Harvey McBurnett once said, “Knifemaking is the fine art of camouflage,” when amending such mistakes. Shane did so in a creative way, born out of necessity.

Another example of this is Shane adds accent fuller grooves on both folders and fixed blades that extend back underneath the handle or guard. The challenge is on fixed blades, where this creates a gap where the guard meets the fuller. His fix is to use black JB Weld epoxy to seal the transition, ensuring a seamless look that maintains the illusion that the fuller vanishes into the hilt.

Getting Off The Ground

Sibert has a grounded, no-nonsense perspective on entering the craft. He suggests that new makers don’t over-invest in high-end machinery immediately. Instead, focus on development and growth first. They also need to get ready for the grind; knifemaking is dirty, repetitive and requires immense discipline. It isn’t always “glamorous” shop work. Dedication is non-negotiable. If you want to be good, you have to be obsessed with the details. And starting out, keep your day job! The pressure to pay rent often stifles the creativity needed to make world-class blades.

Shane is old school with modern touches in his approach to knifemaking. That is the basis for the beauty in his knives.

Read More:

Cool Custom: Jon Christensen’s Mythical Undertaking

Guardian Sword proves a painstaking quest.

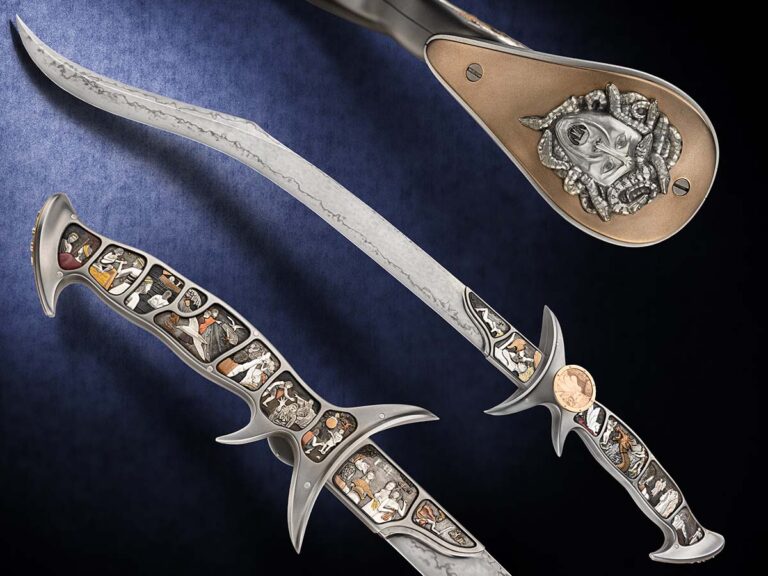
It’s easy to toss around the word epic and difficult to describe Jon Christensen’s recent work any other way. Of course, the subject material for his two-handed sword made it challenging for the results of the project to be anything other than mythical.

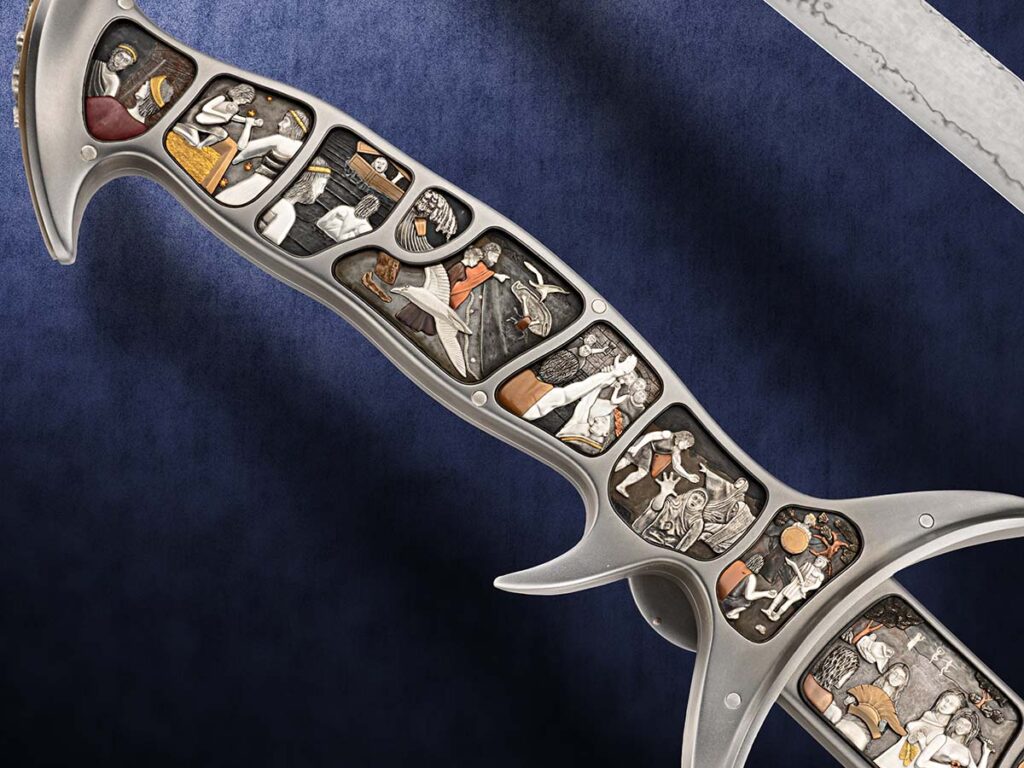
The Montana-based ABS master smith captures the ancient Greek myth of Perseus and Medusa in 16 hand-engraved iron panels inset into the 410SS handle and a bulino-engraved bronze shield on the guard of his Guardian Sword. Among other things, the handle features gold, bronze, copper, silver, custom alloy and mother-of-pearl inlay and is punctuated with Medusa’s head on the butt.

Jon Christensen
Jon Christensen

“The bulino engraving was very challenging as it was my first,” Christensen confessed. “There was a ‘paying my dues’ stage of time spent, which I just had to accept.”

It might be said that the entire project was an exercise in dues-paying. In addition to challenging himself with a new engraving technique, he was also delving into an unfamiliar subject. Christensen gave himself a crash course in the story of Medusa before conceptualizing the panels. But the client who commissioned the sword raised the bar on his retelling of the myth.

“Before starting on the project, the collector requested my interpretation of the story be approved by Tufts University, which is known for a strong program in classical mythology,” he said. “I compiled and submitted a document of the concept showing drawings and descriptions for each scene, as well as the overall sword. They replied saying, ‘It was a masterful interpretation.’”

The Guardian Sword handle, with the panels depicting the Greek myth of Perseus and Medusa.

The sword is reminiscent of the one featured in Benvenuto Cellini’s sculpture of Perseus, showcasing the same unique shape in its 37.5-inch W2 blade, with a hamon. While this aspect of the sword presented challenges, Christensen admits it was the easy part of the Guardian. Much of the 4,000 or so hours he dedicated to the work were focused on the handle, engravings and accurately retelling the ancient myth.

“The time on completing the blade would be measured in weeks, the handle scenes in years working under a microscope,” he said.
Epic, indeed.

“Yes, the scope of the project was very intimidating at times. I had to constantly manage my thoughts to the task at hand,” Christensen said. “As the saying goes, ‘How do you eat an elephant? One bite at a time.’”

Check Out More Cool Customs:

Secrets Of The Shop: Steve Schwarzer & Bob Terzuola

0

Schwarzer’s blister busters and Terzuola’s effective efficiencies.

Editor’s Note: Jim Hammond has been a full-time knifemaker since 1977 and a member of the Knifemakers Guild since 1978. He was the first maker to work with CRKT and has many well-known designs to his name. This is the first of an ongoing column in which he uncovers the tightly held secrets of master knifemakers.

Welcome to Secrets of the Shop, where we dive deep into specific techniques and tips highlighted in the work of premier makers and knife smiths. While trade secrets often imply guarded formulas, for knifemakers, they are keystone discoveries that hone processes and perfect craftsmanship. This column seeks to turn these unrevealed secrets into shared solutions.

Popping Blisters

A veteran ABS master smith and BLADE® Magazine Cutlery Hall of Fame® member, Steve Schwarzer is probably best known for his pioneering work in the canister method of forging mosaic damascus. He is considered one of the finest instructors and ambassadors of the forged blade and of mosaic damascus, teaching at seminars and hammer-ins on the subjects for decades in Europe, South Africa, the USA and elsewhere.

During welding, a cold shut—a spot of incomplete merging of steel—can produce a trapped-gas bubble known as a blister. The spots where these void occur heat at different rates than the surrounding material and turn black. Often caused by worn and cupped dies, these blisters typically form along the billet’s perimeter.

Steve’s solution to addressing blisters is as follows:

  • Release the Gas: Punch a hole directly into the blister.
  • Flux and Forge: Drop borax into the hole and use a small rounding hammer to forge the area, pressing air out of the seam to recreate a uniform weld.
  • Refinement: Check the surface for flatness. Steve utilizes belt and stone surface grinders to achieve trued flats and maximize uniform contact.

To prevent blisters, Steve welds the edges of a billet before the center using a radiused fullering die. Going this route is less prone to create blisters than a flat die, though more apt to distortion. This technique was vital when Steve and Neil Kamimura created a million-layer billet that was folded rather than stacked, requiring the resolution of numerous small cold shuts.

Mosaic On A Budget

Schwarzer uses what he calls a “tiling” process with his canister damascus, sawing off the end to expose the image, and forge-welding them side-by-side to maximize the visual impact across the blade’s surface. (Steve Schwarzer image)

While CNC and EDM equipment can create intricate designs, a more affordable approach involves the sintering process of canister welding damascus, a method originated by Steve and Daryl Meier.

Steve’s canister process is as follows:

  • Composition: A square canister is preferred to maintain the image’s shape using flat dies. Content determines the pattern—solid metals form the primary image, while powder fill creates the background.
  • Preparation: Both ends must be welded shut to exclude oxygen.
  • Release Agents: To free the billet from the canister, Steve uses white spray paint; the titanium dioxide acts as an immediate release agent, oxidizing upon heating. Other options include White Out and stainless-steel foil.
  • Sintering: Steve recommends a soak time of at least 30-plus minutes. Expect a size reduction of roughly 30 percent as micro-spaces between particles collapse.

To expose the end-grain imagery, Steve uses what he calls a “tiling” technique. Band sawing sliced off the billet exposes the faces of the pattern. Then, forge-welding them side-by-side, he maximizes the visual impact across the blade’s surface. Note flat grinds are customary with this process, as deep grinding can distort the integrity of the imagery, especially with twisted materials.

For New Makers

Steve offers two foundational tips for those entering the craft. First bit of advice Schwarzer makes is to, “Avoid unknown materials, even if they’re free.” Without knowing the composition of “mystery steel,” you can never accurately repeat your results. He also suggests makers define their own path, saying, “Don’t chase anybody else’s dreams. Chase your own.”

Cutting Coupons

Bob Terzuola was a pioneer in using lasers and waterjets in his manufacturing process. Among the efficiencies he incorporated in using these tools was cutting what he calls “coupons.” These are simply uniform blade blanks and liner sections. Keeping a load of these on hand speeds up the manufacturing process, while maintaining the integrity of the knife. (Bob Terzuola image)

Known as the “Godfather” of the tactical folding knife, Bob Terzuola has been a full-time maker since 1980 and was inducted into the Cutlery Hall of Fame in 2023. His longevity in the craft stems from a blend of old-school design and modernized production efficiency. Terzuola was a pioneer in the mid-’80s, becoming the first maker to utilize laser cutting for components. Today, he uses waterjet cutting to create generic rectangular blade blanks and liner sections, which he calls “coupons.”

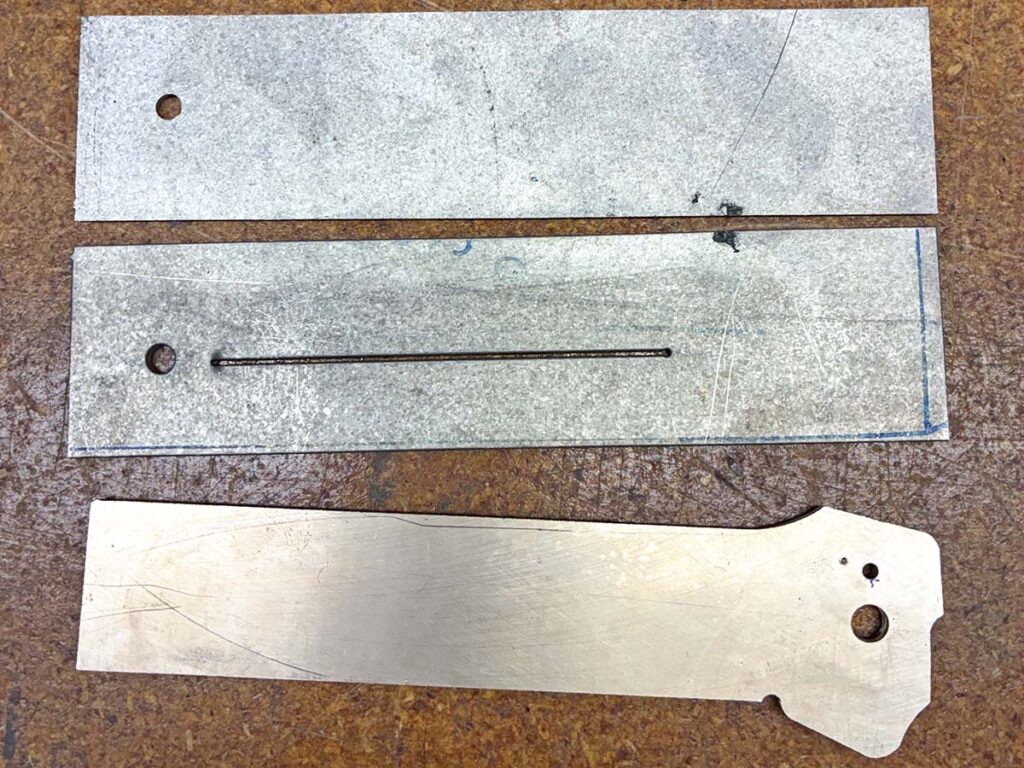
For the blade blanks, Terzuola profiles the rear area with the lock face, thumb ran and pivot/stop pin holes (roughed to 80 percent diameter). The rest remains rectangular, allowing him to incorporate any pattern with minimal grinding. Bob has his CPM 154 stainless steel blanks commercially surface ground to 0.135-inch before heat-treating them himself to HRC 59. For the liners—0.080-inch titanium in our discussion—the coupons are left square, containing only the pivot hole and the horizontal slot for the locking spring arm.

Notably, Terzuola grinds his blades after they are hardened. He argues grinding annealed steel can lead to warping during heat treat and causes the belt to gouge material. Grinding hardened steel, by contrast, is like slicing meat with a razor blade rather than digging dirt from a hole. Despite these modern efficiencies, he said he remains a “pencil-and-paper guy,” eschewing CAD for hand-drawn patterns to maintain design commonality.

Finishing Simplified

Despite modern efficiencies Terzuola has incorporated into his manufacturing process, he remains traditional in his designs. That is, he avoids CAD, instead using pencil and paper to hand-draw all of his knives. (Bob Terzuola image)

Bob’s finishing process for CPM 154 is remarkably lean. He utilizes a 90-durometer smooth-face rubber contact wheel and a simple two-belt sequence. First, he does a rough grind with an 80-grit ceramic belt, then finishes with a 3M Trizact A16 (1,200-grit) belt.
He specifically avoids 60-grit belts, noting that their mesh size is twice as large as 80-grit, creating scratches that are twice as deep and significantly harder to clean up. To ensure blade-lock longevity, he now uses a heat-treated 440-C stainless steel insert in the titanium spring arm. This provides a steel-on-steel lockup, eliminating the wear issues common with titanium.

For New Makers

Terzuola encourages beginners to find their own niche and not get locked into a single model. He emphasizes mastering the fundamentals with hand tools: learn to tap holes, use files and sharpen twist drills. He and I agreed, new makers should also gain proficiency with mills, lathes and surface grinders to be old-school efficient rather than purely CNC-reliant.

Read More:

Custom Cleavers That Have Culinary Chops

Four custom makers push the boundaries of the tried-and-true cleaver.

An inclination toward the kitchen and a desire to design and deliver cutlery used on a regular basis has spurred a number of custom knifemakers to try their skill with the cleaver. It’s a staple in most kitchens and its uses are as varied as the food prepared there.

Robert Wayman of Middleburgh, New York, sees his cleavers as complementing years of food preparation. “I’ve done a lot of my own food processing, and I spent several years in commercial kitchens when I was younger,” he commented. “So, I’ve always had an affinity for culinary knives and especially cleavers. The cleaver is such an iconic blade. I love to make everything from heavy-duty butcher cleavers to medium-duty kitchen cleavers, Chinese cleavers and lighter-duty veggie cleavers for the kitchen.”

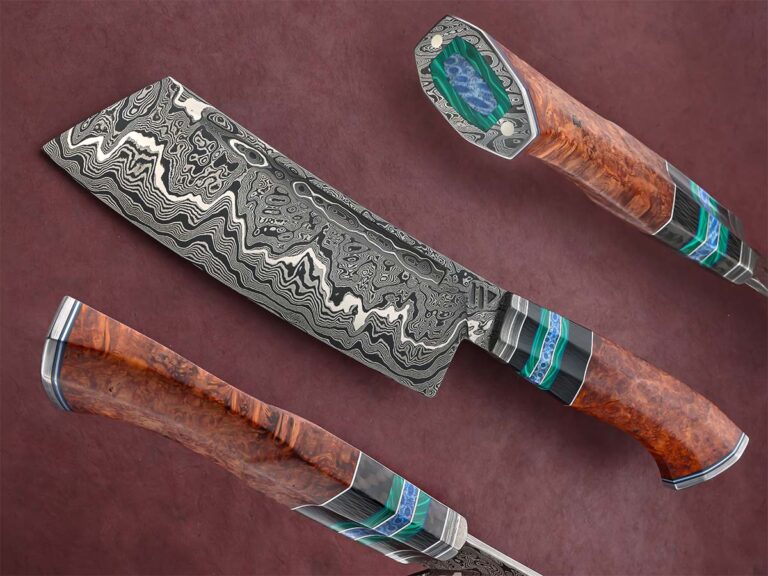
Robert’s featured cleaver is 14 inches in overall length with an 8-inch blade of pattern damascus go-mai five-layer steel. The core is a 100-layer random pattern damascus made of 1084 and 15N20 high-carbon steel and a layer of nickel and matching damascus cladding. The handle includes a damascus collar, stainless steel and G-10 spacers, crosscut carbon fiber, green malachite and blue coral accents, stabilized amboyna burl and a damascus butt cap with stainless mounting pins inset with blue coral framed with green malachite.

“I packed a lot into that one,” Wayman smiled. “As a maker, I’m all about sole authorship. I make all of my own high-carbon damascus steel in-house, and a cleaver provides a great opportunity to showcase that steel. One of my favorite things to forge is a large cleaver with an integral bolster.”

Wayman sees large blades, such as those associated with cleavers, as inherently challenging, while making a task-specific blade, such as a cleaver, adds another layer of complexity. Although they are labor-intensive and involve a lot of time in the shop, performance remains the key.

 “Overall weight needs to be taken into consideration, as well as how that weight is distributed for the style cleaver you are making,” Robert advised. “Ergonomics is an important consideration for any knife or tool, but especially for kitchen cutlery. Whether it’s in a professional or home kitchen, you’re making a handle that a chef or cook could use for hours of food prep on any given day. So, it must be comfortable.”

Edgy Ebony

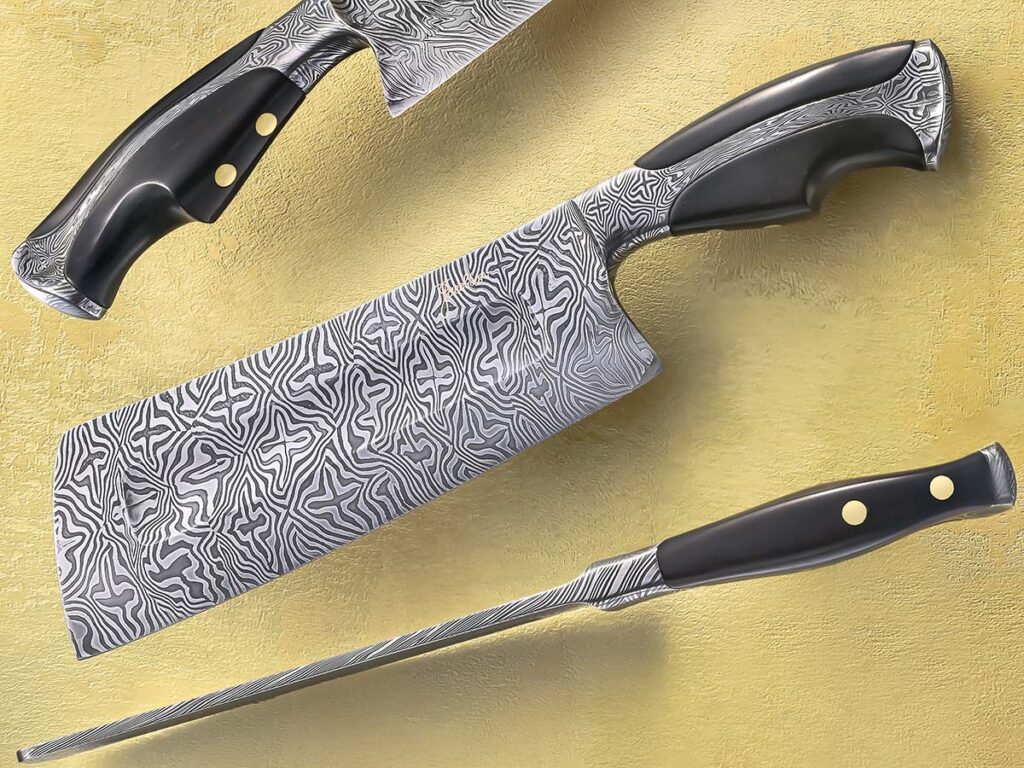
Having served time in professional food service, practical utility is never far from David Jacobson’s mind. However, he isn’t afraid of adding some flourish to his creations, such as the gold-inlay signature near the spine of his mosaic damascus bladed and ebony scaled cleaver. (SharpByCoop image)

David Jacobson’s integral 13-inch cleaver with ebony handle scales sports an 8¼-inch mosaic damascus blade of 1085 and 15N20 steels and a gold inlay signature—his first such accent. He used brass bolt pins to finish the ebony scale attachment.

“I love cooking and making cool chef’s knives and kitchen tools,” Jacobson related from his Felton, California, shop. “Edge geometry for chopping and balance are challenges, and fullers are nice when slicing vegetables for food release. Cleavers are not only for the kitchen. They are great for large fish processing at the dock, chopping through bone and restaurant back-alley butchering. The wide blade shows off the many designs in the damascus steel, and I chose a traditional profile for this particular cleaver. I’ve always liked a black handle with big brass pins—old school.”

Cutting Mustard

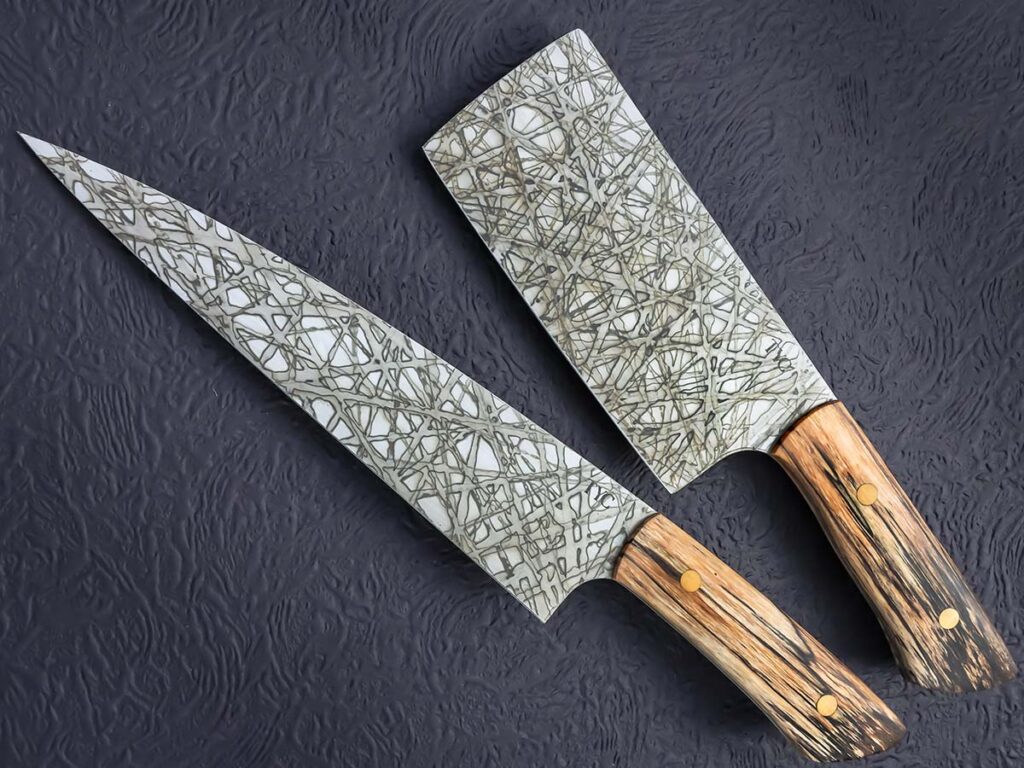
Given the amount of steel and the need to pay attention to minutia is what Bill Tyc figures steers most makers away from cleavers. Tyc achieves an intricate pattern on his cleaver-chef’s knife set through a simple mustard patina, but applied with a straight edge for a pattern he calls “Lines of Insanity.” (SharpByCoop image)

The pairing in Bill Tyc’s featured ensemble is stunning in its presentation. “The cleaver as well as the chef’s knife are made of 52100 high carbon steel from the NJ Steel Baron,” he remarked. “The handles are stabilized spalted tamarind from Wood Dynamics fastened with brass Corby bolts. The pattern on the steel is a mustard patina done with a ruler edge, hence the name “Lines of Insanity” pattern. The cleaver is 11½ inches overall with a 6¼-inch blade. It’s 3 inches tall and ¾ inches at the heel. I felt the spalted lines of the tamarind wood would look perfect with the mustard patina.”

Tyc, who resides in Waterbury, Connecticut, remembers making kitchen knives that did something no other creations had generated. He got immediate feedback from users.

“In fact, the first ‘kitchen’ knife I sold was a cleaver at the Mystic Knife Show in Connecticut,” Bill remembered. “A gentleman circled the floor three times, every time touching a cleaver I had on the table. Last pass, he picks it up and just says, ‘I’ll take it.’ My wife and I look at each other with a thumbs up, and off he goes. Well, the following year, the gentleman comes into the show, right up to my table, and says, ‘Last year I bought a cleaver from you.’ The wife and I again look at each other because we most certainly remembered. He says, ‘I have so much fun using that cleaver every day!’ I reached across the table, shook his hand and said, ‘I’ve been waiting 20 years to hear that! I could pack up and go home, I feel so good.’”

According to Tyc, many custom knifemakers shy away from cleavers because they require a lot of work. At just about any knife show, only a relative few are seen for sale. But he adds cleavers’ utility far exceeds their supposed kitchen niche, pointing out they are handy for camping, survival exercise, yard work and bushcraft as well.

“The most important things are balance and weight,” Bill observed. “A knife used as often as a kitchen knife or cleaver has to feel good in the hand, not just initially, but long term. You may find yourself using your kitchen knives for many hours through the week. You want it to be comfortable, not a labor.”

Veggies Beware

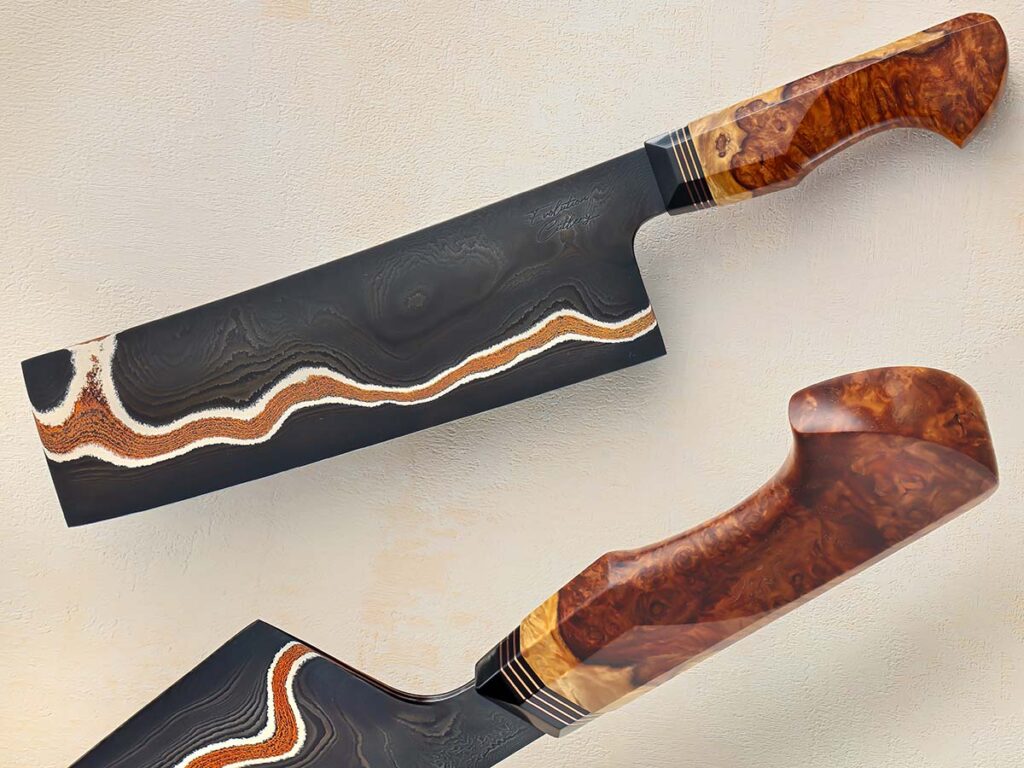
One of the unique advantages of the cleaver, Dan Tomplins points out, is the large canvas it allows for the steel. In the case of his nakiri—vegetable cleaver—its 81/2-inch copper mai blade can’t help but catch the eye, particularly with the steel’s blacked-out finish enhancing the patina'd copper. Note too, the hybrid octagonal/western-style handle made from amboyna burl. (SharpByCoop image)
One of the unique advantages of the cleaver, Dan Tomplins points out, is the large canvas it allows for the steel. In the case of his nakiri—vegetable cleaver—its 81/2-inch copper mai blade can’t help but catch the eye, particularly with the steel’s blacked-out finish enhancing the patina’d copper. Note too, the hybrid octagonal/western-style handle made from amboyna burl. (SharpByCoop image)

In 2016, Dan Tompkins began making knives, and three years later, he started Evolution Cutlery in Highland, New York. His kitchen knife work began simply because he wanted to make cutlery used on a daily basis, and his cleaver immediately attracts attention.

“The big square profile is a great canvas to show forging skills, especially if using mosaic damascus. It allows a lot of room to see the details in the patterning,” said Dan. The subject steel is Baker Forge copper mai with a blacked-out finish and layers of patina’d copper in the nakiri, or veggie cleaver, design. The handle is Tompkins’ hybrid octagonal/western style made from amboyna burl, heirloom fit to a copper and G-10 bolster. The cleaver blade measures 8½ inches, and the overall length is 13 inches.

“One challenge in making cleavers is getting the edge geometry perfect for the intended purpose,” explained Dan. “There are many different types of cleavers, so the proper geometry is an important consideration. Heavy-duty blades require a heavy convex edge, while veggie cleavers are best with a laser-thin edge. When it comes to kitchen knife ergonomics, not only do you have to have a good feel in the handle’s shape and contour, but you also have to have proper balance to make the knife comfortable to use all day. While cleavers will almost always be slightly blade heavy in balance, they should still be balanced not far in front of the handle … Balance can make a light knife feel heavy or a heavy knife feel light. In my opinion, even a heavy knife with proper balance is far more comfortable to use than a light knife with improper balance.”

 Tompkins sees the cleaver in action in varied settings, not just the kitchen. Camp chores like chopping wood or preparing food outdoors can be handled easily with a cleaver made for such adventures, and he makes the cleaver to fit the anticipated tasks.

Versatility is readily apparent in these custom cleavers, and their functionality is in lockstep with good looks driven by their makers’ creativity.

Check Out More Cool Customs:

Custom Gallery: Customs That Demonstrate Martial Mastery

From historic clashes to modern conflict, these fierce custom blades prove there is still a profound amount of art in the tools of war.

Since the dawn of man, the edge of the blade has been used to hash out disputes between everything from clans and tribes all the way to nations. While not the main battle implement in today’s conflict, the martial nature of the knife remains. This particular collection of fierce customs demonstrates there is a heap of art in war.


Caleb Ledford Long Sword

Caleb Ledford Long Sword

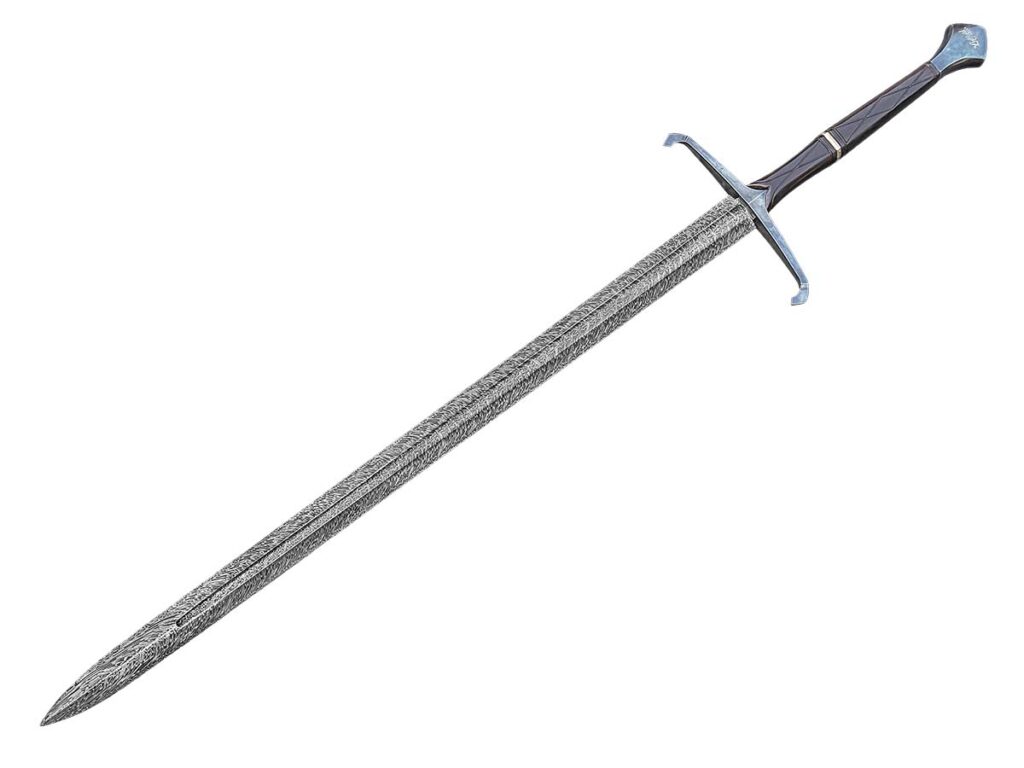
An electric 1084/15N20/mild steel Turkish-twist damascus defines the 31-inch blade of Caleb Ledford’s long sword. Lightening the sizable slicer’s load is a tapered fuller running on its midline. The handle is a pitch-black ebony, and the guard and pommel are cold-blued mild steel.


Jacco Van de Bruinhorst San Francisco Bowie

Jacco Van de Bruinhorst San Francisco Bowie

With matching blade and inserts, Jacco Van de Bruinhorst’s take on the San Francisco bowie is an elegant Barbary Coast brawler. The Canadian maker used ProCut/1084 to create what he calls a “snakeskin pattern.” If you study closely, the inserts harken back to the gold rush days with 24k gold inlay.


Jim Poling Dirk

Jim Poling Dirk

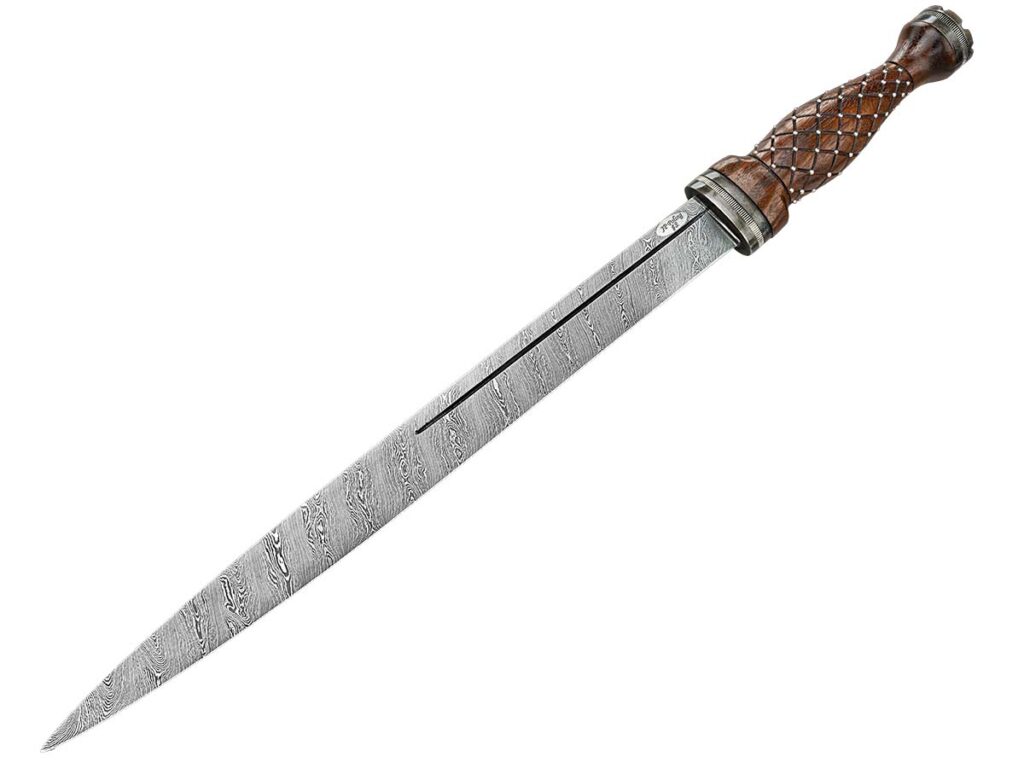
Commissioned by a descendant of King James IV of Scotland, journeyman smith Jim Poling’s walnut-handled dirk appears freshly plucked from the highlands. The dagger boasts a 13-inch 1084/15N20 twist damascus blade, antiqued mild steel fittings and coin-edged nickel spacers.


Andrew Blomfield Pesh Kabz

Andrew Blomfield Pesh Kabz

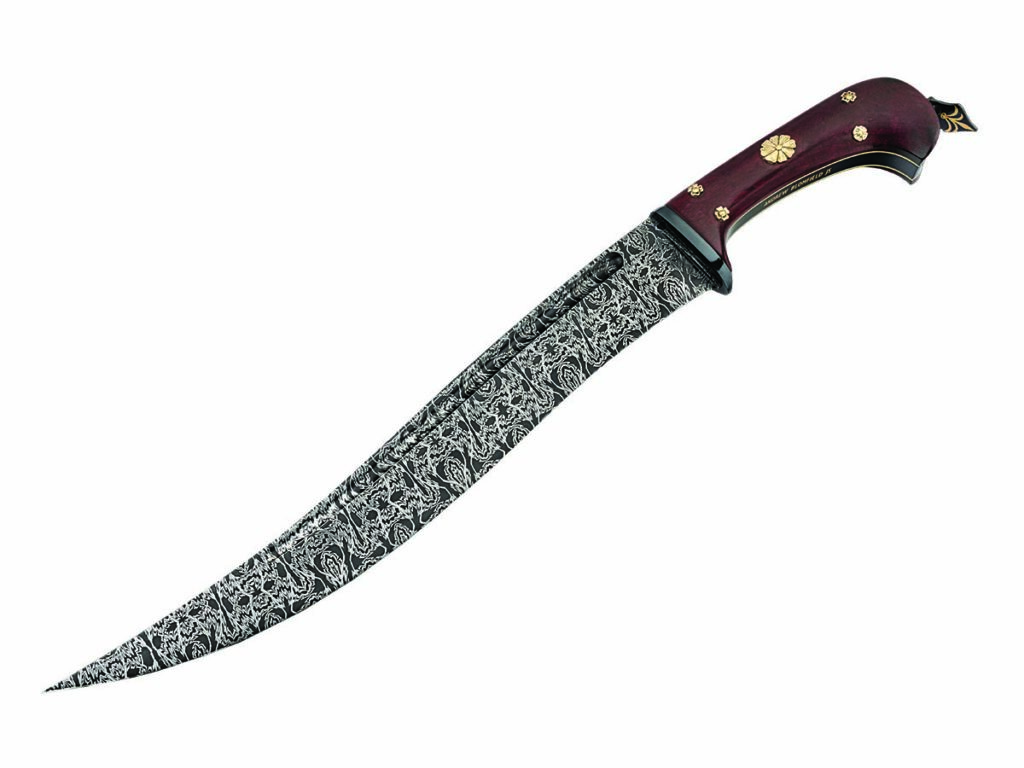
Master smith Andrew Blomfield has taken more than one stab at the pesh kabz in his career, and lands the blow with this 11.5-inch bladed example. The eye-catching mosaic blade is contrasted by the very conservative tones of the purple gidgee handle and blackened steel bolster. A traditional flourish, brass blossoms are on the handle’s pins.


Michael Deibert Wakizashi

Michael Deibert Wakizashi

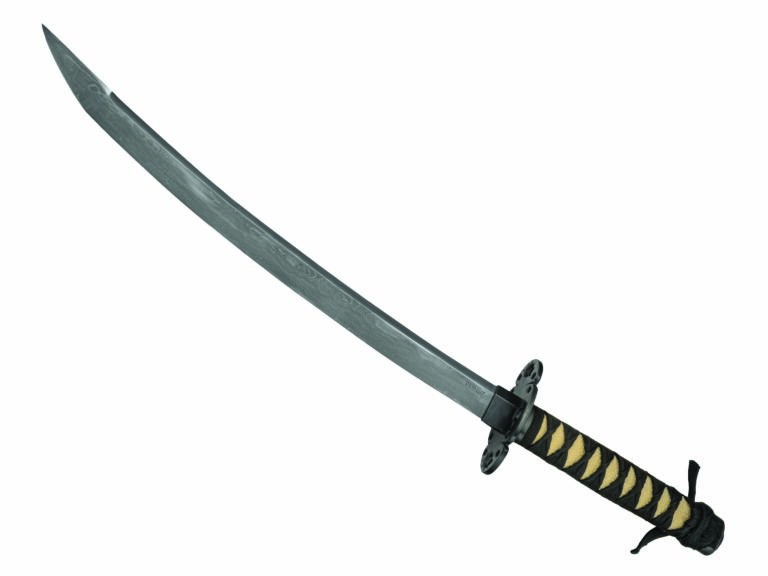
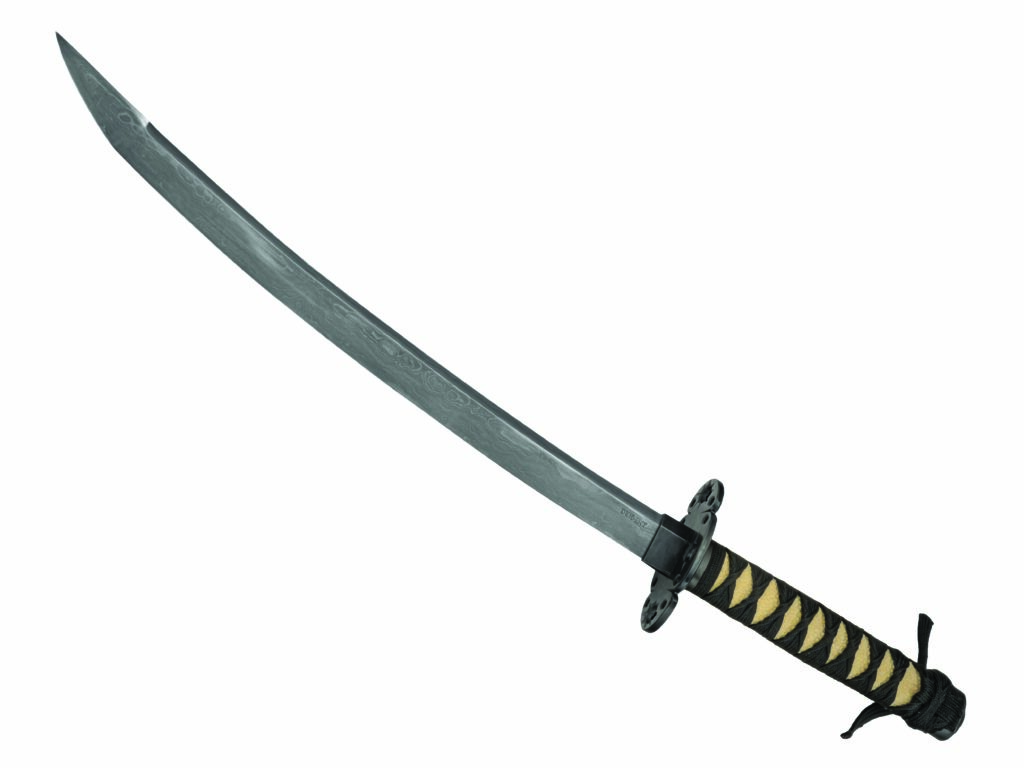
Alabama-based journeyman smith Michael Deibert brings traditional Japanese styling to life with this striking Wakizashi. The 18-inch blade features 1,100 layers of 1080/15N20 steel, paired with a wrought iron bolster. A classic stingray and an Ito-wrap handle complete the 28-inch overall build.


Nate “Tuna” Grant Pocket Fixed Blade

Nate "Tuna" Grant Pocket Fixed Blade
Nate “Tuna” Grant Pocket Fixed Blade

Journeyman smith Nate “Tuna” Grant delivers a compact powerhouse with the Defender. This 7.375-inch overall fixed blade features a 4-inch flat-ground blade forged from 1084/15N20 steel in a striking diamond drop pattern. The build is finished with rich Mun ebony scales.


Emmett Eitreim Dagger

Emmett Eitreim Dagger

Emmett Eitreim presents a refined 12-inch overall dagger featuring a 7-inch flat-ground blade. The steel is a striking rose pattern forged from 15N20/1084, complemented by a 954 aluminum bronze guard and pommel. A stabilized spalted maple handle completes this elegant, high-contrast build.


Check Out More Cool Customs:

Advertisement

Must Read Articles

Read this before you make a knife

Knifemaking 101 – Read This Before You Make a Knife

  by Wayne Goddard My experience has taught me that there's nothing like digging in and getting started. I've often said the hardest part of the...
how to forge damascus steel

How to Forge Damascus

Advertisement
Advertisement