Home Blog Page 158

How to Make a Flipper Folding Knife

make a folder knife
The author’s finished flipper folder—sanded, polished and ready to go!

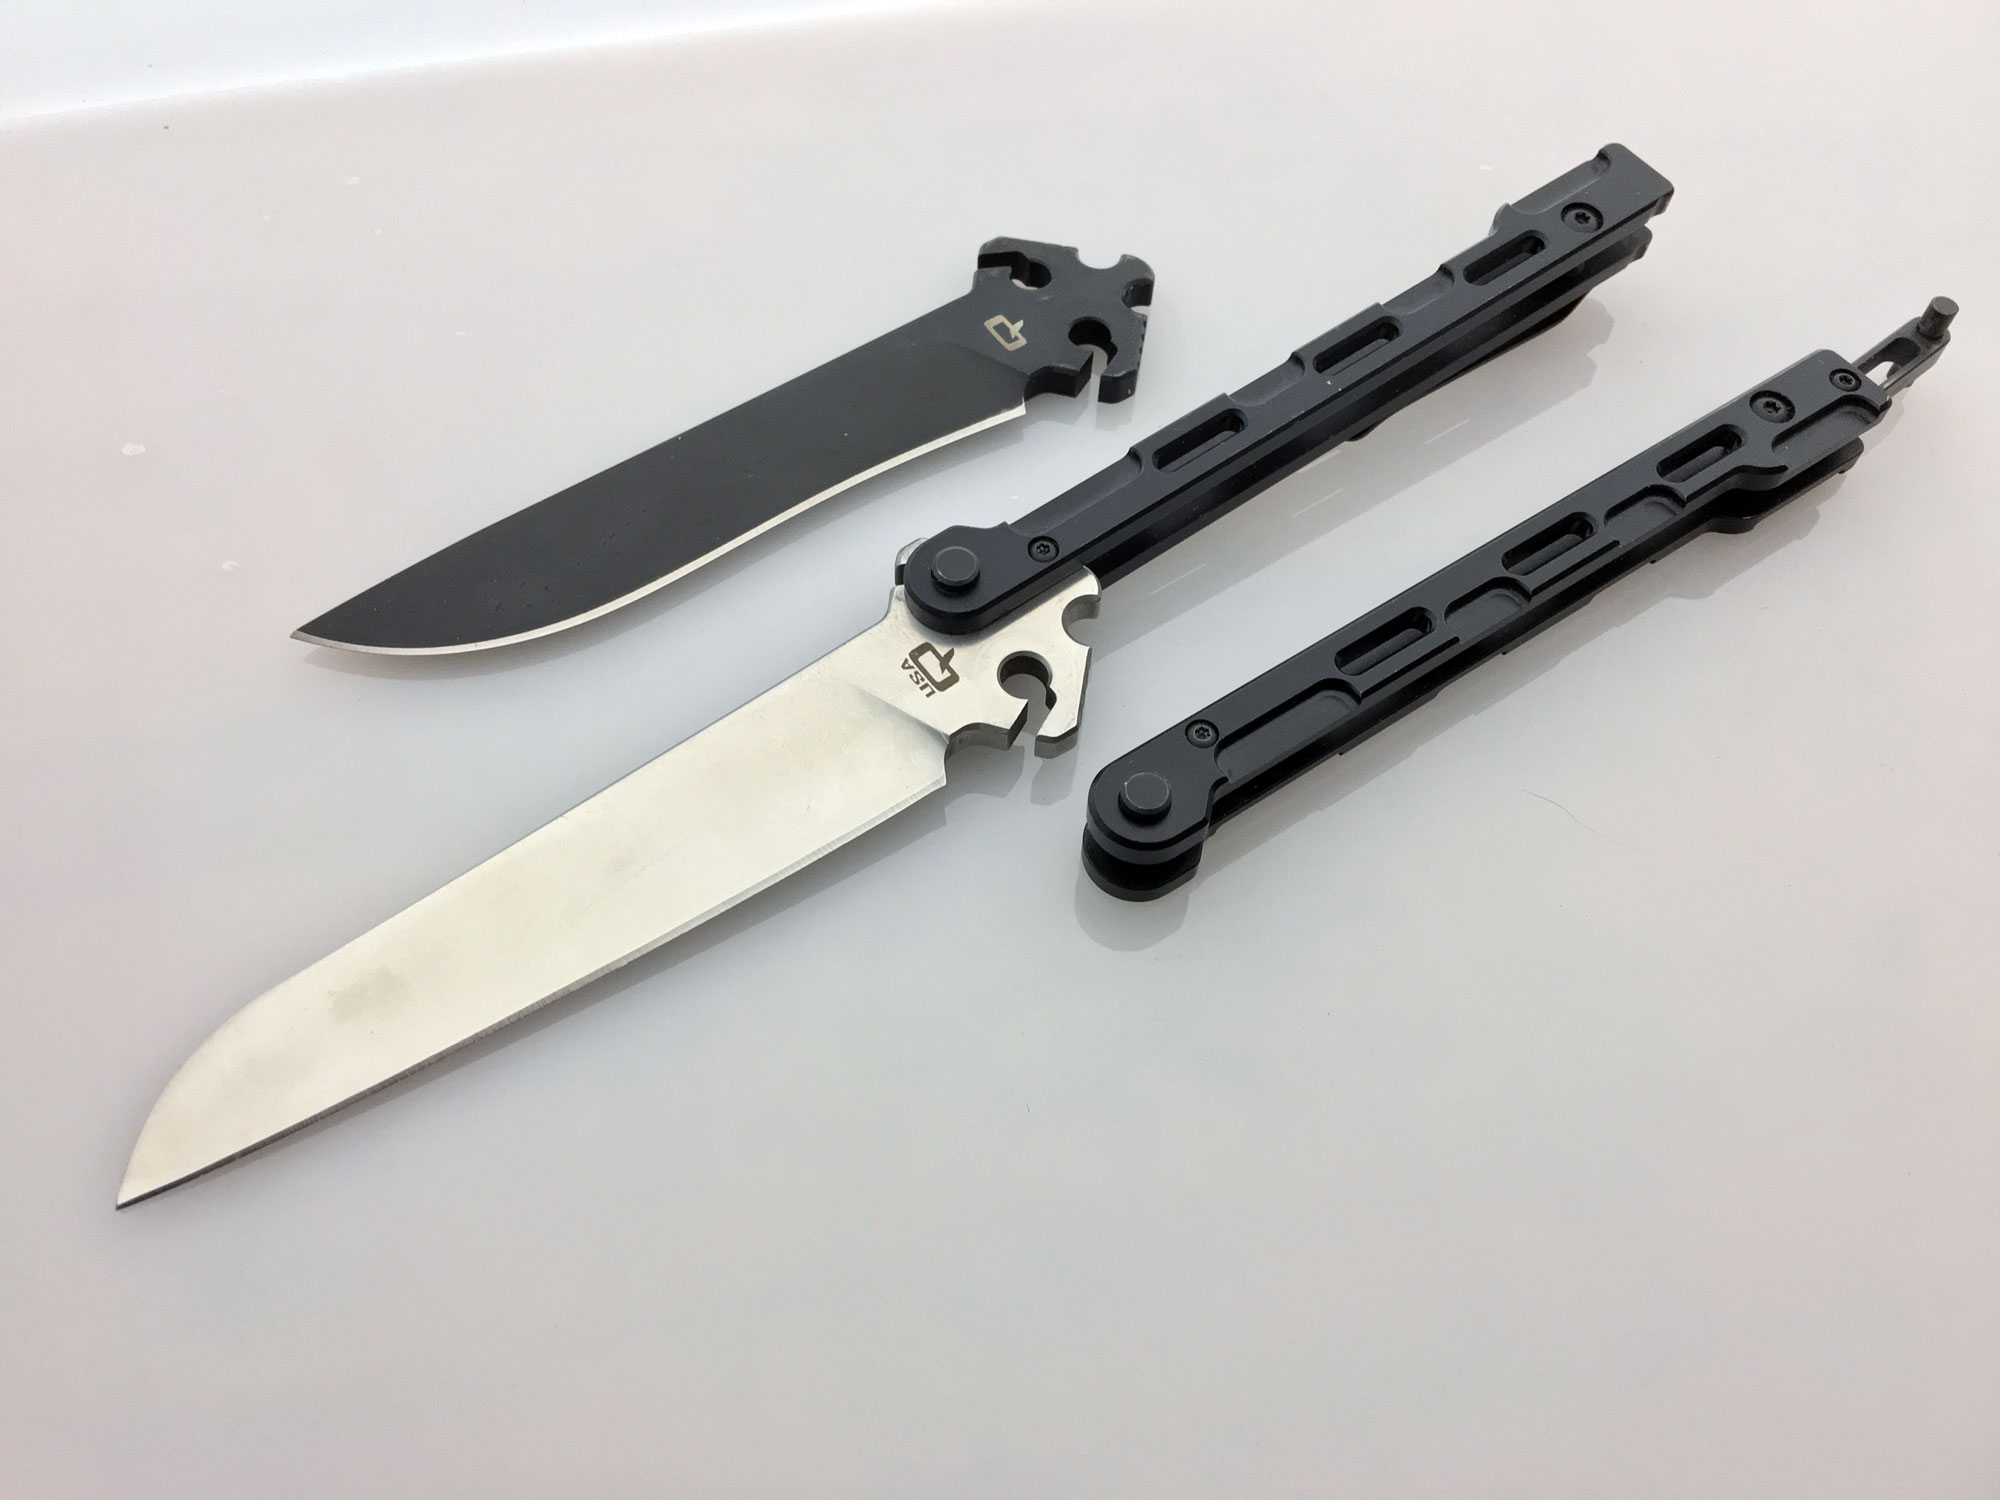
Folder making has advanced so much in the past few years. Now, flipper folders are the hot new ticket.

Following is an overview of the steps in making a modern flipper by hand.

Draw It Up

how to design a knife
The parts are all cut out. The holes in one handle side (center) are center punched and ready to drill.
knifemaking tips
Design the knife parts on clear plastic so you can see where to locate everything.

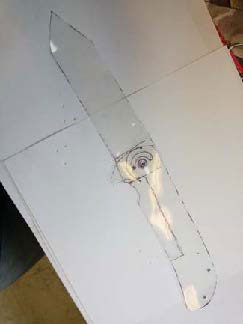
To begin, draw designs on paper and transfer them to clear plastic. Cut out the designs of the blade and handle from the clear plastic. Overlap the tang of the blade on the handle and insert a needle through both pieces where the pivot pin will be.

From there, fold the blade onto the handle and adjust the design as needed.

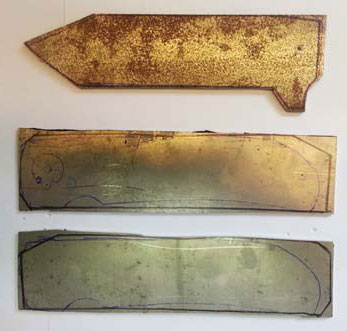
Next, trace around the plastic handle on a titanium sheet. I use titanium in a 1/8-inch size for the top part of the handle and .070 inch for the two bottom pieces. Trace the blade and cut it out.

Know the Drill

drill knife blade
Counter sink all the holes a small amount before drilling them with the 1/16-inch drill bit.

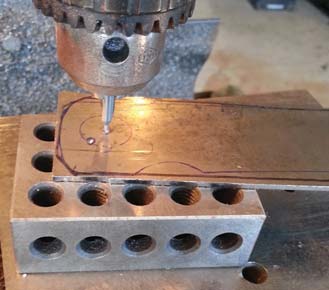
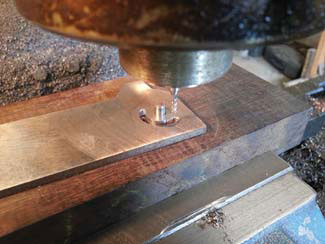
Making folders is mostly about drilling holes. Drill out one plate of titanium with 1/16-inch holes. Place another plate of titanium underneath the drilled-out plate and clamp the two together. Turn it over and drill through the second plate.

Starting with the pivot hole, place a ½x1/16-inch hardened dowel pin in it so the two plates won’t move. Next, drill the end of the handle and put a pin in it.

Continue drilling, clamping and adding pins where your stand-offs go. Each time you drill a hole, take the plates apart and de-burr. A hand drill with a four-flute counter-sink is handy for de-burring.

drill knives
Start drilling all the holes with a 1/16-inch drill bit.

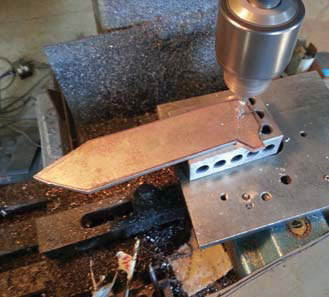
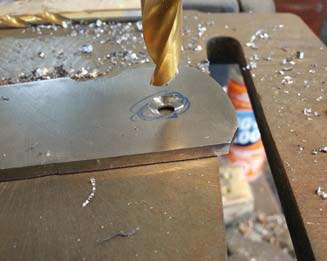
This flipper will have an internal stop pin, so don’t drill all the way through the top plate. However, do drill through the bottom plate—the .070-inch one. From here, affix the plates with 1/16-inch dowel pins. Clamp, remove the pivot pin, and drill and ream to 3/16 inch for the pivot pin. De-burr and reassemble. Drill and ream a 1/8-inch stop pin.

CAUTION: Do not go all the way through the top 1/8-inch plate! Countersink the outside plates for the 2-56 screw heads. I use a #20 drill bit for this.

Pivot, Washers & Pins

make a flipper knife
Mill the slot for the stop pin.

Now it’s time to countersink the two pivot screws. Different types of spacers and stand-offs can be used on a folder. For this flipper I used ones with shoulders from Knifekits.com. Normally I use custom-made stand-offs from Sheffield Knifemakers Supply. The shouldered step-down stand-offs prevent any unwanted movement in the blade.

I open up the holes for the stand-offs to fit in with a 1/8-inch reamer. Actually, I use a reamer .001 inch larger, so it is .126 inch.

The cool new thing with folders is pivot washers with ball bearings. There are many different types from which to choose. Michael Burch recommended washers from Jantz Supply to me at BLADE Show.

bladesmithing tips
Countersink the pivot screws.

You have to sink the washers down into the scales a bit. I use a 3/8-inch, four-fluted end mill to do this step. First, I index a 3/16-inch end mill into a hole on a plate of steel held in a mill vise. I lock down my table and take out the 3/16-inch end mill and put in the 3/8-inch one using a dial indicator to show how far down I am drilling.

Most tactical folders are going pretty thick with washers .020-to-.040-inch on each side of the blade. I sink the washers down so they and the blade are the same thickness as the stand-offs. You want the space between the blade and washer to be equal to the space between the stand-off s or spacer material. Drill and ream a 3/16-inch pivot hole in the blade. Mill a half-moon slot for the 1/8-inch stop pin.

Many makers put the pin in the handle at about the 7 o’clock position when open. Grind the pivot and stop pins down to the proper length. (Author’s note: Grind the pivot pin so it is not exposed past the top of the countersunk hole of the pivot screw. Grind the stop pin so it floats between the two scales.) Grind the 2-56 screws down so they don’t touch each other when they’re screwed into the stand-offs.

Profile the blade and grind the tang at a 7-degree angle. I use a 7-degree block of Micarta® held up against my disc grinder for a guide.

Lock & Detent

knife grinding tips
Grind the tang to fit the lock.

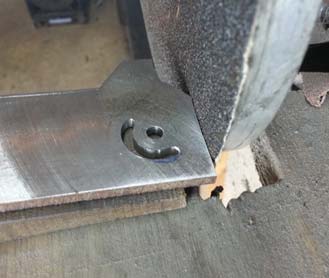
Now it’s time to cut the lock. Place the blade on the bottom liner with the pivot and stop pins in place. Open the blade and scribe a line with an X-acto™ Knife behind the tang onto the liner. Draw a line 3 inches long with a marker down the scale. Clamp in the mill, and, using a slitting saw, cut the 3-inch length. Use a band saw to cut the short face, which will be the lock. Using a cut-off -wheel attachment in a Dremel® Tool, clean up the end of the lock.

On a locking-liner or flipper folder, the lock is made by bending a tab of the titanium liner over so it engages with the end of the tang of the blade. The end of this tab must be coated with carbide. The machine that does this is a little hand-held micro welder and is called a carburizer. Simply run the rod onto the end of the titanium lock and it welds a coating of carbide onto the titanium. This produces a smoother action on the folder.

You can also flame harden the lock by heating it until it turns orange. In order to let the lockbar bend, grind in a .020-inch dent with a ¾-inch wheel at the other end of the lock.

It’s time to drill holes in the lock and blade for the 1/16-inch detent ball. Center punch a hole in the middle of the lock. Drill through with a #54 drill bit.

Close the folder and clamp it closed. Drill through the same hole as the liner into the blade about .060-inch deep. The #54 drill bit is .053 inch. You can also use a .054- or .055-inch drill bit depending on how you want to tune your folder. Grind, heat treat and polish the blade. Press the 1/16-inch ball bearing into the lock. The height left remaining of the ball bearing should equal the thickness of the washer.

Bend the lock over to about the middle of the folder. Now grind the tang at 7 degrees on a disc grinder until the lock starts to grab. You can assemble the folder, hold it up to the light and push the lock away from the knife to see how much more you have to grind the tang. Go slow and grind just a little before checking the lock. Drill and tap the scale for the pocket clip.
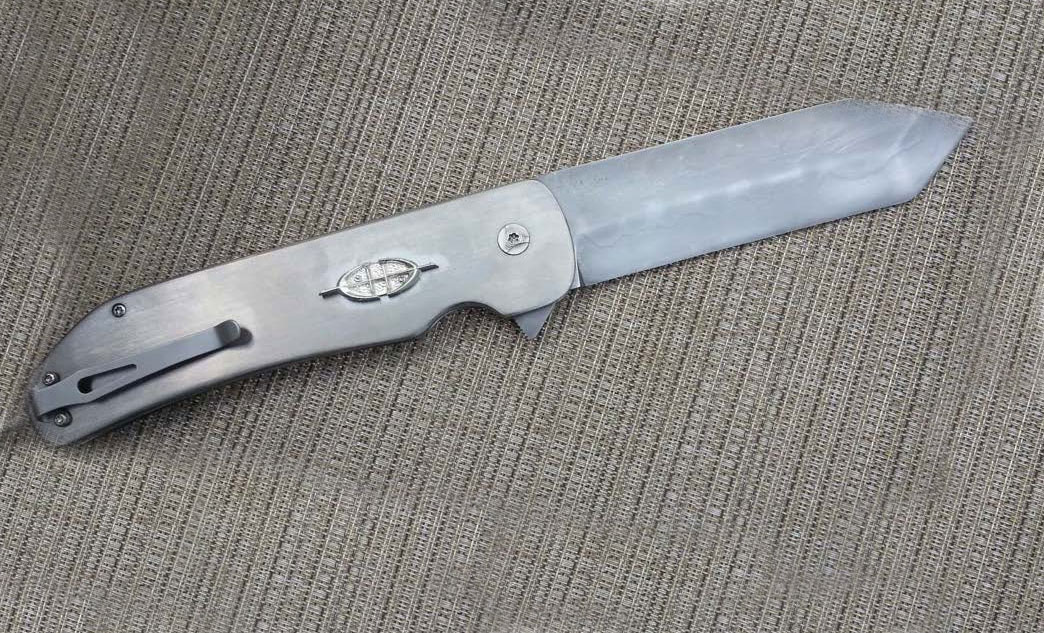
Sand & Polish

Finally, sand and polish everything. I also polish the ends of the screws. After assembling the folder, tighten the bottom pivot screw and adjust the tightness of the folder action with the top screw. Use Loctite© glue on all the screws.

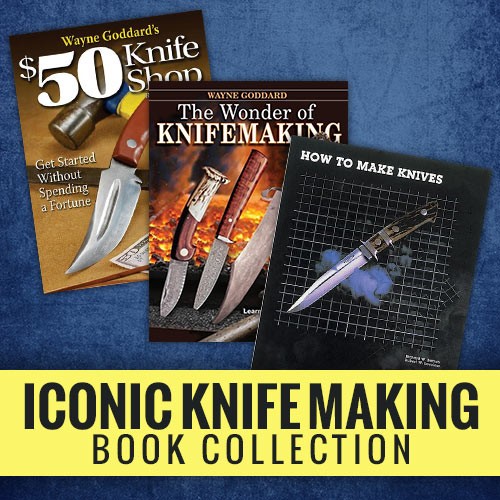
Now Make Another Knife with These Books

tips for making knives

How the Gerber LST Changed Pocketknives Forever

gerber LST best lightweight knives

BLADE Magazine Cutlery Hall-Of-Fame® member Pete Gerber knew he was onto something with the FS1, a knife he remembers as “dandy” and one of three in the Folding Sportsman line that debuted with Gerber Legendary Blades beginning sometime around 1980.

“It was just a little heavy,” Pete recalled. “Blackie Collins was working with us on some projects then, and I asked him for help with it. I said, ‘Blackie, this is a nice knife. How can we take some weight out of it and put some pizzazz into it?’”

The knife engineers at Gerber Legendary Blades had been working with Micarta handle slabs, rather labor intensive at the time since the plastic laminate had to be machined to the appropriate shape.

Gerber bolt action pocketknife
The Bolt Action folders were among the Blackie Collins designs for Gerber that predated the LST. The original Bolt Action is at bottom and the newer Bolt Action hunter is at top.

“We had to mill it out and used brass washers with rivets to attach the slabs,” Pete said. “The original LST was the FS1 in-house design, and Blackie was first given the assignment to put moxie into it using the existing parts. He worked on the design and then put an injection-molded handle on it with nice checkering. Those were his contributions.”

As fine as it was, as long as the slab handles were involved the LST had trouble fully living up to the attributes that provided its name, “Light, Smooth, and Tough.” Collins already had contributed some well-known designs to Gerber, including the Bolt Action folder and the Touché belt buckle knife, and the wheels began to turn in his head.

ultralight knives
The LST, as offered today on Gerber’s website. (Gerber image)

Blackie had a friend in Gastonia, North Carolina, just outside Charlotte, and that friend ran an injection-molding business. Instead of using riveted slabs as handle material, why not try a one-piece injection-molded handle to reduce both the weight and production cost of a knife design that was already selling pretty well? Just to add to the incentive, injection molding would open up the spectrum of handle colors as well.

After some experimentation, the production LST was manufactured with the glass-filled, nylon-reinforced Zytel as the handle material.

“It was the first time a folding knife was made with a one-piece handle, and it worked,” Pete remembered. “The action was so smooth because we went through an operation called ‘match catch,’ where the blade and the catch were kept together until they were assembled and until they were just perfect. When the knife closed, the blade referenced the catch, and it was as smooth as it could be.”

A New Car for a New Knife

blackie collins knife designer
Blackie Collins loved fast cars and motorcycles. When it came time for Pete Gerber to compensate him for his input on the LST, Blackie decided he wanted a Corvette—and Pete made it happen. (Meyerco image)

Almost as sweet as the story behind the LST, which has sold in the millions since the early 1980s, is the back-story of Blackie’s compensation for his input that led to the dynamic little knife’s eventual success. Pete asked Blackie what he wanted in the way of payment for services rendered.

“I didn’t think it could be a royalty knife since it was a modified in-house design,” Gerber explained. “I asked what he wanted for payment, and I suggested that maybe a new car would be something he would like.”

The story goes that the new car turned out to be a Corvette and that Pete’s check for $29,000 made it happen.

Blackie, a Cutlery Hall Of Famer who tragically lost his life in a motorcycle accident in 2011, loved cars and motorcycles and just about anything mechanical, and the idea of new wheels appealed to him. His wife, Jane, remembers well the search for just the right vehicle.

“We went from South Carolina to Jacksonville, Florida, to look at Avanti cars,” she recalled. “He didn’t like the way the new ones handled, so we looked at Corvettes, bought one that was two-tone gold, and drove it home. He owned that car for a few years and then traded it in.”

Pete remembers Collins driving around his hometown in South Carolina in that Corvette with a license plate that simply read, “Blackie.”

Offering items other than money for consulting seemed to work well for Pete, who also once paid Cutlery Hall-Of-Famer Bob Loveless with an airplane.

While Blackie burned up the roads in the Corvette, the Gerber-Collins partnership took the knife market by storm with the LST.

“Blackie used to say that the LST revolutionized the knife industry,” Jane recalled. “He did a lot of work for Gerber, and he really reduced the number of parts on that knife and put the plastic handle on it to make it lighter.”

Taking the World By Storm

History of Gerber knives
A box of lockback folders in the Gerber factory in the early 1980s shows the thick nature of the handles. The LST not only was lightweight, it was thin, too, adding even more to its ease of carry.

The new lightweight knife was a sensation, and soon other knife companies were taking notice, working on something similar. It was pure gold in itself—with a grand total of six parts to the whole enterprise. Buyers wanted the light, smooth-action, durable and reasonably priced LST, and competitors scrambled to keep pace with Gerber’s trendsetter.

Soon enough, there were similar offerings rolling off assembly lines and onto store shelves. The introduction of LST energized knife manufacturers in a manner seldom seen.

The LST developed its own legacy among the knives that changed knife history, and it is still being manufactured in Portland, Oregon, and sold under the Gerber banner today.

“It was the first true ultralight knife,” explained Dan Delavan of Plaza Cutlery in Costa Mesa, California, “and Gerber had a high-quality blade in that light handle at a good price. You could throw it in the pocket of your swim trunks and go! Lightweight became attractive, and the LST was thin, too. It didn’t bulge in a suit pocket and the checkering gave it a nice grip, just like an extension of the finger. It was the knife that introduced the ultralight, and we sold a lot of them back in the day.”

Lightweight vs. Airweight

Contemporary to the introduction of the LST, Cutlery Hall-Of-Famer A.G. Russell was producing ultralight knives of his own in the Airweight series. Like other knife manufacturers and designers, Russell also worked with Blackie.

He remembers the concept of the ultralight as the shape of things to come in the 1970s.

“I wanted strength but little weight in a knife, too,” Russell noted, “and my Airweight was using a Micarta handle. Blackie had that great idea of molding the handle instead of shaping it, which would have suited an operation like Gerber perfectly. The LST was extremely lightweight and it sold in the millions.”

LST Materials

Pete Gerber recalls using 440A stainless blade steel in the early LST, and says the knife had a good, husky blade that he never saw break—and it was complemented with a nicely polished tang.

“Many other companies were copying it, trying to figure out what we did and how the LST worked so well,” Pete said. “Many of those companies made knives that were quite similar to the LST long after ours was successful. I don’t believe we had a patent on it at all; I don’t think we could get one. The patent area was out of my expertise, but I told our folks to get one whenever we could.”

An Enduring Legacy

Peter Gerber knives
Peter Gerber was the headman at Gerber when the LST debuted in 1981. “It was the first time a folding knife was made with a one-piece handle,” he said, “and it worked.”

After almost 40 years, the staying power of the LST is undisputed, and its place as a milestone in the progressive development of knife design is secure. Along with other innovations attributed to Blackie, it stands out among its peers with a timeless depiction of design sense and simple user friendliness.

During the past four decades, the LST has been manufactured in several variants.

DuPont recently celebrated the 50th anniversary of its nylon plastic with a commemorative run of LSTs handled in the company’s Delrin material.

Not long ago, Pete was in a company store in Lincoln City, Oregon, and one of the clerks showed him a Mini LST with a bright green handle.

“I had never seen that bright green before,” Gerber laughed. “It just goes to show you that things can develop that you don’t even know about.”

When the LST hit the market in 1981, the time was right. Since then, it has given Gerber and the knife industry a continuing boost.

“It has sold in the seven figures,” Pete reflected, “and I think it gave us a hell of a shot in the arm.”

Gerber LST Specs

The standard LST sells today on the Gerber company website for a modest $23. The knife weighs a remarkable 1.2 ounces with a drop-point 420HC stainless steel blade of 2.63 inches and a closed length of 3.61 inches. The handle is described as tactile, textured and made of lightweight, synthetic glass-filled nylon.

Light, smooth, and tough, Gerber’s LST has earned its place among the elite products of the modern knife industry.

What Other Knives Changed the World? Find Out With This Download

best knives for the money

How to Make Lara Croft’s Climbing Axe from Tomb Raider

Promos for Tomb Raider, the movie based on the video game series that hits theaters today, may bring to mind the action scenes from the Rambo films, but the kit for protagonist Lara Croft is light on knives. Instead, Croft (played by Alicia Vikander) carries a climbing axe to handle tough environments and dispatch enemies.

Here are some shots from the film that feature the climbing axe:

Tomb Raider 2013 Climbing Axe
(image via imdb.com)
Tomb Raider Lara Croft climbing axe
(image via imdb.com)
Tomb Raider movie weapons
Lara Croft (played by Alicia Vikander) carries the axe on her hip. (image via imdb.com)
Tomb Raider movie axe
(image via imdb.com)

lara croft video gameThe film version of the axe is a copy/paste of the one used throughout the video game series, the latter of which can be seen on the cover of the game at right. 

While the movie version likely a creation of the prop department, the axe is worth noting because of a trend that brings video game knives (or axes, in this case) to life.

So it should come as no surprise that Tomb Raider fans figured out how to make a replica of the climbing axe as early as 2013.

Here are a few tutorials:

These are items for cosplay, meaning they’re made by fans for the sake of entertainment, not proper tools. They’re usually included as part of a larger ensemble.

However, the knife industry at large should pay attention to this on-ramp strategy. For many new and young knife collectors, bringing something from a video game into the real world is their first commissioned piece. Once they get a taste for the craftsmanship that goes into knifemaking (or axe making), they likely won’t stop there, especially when built-in fandoms keep the resale markets healthy.

Start Making Your Own Knives

New to BLADE or the world of knifemaking? You can get started today with basic tools and 50 bucks. This book will show you how to do it. Click here to get it at a special price exclusively through BLADE‘s official store.

tips for how to make a knife


Review: $7.99 Lansky Quick Edge Knife Sharpener

best tools for knife sharpening
The Lansky Quick Edge is priced at only $7.99. Is it worth the purchase? (Lansky photo)

Lansky’s Quick Edge knife sharpener is the ticket for a fast track to a sharp edge.

The Quick Edge works like most other pull-through-type sharpeners. It consists of a sturdy plastic handle with a D-guard, and there is a pair of tungsten-carbide cutters in the sharpener’s head set at a pre-set angle of 20 degrees.

How It Works

how to sharpen a knife
(Lansky image)

The pull-through sharpener works on the principle of scraping a tiny amount of steel from the edge to reconfigure it to a crisp “V” shape. Pull-through sharpeners require very little skill to master—just pull the sharpener head over the entire cutting edge a few times and you’ve got a sharp knife. The Quick Edge is fast, convenient and safe, too, thanks to the D-guard that prevents accidental cuts during sharpening.

The handle’s understated, user-friendly finger grooves enhance grip, and the D-guard is large enough to accommodate a gloved hand comfortably and securely.

A thumb rest on the handle enables you to use your thumb to aid in providing downward pressure during sharpening.

Using the Quick Edge

lansky knife sharpening
Place the V-shaped carbide sharpening element over the cutting edge at the tang and pull toward the blade tip. Repeat until you obtain a sharp edge. The knife is the Kershaw Groove. (Dexter Ewing photo)

Place the knife you want to sharpen edge up on a sturdy work surface. Firmly grip the knife’s handle with one hand and, with the other hand, place the Quick Edge cutting head down on the cutting edge at the area closest to the tang.

With light to moderate pressure, drag the sharpener over the edge in one motion, going toward the blade tip. Once you reach the tip, replace the sharpener where you started and repeat the process several times until you have a sharp edge.

Due to how pull-through sharpeners work—not just the Quick Edge but most pull-through models—I caution against using them with high-quality using knives, including customs. However, if you need a good, serviceable edge for inexpensive working or hunting knives, the Quick Edge is for you.

For instance, if you do a lot of machete work, the Quick Edge should be your cup of tea. When the edge gets dull, sharpen it with a series of pulls and you can go right back to work. The edge the Quick Edge creates will not be as sharp or uniform as one provided by any of Lansky’s clamp-style sharpening kits—hence my recommendation against using the Quick Edge on high-quality cutlery.

Nonetheless, the pull-through model provides a nice, serviceable edge for cutting/chopping outdoor knives that see a lot of use and, perhaps, abuse.

Stored in a tackle box or toolbox, the Quick Edge is ideal for fast stock removal in the field and works best with low- to mid-grade blade steels.

Learn More About Knife Maintenance

knife sharpening tips

3 Balisongs to Celebrate National Learn About Butterflies Day

national learn about butterfly day

In honor of National Learn About Butterflies Day (you are celebrating, right?), BLADE presents these three balisongs for your consideration. Get ready, nation, to learn about butterfly knives!

Why Do Knife Enthusiasts Enjoy Balisongs/Butterfly Knives?

What is it exactly about the butterfly knife that is so captivating? It is a distinctive breed of folder with handles that freely rotate, allowing experienced butterfly users to deftly manipulate the handles in a fancy manner to expose the blade. There is more than a little bit of flash and rock ’n roll to these knives.

As folders have progressed through the years with the use of high-end materials, ball bearings in the pivots and more, so have butterfly knives. Many premium models feature the same blade and handle materials found in high-end tactical folders, and some butterflies have pivot bearings for glassy-smooth handle rotation that you must experience to believe.

Microtech Tachyon III

Microtech Tachyon III balisong butterfly knife

Microtech’s Tachyon III is the third iteration of the company’s Tachyon butterfly, done up in true Microtech fashion through quality materials coupled with top-notch machining and overall craftsmanship.

“It mimics the design and engineering of the ever-popular Marfione Custom Tachyon III, other than the hidden pocket clip,” says Jason McCoy, Microtech’s government and military sales manager. “The handle materials are T6 aircraft-grade aluminum, and we decided to go with Bohler ELMAX blade steel to make it a very durable, affordable cutting tool.”

About 10 inches long overall, the Tachyon III is impressive. The slight recurve of the edge gives the blade enhanced slicing abilities. The milled-in fuller lends a bit of an aggressive appearance, along with the unsharpened swedge. As with some upper-end butterfly knives on the market, the Tachyon III employs pivot bearings for that addicting, glassy smooth action. The handles have machined-in decorative recesses that aid in knife manipulation, giving you a tactile reference point as to blade orientation during flipping maneuvers.

Another noteworthy feature of the Tachyon III is the spring-loaded handle latch, an uncommon feature on butterflies. From the closed/secured or open handle positions, squeeze the handles and the latch pops loose. Moreover, the spring-loaded latch does not bang on the other handle as more conventional, non-spring loaded latches do during flipping exercises.

A steel clip carries the Tachyon III in the pocket very comfortably—a nice feature many butterflies do not have.

Bear Song IV

bear and son bearsong butterfly knife balisong

Bear & Son Cutlery offers the Bear Song IV butterfly knife in two sizes and several blade styles. The Bear Song IV Model B-450-ALCF-B is a nice, compact knife. It offers the only non-stainless-steel blade among our featured butterflies—2 7/8 inches of 1095 high carbon steel in a stain-resistant, no-glare black powder coat.

Approximate closed length: 4.25 inches. Weight: 3.5 ounces. Skeleton holes in the blade match those in the handles, which are T6 aircraft-grade aluminum with a nice carbon-fiber graphic finish.
Also the smallest featured butterfly, do not discount the Bear Song IV’s compact size in terms of its quick manipulation.

“It has ideal weight and balance for flipping with its stainless steel handle spacers to provide continued momentum for performing tricks,” says Matt Griffey, Bear & Son vice president. Phosphor bronze washers facilitate smooth handle rotation. “It has been the number-one-selling butterfly in the Bear OPS line,” Griffey states. “It’s a nice complement to add the next step up for a higher-end butterfly to our entry-level butterflies.”

The Bear Song IV line offers clip-point, tanto and single-edge dagger blades along with Sandvik 14C28N stainless in addition to the 1095 for blade material choices. There is also a high-definition damascus option for some models.

Marty McFly

butterfly balisong marty mcfly

The aptly named Marty McFly butterfly knife from Quartermaster Knives is a nod to the year of the knife’s release, 2015. Twenty-fifteen is the year when the main character of the movie Back to the Future, Marty McFly, sets the DeLorean time machine to travel forward in time. When the movie was released in 1985, 2015 did indeed seem a long way off.

The Marty McFly resembles many other butterfly knives, but it is what you cannot see initially that is special. Incorporating Quartermaster’s BladeExchange feature, the blade can be swapped out of the handles and replaced with one of three other blade styles to tailor the knife to the task at hand.

quartermaster balisong butterfly

marty mcfly balisong butterfly knives

“The knife is able to quickly and easily exchange its blade shape, color or sharpness level without any tools whatsoever,” says Lee Price, Quartermaster Knives co-founder. With a simple press of a button at each handle’s pivot, you can slide the handle away from the blade and replace it. “This is useful when training, as users can easily switch to a dull trainer blade so as to not cut themselves while attempting new manipulations,” he notes.

Quartermaster uses D2 tool steel for the blades and CNC-machined titanium for the handles, catapulting the McFly into high-end butterfly territory. “The QBS-1 and QBS-2 Marty McFly knives are among the all-time best-selling models for us,” Price states. “We plan to introduce new blade styles and updated handles, which will of course be compatible with all prior blades and handles.”

Price adds that the QBS-1 Marty McFly is the company’s initial foray into the butterfly market, and is something consumers have embraced enthusiastically.

Subscribe to BLADE Magazine

Whether you call the United States home or somewhere else, you’ll love a subscription to BLADE magazine.

Knifemaking: What is the Best Kind of Tang?

0

Knifemaking Question

“I have been thinking of making a hidden-tang knife with a blade made by one of the companies that advertises in BLADE®. However, that leaves a problem. Most of the blades in question have either a small tang, which causes a possible stress point, or a traditional-shaped tang that seems very short. Which is better and why?

“I also have seen hidden tangs cut out of full-tang knives; how can this be done without affecting the temper?”

~Anonymous knifemaker

Answer

tang making knives

Let me start with the second question about converting a full-tang knife into a stick-tang- or a so-called hidden-tang knife without affecting the temper. If this is what you would like to do, it certainly can be done without damaging the blade or losing the temper.

While most factory-made blades are fully heat treated, tang and all, you do not need to be so worried about softening the tang. This area could just be spring hardened. But, as you know, it is very important to not let the heat travel up into the blade and soften it.

You will need a bench grinder or a belt sander, or you can even use a disc grinder. Any will do. Whichever machine you happen to have or choose to use, the main thing is to not overheat the material while working it.

To ensure this, you will need to use a coarser grinding stone or a new sanding belt not higher than 60 grit. A fresh new belt is essential for the operation. The sharper the belt, the less friction/heat will occur. A duller belt will create a lot more heat.

Another thing to watch for is to not apply a lot of pressure when you are grinding. Again, the more pressure, the more heat.

Besides using a sharp belt and light pressure, after each pass on the grinder be sure you cool off the blade completely by dipping it in cool water. If you want to get fancy, you can place the blade on a piece of dry ice to cool it, though it is not necessary to go to such lengths.

One obstacle when converting a full-tang knife into a hidden-tang one is the pin and glue holes. The size and placement of the holes will dictate the shape of the tang and obviously the handle shape as well. Consequently, you are limited as to what you can do.

One last thing to watch for is to not grind too close to any of the pin or glue holes because this will be the fault or weakest point of the knife. (See Figure 1.)

As for your first question, both the hidden-and full-tang style of knife construction have been serving mankind for hundreds of years, so I would not consider one more traditional than the other.

Concerning which type of tang is better, it is up to individual preference. The properly prepared tang, either full or hidden, will perform well. A well-constructed hidden-tang knife should have no stress points. (See Figure 2.) A stress point can occur during heat treating if the juncture where the blade and tang meet has sharp corners. (See Figure 3.)

This juncture is where you need to pay more attention and take care to avoid creating sharp corners and edges. A full-tang knife also can have stress points if the drilled holes are not slightly countersunk to eliminate sharp edges.

You mentioned that some of the tangs appeared short in the advertisements you have seen. They say a picture is worth a thousand words, but sometimes a picture does not do justice or give you a true measure of the proportions of the subject.

While checking out all the pictures and blade designs available, you may have missed the information written under each picture. Each picture has the overall size and the blade size. If you take away the blade size from the overall size, you will end up with the exact measurement of the tang.

I am happy to hear you are going to try making a knife from a kit or a factory-made blade. Everyone needs to start somewhere. Maybe it will lead you to try making your own knives, too.

Learn More About Knifemaking

Get Wayne Goddard's book and experience the true wonder of knifemaking.
Wayne Goddard’s book makes knifemaking a wonder to behold.

Knife News Wire 3/12/18 – Experiment: An Entire Month Without a Knife?

no knives for a day

Experiment: An Entire Month Without a Knife?

Roger Barnes, of BC Cutlery Co., is running an experiment. He’s seeing what would happen if he went an entire month without using a knife, and he’s documenting the hurdles he comes across.

It’s an interesting thing to think about. Whether you use a knife or not, the conveniences that make modern living possible are grounded in a blade turning one thing into two things.

BLADE will be following Barnes as he plays out his experiment over the coming weeks, and summing everything up in an article. You can follow along, too, on Twitter.

Photographer Documents What Happens When Knifemaking Leaves Town

Jason Koxvold is a photographer who set out to document the decline of the cutlery industry in the Hudson Valley of New York, which for 150 years formed the bulk of that region’s economy. The result is KNIVES, a photo gallery depicting the fallout.

From Koxvold’s website:

KNIVES is a project made over several years, using documentary photography to trace the shifting relationships between masculinity, myth, and violence in a rural town whose economic base remains eviscerated by globalisation.

The cutlery industry formed the economic backbone of New York’s Hudson Valley for over 150 years, until the Schrade knife factory abruptly moved production to China in 2004, leaving 500 men and women out of work. The town’s maximum security prison, Eastern Correctional Facility, became the largest employer in the area, shielded from the wider community by layers of secrecy. As businesses continued to close during the decade that followed, drug abuse, mental disorders, and rare cancers have become more widespread.


Koxvold’s work is less about the knife industry in general and more about the disruptive effects of a changing global economy on certain parts of the United States. Still, it’s worth a look for knife enthusiasts, if only to better understand how knives fit into the bigger picture.

See the photos here.

(Video info: Jason Koxvold: KNIVES from Elijah Barrett on Vimeo.)


Update on Canada Knife Ban

Canada banned most imports of folding knives earlier this year, and the larger knife community is not taking things laying down.

Here’s where the issue stands. Click a link to learn more.

1) It’s still legal to own a folding knife in Canada. Only imports of knives that open with “centrifugal force” are banned (meaning most folders).

2) A petition in Canada to overturn the ban is gathering steam, and has support from an MP.

3) A prominent lawyer in Canada plans to challenge the ban on constitutional grounds.

4) U.S. groups are organizing to support those efforts in Canada, albeit from a distance.

If this is the first time you’ve heard about this ban, start here.

BLADE also received feedback on social media from knife enthusiasts about this important issue. Here are a few highlights.

canada folding knife ban


Have a News Tip? Submit it Here

Have big news? Tell BLADE with this form.

    Check this box to prove you're not a bot

    Advertisement

    Must Read Articles

    Read this before you make a knife

    Knifemaking 101 – Read This Before You Make a Knife

      by Wayne Goddard My experience has taught me that there's nothing like digging in and getting started. I've often said the hardest part of the...
    how to forge damascus steel

    How to Forge Damascus

    Advertisement
    Advertisement