Home Blog Page 61

Spyderco Paramilitary 2 Review: Still A Cut Above The Rest

The Spyderco Paramilitary 2, simply known as the Para 2, is a part of the Military family of popular tactical folders in the Spyderco lineup. The Para 2 came about as a downsized version of the full-size Military model, answering the call from customers for a practical EDC option. 

Smaller it might be, but the Para 2 retains the essence of what makes the Military a popular working folder. And because of this, the knife has developed a cult following. However, it’s not simply a shrunken-down facsimile of its larger predecessor, having gone through several design improvements that have dialed in the knife to users’ needs.

In this article, we’ll examine exactly what has made the Spyderco Para 2 such a winner in the company’s lineup. And why, if you need a truly rugged everyday option—or just want a classic in your collection—the legendary knife more than fits the bill.

Para 2 Blade

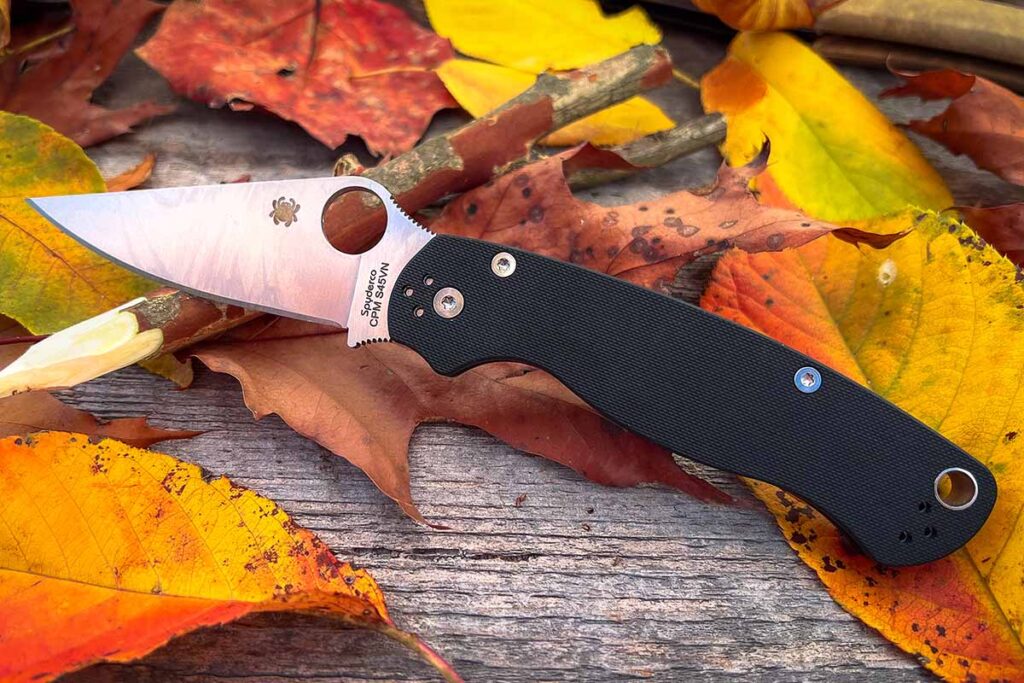
To start things off, the blade of the Para 2 sports a useful clip point shape, enhanced with a full flat grind. Furthermore, the knife has a gradual distal taper from the tang to the tip, evident when viewed from the top. The length of the blade measures 3.4 inches long, enough length to take care of heavy work but short enough for comfortable carry in a pocket. 

Para 2 blade
A CPM S45VN stainless-steel blade brings toughness, excellent edge retenion and easy of sharpening to the game.

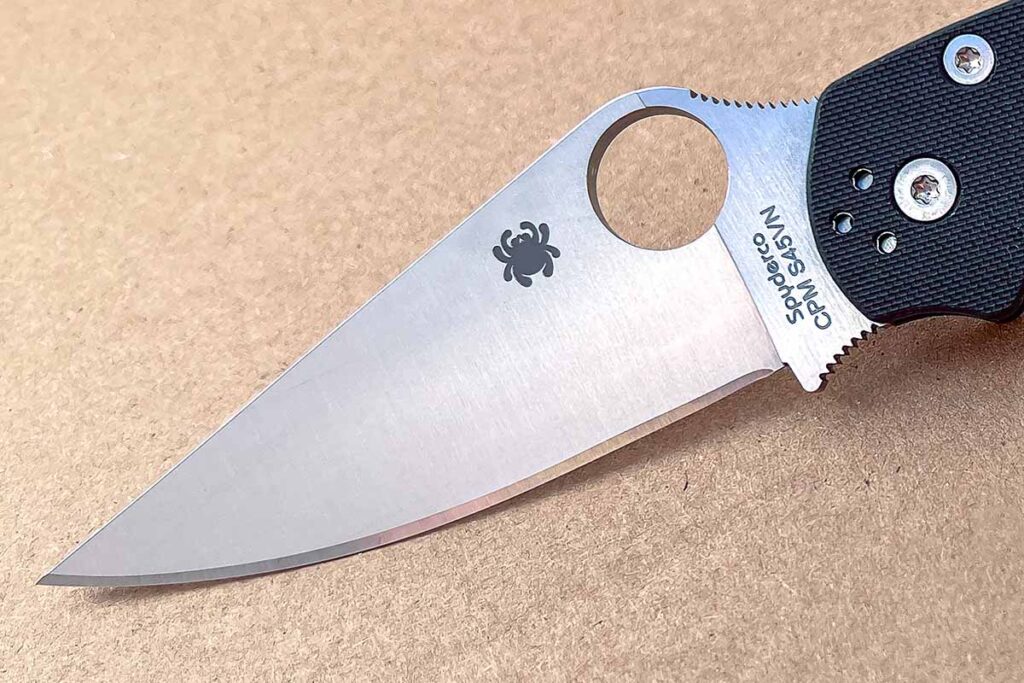
Constructed of CPM S45VN high-performance stainless steel, Spyderco picked the perfect material for a high-end knife. Compared to the gold standard of this class—S30V—S45VN proves a bit tougher, yet is remains easy to resharpen. That is if you have to. The blade’s toughness means it holds an edge extremely well, suiting it for long-haul work without interruption. A final point, S45VN is fairly renowned for its corrosion resistance, making the Para 2 excel in nearly any environment.

As those familiar with Spyderco can guess, the blade boasts the company’s trademark hole near the spine, at the rear. This has been the go-to deployment method for time immemorial on the firm’s knives. Rounding things out on the blade, there’s integrated chill formed by part of the blade and handle when the blade is opened. A choil permits the user to further choke up on the blade for extra control when needed.  

Para 2 Handle

Spyderco opts for a black textured G-10 for the handle, which endows it with a few assets. First, it keeps the knife nimble, cutting down on the Para 2 overall weight. But this isn’t at the expense of strength—G10 is tough as cut nails—and a solid purchase on the knife.

Paramilitary 2 handle
Dark, dashing and useful, the Para 2’s G-10 handled gives users a firm grip on the knife.

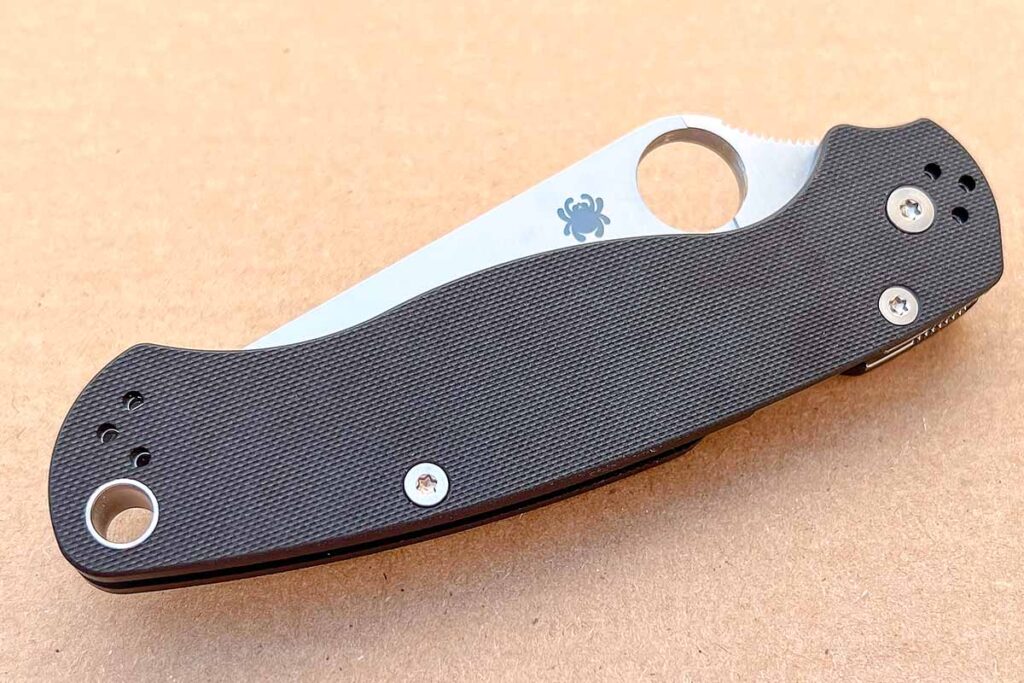
The handles are milled out, allowing the slightly undersized stainless steel liners to sit flush with the G-10. Nicely, this reduces the overall width of the handle but doesn’t sacrifice the lateral strength of the liners. Spyderco also turns its eye to weight reduction with the liners, porting them to further lighten the load—while not compromising strength. 

The handle shape itself is very ergonomic, like the full-size Military. There is an expanded, curved section that forms an integral finger guard to prevent your hand from sliding forward. The handle feels very secure in hand, and this inspires user confidence. 

Compression Lock

Compression lock
With an extremely strong lockup, the Para 2’s Compression Lock adds confidence to the system.

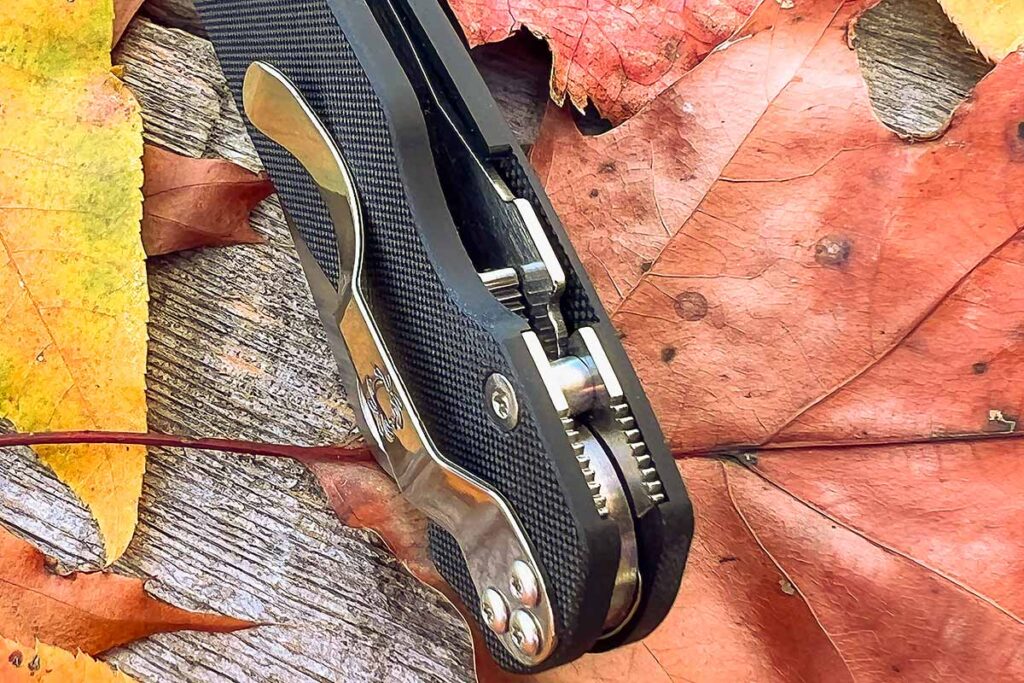
The Para 2 utilizes Syperco’s Compression Lock to secure the blade, a solid system that has several benefits. For those unfamiliar with the mechanism, it’s an in-house design that provides an extremely strong lockup. It operates by the lock bar wedging itself onto a ramp on the blade’s tang and a hardened steel stop pin. As an added benefit, the release is situated on the handle spine, just behind the blade within reach of the thumb and forefinger. Not only is the design ambidextrous, but it also facilitates fast and intuitive one-hand opening (with a bit of practice) and closing. 
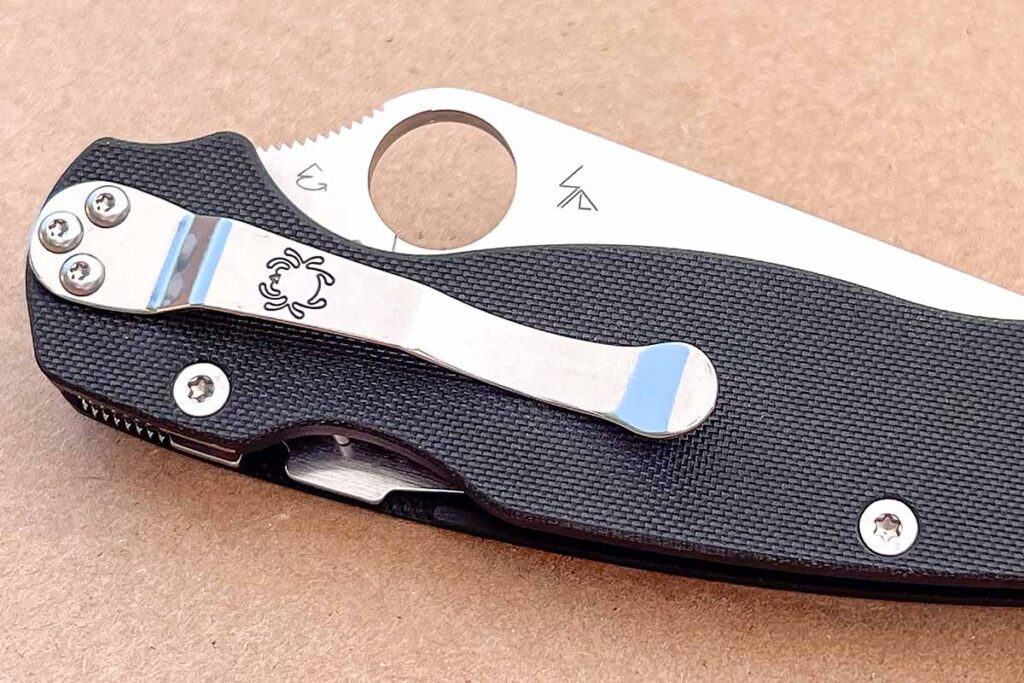
Pocket Clip

A steel pocket clip is attached to the handle in the right-hand, tip-down configuration. However, Spyderco has what they call 4-way clip mounting with the Para 2. This means the handle is drilled and tapped to modify the clip’s position, thus the carry style. Again, this makes the knife lefty- and righty-friendly, as well as allowing for tip-up or tip-down carry. Understandably, this is another facet of the Para 2 has that a lot of fans. 

Para 2 clip
No matter how you carry or hand you use, you can move the clip to suit your needs.

The handle also has an open build, allowing you to effectively clean lint and other debris out of the inside of the handle by using either compressed air or tap water. The handle length is 4.8 inches, making the overall length of the Para 2 around 8.2 inches. I would consider any folder with an overall length of 9 inches to be large, so to say the Para 2 is a midsize folder is a stretch. It’s safer to say it’s on the upper end of being midsize. Still kind of compact, but large enough to handle some man-sized cutting jobs. 

Para 2 In Action

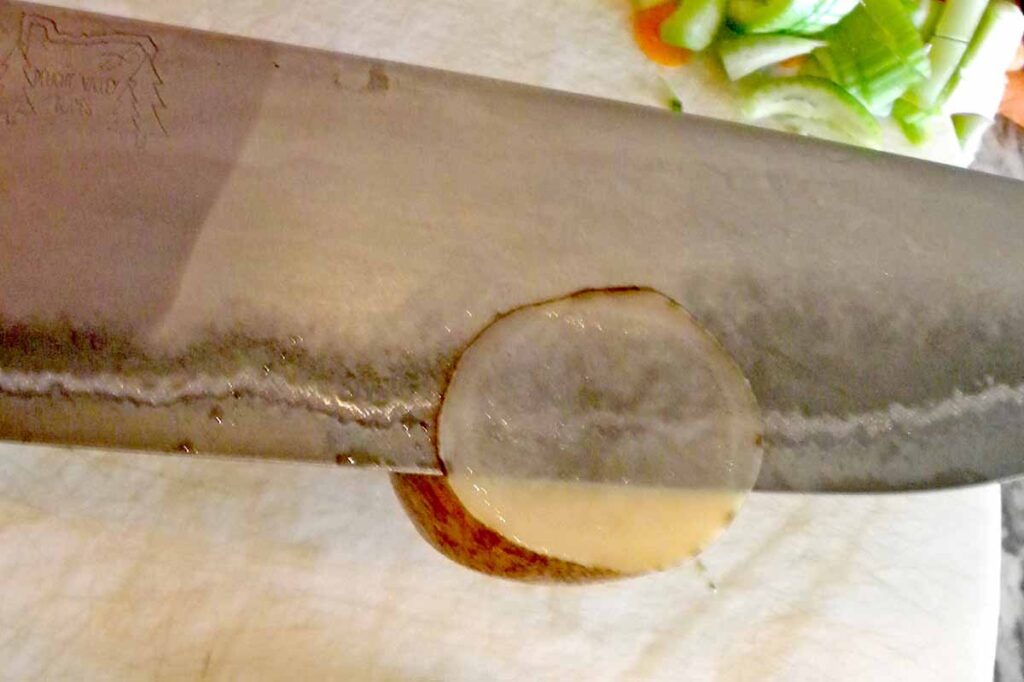
The flat ground blade with distal taper helps the blade sail through anything with ease. This is exactly the reason why the full-size Military is a favorite among knife users the world over. You’ll notice the blade bites in and does so aggressively and it just takes off. Shoot, I have even used my Para 2 and Military in the kitchen to aid in food prep at times. The Para 2 makes for an effective paring knife. 

Paramilitary 2 open
An all-time classic, the Para 2 offers users an option fit to tackle most jobs.

Outside of the kitchen, the Para 2 slices through cardboard, plastic edging, styrofoam blocks, and even strips wire with ease. Spyderco’s cutting edges out of the box are nothing short of perfect. The Para 2 can be put to work immediately without modifications to the edge. S45VN’s durability is out of this world. You’ll benefit from the enhanced edge-holding capability of this steel by not having to sharpen as often. However, all this depends on your frequency of use and that can vary from person to person. 

The handle ergonomics are very comfortable. The Para 2 didn’t leave any hot spots of any kind and is pleasurable to wield during extended periods of use. 

Final Cut

I think you will find the Para 2 to be an excellent daily carry choice for you, if you are looking for a working folder that is also a super comfortable EDC knife. As for how much the Spyderco Paramilitary 2 will set you back, the MSRP starts at $265.00 for the black G-10 handle/satin-finished blade as tested here. There’s also a camo handle for the same price, and black DLC coated versions for a bit more at $285.

More Spyderco Knives:

D.I.Y. Power Hammer Parts: Scrapping Together Your Project

0

So, you’re going to build a power hammer… now’s the time to consider where to get your parts.

The first thing you’ll have to decide is which style of power hammer you will build. There are as many designs as there are folks who build hammers, but they fall into two basic categories: helve hammers and linkage hammers.

Power Hammer Styles

Linkage Hammer

At the basic level, a helve hammer has an arm that moves up and down on a fulcrum to move the hammer head up and down. A linkage hammer uses a wheel, tire or disk that rotates and uses the rotation to move the hammer head up and down. The Little Giant power hammer design uses a linkage, as does the commonly home-built tire hammer. 

Little Giant power hammer
The Little Giant power hammer design uses a linkage, as does the commonly home-built tire hammer. ABS master smith/BLADE® field editor Joe Szilaski pounds away with his 50-pound Little Giant. (Lori Szilaski image)

Helve Hammer

I chose to build an Appalachian-style spring helve hammer because I had access to a variety of leaf springs, and because the design is more intuitive and less mechanically precise. I figured correctly that I could build a helve hammer design from scratch, but that a tire hammer had some engineering points that would be difficult for me to figure out. If you have access to uniform steel sizes or must buy your steel, I suggest a tire hammer. I had good scrap steel and didn’t want to buy much. 

I’m focusing on the upright, heavier, more efficient metal-moving machines. Even so, it’s worth mentioning the smaller, simpler but less efficient helve hammers. I came across a good example in the shop of Shawn Moulenbelt, a Michigan bladesmith who was on season seven of Forged in Fire. His hammer used various sizes of hollow square tubing, a sledgehammer head and a half-horsepower motor. He used a slack belt clutch and interchangeable die plates. His hammer was built by Rusty Glovebox on YouTube and is a solid DIY (do-it-yourself) design.

Bladesmith Shawn Moulenbelt’s helve hammer
Bladesmith Shawn Moulenbelt’s helve hammer uses various sizes of hollow square tubing, a sledgehammer head and a half-horsepower motor. On the upside, these hammers are quick and fairly straightforward to build. On the downside, they’re not all that great at their one job: moving metal. Even so, a similar light use-DIY power hammer is much more efficient than your arm, and much less likely to get tired.

On the upside, helve hammers are quick and fairly straightforward to build. On the downside, they’re not all that great at their one job: moving metal. Even so, a similar light use-DIY power hammer is much more efficient than your arm, and much less likely to get tired. In my mind, if you have the time and skill to build a small hammer, you can just as easily build a bigger one. Even so, the small helve hammers may be just the ticket for your shop.

Power hammer anvil
The author’s home-built hammer combines a 5-inch piece of round stock with a heavy sleeve from a “mud pump” to make an anvil that weighs around 400 pounds.

Resourcing An Anvil

There are many different things that can make a suitable anvil for a power hammer and many more things that cannot. What you are looking for in an anvil is a solid piece of steel that weighs anywhere from 150 to 600-800 pounds, which can be difficult to acquire. 

Sometimes you can find solid square or round bar steel. Some folks recommend railroad axles. Others suggest forklift tines welded together. I’ve seen sections of a 2-inch square bar welded together into a solid 6×6. I’ve seen pieces of 1-inch plate welded where the hammer strikes the ends. Whatever you can find needs to be solid or able to be welded into a solid, single, massive piece, and your welder has to have the power to stick it all together. My hammer is built on a 32-inch piece of 5-inch round bar welded inside a mud pump sleeve that has a 5-inch bore. The total weight of my anvil is around 400 pounds.

What Not To Use

Don’t be tempted to think you can get a piece of something hollow like pipe or square tubing and fill it up and make a suitable anvil. Each stroke of your hammer pounds the steel in-between the hammer head and your anvil, pushing your anvil toward the ground. If you have any movement, vibration or give in your anvil, the force is absorbed by the movement and not efficiently transferred to your workpiece.

Anvil To Hammer Head Ratio

When you finally locate this difficult-to-find thing, it won’t likely be the size or shape you want. My anvil was round, which doesn’t easily weld to square tubing, for example. I had to deal with it. As noted, my anvil was around 400 pounds total weight. Yours may be more or less. You should design your hammer with a minimum 1:10 head-to-anvil ratio. Since I had a 400-pound anvil, I built a 40-pound head. If all you can find is a 200-pound hunk of steel for your anvil, you should stick to a 20-pound head or so. Design your hammer around your anvil, as the anvil is the hardest part to find. Alternatively, find the weight you need for the anvil and use the tire hammer plans.

Another consideration is the base for your hammer. I’d recommend the thickest steel plate you can find, mounted on the firmest foundation you can muster. If I could have built on 1-inch plate and bolted it to a 24-inch-deep concrete pad set into a concrete shop floor, I’d have done it. I had to make do with what I could find in my “free” scrapyard, and deal with the limitations of my shop setting. 

Power Hammer Center Post

For any hammer you need a center post. The post should be heavy enough to withstand the extreme forces involved in rocking a spring arm or linkage with a heavy hammer on one end. I used a piece of 4-inch tubing with half-inch walls. Others have used thinner-walled but larger cross-section square or rectangular tubing, heavy walled pipe or sections of I beam. The tire hammer plans call for a 6-foot-long piece of quarter-inch wall and 5-inch square tubing.

Final Cut

Power hammer base material
Another consideration is the base for your hammer. The author scored some 2-inch-thick, 30-inch-round, 300-pound base plates out of the “drop” pile at a local steel distributor, along with several other potential anvils.

My power hammer has become an essential tool in my shop, to the point that I sometimes wonder how I ever lived without it. I have only begun to explore its full potential. I built it for my appearance on Forged in Fire, where I was fortunate to make the final. I was able to come home and use my hammer to build my final edged piece for FIF. I lost the contest but ultimately still have a power hammer, and I can still take pride in the fact I built it myself from little more than a pile of junk. 

It may take you a few months to gather all the primary parts, or you may get lucky and find them all in one place. Next month’s article will focus on building considerations for a spring helve hammer, and later we’ll discuss the Clay Spencer DIY tire hammer.

Read More On Knife Steel:

2024 Knife Trends: Watchwords For The Coming Year

Chris Quinn of GP Knives is familiar with the ebb and flow of trends and styles in the knife industry and advises to approach the ’24 market with an appreciation of that ongoing phenomenon.

“The knife industry is quite the rollercoaster,” he related, “and what could be popular in the future is anybody’s guess and depends on a lot of things, but mostly the economy at the time. We are a disposable income industry. Over the past year, as inflation and interest rates continued to rise, our industry has had a noticeable slowdown. That said, items that continue to sell well are either hard to get, limited production and exclusive, or a good deal. I don’t see that changing anytime soon.”

Economical & Political Tides

Considering the economic influences and the fact that knife prices naturally rise in step with costs related to materials, production time, scarcity and maker branding, then keeping a keen eye on value is a watchword for the new year.

“2024 is an election year,” Quinn commented. “They are always tricky to navigate. Who’s next in office has a direct effect on the shooting and cutlery industries.”

With this influence, he looks forward to a couple of developing style aspects in the next year.

“The more fidgety the better,” he smiled. “A large percentage of knives aren’t used for more than fidget toys these days, or at least they need to function that way to impress the end user. Popular fidgety locks like Demko’s Shark Lock or WE Knife/CIVIVI’s SuperLock or Pro-Tech’s button lock are all the rage. The smoother and faster the opening and closing a folder can be the better. Traditional folders are hanging in there, but EDC is king. Also, the automatic category continues to grow as we see more and more states loosening their laws on ownership and carry.”

Summarizing, Quinn related, “I don’t have much in the way of predicting styles of knives and don’t see longstanding industry leaders lowering their prices soon, but I do see smaller makers getting more competitive to take the space the giants have abandoned.”

Check Out Our Buyer’s Guides:

In Memoriam Of Grant Hawk: 1941-2023

The award-winning knifemaker and designer passed at 82 after a life filled with adventure and craftsmanship.

Award-winning knifemaker and knife designer Grant Hawk of Hawk Knives passed away peacefully at his Idaho City, Idaho, residence on November 8. He was 82.

Born in Boise, Idaho, on Feb. 15, 1941, to Woodrow Allen “Kelly” Stroud and Dortha Bunce, Grant’s life was a remarkable journey of adventure, resilience and creativity. His early years were spent as a cowboy in Boise, where his connection with the outdoors and love for craftsmanship began. The 1960s saw Grant moving to California to make camper trailers, but he quickly became entangled in the revolutionary spirit of the era, leading to a brush with the law. This encounter prompted a pivotal decision in his life: to adopt a new identity and retreat to the Idaho mountains.

In his seclusion, living in a teepee, Grant’s interest in gold prospecting blossomed. This pursuit marked his gradual reintegration into society and laid the groundwork for his future endeavors. It was during this period of reflection and growth that he discovered his true calling in knifemaking.

Alongside his son, Gavin, Grant embarked on a remarkable journey in the world of craftsmanship. Together they forged a path in knifemaking, combining adventurous spirit with Grant’s innate skill and creativity. Their collaboration led to the creation of distinctive and innovative knife designs, earning acclaim in the knifemaking community.

His final accomplishment was completing his autobiography, which he delivered to the printer just two days before his passing. On the night of his death, he was in good spirits and feeling well, but unexpectedly fell ill and passed away gracefully within 15 minutes.

Grant’s life was a tapestry of diverse experiences, from cowboy to gold prospector, and finally to a revered knifemaker. His legacy lives on through his son Gavin and their shared creations, which continue to inspire and captivate knife enthusiasts around the world.

Grant’s story is a testament to the power of resilience, adaptation and the pursuit of passion. His memory will be cherished by his family, friends, and all who knew him as a man who carved his path, much like the knives he so skillfully crafted.

More About Custom Knives:

Kershaw Blur Review: Focusing On The EDC Classic

A mainstay in the company’s catalog, the Ken Onion-designed, USA-Made Kershaw Blur remains a clear EDC choice.

Kershaw’s Blur has been in the company’s line for several years and it continues to be a good seller for the company. You get it all with the Blur—a handsome look, useful blade shape, and made-in-the-USA toughness.

Devised by custom knifemaker Ken Onion, the Blur exhibits the hallmarks of Onion’s design with its recurve drop point blade and optimized handle shape promoting user comfort, as well as safety. Plus, you get a choice of several variations with the Blur. Each differs by blade steel and handle color, adding some style and flair to your daily carry arsenal.

Kershaw Blur Blade

The Blur’s blade measures 3.4-inches long and is made of Sandvik 14C28N stainless steel. For those seeking a higher-performance steel, Kershaw offers an upgraded S30V version. Though the base-model steel is no slouch, as 14C28N holds an edge well, yet resharpens fairly easily. The Blur’s blade has plenty of bite right out of the box, thanks to its hollow grind.

Kershaw Blur Blade
The Blur’s blade has plenty of bite right out of the box, thanks to its hollow grind. Photos Marty Stanfield

For deployment, the Blur uses ambidextrous thumb studs. These are custom-designed studs, with a unique slanted portion. This rake allows you to bump with your thumb and then back off immediately, so they won’t be in the way of opening.

Speed Safe System

Deployment speed doesn’t disappoint, thanks to Kershaw’s Speed Safe assisted opening technology. The Speed Safe system was developed by Ken Onion and serves as a way to quickly and effectively open a folding knife blade quickly with minimal user effort. Essentially, a torsion bar propels the blade open after the user initiates blade movement by pushing out on the thumb stud.

Kershaw Blur Handle

For those who appreciate a solid and comfortable grip (who doesn’t?) the Blur incorporates some interesting design elements.

Starting with the construction, Kershaw has opted for aluminum alloy, making the handle both lightweight and strong. The shape is also well thought out, offering an intriguing and aesthetically pleasing shape, that doesn’t compromise on comfort. It’s a good example of Onion’s profound understanding of knife ergonomics.

Blur Handle
A fluid shape, the Blur looks nice and fits the palm well. Photos Marty Stanfield

Furthering the usability, the Kershaw chamfers all the edges, ensuring there are no hotspots on the knife and textured rubber inlay inserts are a practical bonus, increasing grip traction tenfold with either wet or dry hands. Kershaw calls this material Trac Tech and it’s very similar to the self-adhesive grip tape you might find indoors in wet locations such as a swimming pool deck.

Interestingly, Trac Tech also helps with holding the knife to the pocket, making it a bit difficult to slide in and out. Depending on who you are and your particular activities, this can be a good thing or an annoyance. It is insurance from the knife falling out of your pocket, but it does slow retrieval time.

I like the use of Trac Tech on the blur simply because it gives the handle a more tactile feel to it.

Trac Tech in a Blur
Looking for more grip, Trac Tech inserts gives the Blur more bite. Photos Marty Stanfield

The general open build of the handle makes cleaning easy, especially when using compressed air or rinsing out under tap water. There is a pocket clip that helps to carry the Blur in the pocket and Kershaw gives you the option of either tip-up or tip-down carry but for right-hand carry only. Sorry lefties!

Final Cut

The Blur is a stylish EDC folding knife that doesn’t back down when there is tough work ahead. The recurve blade cuts very well, and its ample belly makes it an efficient slicer.

The hollow grind really thins the blade out nicely without making it too slender, and therefore it will cut through tougher materials with greater ease. It really excels at cardboard. I like this material for testing as it is a good standard because of its thickness and slight abrasiveness. Both aspects test the edge’s geometry.

Several Kershaw Blurs
Kershaw offers several colors and blade options, helping the Blur fit most folks style. Photos Marty Stanfield

The liner lock of the Blur is dialed in nicely, it hits the tang on the lower third of the width of the blade and allows for some wear as the lock breaks in. Yet, the lockup is very secure. The exposed portion of the lock bar that you contact to release the lock has traction notches on it so you can get a good grip on it. I thought was a nice extra touch on Kershaw’s part.

Overall, the only nit to pick is I wish the clip was designed to carry the Blur deeper in the pocket. Other than this, no real issues to speak of with the knife

When it comes time to purchase a Blue, this might be the hardest decision because of the variety of models. There are a ton of colorways for the handle—black, navy blue, and olive green. Additionally, Kershaw offers several blade options, including plain edge and partly serrated as well as stonewashed, blackwash and Cerakote black finishes. If that weren’t enough, you also have a choice of a tanto blade as well, if that’s more your speed. Heck, there’s even an option with a carbide glass breaker at the end of the handle.

Blur and cardboard
Still a classic after all these years, the Kershaw remains a solid EDC option. Photos Marty Stanfield

The Blur’s MSRP starts at $135 and goes up from there to as much as $185 depending on blade finishes. Overall, the knife presents an overall package—Onion design, high function, nice styling and plenty of options choices. What this adds up to, is an EDC option that should be welcome in anyone’s collection.

Read More About Kershaw:

Delight Valley Veggie Slicer Review: Roughing Up Roughage

Specially formulated to knock vegetables down to size, the Veggie Slicer has an edge in the kitchen.

Never judge a book by its cover. That holds true for knives, too.

When I opened the box containing the Veggie Slicer from Delight Valley Blades, I noticed it did not have a tip like most knives. Well, at least I wouldn’t stab myself. The knife has a full flat grind to sharp, with a very fine edge. It’s made for slicing and dicing, though you know I will do more with it than that.

Veggie Slicer In The Kitchen

Since hunting season was starting, I made a big pot of vegetable beef soup before heading to the woods. I used the Veggie Slicer to slice and dice the veggies. It powered through the carrots very quickly and diced up the celery cleanly. I did my thinnest slice of onion ever. I could easily see the layers of the san-mai through the wafer-thin onion. I chopped the rest of the onion in a flash. On to the potatoes!

Veggie Slicer through a potato
The author sliced the potato so thin with the Veggie Slicer you can see the layers of san-mai through it.

I was expecting more resistance from the spuds. Light pressure was all it took. The knife being so sharp, I had to take care to keep all finger parts away from the edge. The Veggie Slicer will peel the skin from your finger before you can say Veg-O-Matic—and I had a few close calls.

Veggie Slicer Light Cutting Duty

With everything in the pot cooking, I headed out to the garage to slice up the non-edibles. I grabbed a sheet of 20-pound bond copy paper for slicing. I managed to suffer only one nail nick in making the paper fall apart. The knife is nasty sharp for sure. The slices were smooth and I used only the weight of the blade on the pull cuts.

I jumped up to double-walled cardboard to try and slow the edge down. That didn’t work, either. The Veggie Slicer ate through the cardboard as fast as I could get my fingers out of the way. I used both push and pull cuts to see if there was a difference. There was none.

Delight Valley Veggie Slicer vs pine
Thin pine curlicues were the order of the day for the Veggie Slicer.

Heavy-Duty Cutting

It was on to whittling pine. The Veggie Slicer made very thin curlicues. I couldn’t choke up on the blade as the spine was cut at a 90-degree angle—too sharp for the insides of my fingers. As a result, control was a tad more difficult. The blade still cut deep and shallow without a challenge. It zipped into the pine quickly, still scary sharp.

It was time for some half-inch sisal rope. After the first 100 crunching cuts I let my guard down enough to take a nick out of my rope-holding finger. Thanks to all my callouses no blood was shed, but it was close. The second 100 went off without any dulling of the edge (or my finger).

I had to go one step further to see if the fine edge would hold up. I grabbed a whitetail deer antler and gave it 30 chops. The result: no edge damage whatsoever, a sign of perfect heat treatment.

Final Cut

The Veggie Slicer can slice, dice and a lot more if needed. It has one long-lasting edge.

Soup prep with Veggie Slicer by Delight Valley Blades.
The kitchen knife sliced and diced the veggies, powered through the carrots very quickly and diced up the celery cleanly. It’s soup!

I would soften the blade spine and choil and ricasso area so a wider selection of hand grips can be used.

Delight Valley Blades Veggie Slicer Specs
Blade length: 7.5”
Blade steels: 26C3 carbon core and 416 stainless cladding in a san-mai construction
Blade grind: Full flat
Blade width: 1.78”
Handle: Masur birch and carbon fiber
Pins and liners: G-10
Weight: 10.5 ozs.
Overall length: 12.25”
Maker’s price: $600

Read More Knife Reviews:

King Tut Dagger: The Rare Chance To Hold The Legend

1

A chance phone call out of the blue leads to the author’s opportunity to see and hold the iconic Warenski King Tut Dagger.

While in San Diego in summer 2015 for a work conference, I saw a flyer advertising a King Tut exhibit at the San Diego Museum of Natural History. The exhibit focused on recreating the experience of Howard Carter, the British archaeologist who found the lost tomb of Egyptian King Tutankhamun in 1922.

Chad Royer holds Buster Warenski’s reproduction of the King Tut Dagger.
The author holds Buster Warenski’s reproduction of the King Tut Dagger and sheath in the home of Phil and Judy Lobred. (image of Warenski’s Tut Dagger by SharpByCoop; image of the author by Phil Lobred)

The promotional materials advertising the exhibit indicated it would feature recreations of many of the artifacts found in the original tomb. Having been exposed to custom knives all my life through my father, Rick Royster, and being familiar with BLADE Magazine Cutlery Hall-Of-Fame® member Buster Warenski’s work, I wondered if Buster’s famous reproduction of the King Tut Dagger would be part of the exhibit.

I called the museum and asked the young lady who answered if Buster’s reproduction was in the exhibit. She said it was not, but my inquiry grabbed her attention. She didn’t go into much detail but alluded to the fact that the owner of the reproduction lived in the area. We hung up and I went about my trip not thinking anything else of it.

Later that day while visiting the San Diego Zoo I got a call from a strange number, and it was Cutlery Hall-Of-Famer Phil Lobred, owner of the King Tut Dagger reproduction. Apparently, the young lady from the zoo knew Phil and had reached out to him. Phil and I talked on the phone and I told him how my father had worked closely with Buster through the years on several custom pieces, and Phil invited me over to look at the knife. I told my girlfriend we had to hurry up at the zoo because I had somewhere more important to go.

Visiting The King Tut Dagger

I went to Phil’s house that evening. His wife, Judy, let me in and took me to him. We went upstairs to what must have been Phil’s corner of the house. Not only did he have dozens of knives, he also had tons of collectibles. What I remember most were the Eskimo artifacts. He knew what everything he had was and had a story to tell about how he got each one and what it was used for.

Phil Lobred sits by the King Tut Dagger
Phil Lobred sits by the King Tut Dagger reproduction and sheath in the presentation case, as well as the knife’s display cradle. On the wall at left are examples of the African art in his collection.

Then we got to the knives and finally the most extravagant of them all—the Warenski Tut Dagger. I couldn’t believe what I was seeing. It was a marvel to behold, a true masterpiece, something not many people in the world would ever have the opportunity to see up close. I was shocked when Phil asked if I wanted to hold it. He even photographed me holding it, the image of which appears with this story.

I must have been at Phil’s house several hours with him showing me all of his collectibles and talking about them. It was easy to lose track of time. He was a very nice man. It was very gracious of him to invite a total stranger to his house, and let me see and hold a one-of-a-kind piece of art.

It was a once in a lifetime experience.

More On Knife Collecting:

Advertisement

Must Read Articles

Read this before you make a knife

Knifemaking 101 – Read This Before You Make a Knife

  by Wayne Goddard My experience has taught me that there's nothing like digging in and getting started. I've often said the hardest part of the...
how to forge damascus steel

How to Forge Damascus

Advertisement
Advertisement