



Here’s a look at the classes offered by the American Bladesmith Society at the New England School of Metalwork.
Sub-Hilt Knives: Aesthetics And Aggression In Harmony
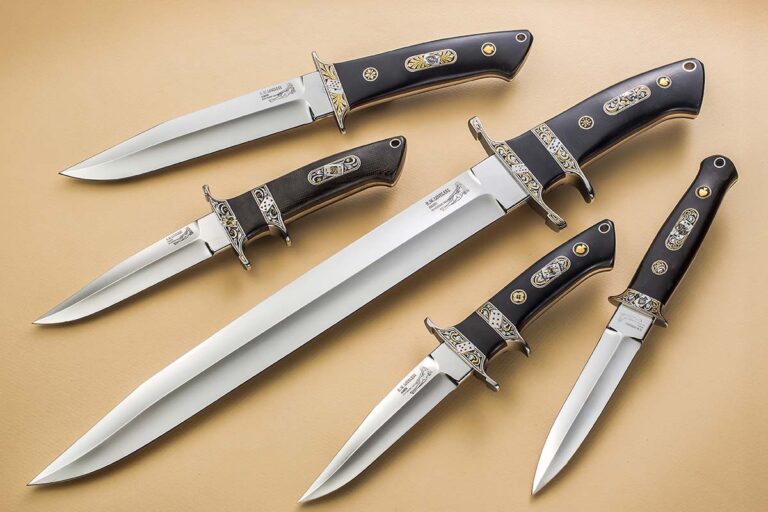
The sub-hilt is at once belligerent and beautiful, adding a strange allure to the knives that sport it.
There is no consensus as to the origin of the sub-hilt knife, though most agree the sub-hilt fighter was popularized by BLADE Magazine Cutlery Hall-of-Fame® member Bob Loveless in the 1970s, if not earlier. Some believe the sub-hilt design was for hunting, and that the main purpose for the added hilt was for greater leverage when a surer grip was needed. A few have even postulated the additional hilt was for use as a brace in pulling the knife out after being stabbed into bone or another hard material, a use that it would no doubt accommodate most effectively.
Gary Langley: Gentleman’s Fixed Blade
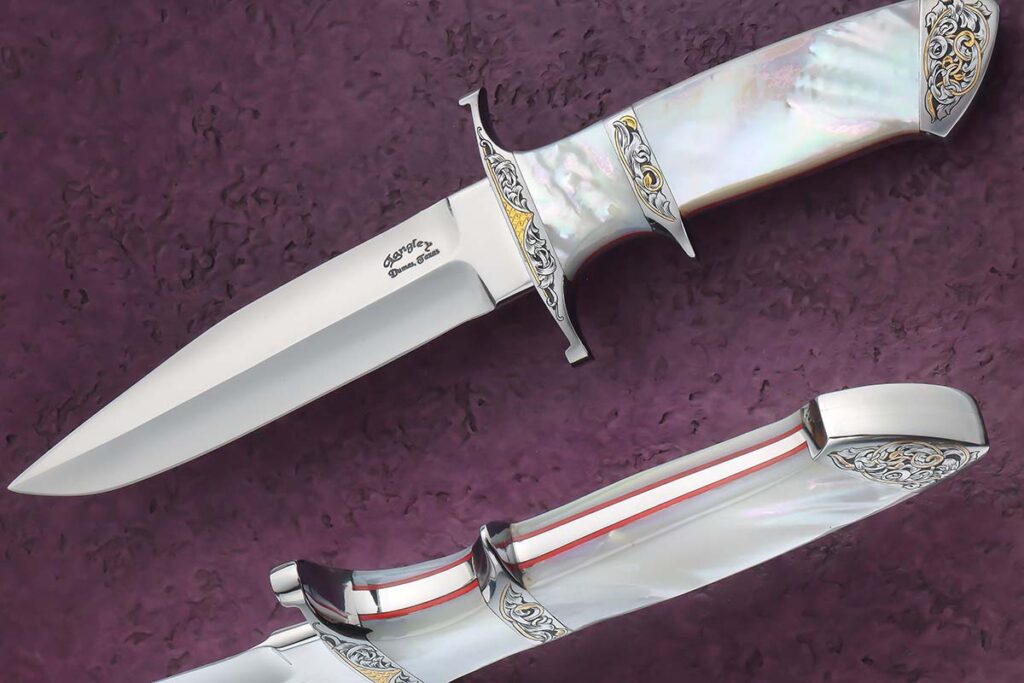
Many knife enthusiasts think of a sub-hilt fighter as being a heavier-edged companion—and in many cases it is—but custom knifemaker Gary Langley’s iteration is a little gem of a knife.
“The small Loveless-style sub-hilt fighter is 3/16-inch CPM 154 steel with a double hollow grind on a 3-inch wheel,” the Dumas, Texas, maker notes. “The heat treatment is by [Cutlery Hall-of-Famer] Paul Bos. I originally designed the knife without the rear bolster. I added it when I couldn’t source the mother-of-pearl scales long enough—and I believe it turned out even better.”
It has what might be called a 19th-century Michael Price San Francisco knife look that makes it a prime candidate for a true gentleman’s fixed blade.
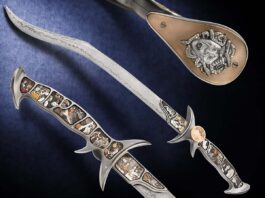
Andrew Blomfield: Sub-Hilt Bowie
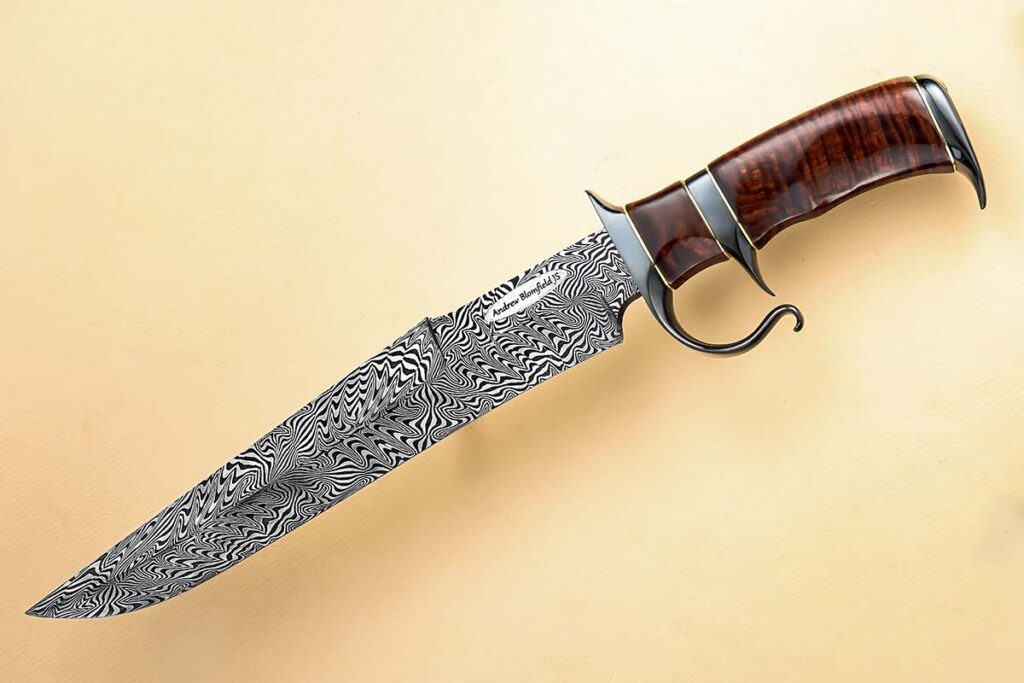
An ABS master smith from New South Wales, Australia, Andrew Blomfield enjoys building large knives such as bowies and daggers. “The bigger the knife the better,” he states. An example is his sub-hilt bowie.
“I feel that this knife has great flow and balance,” he begins. “The blade is an explosion mosaic pattern damascus hardened to 59 HRC. The guards and pommel are salt-blackened steel with brass spacers and the handle is a beautiful piece of Australian ringed gidgee.”
The guard’s bottom quillon curves back toward the sub-hilt to partially enclose the user’s hand a la a D-guard, but also has hints of both a C- and an S-guard to it. Very unusual!
Andrew Meers: Rose of Sharon
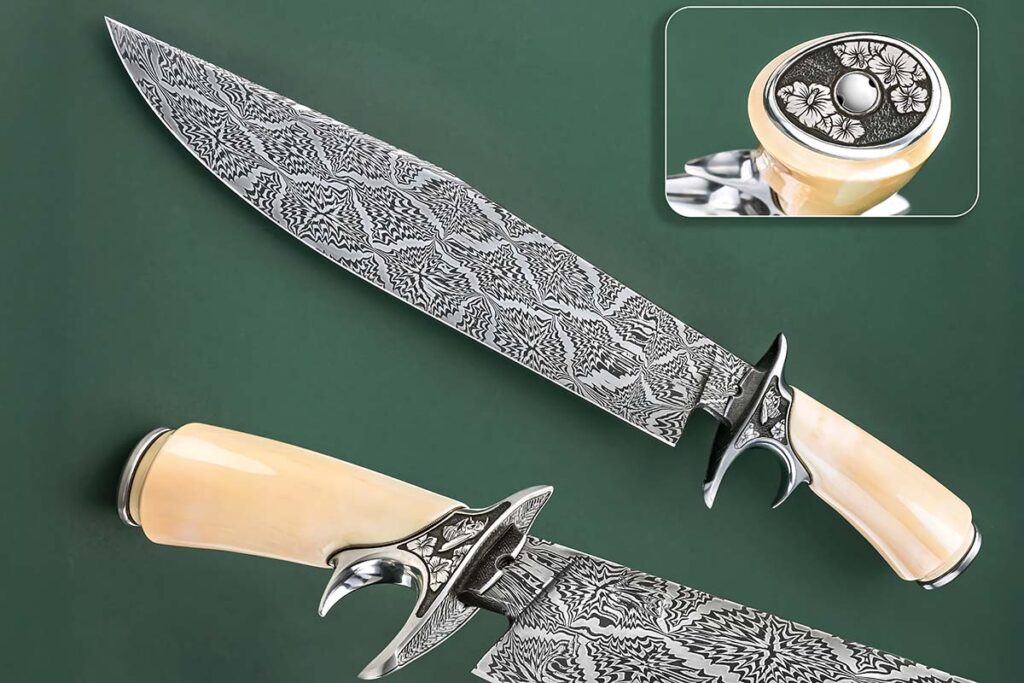
ABS master smith Andrew Meers of Raleigh, North Carolina, says, “I started with the sub-hilt in mind, which is a departure for me.” To say his deviation from the norm worked out well is an understatement.
“I like to incorporate Japanese influences wherever I can, and I wound up adding an integral habaki into the guard design as well,” he explains. “I wanted a blade that was able to feature a mosaic pattern, so I chose a broader shape that expands towards the point rather than tapers. The handle is a simple design to contrast the visual complexity of the guard.”
The engraving theme is of the Rose of Sharon and bees.
“The client had requested a floral theme, and we worked on the rest of the design and layout from there,” Andrew says. “The engraving was meant to complement the layout of the guard and furniture.”
Justin Harrington: A-Team
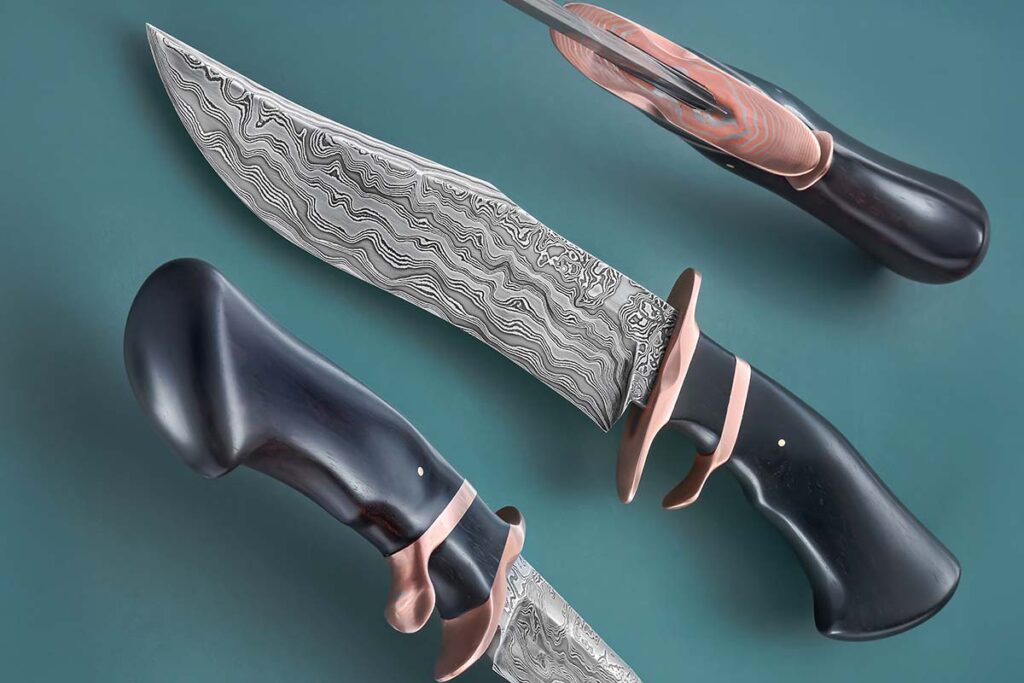
Justin Harrington of Clemmons, North Carolina, began smithing 18 years ago and is the owner of Cyclops Forge. Of the sub-hilt he says, “It’s the racecar of fighting knives—weight, balance, curvature, tip control and placement all are important variables to be employed to reach a harmony which is felt right away when correctly done.
“This knife started its life as a phone call from an Army A-team member who wanted a special combat retirement gift for his buddy. The three of us got together and forged a damascus billet for the knife over three days in my shop. The 8-inch recurve blade is a random-pattern damascus of 1084 and 15N20 carbon steels. The guard and sub-hilt are made from a copper-and-nickel mokumé gané I make in my shop. The handle is around 5 inches of sculpted African blackwood with a bronze pin.”
The sub-hilt has a forward lean and spoon-cupped quillon that slants toward the guard to capture the user’s index finger. The result is a handle that seems to want to grab your hand.
Cool & Sexy
Whether fighter, bowie or what have you, the sub-hilt-knife genre may be more recognizably custom than any other. From the classic Loveless Big Bear fighter to the wide array of today’s renditions, top sub-hilts are cool, sexy and in harmony with the best custom knives extant.
Read More:
- Allure Of The Subhilt
- Randall Knives Of The 422nd Night Fighters Squadron
- Fighters: The Sexiest, High-End Custom Fighter Knives
- Cool Customs: Edmund Davidson’s Fighter 116th Regiment
Hot Bluing Video
Hot bluing process
Spectacles In Steel: A Look At Definitive Damascus Patterns
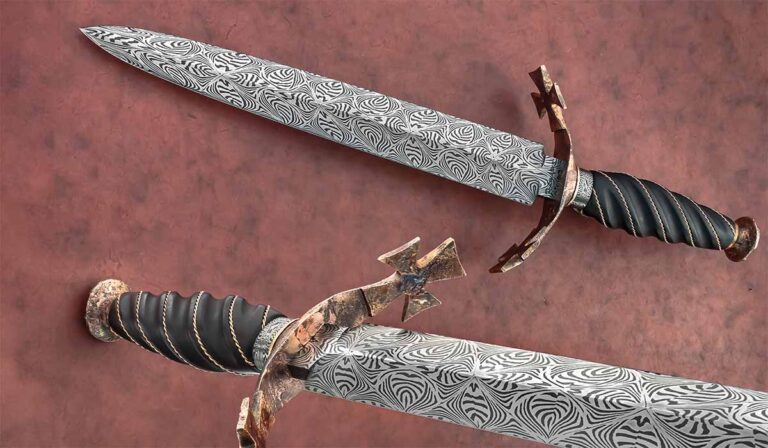
Modern makers’ takes on this age-old steel art.
When BLADE Magazine Cutlery Hall-Of-Fame® member Bill Moran reintroduced knives with damascus blades at the 1973 Knifemakers’ Guild Show, little did he know how much damascus would evolve, redefine itself, expand into new media, and no telling what other recreations and rebirthings it has experienced in the half-century since that fateful weekend in the Muehlebach Hotel in downtown Kansas City.
On this page are some of today’s reincarnations of the material in its various forms, methods, materials and more. What’s staggering to consider is there are so many more variations—not only now but also to come. It is a phenomenon that is truly unique to the custom knife industry and should be celebrated and promoted whenever possible.
David Lisch Templars Mosaic
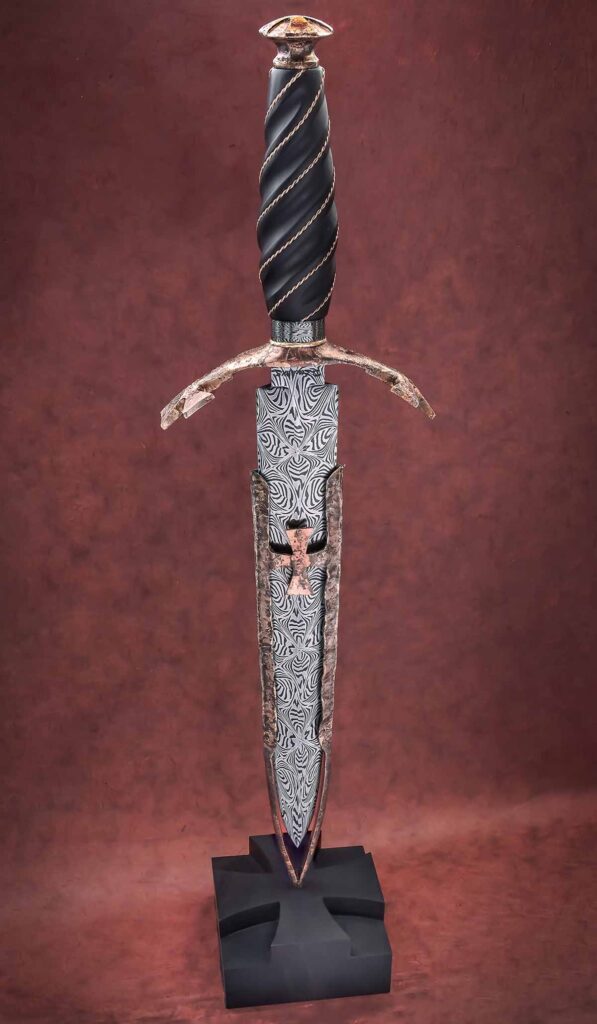
Sporting a pattern ABS master smith David Lisch christened Templars Mosaic, the blade for his dagger is one he forged from 15N20 nickel-alloy and 1080 carbon steels and etched in ferric chloride.
“I was aiming for a bold, bright pattern that had a cross-like shape but wanted it to be a bit organic,” he wrote. The Templars’ cross also is represented on the guard and the finial, and there is one on the stand that holds the knife as well. “All these parts are pure iron covered in melted gold,” he noted. The dagger also has a domed gold spacer between the guard and Dragon Thunder damascus spacer that the fluted-blackwood-with-gold-wire-inlay handle butts up against.
“I made this dagger out of the love I have for creating art with no concern about how long it took or how much money I would make from it,” David stressed. “I did the handle twice and I did the big finial twice. I sold the piece for $10,000 and will not be making another one like this. You can be sure that the love I have for creating will take me to a new dagger, sword or bowie knife that tries to fill the void in me that can only be filled by creating art.”
Jeremy Yelle Jellyroll Mosaic Turkish Twist
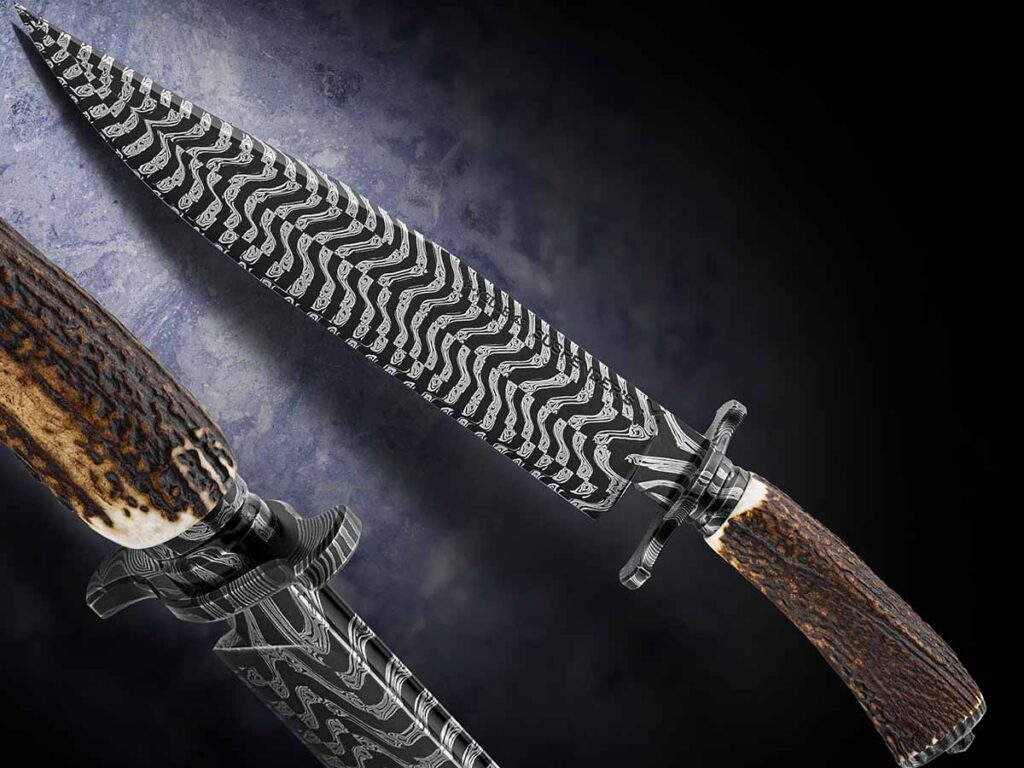
The blade damascus of ABS journeyman smith Jeremy Yelle’s and SBK Cutlery’s stag bowie is a positively electric jellyroll mosaic Turkish twist pattern Jeremy forged in a collaboration with his friend Alex Houle of SBK. Alex forged the collaborative damascus into a blade and Jeremy made the handle.
“We began by welding a billet of alternate layers,” Jeremy wrote of the forging process. The pair drew the billet into a bar and jelly rolled it. “Then we squared it up and welded a four-way incorporating some 1-inch-square 1080,” he continued. They welded the billet, drew it out to ¾-inch square, cut and twisted it, and made a Turkish-twist stack that Alex forged into a blade. “You can also see the ‘fish mouth*’ weld Alex did so the edge bar and the spine meet properly,” Jeremy wrote. “He did a wonderful job making the blade.” Jeremy showed Alex how to work with stag and they finished the parts. Alex revealed the beautiful pattern via a two-step etching process using a solution of ferric chloride and finishing the etch with a coffee-darkening soak and hot wax finish.
Zane Dvorak Multi-Bar
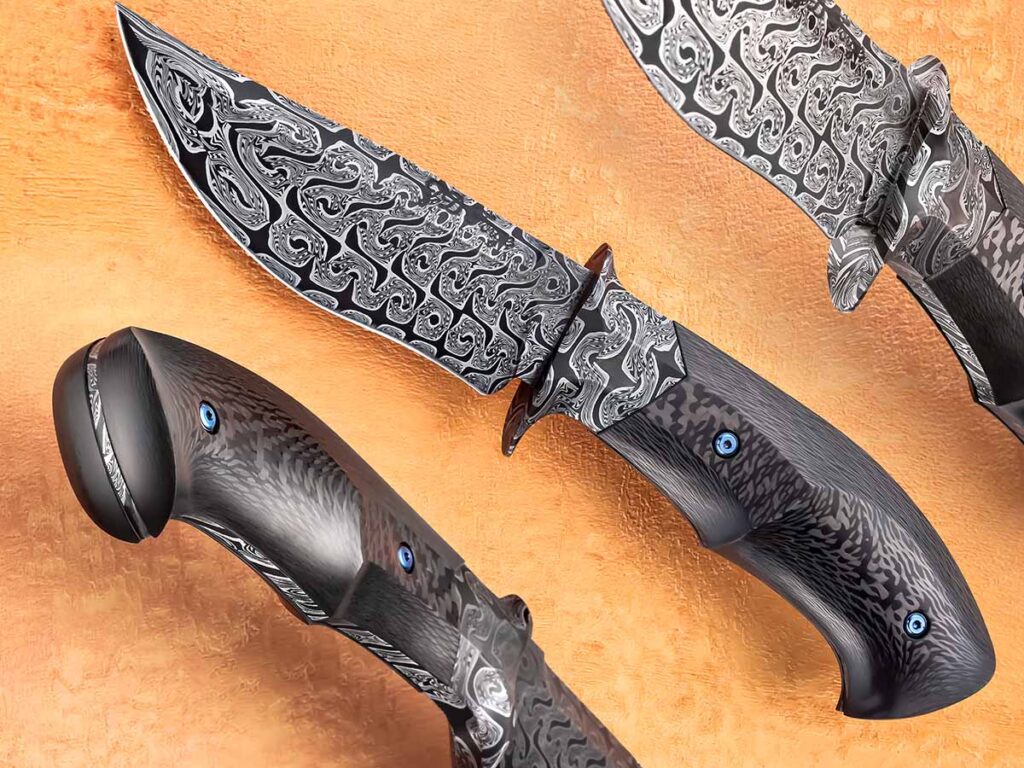
The blade of Zane Dvorak’s hunter is a multi-bar damascus of 1084 carbon and 15N20 nickel-alloy steels. Zane forged the blade/tang of four twisted bars of a twisted-bar pattern, and forged welded the guards and bolsters on with the same pattern. He bird’s mouthed the blade tip and rewelded it back together to create flowing outer bars. For etchant he used Gator Piss Acid from Baker Forge & Tool.
Bird’s mouthing is a process done on multi-bar, mosaic or other types of damascus patterns. According to Zane, it involves cutting a triangle out of the end of the rectangular parent bar—the shape of which somewhat resembles a bird’s mouth—then bringing the steel of the edge and spine back together to form the point of the blade. By doing so the blade exhibits a better consistency and overall flow of the pattern.
Andrew Blomfield Alternate Pattern
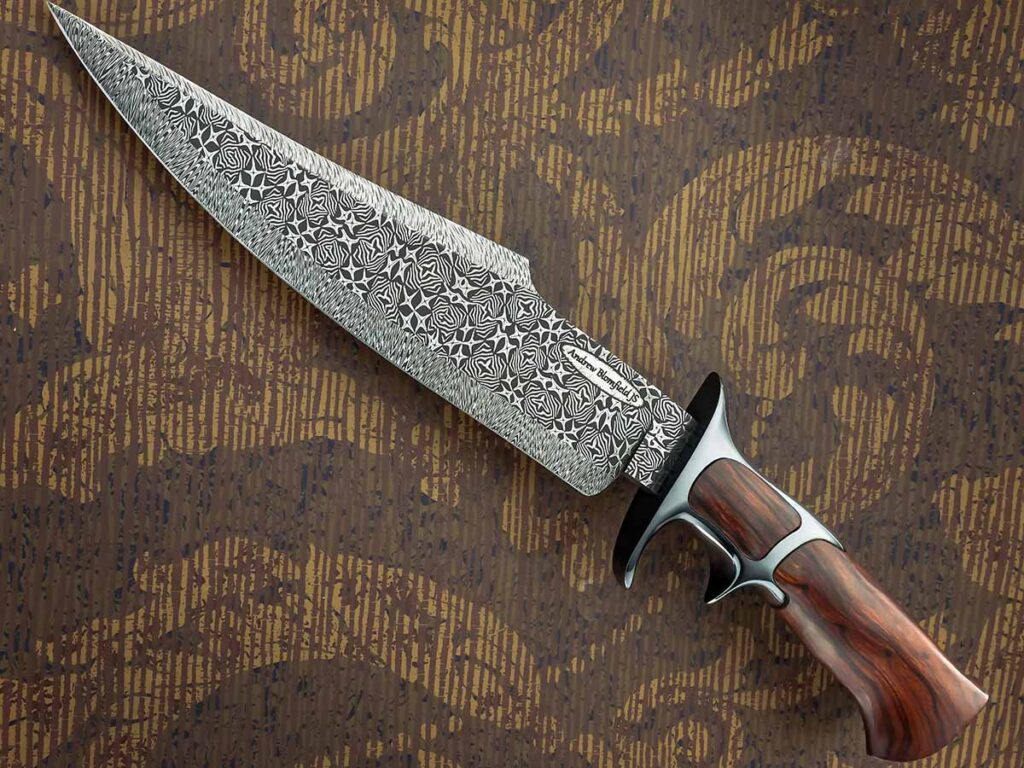
The material mid-blade of Andrew Blomfield’s sub-hilt fighter is a combination of two separate billets of mosaic damascus welded in an alternate pattern. The edge is a straight feather pattern forge welded around the edge. The blade is a combination of pieces from three separate billets. The steels are 1084 carbon and 15N20 nickel alloy etched with ferric chloride.
The integral sub-hilt is 1020 low-carbon steel hot salt blued to a deep black finish. The handle is desert ironwood. The knife is of a full takedown construction.
Frank Edwards Palm Leaf Mosaic Pattern
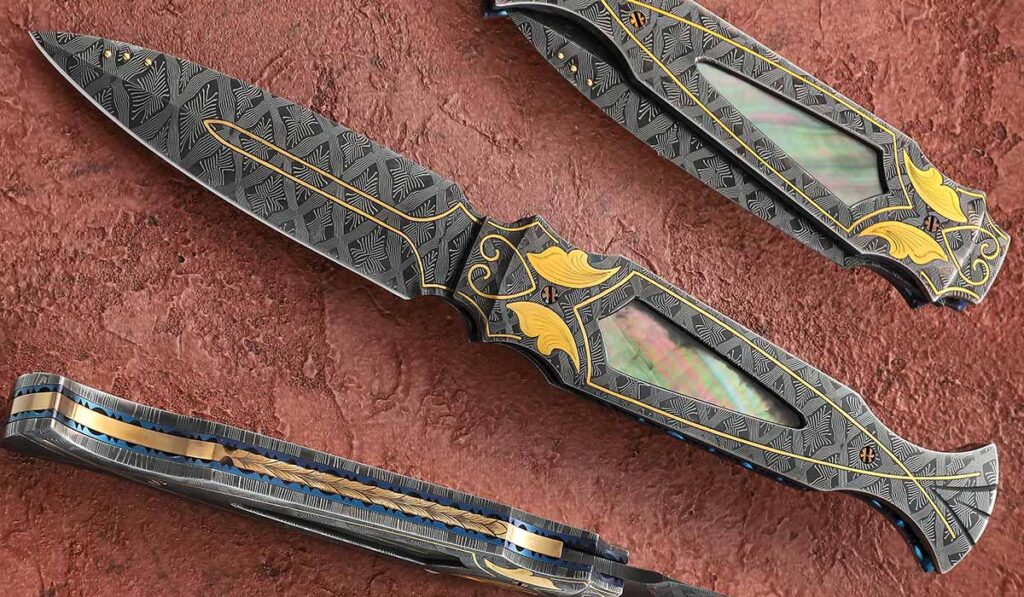
The multi-bar damascus of Frank Edwards’s folding dagger blade is in a Palm Leaf mosaic pattern. Starting with a billet of straight lines, he reduced it all into a square and then biased the squares, four-waying the billet into a 1.5-inch square.
As Frank explained his recipe, “Forge weld another billet of straight lines, keeping them straight as possible to .5 inch by 1.5 inches. Add that to the previous billet and forge weld and reduce to a 1×1-inch square. Then four-way it again. This will give you the frame around the palm leaves. Keep repeating that until you achieve the size of pattern for the knife you’re building.
“The key to getting good mosaics is a slower reduction [of the steel]. We have presses and power hammers that help but they can move too much metal too fast, which will destroy a mosaic in a hurry. The slower reduction allows the billet to stay uniform throughout the length of the bar.”
To expose the pattern he etched the blade with a four-to-one mixture of water/ferric chloride in 10-minute cycles, using 2,000-grit sandpaper between cycles.
Jackson Rumble Stunning Pattern
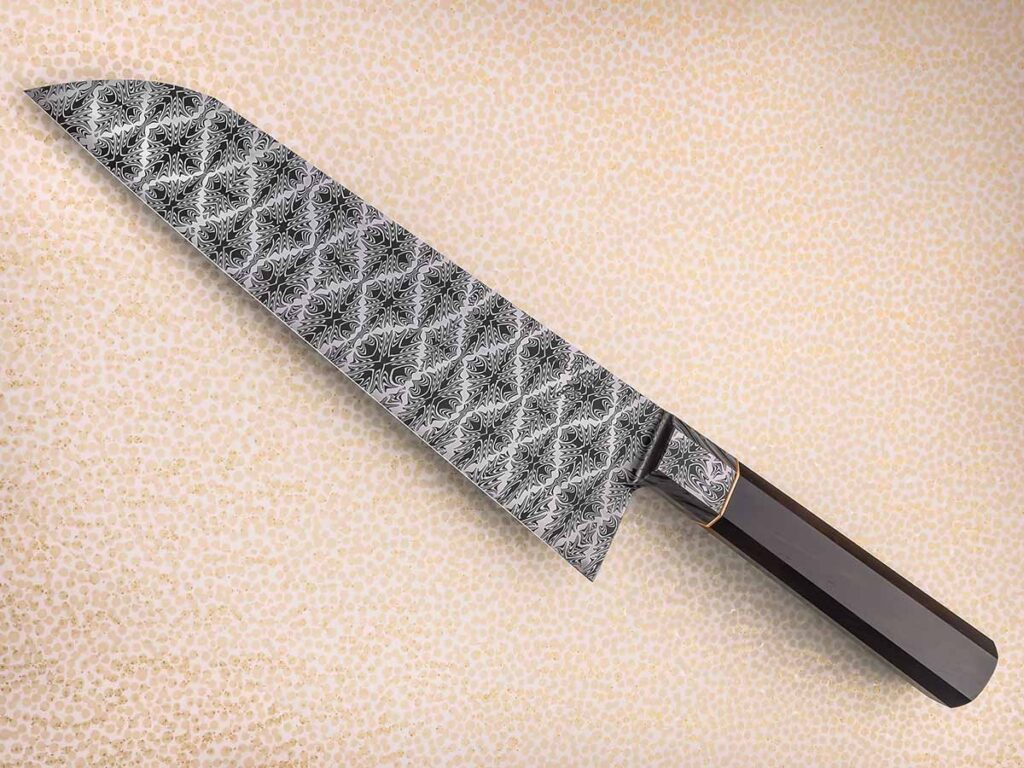
The technique for the stunning pattern on newly named ABS master smith Jackson Rumble’s chef’s knife is what he calls a “pretty standard process” of four-way welding and re-square cycles. Not bad for “pretty standard,” eh (page 28, top left)? The initial stack has large sections of both light and dark steels interspersed through the alternating layers, and Jackson added extra-light steel to the billet in the later stages of the forging process.
“Finally, I used the Filicietti Flip method to transfer the pattern to the face of the billet,” he wrote. “For the etching process I used ferric chloride followed by coffee.”
OK, Jackson, so what’s the “Filicietti Flip method”?
“I’ve heard the Filicietti Flip called other names like the Ferry Flip, or just tile welding,” he explained. “Basically, after you’ve finished building the pattern in the end grain of the billet, you take it to a bandsaw and cut slices off the end at a 35-degree angle. This makes a bunch of pieces in the shape of parallelograms or tiles. The tiles can then be rotated and forge welded back together to form a new billet. Instead of having the pattern showing on the end of the billet, the pattern will repeat itself along the face of the billet.”
We’re glad we asked.
*Also called fish lips, fish mouth is when the tip of the billet begins to curl up on either side during rough forging to resemble a fish’s mouth or lips, thus the name. It is an easy fix for knowledgeable bladesmiths such as Alex Houle.
Check Out More Cool Custom Knives:
Hall-Of-Frame Handles
Frame Handles Remain Just As Useful In Making A Knife Today As It Was Centuries Ago.
Frame handle construction for knives has been around for centuries. Historical examples of many Eastern styles like the kard, khyber and yataghan often feature ornamented frame handles. Nineteenth-century knives attributed to James Black and some of the early American bowies also had frame handle construction. Though it’s been around a long time, the frame handle remains a viable modern construction method for today’s custom knifemakers.
There are many ways to crack the nut/skin the cat on frame handle construction. This article will walk through the frame handle process and point out particular problems and potential solutions for those who wish to pursue building a frame handled knife.
Why You Should Build A Frame Handle
Frame handle construction is best defined as using a wrap-around “frame” to conceal the tang of a hidden tang knife. The first question many people ask regarding a frame handle construction is, “Why would you want to do it that way?”
My first thought goes back to the earlier days of the internet when forums were at their peak, and fine makers like ABS master smith Bruce Bump took the time to document “work in progress” (WIP) threads. Bruce had a fine frame handle WIP on the KnifeDogs.com forum in 2013, and the consensus at the time was that you build a frame handle for quite a few reasons, though the first one is “because you can!”

A frame handle is a much more complex build process than your standard full- or stick-tang knife. However, in addition to the show of skill by the maker, frame handle construction has a few distinct advantages that make the complexity worth the effort:
1. A frame handle allows for the look of a full tang, but with the guard-fitting techniques of a stick tang. For a forged stick-tang-knife design that needs a guard, a frame handle allows the use of full-tang-style handle construction;
2. A frame handle is a good way to use scales or slabs on a stick-tang knife. If you have a good set of stag or mammoth slabs, or if you have stabilized wood slabs that might be too fragile for through-tang construction, the frame handle allows you to use the materials on a stick-tang knife; and;
3. The use of a frame handle gives the maker another area to embellish the knife. Some frames are great for engraving, while others may highlight a damascus pattern. Either way, the frame makes the embellishment stand out in ways that are harder to accomplish on a full-tang knife.
How To Build A Frame Handle
At a basic level, the frame of a frame handle is a piece of material, usually metal, that wraps around a stick tang and mimics the look of a full-tang knife. This presents some challenges that have resulted in a few different creative solutions.
•Challenge 1: The tang must fit inside the frame. Some makers insist on precision so there are no gaps and the fit is tight. Others concede that the handle will be held together with mechanical fasteners and sealed with epoxy, so a precise fit between the frame and the tang is not necessary.
•Challenge 2: All parts of the handle must be securely fastened together. I sat through a class with ABS master smith Mike Williams in which he admonished the students, “Don’t trust in the magic of chemistry” by putting your faith only in the strength of glue. Likewise, veteran bladesmith Jerry Fisk challenges makers to think ahead to what their knives might be like in 100 or 1,000 years, and recommends a mechanical connection that won’t fail over time.
One way to address this challenge is to use pins. If you pin the scales to the frame, pin the completed handle assembly to the tang and follow up with glue, there’s no opportunity for failure. Some choose to make all the pins visible as an artistic element, while others take advantage of hidden pins for all but the one through the tang. Another way is to use a threaded fastener.
Bladesmith Salem Straub recently illustrated the technique on a frame handle WIP on his Instagram feed. Salem used a threaded fastener in an internal slot in the frame to mechanically lock all the parts together tightly. The handle material is relieved on the inside to accommodate the fastener.
Another way to use a threaded connection is to thread the end of the tang and use a fastener on the handle butt. An advantage of this approach is that the fastener itself can become part of the embellishment.
•Challenge 3 is the complex fit-up between all of the knife’s elements. Frame handle construction naturally doesn’t excuse a poor guard fit, but it also provides other places for gaps and misalignment. Once again, there are several potential solutions to alignment problems.
One is the use of alignment pins to make sure everything is secure. Pins on the end of the frame go through any spacers and into holes in the back of the guard so that each part indexes the same during assembly. Some makers, including Bruce Bump in the aforementioned epic WIP, advocate for leaving metal tabs on the end of the frame and fitting the tabs into similar holes on the back of the guard
. In both cases, there’s a mechanical connection that prevents the guard, spacers and frame from rotating out of alignment around the center axis of the handle. Either way, when you build a frame handle, the construction will require you to assemble and disassemble the knife repeatedly, so you’ll need some mechanical way to keep things lined up.
Another fit-up challenge is the overall requirement for clean-fitting joints with no gaps. It sounds simpler than it is, but two surfaces that are dead flat will join together without a gap. The challenge of a multi-piece frame handle with a guard and a few spacers is that you are creating a multitude of surface joints, and every single surface must be dead flat.
At a minimum, you’ll have a joint between the guard and frame, and also between the frame sides and the handle material. Any bump or wiggle on any surface and you’ll have a gap in the final product. Flatness comes in degrees. You can get a fairly flat surface on a platen, flatter on a disk, and still flatter on a surface plate or surface grinder. You have to make the joints as flat as you can with the tools you have available if you want a gap-free fit.
I tend to prefer the look of a tapered tang on a full-tang knife, so I’ve started tapering the frame of my frame handles as well. Others stick with a full thickness frame, where the thickness closely matches that of the blade at the ricasso. Some add spacers between the tang and handle material, while others choose to go with the frame and handle slabs only.

Another fit challenge is presented by the frame itself. In order to adequately finish the visible surface of the frame, whether by simple polishing, bluing or etching, or by engraving, the frame must be 100 percent at final-grit finish prior to final glue up.
Many makers learned to make a full-tang knife by finishing the front edge of the scales, gluing the knife together, shaping the scales down to the exposed tang, and then polishing the handle and the tang at the same time. That method will not work for a frame handle that needs to be blued or etched. Personally, I tend to use dummy pins to fit the entire handle assembly together, then grind the scales down to the frame. In his recent Instagram example, Salem Straub used small screws to hold the handle material to the frame.
With regard to the relationship between the handle material and the frame itself, some choose to leave the material slightly proud of the frame for a “museum” or “heirloom” fit. Others prefer the material to fit flush to the tang. Less commonly, some makers round the frame and leave it slightly proud of the material. Whichever you choose, it is important that the fit be maintained consistently all the way around the frame, from the joint at the guard on the top all the way down to the joint at the guard on the bottom.
Once the profile is set, I polish the handle and the frame together down to final grit, and then apply any surface finish to the frame itself. Once all parts are 100 percent complete, they can be glued together as a final step.
When To Make A Frame Handle
So when should you try making a frame handle? In my mind, if you can make clean full- and stick-tang knives, you could be up to the challenge. If you have slabs of exceptional handle material that deserve more than a simple full-tang knife, a frame handle is a way to step up and put the materials on full display. If you have a knife in mind where the frame and guard need to be blued, damascus or engraved, a frame handle is the way to go.
A frame handle knife has its advantages, but the complexity of the construction presents plenty of challenges. As a skilled maker, you may choose to rise to the challenge of a frame handle just to show that you can.
Ron Lake’s Tab Lock: The Clever Lever

When Blade Magazine Cutlery Hall-Of-Fame© member Ron Lake devised the interframe design and gave the world of knives another standard of innovation and excellence, he continued to look for ways to improve the operation of a standard lockback mechanism. He was not satisfied with pushing a bar to release the lock, particularly with one hand occupied or involved in some type of activity that demanded his full attention.
The solution was fairly simple and came along in the early 1970s, just a few months after the historic debut of the interframe. Ron added a small steel tab at the end of the knife, offering the user a quicker and safer alternative to depressing a bar.
“The tab lock is really not a lock mechanism,” Lake explained. “It is just a tab on the end of a lockback that offers a mechanical advantage. If it isn’t there, I just have a bar to release the lock, and depressing that bar can be hard to do when the hands are soft, cold or wet. The tab gives you a larger surface to push on.”
Ron admits that the tab lock was something of an afterthought, trailing along behind the notion of the interframe. Sometimes the good idea can indeed be made better. As a young knifemaker, he continued to mull over the prospects for a better release.
“I had only been making knives for six years,” he laughed. “I didn’t even know another knifemaker and didn’t know what knives were supposed to look like. I came up with the interframe design and then thought about where I could put a release mechanism. I still make interframes and that’s about all I do make, and they are with the tab.”
While it may look like a simple endeavor, the fashioning of the tab lock is not for the knifemaker who wants to take a shortcut or go down the path of least resistance. Of course, the tab-lock style is not seen in great numbers among today’s knives, and Ron says there is a straightforward explanation for that. It just is not the easiest thing to do.
“I can make them now with less effort than it took back then,” he advised, “but first of all I have to machine a piece of metal that goes on the end. Then I have to silver solder it on, and it’s a rough piece of metal with everything large on it. Then I remove the silver solder so you can see a nice radius, machine the sides to the right dimension and radius the corners.
“From there, I hand sand the surfaces and polish them up. So, it takes several more hours of work than a standard knife, and about 15-to-20 percent of my time goes into that part of the knife. I also have to take the whole knife apart and put it together again two more times, which I don’t have to do on some other models. For a few years, A.G. Russell just thought I butted it up against the end of the lock and soldered it on, but that could get knocked off easily. Later, I explained the process to him, and I can tell you the tab is on there pretty tight, pressed on and silver soldered.”
Tab Release
Some years ago when Ron, along with Wayne Clay and Cutlery Hall-Of-Famer Frank Centofante, co-wrote How To Make Folding Knives, he discussed the geometry of the lockback knife. He remembers visiting Sakai Cutlery in Seki City, Japan, and sitting in the company’s offices, which incidentally included a log cabin from Montana that had been dismantled and reconstructed. The men from Sakai had eight lockback knives laid out in the office, and the geometry between the pivot and the lock was different on each one.
“I asked them who had designed those knives,” Lake smiled, “and they said, ‘We did.’ I asked them why the geometry was different on every one of them, and they told me it was because the toolmaker had made them the way he wanted to do it. To my knowledge nobody had put the geometry of the lockback down on paper until I did. Innovation comes from one-man shops.”
That innovation carried over to the construction of the tab lock, which Ron more aptly describes as a “tab release.” The tab lock actually does lock like any other lockback. The secret to its operation is in the release.
Long-time friend and fellow knifemaking legend and Cutlery Hall-Of-Famer Michael Walker says he agrees that the idea seems simple enough and makes a great impact on the user when it comes to ease of release. “I can say that the tab lock addresses a big problem with the lockback design by adding length, which in turn adds leverage,” he explained, “and the tabs let you unlock without the problem of pushing on a narrow piece of metal. It also eliminates the cutout [in the handle spine], which could restrict use for someone with larger hands. It’s much more functional than the traditional construction, hence he was awarded a patent.”
Lake says he believes his patent was awarded about 1973 and expired around 1994. It not only included the tab, but also extended to the interframe and the bushing inside the handle that spaced the blade away from the frame. Indeed, the tab was part of a larger patent and an afterthought that developed into a novel approach when his inventive mind pondered the question of an efficient and effective release.
“I decided that having the tab at the back of the knife would have a mechanical advantage,” Ron reasoned. “You can close it not only with the thumb but anything else that could be used to press the release. It doesn’t make any difference how long the lever is. It could be in the middle of the handle with the tab on it.”
As for the patent, Ron says he doesn’t worry too much about it. “Centofante put [the tab lock] on his knives, and we were friends,” he remembered. “Some other folks have used it, too. Centofante put his tab on one side of the lock, and the patent specified at the end of the lock lever.” Along with Clay’s lockback, Lake’s and Centofante’s versions of the tab lock both appear on the cover of How To Make Folding Knives.
Over time, Ron says the patent has become even less meaningful to him. The drawings or blueprints are long forgotten—probably shoved into a drawer somewhere in his shop. The concept of trade dress is enough for him. A form of intellectual property, trade dress refers to the look or characteristics of an artist’s work that provide the work’s instant recognition to the consumer.
“After you do something for so long, it does establish trade dress,” Lake commented. “For example, if you saw a lockback lying on a table with a tab on it, would you know who made it? Yes, you would know that knife is mine. That is trade dress.”
Of course, the tab lock made an impression 40 years ago when a young Ron Lake showed it off to a who’s who from the golden age of custom knifemaking. Among those present when the tab lock debuted were Corbet Sigman, Chubby Hueske, Cutlery Hall-Of-Famers Frank Centofante, A.G. Russell, B.R. Hughes and Bob Loveless, and a number of others. Since then, the tab lock has been a quiet trademark of Lake’s knifemaking skill, standing the test of time.—By Mike Haskew
To read similar stories and all about the latest knives, knife news and much more subscribe to BLADE®. For more information, click on http://www.shopblade.com/product/blade-magazine-one-year-subscription-us/?r+ssfb21211#BL1SU
CAPTION
Blade Magazine Cutlery Hall-Of-Fame© member Ron Lake and one of his tab-lock interframe folders in a stag handle and leaf-and-hands engraving—some in gold—on the blade bolsters and even the tab itself by Barry Lee Hands. (SharpByCoop.com photo)
Blade Grinds: A Down And Dirty Guide
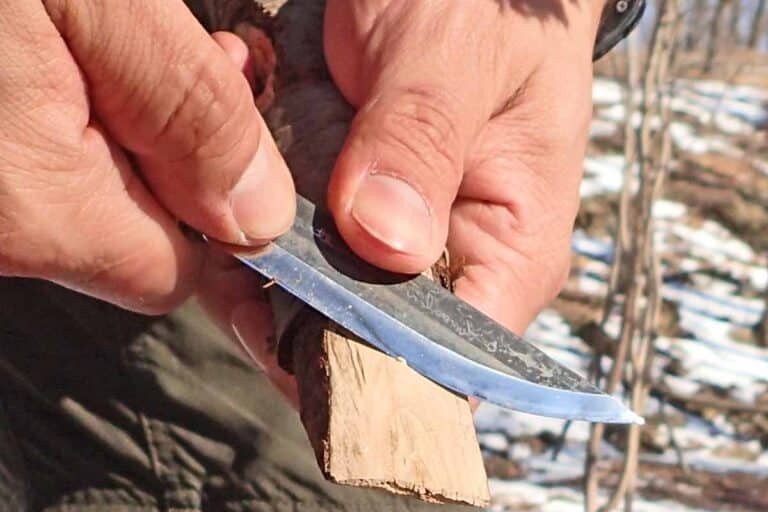
Knife edges come in all different styles. We break down the major types in this quick guide to blade grinds.
Cutting performance is greatly influenced by the way in which the maker grinds the knife. Each grind will have different cutting characteristics. A good knifemaker will consider whether the grind of the knife is suited to the chosen task. You as a buyer will also need to consider if the grind of a knife will suit the tasks you have in mind.
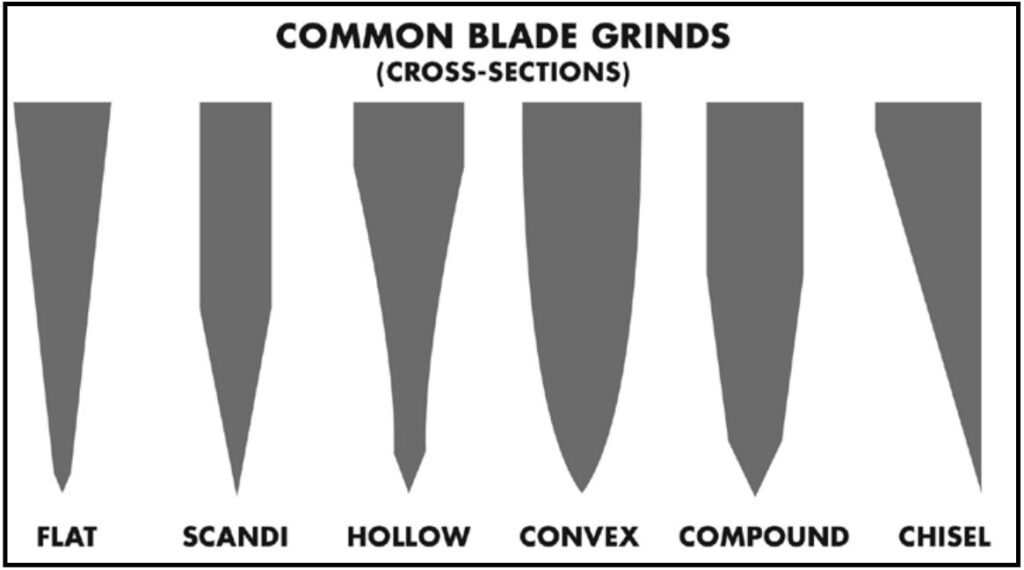
Flat Grind
A flat-ground knife is a simple wedge and may be thick or thin. Flat grinds are good for slicing and deep cuts. I personally prefer a flat grind that goes all the way to the spine. A thinner flat grind will cut more smoothly than a thicker flat grind, where a thicker grind may be more durable.
Hollow Grind
A hollow-ground knife has a slightly concave bevel, which makes it thinner behind the cutting edge. This makes for good skinning and shallow cut work, without giving up overall blade heft or durability. Deep cuts or chopping are not well suited to a hollow grind.
Convex Grind
Convex grinds have slightly rounded bevels, which increases their edge stability. While they may not excel at slicing, they’re the way to go for hard use cutting and chopping.
Scandi Grind
Scandi grinds are a short flat grind with no secondary bevel. “Scandi” refers to the Scandinavian countries where that grind style is popular, especially Finland. This grind style cuts very well but can be difficult to sharpen properly.
Compound Grind
A compound grind may combine several of the basic grind shapes. Particularly on tactical and folding knives, many modern grinds are aesthetically interesting, but at the occasional sacrifice of performance. If you’re collecting for aesthetic reasons, however, these grinds could be all you ever wanted out of a knife.
More Knife Basics:
Must Read Articles

Knifemaking 101 – Read This Before You Make a Knife
by Wayne Goddard
My experience has taught me that there's nothing like digging in and getting started. I've often said the hardest part of the...




