
Knifemaking

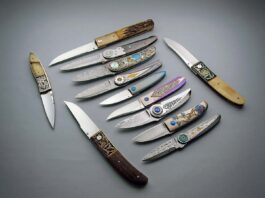
Knifemaking is the building of a knife, which includes the blade, handle and other accouterments. Blades are made by either removing metal from a steel blank via a grinder – known as stock removal – and the forging to shape of hot steel into a blade in the process known as bladesmithing. Other parts, including bolsters, guards, pommels, etc., are needed to complete the finished knife.

Featured Knives – – Knife Collecting – – Tactical Knives – – Survival Knives

How The Pros Coat Their Knife Blades

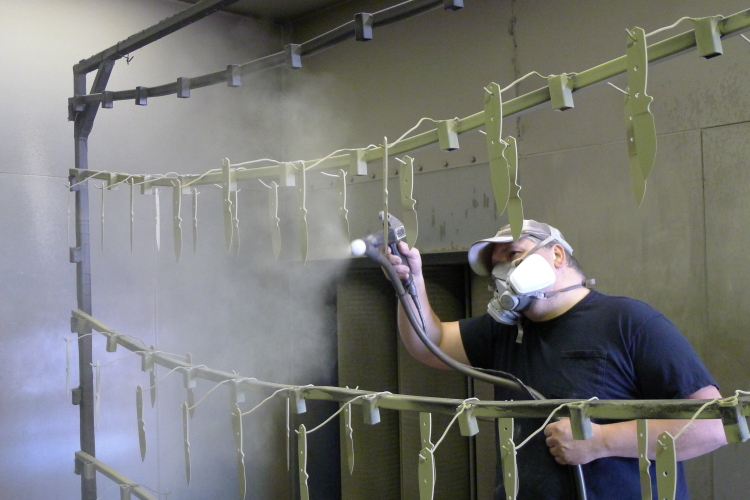
ESEE knives receive the Textured Powder Coat at Rowen Mfg. (Rowen Mfg. photo)

     A coated blade offers protection, non-glare and striking looks. For those who serve in the military, preserve the peace through law enforcement or knife enthusiasts in general, blades are coated black, Flat Dark Earth, tan or what have you for a variety of reasons, and are permanent fixtures in their complement of working gear. The look and feel are appealing, and the ease of maintenance is an attractive attribute.

     Buying a coated blade makes a statement and serves a practical purpose. Knife manufacturers recognize the demand for such blades and see their contributions to the available selection as filling a necessary niche.

     According to Paul Tsujimoto, senior engineer at KA-BAR Knives, powder coating was developed in the mid-to-late 1960s. “Powder coating is applied using the electrostatic principle,” he said. “The parts to be coated are given a negative charge and the powder coat is given a positive charge and sprayed on. The dry coated parts are then baked in an oven or furnace, where the powder melts and fuses into a hard, protective finish.”

     For ESEE Knives, Rowen Mfg. applies Textured Powder Coat to blades of 1095 carbon steel through an electrostatic spray process that causes powder particles to adhere to the steel. Then the coated steel goes through four stages to complete the process: melt, flow, gel and cure.

     “The powder is applied with an electrostatic spray gun. Before the powder is sent to the gun, it is fluidized to separate the individual grains of powder and improve the electrostatic charge that can be applied to the powder so that the powder flows more easily to the gun. Because the powder particles are electrostatically charged, the powder wraps around the back of the part as it passes by toward the air off-take system,” ESEE’s Jeff Randall explained. “To obtain the final solid, tough, abrasion-resistant coating, the powder-coated items are placed in an oven and heated to temperatures that range from 160 to 210 degrees Celsius, depending on the powder—400 degrees in our case.”

     President and co-owner of Spartan Blades, Curtis Iovito said his company’s coating of knife blades is called Physical Vapor Deposition (PVD). “The process is characterized by the creation of a material vapor that can be reacted with different gases to form a thin film coating,” he noted. “We use a method called arc deposition. This process is carried out under high vacuum conditions. One of the nice properties of PVD coating is that it applies uniformly so that you don’t get build-up on corners and edges like some coatings.” IonBond coats Spartan’s blades.

     The commercial name Spartan Blades has given its PVD coating is SpartaCoat. Iovito and business partner Mark Carey became familiar with PVD coating while working on the development of a new rifle with Special Forces applications.

     “While in the Army, we had been looking for a durable coating in [a Flat Dark Earth color] for a new weapons system we were developing,” Iovito remarked. “Fortunately, we were aware that the development of a true Flat Dark Earth Pantone had been done using zirconium carbon nitride. We believe that we were the first company to use a true Flat Dark Earth PVD coating on knives. This coating is often referred to as diamond-like coating, or DLC, in the gun and knife industry because of its resistance to wear.”

     Black Traction Coating is the proprietary name of the finish TOPS Knives uses on its blades through the services of James Bowen. “We use an epoxy hybrid base with polyester in it,” company President Mike Fuller said. “It is electrostatically applied in its dry powder form, and it goes on the blade between three and five thousandths-inch thickness. The knives are then put into an oven and baked at a little over 400 degrees Fahrenheit for about 17 minutes, depending on the thickness of the material. It’s not an ultra-smooth finish like some coatings have, and it enables the user to hold the blade for close work if necessary.”

Carbon and Stainless

While the processes are similar from manufacturer to manufacturer, each has its own variation on the coating theme. KA-BAR coats both carbon and stainless steels, while ESEE uses 1095 carbon steel exclusively as a blade material. Spartan Blades uses CPM-S30V and S35VN, and 154CM stainless steels.

     “At our clients’ request, we use Black Traction Coating on all our products, 1095, 5160 and all the stainless steels as well,” TOPS’ Fuller noted. “One of the reasons we use it on 440C or 154CM stainless is that it preserves the visual integrity of the blade as well as being easier to clean. It doesn’t add appreciably to the cost of the knife, but the benefit from our perspective is that the chance for oxidation is nil where the covering takes place. However, in areas like the final edge of the knife where there is no covering, the blade still needs to be oiled like any other good tool.”

     Spartan officials acknowledge that the coating of their stainless steels follows the surface blasting of the blades in order to eliminate glare. However, when a knife blade is blasted, a surface is created that is less corrosion resistant. Therefore, the PVD/SpartaCoat helps resist corrosion and maintain the flat finish.

     Tsujimoto identifies four primary reasons for coating knife blades: corrosion protection, anti-reflection, enhancing cutting lubricity, and any combination of the first three. “KA-BAR is no exception,” he said. “Because we use a lot of carbon steel that is very prone to corrosion, we utilize blade coatings a great deal. Stainless is coated for both anti-reflection and corrosion. Remember, stainless steel means that it will stain less than carbon steel. Stainless is not totally stain proof.” Iovito agreed.

     “Knives generally are coated to provide anti-glare surfaces and provide wear resistance, as well as to add additional corrosion resistance, not to mention that it makes for a great looking finish,” Iovito noted. “This finish should not be confused with other spray or paint finishes. While these other finishes are OK, PVD coating cannot chip or rub off because it’s bonded to the steel at a molecular level.”

     Of course, the coating in and of itself is only as good as its ability to stay on the blade. Durability may relate to the composition of the coating itself, and to the degree of abuse and wear a particular knife is expected to weather. Recoating of blades is either rare or not offered by many manufacturers, and the premise is simple. The coating is made to last.

     SpartaCoat is applied at a thickness of 3-to-5 microns, and its final hardness registers 70-to-90 HRC on the Rockwell scale. Spartan has recoated some blades in the past, primarily because the owner requested a change of color or to have something etched on the blade. Iovito said only a couple have been recoated for any other reason through the years.

Snowmobiles & Indian Chiefs

The coating of blades has a practical, aesthetic and utilitarian appeal. It adds an element of safety, stealth, survival and style to a blade, while demonstrating a good value every day in the field. Two of Fuller’s experiences are telling. 

     “Some time ago we were working with a snowmobile manufacturer,” Fuller commented. “The manufacturer used the coating material as an undercoating on its snowmobiles. That says something about the toughness of our Black Traction Coating. It’s extremely durable with a bit of flexibility, and the mixture we make has passed military 24-hour saltwater spray tests and chemical emergent tests with flying colors.

     “Years ago, a survival expert took one of our knives to the Peruvian Amazon and left it with a chief down there. These people use their knives every day and sharpen them on river stones.” The survival expert went back three or four years later, Fuller added, and found the chief, who still had the knife—and the coating on the blade was intact.—By Mike Haskew


To read similar stories and all about the latest knives, knife trends, knifemakers and much more, subscribe to BLADE® Magazine. 

Knife Book Of The Day I

     If you’ve ever seen Murray Carter give a sharpening display at his knife show table, shave his beard—or someone’s head—with one of his knives at a BLADE Show seminar or just talked to him in person, you know what a genuine, engaging person he is. If you haven’t seen him up close, his new book, Bladesmithing with Murray Carter, is the next best thing. In some ways, it’s better.

     The first in our Knife Books Of The Day series, Bladesmithing with Murray Carter takes you through the Carter process of making knives as only he can tell it. Design, steel selection, forge welding, lamination techniques, heat treating, grinding, finishing, handles, sharpening, sheaths–it’s all here in 160 pages of hundreds of color pictures, diagrams, knifemaking tools and equipment, how-to’s, safety tips, and much more.

     And, if you act now by clicking on http://www.shopblade.com/product/bladesmithing-with-murray-carter/?r+ssfb201211 #W1852, you can buy it for only $18.47—$9.52 off the regular price.

Ball Bearing Lock Secures 2 Pieces Into 1

From left, the ball bearing slides into the channel formed by the blade and the handle as the Spyderco Polliwog is closed. The ball bearing self-adjusts when the knife is opened and/or closed. (David Jung photo)

     The idea of a ball bearing used as a knife lock may seem like a contradiction. Ball bearings are designed to keep things in motion, not freeze them in place. However, it is the shape of the ball bearing that gives the Spyderco Ball Bearing Lock some of its greatest strengths.

     Since variations on knife shapes and handle materials are harder to patent, that leaves lock designs. Borrowing such a design involves paying a royalty. Devising your own lock negates paying the royalty but involves many hours of research, design and testing.

     The Ball Bearing Lock began on paper, progressed to plastic models and then to the metal prototype stage. Throughout the process, the lock’s patentability was considered—though holding a patent does not mean the patent holder is free and clear. Competitors love to pore over a design to look for loopholes to exploit. Defending a patented design is crucial to its economic success. In the end, Spyderco CEO Sal Glesser, a Blade Magazine Cutlery Hall-Of-Fame© member, said he felt his Ball Bearing Lock was different enough to warrant a patent, and the design would be difficult to copy.

     The Ball Bearing Lock and the evolutionary caged Ball Bearing Lock comprise Spyderco’s attempt to develop a robust lock that meets martial blade craft (MBC) standards without being too bulky or hard to open or close. The hardened ball bearing, which is the main element, is allowed to rotate freely throughout its travel. Because it will always be in a different position, wear and tear is greatly reduced. Another benefit is the lock continually self-adjusts with each use. Because of its design, it can be operated on either side of the handle. An additional benefit is the lock is hard to accidentally disengage, which adds to its safety.

     One look at the Ball Bearing Lock reveals the creative thought process required in its creation. “The design objective,” Glesser noted, “was to have a fairly simple, very strong, very reliable folding knife lock.”

How It Works

When the knife is closed, the ball bearing sits in a slightly curved channel. The channel provides the track for the ball bearing, which is pushed toward the blade due to pressure from a small shaft surrounded by a coil spring. Opposite the slightly curved ramp is the other side of the channel, which is formed by the knife blade.

     As the blade pivots, the ball bearing pushes past the resistance of the closed position detent and follows a circular path until the knife approaches the open position. When the knife is nearly open, the blade channel drops away, allowing the ball bearing to push out into the channel formed at the top of the blade. Throughout the travel, the ball bearing rolls unobstructed with the outward spring pressure, providing the resistance to allow the blade to swing freely. In the open position, the pressure to close is surmounted by the ball bearing locking in place, on top by the liner and below by the blade. When the user removes the outward spring pressure by pulling back on the ball bearing, the blade can be pivoted to the closed position. The hardened ball bearing is unyielding under normal use. In the case of the newer models, a cage of a durable proprietary polymer blend surrounds and centers a smaller ball bearing. The lock action is the same.

The Knives

The Ball Bearing Lock debuted in 2002 on Spyderco’s World Trade Center (WTC) Knife, a non-profit fundraiser for victims of 9/11. On the WTC knife and the follow-up D’Allara knife, Spyderco used FRN (fiberglass-reinforced nylon) handles. The FRN made for a fairly thick, though comfortable, knife. Subsequent knives with the Ball Bearing Lock, including the Polliwog, Phoenix and Dodo, used such “flat” handle materials as stainless steel and G-10, which addressed the thickness concerns.

     The first-generation version had a large, hardened ball bearing. Some seemed concerned it took two fingers to easily slide the ball bearing back in its channel. Eric Glesser, Sal’s son, designed the newer version, which addressed the concern by making the ball bearing smaller and enclosing it in the cage that has more grip and a much thinner profile.

     The original Ball Bearing Lock was visibly different than any other lock, and some of the first models using it did not look traditional. Eric’s Polliwog design allows the ball-bearing channel to be open when the knife is closed, making it appear the ball bearing could slip out. Eric’s Dodo design features an ergonomic handle. It is scheduled to return in Spyderco’s carbon fiber and orange G-10 “Sprint Run” versions. The Phoenix, designed by knifemaker Howard Viele, also used the larger Ball Bearing Lock.

     The P’Kal has the caged Ball Bearing Lock, The knife is based on an edged martial arts technique from the Philippines, which involves an “ice-pick” grip with corresponding downward pulling thrusts. Lock strength is crucial in knives used in the martial arts, so the P’Kal needs the MBC-rated lock.

     The knife that has received the most attention of the caged series is the Manix 2. The original Manix knives featured a massive, heavy-duty design. By moving to the caged version of the Ball Bearing Lock, Spyderco changed the Manix in a positive way for everyday carry.

Use & Maintenance

The Ball Bearing Lock takes some getting used to if you are accustomed to LinerLocks™ or traditional lockbacks. Opening is the same as with other Spyderco knives via the blade hole. The difference is in closing. While it is possible to unlock the blade using one side of the lock, the best way is to pull the lock cage back with the thumb and index finger until it releases. Once the lock disengages, the blade can be pivoted closed. “People either like it or they don’t,” Sal observed. “They like the smooth action. They like the strong lock-up. We wanted it functional and easy to open, but I guess ‘not too easy’ would be one way of saying it.”

     Among the advantages of having an exposed lock is ease of cleaning. “We usually just rinse them out and add a drop of oil here and there,” Sal said. “We’ve never had an issue with the spring. These coil springs go a long time, so really there is not much maintenance, other than occasional oil.”

     The Ball Bearing Lock is one of many locks on the market. Others that share similar characteristics include the Bolt Action Lock designed by Cutlery Hall-Of-Famer Blackie Collins, and the Axis lock designed by Bill McHenry and Jason Williams and found on several Benchmade folders.

     “I think all locks compete and have advantages and disadvantages, so I don’t know that one would be better than another,” Sal opined. “Most locks will either slide or rotate; I guess [the Ball Bearing Lock] would be considered sliding, although it is more rolling than sliding that is the action of the lock.”

     Hence, the Ball Bearing Lock takes the contradictory rolling motion of a ball bearing and the sliding of a piston into a channel to lock two pieces of metal into one. It is a contradiction that works.—by David Jung


For more information on the Ball Bearing Lock and the Spyderco knives that have it, contact Spyderco, attn: J. Laituri, 820 Spyderco Way, Golden, CO 80403 800.525.7770 www.spyderco.com, [email protected].


To read similar stories and all about the latest knives, knife trends, knifemakers and much more, subscribe to BLADE®Magazine. For information on how to subscribe, click on http://www.shopblade.com/product/blade-magazine-one-year-subscription-us/?r+ssfb171211#BL1SU

Malaysian Men Of Steel

Lim Loong Hoi hammers steel in his old school knife shop in Selangor, Malaysia. (photo courtesy of Philip Lim Chin Guan)


     Every morning, Lim Loong Hoi is at his dirty workshop—it looks more like a shack from the front—at about 8 o’clock. Beyond the open door in the rear, the passage leads to a hallway and a few small rooms.

     The boneshaker of a wooden shop has been home to Lim and his family for decades. He said he has been making utility tools, including parangs, goloks, large fisherman’s blades and sickles, since his school days.

     His instructor and mentor was his grandfather. Back in the day, Lim found time after school to help his grandpa at the workshop. Picture a teenager’s delicate hands with a heavy hammer and a pair of tongs when, during morning hours, he was holding a pen or ruler in school. That was about 50 years ago.

     Called Sin Sam Hup Lee, Lim’s shop still stands firm against fluctuating economic conditions and the ravages of time. His back is slightly bent from the long, dreary years of standing before the furnace or hydraulic pump, pounding away at pieces of elongated steel.

     Pasir Penambang is a small village on the outskirts of Kuala Selangor in the state of Selangor, Malaysia. The locals, especially the Chinese, are mostly fishermen, shopkeepers or fish wholesalers.

     The Chinese fishermen are Lim’s regular customers. The edged tools he makes for them are larger than usual. The blades are similar to huge butcher knives, having a curvature that helps in slicing a big fish in two with one swift, downward stroke.

     The Malay farmers usually ask for long sickle blades used in dislodging oil palm fruits, a.k.a. kelapa sawit nuts. Each sickle is hollowed out at the handle to accept a long pole. The pole enables the user to extend the blade about 7 to 8 feet to harvest the nuts from the palm trees. Each sickle costs $2 to $2.60. The price depends on the quality of the steel and blade size.

     In Lim’s workshop, stacks of Jeep leaf springs used for blade steel rest in a corner. The four-wheel-drive springs are rusty and grimy. The haggard bladesmith likely sourced the spring steel pieces by the ton from an old junkyard. He probably got them cheap, too. Most of the time they are cut to required lengths. It is a low-tech, slightly primitive method of stock removal.

     Practicality and function rule the land. Almost nobody here has heard of CPM-S30V, VG-10 or ZDP-189. The most convincing line Lim uses is, “This is Jeep spring steel.” That alone gives his customers some assurance they are getting quality steel.

     Edged tools used by fishermen or farmers in the fields have no time to get rusty because they are used regularly and on a daily basis. After six to eight years, the parang, golok, fisherman’s blade or farmer’s sickle may be deemed unusable. The user simply buys another one from Lim. After all, it costs just a few bucks. Compared to its long-term usefulness and hardiness, the cost per blade is minuscule—which is why the agrarian folk in Pasir Penambang and nearby villages are Lim’s loyal customers.

     Lim’s assistant is taciturn, works like a well-oiled machine and knows the blade-making process intimately. Like his boss, the assistant relishes the feel of steel in his hands.

     Of course, the untidy workplace is not exactly ideal for a private conversation. Customers determine what they want, haggle over the price and depart with the edged tool they bought wrapped in a newspaper.

     Occasionally, some outsider brings a drawing of the piece he wants made. The bladesmith examines the drawing and then determines whether his outdated equipment and other machines are suitable for the order.

     The volume of edged tools he sells will not even make Lim a member of the middle class. He obviously is not making a fortune, as some people may suspect.


Ah Pee

     A couple of doors away along the same row of wooden shops is another knifemaker, Ah Pee. A sign at the front of his establishment says “Chuan Lee Chan.” Originally from China, he has aged before his time, though his eyes have a certain fire that belies his years.

     Pee said his children, especially his son, have absolutely no interest in knifemaking. “The young men today prefer air-conditioned offices and as little dirt on their hands as possible,” he told me.

     The long hours and intense heat from the furnace are enough to deter most from pursuing such a profession. It is backbreaking work with the added disadvantage of low and slow financial returns.

     After about five decades of using the hammer, tongs and grinder, Pee is long past set in his ways. He probably does not know how to do anything else. Perhaps he feels he is too old to learn and master another profession.

     Not all the edged tools sold at both shops are fashioned by the resident makers. They also stock production parangs and some made-in-China models, both more affordable than the handmade models. Lim’s and Pee’s knives cost more because they factor in labor, time and the type of spring steel used. The sharpness of the blade is guaranteed.

     Sometimes each bladesmith will ask the customers how the parangs or knives will be used. Then he might recommend another type of edged tool. The heavy-duty blades—those for chopping hardwood, the bones of livestock, etc.—are made to different specifications than those for skinning and other light work. The smiths’ skills with iron and steel are invaluable to those who need their tools to make a living.


Heat Treating and Sharpening

     Heat treatment consists of quenching the steel in a trough of water. There is no set formula for giving a hardened edge. Pee said it all comes down to “feel.” The long years of experimenting with quenching a red-hot blade in water have given him the intuition and the right recipe of crucial seconds of sinking a piece of hot steel into a trough, and then lifting it up at just the right moment. I have seen Pee do it on several occasions. He said without the special “water treatment” the blade would not hold an edge.

     Sharpening a parang or any kind of blade is done on a hand-held metal grinder. The way Pee does it looks easy—until you put the same grinder in your hands. A flat grind is apparently the way to go.

     First, he clamps the blade on a table vise, covers his mouth with a piece of cloth and dons plastic goggles. He moves the grinder side to side and applies just the right amount of pressure.

     A shower of bright orange sparks fly past his body but Pee pays them no heed. When he is fully satisfied the blade has the correct grind, he unclamps it and adds the finishing touches to the edge with a smooth stone.

     Again, it is all “touch and feel.” When a man has spent three-quarters of his life sharpening blades, you do not question his judgment. He said, “The blade can easily shave the hair on the arm.” I believe him totally.

     He then gives me a piece of invaluable advice. After the blade has been used, wash it in running water. Do not wipe the water off but put the knife out in the sun to dry. Allow the sun to dry the steel blade and it will remain sharp indefinitely.

     It took awhile before I realized the wisdom of his words. The tropical weather, coupled with the scorching Malaysian sun, acts as a form of heat treatment on the sharpened blade. Perhaps the sun’s rays strengthen the already hardened molecular structure of the blade’s edge? Who knows better—the bladesmiths of Pasir Penambang or me, the end user from the city?


Paying Homage

     There are only two bladesmiths along the main road in Pasir Penambang. Both are advancing in age. This is a dying trade. The youngsters are not interested. Those of us who appreciate all things steel and sharpened tools come to this tiny town, away from the hustle and bustle of the bigger cities, to pay homage to men of steel who live a life of quiet desperation.—By Philip Lim Chin Guan


To read similar stories and all about the latest knives, knifemakers, knife trends and much more, subscribe to BLADE®. For more information click on http://www.shopblade.com/product/blade-magazine-one-year-subscription-us/?r+ssfb141211#BL1SU


2012 ABS Expo

0

The 2012 American Bladesmith Society’s All Forged Blade EXPO is the premier show for hand forged blades. From utility blades, to the finest forged and crafted art knives, the ABS EXPO has something for everyone. The show will be held in San Antonio, Texas, January 27 – 29, 2012 the home of the Alamo.See some of the world’s finest forged knives showcased in a unique and informative format for the enjoyment of the forged blade collector/enthusiast by American Bladesmith Society Mastersmiths and Journeyman Smiths.

Dan Cassidy has set up an Expo Photo Gallery so that the makers can exhibit their knives prior to the show, so that collectors may have a sneak preview of these works of art. I have asked the table holders to make knives especially for this show and to photograph them. Please post your photos in the ABS Exposition Gallery of the ABS Forum and ABS Webmaster Dan Cassidy will be available to assist you. Also post your knife photos on other knife forums so that prospective buyers may have a sneak preview to what they will see at San Antonio.

14 inch Thomas Wells Antique Bowie Progress Report.

To see previous posting,Click:Jim Batson on ABS Expo

 BLADE                                                                                                                                           A full scale pattern was made of aluminum from a tracing of the original Bowie. The blade as it was being forged could be laid on the pattern hot as an aide to forge the blade to shape. The steel in this blade was forged from a large coil spring from a rail car. Attached Image

 (Photo 1)

The blade was ground, set up for the guard, Spanish Notch filed , heat treated and finish ground. The maximum blade thickness is .355 inches at the hilt and .250 inches at the clip. The clip was ground and hand finished on one side of the blade as was the original. Attached Image

(Photo 2)
The large tang was used to give the knife a better balance and stronger handle. The tang is tapered from guard aft and from the top down. The pin holes were drilled in the tang.

GUARD
A brass 1/2 template was fabricated to the shape of the guard which fit snuggly on the blade.
Attached Image (Photos 3a & 3b)

 
The guard was hand filed from a 1/4 inch thick piece of cupro nickel 715 , hand finished and polished. Cupro nickel 715 is 30% nickel and 70% copper and is more corrosion resistant than nickel silver which has only 18% nickel.

HANDLE CONSTRUCTION                                                                                                   Photo 4 is the end view of the handle that shows the basic handle construction.
Attached Image
Photo 5 is the handle
Attached Image
and Photo 6 is an exploded view of the handle showing all its components.
Attached Image

The handle was fabricated by wrapping the tang with Teflon tape. A piece of tin .007 inches thick was wrapped around the tang and drilled for the pin holes. Two pieces of Mastodon Tusk were shaped into a trapezoidal cross-section to fit against the tin liner. Holes were drilled in the Mastodon handle scales. The scales were shaped a little over size in the plan view. These scales were super glued with gel to the tin liner using pins to align the holes and a rubber band made of an inner tube as a clamp. The assembly was removed from the tang and a dam was made at each end of the handle with masking tape. The voids at the top and bottom of the handle above and below the tang were filled with JB Weld. The handle was ground to final shape in a rectangular cross-section with each scale being of equal thickness.
The handle is a little larger at the pommel than at the guard. I went to Microsoft Word and made a drawing of the rectangular cross-sections at the front and back of the handle. I drew an ellipse in the rectangles and printed them out.

 
Attached Image (Photo 7)
I then cut out the rectangles and pasted them on the front and back of the handle. The handle was shaped with new belts from 36 grit and 80 grit on the flat platen by holding the handle vertically against the platen. The handle was hand finished to 600 grit.
The front of the handle was taped around the handle the required distance from the end as a guide for the front ferrule. A course file was used to recess the handle .032 inches. The pommel was done the same way. A piece of cardboard .032 inches thick was used to measure the circumference of the ferrule. A rectangular of dead soft German silver .032 inch thick was sawed out a little oversize. The handle was used to form the ferrule with the solder joint at the bottom. The joint was overlapped. Both ends were sawed into with a jeweler saw while held in a vise to obtain a straight joint. The ferrule was opened wide enough to allow an eight inch mill bastard file to be used to file the ends. The file is held in the vise with the face up and both ends are filed at the same time by pulling the ends along the top and bottom faces of the file with a slight pressure. The ferrule and pommel ferrule are wired up, fluxed and hard soldered. The ferrule is suspended by the top; the solder is applied to the inside and the heat to the bottom or outside. When the solder appears on the outside, it is done.
The pommel ferrule was wired to an oversize .070 inch thick plate on one end. It was fluxed and pieces of medium hard solder were laid around the joint on the inside and heated from the outside.
The top and bottom straps were made from 1/2 inch wide by .070 inch thick German silver. The bevels were ground and hand finished on each side. The ends were hand file to fit under the front ferrule and pommel cap.
CHAIN KNUCKLE BOW
After some experimenting, I found that the original chain was called a rope chain that was twisted into a flat plane.
Attached Image (Photos 8a, b & c for construction details)
Eleven gauge (.088 inch diameter) fine silver wire was wrapped around a 3/8 inch diameter rod by hand. Thirty-six turns were made. Over 4 feet of wire was used. This coil was removed from the rod, fluxed and heated to a dull red, about 1250 degrees F., for about 30 seconds allowed to cool to a black heat and quenched in water. One loop was silver soldered with medium hard solder. The chain was constructed and soldered one loop at a time. After using about 10 loops, the chain was twisted flat to insure good solder joints, The chain was completed with 31 loops. A .093 inch internal diameter tube was constructed to make the hinge attachment to the pommel cap. The chain and tube are pictured in Photo 9 below.
Attached Image

 METAL SHEATH
Attached Image (Photo 10)

The all metal sheath was constructed of .032 inch thick German silver sheet metal. After the blade was finished a pattern was made of a piece of oak about 3/4 inches thick. The pattern was made oversize to allow for the liner which is about .040 inch thick. Also make the pattern about 3 inches longer than the blade, the edges were rounded slightly. The sides were cut out of the sheet approximately 3/8 inches wider than the pattern on top and bottom. The tip was notched to allow for the bend. The sheet metal I had was in an as rolled state which was hard. I had to anneal the edges that were to be bent.

 
To shape the sides, place the sides between the pattern and a steel backing in the vice and bend the edges over with a small hammer only hitting the edge in a bending motion. You will have to reset in the vise several times. Take thickness measurements along top and bottom of the blade. Grind the edges of the sides to the require thickness, making sure you have allowed for the metal thickness, the liner thickness and 1/2 the width of the blade. Lay the side flat on the table and measure the height with the depth gage on the back of a veneer caliper.

 Once the left and right side are made, flux the inside of each at the joint. Wire the two sides together with black wire at half inch increments. Flux the outside, use a metal spring clamp on a fire brick to present a joint in the up position to be soldered. Solder both sides with medium silver solder. I use a turbo torch and wire solder. Cut and pull the black wire off. I grind the extra solder off with about 80 grit. I use 120 grit to start the finish grinding on the sheath. It is easier to get the 120 grit scratches out than the 80 grit. You want to polish to 400 grit on a wheel. I use a 10 inch smooth 40 diameter wheel with a 3 inch drive pulley.
The sheath should be pickled to clean the inside. The tip and throat pieces were fitted, constructed and soldered with medium solder. These pieces were then soldered to the sheath body with easy easy solder. The belt loop was formed and tinned with soft 4% silver solder. It was then soldered to the sheath.

WHAT’S LEFT

1. Finish chain and pommel cap attachment with hinge. Polish chain in tumbler.

2. Layout incise carving pattern on handle and carve.

3. Assemble and finish knife.

4. Layout engraving pattern on sheath and engrave.

5. Line the sheath

James Batson, Master Smith
Chairman American Bladesmith Society, Inc.

Ron Lake’s Tab Lock: The Clever Lever

     When Blade Magazine Cutlery Hall-Of-Fame© member Ron Lake devised the interframe design and gave the world of knives another standard of innovation and excellence, he continued to look for ways to improve the operation of a standard lockback mechanism. He was not satisfied with pushing a bar to release the lock, particularly with one hand occupied or involved in some type of activity that demanded his full attention.

     The solution was fairly simple and came along in the early 1970s, just a few months after the historic debut of the interframe. Ron added a small steel tab at the end of the knife, offering the user a quicker and safer alternative to depressing a bar.

     “The tab lock is really not a lock mechanism,” Lake explained. “It is just a tab on the end of a lockback that offers a mechanical advantage. If it isn’t there, I just have a bar to release the lock, and depressing that bar can be hard to do when the hands are soft, cold or wet. The tab gives you a larger surface to push on.”

     Ron admits that the tab lock was something of an afterthought, trailing along behind the notion of the interframe. Sometimes the good idea can indeed be made better. As a young knifemaker, he continued to mull over the prospects for a better release.

     “I had only been making knives for six years,” he laughed. “I didn’t even know another knifemaker and didn’t know what knives were supposed to look like. I came up with the interframe design and then thought about where I could put a release mechanism. I still make interframes and that’s about all I do make, and they are with the tab.”

     While it may look like a simple endeavor, the fashioning of the tab lock is not for the knifemaker who wants to take a shortcut or go down the path of least resistance. Of course, the tab-lock style is not seen in great numbers among today’s knives, and Ron says there is a straightforward explanation for that. It just is not the easiest thing to do.

     “I can make them now with less effort than it took back then,” he advised, “but first of all I have to machine a piece of metal that goes on the end. Then I have to silver solder it on, and it’s a rough piece of metal with everything large on it. Then I remove the silver solder so you can see a nice radius, machine the sides to the right dimension and radius the corners.

    “From there, I hand sand the surfaces and polish them up. So, it takes several more hours of work than a standard knife, and about 15-to-20 percent of my time goes into that part of the knife. I also have to take the whole knife apart and put it together again two more times, which I don’t have to do on some other models. For a few years, A.G. Russell just thought I butted it up against the end of the lock and soldered it on, but that could get knocked off easily. Later, I explained the process to him, and I can tell you the tab is on there pretty tight, pressed on and silver soldered.”


Tab Release

Some years ago when Ron, along with Wayne Clay and Cutlery Hall-Of-Famer Frank Centofante, co-wrote How To Make Folding Knives, he discussed the geometry of the lockback knife. He remembers visiting Sakai Cutlery in Seki City, Japan, and sitting in the company’s offices, which incidentally included a log cabin from Montana that had been dismantled and reconstructed. The men from Sakai had eight lockback knives laid out in the office, and the geometry between the pivot and the lock was different on each one.

     “I asked them who had designed those knives,” Lake smiled, “and they said, ‘We did.’ I asked them why the geometry was different on every one of them, and they told me it was because the toolmaker had made them the way he wanted to do it. To my knowledge nobody had put the geometry of the lockback down on paper until I did. Innovation comes from one-man shops.”

     That innovation carried over to the construction of the tab lock, which Ron more aptly describes as a “tab release.” The tab lock actually does lock like any other lockback. The secret to its operation is in the release.

     Long-time friend and fellow knifemaking legend and Cutlery Hall-Of-Famer Michael Walker says he agrees that the idea seems simple enough and makes a great impact on the user when it comes to ease of release. “I can say that the tab lock addresses a big problem with the lockback design by adding length, which in turn adds leverage,” he explained, “and the tabs let you unlock without the problem of pushing on a narrow piece of metal. It also eliminates the cutout [in the handle spine], which could restrict use for someone with larger hands. It’s much more functional than the traditional construction, hence he was awarded a patent.”

     Lake says he believes his patent was awarded about 1973 and expired around 1994. It not only included the tab, but also extended to the interframe and the bushing inside the handle that spaced the blade away from the frame. Indeed, the tab was part of a larger patent and an afterthought that developed into a novel approach when his inventive mind pondered the question of an efficient and effective release.

     “I decided that having the tab at the back of the knife would have a mechanical advantage,” Ron reasoned. “You can close it not only with the thumb but anything else that could be used to press the release. It doesn’t make any difference how long the lever is. It could be in the middle of the handle with the tab on it.”

     As for the patent, Ron says he doesn’t worry too much about it. “Centofante put [the tab lock] on his knives, and we were friends,” he remembered. “Some other folks have used it, too. Centofante put his tab on one side of the lock, and the patent specified at the end of the lock lever.” Along with Clay’s lockback, Lake’s and Centofante’s versions of the tab lock both appear on the cover of How To Make Folding Knives.

     Over time, Ron says the patent has become even less meaningful to him. The drawings or blueprints are long forgotten—probably shoved into a drawer somewhere in his shop. The concept of trade dress is enough for him. A form of intellectual property, trade dress refers to the look or characteristics of an artist’s work that provide the work’s instant recognition to the consumer.

     “After you do something for so long, it does establish trade dress,” Lake commented. “For example, if you saw a lockback lying on a table with a tab on it, would you know who made it? Yes, you would know that knife is mine. That is trade dress.”

     Of course, the tab lock made an impression 40 years ago when a young Ron Lake showed it off to a who’s who from the golden age of custom knifemaking. Among those present when the tab lock debuted were Corbet Sigman, Chubby Hueske, Cutlery Hall-Of-Famers Frank Centofante, A.G. Russell, B.R. Hughes and Bob Loveless, and a number of others. Since then, the tab lock has been a quiet trademark of Lake’s knifemaking skill, standing the test of time.—By Mike Haskew


To read similar stories and all about the latest knives, knife news and much more subscribe to BLADE®. For more information, click on http://www.shopblade.com/product/blade-magazine-one-year-subscription-us/?r+ssfb21211#BL1SU


CAPTION

Blade Magazine Cutlery Hall-Of-Fame© member Ron Lake and one of his tab-lock interframe folders in a stag handle and leaf-and-hands engraving—some in gold—on the blade bolsters and even the tab itself by Barry Lee Hands. (SharpByCoop.com photo)

How Individual Makers Can Tap New Markets

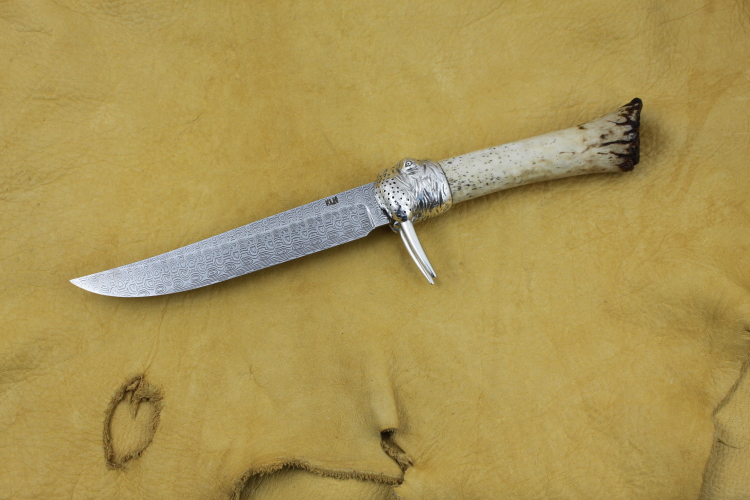
In the November BLADE®, “Unsheathed” outlined the Custom Knife Collectors Association/Jerry Fisk Cutlery Challenge and its potential for tapping new knife markets. Since then, maker Kevin Hoffman’s “I Am The Walrus” art knife placing fourth in the Art Kudos International Juried Art Competition & Exhibition is instructive in showing how individual makers can enter their knives in art competitions and, thus, expose their work to new markets as well.

      Why is exploring new markets important to custom knife enthusiasts, makers and others in the industry? For one thing, new markets mean more exposure to new buyers/collectors, and thus more potential demand for custom knives—and such increased demand translates into more value placed on all custom knives.

      Over 400 artists from 23 countries entered 1,251 individual works in the Art Kudos competition. From these, 157 artists were chosen. Of them, a mere 10 won awards, including Hoffman (http://www.artkudos.com/2011/awards.html).

      Kevin subscribes to several art publications—including ARTnews and professional artist and metalsmith magazines—and belongs to the Society of North American Goldsmiths (SNAG), all of which publish “calls for artists” and art competition announcements. “There are lots of other art publications that you can find on the newsstand,” he added. “There are dozens of art competitions all over the world at any given time, and it’s a matter of finding ones that you qualify for or that your work will fit the criteria for, and entering. I chose this one because I thought my work might be a good fit.”

      He added that the Art Kudos competitions, which are conducted on the Internet, have a very user-friendly application process, including an on-line submission procedure. “Each competition has their own entry process, although it’s becoming easier with the advent of digital photography and the Internet, and a lot of the entries are now made on-line and the competitions accept digital images,” he observed. Unlike some competitions that require submission of the actual knife, Art Kudos allowed Kevin to submit a digital image of the knife and keep the real item for simultaneous exhibit and possible sale at knife shows. “I knew the Art Kudos competition would overlap with the Knifemakers’ Guild Show, and I wanted to be able to exhibit the knife at the Guild Show, too,” he explained.

      This is not to say, given the proper venue and exposure, Hoffman rejects competitions that require keeping the knife for extended periods. “Very often, new competitions or new competitions in new areas are for a period of time, even years, and are more of an exercise in the education of a new audience rather than being good sales venues,” he observed. “Nevertheless, I think it’s important to explore new markets that haven’t seen this type of work before.”

      Hoffman stated it is better to find a competition that fits the maker’s designs than for the maker to design a knife for a specific competition. “You have to find the competition that your work fits the criteria and style of,” he stressed. “In the art world, it doesn’t make sense to make work specifically for a given competition because the deadlines are usually too short for that, and short deadlines aren’t conducive to producing truly good work. You have to choose competitions that your body of work fits into. Some competitions only want paintings, others only want 3-D works, some only photography, some only allow sculpture but not jewelry, or vice versa. Some competitions are open only to artists from a certain region.

      “As for what type of knives to enter, it probably depends on the type of competition and on the preferences of the person doing the judging. In general, I’d say the more [artistic] knives probably have better prospects, although I’ve had some luck with utilitarian knives as well. You just have to read the rules and, if there are specific categories, submit only in the one that your work fits the criteria for. For instance, don’t try to enter a competition that is accepting entries only for two-dimensional works unless you’re entering a painting of a knife.”

      He added there is often a small entry fee. It is used to pay the person or people doing the judging, and, if any are given, to pay for the prizes for the winners.


PICTURE CAPTION


Kevin Hoffman’s “I Am The Walrus” placed fourth in the Art Kudos competition, and features a damascus blade and walrus-oosic handle. He sculpted the walrus-head-and-tusks guard from wax and then lost-wax cast it in 7.5 ounces of sterling silver. Contact Hoffman at 912-920-3579 [email protected]. He will write a chapter on lost wax casting in the second edition of Krause/F+W Media’s upcoming book, How To Make Knives. (photo courtesy of Kevin Hoffman)


To subscribe to BLADE, click on http://www.shopblade.com/category/magazine-issues


Advertisement

Must Read Articles

Read this before you make a knife

Knifemaking 101 – Read This Before You Make a Knife

  by Wayne Goddard My experience has taught me that there's nothing like digging in and getting started. I've often said the hardest part of the...
how to forge damascus steel

How to Forge Damascus

Advertisement
Advertisement