Knifemaking

Knifemaking is the building of a knife, which includes the blade, handle and other accouterments. Blades are made by either removing metal from a steel blank via a grinder – known as stock removal – and the forging to shape of hot steel into a blade in the process known as bladesmithing. Other parts, including bolsters, guards, pommels, etc., are needed to complete the finished knife.

Featured Knives – – Knife Collecting – – Tactical Knives – – Survival Knives

Tips for Grinding a Blade

1

Editor’s Note: This is an excerpt from Murray Carter’s new book, Bladesmithing with Murray Carter. Click here to learn more from this renowned knifemaker.

The shape of the blade, or profile, must be precisely ground. Grinding is the operation of using files or other abrasives to mechanically shape the steel into a functional blade.

Grinding can be divided into two categories: grinding the blade profile and grinding the blade’s edges (secondary and primary).

Let’s talk about the profile. Grinding a forged blade’s profile can be done with a variety of tools. Heating the blade via friction is not a big concern because this grinding is done prior to heat treating (annealing, quenching and tempering). As you may know, the blade needs to be shaped after a pattern or template. At this stage that template is scribed onto the billet of steel that is to become your knife.

Place the pattern so that it most appropriately covers the billet in relation to the thickness and tang. Be careful on full-tang knife billets to orient the template the correct way. I once made the mistake of switching the tang end of the billet for the blade end and wound up with a blade with way too much taper.

Once the template is in place, secure it with a pair of locking pliers or strong clamps. Any sharp-pointed tool that is harder than the annealed steel will scribe (scratch) lines onto the billet. Trace around the template completely. Examine it before you remove the clamp(s) to make sure you can see the scribe lines clearly. Examine it again, checking it against this list:

* Are the lines clear and not making little “train tracks?”

* Is the blade/tang junction exactly where it should be?

* Is the blade where it should be?

* If you have made a mistake scribing the lines, you can lightly grind the surface and scribe again, but you will now be committed to grinding and polishing the flats of your finished blade.

Also remember that, on a laminated billet, if you grind steel from one side you really ought to grind the same amount from the other side as well, or the steel core will no longer line up in the middle. For blades
that are meant to have a forge finish or a hammer-forged finish, these options will no longer be possible, so take great care when scribing lines on a billet.

There are several methods for removing the excess steel from the billet to produce the perfect profile.

* Steel shears

* Cut-off wheel

* Band saw

* Drill press and hack saw

* Belt sander

* Bench grinder

* Kaiten toishi

As the smith is cutting out or grinding the blade profile, the scribed lines, which should be clearly visible, are the guide. As soon as you are so close to the lines that you are actually touching them in places, it is necessary to employ another “micro observation” technique to be in full control of the profile.

In a good source of natural light, hold the blade at eye height with the flats of the blade horizontal. Instead of focusing your attention on the flats, look closely at the outer edges of the blade. If you hold the blade with the point towards your eye, the spine of the blade should look compressed into a few millimeters.

Compressed like this, every high or low spot on your scribed line will be evident. Similarly, every line on the outer profile of the blade should be examined this way. In the pattern or template you used, every line should be well defined and with a purpose. Ask yourself if the lines you are now looking at were meant to be perfectly straight, curved or pointed. Pinpoint trouble areas, then attempt to grind in a way to affect only those areas and re-examine.

At this stage, the blade should be at 97 percent of its final profile. The other 3 percent will be removed in the final polishing stages.

Click here to get 40% off Bladesmithing with Murray Carter and take the next step in the knifemaking journey.

How to Make Mokume

0

* Images by the author, Jeremy Spake and Austin Moody unless otherwise noted.

Pronounced “moe-ka-may ga-nay,” mokume-gane—or mokume as it is more commonly known—is all about layering. For me it’s simply another component of my work, but within itself it’s about color and pattern.

In short, you stack a variety of different metals, bond them together, forge them down, pattern the material by cutting then forging, or forging then cutting, and expose the various colors that lie beneath. It sounds pretty simple and much like damascus.

Neither is true. I do find mokume a bit more difficult and less forgiving. However, all of this is subjective and depends on the specific materials you’re working.

For damascus I use straightforward, low-alloy high carbon steel; for mokume I frequently use exotic alloys that are not forgiving. You can use exotic high-alloy steel, which makes damascus less simple, and straightforward metals for mokume, which makes it simpler.

But enough of my doubletalk—let’s get into the process.

What You Need

Torque plates: 1-inch-thick 316 stainless steel. The plates should be large enough to accommodate both your billet—with some wiggle room—and a half-inch bolt in each corner of the plate.

Bolts, nuts, washers: at least half-inch thick Grade 8 heat-treated, high-alloy steel bolts. Black oxide will help prevent the bolts from bonding to the nuts. I hope this goes without saying, but you will need the correct size of nuts and washers to accompany your bolts.

Boron nitride: It acts as a resist between bolts, nuts, washers, torque plates and your billet. It also acts as a lubricant.

Three plastic tubs at least 1 foot by 1.5 feet and 6 inches tall, or whatever makes the most sense with the size billet you’re making.

Distilled water.

Simple green® Concentrate All-Purpose Cleaner.

For cleaning, 7447 maroon Scotch-Brite™.

Scott® Shop Towel. .002-inch-thick 304 stainless steel sheet. Medium silver solder: It’s always important to have on hand and can help fix problems should they arise.

Activated charcoal pellets.

How to Make Mokume Step by Step

STEP 1: Cut all of the metal to the appropriate-sized sheets, deburr, and make sure they are relatively flat without denting or kinking the metal. You need each piece to be of a consistent thickness. All the sheets can be different thicknesses, but there must be no dents or tapers within individual pieces.

STEP 2: Take the torque plates with the holes already drilled and coat the inside faces with boron nitride. The inside faces of the plates should be dead flat. Also, coat the threads of the bolts and the faces of the washers. Set aside to dry.

STEP 3: Take the three plastic tubs and place them one next to the other. Fill tub number one and number three with 1 inch of distilled water and the center tub with 1.5 inches of the water.

STEP 4: Mix a couple of tablespoons of the simple green cleaner in tub one.

STEP 5: Using tub one and a small piece of Scotch-Brite, clean each side of the first piece of metal. Use a scratch pattern to track your progress. When finished rinse the piece in the first tub, being sure that the water skims cleanly and easily over the surface. If it beads up anywhere, clean again.

STEP 6: After cleaning and rinsing the piece of metal in tub one, rinse it in tub two and store it in tub three.

STEP 7: Clean all of the metal, dedicating respective corners of tub three to hold each type of metal.

STEP 8: Place the bolts through the holes in the bottom torque plate and set it close to tub three.

How to make mokume

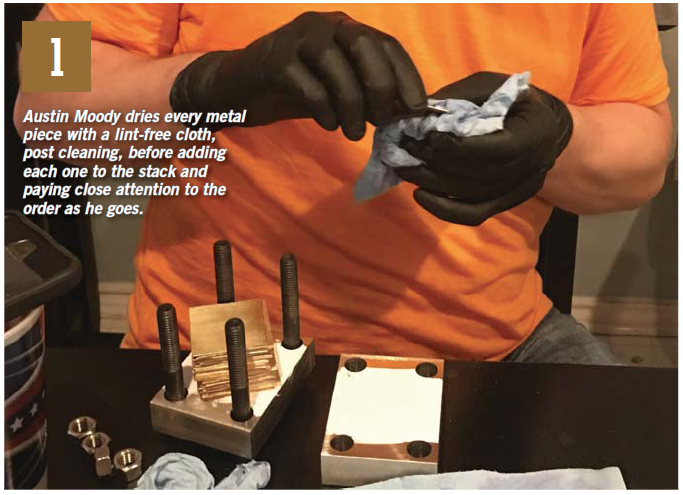
STEP 9: Remove each piece, gently dry using the Scott Shop Towel, and stack in the correct order on your torque plate (see image 1).

STEP 10: Your kiln should be preheated by this point.

STEP 11: Align the metal using a straight edge or square.

STEP 12: When you place the second torque plate on top, be careful to not knock around the billet. Re-align the sheets as necessary while tightening the nuts and bolts.

How to make mokume

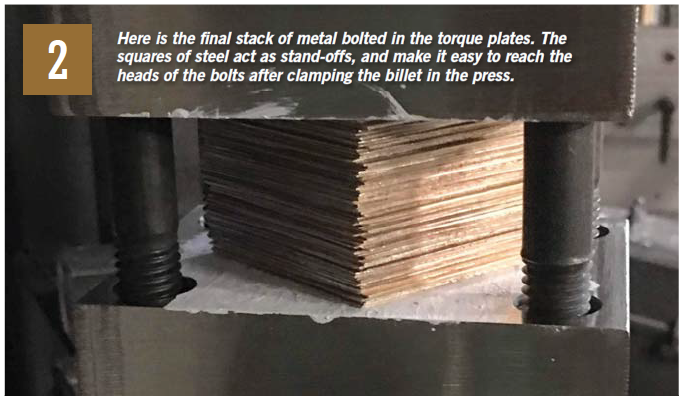
STEP 13: When everything is tight, go to your hydraulic press. Use steel standoffs to get past the nuts and bolts, and press down on the stack. Tighten the nuts with the billet under pressure (see image 2).

How to make mokume

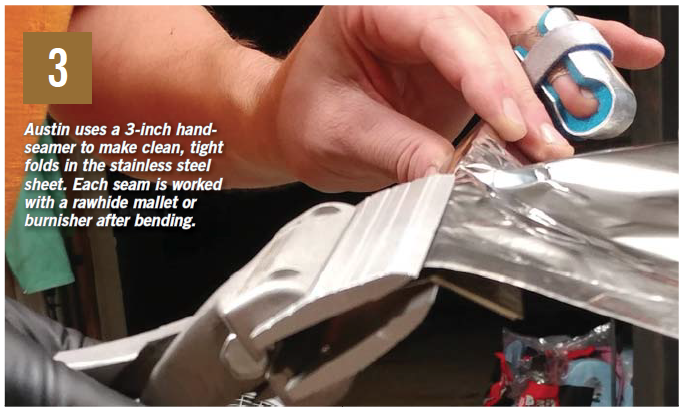
STEP 14: When you create the stainless steel jacket, you want all of the seams to be folded twice. After each fold, either work the seams with a rawhide mallet or burnish them with an appropriate tool (see image 3).

How to make mokume

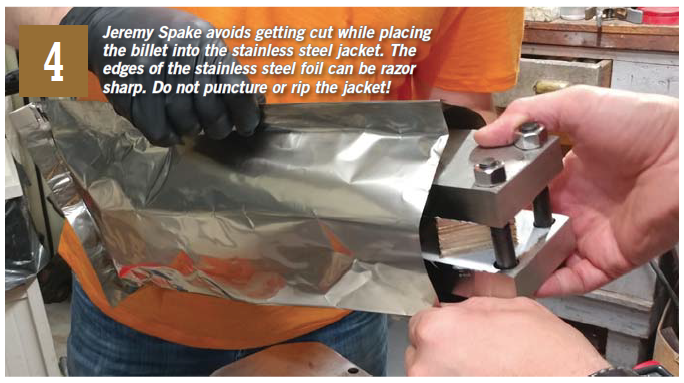
STEP 15: Activated charcoal is ideal for this process—use two tablespoons—but if you only have charcoal on hand, that’s fine. We used hardwood charcoal and crushed the chunks up a bit. You need only a small amount. The point is to seal the foil well enough where no oxygen can come in to cause combustion and burn up the charcoal. Prior to adding the charcoal to the packet, let it sit in the oven for one hour at 250°F to remove any moisture from the charcoal.

How to make mokume

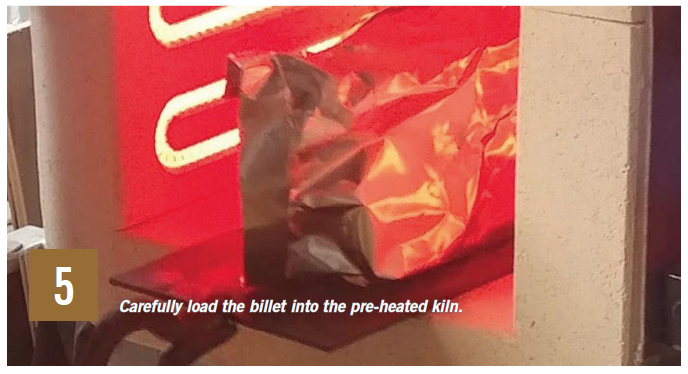
STEP 16: To prevent damage to the bottom of the kiln, we slid our packet in on a thin piece of steel (see image 5).

STEP 17: Kiln time varies depending on how large the billet and torque plates are. You really need everything to be at temperature for only a couple of hours. Larger billets obviously take longer to get to temperature. I recommend doing some research. The billet documented in the article was fired for three hours.

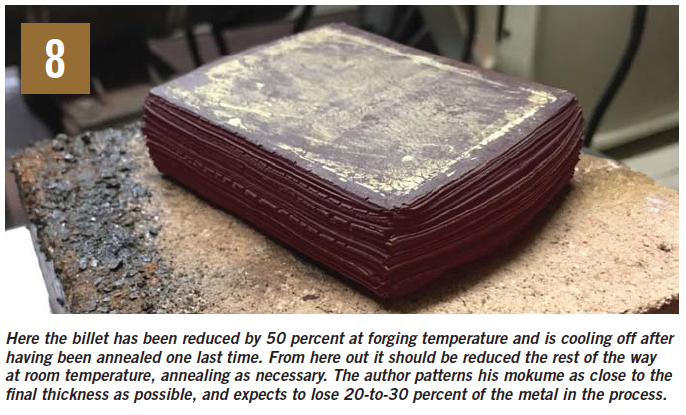
STEP 18: When you have fired the billet long enough, remove it from the kiln, remove it from the foil, and reduce the entire billet by 50 percent thickness at forging temperature. Reduce between 20-to-30 percent with each heat.

How to make mokume

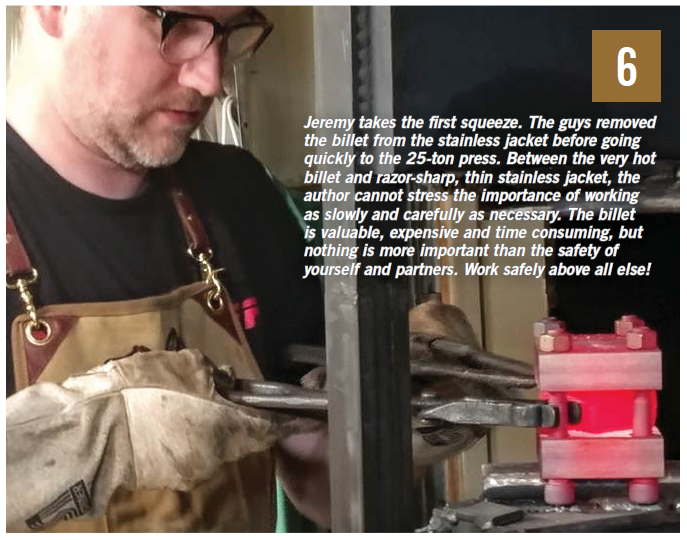
STEP 19: For the first forging process, leave the billet in the torque plates and go straight to the press (see image 6).

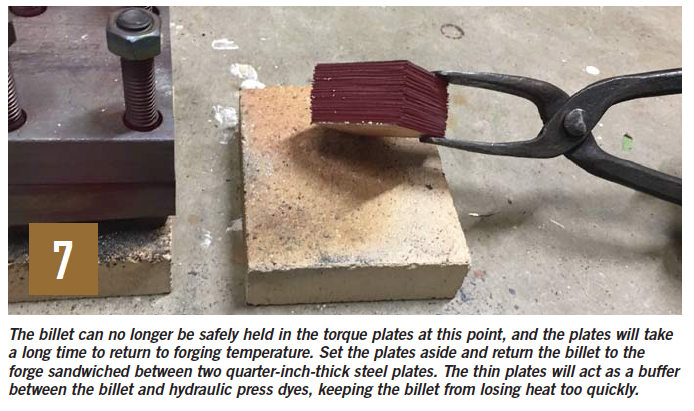
STEP 20: After the first reduction, the billet should slide out of the plates when tilted to the side. You can place the billet between two thinner steel plates—though only if you have a secure way to hold everything—and put them back in the kiln at forging temperature. The plates will help prevent the press dyes from chilling the billet too quickly. Continue until you have reduced by 50 percent from your starting point (see image 7).

STEP 21: Now you can go to cold working. Start out by reducing the billet no more than 10 percent prior to annealing. As you work the billet down, you can start to get closer to 20 percent between annealing cycles. The process for annealing depends on your metal combination. The relevant information should be easy to find with an Internet search.

How to make mokume

STEP 22: When it comes to patterning mokume, the process is very similar to damascus. However, instead of using a milling machine or angle grinder to cut a pattern into the metal, tools such as a flex shaft or files would be more appropriate. After cutting a pattern into the metal, forge the billet flat to bring the low points to the surface. As with damascus you can also forge patterns into mokume, either with a hammer or specific coining dyes. Reveal your pattern by grinding down to the low points. As a rule of thumb, it’s not recommended to pattern deeper than one-third the thickness of the billet.

More than One Way to Do It

Full disclosure: there is more than one way to make mokume. I have made and know others who make mokume using processes that differ from what I am sharing.

Schools of Sharper Learning

You can forge, grind, heat treat and finish a kukri at Dave Lisch’s Studio 4 Forging Facility in Seattle, Washington. (photo courtesy of Dave Lisch)

Talk to anyone in the know in the factory knife industry and he or she will tell you most of the hottest knife styles, materials, mechanisms and more seen on today’s production knives originated in the custom segment of the knife industry. In fact, with the growing amount of knifemaking learning centers and symposiums nationwide, an ever-increasing number of contemporary makers who set the trends in custom and factory knives are cutting their teeth in the schools of sharper learning. Consequently, no matter the hottest knife trends, chances are many of them come from the minds of those who teach and/or learn at today’s top knifemaking venues.

Those venues range from California to New England and many points in-between, and chances are one is near you. What’s more, each seems to offer something different, not only in subjects taught but in its overall philosophy and approach to knifemaking in general.

At the Branson Hammer-In & Knife Show in Branson, Missouri, knifemaker Gary Mulkey leaves the type of demonstration up to the demonstrator “so as to make it as enjoyable for all as possible. My goals in sponsoring this event are twofold: to provide a fun weekend for the knifemakers and to introduce new people to the world of custom knives.”

The Ashokan Seminar in Ashokan, New York, has been around as long or longer than any of them, started by the New England Bladesmith’s Guild in the early 1980s as a “non-sanctioned shadow organization.” “The sole purpose of the group is the education and improvement of the craft of knifemaking,” noted bladesmith and BLADE® contributor Tim Zowada. “With that goal in mind, the seminar is the only function of the group. There is no membership. There are no dues, nor newsletter. This lack of structure eliminates politics within the group. All the demonstrators and staff donate their time. This is a seminar covering all facets of knifemaking, taught by those with a strong desire to teach and share.”

     BLADE field editor/ABS master smith Joe Szilaski’s approach at his Knife & Tomahawk Learning Center is tailored for each individual student. “My philosophy has been you will learn more if you work on the style of knife that interests you most,” he stated, “and as with most things in life, there is more than one way to skin a cat. A technique that works for one person may not work for another. I have almost 50 years experience in metalworking and am able to demonstrate several different techniques that will help the student find what method works best for him.”

Whether you want to make a knife from start to finish, focus on one or more specific techniques or knife patterns, forge steel, grind blades, inlay wire in knife handles, test knives to the brink of destruction or what have you, today’s learning centers have it. Meanwhile, some of them also conduct knife shows and auctions where you can buy and sell knives, equipment, materials and related items, and cutting competitions where you can watch the knives in action—all the while talking and trading ideas with top makers, the legends and the brightest young minds of knifemaking.

A number of the schools are located in picturesque and/or notable settings—the Moran School of Bladesmithing in historic Old Washington, Arkansas, the Batson Bladesmithing Symposium at the Tannehill Ironworks in McCalla, Alabama, and the Big Sky Country Conference near Glacier National Park in Frenchtown, Montana, to name but three—with lots of good food, local attractions, camping and/or comfortable accommodations, and good times to be had by all.

Things you should bring to each venue (if not already provided) include a notepad, pens/pencils and/or recording device, casual and work clothes, gloves, goggles, earplugs and a dust mask.

In alphabetical order, the centers of instruction are (please note in instances where dates and schedules have not been firmed up yet, past courses and instructors are listed to give you a taste of what to expect in the coming year):


Ashokan Seminar, New England Bladesmith’s Guild, Sept. 14-16, The Ashokan Seminar, Ashokan, New York

•Schedule varies (beginner to advanced level); past demonstrators include Phil Baldwin, Rick Barrett, Kevin Cashen, Delbert Ealy, Don Fogg, Rick Furrer, Jim Kelso, Dan Maragni, R.J. Martin, Jerry Rados, Jim Siska, Tim Zowada and others, all of whom donate their time “with a strong desire to teach and share”

•Casual clothing recommended; safety glasses required for demos; work clothes suggested for participating in open forge time

•Cost: $265 includes room and board (“The food is fabulous!”)

•Tim Neu (registration), Dept. BKG12, 511 Beaverkill Rd., Olivebridge, NY 12461 [email protected], or Tim Zowada (general questions) 231-348-5416 www.ashokanknifeseminar.com


Batson Bladesmithing Symposium, Knife Show, auction and cutting competition, spring, Tannehill Ironworks, McCalla, Alabama

•Past courses: Basic bladesmithing, damascus, handles and guards, folder construction, sheath making, scrimshaw and much more taught by Kevin Cashen, Wade Colter, Jim Crowell, Alex Daniels, Christoph Deringer, Rick Dunkerley, Ken Durham, Vince Evans, Jerry Fisk, Don Fogg, Rick Furrer, Wayne Goddard, Jay Hendrickson, B.R. Hughes, Joe Keeslar, Chris Marks, Charles Ochs, Mel Pardue, Al Pendray, Tim Potier, Steve Schwarzer, Devin Thomas and others; supplies, materials, knifemaking equipment and more

•Cost: Contact Jim Batson for more information

•Jim Batson, 256-971-6860 or 912-383-6776, [email protected]


Big Sky Country Conference, July 14-15, Josh Smith’s Knife Shop, Frenchtown, Montana

•Past instructors (mid-level to highly advanced classes; everyone welcome, especially collectors;): Harvey Dean, Rick Dunkerley, Larry Fuegen, Tim Hancock, Richard Rogers, Bill Ruple, Jurgen Steinau, Owen Wood, John Young and more

•Notepad and recording devices; everything else is available there

•Cost: $185 per person, $225 per couple; includes lunch and dinner Saturday; collectors encouraged to attend the Big Sky Country Knife Show Friday before the conference; the show includes 12 top makers specially selected to attend (contact Josh for an invitation)

•Josh Smith, 406-626-5775 [email protected], www.joshsmithknives.com


Branson Hammer-In & Knife Show and cutting competition, Sept. 29-30, The Shepherd of the Hills Farm, Branson, Missouri

•52-table knife show ($100 exhibitor table fee) runs concurrently with hammer-in both days; cutting competition on Saturday

•2011 demonstrators/courses (beginner to advanced level) included: Jim Crowell, bladesmithing hunters; Kyle Royer, bladesmithing bowies; Jerry Lairson, fitting guards; Brion Tomberlin, heat treating and ABS JS blade testing; Linda Ferguson, scrimshaw; Jason Burton, grinding a hunter blade; Bill Lyons, filework; and more

•Cost: Attendance free to the public

•Gary Mulkey, 417-348-0123, [email protected]


California Hammer-in (ABS), Oct. 19-21, College of the Sequoias, Visalia, California

•Past courses/instructors (everyone welcome): Basic forging, heat treating, grinding and  finishing, and handles and guards to advanced forging of complex mosaic damascus patterns and folding knife construction; also, wire inlay, filework, sheathmaking, forge design and construction, the making of wootz and tamahagane, and more; instructors Bill Burke, Jon Christensen, Rick Dunkerley, Tom Ferry, Don Fogg, Joe Keeslar, Bob Kramer, Greg Neely, Michael Vagnino, Owen Wood and others

•Bring safety glasses, ear protection and long pants, and notepads pens/pencils

•Cost: $55

•Michael Vagnino, 559-827-7802, [email protected], americanbladesmith.com


Great Smoky Mountain Bladesmithing Symposium & Knife Show, March 9-11, Haywood Community College, Clyde, North Carolina

•Bill Wiggins, 828-226-2551, [email protected]


Guadalupe Forge Hammer-In & Knifemakers Rendezvous (includes a show-and-tell knife show), February and September, New Braunfels, Texas

•Past courses (everyone welcome): basic blade forging, advanced blade and damascus forging, mosaic damascus, grinding, handles and guards, mortise-tang construction, slip joints, locking liners, lockbacks, basic machining, surface grinders and pantograph mill, leather and metal sheaths, engraving basics, filework, choosing quality handle materials and more. Also Stout’s one-on-one basic, advanced and folder classes, and a tentative one on autos

•Basic tool-room attire

•Cost: $200 (noon meals included)

•Johnny Stout, 830-606-4067, [email protected] or  Harvey Dean, 512-446-3111


Haywood Community College (ABS), February through December, Clyde, North Carolina; campus is a designated arboretum with many “natural” classrooms in the Appalachian Mountains of Western North Carolina

•2012 demonstrators/courses: Brute de Forge, Joe Keeslar; intro to bladesmithing (2 separate courses), Greg Neely (week 1) and Jim Batson (week 2), and  Bill Wiggins (night classes); handles and guards, Jim Rodebaugh; damascus (2 separate courses), Tim Potier and Steve Dunn; and spring and fall hammer-ins

•Cost: Ranges from $65 (hammer-ins) up to $850 for each course

•Howard Tew, 828-627-4667, [email protected], www.americanbladesmith.com


Heartland Hammer-In, Oct. 6-7, Washburn Institute of Technology, Topeka, Kansas

•Steve Culver, 785-484-0146, [email protected]


Joseph Szilaski Knife & Tomahawk Learning Center, classes year round (mostly weekends) in Joe’s 4,400-square-foot shop

•Course schedule (everyone welcome; 6 students per class): blade forging, grinding (2 days; Jim Siska assisting); hawks (5 days); locking-liner folders (4 days); also, 2-day courses in bladesmithing, grinding, handles and guards (Siska assisting), carving ivory, steel and bone, engraving and inlay, and more

•Wear good shoes and long pants w/no cuffs or nylon; hearing and eye protection (though goggles, masks, gloves and ear plugs are provided)

•Cost: Most classes $200 per day (includes materials, supplies and meals)

•Joe and Lori Szilaski, Dept. BKG12, 52 Woods Dr., Pine Plains, NY 12567 518-398-0309, [email protected], www.szilaski.com


Mid-America Hammer-In, Aug. 24-26, Miami County Fairgrounds, Troy, Ohio

•Butch Sheely 419-832-5801 [email protected]


New England School of Metalwork (ABS), December 2011 through November 2012, Auburn, Maine

•Course schedule (contact Dereck Glaser for levels of expertise required): basic bladesmithing and American-style tanto, Nick Rossi; simple sheathmaking; basic damascus knifemaking, Christoph Deringer; intro to Japanese sword forging, Howard Clark; damascus, J.D. Smith; intro to bladesmithing (2 separate courses; each one includes dorm and kitchen use), Jim Crowell (1 week each) and instructor to be determined; handles and guards; Brute De Forge, Joe Keeslar; summer hammer-in; and more

•Cost: Ranges from $55 (hammer-in) up to $1,000 for each course

•Dereck Glaser, 207-777-3375, [email protected], www.newenglandschoolofmetalwork.com


Studio 4 Forging, dates to be announced, Seattle, Washington

•2012 demonstrators/courses: Mike Vagnino, lockback folders, 3 days; Jason Knight, kukri knife class, 3 days; David Lisch, shop rat knife, 1 day; David Lisch, in-depth damascus, 5 days; Tom Ferry, locking-liner folder class, 3 days; also, a wide range of bladesmithing classes throughout the year

•“Come get something hot and make something cool!”

•Cost: Ranges from $150 to $1,000 for each course

•David Lisch, [email protected], DavidLisch.com


Texarkana College Moran School of Bladesmithing (ABS), February through October, Washington, Arkansas (venue is a replica of a one-room school house and a stable/barn)

•2012 demonstrators/courses: intro to bladesmithing (4 separate courses) by Greg Neely and Dickie Robinson, Gordon Graham, Kevin Cashen and Mike Williams, and Jim Crowell and Tim Potier; handles and guards (4 separate courses) by Dan Petersen, Roger Massey, Mike Ruth Sr., and Joe Keeslar; damascus (2 separate courses), J.R. Cook and Steve Dunn; slip joints, Wes Davis; and spring and fall hammer-ins (both at Piney Woods; contact B.R. Hughes, 903-838-0134, [email protected])

•Cost: Ranges from $55 (hammer-ins) up to $850 for each course

•Debbie Bricker, 903-832-5565 ext. 3266, [email protected], www.americanbladesmith.com


Willow Bow Ranch Seminars, instruction offered pretty much year round, Riverton, Wyoming

•Courses (no experience necessary): Each student forges, heat treats and grinds a high-performance blade of 52100 or 5160 steel and tests it for cutting and toughness, with close to a week necessary to complete one blade; etching; advanced seminars on handles and guards and sheaths available on request; Ed Fowler and Chris Amos, instructors (both one-on-two and one-on-one instruction available when possible)

•Wear cotton shirts and pants; bring glove/gloves, shop apron if you use one, safety glasses, earplugs and your favorite hammer

•Cost: Contact Ed Fowler for more information

•Ed Fowler, 307-856-9815


Youth Hammer-In (ABS), June (dates to be announced), Smoky Mountain Knife Works, Sevierville, Tennessee

•Contact Houston Price, 865-397-0053, [email protected]


For more on the latest knives, knifemaking instruction, knife trends, knifemakers, what knives to buy and where and much more, subscribe to BLADE® Magazine, the World’s No. 1 Knife Publication. For subscription information click on http://www.shopblade.com/product/blade-magazine-one-year-subscription-us/?r+ssfb060112#BL1SU


 

5 Pieces of Critical Knifemaking Safety Gear

Making knives can be gratifying, but it can also be dangerous, dirty labor that requires proper precautions. Here is a selection of gear that can make the knifemaking experience safe and more enjoyable.

If you need a reminder of what can happen if you don’t take safety seriously, read these knife shop horror stories here and here.

Reusable Respirator

Safety mask for making knives

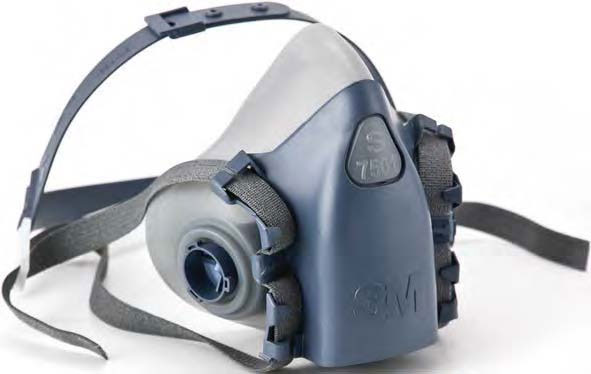
Breathing in fine metal particles and wood dust can do serious damage to your lungs over time. While disposable respirators are good products, anyone who grinds and sands frequently needs a higher level of protection. As result, Jantz offers the 3M 7500 series Reusable Respirator.

“The biggest complaint we hear about respirator use is comfort and heat,” Jantz’s Shanna Kemp noted. “3M’s 7500 series solves these problems with a combination of comfort and durability.”

MSRP for both medium and large sizes: $33.95 each. The MSRP for a combination cartridge to complement the unit is $14.95.

Belt Safety Guard

Belt guard for making knives

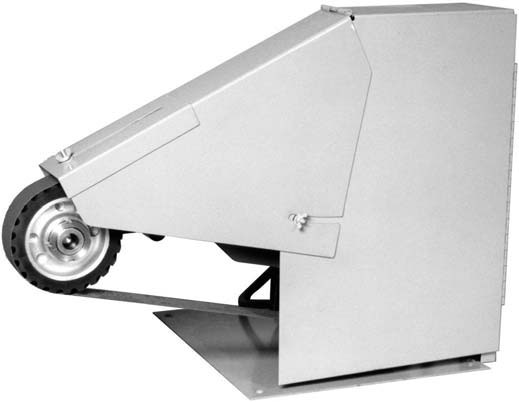
Hawkins Knife Making Supplies offers the Bader B3 Belt Guard, which features an adjustable front hood that minimizes the risk of injury if an abrasive belt should break while in use. Order by phone only. MSRP: $170 (plus shipping and handling).

Forge-Welder Safety Glasses

safety glasses for making knives

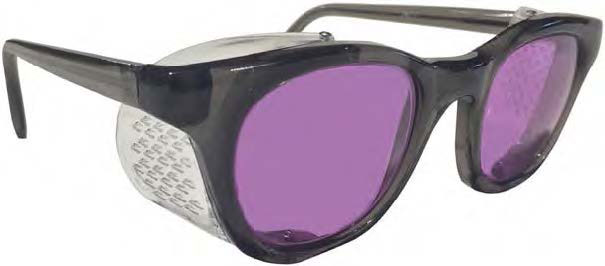
David Kayne of Blacksmiths Depot says the Didymium Glasses are the company’s best-selling safety item.

“They will save the eyes of anyone who regularly works at temperatures above 2,000°F,” he noted, “forge welding of billets for damascus in particular.” MSRP: $75.

Super Magnet

magnet for knifemaking

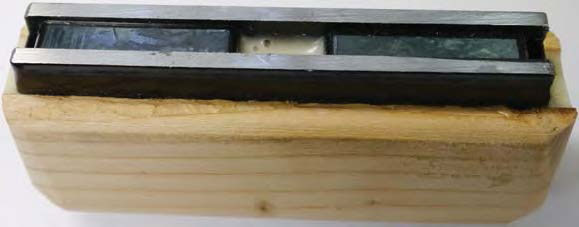
According to Shannon Edgington of Knife & Gun Finishing Supplies, K&G’s model no. WT12 magnet comes in a 5-inch size and is more than strong enough to hold small pieces of steel against a disc or belt sander.

“The magnets are great ‘finger savers’ for removing the bark or just flattening the surface of steel,” she wrote. MSRP: $19.95.

Heat-Resistant Work Apron

apron for making knives

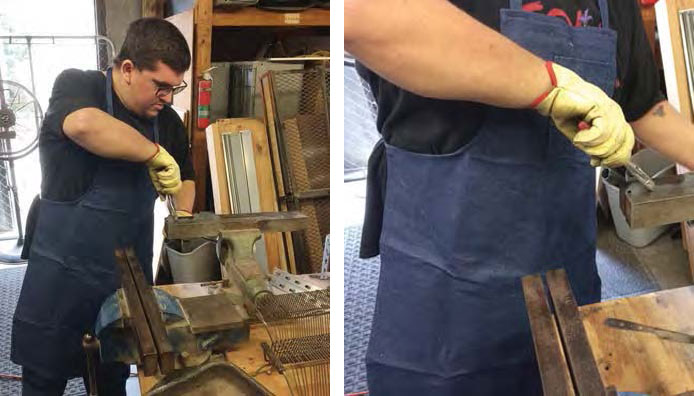
Texas Knifemaker Supply’s heat-treat technician wears the company’s heat-resistant denim work apron to shield himself from the oven’s radiant heat, as well as from the red-hot blades as he checks them for straightness before air quenching.

The heavy-duty denim is nice and thick and has a waistband cord to tie behind the back. One size fits all. The apron also protects clothes from dirt and grime. A handy pen pocket is ideal for telescopic magnets, safety glasses, etc. MSRP: $12.95.


Learn More About Making Knives

how to make a knife

Knifemaking 101: Why Do Knifemakers Use Titanium?

0

Here’s why knifemakers use titanium:

  • Lightweight and tough
  • Softer than steel
  • It’s a reactive metal

In the knife world, titanium has been at the forefront of space-age metals for well over two decades, due in great part to the boom in the tactical knife genre borne out of the first Gulf War in the early 1990s. Titanium was originally used in the U.S. space program for its weight savings and toughness, and from there bled into military programs for the very same characteristics.

Titanium is also nonmagnetic, proving useful in certain applications. While tough, titanium is softer than steel, and although some knifemakers have used it as blade material, it never quite caught fire like the new exotic stainless steels that dominate the upper end of the market today.

Aluminum is also nonmagnetic and anodizes quite well, but it gets little respect in the knife industry because as an extremely soft metal it’s considered an inexpensive alternative to titanium.

Titanium is a reactive metal—its characteristics can be changed by outside influences. Heat-treating knife handles or dipping them into an electrolyte solution that has been both positively and negatively charged color enhances the metallic surface. The amount of heat or electric charging can be varied by the amount of direct heat or voltage applied, and this determines the color hue that the metal takes.


Learn More About Knifemaking in the World’s Greatest Knife Book

Best books about knives

Photos: How to Wrap a Japanese-Style Handle

0
Japanese Style Knife Handle Wrap
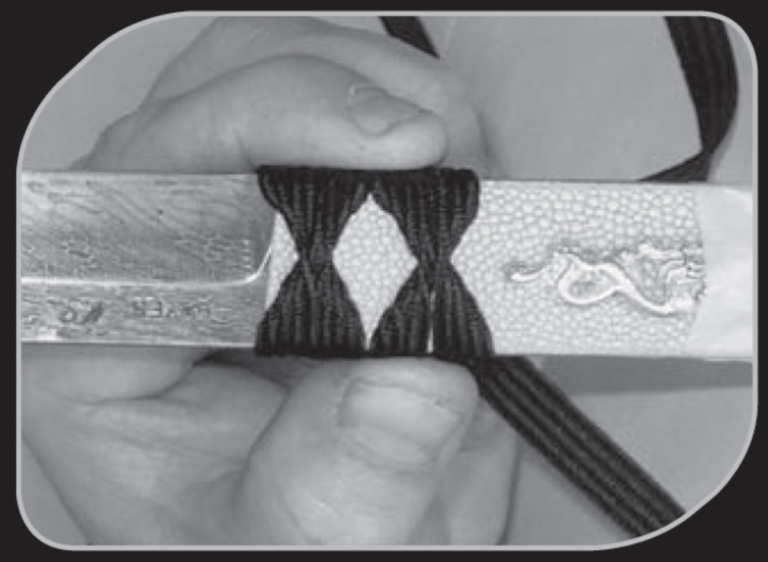
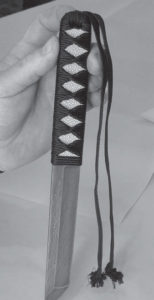
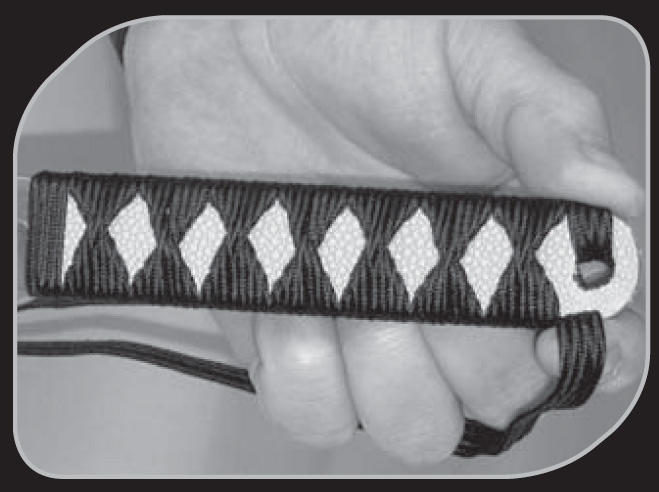
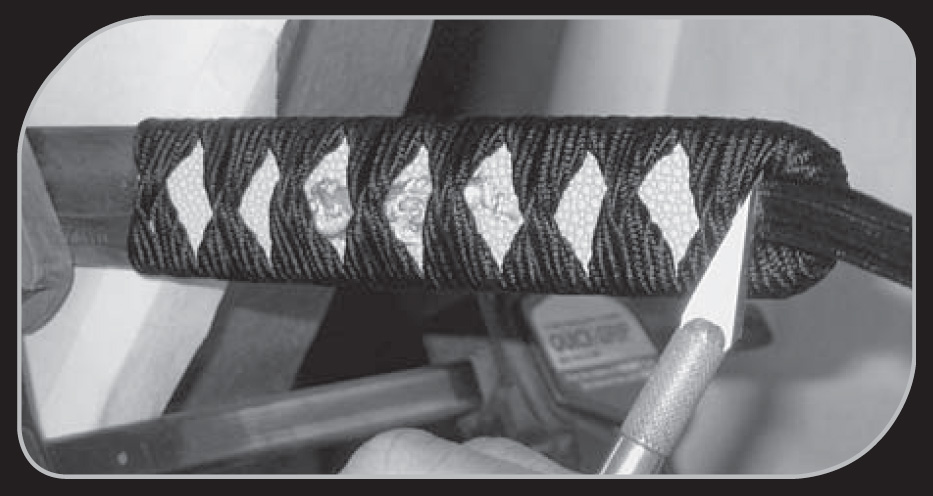
The finished wrap should look like this.

ABS master smith Wally Hayes details each step in this photo series. This demonstration wraps over a ray skin handle.

Japanese Style Handles
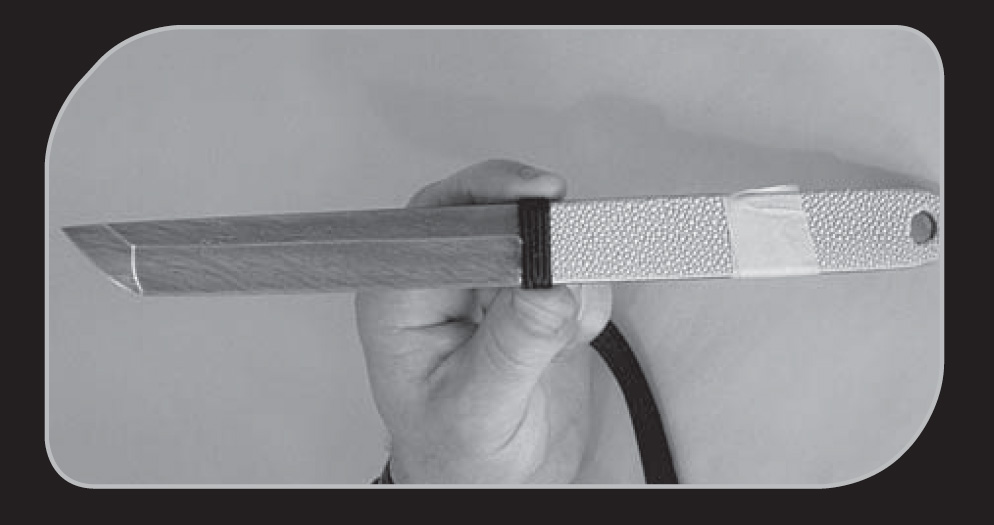
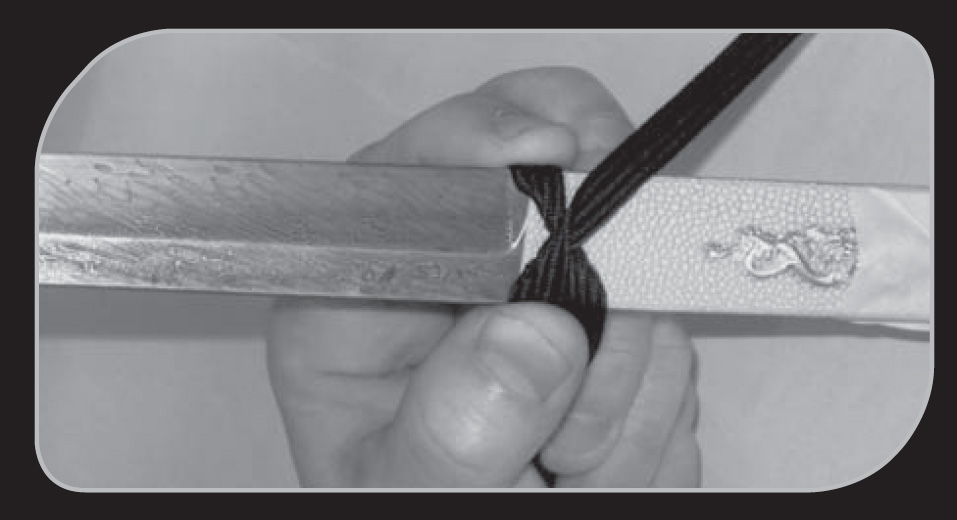
Step 1: Lay the middle of the silk wrap across the handle, overhanging the ray skin a little bit.
Knifemaking photos
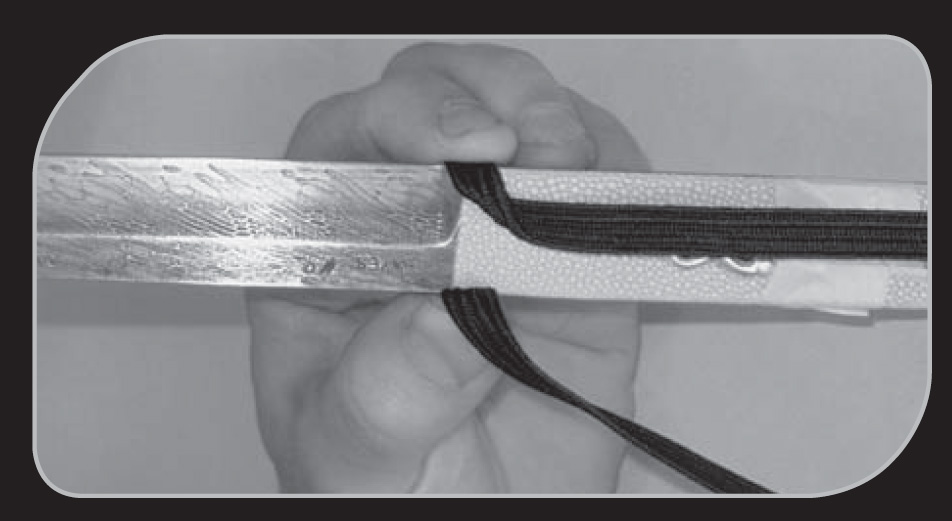
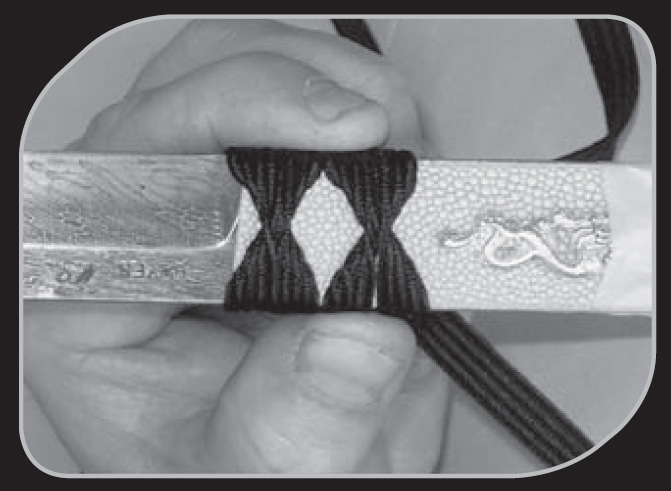
Step 2: Start by folding the wrap a half turn down. The trick is to fold the wrap, not twist it.
Wally Hayes knifemaker
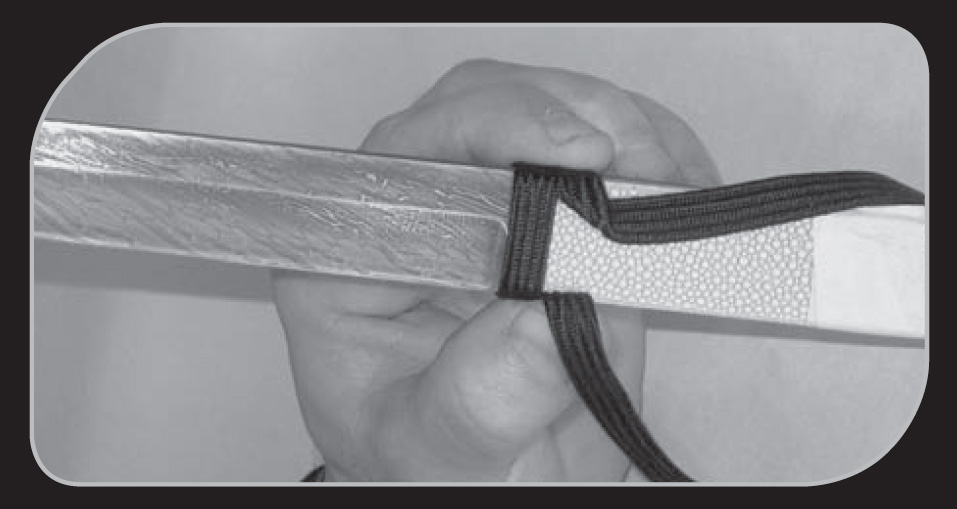
Step 3: Fold the wrap a half turn up.
Japanese knife handles
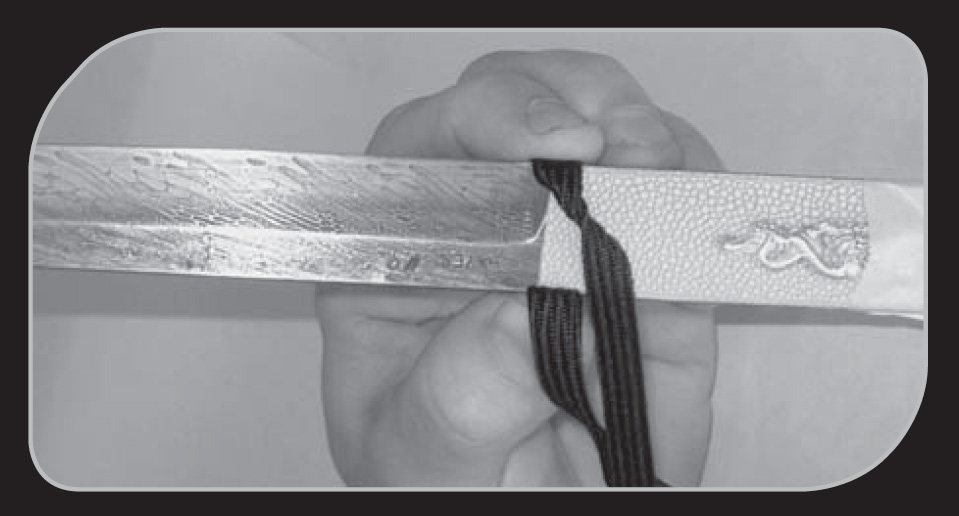
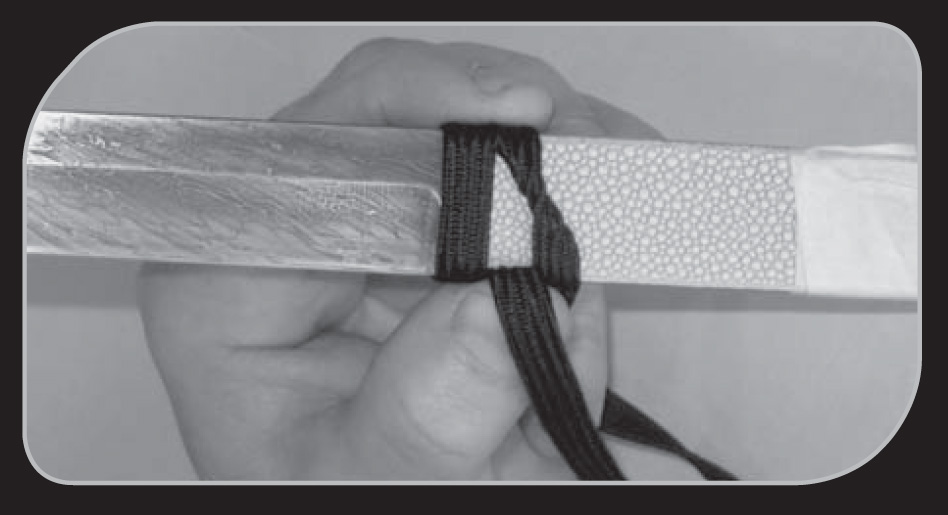
Step 4: Fold the wrap a half turn down, being sure to always turn the half-turned-down part into the handle side.
How to wrap a knife handle
Step 5: Fold the wrap a half turn up and lay it across the handle. Reach around the back of the handle and pull the ends of the wrap tight.
Knife handle wraps
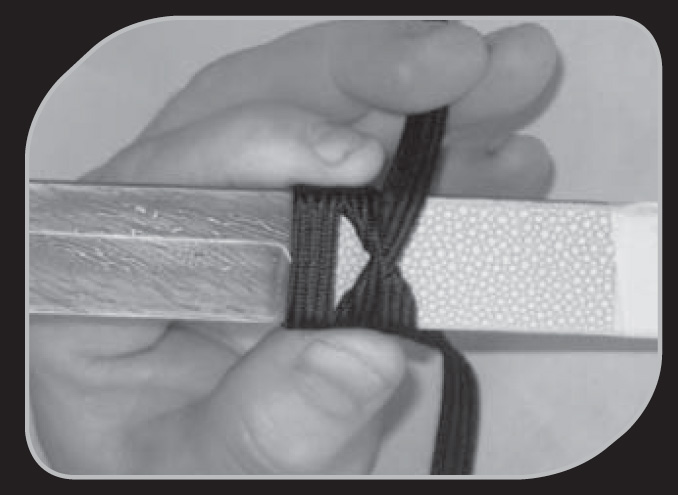
Step 6: Start again on the right-hand side of the handle. Fold the wrap a half turn down.
Ray skin knife handles
Step 7: Fold the wrap a half turn up.
Wrap a knife handle with cord
Step 8: Fold the wrap a half turn down and then a half turn up, lay it over the right side and grip it. Adjust your grip, pull the ends of the wrap tight and re-grip. The wraps will lock into each other. Keep the folds and crossover section in the middle of the handle. Pull both ends tight.
Knife handle wrapping tips
Step 9: Continue wrapping down the handle. The first wrap on each side is left over right. As you continue down the handle, alternate left over right, then right over left.
Japanese Style Knife Handle Wrap Example
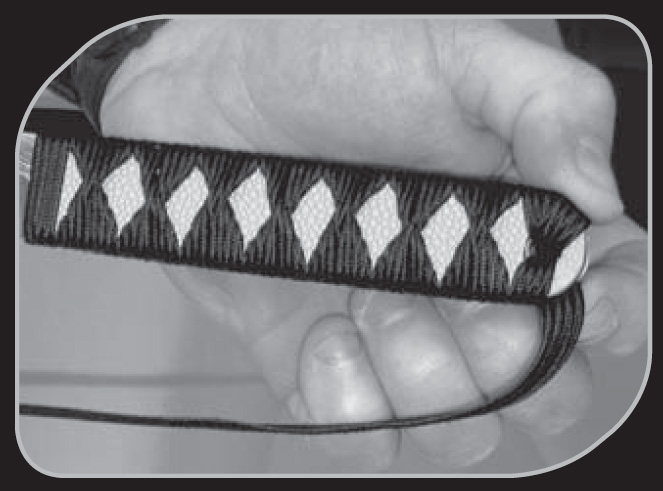
Step 10: Once you get to the handle butt, feed the wrap through the lanyard hole.
Step by step knifemaking tips
Step 11: Feed the wrap through the lanyard hole until you cover the entire butt.
Gluing knife handle wrap
Step 12: Hold both ends of the wrap and apply a drop of Crazy Glue® to freeze the wrap in place.
Wrapping a knife handle
Step 13: Turn the knife over and clamp the blade to a table. Cut off the ends of the wrap with an exacto blade.
Gluing a knife handle
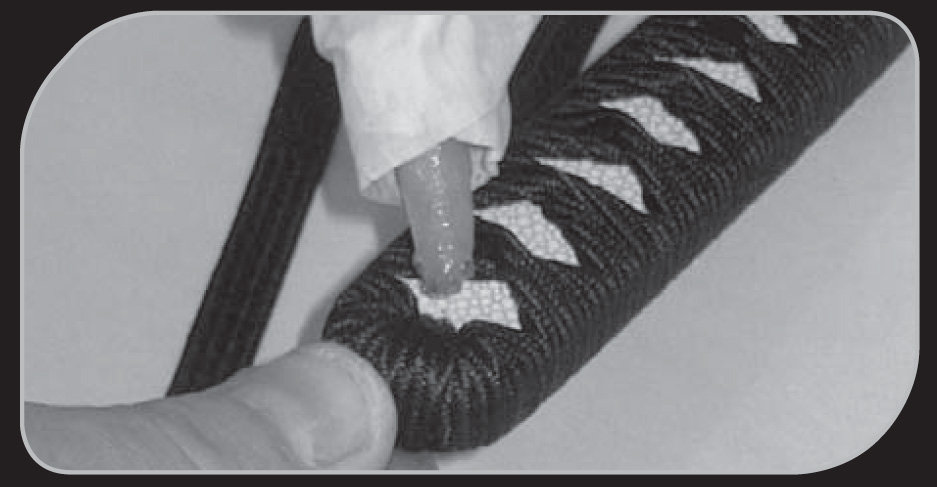
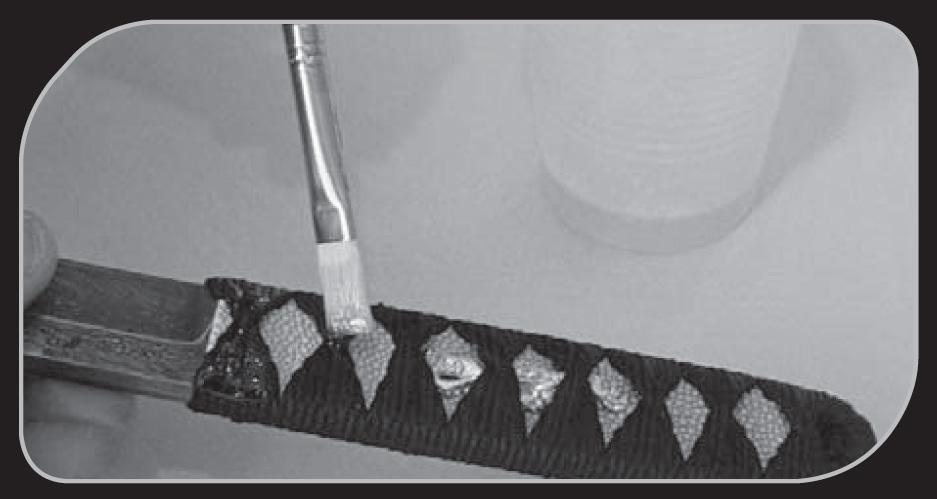
Step 14: Being careful not to get it on the ray skin, apply epoxy to the wrap with a small paintbrush.


Survivalist Creek’s Life Led Naturally to Whiskey Knives

All Whiskey Knives come with multiple sheaths that configure to however you like to carry, or you can upgrade to what you see here.

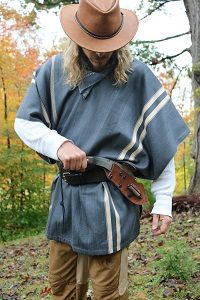
Survival instructor, author and TV star Creek Stewart cross-carries a Whiskey Knives Corvid.

When Matthew Stewart was 5, his grandfather gave him a nickname that would chart the course of his life. “I was always playing in the creek,” said Creek Stewart, survival instructor, author and star of The Weather Channel’s now-cancelled “Fat Guys In The Woods.” No matter the time or weather, the boy was at the creek—happy. Not much has changed, except the budding outdoorsman of yore has now built an empire on his comfortable, family-friendly style of survival instruction. All things Creek also includes the soundly crafted, old-timey line of Whiskey Knives, which in addition to being ideally designed for bushcraft and easy on the wallet, also offers some scaled-down versions of classic styles that hands of all sizes can control. You can read all about Whiskey Knives and how they are made in an upcoming issue of BLADE magazine. If you’re not a subscriber, sign up so you don’t miss it.

Creek is “everywhere” and there are good reasons for that, not least being that he is genuinely warm and friendly. “I like working with people,” he said. Creek was a Boy Scout and an Eagle Scout. The first E in the CRE///K logo is representative of a scratch from an eagle’s talons. He continues to be a devotee of the Boy Scouts of America and a counselor for the Wilderness Survival merit badge. He lives the Be Prepared Boy Scout motto, and opted for Not If But When as his own tagline. Yes, scouts are being taught all kinds of skills, explained Creek, “but they’re also building character and learning life lessons.” He listed perseverance, teamwork, manners, camaraderie—all things the Boy Scouts instilled in him.

At Butler University in Indianapolis, Creek first perused a pharmacy major, but the misdirection, the urban setting and a campus crow that thought it was an alarm clock brought him to an awakening. You can read about his adventures trying to snare the bird on his website at The Crow, but in summary, the crow reawakened Creek’s inner woodsman. He decided he wanted to teach wilderness survival skills and set about making it happen.

He settled on a business major, a plan that would serve him well. During his sophomore year, he wrote and illustrated a wilderness survival field manual that collected his knowledge at the time. He had the book printed and spiral-bound, and offered free classes at Boy Scout troops to peddle it. He sold books, but he longed for a way to bring his customers to him rather than traveling to them. He asked his parents if he could teach a class in the woods on the family farm. Although still unnerved by his switch in major, they agreed. He sent out press releases and 15 people showed up. He’s been teaching ever since, part-time for many years but never quitting on his dream.

Creek’s business schooling helped him hone his marketing strategy. His many brands include, in addition to Whiskey Knives, Willow Haven Outdoor Survival School where he teaches one-day and weekend getaway survival courses on his 20-acre property, complete with lodge, in Anderson, Indiana. He also is lead instructor for the Escape The Woods challenge, which takes place at various locales around the country. The Not If But When Survival Store, which his parents now run, offers a collection of widely available survival items. And, Apocabox is a bimonthly subscription; six times a year members receive a box of survival tools and gear, hand-picked by Creek. It also includes a challenge that you can practice in the calm and comfort of a non-crisis. For instance, the December box included instructions on making snowshoes from your Christmas tree.

Creek’s overview of Whiskey Knives includes a revelation: his first knife.

Creek also saw that writing was going to be essential to reaching the right people—namely men and women of all ages and abilities. (While other survival instructors might emphasize immersing you in a survival scenario while you’re still learning, Creek feels that people absorb more and retain it longer, if they’re warm, dry and fed.)

His best-selling book is “Build the Perfect Bug Out Bag,” but he offers one on putting together a bug-out vehicle, two on survival skills and an intriguing one on the survival skills used in “The Hunger Games.” But Creek has also written two fiction books. “Stuck” is a short story about a Boy Scout dropout who through a series of bad decisions finds himself in a crisis situation—quicksand!—that he can only survive by using what he learned in scouting. “Rugosa” is a young-adult romance, due out this month. The novel has been in the works for six years. “I’m really sticking my neck out on this one.” Creek is anxious to see if his fans “get” it. “I’m a survivalist, but I’m also a person,” Creek said. (Check back for an upcoming review.)

Some people learn about Creek via completely different avenues. They may read some of his guest posts on The Art of Manliness blog and other websites. “I’ve known Brett (McKay, founder of AoM) a long time. I’m so proud to be a part of that,” Creek said. The Art of Manliness celebrates men stepping boldly into their roles as men, husbands and fathers, and includes articles on everything from health and style to relationships and how to survive in the wild. Creek has also been a guest on television shows such as TODAY, Inside Edition and Fox & Friends. He’s been featured in magazines like Men’s Fitness, Backpacker and Outdoor Life. And he was the star of The Weather Channel’s hit show, “Fat Guys in the Woods.”

When IBM purchased the digital portion of The Weather Channel in 2015, many programs were slashed, and “Fat Guys in the Woods” was just one of them. The show provided Creek with the ideal outlet for his wildlife survival instructing and was an inspiration to viewers who wanted to spend more time in the outdoors or jumpstart a healthier lifestyle. Three sedentary buddies would spend a week with Creek, learning survival basics. The last 24 hours would be spent alone, each man building his own shelter and fire. Creek would award one of them with a knife-sheath set. One would stand out as needing encouragement, or being there for the right reasons or excelling in a certain skill. “He gave it everything he got—a job well done,” as Creek put it.

That kit was an Ontario Knife Company’s Black Bird SK-5 wilderness survival knife with a sheath designed by Paul Scheiter of Hedgehog Leatherworks. It was the sheath that had Creek thinking about how to fine-tune the products he offered going forward. “I love my parents, and every day I get to spend with them (at Not If But When) is a blessing,” Creek said. He’s also happy to provide a place where people can find all the products he recommends in one place. But what he really likes is working with small American businesses that reflect simple, well-made, traditional craftsmanship. “I like things that have a story.”

That quest for mom-and-pop entrepreneurship and throwback workmanship with a story behind it, is what led to one of Creeks proudest collaborations: Whiskey Knives made by Reptile Toolworks in Kentucky. To read more about this partnership and exactly how Whiskey Knives are constructed, be sure to subscribe to subscribe to BLADE magazine.

bl1su-70Don’t Let Your BLADE Subscription Lapse

BLADE Magazine is all about the blade: what it’s made out of, how its made, to what specifications and even who makes it. Be sure to keep your issues coming as the months tick down to BLADE Show, June 2-4 in Atlanta, Georgia. At $21.98 you’ll save 70 percent off the newsstand rate. Other options include digital, Canadian print and International print subscriptions.

Advertisement

Must Read Articles

Read this before you make a knife

Knifemaking 101 – Read This Before You Make a Knife

  by Wayne Goddard My experience has taught me that there's nothing like digging in and getting started. I've often said the hardest part of the...
how to forge damascus steel

How to Forge Damascus

Advertisement
Advertisement