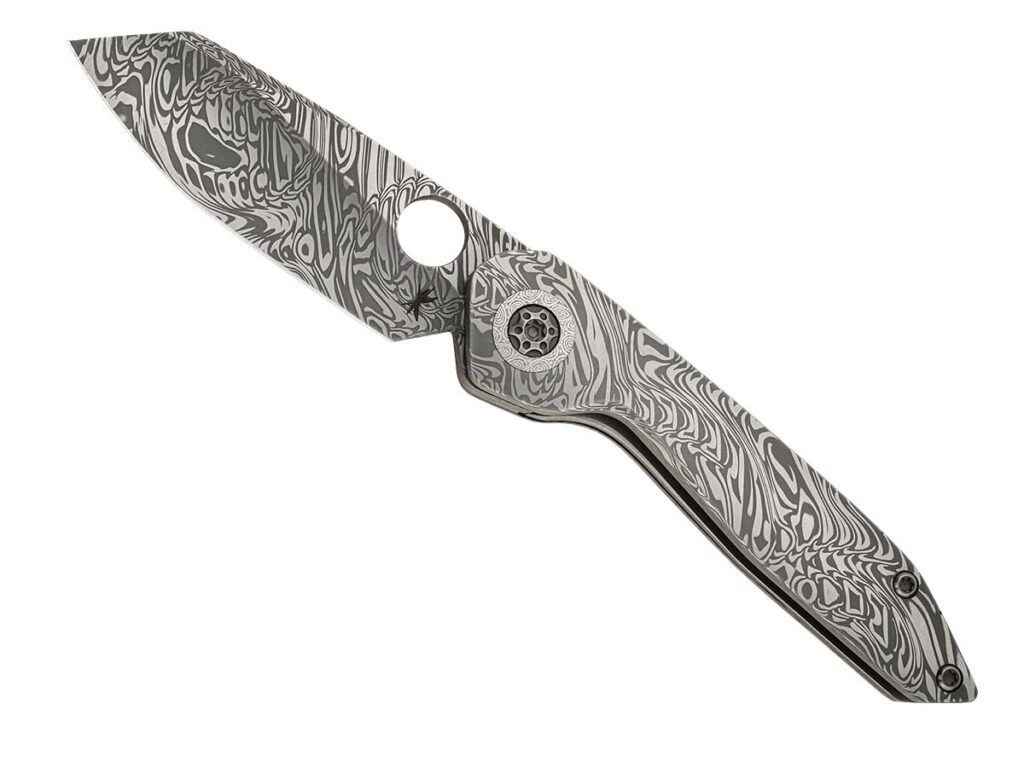
Knifemaking is the building of a knife, which includes the blade, handle and other accouterments. Blades are made by either removing metal from a steel blank via a grinder – known as stock removal – and the forging to shape of hot steel into a blade in the process known as bladesmithing. Other parts, including bolsters, guards, pommels, etc., are needed to complete the finished knife.
I received an email from Roberto Mazzarella of knifeplanet.net saying he did some research on traditional European knives, and contacted museums and associations to find one traditional knife for every European nation. He, of course, found out that some nations have many knife patterns they claim as their own, and others were a little more difficult to uncover. But his research did result in a fascinating and diverse array of European knives. He agreed to allow me to link to his resulting article, “Around Europe in 47 Knives: The Most Iconic Knives of Europe.” Whether you agree with his findings or not, it’s at the very least neat to look at the knives.
As Mazzarella states in his opening paragraphs, “Knives have been around since caveman chiseled stones to meet their daily needs. Nowadays, thankfully, knife making has progressed quite a ways. In Europe, knife making and knives have a rich, deep and complex history, dating back to cavemen themselves. Therefore, the continent is home to thousands of diverse and unique knives and knife making cultures stretching from medieval Belgium to Ottoman Turkey. Being such a diverse and unique area, however, we wondered how knives differed around the continent. For example, is an iconic knife in Belarus the same as a knife in Bulgaria? Is there an iconic knife from Albania? Due to the fact that there has never been any in-depth research of this kind before, we took it upon ourselves to find these answers. We contacted local knife makers, museums, knife collectors, and local historians from every country in Europe. This never-before done research took over a month of grueling research and labor.”
For Ages, The Hamon Has Fascinated Makers And Knife Users Alike. Finicky, Beautiful, And Historic, The Hamon Continues To Wow.
It stretches much if not most of the blade’s length, and when it appears it’s accompanied by an air of mystery, of the exotic. Its contours are created by the knifemaker, and it has always served as a focal point for function and aesthetics. But exactly what is it?
For ages, the hamon has fascinated craftsmen and cutlery users alike.
“Technically, the hamon is the differentiation line between the hardened martensitic edge and the ‘not hardened’ body of the blade,” explained ABS master smith Brion Tomberlin. “The term temper line has been around for years, and, in my opinion, is not correct. Temper refers to drawing back the hardness of the hard martensite after quenching to reduce brittleness and impart toughness. So, a hamon is not a line where temper starts and stops.”
Elaborated knifemaker Joel Mercier, “Tempering refers to the action of heating a quenched steel to a given temperature to remove the brittleness induced by the newly formed martensite, the hard steel molecules created when a steel is quenched. Untempered martensite is very hard but also brittle as glass. It is possible to temper various zones of a blade at different temperatures.”
The hamon is an indicator of the hardening difference between the edge and the softer areas of a blade. These areas are not developed during the making of the steel itself, and a hamon may be formed with stock removal or forged steel.
The hamon comes to life in the quenching process. By achieving different cooling rates, makers form various quantities of martensite, hence a varied hardening of the steel. The faster the steel cools, the higher the percentage of martensite.
The appearance of the hamon denotes a harder edge and a tougher spine in the blade, allowing for flexibility while preserving sharpness and cutting ability. “The hamon,” related knifemaker Johnny Raymer, “is the visual representation of the transition zone between the hardness levels in a differentially heat treated blade. A temper line is often visible within a hamon and is the boundary in which the most drastic change in hardness occurs.”
Along with the functional aspect of the hamon, there is an artful attractiveness. Raymer explains that the hamon extends beyond the temper line itself to the further reaches of the blade during the blending of hardness levels. Most often this is seen toward the edge, yielding a smoky appearance and becoming the hamon’s most artistic component.
How Do You Make A Hamon
Developing a hamon depends on controlling the cooling of the steel as necessary. The rate of cooling is typically determined with the use of clay or another suitable material.
“First, you need to consider your steel selection,” Tomberlin advised. “You need a steel that is low alloy and has a low manganese content. Manganese promotes deep hardening, and the more manganese you have in the steel, the less hamon formation will occur. The most common modern steels that fill the bill are 1095, W1, W2, and 1075, and before the steel is quenched a coating of clay of some sort is applied to the surface that you intend to be less hard. The clay slows down the cooling process in that area.”
Order: 210218_Joel_Mercier_001
Maker: Joel Mercier
Email: [email protected]
Phone: +1 08196905635
Knife Info: Maple sap sprout themed fighter
W2 steel blade, wrought guard and buttcap, copper fittings and curly maple.
Once a blade has been forged or stock removed, Tomberlin takes it to a 120-grit finish that will allow the clay to stick. He thoroughly cleans the blade to remove any oils and then applies the clay. He prefers satanite refractory mortar and learned to use it from now-retired ABS master smith Don Fogg years ago. However, fireplace mortar or certain types of cement, Rutland for example, will also work.
When a light coating of clay is applied, the maker can manipulate the pattern of the hamon. For quenching, Tomberlin uses Park’s 50 oil. Water is an alternative but it takes practice and may produce cracks. “It isn’t for the faint of heart,” he commented.
After quenching, a quick grind at 120 grit will reveal the hamon. Telltale signs that the process has gone awry include the absence of activity—a consequence of the blade being too hot at the moment of quenching. If the hamon runs off the edge of the blade or falls below the pattern of the clay, it indicates that the clay coating was too thick or the blade was not hot enough to perfect the process.
A fine example of a Tomberlin hamon is seen in his chef’s knife with a seven-inch W-2 blade, exhibition thuya wood burl handle, G-10 spacers, and silicon bronze accent. The hamon is subtle yet striking and reaches toward the blade edge in a stunning display.
Raymer adds that the temper line is the boundary of differential hardening, but also notes that it may be more visible in some cases than others.
“It is almost always unbroken, but as far as being clear and well defined, that is not always the case,” he observed. “Depending on the etching or polishing process you can get multiple results for the visual aspect of the hamon, as well as multiple temper lines depending on the hardened areas.
“Etching for a stark contrast with dark smoked or bled-out areas in the ashi* region of the hamon is very popular. But the hamon can also be given a frosted appearance with etching or simply polishing to give it a subtle ebb and flow that is only seen as the hamon catches light.
“As far as a well-shaped pattern, the hamon is very controllable by the artist crafting the blade,” Johnny maintained. “It could be as systematic or symmetrical or as organic and free as the craftsman desires. The most important objective, as with many aspects of knifemaking, is symmetry from one side of the blade to the next.”
Raymer reveals his skills with the creative hamon achieved on a 5.25-inch blade fashioned from 1095 steel accompanied by a magnificent 11-layer handle consisting of brass, G-10 spacers, Tasmanian blackwood and black ash burl. The overall length is 10 inches, and the knife is accompanied by a sheath in seven or eight-ounce leather with a multi-directional belt attachment.
Those who work in stock removal and wishing to try the hamon technique can take heart. “Forged blades and stock removal knives have the same potential for hamon activity in my opinion,” Johnny stated. “All knives become stock removal at some point. The heat treatment is the same for me in a stock removal knife as well as a forged knife.”
Mercier calls the maker’s manipulation of the hamon the most interesting part of the process. “I have yet to ‘crack the hamon code,’” he advised. “There are many variables at play here, all of which will dictate where and how the hamon will show. The geometry of the blade, the steel used, the type and thickness of the clay, the temperature of the steel, the type and temperature of the quenchant, a vertical or horizontal quench, and more.
“I don’t believe there are better shapes for a hamon. As for the location, I would say it depends on the type of blade and how crucial the hamon is. For example, a hamon is more of a question of aesthetics on a kitchen knife than it is on a weapon. A hamon done properly will show three zones very clearly—high, medium and low martensite areas—and it won’t get too close to the edge of the blade.”
Mercier showcases his hamon technique with a fighter sporting a W2 steel blade, wrought iron guard and buttcap, copper fittings, and curly maple handle. The hamon is well defined and distinctive, clearly marking the effects of the differential quenching process.
“A hamon has nothing to do with forging steel,” Joel agreed. “It all happens during quenching, no matter whether the blade is forged or done by stock removal. If the wavy line of the hamon drops down below or into the blade edge, it means that area will be softer and will compromise the edge performance. Many things can be responsible for this, such as a quenching temperature that is too low, clay that is too thick or too low on the blade, or a quenchant that is too slow. I believe the most common mistake new makers do is using too much clay.”
The Visual Beauty Of The Hamon
In the end, the development of the hamon primarily adds another dimension to the visual presentation of the knife. It certainly denotes a maker’s skill and attention to the need for a tough spine and an edge that maintains its sharpness without being too brittle.
The 1084 carbon steel blade of Adam Mille’s fighter comes complete with hamon. The handle is quilted big leaf maple burl. Overall length: 11.5 inches. (SharpByCoop image)
“Hamons themselves are just an aspect of art,” Raymer reasoned. “The process of differential hardening is beneficial in creating a blade that can take more impact like those seen in fighting knives or choppers, but still performs cutting tasks proficiently. This hardening method allows the knife to spring and/or bend without shattering and without reducing edge performance.”
The hamon, therefore, is representative of the highest performance in blade steel, a visual cue to the user to have confidence in the knife’s ability to undertake the task at hand.
*Ashi refers to the area of a hamon’s lines or shapes that descend toward the edge, and are created by thin strips of clay applied during the coating process.
Follow the journey of Iranian bladesmith Masoud Hashemabadi, AKA Apurak, as he masters the art of the X-Rhea knife.
In February 2020, after months of contemplation and with the support of my wife, Maryam, I embarked on my journey in bladesmithing here in Iran. And I finally answered a long-standing urge within me—to delve into the world of forging and knifemaking. I was drawn not simply to the act of shaping steel but to the intricate, multifaceted craft of bladesmithing. Bladesmithing demands a convergence of skills: precise forging, material management, heat treatment, bevel grinding, understanding edge geometry, honing razor-sharp edges and more. Handmade knives, though ancient tools, continue to captivate enthusiasts today, representing a connection to human history.
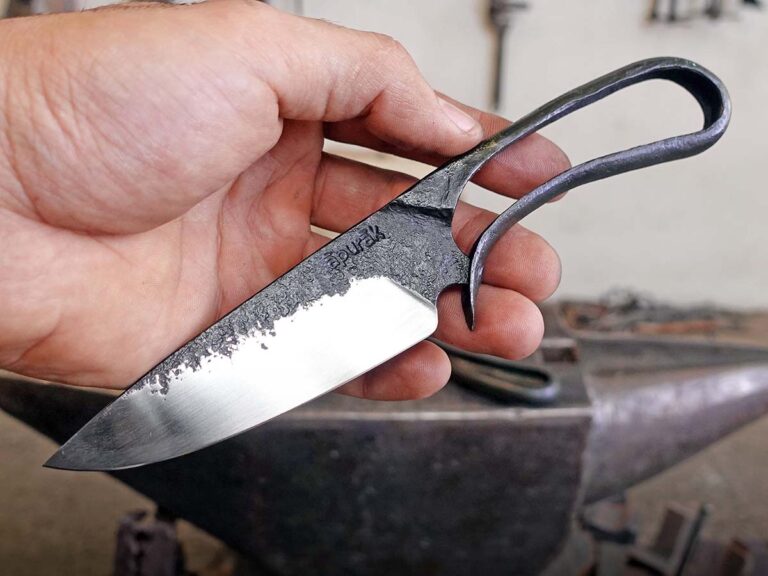
Each of my works bears the mark Apurak, also my handle on Instagram where I go by apurak.co. The word translates to “The Maker” in Pahlavi or the Middle Persian language—an ancient language.
I began forging with basic tools: a steel block as an anvil, a simple hammer, a homemade coal forge, an angle grinder, a hand drill and a welding machine. I spent six months making additional tools and immersed myself in every piece of content I could find on forging. My first knives were rudimentary—simple full-tang and hidden-tang fixed blades. They were decent, but they didn’t fully satisfy me. During this time, I experimented with different designs, including the old blacksmith’s knife (sometimes known as the Viking knife). None of them quite captured my imagination.
Masoud (left) began his blade smithing journey in 2020 after much contemplation and the support of his wife, Maryam (right). The desire to endeavor upon the multi-skilled craft of making knives had been longstanding in Masoud, he recounts.
Then, about a year into my journey, I came across ABS master smith Lin Rhea’s X-Rhea design on his Instagram account. This design—seamless, balanced and powerful—struck a deep chord within me. I knew I had to learn to forge this knife, so I respectfully reached out to Lin for permission. I watched his videos, analyzed every detail and eventually began my own attempts at creating an X-Rhea. This journey marked a new chapter in my life.
From Inspiration To Learning
No one can create a truly unique knife design early in their career. We all start by holding onto something, following established paths until we understand our own direction in the field. For me, the X-Rhea was this guidepost. My early attempts were crude and far from perfect—out of proportion and visibly flawed. But I was thrilled to make progress. With each X-Rhea, I learned more, not only about the design but about the fundamental techniques of forging. This process fulfilled me in ways I hadn’t anticipated.
Regular feedback from Lin himself was invaluable. We communicated frequently through Whats-App and Instagram, discussing various approaches to forging, hammer techniques, and the finer points of knife-making. Lin became more than a mentor; he became a friend, generously sharing his knowledge and guiding me through my early missteps.
X-Rhea Process
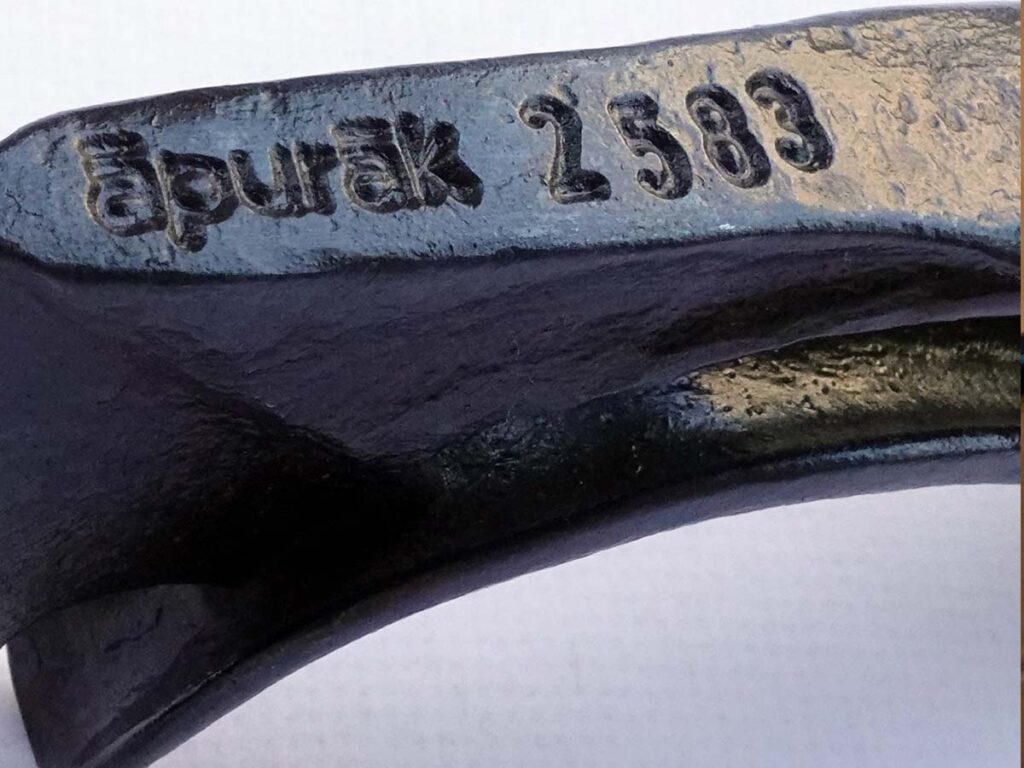
Masoud Hashemabadi maker’s mark, Apurak. The word is from Middle Persian and means “The Maker.” The numbering, seen on the spine of his work, is the year it was created according to the Cyrus Imperial Calendar.
The X-Rhea has a unique shape, but the process of creating it is what makes it truly special. Unlike most designs, which often involve templates or precise measurements to envision the final product, the X-Rhea requires a different approach. You start with a rough sketch and rely on imagination, skill and a sense of flow to bring the knife to life. Each hammer strike must be deliberate and you visualize the end result throughout. This approach makes the final product feel like a true reward, a direct extension of the maker’s vision and hand.
For me, the X-Rhea became more than a knife—it became a pathway toward mastering my craft. Unlike conventional knives, which can incorporate multiple materials like wood, Micarta or stag, the X-Rhea is a single piece of steel. This simplicity, however, does not mean it’s easy to make. Achieving a knife that is functional, strong, ergonomic and aesthetically pleasing in a single piece requires foresight, skill and an understanding of the material’s properties.
Lin and I often spoke about this unique forging process. He explained how the X-Rhea or one-piece concept demands a cohesive flow of thought, a continuity that aligns with the uninterrupted structure of the knife itself. “There’s no breaking point,” he said. His words perfectly captured what I was experiencing in practice. This concept aligned with my personal philosophy: as makers, we should focus more on our skills and presence than on the tools themselves.
X-Rhea Of Tradition
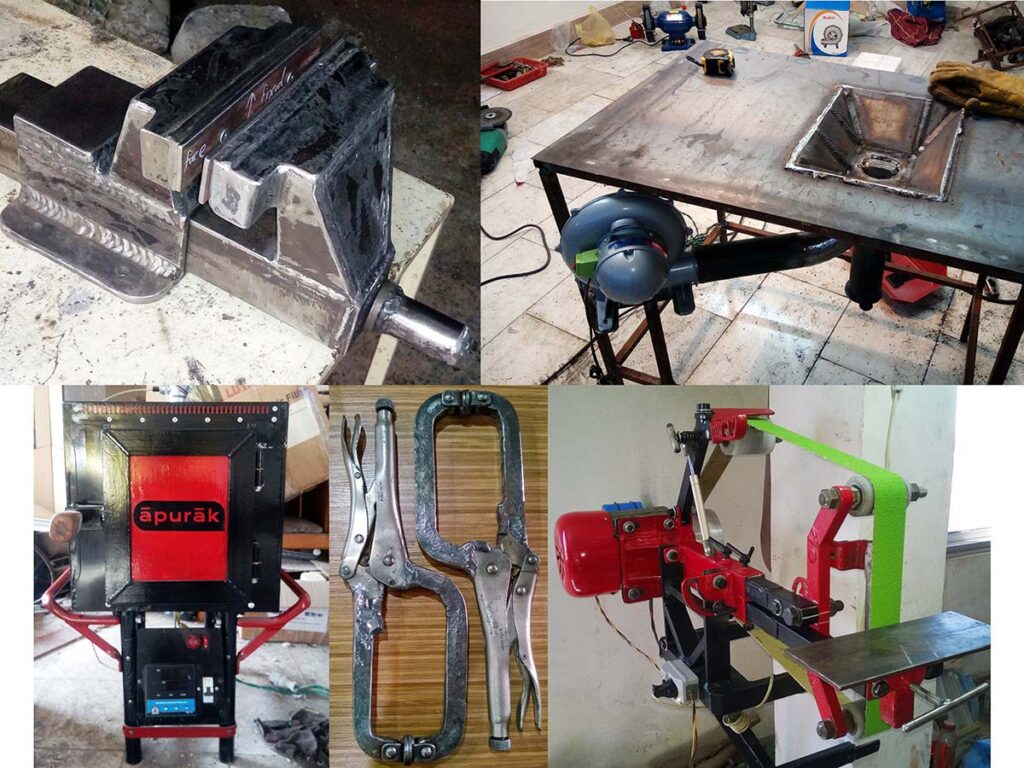
A look at Masoud’s tools he made in his early journey into knifemaking, including (top from the left) a bench vise, coal forge, (below going clockwise) belt grinder, clamps and a heat-treating oven.
Throughout history, craftsmen have created extraordinary works with simple tools. When we look at the objects in museums, we see artifacts made with skills and techniques that, even today, seem nearly impossible to replicate. These craftsmen weren’t limited by the tools of their time. They relied on their presence, creativity and mastery, developing techniques that allowed them to reach incredible levels of precision and artistry. With the X-Rhea, I felt a connection to this tradition. Using only the most essential tools, I was able to engage deeply with each piece I crafted.
In today’s world, technology allows us to create faster and with greater efficiency, but it also risks overshadowing the maker’s role. Many makers, when faced with limited tools, may consider certain tasks impossible. Yet through my experience with X-Rhea knives, I found that fewer tools could offer a sense of creative freedom, encouraging me to explore what’s possible with technique alone. Each knife became a unique testament to the skill, discipline and power of traditional craftsmanship.
Working with Lin, I learned to view knifemaking through a different lens. He encouraged me to see the X-Rhea as an art form that goes beyond simple functionality. In his words, this process is like “a physical manifestation of a simple musical tune.” It became a flowing, intuitive rhythm rather than a rigid sequence of steps.
Editor’s Note: This is the first part of a two-part article. The second part of the article will be added to this story once it runs in the May 2026 issue of BLADE Magazine.
Frame Handles Remain Just As Useful In Making A Knife Today As It Was Centuries Ago.
Frame handle construction for knives has been around for centuries. Historical examples of many Eastern styles like the kard, khyber and yataghan often feature ornamented frame handles. Nineteenth-century knives attributed to James Black and some of the early American bowies also had frame handle construction. Though it’s been around a long time, the frame handle remains a viable modern construction method for today’s custom knifemakers.
There are many ways to crack the nut/skin the cat on frame handle construction. This article will walk through the frame handle process and point out particular problems and potential solutions for those who wish to pursue building a frame handled knife.
Why You Should Build A Frame Handle
Frame handle construction is best defined as using a wrap-around “frame” to conceal the tang of a hidden tang knife. The first question many people ask regarding a frame handle construction is, “Why would you want to do it that way?”
My first thought goes back to the earlier days of the internet when forums were at their peak, and fine makers like ABS master smith Bruce Bump took the time to document “work in progress” (WIP) threads. Bruce had a fine frame handle WIP on the KnifeDogs.com forum in 2013, and the consensus at the time was that you build a frame handle for quite a few reasons, though the first one is “because you can!”
An exploded view shows an ABS journeyman smith Karl Andersen frame handle construction knife before assembly. (Karl Andersen image)
A frame handle is a much more complex build process than your standard full- or stick-tang knife. However, in addition to the show of skill by the maker, frame handle construction has a few distinct advantages that make the complexity worth the effort:
1. A frame handle allows for the look of a full tang, but with the guard-fitting techniques of a stick tang. For a forged stick-tang-knife design that needs a guard, a frame handle allows the use of full-tang-style handle construction;
2. A frame handle is a good way to use scales or slabs on a stick-tang knife. If you have a good set of stag or mammoth slabs, or if you have stabilized wood slabs that might be too fragile for through-tang construction, the frame handle allows you to use the materials on a stick-tang knife; and;
3. The use of a frame handle gives the maker another area to embellish the knife. Some frames are great for engraving, while others may highlight a damascus pattern. Either way, the frame makes the embellishment stand out in ways that are harder to accomplish on a full-tang knife.
How To Build A Frame Handle
At a basic level, the frame of a frame handle is a piece of material, usually metal, that wraps around a stick tang and mimics the look of a full-tang knife. This presents some challenges that have resulted in a few different creative solutions.
•Challenge 1: The tang must fit inside the frame. Some makers insist on precision so there are no gaps and the fit is tight. Others concede that the handle will be held together with mechanical fasteners and sealed with epoxy, so a precise fit between the frame and the tang is not necessary.
•Challenge 2: All parts of the handle must be securely fastened together. I sat through a class with ABS master smith Mike Williams in which he admonished the students, “Don’t trust in the magic of chemistry” by putting your faith only in the strength of glue. Likewise, veteran bladesmith Jerry Fisk challenges makers to think ahead to what their knives might be like in 100 or 1,000 years, and recommends a mechanical connection that won’t fail over time.
One way to address this challenge is to use pins. If you pin the scales to the frame, pin the completed handle assembly to the tang and follow up with glue, there’s no opportunity for failure. Some choose to make all the pins visible as an artistic element, while others take advantage of hidden pins for all but the one through the tang. Another way is to use a threaded fastener.
Bladesmith Salem Straub recently illustrated the technique on a frame handle WIP on his Instagram feed. Salem used a threaded fastener in an internal slot in the frame to mechanically lock all the parts together tightly. The handle material is relieved on the inside to accommodate the fastener.
Another way to use a threaded connection is to thread the end of the tang and use a fastener on the handle butt. An advantage of this approach is that the fastener itself can become part of the embellishment.
•Challenge 3 is the complex fit-up between all of the knife’s elements. Frame handle construction naturally doesn’t excuse a poor guard fit, but it also provides other places for gaps and misalignment. Once again, there are several potential solutions to alignment problems.
One is the use of alignment pins to make sure everything is secure. Pins on the end of the frame go through any spacers and into holes in the back of the guard so that each part indexes the same during assembly. Some makers, including Bruce Bump in the aforementioned epic WIP, advocate for leaving metal tabs on the end of the frame and fitting the tabs into similar holes on the back of the guard
. In both cases, there’s a mechanical connection that prevents the guard, spacers and frame from rotating out of alignment around the center axis of the handle. Either way, when you build a frame handle, the construction will require you to assemble and disassemble the knife repeatedly, so you’ll need some mechanical way to keep things lined up.
Another fit-up challenge is the overall requirement for clean-fitting joints with no gaps. It sounds simpler than it is, but two surfaces that are dead flat will join together without a gap. The challenge of a multi-piece frame handle with a guard and a few spacers is that you are creating a multitude of surface joints, and every single surface must be dead flat.
At a minimum, you’ll have a joint between the guard and frame, and also between the frame sides and the handle material. Any bump or wiggle on any surface and you’ll have a gap in the final product. Flatness comes in degrees. You can get a fairly flat surface on a platen, flatter on a disk, and still flatter on a surface plate or surface grinder. You have to make the joints as flat as you can with the tools you have available if you want a gap-free fit.
I tend to prefer the look of a tapered tang on a full-tang knife, so I’ve started tapering the frame of my frame handles as well. Others stick with a full thickness frame, where the thickness closely matches that of the blade at the ricasso. Some add spacers between the tang and handle material, while others choose to go with the frame and handle slabs only.
ABS master smith Mike Quesenberry used frame-handle construction on his dog-bone bowie. (Eric Eggly/PointSeven image)
Another fit challenge is presented by the frame itself. In order to adequately finish the visible surface of the frame, whether by simple polishing, bluing or etching, or by engraving, the frame must be 100 percent at final-grit finish prior to final glue up.
Many makers learned to make a full-tang knife by finishing the front edge of the scales, gluing the knife together, shaping the scales down to the exposed tang, and then polishing the handle and the tang at the same time. That method will not work for a frame handle that needs to be blued or etched. Personally, I tend to use dummy pins to fit the entire handle assembly together, then grind the scales down to the frame. In his recent Instagram example, Salem Straub used small screws to hold the handle material to the frame.
With regard to the relationship between the handle material and the frame itself, some choose to leave the material slightly proud of the frame for a “museum” or “heirloom” fit. Others prefer the material to fit flush to the tang. Less commonly, some makers round the frame and leave it slightly proud of the material. Whichever you choose, it is important that the fit be maintained consistently all the way around the frame, from the joint at the guard on the top all the way down to the joint at the guard on the bottom.
Once the profile is set, I polish the handle and the frame together down to final grit, and then apply any surface finish to the frame itself. Once all parts are 100 percent complete, they can be glued together as a final step.
When To Make A Frame Handle
So when should you try making a frame handle? In my mind, if you can make clean full- and stick-tang knives, you could be up to the challenge. If you have slabs of exceptional handle material that deserve more than a simple full-tang knife, a frame handle is a way to step up and put the materials on full display. If you have a knife in mind where the frame and guard need to be blued, damascus or engraved, a frame handle is the way to go.
A frame handle knife has its advantages, but the complexity of the construction presents plenty of challenges. As a skilled maker, you may choose to rise to the challenge of a frame handle just to show that you can.
With the popularity of the original article about knife shop accidents, here are five more knifemaking lessons learned the hard way. Use these stories as examples of what to watch for while in the shop. Stay safe!
“I Sawed My Index Finger in Half”
Lesson: A slow moving metal-cut bandsaw can appear quite harmless, yet one of my worst injuries in over 40 years of knife making occurred with mine.
While hurrying to cut a screwdriver slot into the head of a threaded stainless steel handle escutcheon bolt, I failed to do the two safety steps I apply now: fully support the fastener upon a slotted plate encircling the saw blade and hold the bolt with a pair of vice-grips, keeping my hands a safe distance back away from the blade.
But instead, as I pushed the 3/8″ fastener into the saw blade, it snagged the top edge of the face, dragging it down into the exposed slot in the table in front of the blade, pivoting the front part of my index finger into the blade while wedging it in place with the opposing shoulder on the part. As the blade sawed my nail in two and continued to slice through my entire fingertip due to the back pressure from the part, I had to slowly watch and wait for this gruesome process to end once I quickly turned the machine off.
To say it bled a bit was an understatement, as a friend who’d stopped by after I’d left for the hospital asked excitedly if I’d gotten a deer that morning, due to the amount of blood all over the doorknobs and floor leading into the house.
As the doctor was about to remove the sectioned fingernail pieces and stitch up the huge, tapered gash, I’d chosen to remain seated upright on the bench to watch. However, upon trying to insert the needle into my fingertip to deaden it, the callused tip proved so dense that he proceeded to drive the needle all the way through my finger and out the top, shooting a stream of Novocaine all the way to the top of my shoulder.
At that point, I told him, “I think I’ll lie down now.”
Lesson: Any time you place a blade against a fast-moving wheel, use extra caution.
I was getting ready for a turkey dinner and noticed how dull my knife was. I went out to my garage to my paper wheel. I started to sharpen, but my sleeves were loose. I put the knife down, rolled up my sleeves, and grabbed the knife. The knife caught the wheel like a bullet. It hit the back wall and shot straight at my head. I blocked the knife with my hand, and in doing so cut tendons on top of my little finger at the knuckle. I felt like a fool and knew that I did a stupid thing.
James Merten
“That Got Me Nine Stitches”
Lesson: Don’t assume pliers will never fail.
I’ve had a few times that scared me, but one time stands out in particular. I almost had this knife done, and I was holding the handle in my left hand and the blade in my right with a pair of pliers. The blade slipped, and the point went right through my first finger. That got me nine stitches.
Bill Stout
“The Point Spun Across the Palm of My Hand”
Lesson: Protect your hands when using a drill press.
I just finished grinding the blade and a small clip on this little 3-inch blade. I took it over to the drill press for the handle holes. Little did I know that copper, which is what the customer wanted, would grab the drill bit. The knife started to spin out of my hand, like a helicopter.
Instinct made me hold tighter, but the press was stronger. The point spun across the palm of my hand and gave me a deep, 1.5-inch gouge in the palm of my hand.
Now I always wear a Kevlar glove or use a stopper of some sort to catch the knife if it ever spins again.
Lesson: Locks have come a long way, but they’re not foolproof. Also: don’t stab tires to be a show off.
Editor’s note: This one isn’t about knifemaking, but it’s still worth reading.
I was at one of those big shows they hold at Las Vegas every year. The guy hawking the knife was talking about how his knife had the best grip. He was stabbing his knife through a steel belted radial tire.
As the demo went on he invited anyone from the crowd to come up and try to stab their knife through the tire. Finally, a man that looked like Charlie Daniels decided to try. He had a folder in his hand. He took two or three steps and lunged at the tire knife in hand.
I heard a crack and the big man withdrew his hand like people do when they get cut. He stared at his drooping fingers in disbelief. The lock on the lock back had broke and the folder folded closed on his fingers. The crowd gasped. The first aid guys shuffled him off.
So another big guy comes up with a rather large hunting knife. He raised his hand as high as he could and brought the blade down hard in a hammer fist motion. His hand slid down the handle on to the blade, cutting most of the way through three fingers.
That brought the dog and pony show to an end while the organizers of the show directed everyone’s attentions else where. Lesson learned: let someone else show off for the big crowd.
Ernest Lephart
Share Your Stories
Have a horror story of your own? Tell BLADE about it. It could save someone from injury, or worse.
If you’ve ever seen Murray Carter give a sharpening display at his knife show table, shave his beard—or someone’s head—with one of his knives at a BLADE Show seminar or just talked to him in person, you know what a genuine, engaging person he is. If you haven’t seen him up close, his new book, Bladesmithing with Murray Carter, is the next best thing. In some ways, it’s better.
The first in our Knife Books Of The Day series, Bladesmithing with Murray Carter takes you through the Carter process of making knives as only he can tell it. Design, steel selection, forge welding, lamination techniques, heat treating, grinding, finishing, handles, sharpening, sheaths–it’s all here in 160 pages of hundreds of color pictures, diagrams, knifemaking tools and equipment, how-to’s, safety tips, and much more.
This summer’s crop of custom knives brings damascus front and center. From twisted and ladder patterns to stainless blends and copper-clad creations, each blade in this collection highlights not just the maker’s skill, but their artistry with steel. Whether forged for daily carry, culinary precision, or collector prestige, these knives turn heads with standout materials—think crystallized titanium, crosscut mammoth, and ringed Western Myall—paired with performance-driven designs. Featured makers range from journeyman smiths to Guild members, each offering a unique take on the timeless beauty and cutting power of damascus steel.
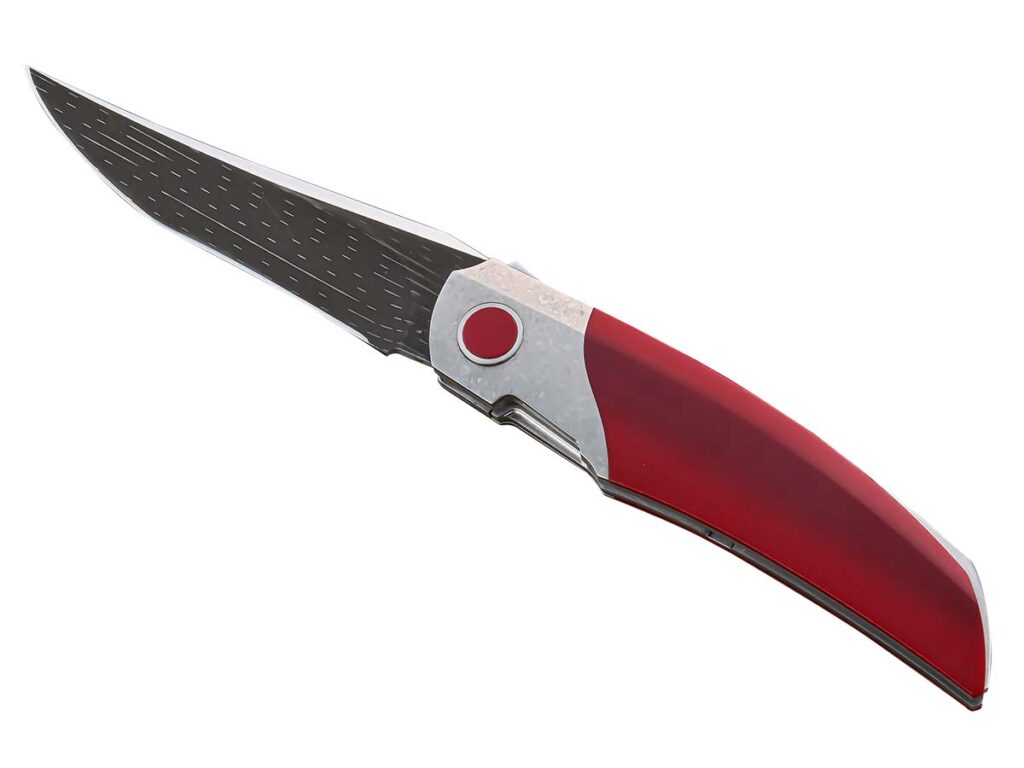
Carlos Queiros Thorn Persian TRS
Knife type: Folder Blade length: 3.35” Blade material: Chad Nichols Starfire stainless damascus Blade grind: Flat Scales: Vintage bright red linen Micarta® Bolsters: Crystalized titanium Pocket clip: Yes Closed length: 4.53” Maker’s price for a similar knife: $4,700-$4,800 at press-time exchange rate Maker: Carlos Queiros (SharpByCoop image)
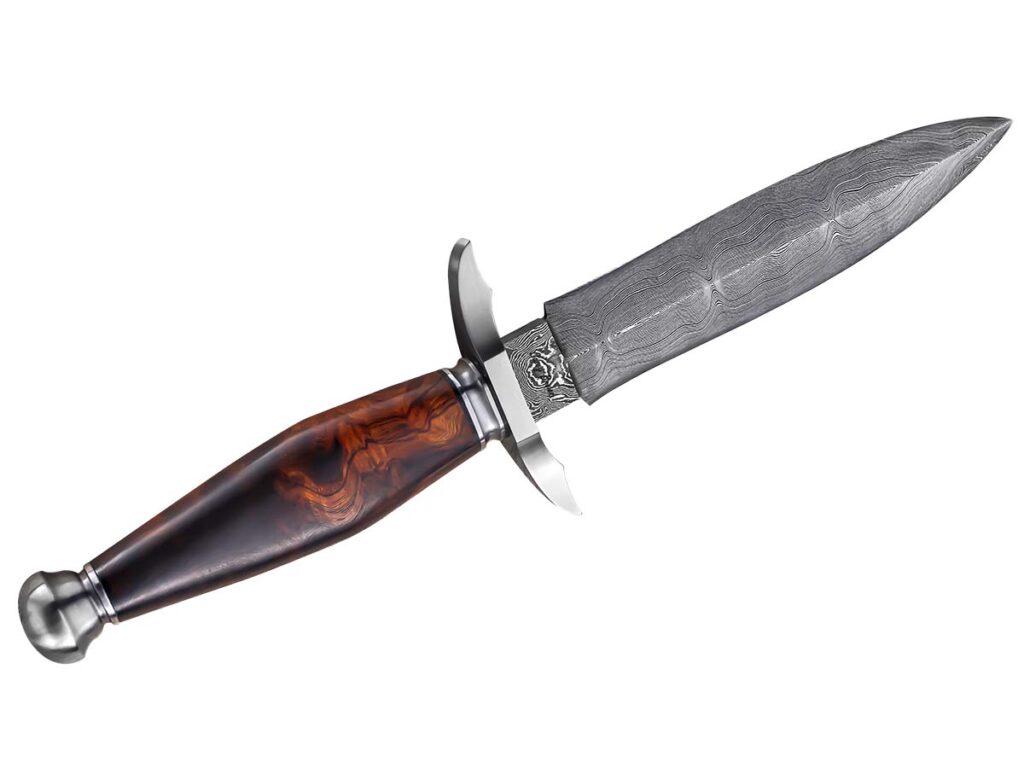
Casey Brown Dagger
Blade length: 5.5” Blade material: Ladder-pattern damascus Blade grind: Flat Scales: Desert ironwood Guard/fittings: 416 stainless steel Overall length: 10.25” Maker’s price for a similar knife: $900 Knife to know: The maker is an ABS journeyman smith Maker: Casey Brown (SharpByCoop image)
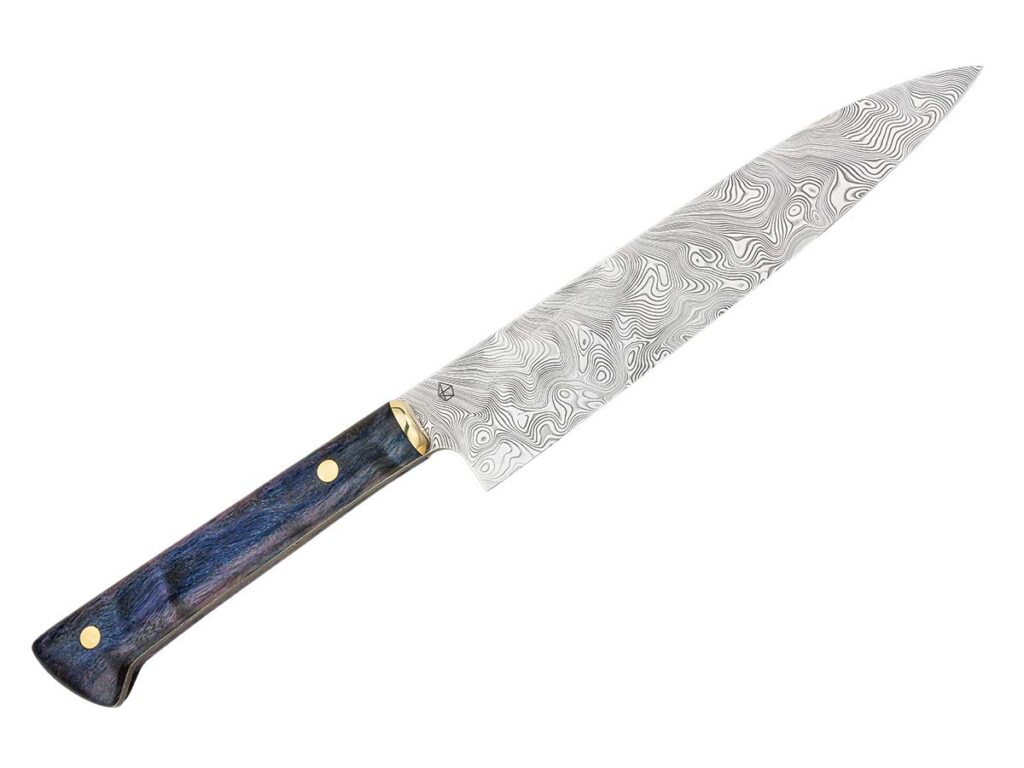
Luka Allen Petty Knife
Blade length: 5 5/8” Blade material: Bjorkman’s twist damascus by Damasteel Blade grind: Flat Scales: Cottonwood Fittings: Brass Overall length: 9.75” Maker’s price for a similar knife: $450 Maker: Luka Allen, lukaallen.com (Jocelyn Frasier image)
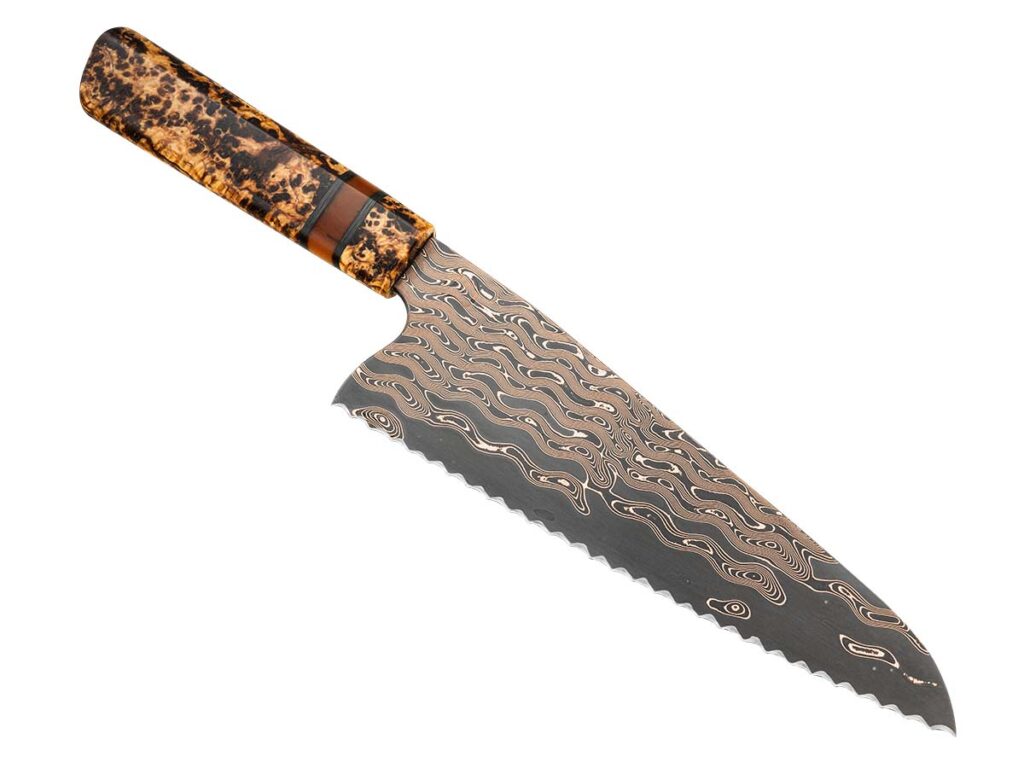
Micah Dunn Chef Bread Knife
Blade length:7.5” Blade material: Baker Forge & Tool copper-mai Surge pattern Blade grind: Flat Scales: Spalted chestnut burl and vintage Micarta® Overall length: 12.25” Maker’s price for a similar knife: $1,200 Maker: Micah Dunn, mdedgeworks.com (Jocelyn Frasier image)
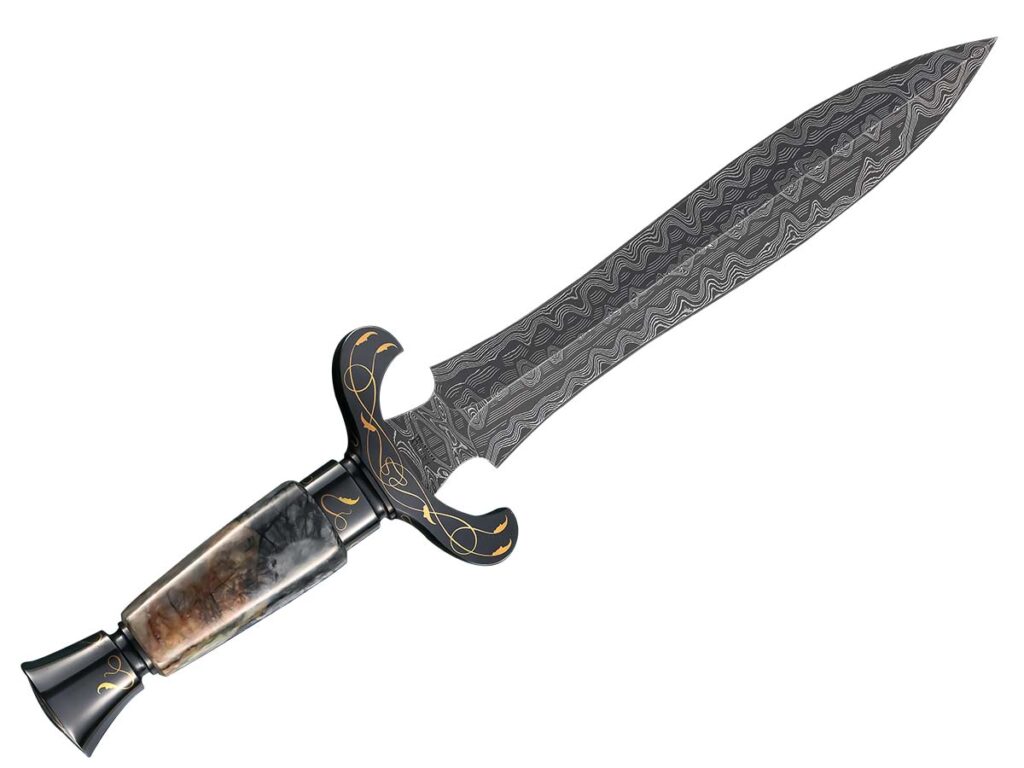
Dennis Friedly Art dagger
Blade length: 9” Blade material: Mike Norris damascus Blade grind: Hollow Scales: Picasso marble Fittings: Blued steel Embellishment: 24k-gold inlay by Ray Cover Jr. Maker’s price for a similar knife: $7,200 Knife to know: The maker is a voting member of The Knifemakers’ Guild Maker: Dennis Friedly, friedlyknives.com (SharpByCoop image)
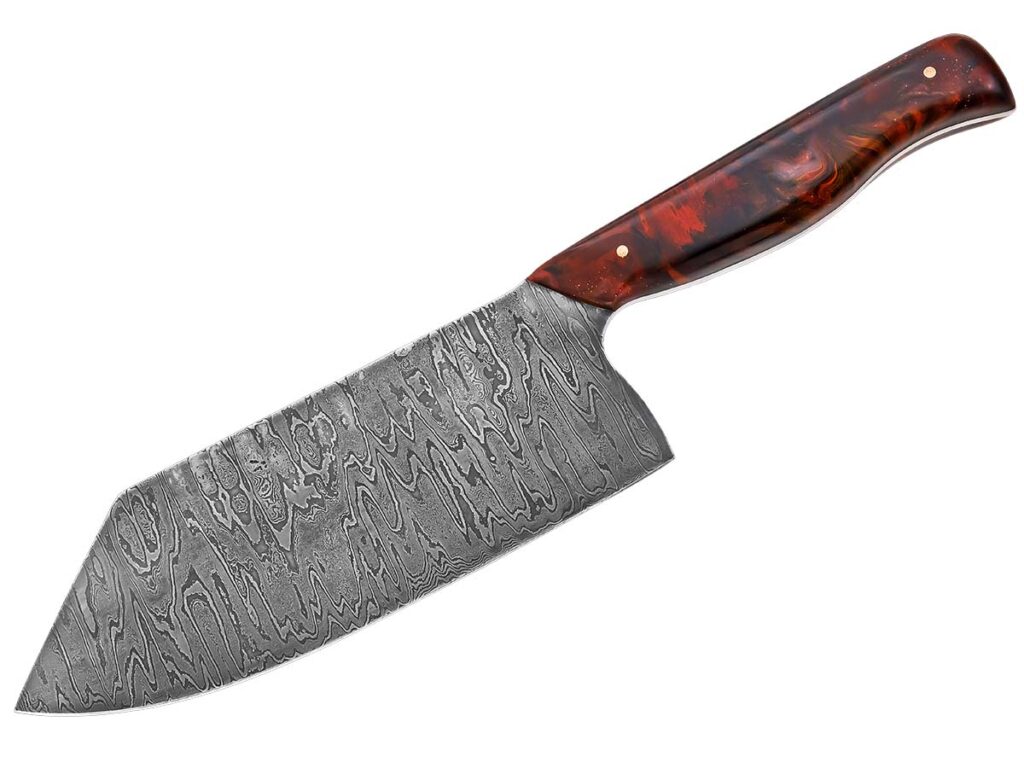
Dane Standen Cleaver
Blade length: 7.3” Blade material: 243-layer textured damascus of 1084 carbon- and 15N20 nickel-alloy steels Blade grind: Flat Scales: Colored resin Pins: Copper Overall length: 12.2” Maker’s price for a similar knife: Contact maker for info Knife to know: The maker is a probationary member of the Australian Knifemakers Guild Maker: Dane Standen (Rod Hoare image)
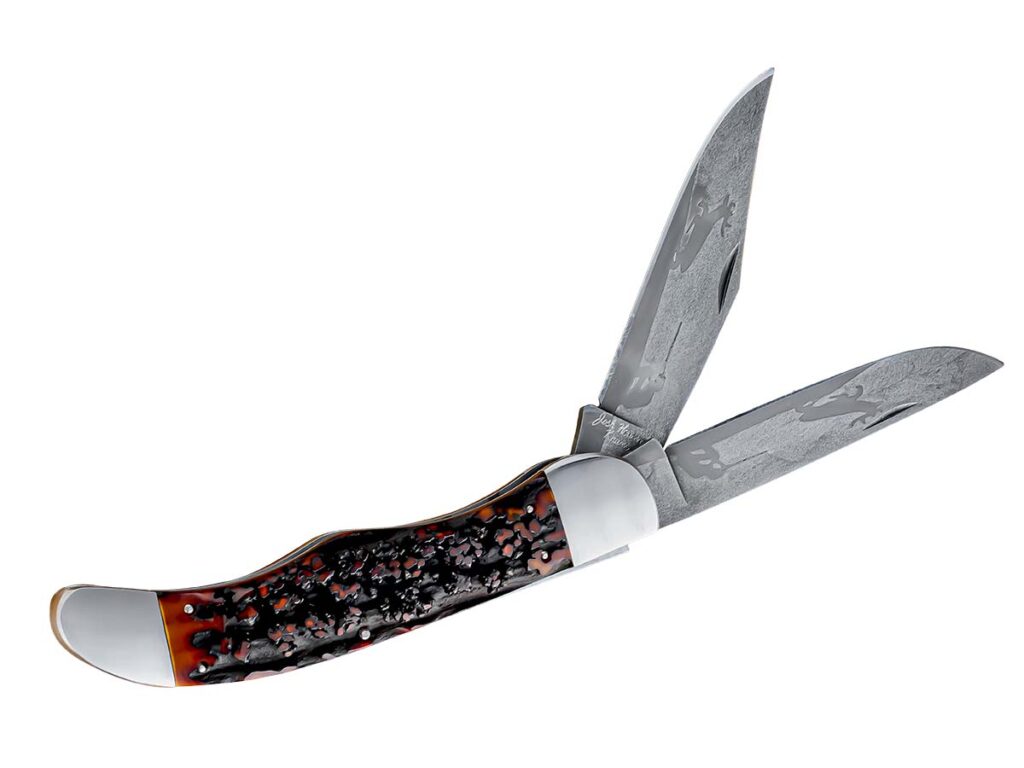
Josh Howard Folding Hunter
Action: Slipjoint Blade length: 3.5” Blade material: Pattern-welded deer hunting scene Blade grind: Hollow Scales: Amber stag Handle frame & bolsters: Stainless steel Closed length: 5.25” Maker’s price for a similar knife: Contact the maker for info Maker: Josh Howard, deerlickridgeforge.com (SharpByCoop image)
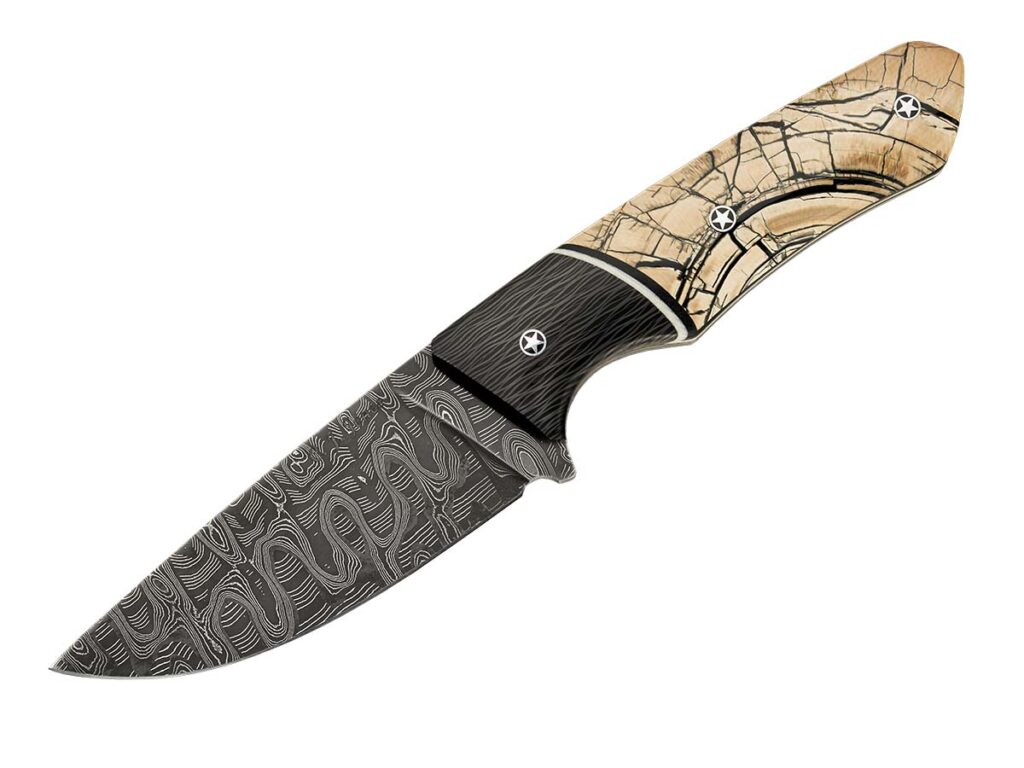
Chad J. Jones Hunter
Blade length: 3.75” Blade material: Mike Norris Hornet’s Nest stainless damascus Blade grind: Flat Scales: Crosscut mammoth tusk Liners: Black and white G-10 Bolster: Zebra carbon fiber Overall length: 8” Maker’s price for a similar knife: $1,250 Maker: Chad J. Jones (Jocelyn Frasier image)
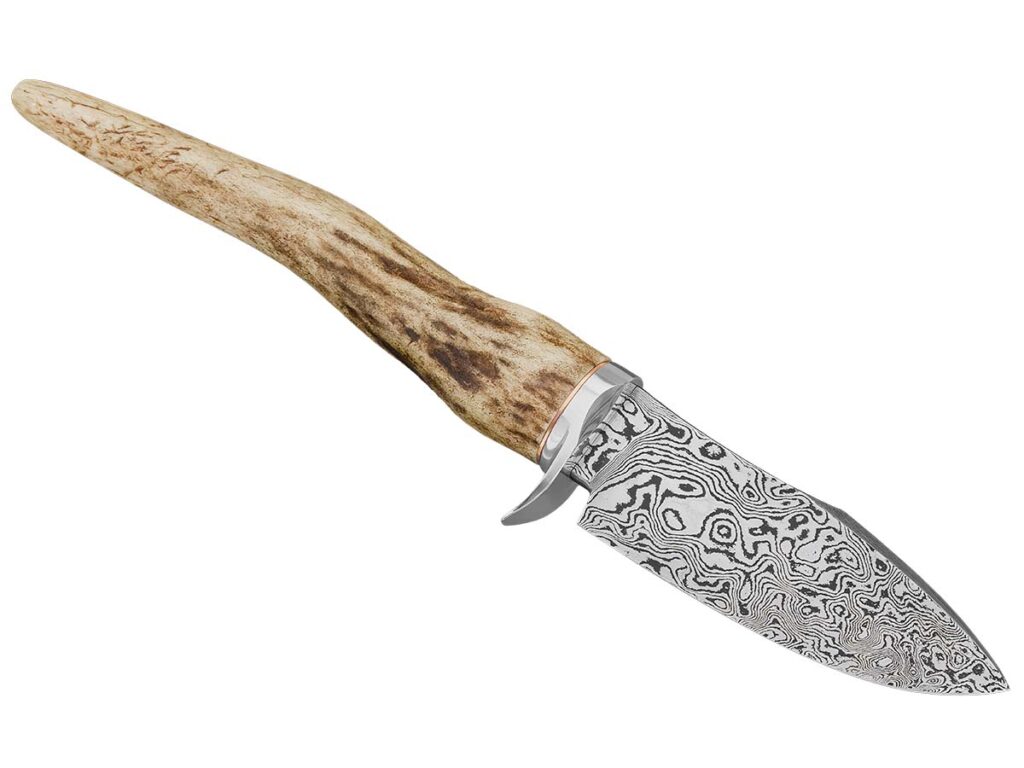
William Manning Hunter
Blade length: 3.35” Blade material: Random-pattern damascus of 1084 carbon-and 15N20 nickel-alloy steels Blade grind: Flat Scales: Antler w/copper spacer Guard: 416 stainless steel Overall length: 8.27” Maker’s price for a similar knife: Contact maker for info Knife to know: The maker is a probationary member of the Australian Knifemakers Guild Maker: William Manning, manningblades.com (Rod Hoare image)
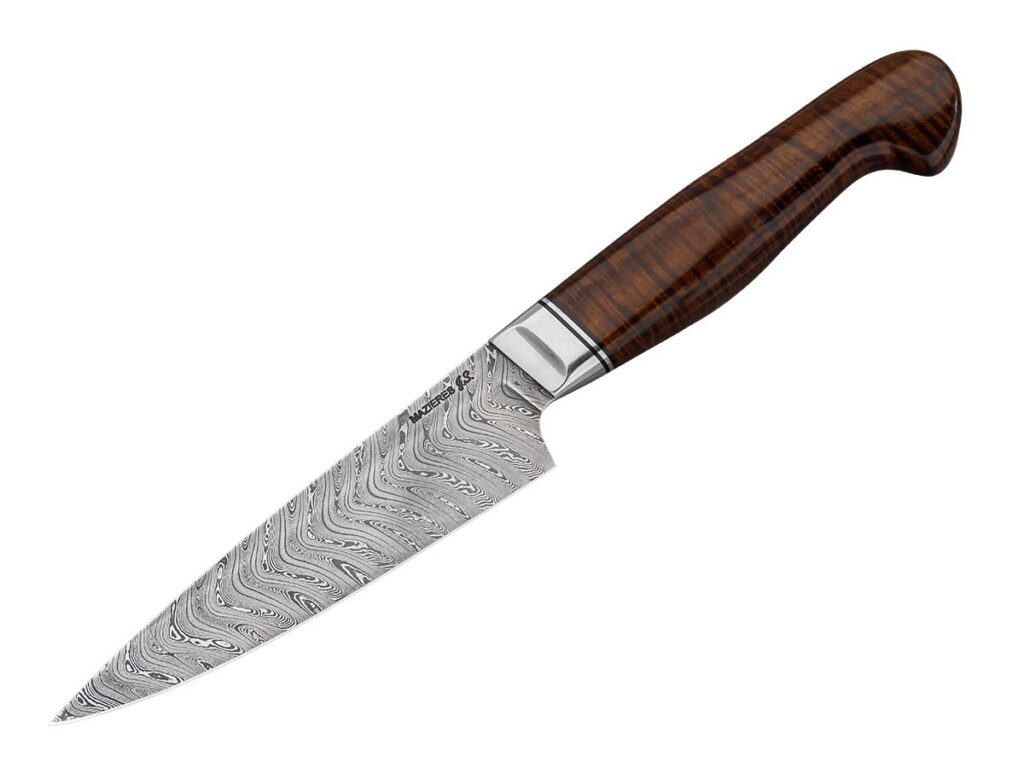
Francois MazieresMedium Paring Knife
Blade length: 5” Blade material: Pattern-welded damascus in 150 layers of 1084 and 1075 carbon- and 15N20 nickel-alloy steels embossed using chevron dies for the final pattern Blade grind: Flat Scales: Stabilized South-Australian ringed Western Myall wood shaped in a composite Western/cowboy style Spacers: G-10 and stainless steel Bolsters: Scalloped, pinned and soldered 416 stainless steel Construction: Hidden tang Overall length: 10” Maker’s price for a similar knife: $320.62 at press-time exchange rate Knife to know: The maker is a member of the Australian Knifemakers Guild and a journeyman smith in the American Bladesmith Society Maker: Francois Mazieres, Yandiwa.com.au (Rod Hoare image)
Nate “Tuna” Grant Utility Fixed Blade
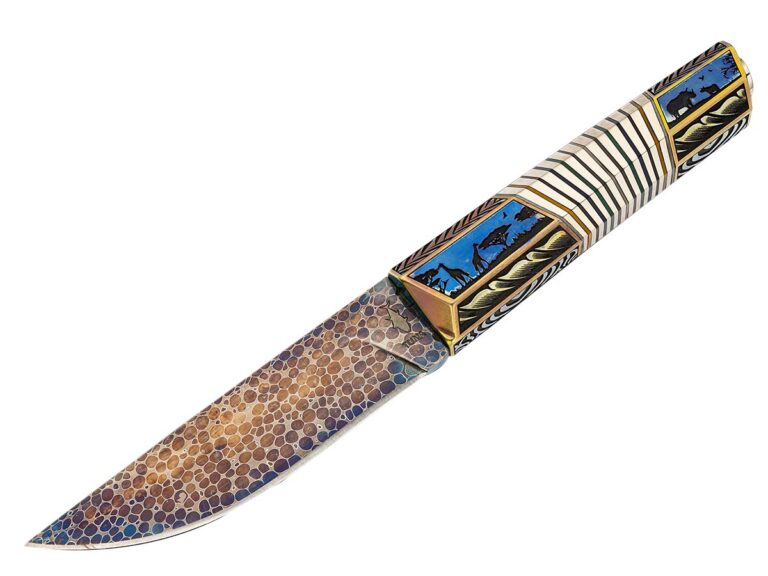
Blade length: 4” Blade material: Rietveld Dragonskin damascus by Bertie Rietveld Blade grind: Flat Handle: Titanium, nickel silver, fiber liners, laser engraved Overall length: 8” Sheath: Guster leather; inlaid w/exotic animal skin; belt model with snap Maker’s price for a similar knife: $5,000 Knife to know: The maker’s utility fixed blade won Best Utility at the 2024 Lost Pines Knife Show Maker: Nate “Tuna” Grant, madebytuna.com (Jocelyn Frasier image)
Bryan Montalvo Basset
Knife type: Folder Blade length: 3.25” Blade material: Grabak damascus by Damasteel Blade grind: Hollow Blade pivot: Skiff caged ceramic bearings Handle: Same material as blade Lock: Linerlock Pocket clip: Same material as handle Closed length: 3.5” Maker’s price for a similar knife: $3,000 at press-time material costs Maker: Bryan Montalvo, keanisonknives.com (Jocelyn Frasier image)





 Due to the fact that there has never been any in-depth research of this kind before, we took it upon ourselves to find these answers. We contacted local knife makers, museums, knife collectors, and local historians from every country in Europe. This never-before done research took over a month of grueling research and labor.”