Knifemaking is the building of a knife, which includes the blade, handle and other accouterments. Blades are made by either removing metal from a steel blank via a grinder – known as stock removal – and the forging to shape of hot steel into a blade in the process known as bladesmithing. Other parts, including bolsters, guards, pommels, etc., are needed to complete the finished knife.
Known for his custom kitchen knives, here are the tools Dmitriy Popov relies upon to craft his creations.
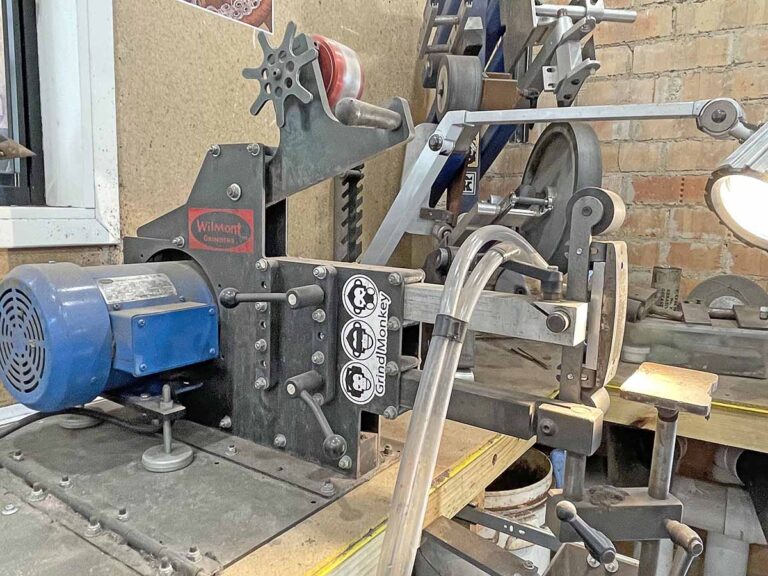
“I am not going to score any originality points for naming my belt grinder as the most important tool in the shop,” Dmitriy Popov begins with a smile. “I have had the pleasure of using a wide variety of grinders and the Wilmont TAG 101 is my favorite. Chris Williams, who builds it, is a knifemaker himself and it shows in the product. Also, Chris is only a message away in case you may need anything, not that you have to worry about it too much the way this machine is built.
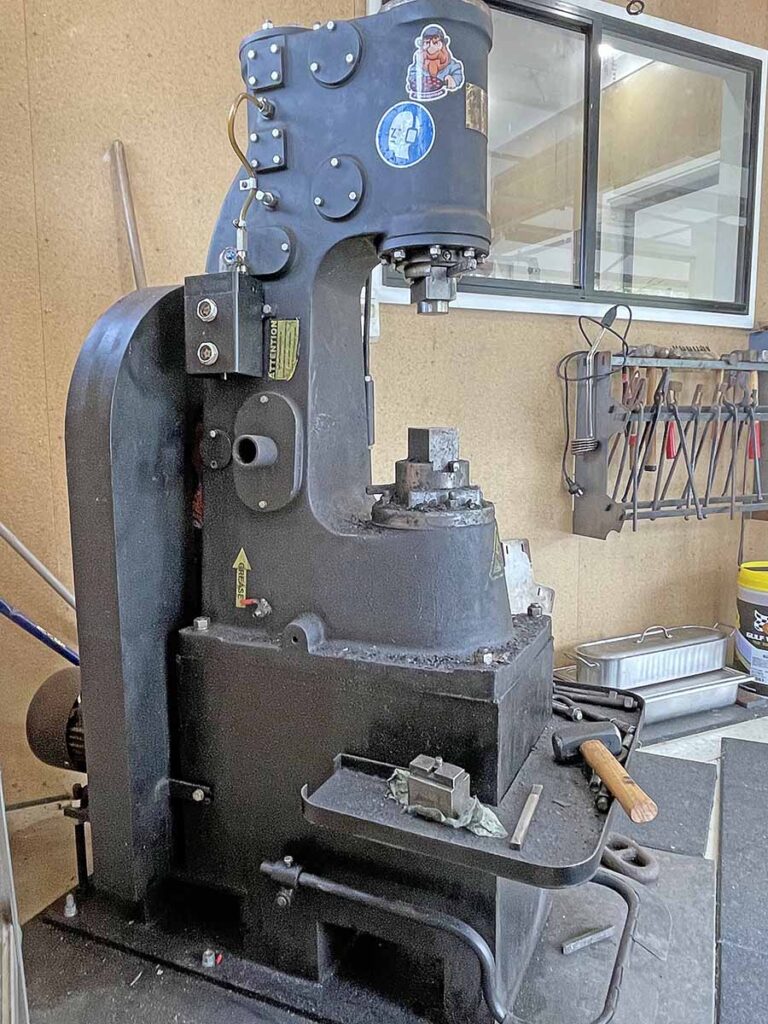
Popov’s 15-kilogram Anyang power hammer “gets the job done in no time.”
“I have a large variety of tooling accessories that I use with the grinder—radius platens, flat platens, rotary plates, large and small wheels, as well as a surface-grinding attachment. I run the grinder off a dedicated Genesis VFD [Variable Frequency Drive], which enables me to control the speed.
“Next up is my Toolmex 1-horsepower disk sander,” Dmitriy continues. “It took me a little while to get to know this machine and to incorporate it into my workflow—but these days I would struggle to make a knife without it. My sander is hooked up to yet another VFD, which is shared between the disk sander and my second belt grinder through a switch. I can slow it right down and change the rotation direction.
“I primarily use a disk sander for two purposes. First, to thin out the knife behind the edge. I do this very carefully with the aid of water cooling in order not to generate any heat that would negatively impact heat treatment. Secondly, I use it to shape facets on my knife handles, which are mostly wa [Japanese-style octagonal] handles these days.”
His power hammer is a real game-changer.
“I used to hate forging as tendinitis in my elbow would flare right up and would take weeks to settle,” he explains. Before Popov moved his shop to a rural area, getting a power hammer was not an option due to the noise level it generates. “Needless to say is how much easier, quicker and more pleasurable my forging experience is now,” he writes. “The hammer is only a 15-kilogram Anyang but it gets the job done in no time.”
Dmitriy does his own heat treating with a Paragon KM24 Pro Heat Treat oven. “Quite a high-ticket item this one,” he notes, “a three-zone 415V/3P/15A unit which reaches temperatures of 1,100° C/2,012 F° in just 15 minutes. It has super precise temperature control front to back, which is so crucial for me in order to be able to squeeze out the most of each steel I work with.
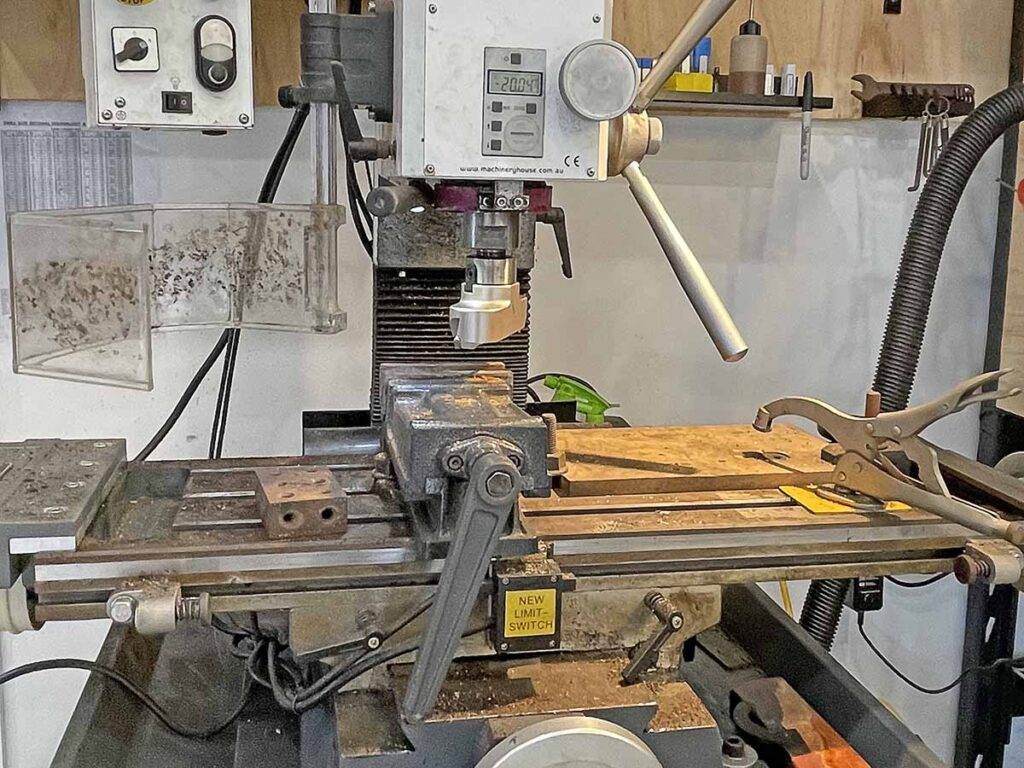
When selecting his milling machine, Dmitriy wanted something solid and with enough vertical clearance. As a result, he opted for the Optimum MH28V. He also fitted it out with an Optimum DRO (Digital Readout at top left) and a motorized slide table.
“My milling machine is definitely underutilized in my workshop. When selecting the mill, I wanted something solid and with enough vertical clearance. The Optimum MH28V fit the bill. Machine and tooling is not cheap and I use it only for a couple operations, but it is a real time saver.”
Last but not least, Dmitriy expounds the virtues of his large workbenches.
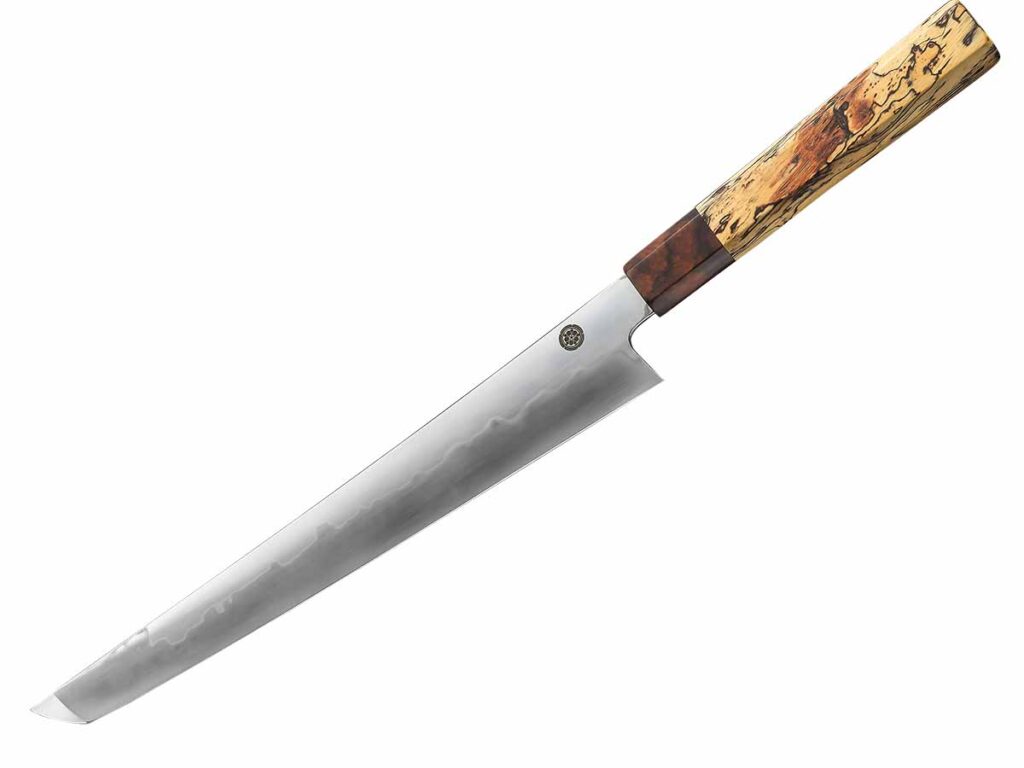
Dmitriy Popov specializes in custom kitchen knives such as his Honyaki Sujihiki Sakimaru in an 11.8-inch blade of differentially heat-treated W2 tool steel with hamon. The handle is stabilized spalted tamarind and ironwood. (SharpByCoop knife image)
“This seems simple but if you make knives, you know that you will end up using any horizontal surface available to you. I would say that one-third of my workshop floorspace (page 45) is taken up with workbenches which allow me to work on multiple projects at the same time, and stay organized and productive. I found that yellow-tongue flooring panel is a great workbench surface, and frames can either be built from timber or, alternatively, metal warehouse framing can be purchased from any hardware shop or Costco.”
How two U.S. knifemakers successfully transitioned from home shop to factory.
Ever wonder why some custom knifemakers decide to take the leap from the rarified air of being a sole artisan to the crowded arena of factory fare? Sometimes the answer is easy. For instance, in 1999, BLADE Magazine Cutlery Hall-of-Fame® member Chris Reeve switched his custom shop over to a micro-manufacturing outfit in Boise, Idaho, simply because he couldn’t supply enough of his popular Sebenzas to a thirsty knife-buying public. That one move catapulted Chris Reeve Knives (page 26) into a successful American manufacturer of folders and fixed blades.
We thought the practice of switching from shop-to-factory, and the reasoning behind such a move, to be an interesting one, so we sought out a couple of like-minded makers from two different genres to bring you an inside look at such a move.
Long Road Of American Knife Manufacturing
Daniel Winkler never planned on producing factory knives, but when a government contract to aid the troops fighting in the Middle East came along, his love of country won out. He had, however, made a name for himself long before that. Winkler built his first knife in high school shop class and still has it among the knives he has archived. In the ensuing years he began gaining popularity among members of the black-powder and knifemaking communities. In the late 1980s he teamed up with partner Karen Shook, whose sheaths greatly complement his custom period knives to this day. In 1992 he forged blades for the hit movie The Last of the Mohicans starring Daniel Day-Lewis, which enhanced Winkler’s popularity even more.
Daniel Winkler went from a one-man knifemaking shop he used from 1992-2006 in Blowing Rock, North Carolina, to the 35,000-square-foot facility he and partner Karen Shook operate in Blowing Rock today.
Simply stated, Daniel Winkler is more than a knifemaker, he’s an institution. But it was a long road with a lot of steps along the way. “My first shop was in the hall of my house. I would clamp knives to the stairs and file them to shape,” he recalls. “I graduated to a garage and bought a 1-by-42-inch belt sander. My first forge was made from a truck wheel and a vacuum cleaner. I used charcoal and a piece of railroad rail for an anvil. I still have that anvil, too.” Winkler says his biggest challenge during those early days was “a lack of time, as I had to work a full-time job—and mostly a lack of practical knowledge.” As his popularity grew so did his equipment and capabilities as a master forger, but that would bring change as well.
“I never really wanted to make factory knives,” Winkler opines. “Back in the mid-2000s I was contacted by members of a Special Operations group. They were not happy with the edged equipment they were getting and asked if I would help them get better designed and higher functioning equipment. Initially, I was going to help with the design and development and contract another manufacturer to make the tools. What I found was other people wanted to do things their way and not adapt their manufacturing methods to how I wanted operations done.
“Karen and I discussed the situation and decided whether we were going to be involved with making edged equipment that could very realistically mean life or death based on the performance of the equipment. We decided that no compromise was worth accepting, so we started our own limited production company. We called it Winkler Knives II since we were still making our hand-forged pieces. We successfully made the requested equipment, and [Winkler Knives II] started growing by word of mouth in the military community. As we grew in professional circles, the public with an interest in Tier-1-level military uses found us. Our involvement was verified in a book written by a Navy SEAL and the Sunday edition of The New York Times. Business took a big leap after that.”
Making The Leap Into Knife Manufacturing
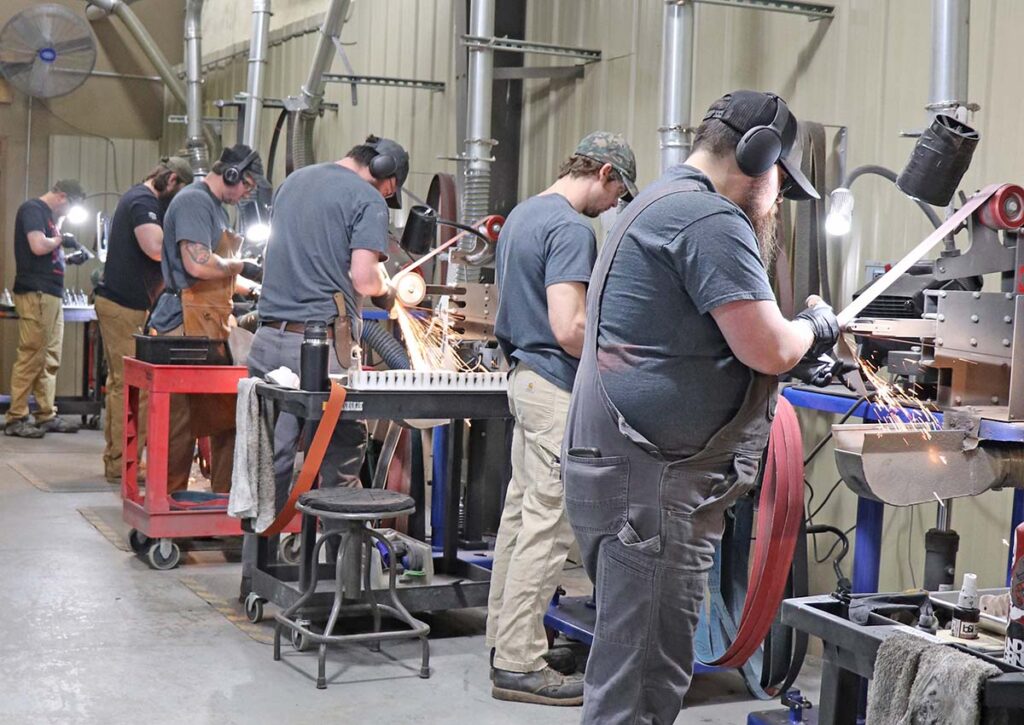
Sparks fly on the grinding line in Winkler’s Blowing Rock, North Carolina, facility. The company employs one part-time and 28 full-time employees.
“My first shop was my one-man forging/grinding shop. I hired two part-time staff to assist in handling it. It was a very tight space,” Daniel notes. “From here I added additional grinders and rented a small space in a warehouse. I did the steel grinding and heat treating while Karen worked on finishing. The first models were two Combat/Breaching Hatchets—one for Naval Special Warfare and another for Army Special Operations. That was in 2004-2005.”
Today Winkler Knives has exploded in size to a 35,000-square-foot facility with one part-time and 28 full-time employees. Daniel credits buying a water jet to cut production costs, hiring the right people, and creating an environment for lasting and satisfying jobs.
“I have a rule we adhere to,” he observes. “Any changes we make must make the product better in performance and/or quality, and make the operation safer for our employees.” It is a dictate that continues to make Winkler Knives a mainstay in the business of all that cuts.
Paying Dues
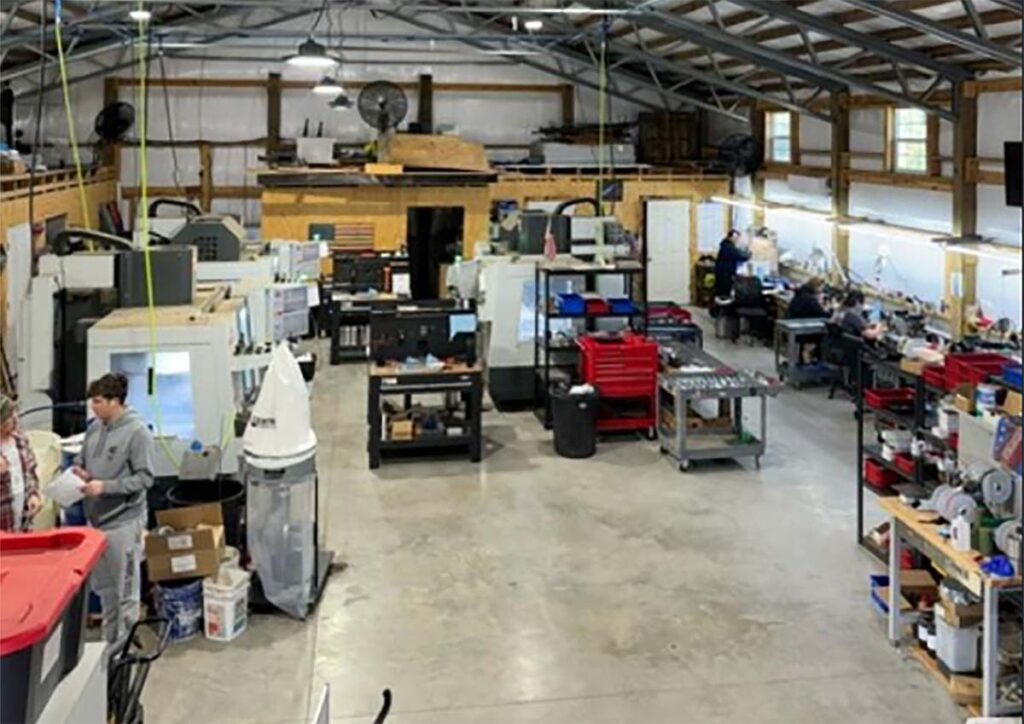
In 2019 McNees Knives went from a 400-square-foot shop to today’s 3,500-square-foot factory. Among the hot sellers for McNees are the MAC2 integral-lock folders.
United States Marine Corps veteran and devoted outdoorsman Jonathan McNees of Vernon, Alabama, has always been a knife fan, and when he got drawn into the world of custom knifemaking on the internet he was hooked for good. “I started making knives in 2008 after discovering online forums where people were discussing making knives in their personal garages and the like. Before that,” he remembers, “I really had no idea people were doing that—not at that level, at least.” Finding some brands he’d never seen before, like Strider Knives, led him to locating the forums, he added.
“My first shop was a 400-square-foot pole barn in my backyard that started with an extension cord run from the house to power it,” McNees reveals. “I cobbled together my first 2-by-72 grinder using some ‘no weld’ grinder plans I picked up. It was the epitome of a ‘Frankengrinder’—a bench grinder for a motor and a plastic lawnmower wheel as a drive wheel, but it got the job done. I ground hundreds of knives on it before I bought a real grinder. The most difficult thing in the early days, aside from learning the hand-to-eye coordination on the technical stuff, was getting my name out there and building a reputation. I had to be aware of my place in the food chain and pay my dues.
“My breakthrough moment to switch to factory knives came from looking at my work from a business perspective. I always tried to work fast but no matter how fast I got, the business was never going to scale with me building customs by myself. I realized I not only wanted to be a craftsman but I also wanted to build a business. I went to production in 2019. I realized I couldn’t make the kind of impact in the industry I wanted to by just flying solo doing customs. I was probably putting out between 200-to-300 knives a year as a custom knifemaker.
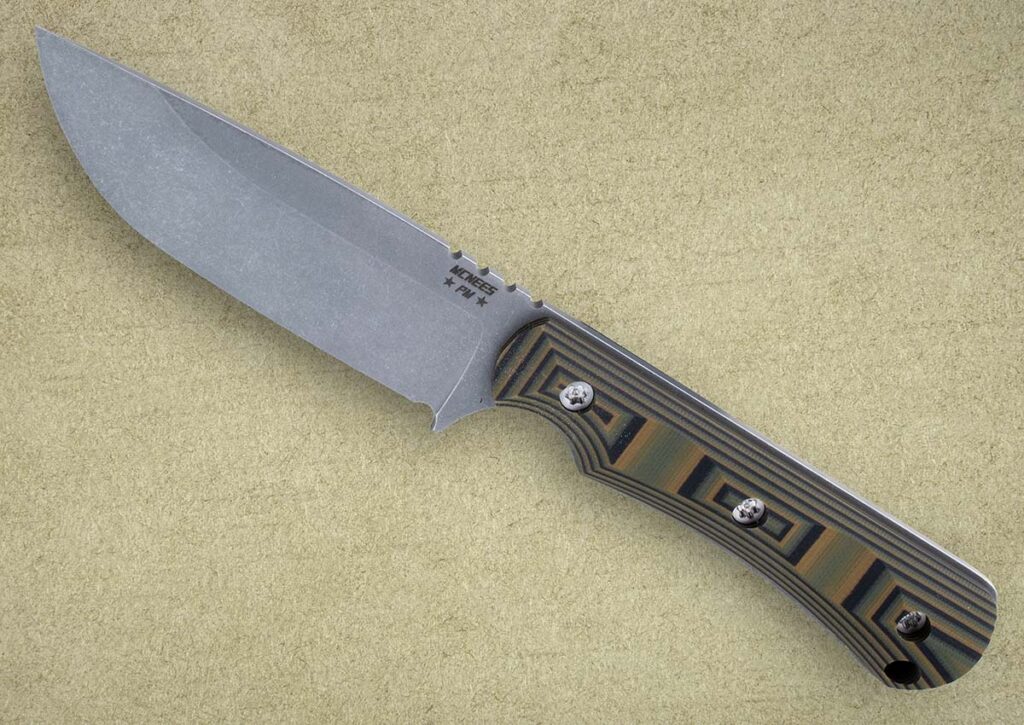
The McNees Knives Ridge Runner won the BLADE Magazine 2024 Fixed Blade Knife Of The Year® Award at last year’s BLADE Show. The 3.7-inch blade is CPM 3V carbon steel and the handle is G-10. MSRP: $312. (Jocelyn Frasier image)
“The first step into production was using U.S. OEM shops to do all the machining and grinding work,” he continues. “I hired two people—one primarily ran our laser, which we did non-knife projects with to help with cash flow, and the other I taught to do all the hand fitting and assembly. I helped where needed on the production but mostly continued to make customs during this phase.” All this continued to be done in the 400-square-foot shop.
“One big step forward came in 2021 when we moved and built a 3,500-square-foot shop and bought our first CNC mill,” Jonathan states. “Since then, we’re up to seven full-time employees plus myself, and my wife has come to work full time in the business for a total of nine. Our bread and butter is our framelock tactical folders, but we also have a good start on a fixed-blade line with three new models added this year.
“We should finish with 3,000-to-4,000 knives produced this year, but our biggest recent accomplishment is a great increase in production numbers thanks to getting a lot of processes dialed in and getting a really solid team in place,” he observes. “We have a new folder coming out next year that is based off one of my most popular custom designs, so we’re really excited about that. We plan to continue to scale and grow as much as we can. We love this industry and want to provide a positive influence.”
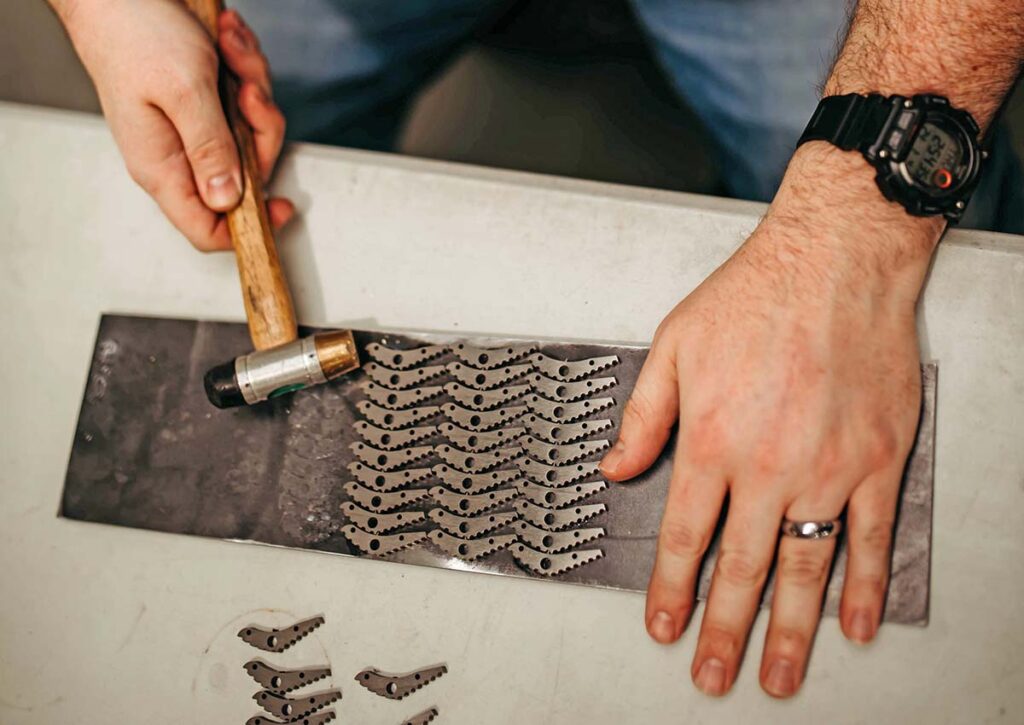
Parts for a McNees Knives folder are removed from the plate used to surface grind them, a far cry from the days when they were done by hand.
Daniel and Jonathan are two custom knifemakers who made the leap to factory production for two different yet legitimate reasons, but both share the common commitment of making knives. They reflect the American dream in action and have done themselves proud.
Get a gander at what’s on the slate for NSM in 2026.
According to a recent post by Niagara Specialty Metals (NSM) on BladeForums, NSM (nsm-ny.com) had several steels and materials available either now or that were “incoming” as BLADE was going to press.
The list includes: MagnaCut; CPM154; S30V; S35VN; S45VN; S90V; 3V; 4V; CruWear (aka NSM Wear); 154CM; 20CV; M4; CPM D2; D2; 440C ESR; 416; and 6-4 titanium. The new MagnaMax (page 66) should be available in 2026.
The post stated that all particle metallurgy grades are “coming in from Erasteel and Carpenter and the quality has been excellent.” All of NSM’s air-melt steels and 6-4 titanium are domestic.
The only grades off the list at press time were 15V, 110V and Rex 121. “They were Crucible exclusives,” the post noted of the three grades not on the list, “and we’re working with the mills to bring them back once production can be re-established.”
The popular pattern offers a complex combination of material and motif.
The variations on damascus steel themes are endless. The possibilities are tempered only by the maker’s time at the forge and his or her desire to create.
Among these many variations, one pattern has recently captured the spotlight. These days, feather damascus is trending and custom makers are producing knives that turn heads, captivating buyers with the intricate layering that produces hard steel intertwined with the look of the light and wispy. Feather damascus offers a medium of both performance and artistic expression that influences every aspect of the maker’s creativity.
Ethan Kolar of Plummer, Idaho, describes his interest in feather damascus as “chaotic flow.” He explains, “The pattern’s center seam, where the jagged W’s converge, creates a flow in the blade which really adds to the overall confluence of the knife as well as creating a controlled chaos as the pattern explodes from the center filling out the blade.”
Kolar enjoys the hint of “jaggedness” and the center line that ties the blade together, and in the making of his feather damascus, his focus lies in test etching every restack from the forge. He sees the pattern in many different forms with the observation that “a pattern is not right or wrong but more of what the maker envisions and creates and what is right to him for his knife.”
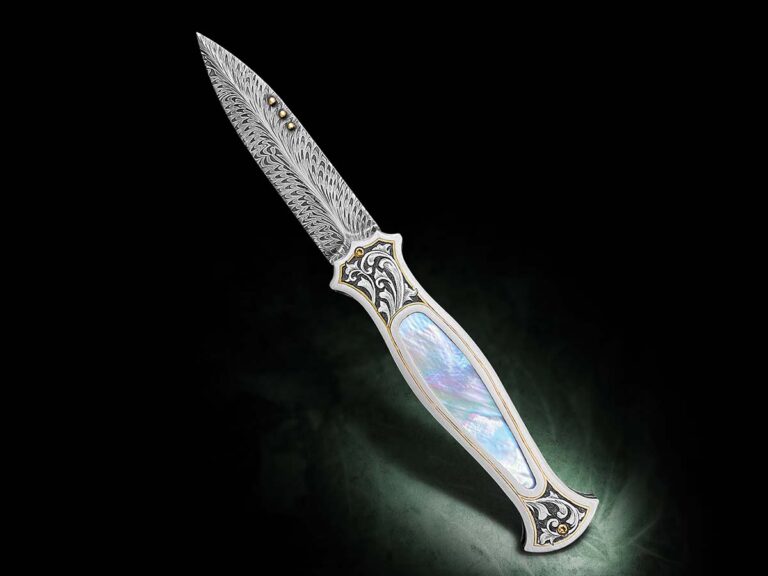
The folding dagger Ethan composed includes a 3-inch feather damascus blade of 1084 and 15N20 steels with an engraved gold inlay and scroll worked 416 stainless steel window frame fitted with exhibition-grade white-lip mother of pearl. Liners are 15N20 file-worked and nitre blued, while the backbar of 416 stainless is engraved and sports delicate file work. Its overall length is 7 inches.
“Most of the inspiration I have while making damascus comes from envisioning my final product,” Ethan remarked, “what engraving will go with it, the handle embellishment, and a lot to do with the overall color of the knife, deciding whether the pattern will be brighter or darker.”
Steel On Fire
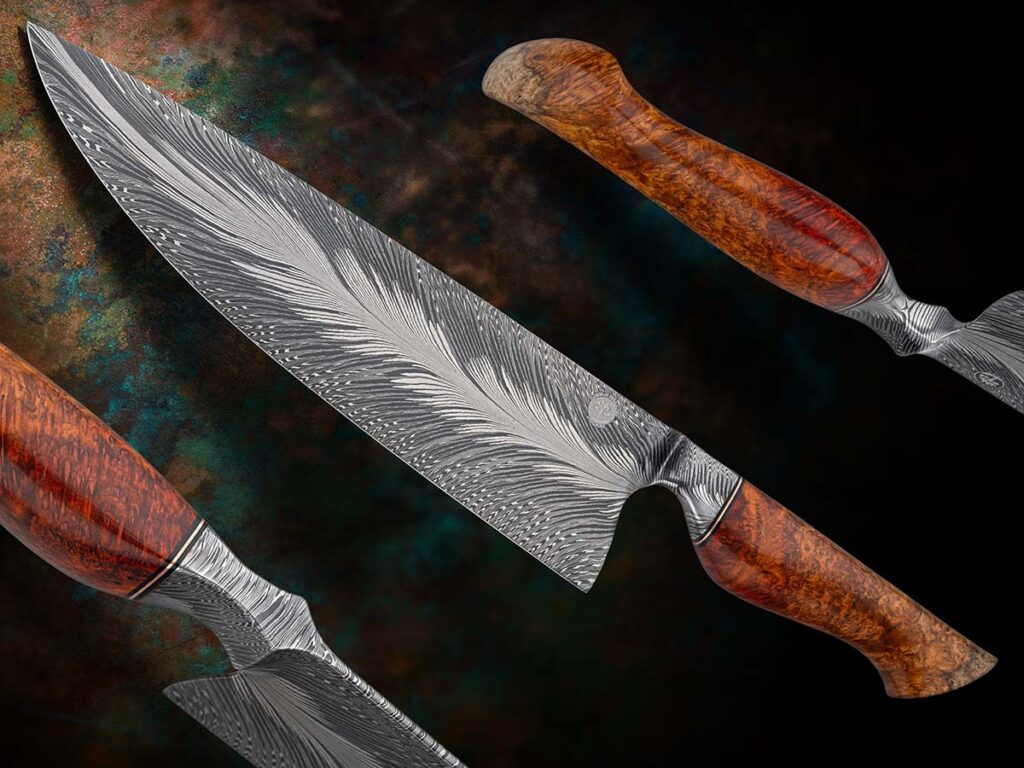
Winning Best Damascus at the 2025 BLADE Show West, Trevor Morgan’s “Torrent of Fire” chef’s knife includes a 9.25-inch blade of 1084 and 15N20 in a mix of W’s and straight layers with a fat core of 15N20. The knife’s overall length is 14.2 inches, and the handle is dark red tiger’s blood amboyna burl with a splash of sapwood for contrast. (Jocelyn Frasier image)
Another contemporary artisan exploring the feather damascus pattern is ABS journeyman smith Trevor Morgan. Having attended the Bill Moran School of Bladesmithing in Texarkana, Texas, in 2020, his goal with each feather damascus blade is to make the pattern “pop.” To achieve that look, his hand follows an artistic eye.
“Contrast, for sure, really makes any pattern cool,” said Trevor, “especially feather or mosaic damascus, larger pieces of dark and bright steel, gradients and that kind of thing. Also, out-of-the-ordinary stuff like feather [damascus] can be really cool to look at. Symmetry is always great with a feather pattern because it’s pretty easy to notice when something is out of whack with a feather due to the defined center. Complexity is also great. If it’s hard to figure out, all the better.”
According to Morgan, a resident of Apple Valley, California, the feather pattern can be challenging due to the hot-cut process, which puts enormous stress on the billet in somewhat weird ways and causes every forge weld to want to split open. The problem, however, can be mitigated by mig welding all the way around the seams. But this is his least favorite method of achieving the integrity of the billet because it requires grinding away the welds, wasting material and consuming time.
Trevor’s inspiration for feather damascus pieces comes from the world around him. “It’s places and people,” he commented, “from nature and the endeavor to make something organic and as lifelike as possible in steel. I regularly get swept up in the general zeitgeist surrounding the making of complex patterns. I see something on social media or somewhere, and I think, ‘Man, that’s really awesome! I’d love to try to make something like that.’ Then comes the real creative part, where I just get an idea of something that might look really cool and put it together.”
Morgan’s method is readily revealed in his featured piece, named “Torrent of Fire.” The knife includes a 9.25-inch blade of 1084 and 15N20 in a mix of W’s and straight layers with a fat core of 15N20. The knife’s overall length is 14.2 inches, and the handle is dark red tiger’s blood amboyna burl with a splash of sapwood for contrast.
Organic Appeal
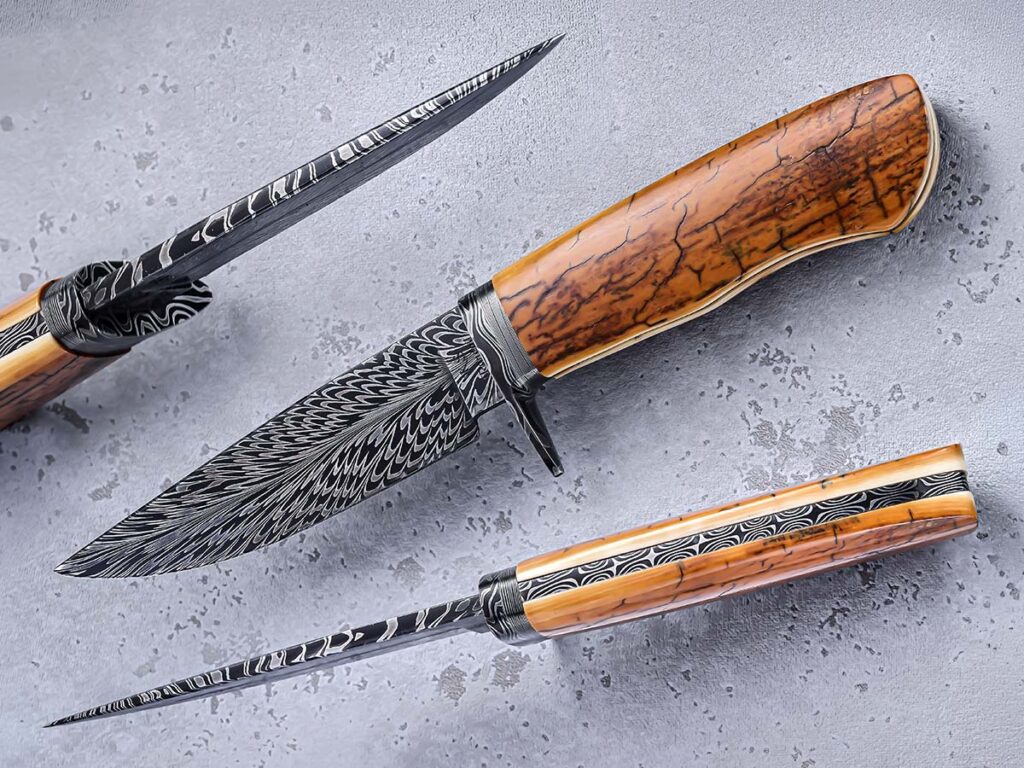
Splitting the billet down the center to maintain symmetry is among the trickiest aspects of feather damascus to Steve Randall. He nails it on his frame-handle hunter, with the axis of the pattern fountaining from the mastodon scales in a balanced and spectacular fashion. (SharpByCoop image)
Feather damascus has been a staple steel for ABS master smith Steve Randall for some time. He seeks a continual flow of the steel from the handle to the tip, and oriented so that the handle appears to actually hold a feather. “I was attracted to the feather pattern because of it’s a very cool, organic look,” he advised. “Like a snowflake, there are no two exactly the same. I’ve been forging feather damascus for at least seven years, and I’ve made several bowies and hunters.”
Randall, of Estancia, New Mexico, presents his feather damascus piece with frame-handle construction, showcasing mastodon scales with an overall length of 9½ inches and a blade of 4¾ inches. “Feather damascus is a more challenging pattern,” he said. “My tricks are patience and concentration. There are many welds involved in the pattern, which can contribute to cold shuts, which can destroy hours of hard work. The trickiest part is splitting the billet right down the middle and maintaining symmetry.”
While he describes the feather damascus forging process as complicated and labor-intensive, Steve sees the payoff in the harmony of the pattern and its related materials in the finished knife. “I always try to complement it with the best handle materials I have available,” he reasoned. “I prefer stag or ivory. If using wood, I avoid busy patterns and colors. I draw inspiration from many other makers. There are so many accomplished makers who produce a variety of feather patterns. It is one of my favorite patterns to forge because it can really accent the flow of the blade and give it a great overall look.”
Movement And Flow
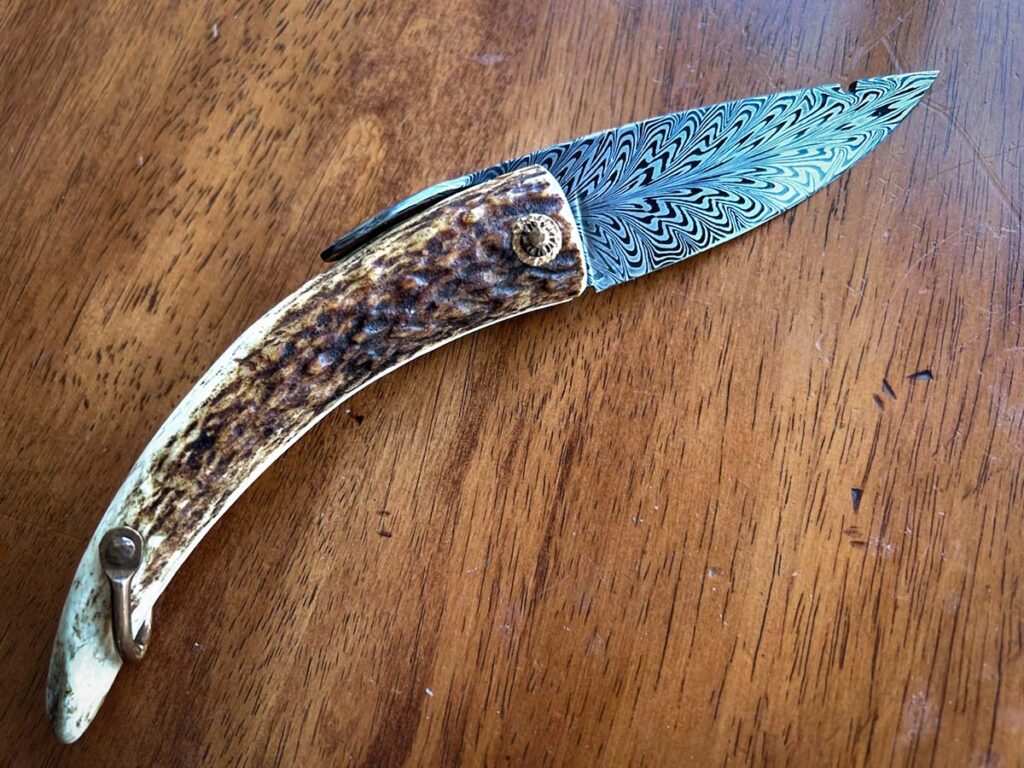
While David Lisch doesn’t feel he’s hit the limits of his Mountain Man folder, the style of knife is striking with its feather damascus blade set in stag-tip handle. Copper hardware and pivot give the knife its antediluvian look, while the flowing pattern of the blade anchors it in modern forge techniques. (David Lisch image)
It took a single demonstration by the great master smith Harvey Dean to convince David Lisch, who earned his ABS journeyman stamp in 2009 and his master stamp six years later, to try the feather pattern. “I was always attracted to feather damascus,” he remembered, “but around 2008 I had the chance to see Harvey Dean demonstrate it at an event at Josh Smith’s, and I went right home and made the tools needed and gave it a go. I’ve been making feather damascus since his demo, and my hat is off to Harvey.”
For David, the making of feather damascus is challenging, but he says book matching the blocks really helps with the constant flow of the pattern. Sometimes, he says, makers will intentionally disrupt the flow by spinning one block one way and one the other to enhance the look. If it is done intentionally, he advises, there is no wrong way to stack the blocks. Forging all begins with the initial stack, and David starts with a 12- to 15-pound billet, acknowledging that the pattern can be wasteful in material. He tries not to go too far or stop too short in the forging process and offers that sometimes less is actually more.
“I love feather damascus because it looks different from maker to maker,” added Lisch. “I like a feather with movement and flow, not too bold and not way too fine, something that is easy to look at. For me, the more the pattern follows the forging, the more I like it. The center should lift up into the bolster or ricasso, showing that the blade was forged rather than running off the blade under the ricasso, showing it was just ground into a shape that disrupts the flow.”
Lisch gained a measure of popularity with his Mountain Man 2 folder, and the pictured knife is an example of what he describes as a “deep dive” into the style while using stag tips. “I set out trying to create my own version of one of the oldest knife designs in America,” he remarked, “and I believe I did just OK. But I’m not finished. So far, I’ve made several versions of the folder and have taken it even further with help from my friend and mentor [master smith] Mike Vagnino.”
Lisch had brought together his feather damascus touch and innovative design composition by introducing a clocking adjustable pivot that he has incorporated into a slipjoint, linerlock, lockback and flipper, all in the Mountain Man style with bronze, copper, stag and, of course, feather damascus. He has yet to reach the outer limits of his Mountain Man creativity and says that more will come in due time.
Counter-bending begins with the counter-bending jig. These are made by forging a steel bar .75-1 inch square and about five inches long into a “bottom swage” device. This looks something like a cradle. It can be placed into your anvil’s hardy hole or locked in a vise.
You don’t necessarily need to weld the hardy stud on the bottom, just lock it in the vise. A banana would fit nicely into this cradle. File a groove into the top-right edge to “catch” the point. I use railroad spikes to make this jig. As you make more knives you may choose to change that radius depending upon factors between you, your tools, and your steel.
Bending With The Railroad Spike Counter-Bending Jig
Place the counter-bending jig in the hardy hole or vise. Place the blade bar in the forge at the most convenient position for extraction and quick placement on the jig. Heat to orange. Place the bar on its spine, with the choil and cutting edge looking up and the point at the groove. Keep the bar at the center of the jig.
Note the “air” between the billet and the spike. The blade is almost resting at the bottom of the jig. The next blow will force it completely into the concavity of the railroad spike jig.
NOTE: Blacksmiths will refer to shaping tools like this railroad spike jig as a swage. Sometimes as a bottom swage. Swages (sometimes called ‘swedges’) are concave in shape. Fullers, on the other hand, which are also shaping tools, are convex.
With the round hammer face strike the bar in the center. This will take one to several heats and hits depending on how hot the bar is and how hard you hit it. Rarely will it take one heat and one hit. Usually it takes many. Do not hit it any more than necessary. We want the entire blade in the concavity of the jig. When it’s there, stop.
NOTE: Remember that straightening blows are much lighter than forging blows. Straightening blows are just hard enough to bring the blade back to straight and flat.
Then, put the blade back into the forge, take a heat, and do the swage business again. Steel, when hot, is extremely malleable (like soft clay) and can be told what shape to take.
You can purchase Paul White’s Forged: Making a Knife With Traditional Blacksmith Skills here.
Micarta Is One Of Many Materials Used For Blade Handles. Used For More Than A Century, Micarta Continues To Be Incredibly Popular.
Micarta is not a new material, in fact, it has been used for over 100 years. Unlike naturally-occurring materials, Micarta offers properties other materials don’t. We’re going take a look at what Micarta is and what makes it probably the best material available for making knife handles today.
What Is Micarta?
Micarta is the name of a commercially-owned product, and isn’t just a generic material. Micarta is a durable type of composite made of a base material suspended in epoxy resin. Norplex Inc. owns the trademark on the term.
The material is compressed under heat and is classified as a thermoset product. The main name associated with the invention of Micarta is George Westinghouse. During his life, Westinghouse never stopped creating new things, and the first developments of what we know now as Micarta occurred somewhere between 1900 and 1910.
Because of the way that Micarta is made, it has extensive applications for insulation in electrical systems. It is unknown when this material became a popular knife handle option, but it is safe to say it’s never been more popular than today. Like many materials of the era, such as Bakelite and Celluloid, Micarta found its way into craft use.
How Is Micarta Made?
It’s hard to pin down Micarta. In the old days, fabric and paper were used as the base material, but today we have a wide variety of other types that exist, including carbon fiber and glass. Knife handles are actually a fairly narrow category of end-use for Micarta.
The process by which Micarta is made is relatively simple. Materials are soaked in whatever type of thermoset is going to be used, and, once impregnated by the resin, it is subjected to intense heat and pressure which causes a sheet to be formed. Decades ago, Micarta was also made in large blocks.
These large blocks are a favorite for revolver grips and other large, three-dimensional forms. There are people that shop garage sales and estate auctions looking for fixtures or items made using these older types of Micarta. The most prized is a type of paper Micarta that is about the closest thing to elephant ivory in terms of texture and color that grip makers can get.
Who Uses Micarta?
Mini knife makers that work with the material end up ordering large quantities to their specifications. Smaller companies tend to work with what is available through existing supply chains, which is a large reason why you end up seeing very similar colors across the board.
It is possible to get Micarta in custom colors and textures, though you may have to spend thousands to get it. If you find that you are looking to put a nice handle on a knife, it is a good idea to call around and see if any companies have scrap that they are willing to sell.
Micarta Vs. G-10
True Micarta is not the same thing as G-10 or other types of thermoset laminates. Many people tend to use the terms interchangeably, but in a strict manner of speaking, true Micarta will be made using paper, burlap, canvas, or linen set in resin. G-10 is different in that uses glass cloth, a type of material made from carbon fiber filaments.
Micarta is usually heavier than G-10 and carbon fiber laminates, but, in terms of knife handles, the difference is negligible and is not too far apart from the weight of standard hardwoods. Bakelite, while common on a tremendous number of products and weapons, isn’t the same type of material as Micarta even though it occupied many of the same roles.
Comparing Micarta To Other Handle Materials
As Micarta has become more popular, more companies have offered it as an option, but sometimes incorrectly. A true Micarta material is not quite as durable as G-10, but it is going to hold up better than wood or leather. G-10 is an essentially absorption-proof material. Most handle materials out there, Micarta included, will absorb a degree of water, sweat, or blood.
Though it is unlikely to permanently stay in the material, it is recommended you keep Micarta clean. Usually, hot soap and water does the trick, and, while you can get oil on it, expect it to stain a bit. This has to do with the fact that the materials in Micarta are either paper or fabric, and many of these materials are exposed, though fully impregnated by resin.
Wood handles are subject to small problems, and if installed incorrectly, they can split or crack quite easily. Wooden handles are not especially great for heavy outdoor tasks, such as chopping or batoning. Wood also has the problem of absorbing ambient moisture. In especially humid environments, handles can swell and crack on the pins. Micarta has no grain in the way that wood does, although it is typically applied to knives along its length.
When comparing Micarta to carbon fiber it comes down to durability and weight savings. Carbon fiber is not an especially durable material, though it is very lightweight. As far as knife handles go, carbon fiber is excellent for inlays and panels, though it is not as good of a material for making full scales. When compared directly to Micarta or G-10, carbon fiber is harder to shape and is more difficult to apply a working textured finish.
Best Knives With Micarta Handles
Linen and canvas Micarta is my hands-down favorite material for knife handles. The reason I find these types of Micarta the best is that they provide the greatest degree of function in the hardest environments. I like G-10, but I have found it too slippery across the board when covered in blood and fat out hunting and it becomes ice cold to the touch very quickly. While it is a very durable material, it feels much more like plastic than Micarta and, for lack of a better way of saying it, never develops the character like wood, leather, or Micarta.
Linen or canvas Micarta offers the texture I want on a grip across the board, and I have put several products through an insane amount of daily use without any negative effects. Each of these knives I list here I have used for months or years, and I can strongly recommend them.
Winkler Utility Knife
The utility knife was the first Winkler I ever owned, and it is still a constant companion. I have used this knife extensively for everything from opening paint cans and cutting heavy-duty straps to prying apart pallets and even building out countertops and interior demolition.
I have logged hundreds of hours with this knife in hand and it has been extremely comfortable the entire time. The green Micarta handle has held up extremely well, though it now has some gouges from use. It is not on the cheap side, retailing at $450, but it has been worth every penny.
Case/Winkler No.6
A collaborative project between Case Knives and Winkler, the recurve utility No.6 is a heavy-duty knife built for some of the hardest projects. I have taken this knife with me out to the field and have also lent it out as a skinning knife for deer hunting.
Due to its deep, recurve belly it is exceptional for chopping tasks and is just as good in the kitchen as it is blasting through small limbs. While no longer available on the Case website, my version has a tan canvas Micarta grip and it has held up exceptionally well. While it’s not contoured exactly to my hand as I have experienced with knives direct from Winkler, it feels good in its own right and will provide a lifetime of use. The MSRP is $430.
White River Knife And Tool FC7
An extremely attractive, large knife, the FC7 is my go-to hunting knife for deer. While it may seem like a large knife, my experience in the field has taught me that it is probably the best big-game knife money can buy today. It is gorgeous to look at and the orange liners on the green Micarta definitely add to it. I see no reason why I will not continue to get years and years of use out of this product. The MSRP on the FC7 is $330.
White River Knife And Tool Exodus 4
The Exodus 4 is the knife that I use in the kitchen every day for almost all tasks. It is probably the most washed knife on this list. It has been constantly exposed to soap, oil, and all other manner of kitchen materials. It makes an excellent carrot peeler using the square edge of the spine.
My version has black Micarta panels, and they have held up extremely well to the constant washing and use. This knife and its grip have arguably been exposed to more caustic materials across-the-board than any of the other products, it was even put through the dishwasher several times by accident. The Exodus 4 is easy to hold even while in the direst of kitchen nightmares. The MSRP is $175.
ESEE Camp Lore RB3
The knife itself had some shortcomings. The steel is sharp but requires maintenance, and it is not very resistant to blood. My original version of this knife has been discontinued, Esee has a dimensionally identical, but cosmetically different, version for sale now. The MSRP on that knife is $190.
I don’t remember what the Camp Lore version cost many years ago, but it has held up to my abuse. The grip panels are Micarta, and they have seen more than their fair share of punishment. The blade shape was less than ideal for working on four or five deer in a night, and I quickly learned my lesson and moved to a bigger knife. I will say that in the years that I used this knife, it was a good friend for the field, and I look forward to passing it on to my kids when they are older.
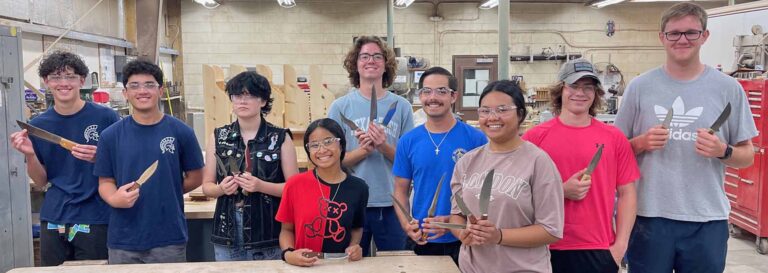
A South Pacific tradition, Dr. Douglas Hepler instructs a knifemaking course at Kwajalein Junior-Senior High.
Kwajalein Junior-Senior High may be the only American high school that has knifemaking as an official part of the school curriculum—and it just celebrated its latest graduating class of knifemakers.
The school is on the U.S Army Kwajalein Atoll, Ronald Reagan Ballistic Missile Test Center, in the Republic of the Marshall Islands in the South Pacific Ocean. Kwajalein Island is the site of a titanic three-day battle that cost almost 400 American and over 4,000 Japanese lives during World War II. Today, though, instead of artillery fire and other explosions on the idyllic coral atoll, the sound of belt grinders and buffers can be heard.
Taught by Dr. Douglas Hepler, a retired Navy chief petty officer, students in grades nine through 12 shape blades from 1080 carbon or 440C stainless steel. According to Doug, “The kids do everything: layout; cutting out and grinding the profiles; drilling the rivet holes; stamping desired logos; grinding the edges; heat treating and plate-quenching; doing the oven temper and freezer cryo-treatment at home; the final polish; adding and completing the handles; and sharpening. They do it all.
Douglas Halper
“We have Burr King and Grizzly belt grinders, Baldor buffers and a Paragon oven. We use local woods—coconut palm, kamani, hao, noni, etc.—for handles. We also use whalebone whenever we find a dead carcass washed up on the beach. We buy all our rivets, steel, 2×72 grinding belts and polishing items from Jantz Supply, and have for years. I buy all my personal knifemaking supplies from them as well. You can’t beat the price and top-notch service. They are a great company.”
Concluded Doug: “I am very proud of my students. They have taken what I can teach them and have become better cutlers than I will ever be—and I think that’s awesome.”