Knifemaking is the building of a knife, which includes the blade, handle and other accouterments. Blades are made by either removing metal from a steel blank via a grinder – known as stock removal – and the forging to shape of hot steel into a blade in the process known as bladesmithing. Other parts, including bolsters, guards, pommels, etc., are needed to complete the finished knife.
If you’ve ever seen Murray Carter give a sharpening display at his knife show table, shave his beard—or someone’s head—with one of his knives at a BLADE Show seminar or just talked to him in person, you know what a genuine, engaging person he is. If you haven’t seen him up close, his new book, Bladesmithing with Murray Carter, is the next best thing. In some ways, it’s better.
The first in our Knife Books Of The Day series, Bladesmithing with Murray Carter takes you through the Carter process of making knives as only he can tell it. Design, steel selection, forge welding, lamination techniques, heat treating, grinding, finishing, handles, sharpening, sheaths–it’s all here in 160 pages of hundreds of color pictures, diagrams, knifemaking tools and equipment, how-to’s, safety tips, and much more.
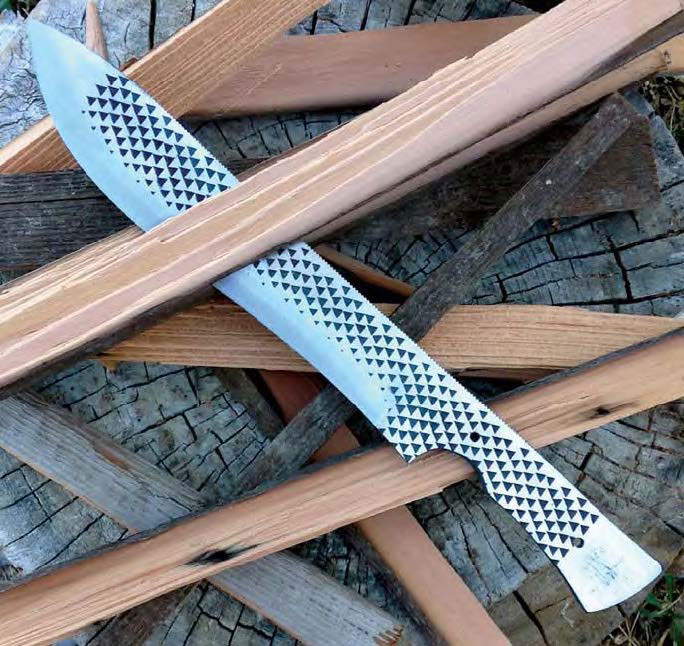
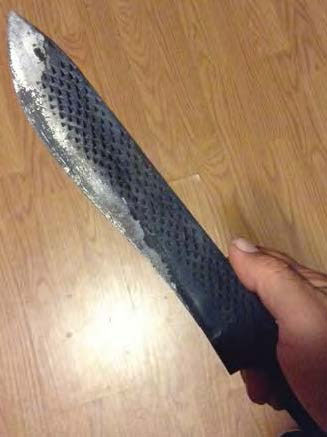
This is what the finished project looks like. The handle is not covered in this tutorial, but the design is ready to take any number of options. (All images by the author)
I’m going to walk you step by step through making a bowie from a common farrier’s rasp, as simply as possible, with a few tips to save time and improve the finished blade as we go. It is a simple bowie-style camp knife useful for all sorts of tasks.
1) Pattern Sketch
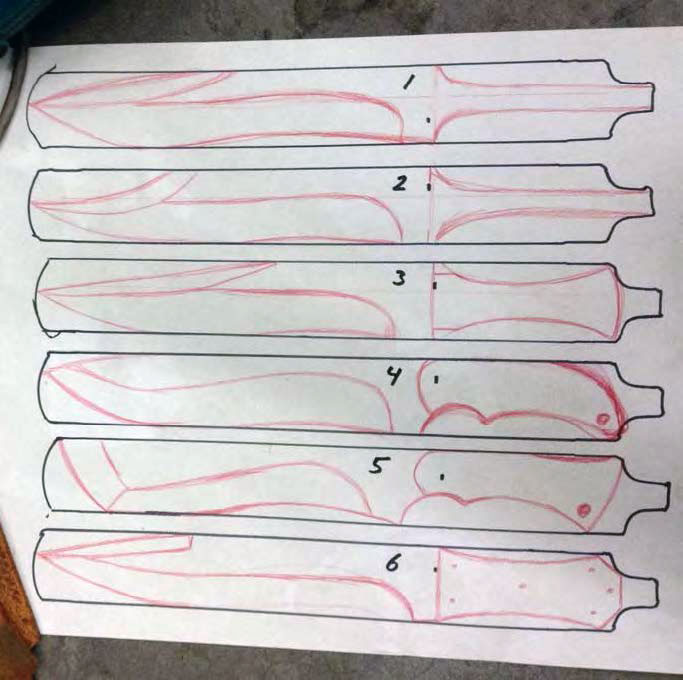
The author traced assorted patterns on the rasp images on a large sheet of paper so he could compare each style side by side and see what works and what doesn’t.
The first thing you need to do is decide on a style that suits your needs and your purpose. I find that visual aids are the easiest way to get the results I’m after, so I often do several sketches and drawings to decide what I’m trying to accomplish.
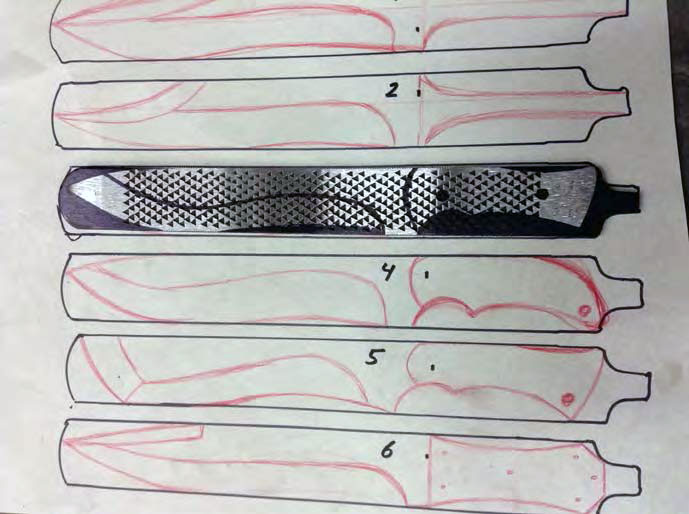
For this I traced the rasp multiple times on a large sheet of paper so I could compare each style side by side and see what works and what doesn’t, as well as what the maximum potential of my material was. I decided on blade shape #4 with handle shape #5. The combo should be a good general chopper and comfortable in the hand.
By visualizing this way I can mix and match infinitely. Don’t be afraid to get creative, especially when using recycled and often-free materials. This is a chance to express yourself and your vision in steel.
2) Annealing
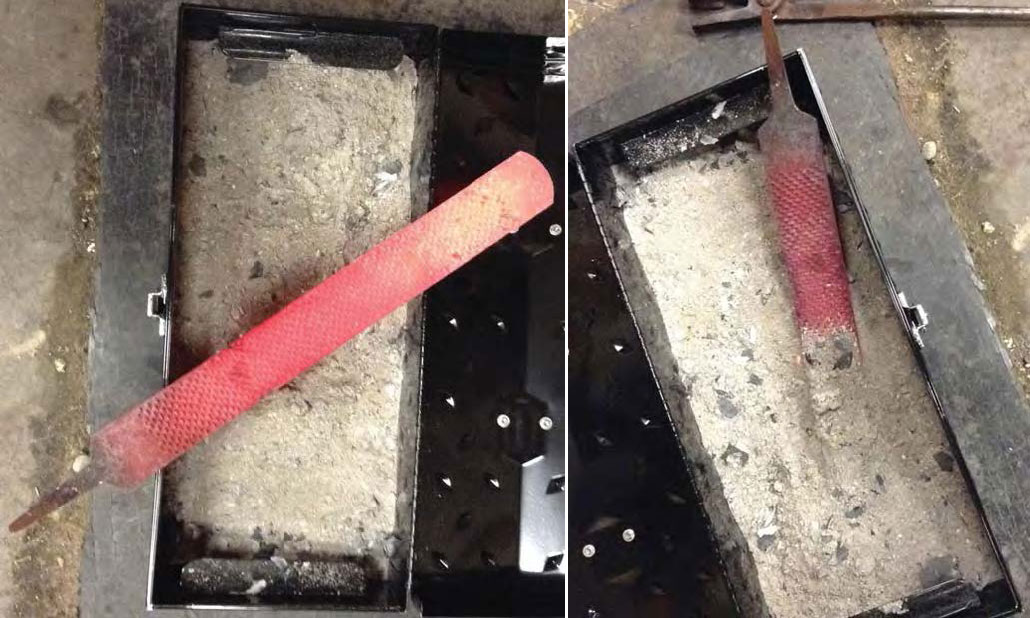
Heat the rasp to nonmagnetic and then bury it in a simple metal toolbox filled with clean wood ash.
Now you have a design in mind, but, before you can achieve bowie knife greatness, you must anneal the rasp so it can be shaped, drilled and ground more easily.
It is certainly possible to make a rasp or file knife without annealing, but great care must be taken not to get the steel too hot and ruin the temper. Moreover, the high hardness of the file in its current state means a blade made this way would be very brittle and prone to breaking under hard-use conditions.
If you have access to a heat-treating oven, by all means use it to anneal your steel. This is a very simple and basic build, so I’ll be heating the rasp to nonmagnetic and then burying it in a simple metal toolbox filled with clean wood ash. Burying it insulates the steel, allowing it to cool very slowly. The slow cooling softens the steel so it’s easier to work.
Vermiculite is also great for this step if you don’t have access to wood ash. Vermiculite can be purchased at most garden centers and insulates very well. It will take several hours for the rasp to cool. Don’t rush it! It will be well worth it once you start filing, drilling and grinding.
3) Design Transfer
Once the teeth are cleaned off, transfer the blade design to the rasp.
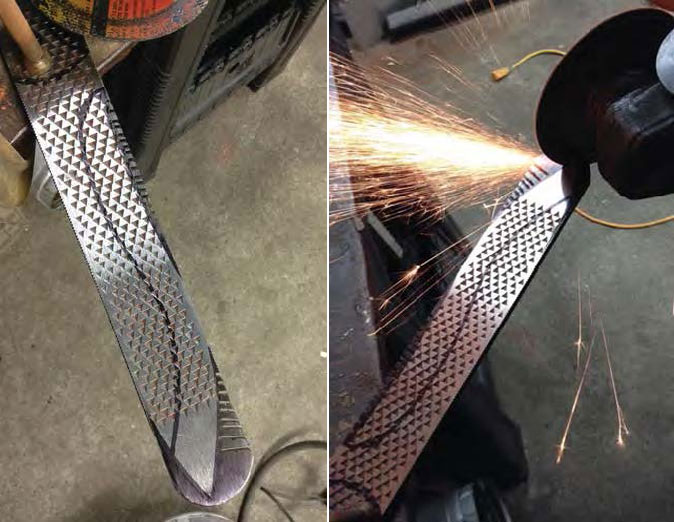
The rasp has cooled and it’s time to go to work. The first step is to grind the teeth off both sides. This leaves a nice, flat surface to work with but the memory of the rasp is left behind, which gives the knife a distinctive, rugged look.
An angle grinder will work great for this task, but any number of basic tools will suffice. Use whatever is readily available to you. Once the teeth are cleaned off , transfer the blade design to the rasp. Cutting out the pattern and over spraying it with black paint works very well.
However, since this design is fairly simple, I drew it out with a permanent marker.
4) Notched & Cleaned Up
When you go to cut out the profile from the rasp (left), notching out the shape with a hacksaw or cutting wheel (right) makes the job much easier.
Now you can start cutting out the profile. Notching out the shape with a hacksaw or cutting wheel will make the job quite a bit easier. I find that removing small pieces of metal is easier then trying to make large cuts.
After the bulk of the steel has been removed, the final profile can be shaped out with files or an angle grinder.
5) Drilling Pins
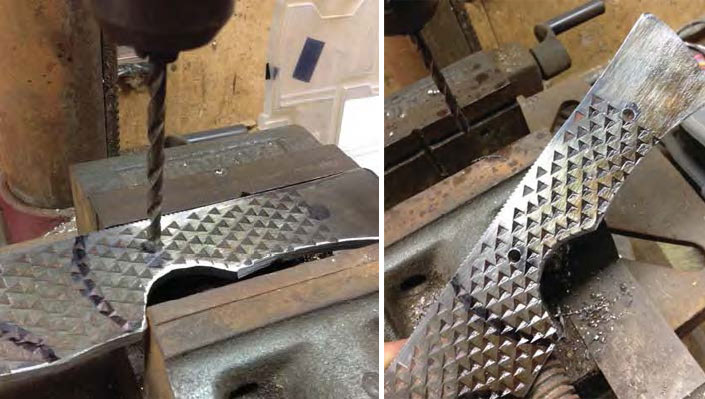
Drill a couple of holes for pins. The author uses brass bolts for the latter.
The blade is starting to take shape. Now is a good time to consider what handle material is best for your creation.
There’s no wrong choice. With the seemingly limitless options available today, you can truly express yourself from mild to wild. If you’re feeling traditional you can go with antler or perhaps stacked leather.
If you want to go more cutting edge, there are hybrid burl blocks with every color resin in the rainbow. Shredded money and eggshells are even finding their way into knife handles these days.
I’m going more traditional, so now is the time to drill a couple of holes for pins. I’m going to use brass bolts as pins. They are inexpensive and can be bought at any hardware store. The threads add an extra mechanical bond when they are epoxied into place, and also act as built-in clamping devices to ensure a solid, tight fit-up when the scales are applied.
6) Grind the Bevels
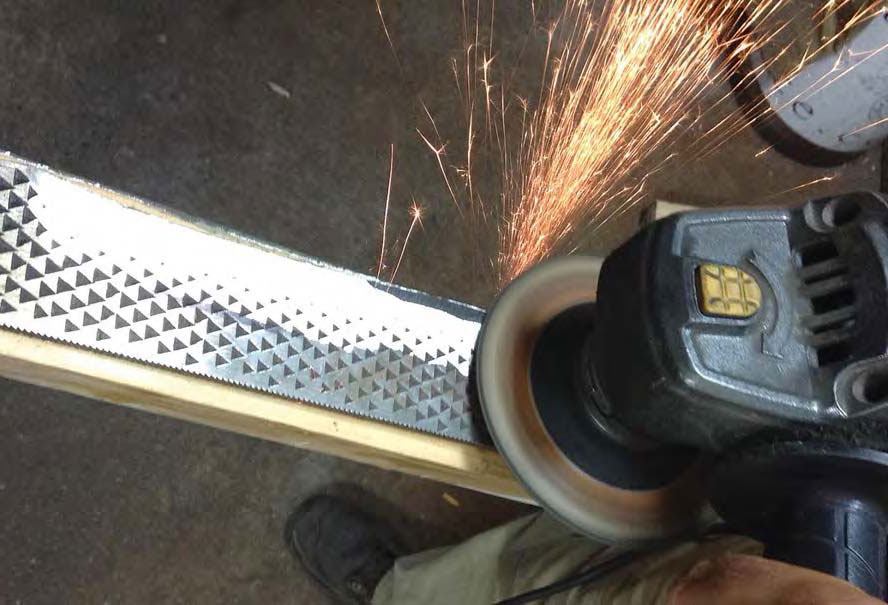
Rough grind the bevels. The author used a 4-inch angle grinder. Leave the edge about the thickness of a penny.
With the profile cleaned up and all necessary holes drilled, it’s time to start grinding in the rough blade bevels in order to get your blade ready for hardening.
The trusty 4-inch angle grinder goes to work again, though a bench-top grinder or even a good, sharp file will get the job done. The goal here is simply to remove the bulk of the metal on the sides of the blade evenly so there is less work to do after hardening.
Don’t grind all the way to sharp at this point! Leave the edge about the thickness of a penny—this will protect the steel that will become your cutting edge from overheating and decarburization, helping to ensure your finished knife will live up to its maximum potential.
Once the bevels are roughed in, finish up with sandpaper or a flap disc to 220 grit. Be sure to remove any deep, heavy scratches, as these could lead to cracks during hardening.
7) Heating and Quenching
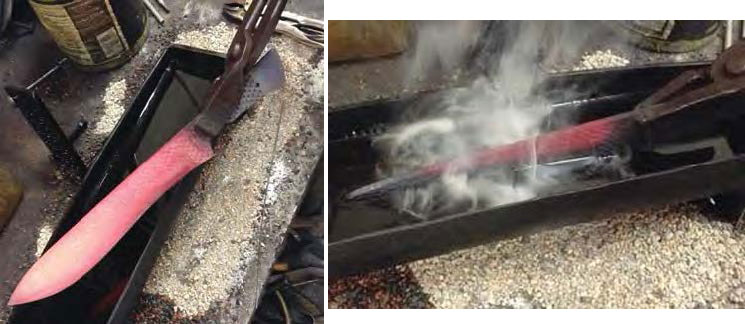
After you heat the blade to nonmagnetic, quench the edge.
Now you’re ready to harden some steel! I’m going to use a forge to heat the blade to nonmagnetic—aka the critical temperature—though a torch works equally well.
Slowly bring the blade up to temperature and check it oft en with a magnet. When nonmagnetic is reached, edge quench to harden the cutting edge, and leave the spine slightly softer for additional strength and toughness.
Submerge the blade in the quench oil once all the color has left the blade and it goes to black. Allow the blade to cool to room temperature in oil. This will take an hour or so.
A variety of things will work as quench oil and everyone has a favorite. Depending on the types of steel used, I’ve had good luck with canola oil, ATF transmission fluid and mineral oil. I quenched my blade in Texaco type A.
WARNING! Mixing hot steel with oil can and will cause a fire! Be sure to take appropriate safety precautions. A well-ventilated space free of other flammable materials, as well as personal protective gear and a fire extinguisher, are musts!
8) Check for Hardening
Once the blade has cooled, remove it from the oil and clean it off. Brake cleaner works well for this, as well as simple dish soap and warm water.
Once the blade has cooled, remove it from the oil and clean it off . Brake cleaner works well for this, as well as simple dish soap and warm water. If the hardening was successful, you should see an area of clean steel on the cutting edge where the carbon scale has popped off the blade.
A second simple and easy way to check for a hardened blade is with a fresh, sharp file. Run the file over the knife’s cutting edge. The file should skate easily and not bite into the edge. If this is the case, you are ready to temper the blade.
9) Tempering
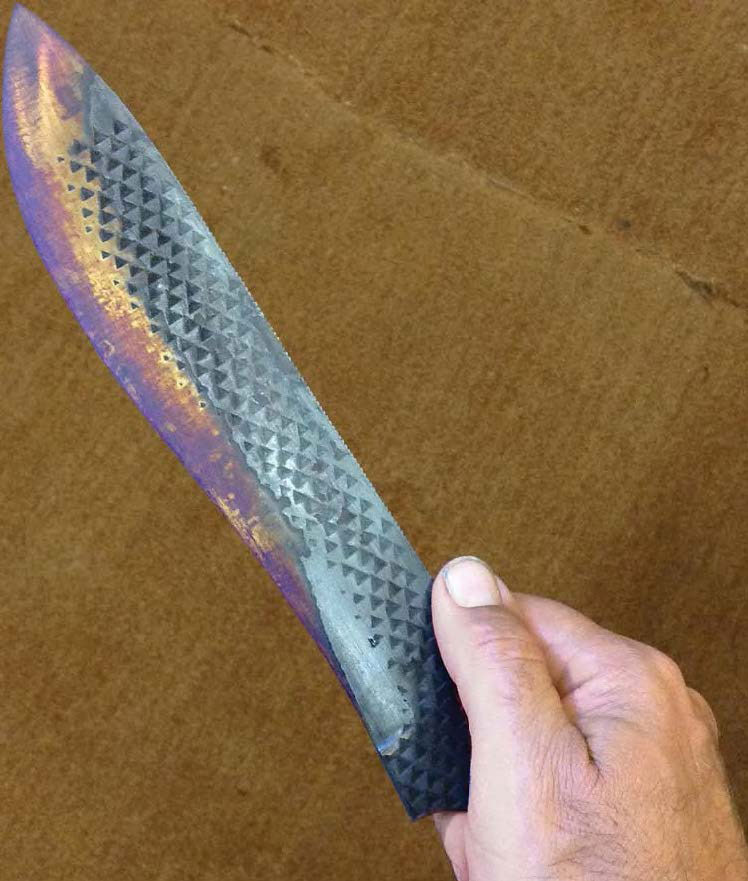
During the basic heat treatment and tempering process, the steel oxidizes and the clean portion changes color.
Tempering is a fairly simple process. Basically, in order to reduce brittleness and increase toughness, tempering is heating the blade to a lower temperature than you did in the annealing step.
Again, if you have access to a heat-treating oven, by all means use it. However, a toaster oven or basic household oven will work just as well. Oven temperatures vary greatly—especially toaster ovens—since they lack heavy-duty insulation. This means the exact temperature you need to use will vary as well.
I start by putting my blade in the oven for an hour at 375°F. As the steel heats it oxidizes, and the clean portion changes color. This is a simple, basic heat treatment and temper, so the color change is your indicator rather than an exact temperature.
As the heat rises the color goes from a bright gold to a shade of bronze straw, then a light purple to a blue on its way to a dark blue/almost black. The dark bronze to purple is your goal. The blade should be hard enough to hold a good edge but soft enough to not chip or break during use.
I did three one-hour cycles, each 25°F hotter according to my oven, and 425°F was the temperature that gave me the desired result. A simple trick to get a more even heat in a regular household oven is to put a sheet pan on the bottom rack.This holds heat closer to the element and keeps the temperature fluctuations to a minimum.
10) Finishing and Final Edge
Jump into the rich tradition of knifemaking with this collection of essential books from BLADE. You’ll save a bundle with this bundle!
Now you have a hardened and tempered blade ready for finishing and a final edge.
You need to remove only a small amount of steel to get down to the final edge. Don’t rush at this point! Go slowly to keep from getting the steel too hot and ruining all your hard work up to now. As long as the steel stays bright and shiny you will be fine. Any discoloration at this stage means overheating and the risk of losing the blade temper.
You also are working down to the final, finished and sharp edge. Stitches aren’t cheap! Be aware of where your fingers are.
Some light grinding or fi ling as in the previous steps will bring your bevels down to the finished edge. Polish to at least 220 grit. A higher-grit polish will look more finished, as well as be less prone to rust, and provide smoother, more fluid cuts.
Once you get to 220, it’s time to apply an edge and see how you did. Some simple test cutting and chopping will tell you if you need to change anything, such as the thickness of your cutting edge or if you need to re-temper perhaps a few degrees hotter. Use the materials you originally planned on cutting with your new bowie to decide this.
For example, since the blade primarily will be a camp knife, simple tests such as splitting kindling, cutting rope and twine, and making the all-important hotdog stick will tell you what you need to know.
Whether You Call It Copper San-Mai, Cu-Mai, Or Anything Else, Copper Damascus Is One The Trendiest Ways To Forge Knives Today.
By now most knife enthusiasts are familiar with pattern-welded steel, commonly called damascus, whose re-invention for use in knife blades is attributed to BLADE Magazine Cutlery Hall-Of-Fame® member Bill Moran.
The damascus world has since exploded with complicated mosaics, exotic-tiled canister billets, and, more recently, even some interaction between pattern welding and 3-D printing. These new techniques are mind-blowing for sure.
Copper San-Mai
A 2.75-inch go-mai blade with a wrought-iron cladding over an Aogami2 core and a copper shim layer highlights Joe Edson’s frameback straight razor. The frame is copper with a forced patina. The scales are crosscut mammoth ivory on a G-10 backer with a forged-patina-copper-wedge spacer. Closed length: 3.25 inches. (SharpByCoop image)
One of the hottest new trends in damascus is the inclusion of copper into pattern-welded billets. Commonly called copper-mai, copper san-mai or cu-mai, the technique has been brought to near perfection by Coy Baker at Baker Forge & Tool.
In 2019 at the request of a customer, Baker created his first copper damascus billet. Starting with Baker as a one-at-a-time weekend garage craftsman, the business exploded. Baker Forge & Tool now has a 3,000-square-foot shop and 10 employees, and they can’t keep up with demand.
Baker says the welding of copper in stacked configurations has been around for centuries in the form of mokumé gané, aka mokumé. While he’s the first to blow up Instagram with welded copper damascus, he is certainly not the first to attempt the cu-mai technique.
He primarily uses 80CrV2 carbon steel for the cores of his billets, and also various patterns of a damascus of 1080 carbon and 15N20 nickel-alloy steels. ABS master smiths Steve Schwarzer and Jason Knight helped him along in his early damascus-making journey.
How To Forge Copper Damascus
To forge a copper damascus billet, Baker typically uses a core of 80CrV2, a layer of 20-gauge pure copper shim stock, and a cladding of 1080/15N20 damascus.
“It’s important that the core and cladding stay in a 1-to-1-to-1 thickness ratio,” he said. “The copper doesn’t harden, and it’s critical to keep the core centered so that the cutting edge of the knife will be hardenable steel.”
He hasn’t experimented with copper alloys other than pure copper, though he has used some bronze and nickel with good results.
It’s no surprise that there are trade secrets that Baker didn’t volunteer, and I was polite enough not to ask. Copper stacked in a billet oxidizes quickly, similar to stainless, and so the welding must be done very precisely. For the welds to stick, the surfaces being welded also must be exquisitely clean, with not even a trace of oils or fingerprints.
The Different Types Of Copper Damascus
Baker did reveal that there are two basic versions of the process. In one, the layers are welded around the perimeter as in canister or stainless welding, and then the entire billet is welded at once. In this method, the temperatures are enough to liquefy the copper, and the perimeter welding keeps the liquid in.
In the other version, the billet components of core, copper and clad are stacked together and held at brazing temperature. This is Baker’s preferred method, as the copper doesn’t liquefy and so performs more consistently when it comes to thickness. Such exact brazing requires precise temperature control, as a 10-degree variation in either direction from the proper brazing temperature can produce failure.
While there are no doubt smiths who have attempted and maybe even successfully welded copper damascus by hand, Baker acknowledges that the aspiring smith is much more likely to be successful using a press or power hammer to set the weld. Precision temperature control also gives increased chances of success.
Dion Damascus
A 10.25-inch blade of NBC san-mai, black ash burl handle with an ebony bolster and a white G-10 spacer help complete Andrew Mochado’s kitchen model. Overall length: 16 inches. (Eric Eggly/PointSeven image)
While Baker is the best known and most common source for copper damascus, another variation is available from Dion Damascus. Florida knifemaker Andrew Mochado recently made a knife from a bar of Dion Damascus that included brass, copper, and nickel clad over a core of 52100 carbon steel.
“It is my take on a gyuto-style chef’s knife,” he said. It has a box elder burl handle with an ebony bolster. Mochado heat treated the blade in a gas forge. “The outside layer of the billet was nickel, so it was very difficult to get it all up to temperature,” he explained. “The nickel buckled up a bit and I thought I had a failure. I was able to successfully grind off all the buckling, and the blade was still perfectly forged together.”
Baker pointed out that the melting points of copper and nickel are above the heat-treating temperature of carbon steel. However, in a forge, the outside layers come in contact with a forge atmosphere that’s well above the desired hardening temperature, thus causing problems with the non-ferrous layers.
How The Copper Affects Knifemaking
Jordon Berthelot is a Texas maker known for kitchen knives and intricate carved and sculpted blade plunges. He’s also made dozens of blades with Baker’s cu-mai. He has been Coy’s “guinea pig” for testing new patterns for months. When Baker develops a new pattern, Jordon builds the prototype.
“I’m pleased with how the cu-mai grinds. You might expect the copper to be gummy or soft or to grind differently when you sculpt it, but it pretty much grinds the same as steel,” Berthelot observed. “You always have to pay attention to get the carving right, but the copper poses no problems.”
Makers will notice the copper being softer if they hand-sand it aggressively, but overall the copper layers are no more difficult to finish than regular steel.
When it comes to finish work, Berthelot recommends sanding to at least a clean 600 grit prior to etching. “Regular” ferric chloride doesn’t perform well, and etching copper in it will leave a copper tint on standard damascus steel blades later. Instead, Berthelot prefers a 20/20/60 mix of ferric chloride, muriatic acid and distilled water. The addition of the muriatic acid keeps the copper from looking blurry, and keeps the material out of the solution for future etching. After the etch, Berthelot buffs with “black magic” rouge so the copper will “pop” nicely.
Forged in Fire season 1 episode 2 “OG” winner Chris Farrell of Fearghal Forge in Austin, Texas, took advantage of the bold copper line in his piece of Baker Forge damascus. The copper makes a dramatic, bold statement, and so do the curves and lines of Farrell’s fancy faceted fighter.
“People see my faceted handles and think they’re kinda funny until they pick one up and realize how well it fits their hands,” Farrell said. He is fascinated by innovations in the knife industry and is always looking for his own ways to innovate. He’s experimented with forging Baker’s copper damascus bar stock: “It can be done, but you really have to be careful. It’s real easy to mess up!”
Copper Damascus Around The World
Australian maker Adam Fromholtz crafted a cake knife of copper damascus from the Japanese steel company Takefu. Takefu steel can be hard to find in the USA, but there is a reliable Australian distributor. Adam’s knife is copper, nickel and brass clad over a V-Toku-2 carbon core. Handle: Tiger myrtle. Blade and overall lengths: 9.25 and 14 inches. His list price for a similar knife: $1,800. (SharpByCoop image)
The cu-mai trend is not limited to the United States. Australian knifemaker Adam Fromholtz of Canberra crafted a cake knife of copper damascus from the Japanese steel company Takefu. Takefu steel can be a challenge to find in the USA, but there is a reliable Australian distributor.
Adam’s blade is copper, nickel and brass clad over a V-Toku-2 carbon core. Regarding the steel, Fromholtz noted that it was near impossible to forge due to the differences in ductility between the materials. Because of the softer cladding, he noted that the blade tends to gall a bit, so makers should take note of this when fitting a slotted guard on a blade of such a material. Overall, the steel is simple to finish but shows handling marks easily.
How Do Copper Damascus Knives Perform?
Is copper damascus all flash and bling or does it perform? Copper does not harden the way steel does, which makes you wonder how it impacts knife performance. First of all, copper damascus is used with a monosteel—that is, one layer of steel—or a regular carbon damascus core.
Using a steel core makes it where the copper has absolutely no impact on the blade’s cutting performance, edge stability or toughness. Baker said he knows of two makers who have used his cu-mai material to complete American Bladesmith Society-style performance tests of rope cut, 2×4 chop and 90-degree bend.
When it comes down to it, the copper layers are very thin. Considering that the final weld-up of clad/copper/core/copper/clad may be as much as 2 inches thick, and that the copper starts out roughly .03-inch thick, the overall final billet has very thin layers of copper. It’s enough for a dramatic pattern but not enough to impact knife performance in a negative way. “I made a knife with it then beat the hell out of it,” Farrell said. “So long as it’s heat treated properly, it’s good stuff.”
Availability Of Copper Damascus
The 9-inch blade of Jordon Berthelot’s chef’s knife is Baker Forge & Tool auro-mai damascus with a core of 80CrV2 carbon steel. “It has my carved ridge that adds great weight reduction and a nice ergonomic flow, and decreases the drag coefficient,” Berthelot wrote. “It also allows me to alter the pattern.” Overall length: 14 inches. Maker’s price for a similar knife: $1,700. (image courtesy of Jordon Berthelot)
If you’re a maker looking to capitalize on the copper damascus trend, get in line. Baker Forge releases approximately 70 billets a week to the public, in addition to what it produces for commercial use. The billets “drop” Saturdays on Instagram and are usually gone by the end of the day.
Most billets are 2-2.5 inches wide and come in thicknesses from ⅜ inch all the way down to 3/32 inch. Pricing currently runs up to $25 per linear inch, but as in all things post-pandemic manufacturing, the supply costs for raw materials keep increasing.
As for consumers, check knife shows, magazine stories such as this one, and Instagram and elsewhere on the Internet. Cu-mai knives are out there—you just might have to do some digging to find them.
Specially engineered for knife blades, the two alloys are at the cutting edge of metallurgy.
Editor’s note: The genius behind MagnaCut—arguably today’s most popular blade steel for both custom and factory knives—the author has helped create two new blade materials that he fully expects to meet with wide-ranging acceptance as well. Following is his story on his latest voyage into his favorite subject.
I pitched the idea of MagnaCut steel to Crucible Steel and Niagara Specialty Metals in 2019. I said I had an idea for a steel that would match the best of the non-stainless powder-metallurgy steels in terms of wear resistance and toughness. This would be a big deal because there has been a longstanding gulf between the performance of carbon steels and stainless steels. My team and I successfully turned the idea into MagnaCut, released in 2021, which had a microstructure like a non-stainless steel while being stainless—offering the best properties of both.
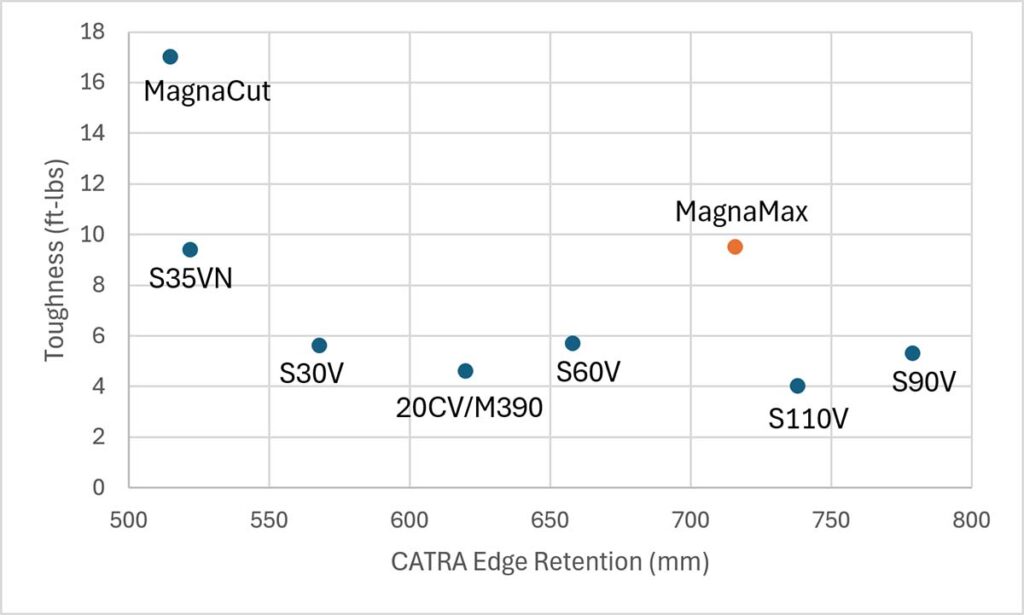
I intentionally sought balanced properties with MagnaCut so it was both tough and wear-resistant, similar to non-stainless grades such as CPM 4V, CPM CruWear and Vanadis 4 Extra. Knife enthusiasts, especially those into folders, often seek higher-wear-resistance steels for maximum edge retention. Instead, I tried to push for a more balanced set of properties so knife buyers could see the benefits of having high toughness in addition to good wear resistance. This can allow knives to be made with thinner edges for better cutting ability, because toughness helps thinner edges resist chipping. In my edge retention tests with the CATRA (Cutlery Allied Trades Research Association) edge testing machine, thinner edges with smaller angles lead to larger differences in edge retention than the steel choice, or even the heat treatment! It seems many knife buyers have seen the light as MagnaCut has gained quite a bit of popularity since its release.
MagnaMax Steel
Nonetheless, I also knew knife enthusiasts would ask for something more wear-resistant. The folder crowd is not as worried about toughness and are seemingly always asking for greater wear resistance and edge retention. However, when the wear resistance gets too high, the steel becomes “unbalanced,” and the toughness becomes a significant issue. I see images of broken folders semi-regularly from the most extreme wear-resistance grades.
MagnaMax shares the same high corrosion resistance and good hardness potential as MagnaCut, but has higher wear resistance at the cost of some toughness. Because MagnaMax shares a similar microstructure to non-stainless steels, its toughness level for that high wear resistance is excellent.
The “sweet spot” for higher-wear-resistance products seems to be in the family of non-stainless alloys such as CPM 10V, Vanadis 8 and K390. In particular, K390 has been building in popularity through Spyderco knives in recent years for its excellent combination of properties. I had actually proposed to Crucible and Niagara way back in 2019 that, after we were successful with MagnaCut, I had another idea I was calling stainless 10V at the time.
This led to a new product called MagnaMax, a higher-wear-resistance steel in the same family as MagnaCut. It shares the same high corrosion resistance and good hardness potential as MagnaCut, but has higher wear resistance at the cost of some toughness. Because it shares a similar microstructure to non-stainless steels, its toughness level for that high wear resistance is excellent.
Two of the highest-toughness stainless powder-metallurgy steels before MagnaCut were CPM S35VN and CPM 154. MagnaMax matches the toughness of those grades while being much more wear-resistant. In recent years, one of the more popular folding knife steels has been M390, and MagnaMax has over twice the toughness and substantially higher slicing edge retention. Spyderco used the second prototype heat of MagnaMax in a series of its Mule series knives intended for enthusiasts to try out different steels. A Spyderco Forum member known as vivi said he cut 325 gallons worth of cardboard strips with one of these knives. He reported, “Even without adding the numbers up, I can say this steel has the best edge retention of any steel I’ve tried.”
The author (left) and his father, BLADE Magazine Cutlery Hall-of-Fame® member Devin “Hoss” Thomas.
The development of MagnaMax was not without its issues, however. The first two test heats of the steel were made by Crucible, a longstanding U.S.-based steel company that unfortunately went out of business in 2025. Crucible is the company behind many of the industry’s leading knife steels like 154CM, S30V, S35VN and 3V. Crucible is the company that invented powder metallurgy itself, a significant innovation providing the excellent properties of all the “CPM” (Crucible Particle Metallurgy) grades. Crucible went under basically right while it was making the second test heat of MagnaMax. A couple of slabs were even recovered from a pile of scrap after the company was dismantled so my team could test it. We made the first test heat of MagnaMax back in March 2023, and we are just now approaching the product’s wide release.
Niagara Specialty Metals (NSM), the company that hot rolls, anneals and distributes the majority of the leading steel grades, has played a key role in keeping these steels alive. Crucible relied on NSM for hot rolling the high-end, complex grades, as it is the only facility in the United States capable of processing them.
Niagara had already assumed an active role in the knife industry many years before, taking over the distribution of blade steels over a decade ago after Crucible’s first bankruptcy in 2009. It pushed for new grades like CPM S45VN, and without NSM, I’m not sure MagnaCut would ever have been made. Niagara is working with other suppliers of powder-metallurgy steel, including Carpenter and Erasteel, to ensure these grades remain available. My team has been working closely with these partners on the development of MagnaMax, but that also means we almost had to start over after Crucible’s unfortunate demise. The good news is I have been testing MagnaMax made by Erasteel, and the properties look excellent, at least as good as the Crucible-made material. And it’s actually looking a little better.
Pop’s ProCut Steel
Perhaps sometimes I get carried away working on new knife steels that push the boundaries for wear resistance. Some knifemakers are looking for simpler grades that are easy to forge, grind and finish.
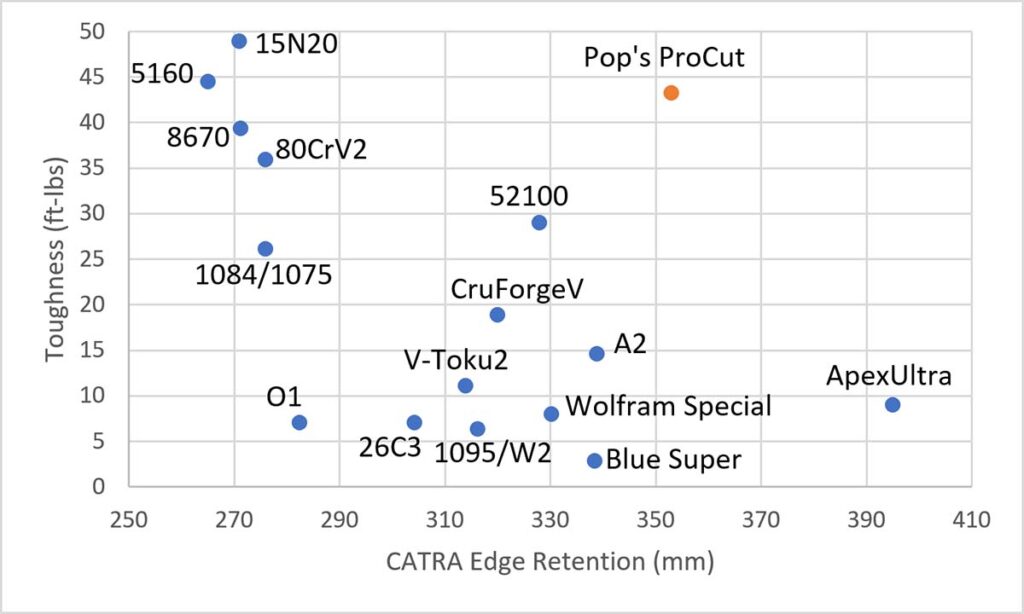
Pop’s ProCut’s toughness matched that of steels like 8670 and 5160, known for their excellent toughness. The edge retention was better than the majority of forgeable grades outside of ApexUltra, a high-performance forging grade.
Joey Berry of Pop’s Knife Supply contacted me in March 2024 asking for an improved version of Pop’s most popular grade, 80CrV2, which is known for being very easy to work, high in toughness and low in cost. I told Joey I would need to think about it because I had no idea off the top of my head what version of 80CrV2 would fill the niche of bladesmiths who want something inexpensive and easy to work. However, I have always enjoyed working with Pop’s Knife Supply, so I gave some serious thought to what kind of steel would be ideal for Joey’s request.
Pop’s is growing rapidly and has been a big supporter of mine, selling copies of my books—Knife Engineering and The Story of Knife Steel. It has been expanding its steel offerings and its steel education base to better serve customers, and I knew a steel along these lines would be a good fit for it. One of the trade-offs with knife steel design is when you add some elements like vanadium in significant amounts, things like forgeability and finishability go down. How could I make something new and exciting without pushing so much it becomes difficult for knifemakers to work with?
I thought about how high-nickel steels like 15N20, L6 and 8670 are known for their excellent toughness—at the top of my charts—but also have very limited wear resistance. I also knew some relatively rare steels like Blue #1, V-Toku2 and Wolfram Special have small additions of tungsten and vanadium for wear resistance. In grades with higher amounts of those elements, I start to see complaints from makers about the difficulty of working with them, though they seem to be at a place where they hit the right balance before forging and hand sanding become issues. These tungsten-vanadium steels are relatively challenging to find, often expensive when you do, and their toughness is much lower than the high nickel grades. As a result, the idea was to combine the high nickel approach for toughness with the controlled additions of tungsten and vanadium for wear resistance.
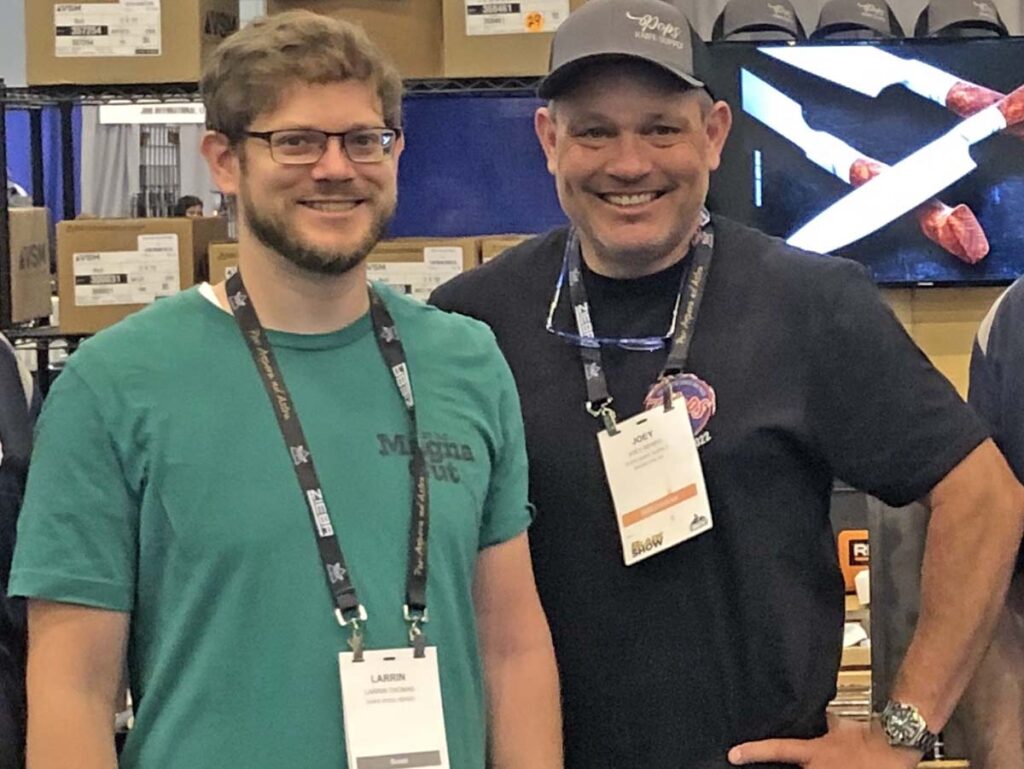
The author (left) and Joey Berry of Pop’s Knife Supply.
Another major factor for this development was the ease of heat treating. Often, steels like 1084 are recommended to novice makers for heat treating in a forge because it is dead simple to harden—just heat it to nonmagnetic and dunk it in oil. However, these grades are also very easy to overheat; they come out hard, but the toughness is greatly reduced. Only a few seconds in a forge past nonmagnetic can lead to a reduction in toughness.
On the flip side are grades like 80CrV2 that have chromium and vanadium additions to limit grain growth, so overheating isn’t as much of an issue. But the chromium also means you must heat past nonmagnetic and hold it there to ensure the carbides dissolve. The chromium slows everything down. However, I thought if we kept the chromium content very low the new steel could still be quenched from nonmagnetic and achieve full hardness, while the tungsten and vanadium additions would create tiny carbides that “pin” the grain boundaries so overheating and grain growth are not issues. This would make the easiest-to-heat-treat knife steel ever. Just heat it past nonmagnetic and quench it, and you will get high hardness and toughness every time.
My team and I got a steel company to agree to try the composition I proposed and waited (im)patiently for the steel to arrive. This was a major investment for Pop’s Knife Supply, and there was no guarantee the new steel would work just because it sounded good on paper. Fortunately, however, when we tested the steel, its toughness matched steels like 8670 and 5160, known for their excellent toughness. The edge retention was better than the majority of forgeable grades outside of ApexUltra, a high-performance forging grade I developed with makers Marco Guldimann and Tobias Hangler. And in testing the heat-treating range, we found it could be quenched anywhere from 1400°F up to 1750°F—over 300°F! This met our target of making a steel that is easy to heat treat.
Reports from makers have been very positive for Pop’s ProCut. They have praised the ease of working as well as the tested performance. Dawson Knives related: “We found it to be an excellent steel that 1) Offers a razor-sharp edge on par or better than other modern steels; 2) Holds that edge cut after cut; 3) Displays excellent lateral strength (it flexed close to 20 degrees in either direction and returned to true); and 4) Extreme impact resistance (edge resisted chipping, cracking or rolling when driven into a piece of steel Unistrut with a sledge hammer). We are able to get our edge hardness to Rockwell C of 62-63 and still retain superb flexibility.”
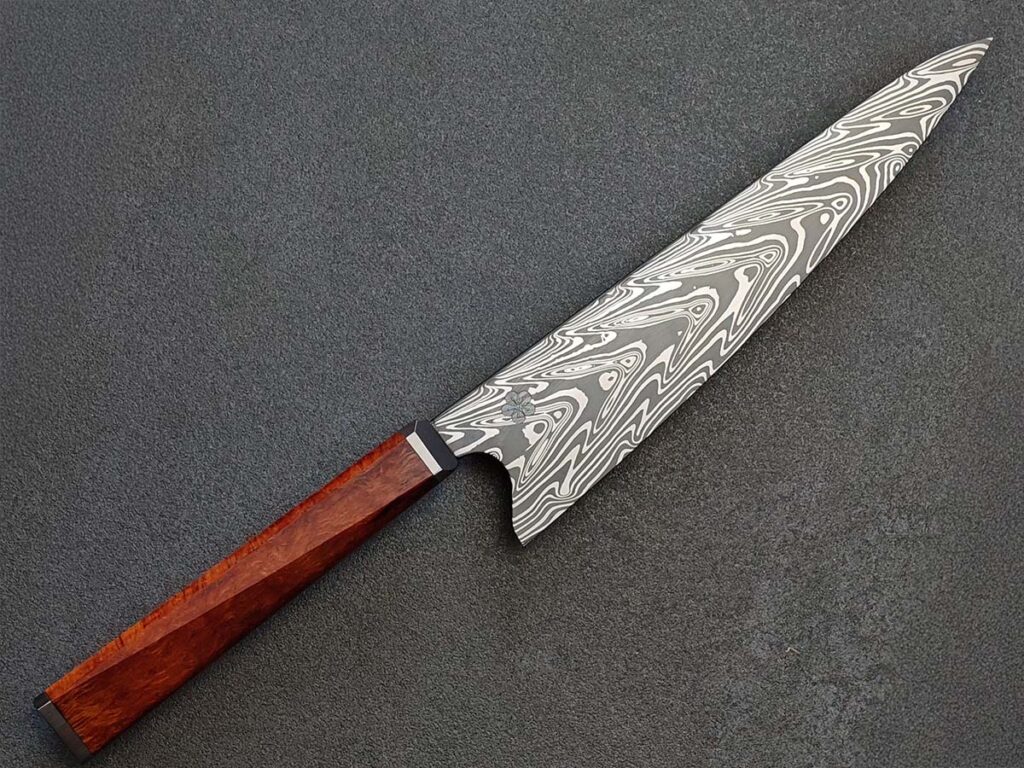
Kurt Glatt forged Pop’s ProCut and ApexUltra steels for the damascus blade of his chef’s knife.
Another exciting aspect of ProCut is the high nickel content (2 percent like 15N20) allows it to be used in pattern-welded damascus as a “bright” layer. This gives a new, higher-edge retention steel for use in damascus. As noted, previous high nickel grades have very low wear resistance. It can even be used in combination with other high-wear-resistance grades to make superior edge-retention damascus. I have seen a couple of knives using both ProCut and ApexUltra for some excellent-looking and performing damascus.
More To Come?
I’m constantly working on new ideas, though it’s hard to predict which projects will pan out or when they’ll be released. It’s been incredibly rewarding to see the steels I’ve developed used by top knifemakers and major knife companies, and to hear from end users who genuinely love them. When my dad, BLADE Magazine Cutlery Hall-of-Fame® member Devin “Hoss” Thomas, took me to my first knife show as a teenager, I never would have thought I would be working on such cool stuff.
Steve is survived by his wife, Mary, six brothers, one sister and a number of nieces and nephews. Memorials may be made to the charity of your choice. Condolences may be expressed online at www.robinsonfuneralhomes.com or visit www.legacy.com/obituaries/charleston.
“I was born a tinkerer,” Dwayne Horvath of Aku-Strike Knives of Pittstown, New Jersey, related. He was always taking things apart, from his father’s reel-to-reel video recorder to his car. By his own admission he was not great at school, but it was during those moments looking out the window, daydreaming, when ideas came to him—lots of ideas. It carried over into his car-racing days, his career as a successful fix-it man and now in retirement as a full-time inventor who daydreamed a trainer knife.
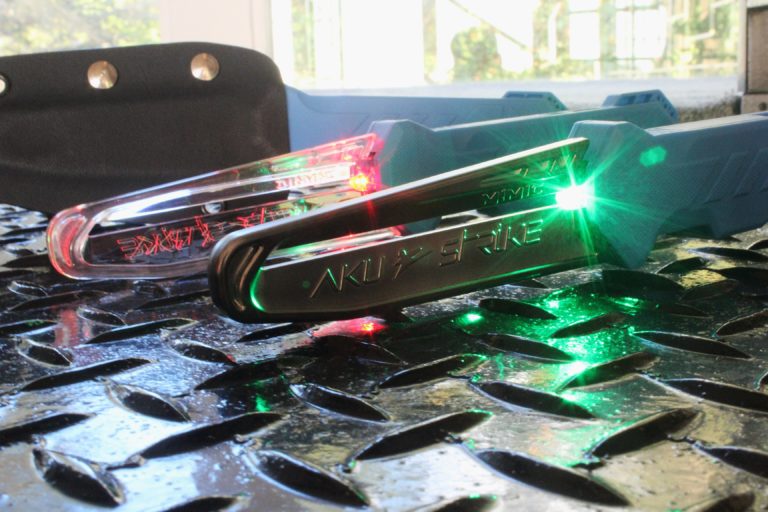
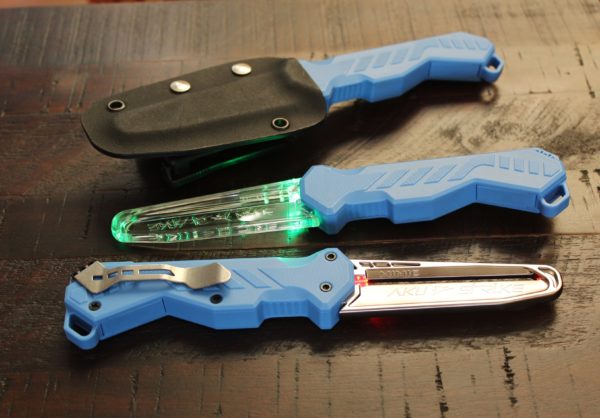
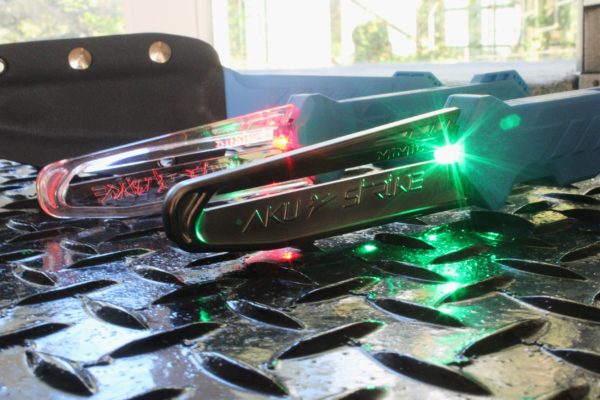
The Aku-Strike Mimic T-16 confirms contact with a red or green LED light and different tones for daytime use when lights are not as visible. Available in nickel or clear. MSRP: $41.95-$43.95. Contacts for Aku-Strike Knives appear at the bottom of this article.
The Aku-Strike Mimic T-16 came to Dwayne in a vision driving home one night from a training session at Alex Wilkie’s Martial Arts Academy in Bridgewater, New Jersey. “It was not a thought before it was a vision. The vision was possibly stirred by an emotion or feeling from training that night,” Dwayne explained.
Dwayne knew about the Shocknife, which is indeed useful for inducing fear in combatives training, but it’s is not something you want to learn on or use every day. Chalking the edges of training knives indeed leaves a mark to inform you and your training partner of a strike, but it’s messy and may not fully wash out of some shirts. There was a real need for another alternative.
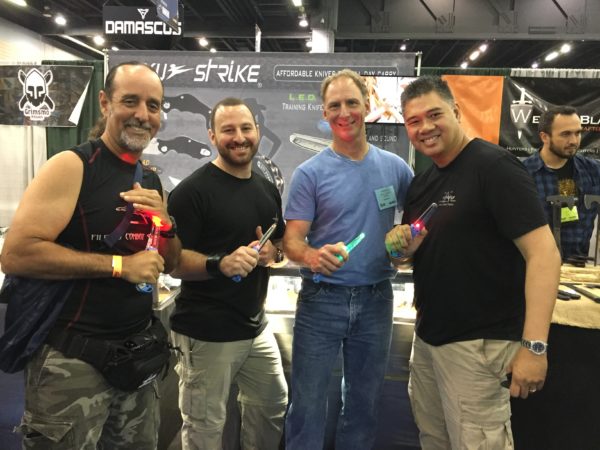
Carlos Pipo Lopez and Samuel Yaron Brill, on the left, and Ray Dionaldo, on the right, all of FCS (Filippino Combat Systems) Kali, give Dwayne Horvath’s (second from right) Aku-Strike Mimic 16-T, an LED training knife with tones, resounding thumbs-up.
“I noticed some students going through the motions of training with the knife and wondered if they realize how deadly a knife can be. I then asked myself, ‘How could I be more aware of being cut and the danger of the blade and also convey to my partner that he is in danger or is being cut? We need something to alert us when contact is made, or what I coin, ‘confirmation of contact,’ while training,” Dwayne explained.
When you take away shock and chalk, you have light or sound left. “Now how do I make this work?” Dwayne asked himself. He had some knowledge of patents. He knew that if he designed something simple, he could get a broad patent. That would in turn mean he would need to minimize parts and keep the construction of the training knife simple. That is a challenge with all the patents out there. He knew he needed at least one switch to turn it on. Any more and he might be infringing on someone else’s design.
Then Dwayne asked himself, “What would be the best way to make the blade send a signal to the electronics? I started drawing and one hour later I figured out the basics. Of course, there were many thoughts and designs in between,” he added.
With the Aku-Strike in the sheath, the battery tray angle also serves to register your fingers to hook the handle for a quick draw. This is one feature that attracted Ray Dionaldo, of FCS Kali, as the feel was similar to his quick-draw knife. The knife also has a secure feel when your hands sweat. Contacts for Aku-Strike Knives are listed at the bottom of this article.
Dwayne was on his last chance with the U.S. Patent and Trademark Office. After reading many patents and going through a few attorneys, he got the patent worded appropriately. He then contacted an attorney who secured a patent. Two months later, Dwayne received the kind of broad patent he had hoped for. Then he got an additional patent.
The Aku-Strike Mimic T-16 has received endorsements from law enforcement agencies whose members must be thoroughly trained for whatever they might find on their beats, including an aggressor with a knife. Martial artists like Ray Dionaldo of FCS (Filipino Combat Systems) Kali, Doug Marcaida of “Forged in Fire” fame and Funker Tactical, the home of all kinds of fighting videos, have all given the Aku-Strike their nod of approval. Even, Setcan, the company that invented the Shocknife, has endorsed the Aku-Strike. The two training knives are not really competitors since one can be used on a more regular basis, while the other can be used periodically to maximize the intensity of a particular training session.
Dwayne had originally envisioned an aluminum blade. “I took it to an Airsoft range. Kids were swinging for the fences. OK, not safe with aluminum for teens, plus you know it hurts—that’s a given,” Dwayne commented. He moved on to polycarbonite. “The polycarbonite had limitations with flex and strength, but overall it was a win, and much more forgiving,” he emphasized. “As a matter of fact, it hurt much less than many rubber trainers and, of course, aluminum.”
Dwayne’s goal was to appeal to a wider, younger demographic that was just starting out with their combatives training to hardcore adult players of Airsoft and paintball. He also wanted to reach law enforcement and martial arts professionals. He finds the inventing to be easier than the marketing. But without that creativity, there would be nothing to market. Dwayne received the kind of encouragement and validation he needed throughout his life, later when his business was a success, but also earlier around the race tracks of New Jersey.
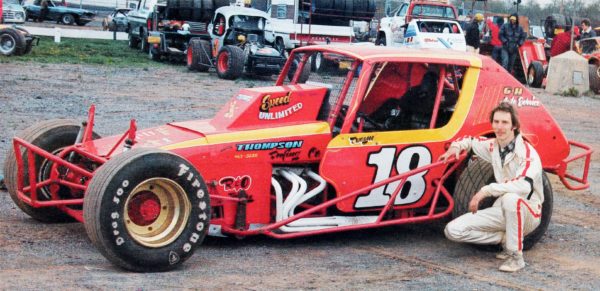
Dwayne Horvath of Aku-Strike Knives spent his formative years on the dirt-track speedways of New Jersey. He was given the encouragement and leeway to tinker, to daydream and now in his retirement he has invented a training knife that gives instantaneous pressure-based feedback through LED light and tone during combatives training. (Photo by Bob Snyder)
“At an early age, I loved racing and would go to Flemington Speedway, a local dirt track…It was a family event every weekend, consisting of fast cars sliding around the dirt track and a bucket of fried chicken,” Dwayne recalled.
“One night my favorite driver crashed real bad, destroying the starter’s stand,” Dwayne felt terrible and wanted to help. He got his father’s permission, and Howie Cronce took Dwayne to his house and let him help. “After school I would ride my bike about 10 miles to his shop, work to the wee hours.” Dwayne would eventually fall asleep and Howie would wake him, put his bike in the back of his pickup and take him home.
“In high school I wasn’t the sharpest tool in the shed. I usually wanted to look out the window and daydream, but I did rebuild a teacher’s engine on his Studebaker and built go-carts from scratch.
“In my racing days, I had what some would call some crazy ideas (probably from daydreaming) about the workings of a car suspension,” he explained. He needed to learn more, but from where? In those days, access to the Internet wasn’t readily available. He decided to sneak into the library at a technical college and hit the books and microfiche to research the effects of tire-slip angles and G-force on race cars.
“I then saved money to buy a G-meter to put in our dirt car, which had never been done before. When uploaded to a laptop, this would show all the forces of breaking, acceleration and cornering in real time so we could see what and when things were happening.” Then adjustments could be made to the shocks, springs and geometry on the car. “I was invited to the Penski shop to study the new shocks we used and got to know Ray Evernham before he teamed up with Jeff Gordon and Hendrick Motorsports.”
And it’s been like that ever since. If grades were given out in daydreaming, Wayne would score an A-plus.
You can read your digital issues of BLADE Magazine anywhere you have your phone, tablet or computer, and there’s no need to find storage for all your old issues.
If piling-up issues of magazines seems like a waste to you… If you feel like you don’t have time to read a magazine… If you like the stories we offer in BLADE, but want a more economical option, then a digital subscription is the answer. An annual subscription to BLADE is $17.98, $4 off the print price.
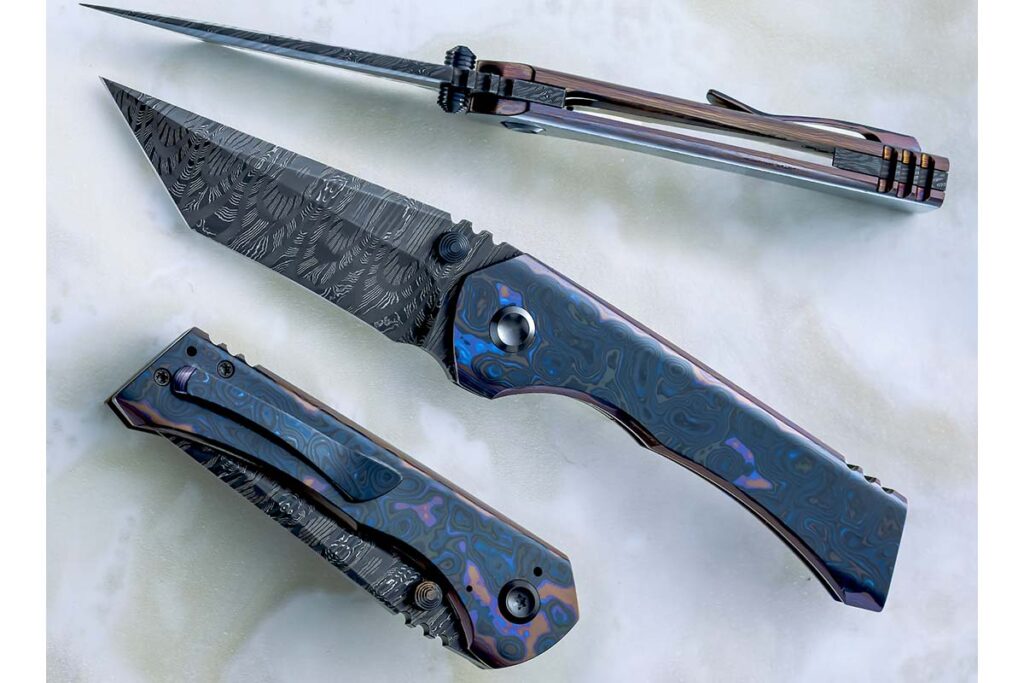
Not one of his everyday builds, the Taka v2s by Brian Brown features a notable blade, handle and lock.
Brian Brown likes a good, pointy tanto.
“It’s kind of a straight hollow grind all the way from the choil to the tip in a climbing grind,” he explained of the blade on his Taka v2s dress tactical folder. Grinding it that way helped him keep the blade extremely thin from the recurve edge to the tip. “You’ve got to be really careful [at the edge] because that’s gonna be the lowest spot where it gets thinnest the fastest—and I’ve burned through them before,” he noted.
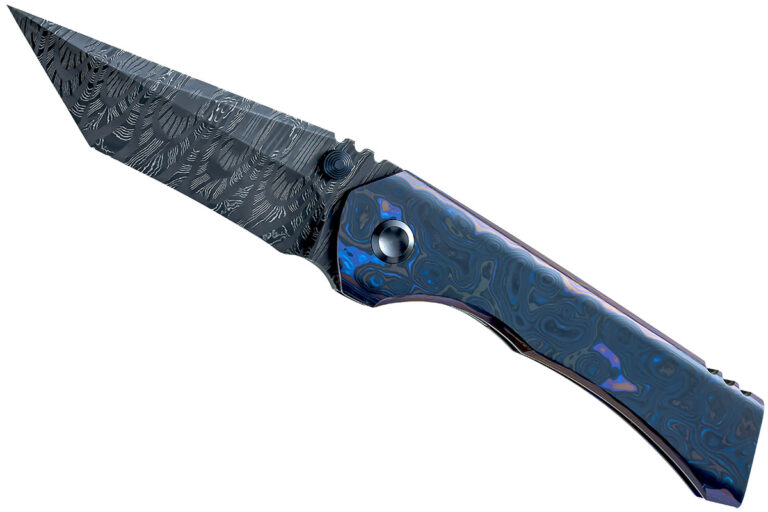
Brian Brown said he had to be careful grinding/removing the top layer of the Black Top Timascus™ handle material by Alpha Knife Supply or he would expose too much of the titanium and change the color—somewhat visible here on the spine. The 3.125-inch blade is FireClone 2 forged by Mike Norris, which Brian lauded as some of the best stainless damascus anywhere. Closed length: 4.375 inches. (SharpByCoop knife image)
Only the second one he’s done, the folder’s linerlock-like inset lock enabled him to use the fancy handle material paired with a straight, solid piece of Grade 5 titanium for the lockbar. There are several more steps involved but the upshot is the scales are symmetrical as with a linerlock—a symmetry Brian prefers to that of a framelock. Plus, the inset lock results in a thinner handle than with a linerlock because the lock side must be relieved to make room for the lockbar.