
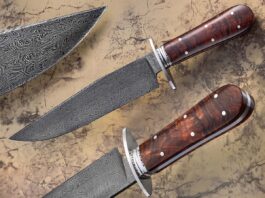
Knifemaking

Knifemaking is the building of a knife, which includes the blade, handle and other accouterments. Blades are made by either removing metal from a steel blank via a grinder – known as stock removal – and the forging to shape of hot steel into a blade in the process known as bladesmithing. Other parts, including bolsters, guards, pommels, etc., are needed to complete the finished knife.

Featured Knives – – Knife Collecting – – Tactical Knives – – Survival Knives

Instagram: Social Media’s Knife Leader

Knifemakers Continue To Evolve Their Use Of Social Media Platforms To Promote Their Work And Expand Their Customer Base.

It’s been around a while now—long enough for an update on its relevance and impact on the knife industry. Meanwhile, social media in some ways remains a new frontier for both knifemakers and the market.

It isn’t unusual for those interested in buying an existing knife or commissioning one from a pro to use social media such as Instagram, Facebook, and other windows into the lives and work of custom makers. The media provide outreach and information on an unprecedented scale, and custom makers who take advantage of the opportunity to put themselves in front of the buying public take different approaches.

Some use video, others still photos. Some use music, others narration of what the viewer is seeing. Some allow the hum and whir of machines or the ring of the hammer to set the tone and convey the message. The answers to the questions of where and how to apply social media in their work lives vary among makers, but the involvement of social media in their marketing and sales efforts has become a regular part of their routine.

“Instagram broadens the customer base, and if you aren’t using it you are missing out on that client base,” related knifemaker/5th Special Forces veteran/BLADE® field editor Kim Breed (@kimbreed1911 on Instagram). “I was dead set against it, but my son Keith got me going and said that it was something I needed to do. You can target your audience with a hashtag, and then when someone searches for something in particular it will come up.”

Kim likes to use music as a backdrop for his videos and especially enjoys the rock band AC/DC (the band’s song “Thunderstruck” is among Kim’s favorites). Of course, there are other musical selections, and he ties the tune into what is happening on his Instagram and Reels posts. 

“When I’m doing hand hammering or power hammering, I love AC/DC,” he smiled, “and sometimes I’ll use dramatic songs when I’m etching, or whatever. Instagram is easy. I can do it on my phone and post it in five minutes, and I’m sure you can do the same thing with Facebook.”

Since the social media surge, Kim has found that how-to video posts are more popular than pictures of knives alone. He also advocates frequent posting of relevant work in progress. 

“I try to post something at least once a day,” he remarked, “and it may be something like etching damascus steel. I get good hits and feedback on that and anytime I post videos working with a milling machine or grinder so people can actually see me building a knife.”

Making Social Media Work For You

Schroeder gyuto
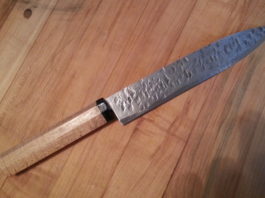
Isaiah Schroeder, whose forged gyuto was featured on page 82 of the October BLADE®, uses both Instagram and Facebook and publishes an email newsletter around once a month with his latest knives and prices. That way, everyone signed up for the newsletter gets it at the same time and has an equal chance to get one of his new knives. (SharpByCoop image)

Isaiah Schroeder uses both Instagram and Facebook with the handle @schroederknifeworks and has found a much wider audience than might otherwise have become familiar with his work. He is regularly in front of his followers with updates and information.

“I started doing my email newsletter [www.schroederknifeworks.com/newsletter] several years ago,” he commented, “mostly so that I don’t have to be completely dependent on Instagram’s algorithm to show my customers when my new work is available. With this newsletter, everybody who is signed up for it gets it at the same time and has an equal chance to get one of the knives. I do the whole thing myself using a service called Mailchimp, which just makes it easier to keep the list and format the content. My goal is to have one batch of knives per month and one newsletter per month.”

Schroeder uses Instagram primarily but cross-posts to Facebook when preparing social media input. He sees Instagram as a way to reach more people, and a gallery of his work conveys the quality of his knives and materials he uses. Recently, he has seen short videos take hold and is using these to reveal his shop work. The result has been dramatic.

“Instagram has been great for my business,” he smiled. “I’ve sold knives around the world because of it. I focus on cooking knives, and there is a large foodie presence on Instagram so that meshes well with my content.”

Isaiah also appreciates the free flow of information afforded by social media, everything from the knifemaking process to presentation to pricing. The volume of information at the fingertips of the viewer is incredible, and knowledge is buying power.

“I’m not too shy about posting my prices for the public to see,” he reasoned. “I’ve always wondered why some makers won’t post prices. It’s something people always ask about, so they clearly want to know. I’d rather make it known. Then people can have time to decide whether they think it’s worth it for them or not. I guess it might be different if I were selling through a retailer or making custom orders.”

Knifemakers Grow Their Brand

For his custom knives, Mike Vagnino indicated posting work in progress seems to get the best response and exposure regardless of whether they are still shots or videos. (Vagnino image)

Just getting a custom knife enterprise off the ground from a marketing perspective can be a huge challenge, and when custom knifemaker Mike Vagnino and business partner Patrick Ma kicked off Terrain 365, they immediately began looking for ways to raise their new company’s profile.

“Our primary source for promoting the business is social media, which has worked very well for us,” Mike explained. “Our goal, of course, is to sell knives by making people aware of our brand and drawing them to our website. Patrick handles our social media for Terrain 365, and the key seems to be posting often and consistently.”

While Mike emphasizes he is no social media expert, he acknowledges social media’s inclusion in a sales-and-marketing strategy will pay dividends. 

“I use Instagram and Facebook primarily to promote my custom knives and any new projects I’m working on, not necessarily to generate immediate sales, but to keep my name out there. For my custom knives, posting work in process seems to get the best response and exposure regardless of whether they are still shots or videos. I choose not to speak during the video because I think what I’m showing is explanation enough—not because I think it’s more intriguing—although that may be the effect. Actually, I think telling a story might help if it’s interesting enough, but keeping the video short to match the people’s attention span nowadays is what I keep in mind.”

In promoting Terrain 365, Mike and Patrick have found that outdoor photos of the knives in action work best. Since their company is geared toward everyday carry knives and those that are ideal for use in the outdoor environment, their knives are constructed in rust-proof, non-magnetic materials. Take a look at Mike on Instagram @michaelvagnino.

Making First Impressions

David Lisch says Instagram may be the place many knife consumers see a maker’s work for the first time, so everything the maker posts should be first rate.

ABS master smith David Lisch issues both an endorsement and a warning when it comes to his use of social media. 

“I have found that social media is both a blessing and a curse,” he observed. “It has been a struggle for me to find a balance. If you let it, social media can eat up so much of your time, time you could spend creating, making, and being in life. It is important to find the balance.”

Indeed, every opportunity carries a requirement for thorough evaluation and an awareness of the unintended consequences. 

“I have focused my social media on Instagram primarily,” David added. “It is where I share my knowledge and sell my knives and meet my students. I have taken time to figure out what works for me and how to present myself. It might not seem like it at times, but I take Instagram very seriously.”

For those makers beginning to consider social media as an enhancement to their overall livelihood, Lisch provides a voice of experience and makes a few sound recommendations. 

“My advice for knifemakers new to Instagram is to treat your feed like a portfolio page. This is the place people will see your work, maybe for the first time. It is your first chance to make an impression on a potential collector. Go in and clean up your feed on occasion and remove any stupid stuff.

“Keep it engaging,” Lisch continued. “Show work in progress as well as finished work. Use your storyline to keep folks up to date with what you are working on, or what is happening on a lighter side. Because your storyline is only up for 24 hours, it is self-cleaning. It is a great opportunity to have fun and connect with the folks interested in your life. Be yourself; do not try too hard to create content that is not you. Use hashtags and try different ones. Post to Reels, and if they are good they may go viral. As your audience grows, remember you are also a role model. If you are working, wear your safety gear. Be real.”

David can be found on https://www.instagram.com/davidlisch/. Click “Highlights” on his Instagram home page for his free video classes.

The social media phenomenon is sure to stay with makers into the future, and participating in the most effective ways will produce the desired benefits for them and their customers. True enough, getting involved may be a bit intimidating, but taking the plunge is becoming more of a necessity every day.

Read More

9-11 Knives: Custom Memorials To The Tragic Day

The atrocity that shocked the world continues to transform it, and knives, too. Here is a look at some of the memorials 9-11 spawned from that fateful day.

It began as an ordinary Tuesday. It ended with the world changed forever.

The atrocity of the terrorist attacks at 8:45 a.m. EDT on Sept. 11, 2001, will never be forgotten. Now, 20 years after planes crashed into the World Trade Center in New York, the Pentagon in Washington, D.C., and a field in Shanksville, Pennsylvania, retrospect brings not only memories of sadness and profound loss, but also an acknowledgment of the heroism of 9-11 and the humanity that emerged.

A measure of that humanity took the form of custom knives made from the twisted and scarred steel of the World Trade Center (WTC) buildings—forged once in the conflagration of that terrible day and then again in tribute to lives lost, and for the benefit of those who miss them and live on.

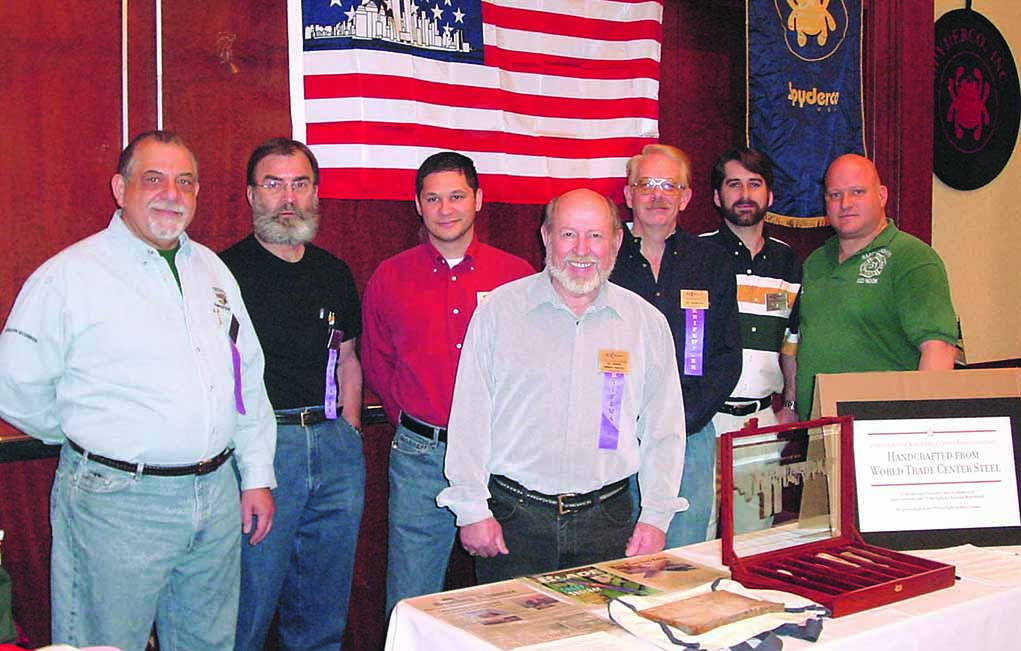
 Keith Kaiser (right) was in Ladder Company 131 of the New York City Fire Department that reported to the World Trade Center on 9/11. In 2003 he enlisted several leading makers to produce knives with blades made from WTC steel. Those makers, with the exception of Mel Pardue, from left are: Bob Terzuola, Bob Dozier, Allen Elishewitz, Gil Hibben, and Pat and Wes Crawford.
Keith Kaiser (right) was in Ladder Company 131 of the New York City Fire Department that reported to the World Trade Center on 9/11. In 2003 he enlisted several leading makers to produce knives with blades made from WTC steel. Those makers, with the exception of Mel Pardue, from left are: Bob Terzuola, Bob Dozier, Allen Elishewitz, Gil Hibben, and Pat and Wes Crawford. (Eric Eggly/PointSeven image)

Ladder Company 131 (L131) and Engine Company 279 (E279) of the New York City Fire Department (FDNY) were housed in the Red Hook section of Brooklyn on 9-11. Keith Kaiser was a member of L131. Moved later to enlist the support of several custom makers to produce knives with blades made from WTC steel, Keith remembers the horrific day vividly.

“Because of the proximity to lower Manhattan, both companies started to gear up,” he recalled. “As we were approaching the tunnel into lower Manhattan, we saw the second plane hit the south tower. The engine company went into the buildings first, and the ladder company soon followed. L131 was in the lobby of the hotel on the ground floor of the south tower when it fell. We breached a wall and got out a group of civilians before we realized what was going on. The engine company was never found.”

Five members of E279 were killed, and the FDNY lost 343 firefighters in all. Since then, according to Kaiser, nearly as many have died from 9-11-related cancer and other illnesses. His older brother, Wayne Kaiser, an electrician who worked to restore communications in the wake of the terrorist attack, recently died of illness due to extended exposure to toxic dust and debris.

Keith was seriously injured on 9-11. “Oddly enough, my getting injured probably saved my life because I was not able to dig in the pile subsequently,” he said. “I was looking for something to occupy my mind and time, and one of the men lost from my company, Christian Regenhard, was a knife collector. I thought I would try to get my hands on some steel and get knives made out of it for charity and to keep me involved.”

Early efforts to get the project started were difficult, but Kaiser persisted. Eventually, he contacted several of the biggest names in custom knives and secured their commitment to contribute to a benefit for the New York Firefighters Burn Center Foundation. Bob Terzuola, Bob Dozier, Jerry Fisk, Pat and Wes Crawford, Allen Elishewitz, and BLADE Magazine Cutlery Hall-Of-Fame® members Gil Hibben and Mel Pardue made one knife each with blades incorporating steel from the fallen twin towers (page 90, August 2003 BLADE®).

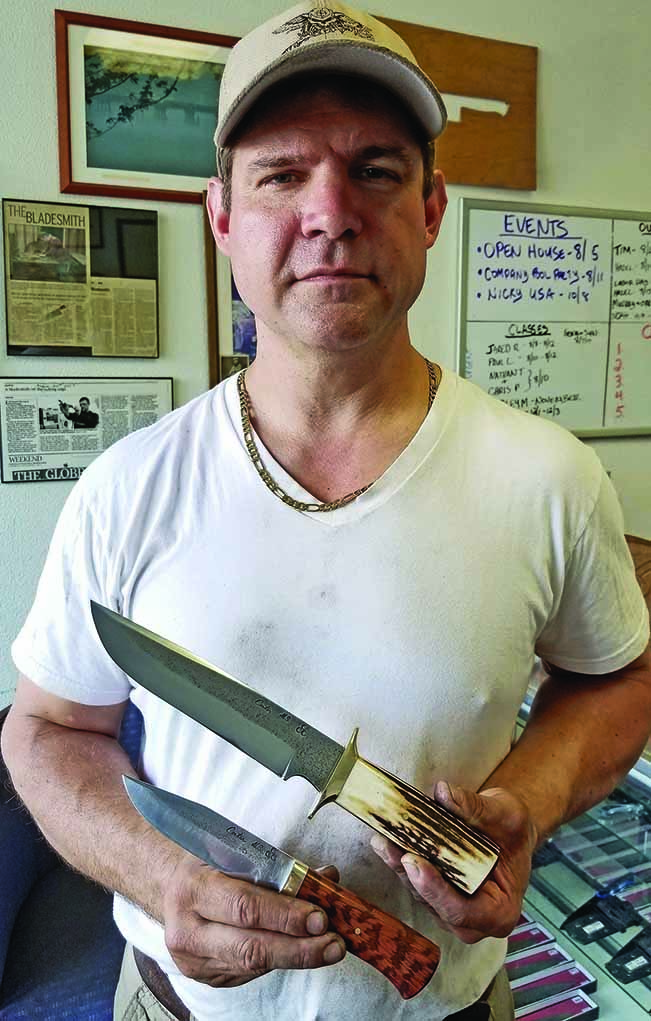
 Murray Carter holds the last two knives he made of WTC steel as part of a special fundraising project that included FDNY343 (fdny343.org) and Building Homes For Heroes
Murray Carter holds the last two knives he made of WTC steel as part of a special fundraising project that included FDNY343 (fdny343.org) and Building Homes For Heroes (buildinghomesforheroes.org). (Murray Carter image)

“It was planned with the help of Christian’s father, who was a New York City police detective,” Terzuola said. “Seven knifemakers, including myself, volunteered their time and materials. Keith presented the idea to us and offered to supply a piece of steel from the wreckage of the fallen towers to each knifemaker, from which they could make a knife of their choosing.”

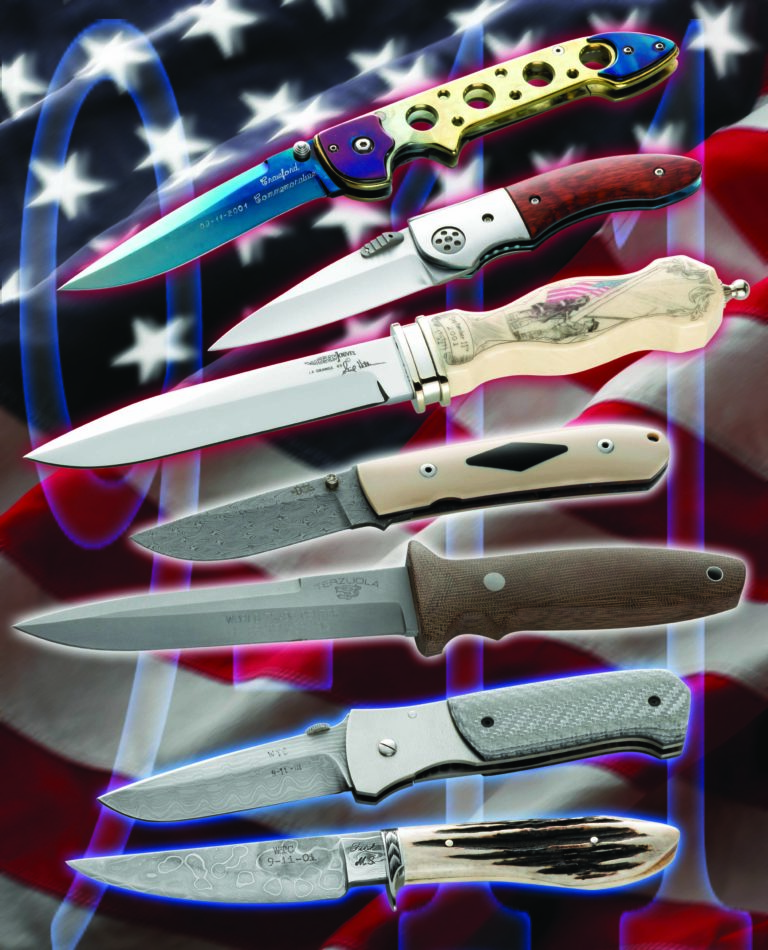
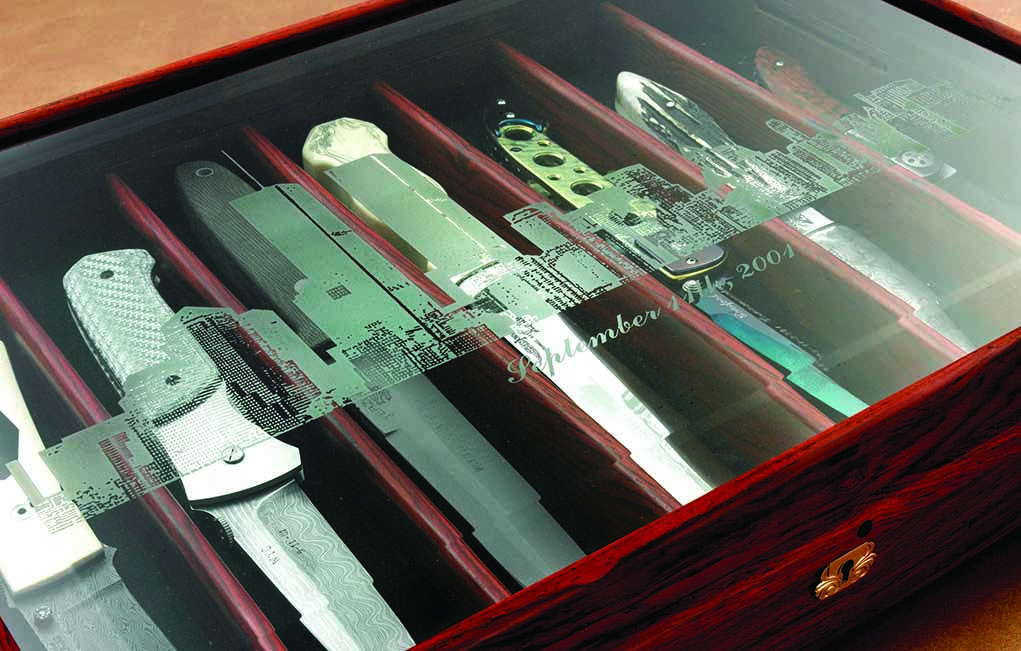
The knives included signature works: a Dozier damascus folder; an Elishewitz folder; a CQB from Terzuola; a Hibben dagger with scrimshaw handle; a skeletonized folder from the Crawfords; a damascus folder from Pardue; and a damascus stag Sendero hunter from Fisk.

The task brought the added challenge of making the Trade Center steel usable for knife blades. “It was low carbon structural steel,” Dozier related, “and I asked Daryl Meier to make damascus for me. At the first show after 9-11, Keith brought some steel to me and wanted me to make a knife with it. I wouldn’t take it. A friend of mine who was a state police investigator here in Arkansas said to leave it alone because it was evidence. Then about a month later, a big cardboard box came in the mail and there was the steel. I cut it into pieces and Daryl made some ladder-pattern damascus.”

Once the knives were gathered, they became tangible remembrances. “They were placed in a beautiful cocobolo box with a beveled glass top that was etched with the World Trade Center,” Terzuola commented. “The idea then was to put them up for auction for the benefit of the burn center. Keith sent them around to various museums prior to the auction, and after several years they almost became permanent exhibits in some places.”

Keith reached out again to Terzuola, who helped arrange an auction, and the set sold in June 2020 with the proceeds benefiting the hospital. “Keith sent me the knives, and I cleaned them up and got hold of Rock Island Auction in Illinois, one of the top auction houses for knives and firearms,” Bob states. “They did a beautiful two-page spread in their catalog and after the auction sent a check directly to the burn center.”

Murry Carter Knives 9-11 Custom

Like so many others, the atrocity of 9-11 touched custom knifemaker Murray Carter significantly. He was asked to partner with FDNY343, an organization of retired New York firefighters dedicated to keeping the memory of those lost on 9-11 alive, and Building Homes for Heroes, a charitable enterprise that provides homes for those injured while serving their country and in the 9-11 attacks.

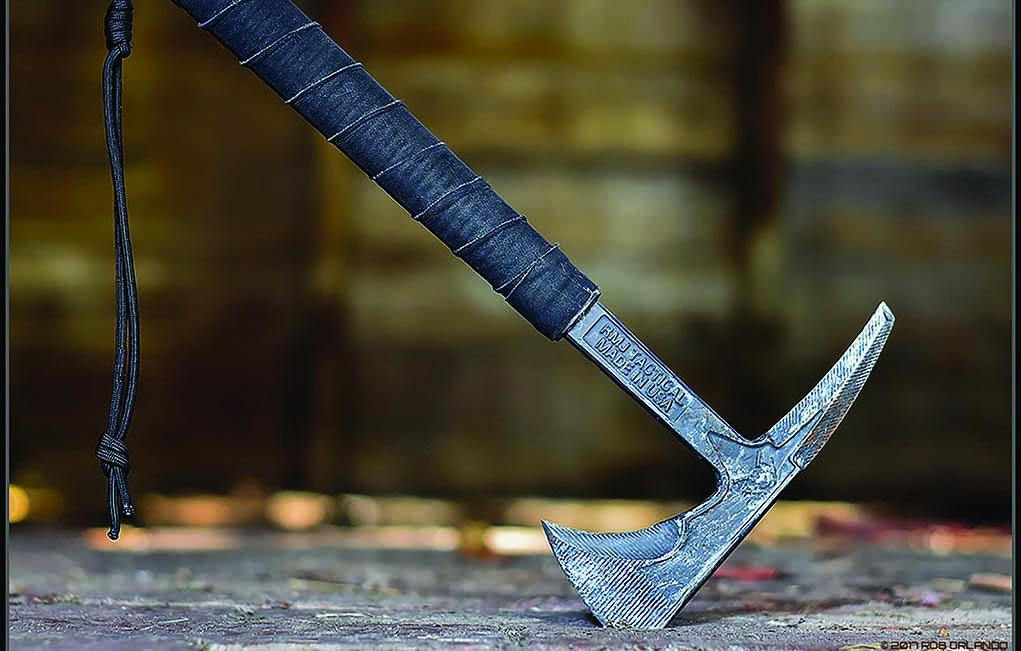
Ryan Johnson was just starting up his RMJ Tactical when 9-11 shook the world. The U.S. military was looking for something that would punch through body armor and the RMJ Eagle Talon hawk, featured on the cover of the March 2002 BLADE®, filled the bill. RMJ Tactical took off and is one of today’s leading hawk makers with such models as the Shrike.

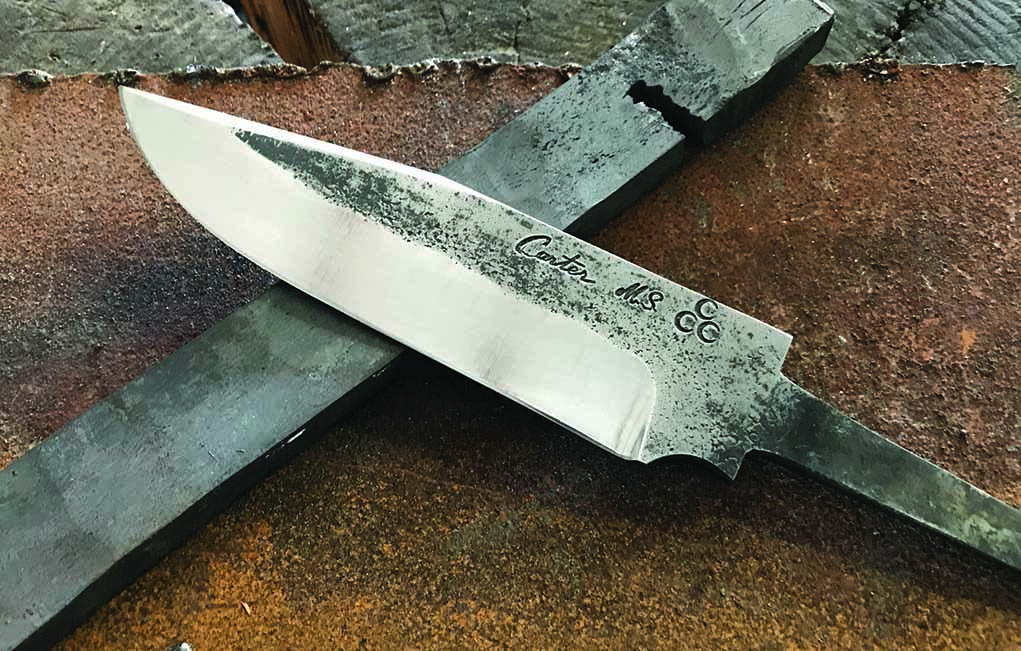
Carter has produced several kitchen and outdoor knives, each incorporating a laminate of Trade Center steel with a 1084 carbon steel core. The motivation to produce the knives was strong, and Murray notes that the components of fire, water and stone were present both in the 9-11 incidents and the making of the knives. He reasons that fire enabled the forge, water quenched the blades and stone honed them into tools. Conversely, fire brought the towers down, water hampered rescue efforts, and lives were lost in the crush of stone.

“So, the same elements are here in the knives, and they bless people daily,” Murray explained. “When iron is red hot, that’s how we get steel, and some of the victims were burned, the elements fused in a chemical trade. The depth of the fusion was dependent on time and it was brief. So, I didn’t want to do much grinding in order to leave these elements in the surface of the steel.”

One of Carter’s kitchen knives was auctioned for $10,500 and the proceeds were given directly to Homes for Heroes. He calls the effort, concluded in the spring and autumn of 2017, an honor and one of the most humbling tasks of his long knifemaking career.

RMJ Tactical 9-11 Spike Hawk

Ryan Johnson was just starting up his Chattanooga, Tennessee-based RMJ Tactical when 9-11 shook the world. He had always been interested in tomahawks, and was making pipe and spike hawks before that desperate day. Then, things changed quickly.

“I had made a spike hawk and a gentleman saw one of them on my website,” Ryan remembered. “He was with Air Force security forces and said, ‘We’ve got some guys securing air strips, and we’re looking for something that will punch through body armor.’ He said my French-and-Indian-War-style hawk looked perfect for the job.”

The seven knives from Keith Kaiser’s 9/11 memorial project were placed in a beautiful cocobolo box with a beveled glass top etched with the World Trade Center.
The seven knives from Keith Kaiser’s 9/11 memorial project were placed in a beautiful cocobolo box with a beveled glass top etched with the World Trade Center. (Eric Eggly/PointSeven images)

The first shipment of five spike hawks had just gone out before 9-11. “The same guy called me up and he was already in the Gulf,” Ryan said. “He said to get busy making these things because they would be big.”

Like lightning, the demand for hawks soared—not only with the catalyst of 9-11, but also with the wars in Iraq and Afghanistan that followed. “I received a call from a gentleman working as an attaché to Donald Rumsfeld [Secretary of Defense] and made him a hawk. He sent me a picture back of him in his office at the Pentagon with a letter that said when the planes hit the towers, all the brass in the Pentagon were out in the hallway in front of his office passing that hawk around. A few moments later, a plane hit the Pentagon. Just before that happened, an admiral had walked by and said, ‘This war will be fought by hawks at the ends of the hands of soldiers.’”

A short time later, a story on Ryan’s hawks appeared in the Chattanooga newspaper and was picked up by the Associated Press, ultimately appearing in countless media outlets. “The article was on making hawks for the military,” Johnson recalled, “and before long Green Beret units were getting in touch with me and asking why they weren’t getting hawks. When you look back at the early days of the wars, Task Force Dagger included the first 300 special forces and others into Afghanistan. We had hawks going in with them.”

Orders kept coming, and civilian deliveries were postponed to fill the demand from the military as RMJ Tactical got started. Twenty-five Eagle Talon hawks went to Marines in the town of Najaf, Iraq, just before the battle for control of the city of Fallujah.

“I got a phone call concerning those 25 hawks,” commented Ryan, “and it was from the wife of a Marine officer. She said there was a plane leaving that night with room aboard for the shipment if we could get it ready. I called my friend Richard Carmack and knew his kids might have the time to help wrap the handles if I could provide the pizza and a movie. Now, Richard makes sure things run right here, his son Jonathan is our production manager and I’m still working in design.”

Conclusion

The atrocity of 9-11 and the lengthy conflicts that emanated from it continue to echo through the lives of every American. Remembrance is tinged with vigilance and the pledge to never forget the sacrifices of those lost.

 Here are the beginning (bottom level), middle (mid-level bar of steel) and end products (top level) Murray Carter used to forge weld World Trade Center iron into a usable blade with a 1084 core. The blade is water-quenched for maximum sharpness and edge retention, and the blade surface still retains the soul-infused character of the WTC steel.
Here are the beginning (bottom level), middle (mid-level bar of steel) and end products (top level) Murray Carter used to forge weld World Trade Center iron into a usable blade with a 1084 core. The blade is water-quenched for maximum sharpness and edge retention, and the blade surface still retains the soul-infused character of the WTC steel. (Murray Carter image)

Though nothing is for sure at this time, there may yet be other knives produced with the venerated World Trade Center steel. Terzuola still has a small amount of the steel but probably not enough for another knife blade. He is considering a knife with Trade Center steel bolsters and G.L. Hansen Micarta® that includes a thin blue line in its composition. Proceeds from the sale of such a knife would go to benefit a law enforcement officers relief fund.

Bowie Knife: Shorter Customs Are Where It’s At

Forget the traditional 10-inch blade, the new sweet spot for a custom bowie knife is now a 9- to 9.5-inch blade!

In July 1990 I was in the Army, home on leave from South Korea and attending The Knifemakers’ Guild Show in Orlando, Florida. While there, I was introduced to the forged blade.

I stopped by the table of ABS Master Smith Jim Crowell. He explained to me what it took to gain the prestigious rating of ABS master smith. It wasn’t just the quality of the knife that impressed me. I was amazed at how a 15-inch knife with a 10-inch blade could be so lightweight. While I was not new to fixed blades, my experience to that point had been with stock-removal knives.

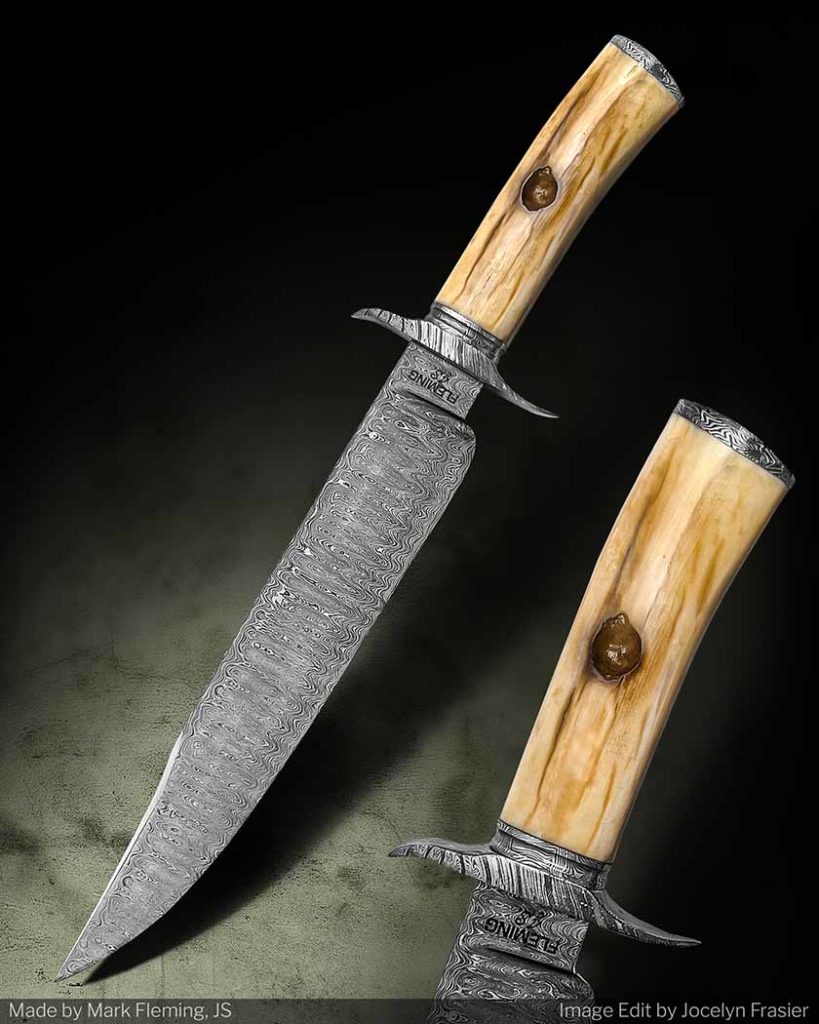
Bad to the bone, Mark Fleming’s forged Southwest Trail Bowie has a 9.5-inch blade made of 1084 carbon and 15N20 nickel-alloy steels in a ladder pattern. The handle is ancient walrus tusk, capped with a damascus pommel, ferrule and guard. Almost a steal, with Fleming marking the price at $1,900 for a similar knife.

Jim explained that distal tapering is a procedure to thin the blade from guard to tip and spine to edge. The amount of tapering depends on the purpose of the knife. As I moved through the show, I started paying more attention to the forged blades on the exhibitors’ tables. What I discovered was what was called the ABS Bowie. The dimensions of the knife were a blade of 10 inches in length, 1.5 inches wide and a quarter inch thick, generally with a 5-inch handle.

Development Of The Shorter Custom Bowie Knife

Those who have been involved with custom knives for some years know that the knives tend to move in cycles. Innovation leads to demand from collectors. There’s a lot of “following the leader” in the custom knife business. This could have helped explain why so many knives were dimensionally identical at the ’90 Guild Show. While some had damascus blades and hardware, most were carbon steel. 

In 1992 the custom knife market cycled to a new entry into the custom knife world: the tactical folder. Toward the end of the decade, tactical folders started to wane, and forged blades once again established their prominence in the custom knife world. This time around the cycle began with hunters—basically, those with forged carbon steel blades, stainless guards, and wood or stag handles. The price point was predominantly in the $150-to-$210 range. By 2002, collectors buying hunters were ready to move to the hunter’s “big brother.” Meanwhile, the decade was populated with damascus patterns such as ladder, raindrop and twist, all of which began to show up more regularly.

Another nine-and-a-halfer, Ben Brea’s Forged Stag Bowie has a ladder-pattern damascus blade and a checkered koa handle. The superlatively executed custom bowie knife comes with a custom leather sheath. Breda set the price of a similar knife at $2,000.

While damascus was in demand by the higher-end collectors, it was W2 tool steel blades with hamons that took center stage for about five years. No two hamons were exactly alike. They looked cool and, for most collectors, were affordable. While antique designs from the mid-1800s were showing up more regularly, the one thing that hadn’t changed was the ABS Bowie, the majority of which continued to have 10-inch blades or longer.

BLADE Magazine Cutlery Hall-Of-Fame® member Jim Bowie was at least 6 feet tall. Depending on your source, the knife he carried had a blade with a length anywhere from 9.25 inches (on the one his brother Rezin stated was made for Jim), to 121/8 inches (the knife known as the Edwin Forrest Bowie), and a handle length of up to 6 inches. For size comparison, the Japanese ko-wakizashi, a short sword that was carried by samurai, started with a 12-inch blade. The ko-wakizashi was worn outside the clothes in a belt at the waist. Current knife laws aside, a knife that long would be difficult to carry and use openly. After all, have you ever tried carrying around a knife with a 12-inch blade? My only experience was a two-week field exercise while I was in the Army. The knife I took with me had only a 10-inch blade. Granted, I am at least 1 inch shorter than Jim Bowie was. But the 10-inch blade was cumbersome to carry and, quite frankly, just too long for what a soldier needed. Also, it would be challenging to deploy the knife without having it in a cross-draw setup similar to what the samurai employed.

Dimensional Changes To Cutom Bowie Knives

While it isn’t much different from the ABS Bowie, the current hot custom bowie features a 9-to-9.5-inch blade. The other difference on many of the blades is that the width has expanded from 1.5 to 1.75 inches. The additional blade width allows makers who so desire to use some curves along the primary edge.

A big boy of the bunch, Brian Sellers’ 9.5-inch custom bowie knife boast a twist-pattern damascus blade (double-edged) with stainless steel liners. The handle is ironwood and features a sub-hilt design, which Sellers would ask $2,400 for a similar creation.

I think that the shorter, wider blade is more aesthetically appealing. It no longer looks long and thin like its lengthier, narrower cousin. Moreover, the additional width results in a more substantial blade. Finally, extending the blade width allows bladesmiths to tweak the accompanying damascus patterns. Mosaic damascus patterns have gained favor among makers and collectors over the past two years. The extended blade width may give rise to new mosaic patterns. At the same time, the extra width may add a fresh take on standard damascus patterns such as ladder and twist.

The Constant Change Of The Bowie Knife

Today, most of us don’t use large bowies to defend our honor or protect our loved ones. Whether antiques or current models, many bowies have been relegated to collections. Given the amount of 10-inch custom bowies made over the past 30+ years, hundreds of them are for sale in the primary market and thousands are available in the aftermarket. Should you want a 10-inch bowie, your choices of materials and combinations are almost limitless. Given the number of 10-inch bowies available in both the primary market and aftermarket, it should be no wonder collectors are looking for something different.

As many of you may know, as a purveyor I keep pretty close tabs on several custom knife market sectors. Damascus bowies is one such sector. Over the past 18 months, I’ve seen both collectors and makers move away from the standard 10-inch bowie. This is not to say such bowies are not being made but that the demand has slowed. Makers are creating new types and patterns of damascus. Is it any wonder then that what were considered standard dimensions over the past 30 years are being revisited? The new sweet spot of the 9-to-9.5-inch blade is appearing more on today’s custom bowies. Eventually, bowie collectors will once again look for something new and different for their collections. As the Greek philosopher Heraclitus said, “The only constant in life is change.” The same is true in custom knives.

More Bowie Knives:

Knifemaking: How to Make Temper Lines

0

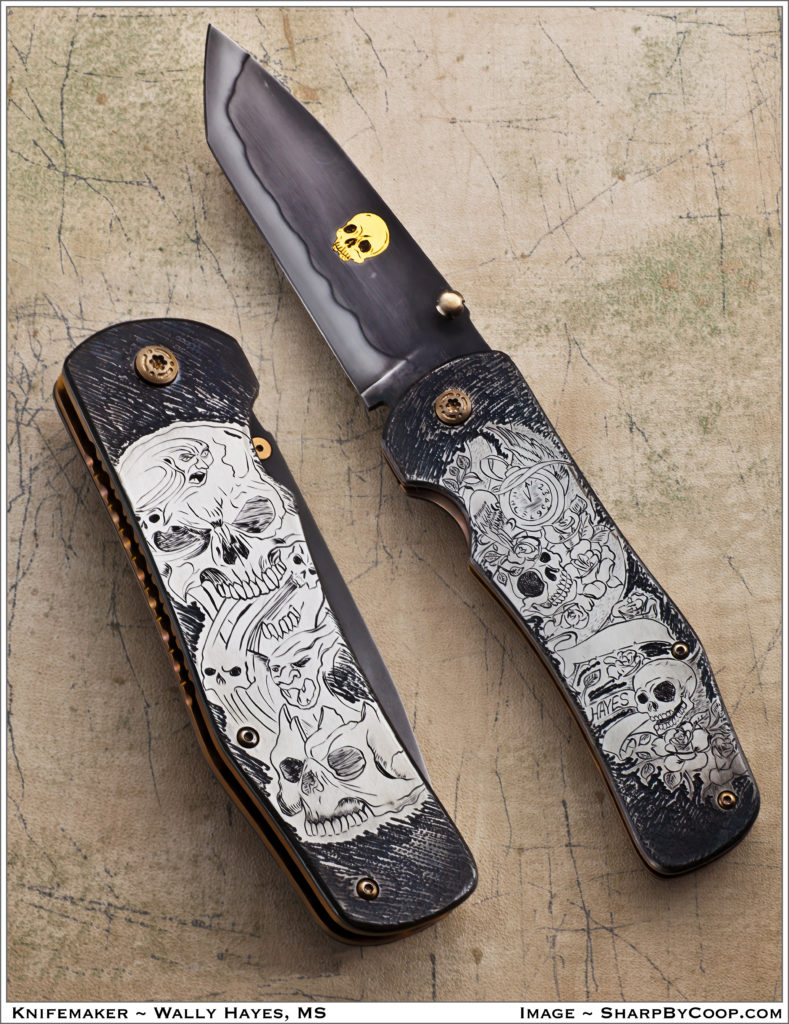
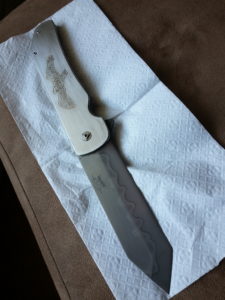
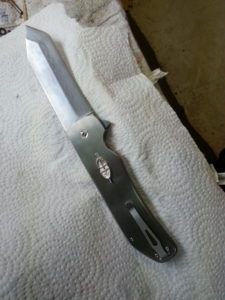
Temper lines—aka hamons—are a very exciting part of knifemaking, and I would like to share with you how I produce cool temper lines on folders. -Wally Hayes


The latest folder exhibiting a handsome temper line—aka a hamon—by the author (inset) is this skull-encrusted model. (SharpByCoop knife image)

STEEL and CLAY

First you need to select your type of steel. You can use 1084 carbon steel or high-carbon damascus, but I prefer W2 tool steel. I get mine from New Jersey Steel Baron because I can get it surface ground to whatever thickness I need.

The W2 is low in manganese, enabling you to create wild temper lines. I grind the blade leaving the edge about the thickness of a dime. The thickness helps prevent your blade from warping in the quench and also helps hold the heat, giving you time to get the blade into the quenching oil.

The clay I use is a stove furnace cement used to repair fireplaces and chimneys. I get mine at the hardware store and it comes in a small tub or a tube like the tubes of silicone used with a squeeze gun for calking.

APPLYING the CLAY

To apply the clay I use a sharpened Popsicle® stick, being careful not to put any clay where the ball bearing in the liner will travel on the tang of the blade. Also, do not put any clay near the pivot hole as you want that area to become fully hard when quenched.

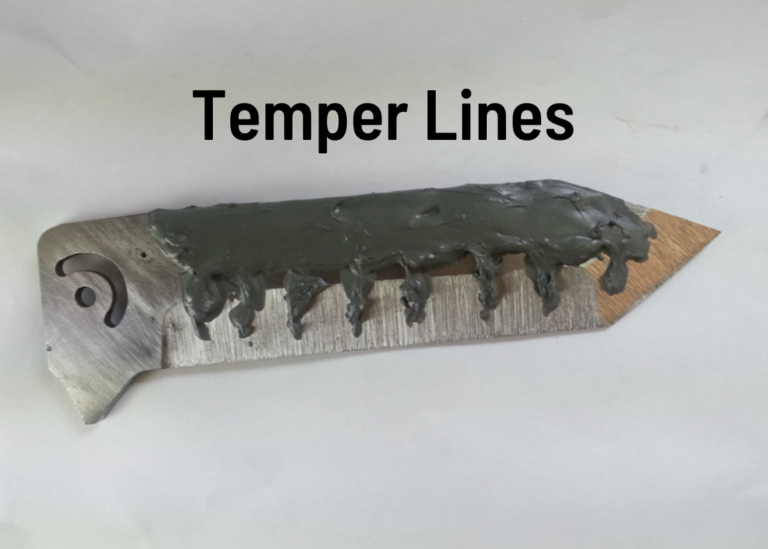
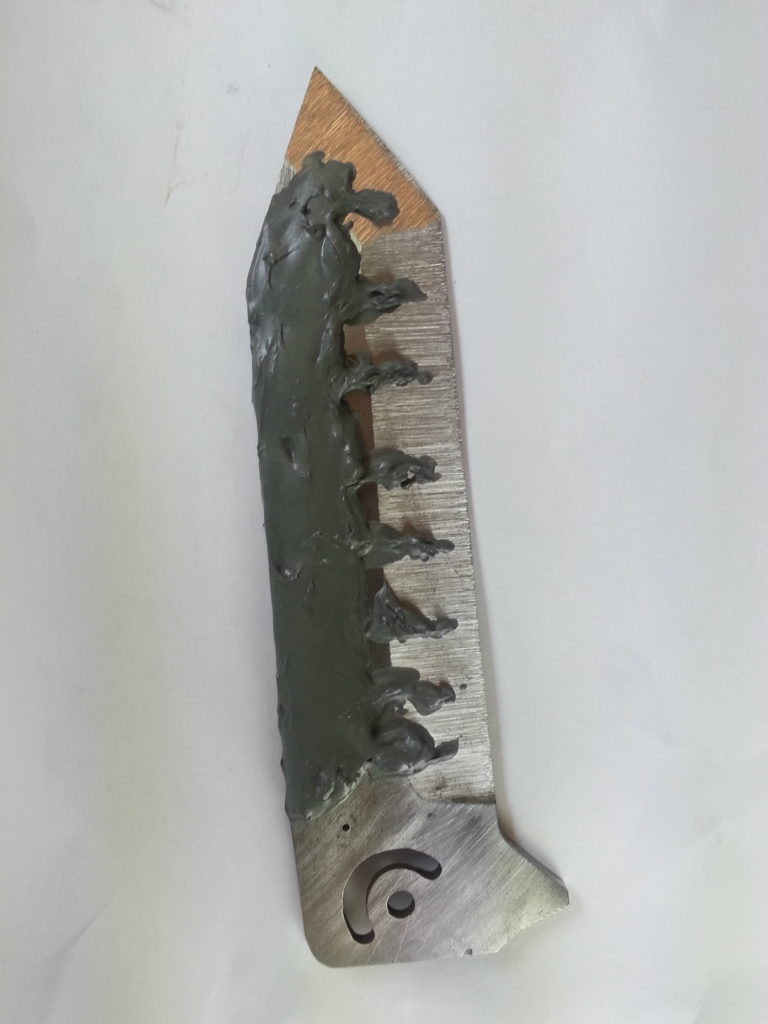
I like a very exaggerated temper line with big waves. You can achieve this by placing short lines of clay every half inch down the blade. Do not carry the clay line all the way to the edge as you want the edge fully hard.

1) The author likes very exaggerated temper lines with big waves. You can achieve this by placing short lines of clay every half inch down the blade.

I put the clay on the blade about an eighth of an inch thick. This seems to work very well. Let the clay dry for about four hours before you heat treat it. To heat treat the blade I use a propane forge. I place a coat hanger through the pivot hole and twist it around the tang of the folder to give me something to hold onto. 


HEAT and QUENCH

Gently heat the blade near the opening of the forge for a minute before placing it into the forge edge up. Watch the blade come up to temperature, placing the tang near the hottest part of your fire. The tang is the thickest area of the blade and slowest part to get up to critical temperature. Heat the blade until a magnet does not stick to it. I use a cow magnet on the end of a pipe and keep testing the blade as it heats up to temperature.

When a magnet does not stick to high carbon steel the steel is at critical temperature, at which point the blade should be removed from the forge and quenched in oil. For steel, I use a fast-quench oil such as the kind from Parker or Fensoil. I have also done many successful quenches in vegetable oil.

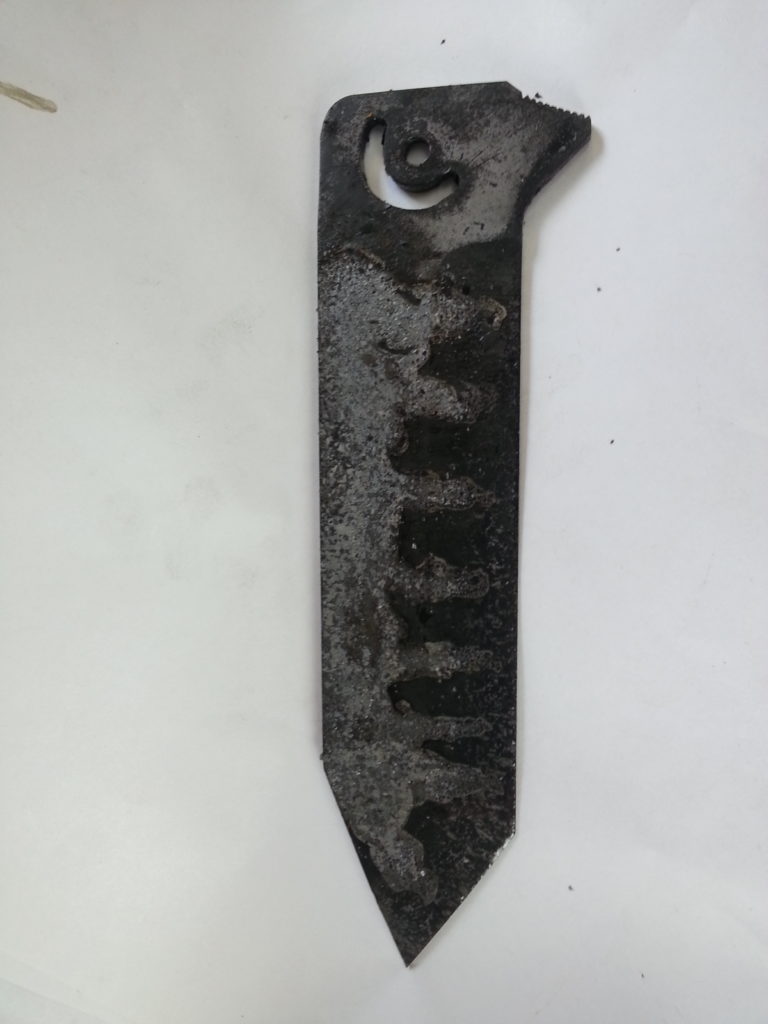
2) Here is the blade after quenching. The author uses a fast-quench oil such as the kind from Parker or Fensoil. He also has done many successful quenches in vegetable oil.

I quench the blade and then leave it submerged for two minutes before removing it. Once its out, I clean the blade with a paper towel. I then put the blade in the toaster oven for one hour at 385°F.

WARP CHECK, GRIND and POLISH

After the blade is cool I check it for straightness on a flat piece of steel. I use a set of parallels for this. If the blade is warped, I clamp it to a slightly curved piece of thick steel, and press the warp out with the twist clamp. Then I place the clamped blade in the toaster oven for another hour’s worth of temper at 350°F. This works really well and is less stressful to the blade when compared to trying to straighten it another way.

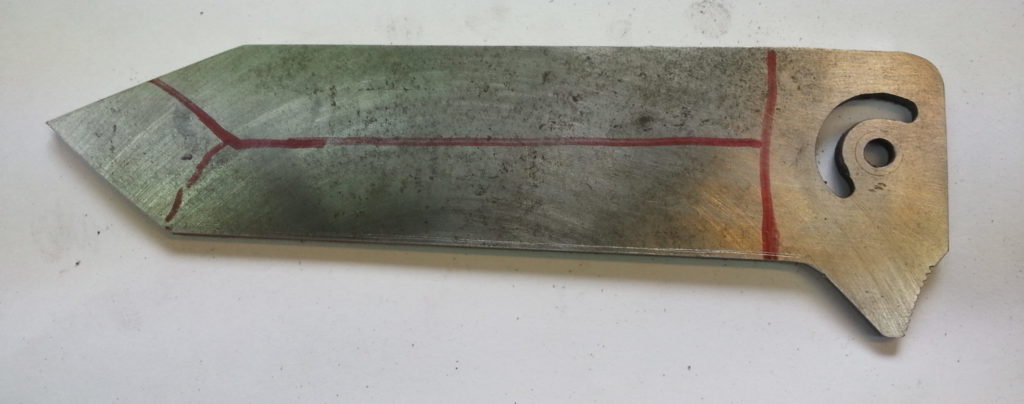
3) The red marks served as guides for the finish-ground blade.

Once the blade is straight it is time to finish grind and polish it up to 2,000 grit. I do the final polishing by hand to ensure every scratch has been removed. After this I sharpen the edge and make sure it is also polished carefully. Finally, I use sand paper backed up by a thick piece of leather and sand very slowly so I don’t cut myself.

The ETCH

Next up: Etch the blade to bring out the temper line. Clean the blade with acetone. Wear latex gloves to protect your hands and to keep oils from your hands off the clean blade. To etch the blade I use ferric chloride diluted four-to-one with distilled water—that is, four parts water to one part ferric chloride. Hang the blade with a cotton string tied through the pivot hole and place it in the acid for 15 seconds. Remove the blade from the acid and spray it with Windex®. This neutralizes the acid and stops the etching. Dry the blade and coat it with WD-40®. Rub a little bit of polishing compound onto the blade to remove some of the residue from the etching. I use Flitz or Peek polishing paste with a paper towel and some WD-40. Polish lightly and be very mindful of the sharp edge. Clean the blade with WD-40 and wipe off any excess oil.

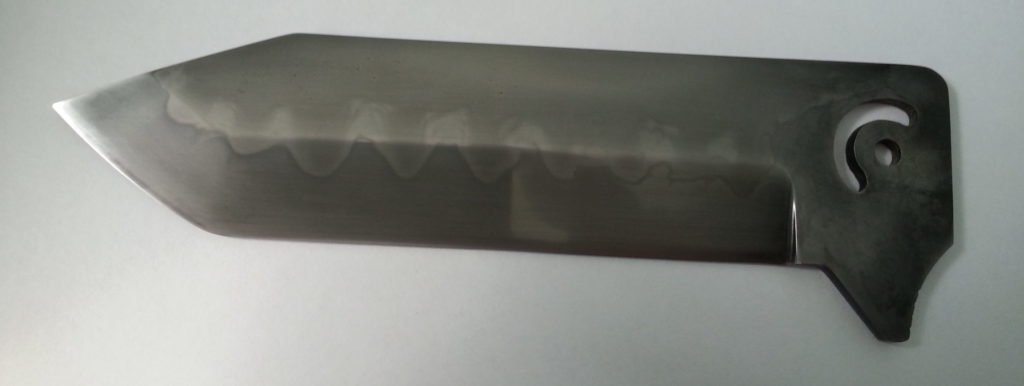
4) Here is how the blade appears after polishing and etching. The temper line is now visible.

To get the temper line white, go over the blade lightly with a piece of 3,000-grit-or-higher sandpaper.

I hope this gives some insight into the fun world of temper lines and more people will experiment with this fun process.

Above: The blade of the author’s finished folder exhibits a temper line with big waves—just the way he likes it.

For more information contact Wally Hayes, 9960,9th Concession, RR#1, Essex, ON, CanadaN8M-2X5 226-787-4289.

Cool Customs: Jim Poor’s Slip Joint

0

With A Background In Being A Farrier, Jim Poor Makes Knives Just As Tough As His Horseshoes And His Slip Joint Folding Hunter Is No Exception

Jim Poor provides two modes of EDC in one with his slip-joint folding hunter—carry it the traditional way in your pocket or, for a change of pace, on your belt in a leather pancake sheath.

Jim made the knife and he and his son Tyler collaborated on the sheath. Tyler did the leather tooling, cut it out and laser engraved it, and Jim glued and sewed it together. The knife features milled liners of 416 stainless steel, with the liners and bolsters all one piece.

A blacksmith by trade, the 63-year-old Poor has been making knives about eight years, starting with fixed blades before going to pocketknives four years ago. He forges damascus, including the Riptide pattern on his folding hunter, and also sells his damascus, including to a number of his slip-joint making friends in the South Texas Slipjoint Cartel.

Flatland Forge

Along with making custom knives, both fixed blades along with slip joints and some feather damascus folders, Jim and his wife Kathleen forge horseshoes and farrier tools of all types. They’ve been working together for decades and today, the shop makes more than two dozen different types of hammers and other tools.

You can take a tour through Flatland Forge, led by Jim, in the video below.

Contacting Jim Poor

Address: Flatland Forge, attn: Jim Poor, Dept. BL1, POB 39, Tuscola, TX 79562 
Phone Number: 325-554-7552 
Email: [email protected]
Website: flatlandforgeusa.com

Slip Joint Knife Specs

Knife: Slip-joint folding hunter
Maker: Jim Poor
Blade length: 3-⅜ inches 
Blade material: Riptide damascus of 1084 carbon and 15N20 nickel-alloy steels
Handle: Jigged cow bone dyed red
Bolsters and frame: 416 stainless steel
Bolster engraving: By Tyler Poor
Backspring: CPM 154 stainless
Closed length: 4.5 inches
Sheath: Leather pancake model tooled and laser engraved by Tyler Poor
Maker’s price for a similar knife and sheath: $850

Make a Bowie Knife in 10 Steps

0

bowie knife guide to knifemaking
This is what the finished project looks like. The handle is not covered in this tutorial, but the design is ready to take any number of options. (All images by the author)

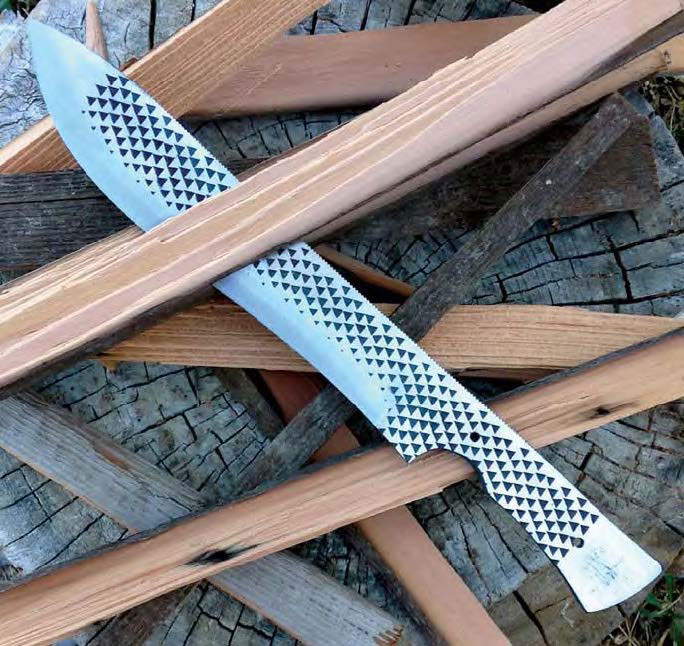
I’m going to walk you step by step through making a bowie from a common farrier’s rasp, as simply as possible, with a few tips to save time and improve the finished blade as we go. It is a simple bowie-style camp knife useful for all sorts of tasks.

1) Pattern Sketch

knifemaking bowie
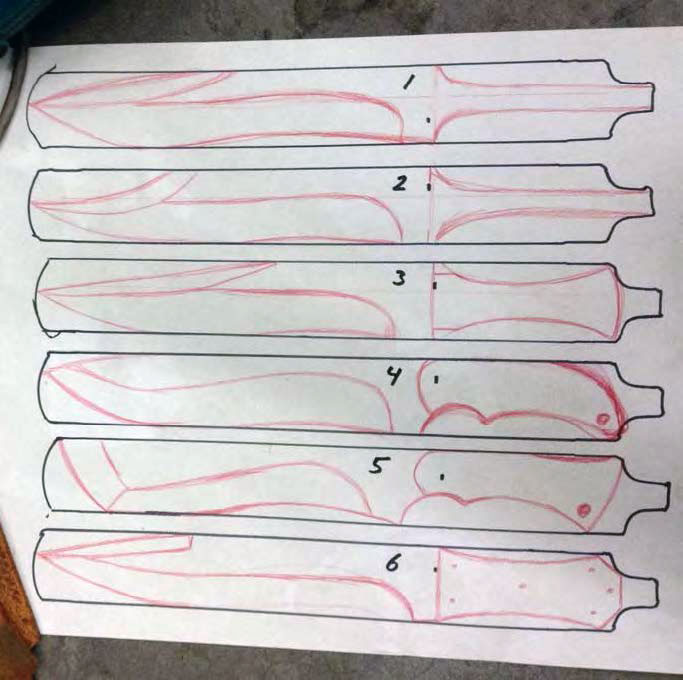
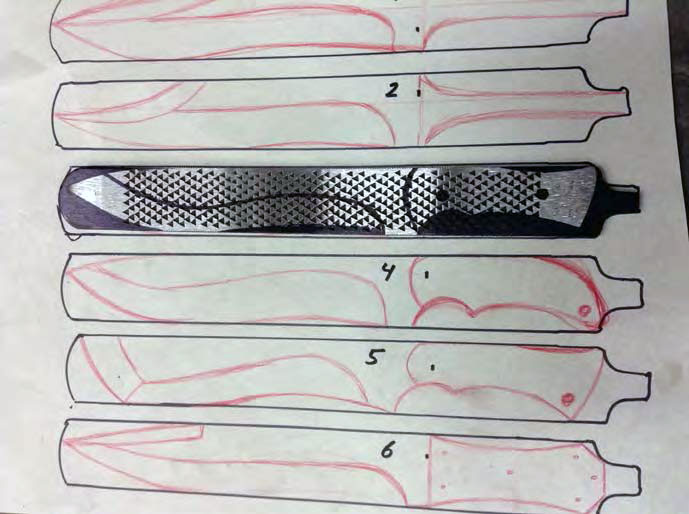
The author traced assorted patterns on the rasp images on a large sheet of paper so he could compare each style side by side and see what works and what doesn’t.

The first thing you need to do is decide on a style that suits your needs and your purpose. I find that visual aids are the easiest way to get the results I’m after, so I often do several sketches and drawings to decide what I’m trying to accomplish.

For this I traced the rasp multiple times on a large sheet of paper so I could compare each style side by side and see what works and what doesn’t, as well as what the maximum potential of my material was. I decided on blade shape #4 with handle shape #5. The combo should be a good general chopper and comfortable in the hand.

By visualizing this way I can mix and match infinitely. Don’t be afraid to get creative, especially when using recycled and often-free materials. This is a chance to express yourself and your vision in steel.

2) Annealing

tutorial for making knives
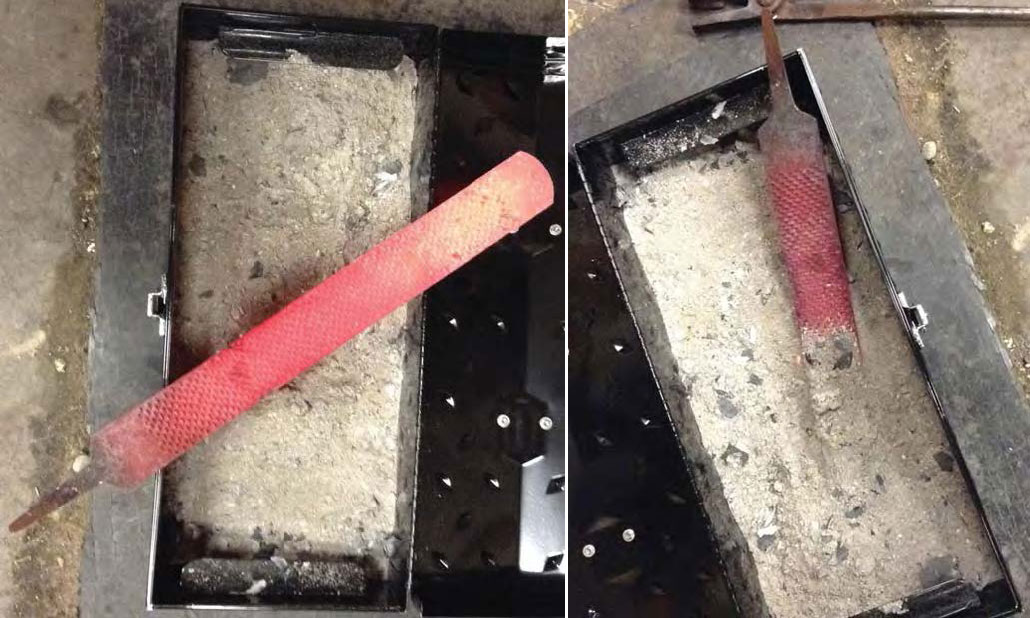
Heat the rasp to nonmagnetic and then bury it in a simple metal toolbox filled with clean wood ash.

Now you have a design in mind, but, before you can achieve bowie knife greatness, you must anneal the rasp so it can be shaped, drilled and ground more easily.

It is certainly possible to make a rasp or file knife without annealing, but great care must be taken not to get the steel too hot and ruin the temper. Moreover, the high hardness of the file in its current state means a blade made this way would be very brittle and prone to breaking under hard-use conditions.
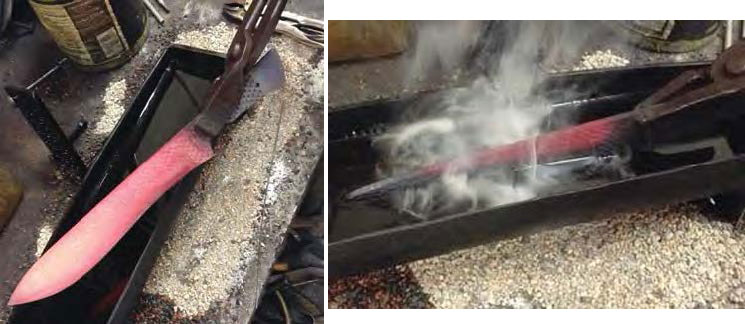
If you have access to a heat-treating oven, by all means use it to anneal your steel. This is a very simple and basic build, so I’ll be heating the rasp to nonmagnetic and then burying it in a simple metal toolbox filled with clean wood ash. Burying it insulates the steel, allowing it to cool very slowly. The slow cooling softens the steel so it’s easier to work.

Vermiculite is also great for this step if you don’t have access to wood ash. Vermiculite can be purchased at most garden centers and insulates very well. It will take several hours for the rasp to cool. Don’t rush it! It will be well worth it once you start filing, drilling and grinding.

3) Design Transfer

how to make a knife
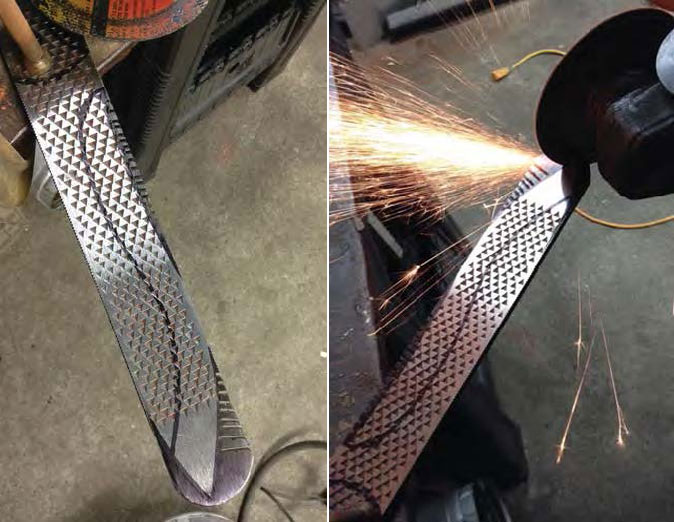
Once the teeth are cleaned off, transfer the blade design to the rasp.

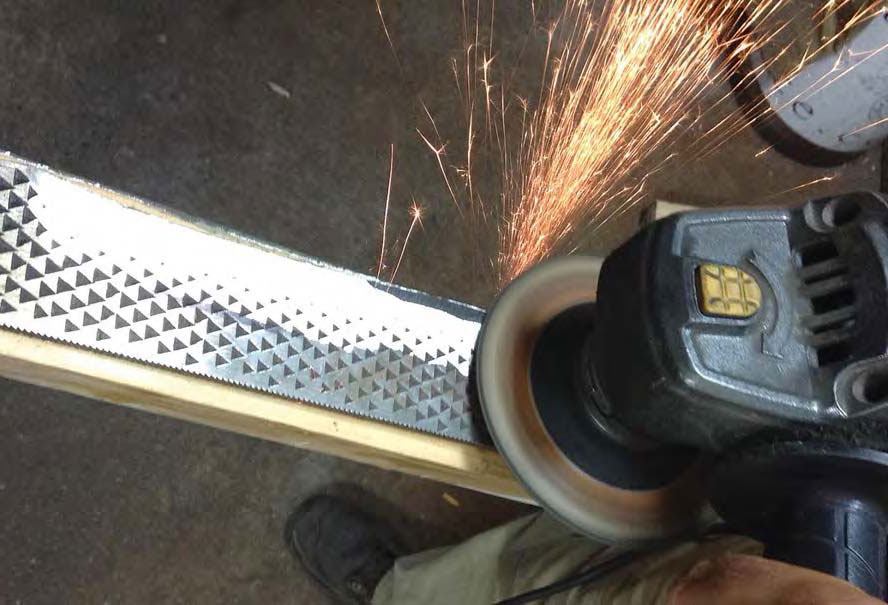
The rasp has cooled and it’s time to go to work. The first step is to grind the teeth off both sides. This leaves a nice, flat surface to work with but the memory of the rasp is left behind, which gives the knife a distinctive, rugged look.

An angle grinder will work great for this task, but any number of basic tools will suffice. Use whatever is readily available to you. Once the teeth are cleaned off , transfer the blade design to the rasp. Cutting out the pattern and over spraying it with black paint works very well.

However, since this design is fairly simple, I drew it out with a permanent marker.

4) Notched & Cleaned Up

steps for making a knife
When you go to cut out the profile from the rasp (left), notching out the shape with a hacksaw or cutting wheel (right) makes the job much easier.

Now you can start cutting out the profile. Notching out the shape with a hacksaw or cutting wheel will make the job quite a bit easier. I find that removing small pieces of metal is easier then trying to make large cuts.

After the bulk of the steel has been removed, the final profile can be shaped out with files or an angle grinder.

5) Drilling Pins

guide for making a knife
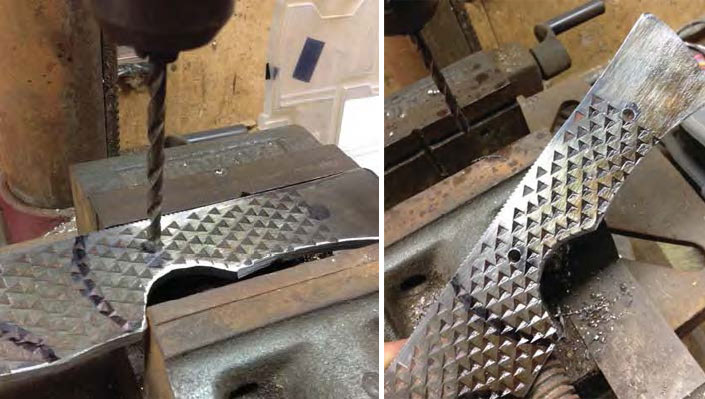
Drill a couple of holes for pins. The author uses brass bolts for the latter.

The blade is starting to take shape. Now is a good time to consider what handle material is best for your creation.

There’s no wrong choice. With the seemingly limitless options available today, you can truly express yourself from mild to wild. If you’re feeling traditional you can go with antler or perhaps stacked leather.

If you want to go more cutting edge, there are hybrid burl blocks with every color resin in the rainbow. Shredded money and eggshells are even finding their way into knife handles these days.
I’m going more traditional, so now is the time to drill a couple of holes for pins. I’m going to use brass bolts as pins. They are inexpensive and can be bought at any hardware store. The threads add an extra mechanical bond when they are epoxied into place, and also act as built-in clamping devices to ensure a solid, tight fit-up when the scales are applied.

6) Grind the Bevels

guide to how to make a knife
Rough grind the bevels. The author used a 4-inch angle grinder. Leave the edge about the thickness of a penny.

With the profile cleaned up and all necessary holes drilled, it’s time to start grinding in the rough blade bevels in order to get your blade ready for hardening.

The trusty 4-inch angle grinder goes to work again, though a bench-top grinder or even a good, sharp file will get the job done. The goal here is simply to remove the bulk of the metal on the sides of the blade evenly so there is less work to do after hardening.

Don’t grind all the way to sharp at this point! Leave the edge about the thickness of a penny—this will protect the steel that will become your cutting edge from overheating and decarburization, helping to ensure your finished knife will live up to its maximum potential.

Once the bevels are roughed in, finish up with sandpaper or a flap disc to 220 grit. Be sure to remove any deep, heavy scratches, as these could lead to cracks during hardening.

7) Heating and Quenching

Bowie knife tutorial step by step

After you heat the blade to nonmagnetic, quench the edge. 

Now you’re ready to harden some steel! I’m going to use a forge to heat the blade to nonmagnetic—aka the critical temperature—though a torch works equally well.

Slowly bring the blade up to temperature and check it oft en with a magnet. When nonmagnetic is reached, edge quench to harden the cutting edge, and leave the spine slightly softer for additional strength and toughness.

Submerge the blade in the quench oil once all the color has left the blade and it goes to black. Allow the blade to cool to room temperature in oil. This will take an hour or so.
A variety of things will work as quench oil and everyone has a favorite. Depending on the types of steel used, I’ve had good luck with canola oil, ATF transmission fluid and mineral oil. I quenched my blade in Texaco type A.

WARNING! Mixing hot steel with oil can and will cause a fire! Be sure to take appropriate safety precautions. A well-ventilated space free of other flammable materials, as well as personal protective gear and a fire extinguisher, are musts!

8) Check for Hardening

knifemaking process bowie knife
Once the blade has cooled, remove it from the oil and clean it off. Brake cleaner works well for this, as well as simple dish
soap and warm water.

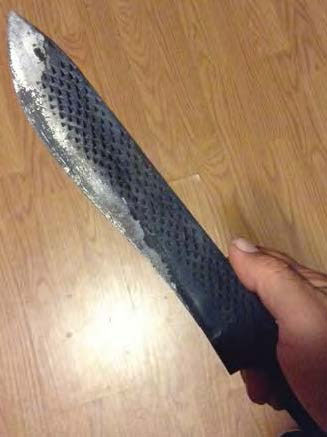
Once the blade has cooled, remove it from the oil and clean it off . Brake cleaner works well for this, as well as simple dish soap and warm water. If the hardening was successful, you should see an area of clean steel on the cutting edge where the carbon scale has popped off the blade.

A second simple and easy way to check for a hardened blade is with a fresh, sharp file. Run the file over the knife’s cutting edge. The file should skate easily and not bite into the edge. If this is the case, you are ready to temper the blade.

9) Tempering

tempering heat treating knifemaking bowie
During the basic heat treatment and tempering process, the steel oxidizes and the clean portion changes color.

Tempering is a fairly simple process. Basically, in order to reduce brittleness and increase toughness, tempering is heating the blade to a lower temperature than you did in the annealing step.

Again, if you have access to a heat-treating oven, by all means use it. However, a toaster oven or basic household oven will work just as well. Oven temperatures vary greatly—especially toaster ovens—since they lack heavy-duty insulation. This means the exact temperature you need to use will vary as well.

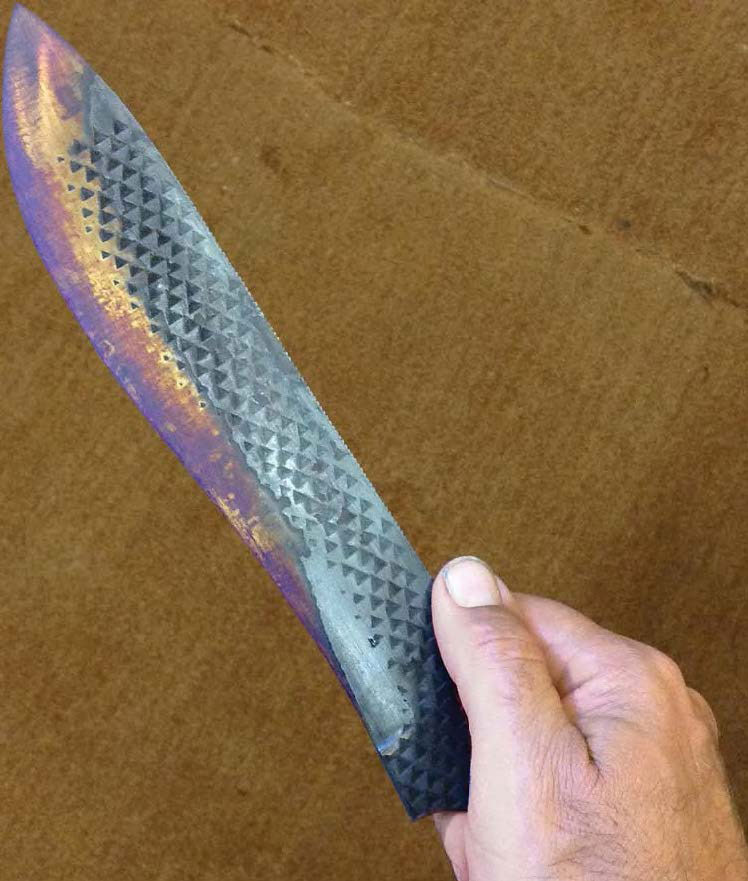
I start by putting my blade in the oven for an hour at 375°F. As the steel heats it oxidizes, and the clean portion changes color. This is a simple, basic heat treatment and temper, so the color change is your indicator rather than an exact temperature.

As the heat rises the color goes from a bright gold to a shade of bronze straw, then a light purple to a blue on its way to a dark blue/almost black. The dark bronze to purple is your goal. The blade should be hard enough to hold a good edge but soft enough to not chip or break during use.
I did three one-hour cycles, each 25°F hotter according to my oven, and 425°F was the temperature that gave me the desired result. A simple trick to get a more even heat in a regular household oven is to put a sheet pan on the bottom rack.This holds heat closer to the element and keeps the temperature fluctuations to a minimum.

10) Finishing and Final Edge

Learn how to make knife from a rasp file
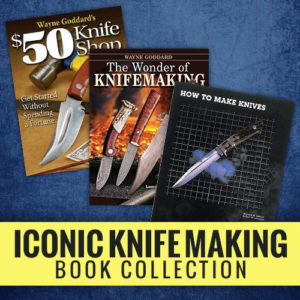
Jump into the rich tradition of knifemaking with this collection of essential books from BLADE. You’ll save a bundle with this bundle!

Now you have a hardened and tempered blade ready for finishing and a final edge.

You need to remove only a small amount of steel to get down to the final edge. Don’t rush at this point! Go slowly to keep from getting the steel too hot and ruining all your hard work up to now. As long as the steel stays bright and shiny you will be fine. Any discoloration at this stage means overheating and the risk of losing the blade temper.

You also are working down to the final, finished and sharp edge. Stitches aren’t cheap! Be aware of where your fingers are.

Some light grinding or fi ling as in the previous steps will bring your bevels down to the finished edge. Polish to at least 220 grit. A higher-grit polish will look more finished, as well as be less prone to rust, and provide smoother, more fluid cuts.

Once you get to 220, it’s time to apply an edge and see how you did. Some simple test cutting and chopping will tell you if you need to change anything, such as the thickness of your cutting edge or if you need to re-temper perhaps a few degrees hotter. Use the materials you originally planned on cutting with your new bowie to decide this.

For example, since the blade primarily will be a camp knife, simple tests such as splitting kindling, cutting rope and twine, and making the all-important hotdog stick will tell you what you need to know.

Time to Make the Handle

Click here to read how to make a handle for this knife.


Dads And Daughters: Passing The Art Of Knifemaking Down

0

The Older Generation Is Teaching The Next Crop Of Makers The Ropes Of How To Turn Steel Into Knives And Knives Into Memories.

Though it isn’t rare for kids to follow in the footsteps of their parents when it comes to choosing a career, the path to becoming a well-known custom knifemaker may just involve a bit more dedication than most other vocations.

For American Bladesmith Society (ABS) master smith Josh Fisher and Wolfgang Loerchner, the adventure has been quite rewarding as their respective daughters, Karis and Elizabeth, have become quite accomplished in their own right. 

Josh And Karis Fisher

The 2021 Texarkana Hammer-In was a memorable one for the Fishers, with Karis earning her ABS journeyman smith (JS) stamp, Josh his ABS master smith (MS) stamp, and each taking home the annual award for the best knife submitted by a JS and MS.

“When I was younger, I would always sit out in the shop watching my dad make knives,” Karis remembered. “Over time, I slowly started messing around sanding on pieces of metal, thinking I was making a knife. This eventually led to my interest. My first knife was a small full-tang hunter with a pink handle that my dad helped me make.”

Josh, no doubt, was ready and willing to help his daughter hone her skills when the time came. “Karis has always been pretty good at grinding blades,” he smiled, “but she struggled with guard fit up for a while and finally got that figured out.”

Of course, there were challenges and an obstacle or two along the way as Karis gained knowledge in the custom knifemaking world. She spent time at the forge, hammering away in preparation for ABS recognition, but that got placed on hold for a while.

“Yes. Definitely, I had a few setbacks,” she reflected. “I first attempted the ABS journeyman smith test in 2019 and failed. I then tried to retest the next year, but due to [the pandemic] it was canceled. In 2021, at the Texarkana Hammer-In, I finally got to retest and passed. Looking back, I think it worked out for the best because I was able to come back and win the Keeslar Award.”

The Joe Keesler Award is an annual honor for the best knife submitted by a successful journeyman smith applicant. If nothing else, the award validated the hours that both Josh and Karis had dedicated to her custom knife and bladesmith upbringing. And making the year extra special, Josh received his ABS master smith designation at the Texarkana Hammer-In, and later the B.R. Hughes Award for the best knife submitted by a successful master smith applicant. It, too, is an annual honor.

Josh added that sheer space and equipment limitations have impacted the progress of the Fishers’ work from time to time.

 “One of the main obstacles is working around each other in the shop,” he said. “We currently only have one grinder, so we sometimes have to wait for the other to finish before getting to work. Another grinder is definitely one of the next tools we are going to have to get.”

Bog oak comprises the handle of a Karis Fisher fixed blade with a recurve damascus blade.

Despite a little inconvenience, Karis has come a long way in a relatively short period of time. Family and friends are impressed. 

“All my relatives have always thought that it was cool,” that I made knives, she observed, “but my friends have always thought it was a little strange, especially the fact that my Instagram account has no pictures of me, just my knives.”

Her mom, Kim, is a big fan. “My wife loves to go to knife shows,” Josh related, “so she has always been supportive and happy about Karis and her work in knives.”

While Karis isn’t sure of an exact moment when she knew she wanted to make knives, the idea was never far from her mind. “I think I’ve always kind of known that it was something that I wanted to do,” she noted. “I enjoy making all types of knives, but small hunters are probably my favorite right now. I recently made my first slip joint, and I think they could easily become my new favorite.

“Probably my favorite part of knifemaking is seeing the finished product. But, if I had to choose an actual step, it would be all of the small embellishments and final finishing of the knives. If I had to pick a least favorite part, it would be hand sanding the blades!”

Wolfgang And Elizabeth Loerchner

Wolfgang Loerchner (left) and Elizabeth (right) had to share space in Wolfe’s crowded shop in the early days—at one point including long hours seven days a week for about a year—but it has all paid off. In the middle is Wolfe’s granddaughter by his eldest son.

The year 1982 was momentous for Wolfgang Loerchner. He made his first knife, and topping that achievement, his daughter, Elizabeth, was born. 

“It almost seems as if this path was destined for her,” he smiled. “Knives were a part of her life from the very beginning in various ways—observing the stages of the creation of a knife, the many shows, photos, and articles of the knife shows as seen in various magazines, observing friends visiting, and the many conversations that surrounded all aspects of knives. In some way, shape, or form, knives have always been a part of Elizabeth’s life.”

Elizabeth made an early step into knifemaking and then regrouped. Her second foray has been hugely successful.

“Having always had a strong interest in the arts, knifemaking was something I considered at one point when trying to decide my future,” she commented. “I made one attempt at knifemaking in 2003-2004. However, it quickly became apparent that the timing was not correct. It was not until several years later, after visiting the Milano Show in 2009, that I became truly inspired.”

Elizabeth and Wolfgang were sitting together on their return trip from the Milano Show, and she presented him with the idea of teaching her again. Of course, he was more than happy to get started, and Elizabeth began working on a knife design immediately. In January 2010, she sat down with her father once more—this time in his shop—and custom knifemaking quickly became a huge part of her life.

“I’ve had a couple of personal situations that did set me back,” she related, “but they have not kept me down. All around, there has been full support of my decision. Everyone has been happy to see me working in the arts and also to be carrying on what my father has been doing.”

Elizabeth’s mother, Dianne, shared a positive perspective. “I was glad for her, that she was able to use her artistic abilities to create knives. During her high school education, Elizabeth was always happiest when she was in the midst of creating an art project. In the few years directly after high school, she was thinking about steel and what she could do artistically with steel, which seemed a logical first step to me. 

“Elizabeth has an artistic flair that is unique to her, different from her father’s, and allows her to create pieces that carry more of a whimsical note to her knives. This is reflective of her deep creative ability. When she asked her father to teach her, I was a little hesitant since she had been living away from home for several years. While there were several tense moments, overall it was a good experience for both of them.”

Elizabeth’s knives have been recognized by aficionados worldwide at such exclusive venues as the Arts In Metal Show in Stresa, Italy, including this piece from the 2014 event. In fact, both she and her father have been regular exhibitors at the elite Italian show. (Francesco Pachi image)

The commitment of time and energy made for a few challenges in the learning process, but the entire experience has been worth the investment for Wolfgang and Elizabeth. Each has a distinctive design and artistic expression, coexisting, learning, and producing outstanding objects of art.

“One of the greatest obstacles we probably had to face was learning to work so closely side by side for so many long hours,” Wolfgang recalled. “There were other small obstacles. Working together in this way involved learning a whole new form of communication. We would often be saying the same thing but speaking it in a different language. Many mistakes were made as a result, but in due time we found our way to overcome this obstacle and work through things more smoothly and efficiently.”

Elizabeth recognizes the fact that she has learned to accept constructive criticism and teaching moments from her father. Wolfgang, on the other hand, points to a new method of communication developed as they worked together. Still, Elizabeth is adjusting.

“The most difficult part has been living in the path or shadow of my father,” she noted, “with the sense of needing to live up to the expectations of others. Creating my designs, it only seems to come naturally that my style is so similar to his. There are many reasons for this, and I constantly strive to find that fingerprint of my own.”

Elizabeth has always been an accomplished artist, drawing and painting with passion. Holding a file seems to come almost as naturally as working with a paintbrush or pencil. So, as her hand-eye coordination came together almost effortlessly, working in steel and making lines flow in knives was virtually second nature.

Fixed blades and integrals are the favorite types of knives for Elizabeth, and she appreciates their aesthetic qualities. 

“There is something about the power and strength of them,” she reasoned, “and what seems to be a limitless canvas. There is something pleasurable about working with folders and how the knife changes, whether open or closed. When working with daggers, fixed blades, and integrals, the limitations of working around the mechanical parts have been removed, and I find this gives more freedom to my designs.

“The most pleasurable part of knifemaking,” she added, “is the filework. Watching the steel slowly come to life, seeing the design come out of it as if it always lived there, is highly rewarding. The final finishing of a knife can be the most frustrating part. This is when any possible flaws start coming to light. Since I am my own worst critic, it can turn into a never-ending process of doing multiple things over and over again.”

Nonetheless, the Loerchners know they were destined to work together, one to learn from the other. In turn, each helps the other reach new heights of artistic expression.

Read More

Advertisement

Must Read Articles

Read this before you make a knife

Knifemaking 101 – Read This Before You Make a Knife

  by Wayne Goddard My experience has taught me that there's nothing like digging in and getting started. I've often said the hardest part of the...
how to forge damascus steel

How to Forge Damascus

Advertisement
Advertisement